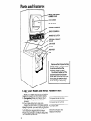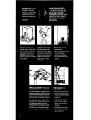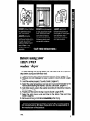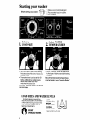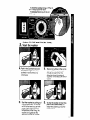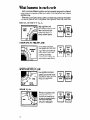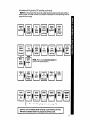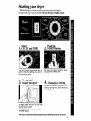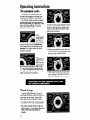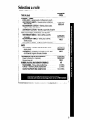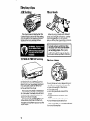
1
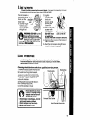
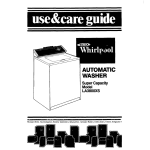
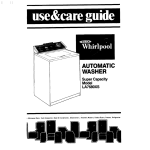
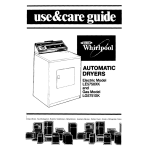
.
thWm
.
WASHER
l
DRYER
Models LT5000XM
LT5004XM
LT5008XM
--..I.*
wave
-
Ovens,
.,
Trash Compactors,
ill,.
Room Au Condllloners.
Oehumldlfiers,
2.
Aulomatlc
Washers,
Clothes
Oryers.
Freezers.
Refrlgeralor-Freezers
Parts and features
1
MODEL AND SERIAL
NUMBER PLATE
LINT SCREEN
DRYER DRUM
WASHER CONTROLS
DRYER CONTROLS
WASHER LID LATCH
gP.;Lq;AL
EXHAUST
LINT FILTER
BASKET
AGITATOR
’
/
s
Copy your Model and Serial
When you need service or call with a
question, have this information
ready.
1. ComDlete
Model and Serial Numbers (from the plate located
as
shown).
2. Purchase date from sales slip.
Copy this information
in these spaces.
Keep this book, your warranty
and sales
slip together
in a handy place.There
is no warranty
registration
to return.
Proof-of-purchase
is all that is required
for in-warranty
service.
2
TUB
Remove the Consumer
Buy
Guide label. It will be easier
to remove before the
washer l dryer is used.
You should wipe out the
washer basket and dryer
drum with a damp cloth before using to remove dust
from storing or shipping.
Numbers
here
Comolete
Model
Complete
Serial
Purchose
pole
Number
Number
Service Company
and
Telephone
Number
Contents
Your Responsibilities
Installation
Operation
Safety..
Before Using Your Washer - Dryer
WASHER
Starting Your Washer
LidLatch
What Happens in Each Cyc!e
Other Operating
Instructions
Cleaning the Lint Filter
DRYER
Starting Your Dryer
3
3
3
4
5
6
7
8
10
10
41
01984 Whirlpool
Operating
Instructions
Selecting a Cycle
Drying Tips
Lint Screen
Lint Removal
WASHER. DRYER
Vacation Care
Winterizing
If You Need Service or
Assistance
1. Before Calling for
Assistance
2. If You Need Assistance.
3. If You Need Service..
4. If You Have a Problem
Corporation
Your responsibilities
Read this”Use and Care Guide”and
your “Laundry
Guide”
carefully
for important
use and safety information.
You are personally
responsible
for installation.
Have your
washer /dryer installed
by a qualltled
installer and make sure that
it has been..
1. Installed
exactly
according
to the”lnstallation
Instructions:’
including..
l proper
electrical
supply,outlet
and grounding;*
l proper
water supply, plumbing
fixtures and drain;*
l proper
dryer exhausting
system.*
2. Installed
and leveled
in a room where..
l there
is adequate
ventilation
and protection
from weather;
l the floor
is strong enough to support the weight;
l The temperature
is above 45 F (7.2 C) because..
- the dryer will not operate
properly
at cold temperatures.
-freezing
temperatures
can damage
the washer.
‘Reter to the”lnstallation
Instructlons”tor
complete
information.
You are personally
responslble
for proper use of your
washer /dryer. You must be sure that it is..
1. Used only by those who understand
how to operate
it properly.
2. Properly maintained
and used only for jobs expected
of home
washers and dryers.
You are personally
responsible
for the safe use of your
washer /dryer.
DO NOT try to service
this appliance
unless it
is unplugged
or the
electrical
power has
been turned off.
12
13
14
15
15
16
16
,7
17
18
18
18
I
Before using your
THIN TWIN*
washer dryer
l
For best washing
steps before, during
and drying results, you must take
and after each load:
some
very
important
1. Prepare and sort each load for washing (“Laundry Guide,” pages 4-5).
2. Measure and add detergent
or soap to washer (“Laundry Guide,” pages
9-10).
3. Load the washer properly
[“Laundry Guide,” pages 6-7).
4. Select the wafer temperature,
load size and cycle recommended
for the
fabrics before starting the washer (“Use and Care Guide,” pages 6-7).
5. Add other laundry aids to the washer according
to instructions (“Laundry
Guide,” pages 11-13).
6. Properly sort the load for drying [“Laundry Guide,” pages 18-191.
7. Select the right drying
cycle and time for the fabrics (“Use and Care
Guide,” page 13).
6. Remove and hang or fold items Immediately
after drying.
‘Tmk.
Starting
your washer
I. Measure and add detergent.
2. Place sorted load in washer.
3. Start washer.
Select a
1. LOAD SIZE
2.
Turn the knob to point at a setting
that describes
the size of load you
want to wash.
l The water
level can be set for EX
SMALL, MEDIUM or LARGE loads.
Select the water level that
matches the load size.
See your “Laundry Guide” for details
on load sizes.
l
LOAD
Select WATER
TEMPERATURES
Match the wash water temperature
to the type of fabrics and soils being
washed.
Recommended
wash temperatures
can be found in your “Laundry Guide:
l
SIZES AND WATER LEVELS
For best cleaning
results,
load must be able to move
in the water. Too big a load
little water can cause wear
tearing of load items.
the
freely
or too
or
LARGE
(119 gals
6
L)’
(96gals~363L)’
IX-SMALL
[7 3 gals
DO NOT
OVERLOAD WASHER.
‘451
MEDIUM
‘27
‘Approxlmale
7 L)’
fill with load
3.
A.
C.
Select CYCLE and WASH TIME;
Start the washer
Push in the Control Knob and
turn it to the right. It must be
pushed in and turned only
clockwise.
Start the washer by pulling out
the Control Knob. The washer
will fill to the level you set with
wash water of the selected
temperature.
After filling, the
washer will agitate for the
selected number of minutes.
B.
Stop on a number in the cycle
you want. The numbers are
minutes of wash time The
drawing shows 8 minutes of
agitation
in the REGULAR HEAVY
Cycle.
D.
To stop the washer at any time,
push in the Control Knob. To
restart the washer, pull out the
Control Knob
What happens in each cycle
Each cycle has different agitation
and spin speeds designed
for different
kinds of fabrics. Numbers on the dial in each cycle are the minutes of WASH
agitation
time.
When the Cycle Control Knob is set to a number and pulled out, the washer
fills before agitation
and timing starts. After agitation
starts. the knob turns
REGULAR
HEAVY
rr r
.
regular
heavy
4
a
lIIiiii
PERMANENT
Cycle
High agitation
and
spin speeds help remove
heavy soils and spin
water from heavy or
sturdy cotton fabrics.
PRESS Cycle
High-speed
agitation,
low-speed
spin and cooling of the wash water before the spin help clean
clothing
and keep
wrinkles from setting into
permanent
press fabrics.
KNITS/GENTLE
Cycle
011
8
2
l
m
2 f
knits
gentle
Low agitation
and spin
speeds and shorter wash
time gently wash delicate
items and washable
synthetic
knits.
Pull I&WI
Puti l mp
SOAK Cycle
Periods of agitation
and
soaking time clean
stained, yellowed,
gray
or heavily soiled laundry.
Use recommended
amount of detergent.
8
clockwise
until it Doints to OFF and the cvcle ends.
NOTE:You may hear the sound of wate’r spraying
some cycles. In some cycles, cold water is sprayed
help with the rinsing.
I,,I
WASH
1 SOAK
High
Cr.aaA-
I
WASH
1
1 1
Ic-
during the spin parts of
on the spinning
load to
NOTE: Always use cold rinse water
permanent
press fabrics.
I
Pre-wash
SOAK
setting
I
I
WASH
begins
I
I
DRAIN
for
I
I HIGH
I I WASHER I
here (see page101
I
I
I
care Is needed
when soaking or pre-washing
Special
~our”Laundry
Guide” tar proper use of this cycle.
laundry.
I
I
Other operating
instructions
For a rinse and spin
For a drain and spin
You may need an extra rinse and
spin for heavily soiled loads which
need more detergent.
(Extra detergent can require an extra rinse.)
l Push Control
Knob in.
l Turn clockwise
to any.on
the dial.
See above drawing.
l Pull Control
Knob out.
l The washer
will fill to selected
level; agitate 2 minutes; drain
and spin.
For agitation
and spin speeds
Your washer can be set to drain
and spin out water.
* Push Control Knob in.
l Turn clockwise
to the bar just before
OFF. See above drawing.
l Pull Control
Knob out.
l The washer
will drain and spin.
For a soak or pre-wash
For best results, use warm water
for soaking or pre-washing
stained
laundry. Hot water can set stains.
in each
l
l
l
l
l
cycle.see
pages
8 and 9.
Use recommended
amount of
detergent or pre-soak product.
Push Control Knob in.
Turn clockwise to point at a number
in the SCAK Cycle?
Pull Control Knob out to start washer.
When the cycle is over, add detergent for the next selected wash
SOAK Cycle should
followed
by a Wash
Important:
See additional
care
information
on page 7 of your
“Laundry
Guide!’
‘To start soak with agitation,
must point to a number
Cleaning
the Cycle Control
in the SOAK Cycle.
Knob
the lint filter
Water runs through the lint filter
whenever
the washer agitates.
Check it often to make sure it’s clean
and is filtering at its best.
To remove it for cleaning,
press the
release and pull straight out. Instructions for cleaning
are printed on the
bottom of the filter.
Starting
your dryer
Before starting your dryer, be sure laundry is sorted and loaded
properly
(see your “Laundry Guide”]. Be sure the door is tightly closed.
1. Et!&
Push the
2. START Button
and TIME
Turn the Control Knob either way to
point to the time setting you want in
the cycle you want.
3.
To stop and
restart the dryer
The dryer will start tumbling
you push the START Button.
4
l
Changing
when
a setting
The setting can be changed
at any
time by turning the Control Knob to a
new setting.
70 stop, open the door (or turn the
Control Knob to OFF).
To restart, close the door and push
the START button.
The Cycle
Control
Knob should
point to OFF when the dryer
is not in use.
11
Operating
instructions
The automatic cycles
The automatic
cycles allow you
to select the degree of dryness you
prefer for the clothes being dried.
The Control Knob moves and stops
several times until the load reaches
the dryness setting you selected. Then
the knob automatically
moves to
OFF and tumbling stops.
weight cotton items. The load tumbles without heat during the last 5
minutes. This helps make the load
easier to handle.
AUTOMATIC
PERMANENT
PRESS to dry
m permanent
press, knits and other synthetic fabrics. The load tumbles without heat
during the last 10 minutes. This helps
keep wrinkles from setting in.
Timeddrying
Use the TIMED DRYING Cycles for
any load you want to dry by time. For
example:
small loads, large bulky
items, items to be fluffed or dusted.
Turn the Control Knob to the number
of minutes you want - from 10 to 50.
9 The last 5 minutes of this cycle are
without heat - a cool-down
time. This
helps make the load easier to
handle.
l
12
For the first few loads, set the Control
Knob to point to an* in either automatic cycle. When the dryer stops,
feel the dried items.
l
l
If items are drier than you like, use
a setting to the right of the* the next
time you dry a similar load.
If items are not as dry as you like,
use a setting to the left of the* the
next time you dry a similar load.
TYPE OF LOAD
SUGGESTED
CYCLE
COTTONS - LINENS
EXTRA HEAW - Bedspreads, mattress pads, quilts
HEAVYWEIGHT FABRICS-Towels,
jeans, corduroys,
workclothes
,,,,,,____,..........,............
MEDIUMWEIGHT COTTONS-Sheets,
pillowcases,
cotton underwear, diapers
LIGHTWEIGHT COTTONS - Batistes, organdies, lingerie
AUTOMATIC
REGULAR
PERMANENT PRESS, SYNTHETICS AND BLENDS
HEAVYWEIGHT FABRICS-Work clothes, jackets,
raincoats
.._........__.__....._.,,_,.....
MEDIUMWEIGHT FABRICS-Shirts, play clothes,
sheetsslacks
LIGHTWEIGHT FABRICS - Lingerie, blouses, dresses
AUTOMATIC
PERMANENT
PRESS
KNITS
HEAVYWEIGHT -Cottons, rayons, blends, T-shirts,
slacksshirts
. . . . . . . . . . . ..__....................
LIGHTWEIGHT - Synthetics (polyester, acrylic, etc.)
and blends, lingerie, blouses, dresses
AUTOMATIC
PERMANENT
PRESS
LIGHTWEIGHT AND DELICATE FABRICS
Sheer Curtains (2 or 3 panels)
Gauze, lace,etc.
AUTOMATIC
PERMANENT
PRESS
RUBBER, PLASTIC, HEAT-SENSITIVE FABRICS
FOAM RUBBER- Pillows, bras, stuffed toys ..........
...........
PLASTIC-Shower
curtains, tablecloths
OLEFIN, POLYPROPYLENE, SHEER NYLON ............
AIR
20 MINS.
20 MINS.
15-20 MINS.
Drying
tips
Mixed loads
The dryer does not heat when the
Control Knob is set on AIR. This setting
can be used to fluff bedding, plastic
tablecloths,
foam rubber pillows,
stuffed toys, sneakers, etc.
When drying a load with different
kinds and weights of fabrics, use the
cycle suggested
for the lightest
fabrics. When the dryer stops, remove
dry items and reset the control.
To help reduce wrinkling,
take
the load from the dryer as soon
as tumbling
stops. This is very
important
for permanent
press,
knits and other synthetic
fabrics.
TUMBLE
PRESS Setting
The TUMBLE PRESS setting removes
wrinkles from dry clothing
such as
items that may have been packed
in a suitcase, closet, or items not
removed
from the dryer.
The load will tumble in heated air
for 5 minutes. The heat shuts off and
the dryer continues to tumble the
load for 10 more minutes.
For best results, TUMBLE PRESS only
a few items at a time. Put them on
hangers or fold them as soon as the
dryer stops.
14
Drying
times
Drying times will vary depending
on:
. amount of moisture in the clothes.
l type
and weight of the fabric.
l size of the load.
l room
temperature
around the
dryer.
l temperature
of the wash rinse
water.
l amount
of lint in the lint screen.
l dryer
temperature
selection.
See page 19 in your”Loundry
Guide”
for more information.
Lint screen
Clean
increase
the lint screen before each load. A screen
drying time and may be a FIRE HAZARD.
The lint screen is
inside the dryer
putt
straight
drum, on the
back wall.
1. Use the finger
holes to pull
the lint screen
straight out.
WARNING: DO NOT run the
dryer with the lint screen
base, damaged
or missing.
Doing so can cause overheating, can damage
fabrics and
can be a FIRE HAZARD.
blocked
4-y
2. Lightly
squeeze the
body, as
shown, while
pulling the
cover off.
‘\
\
3. Roll lint off the /
screen with
your fingers.
Squeeze body;
pull cover off.
DO NOT rinse
or wash the
screen. Wet lint is hard to remove.
4. Replace the cover on the body of
the lint screen.
5. Push the lint screen straight back
in until it clicks into place
1
Lint removal
Lint can gather inside the dryer and create a fire hazard.
This lint should be removed
every 2 to 3 years, or more often,
depending
on dryer usage.
Cleaning
should be done only by a qualified
1. Remove back panel from dryer
2. Avoid touching
thermostats,
wires, terminals
and heater box.
3. Remove lint from shaded area
- see art - with a sol? brush or
vacuum
cleaner,
4. Replace
back panel. Reconnect, exhaust duct, etc.
Level the washer/dryer.
Avoid electrlcal
shock
hazardunplug power
supply cord or turn off
electrical
power.
Avoid injury or damage-do
not
put hands inside cabinet.
Metal edges may be sharp.
Make sure dryer is cool.
service
person.
l
l
l
l
by lint can
Exhaust Duct Outlet
Vacation
care
1. Turn off both water faucets to
take pressure off inlet valves
and hoses.
2. Unplug power supply cord or
turn off electrical
power supply.
3. Clean lint screen and lint filter.
Winterizing
Install and store your washer/dryer
where it won’t freeze. Because
some water stays in the washer, freezing can damage
it. If your washer/
dryer is stored or moved during freezing weather, winterize
it.
1. Shut off both water
faucets. Disconnect
and drain water
inlet hoses.
To use the washer
1. Flush water pipes
and hoses.
2. Reconnect
water
let hoses.
16
2. Put a quart of automobile-type
antifreeze in the basket.
again..
.
3. Turn on both water
faucets.
in-
3. Run washer on a
drain and spin setting (see page IO) for
a bout 30 seconds to
mix antifreeze
and
water.
detergent.
If you need service or assistance,
we suggest you follow these four steps:
I. Before calling
for assistance..
Performance
problems
often result from little things you can find
and IIX yourself without tools of any kind
IF YOUR WASHER DOES NOT FILL:
l Is the power
supply cord
plugged
in?
l Are both
waler faucets open?
l Are fuses blown
or clrcult-breaker
tnpped?
l Are the water
supply hoses klnked?
l Is the Cycle
Control Knob se! and
pulled out?
IF YOUR WASHER DOES NOT SPIN:
Is the lid closed?
l Is the power
supply cord plugged
l
in?
.
MAKE SURE THE DRAIN HOSE IS
HIGHER THAN THE WATER LEVEL IN
THE WASHER. IF IT ISN’T...
l The washer
may seem to be
draining
during wash and rinse
cycles.
l Water
can siphon out (See “lnstallation
Instructions”]
IF YOUR WASHER STOPS DURING
THE PERMANENT PRESS CYCLE:
l Remember,the
washer will stop
for about 1’ z minutes after the
partial drain during the cooldown period in this cycle
DRYER DOESN’T RUN OR
DOESN’T HEAT:
l Is it plugged
in?
l Is the circuit-breaker
tripped
or
one or both of the fuses blown?
l Did you
push START?
l Is the door
closed?
l The AIR setting
is without heat.
l The last minutes
of heat settings
are without heat. See page 12.
DRYING TIME SEEMS LONG:
Are fuses blown or a circuit-breaker
tripped?
IF WASHER DRAINS AT THE WRONG TIME:
l The drain
hose should be at least
28 inches above the floor and
secured.
l The drain
hose should not fit tightly
in the drain pipe.
l
l
l
l
Is the lint screen Clean?
Is the room cold?
Check your”Laundry
Guide:’
page 19.
2. If you need assistance*...
4. If you have a problem*...
Call Whirlpool
COOL-LINE@ service assistance
telephone
number.
Dial free from:
Continental
U.S. . (800) 253-1301
Michigan
. . . . . . . (800) 632-2243
Alaska & Hawaii
(800) 253-1121
Call our COOL-LINE
service
assistance
telephone
number
(see
Step 2) and talk with one of our Consultants, or if You prefer, write to:
Mr. Robert F.Gunts, Vice President
Whirlpool Corporation
Administrative
Center
2OOOW33, North
Benton Harbor, Ml 49022
*If You must call or write, please provide: model number, serial number,
date of purchase,
and a complete
description
of the problem.
This information
is needed
in order to better respond
to your request
for
assistance.
and talk with one of ourtrained
Consultants. The Consultant
can instruct
You in how to obtain satrsfactory
operation
from Your appliance
or, if
service is necessary,
recommend
a
qualified
service company
in Your
area.
3. If you need service*. . .
w
Whirlpool
has
a nationwide
net1 work of franchised
TECH-CARE@ Serv-
~~,“.~~Rp~~;’
0
ice technicians
are trained to fulfill
the product
warranty
and provrde
after-warranty
service, anywhere
in
the United States. To locate
TECHCARE service in Your area, call our
COOL-LINE service assistance
telephone number [see Step 2) or look in
Your telephone
directory
Yellow
Pages under:
18
FSP IS a regIstered
trademark
af WhIrlpool
Corporation
for
.quoltly
parts took for this
FSP
symbol of quallty whenever
you need a replacement
part
8 for your WhIrlpool appliance
FSP replacement
ports
WIII fit right and work right. because
they are
made to the same exacting
SpeClflCallOnS
used to build every new WhIrlpool
OppllanCe
Notes
Maklng your world a little easier
Part No. 693012 Rev. A.
01984 Whirlpool Corporation
Printed
*$I .areF;.*.i*1
ltomatlc
Washers,
Clothes
Dryers.
Freezers.
Refrigerator-Freezers,
Ice Makers,
::,.b.‘s.:!t &i-.*;w.*.J,
Olshwashers,
Built-In
:c&
Ovens
in U.S.A.
%Abr~~:?r~
and Surface
Units.
%e?z+
Ranges,
Mlcr