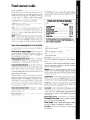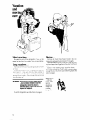
1
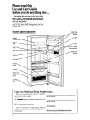
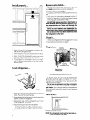
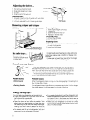
MANUAL
DEFROST
REFRIGERATORFREEZER
Model ELlSCCXR
ers. Freezers, Relrlgerator-Freezers,
Ice Makers, Olshwashers, Bwlt-In Ovens and Surlace Units, Ranges, MIcrowave Ovens. Trash Compactors, Room Air Condltloners, Oehumldlf
Please read this
Use and Care Guide
before you do anything
else.. .
This booklet
tells you how to start your refrigerator, clean it, move shelves and adjust controls. It even tells you what new sounds to expect
from your refrigerator.
Treat your new refrigerator
with care. Use it
only to do what home refrigerators
are designed to do.
Stationary
Extra Cold
Shelves
Parts and features
Comaartment
Crisper
Cover
.
Copy your Model and Serial Numbers
here. . .
When you need service 01 call with a question.
have this informatlon ready:
Model Number
1. Complete
Model and Serial Numbers (from the
plate located as shown).
Serial Number
2. Purchase date from sales slop.
Purchase Date
Copy this Information in these spaces. Keep this
book. your warranty and sales slip together in a
handy place.
I
2
Service Company
and Telephone
Number
Contents
SAFETY FIRST.
BEFORE YOU PLUG IT IN
Install Properlv
Level Refrigerator,
::::::::
Remove Sales Labels
Clean It
Plugltln
TurnItOn
USING YOUR REFRIGERATOR.
Setting the Control
The Freezer Tray
Changing the Light Bulb
Adjusting the Shelves
Removing Crisper and Crisper Cover
Ice Cube Trays
Sounds You May Hear
Energy Saving Tips
DEFROSTING AND CLEANING YOUR
REFRIGERATOR
Defrosting the Freezer Compartment.
Cleaning the Refrigerator,
Cleaning Chart
FOOD STORAGE GUIDE.
VACATION AND MOVING CARE,
IF YOU NEED SERVICE OR ASSISTANCE
I, Before You Call for Assistance
2. If You Need Assistance
3. IfYouNeedService
4. IfYouHaveaProblem...
,..,..,
5
5
6
6
6
1
.,
Page
6
6
7
7
7
8
9
10
11
11
11
11
11
1
;
;
1
i
;
f
:
:
“,.
01985 Whirlpool
Corporation
Before you plug it in
IMPORTANT
Before using your refrigerator, you are personally
responsible for making sure that it...
l is installed
and leveled on a floor that will hold
the weight, and in an area suitable for its size
and use.
l is connected
only to the right kind of outlet, with the
right electrical
supply and grounding.
[Refer to
your “Electrical
Requirements
and Grounding
Instructions:‘)
l
is used only for jobs expected
of home refrigerators.
l
l
l
l
l
l
is not near an oven, radiator or other heat source.
is properly maintained.
is out of the weather.
is used in an area where the room temperature will
not fall below 55” F (13” C).
is not used by those who may not understand how
it should be used.
is not loaded with food before it has time to get
properly cold.
3
Install
properly..
Remove sales labels.. .
.
Remove the Consumer Buy Guide label, tape and
any inside labels before ustng the refrigerator
To remove any remaining
glue:
1 Rub briskly with thumb to make a ball then remove
OR
2. Soak area with dishwashing detergent solution (1
teaspoon detergent in 1 quart warm water] before
removing glue as described in step 1.
DO NOT USE rubbing alcohol
or flammable
or
toxic solvents, such as acetone,
gasoline,
carbon tetmchloride,
etc. These can damage
the
material.
NOTE: DO NOT REMOVE ANY PERMANENT INSTRUCTION LABELS INSIDE YOUR REFRIGERATOR.
Do not remove the Tech Sheet fastened
under
the refrigemtor
at the front.
Clean it...
Clean your refrigerator before plugging
it. See cleaning Instructions on page 7
Plug it il I...
3-prong
grounding
type
wall receptacle
1 Allow 3 Inches (7 5 cm] between overhead cabinets and the refrigerator top
2 Allow at least an Inch (2 5 cm) between the refrlgerator condenser and the wall
3. Allow % inch (1.25 cm) space on each side and at
top of the refrigerator for ease of installation.
4 If the refrigerator ISto be against a wall, you might
want to leave enough space so the door can be
opened wider
y”l”!1
Level refrigerator..
.
v
grounbingplug
Refrigerator
Power Cord
Lower
I. Keep the 4 bolts that held refrigerator in shipping
crate. They are the levelling legs.
2. Screw these bolts all the way into bolt holes at the
bottom corners of refrigerator.
3. Adjust each leg until the refrigerator won’t rock.
Slide refrigerator into place.
4. Adjust front legs to level the refrigerator.
- To raise corners, turn legs in direction shown
-To lower corners, turn legs in direction shown.
5. Check with level
4
1
..
?
RECOMMENDEDGROUNDING
Raise
it in or using
METHOD
A 115 Volt, 60 Hz., AC only, 15 or 20 ampere fused
grounded electrlcal supply is required. It is recommended that a separate
circuit serving only this
appliance
be provided.
Do not use an extension
cord. Use a receptacle which cannot be turned off with a switch or
pull chain. See individual electrical
requirements
and grounding
instruction sheet in your literature
package.
Turn it on...
RUN
OFF
i
I c-
RUN SWITCH
.-
fi Move run switch to RUN
NOTE: The refrigerator
motor will not operate
til the run switch is on RUN.
un-
Using your refrigerator
Setting the control . . .
The control for the refrigerator temperature
the refrigerator When the refrigerator IS plugged
and the run switch is moved to RUN
l
IS
in
in
Give the refrigerator
time to cool down completely
before adding
food. (This may take several hours )
This setting should be about right for normal
household
refrigerator
usage.
The control will be set about right when milk or juice
is as cold as you like. In hot weather or if the door is
opened often, turn the control to a higher number to
keep the temperature you like If the milk or juice is too
cold or refrigerator items start to freeze, turn the control to a lower number or adjust the freezer tray
damper. Wait 24 hours after an adjustment is made
before further chanae is made to the controls
Set the THERMOSTAT CONTROL to 3
The freezer tray..
The freezer tray is located under the freezer compartment.
The damper at the rear of the freezer tray helps
control the refrigerator temperature for warm weather
operation. The damper can be adjusted for proper
cooling and defrosting of the refrigerator:
To adjust the damper:
I. Pull out the freezer tray.
2. Lift out the damper from the rear of the tray.
3 Slide damper into the desired position.
Damper
\
Positions
\
A - [Closed]
B ~
Cu E - [FULL Open)
- +sition
for normal
cooling and defrosting
NOTE: “B, C, D” positions
provide
fine cooling
adjustments
to best meet your cooling needs in
warm weather.
weather
Changing
WARNING:
the light bulb...
Before removing the light bulb, either
unplug the refrigemtor
or disconnect
the electricity
leading
to the refrigemtor
at the main power supply.
Shock and injury can occur if electricity remains connected.
I, Reach behind control console to find bulb.
2 Remove bulb.
3. Replace with a 40.watt (maximum)
appliance
bulb
setting.
Adjusting
I.
2.
3
4.
the shelves...
Guide
First, remove food from shelf.
Slide shelf straight out to stop
Lift front.
Slide the rest of the way out
Shelf Sf
Replacing
Shelf:
I. Frt back of shelf on top of guides with wrre stops
on the bottom of gurdes.
2 Lrft front, slide shelf in until It clears gurde stops
Removing
cover.. .
crisper
k--lShelf Guide
and crisper
Lift the Front, Then the Back
I
to stop
II Agaln
Ice cube trays.. .
Removing
Crisper:
I. Slide crisper strarght out to stop
2. Lift the front.
3. Slide the rest of the way out
4. Replace in reverse order.
Removing
Cover:
I, Lift front, then lift back.
2. Pull up and out.
Replacing
Cover:
1 Frt notches on back of cover into back
on wall of refrigerator.
2 Lower front Into place.
supports
For best results when freezing ice cubes, place ice
cube trays side-by-side
in bottom of freezer compartment.
If cubes are not used, they may shrink. The longer
cubes are stored, the smaller they get.
To remove ice:
1. Hold tray at both ends.
2. Slightly twist.
Sounds you may hear...
Your new refrigerator may make sounds that your old one didn’t.
Because the sounds are new to you, you might be concerned about
them Don’t be Most of the new sounds are normal. Hard surfaces lrke
the floor, walls and cabrnets can make the sounds seem louder.
The followrng chart describes the kinds of sounds that might be new
to you. and what may be makrng them
Possible
Sounds:
Probable
Causes:
l
Water Sounds:
When the refrigerator stops running, you may hear gurgling
few minutes after it stops.
l
Running
Your refrigerator has a high-efficiency
compressor and motor It \vill run longer
than older desrgns. It may even seem to run most of the time.
Sounds:
in the tubing for a
Energy saving tips.. .
You can help your refrigerator use less electrrcity.
Check door gaskets for a tight seal. Level the cabinet to be sure of a good seal.
l Clean
the condenser coil regularly.
l Open
the door as few times as possible. Think
about what you need before you open the door
Get everything out at one time. Keep foods organized so you won’t have to search for what you
want. Close door as soon as food is removed.
l Go ahead
and fill up the refrigerator, but don’t
overcrowd it so air movement is blocked.
l
l
6
l
It is a waste of electricity to set the refrigerator and
freezer temperatures colder than they need to be. If
ice cream is firm in the freezer and drinks are as
cold as your family likes them, that’s cold enough.
Make sure your refrigerator is not next to a heat
source such as a range, water heater, furnace, radrator, or in direct sunlight.
Defrosting and cleaning your refrigerator
The freezer compartment
in your refrigerator should
be defrosted
whenever
frost builds up to ‘/s-inch
(6 mm].
The entire refrigerator should be cleaned
about
once a month to help prevent odors from building up.
Of course, spills should be wiped up right away.
Defrosting the freezer
compartment.. .
1. Move the Run Switch to “OFF:’
2. Remove food and ice cube trays. Wrap food in
newspaper and put in a cooler to keep frozen.
3. Make sure the freezer tray damper is in the ‘W’
position,
4. Place a pan of hot water in the freezer compartment to speed defrosting. Leave door open.
5. CAUTION: Do not use any type of electric defroster or sharp utensils (ice pick, knife, etc.]
to speed defrosting. These can cause damage
Scrape with plastic window scraper
6. Replace hot water every 10 to 15 minutes.
7. Soak up defrost water with a cloth or sponge.
cooing
Cleaning
ition for normal
and defrosting.
the refrigerator...
To clean your refrigerator, move the Run Switch to
OFF, unplug it, take out all removable
parts, and
clean it according to the following directions.
When cleaning is complete, replace all refrigerator
parts, plug it in, and move the Run Switch to RUN.
8. Empty defrost water from freezer tray [Pull out to
stops; lift front slightly; pull out the rest of the way.)
9. Clean compartment
and freezer tray with a solution of two tablespoons (26 g] of baking soda and
one quart (.95 I) of warm water Rinse well and dry
10. Replace food and ice cube trays
11. Move the Run Swatch to RUN
Cleaning
chart.. .
Part
what
Removable parts
(shelves, crisper, etc.)
Sponge or cloth; mild
detergent and warm
water.
Outside
to use
How to clean
Sponge, cloth or paper
towel; mild detergent,
appliance
wax [or good
auto paste wax)
Wash removable parts with warm water
and a mild detergent.
Rinse and dry
l
l
l
l
l
Waxing
Inside walls [freezer
compartment
should be
allowed to warm up so
cloth won’t stick.]
painted
metal
Sponge, soft clolh or
paper towel, baking
soda, warm water, mrld
detergent
surfaces
l
l
Docx loners and gaskets
Sponge, soft cloth or
paper towel, mrld
detergent, warm water
DO NOT USE Cleaning
bleaches
or cleansers
Dark Plastics
(covers and panels)
Mrld detergent and
warm water, soft, clean
sponge and soft, clean
cloth
Wash with warm water and a mild detergent Do not use abrasive
or harsh
cleansers.
Rinse and dry
Wax painted metal surfaces at least
twice a year with appliance
wax or a
good auto paste wax. Apply wax with
a clean, soft cloth. Do not use wax
on plastic parts.
l
l
provides
rust protection.
Wash with warm waler and
- mrld detergent or
-baking
soda (2 tablespoons
1 quart ( 95 I) warm water
Rrnse and dry
Wash wrth mrld detergent
water
Rinse and dry
waxes, concentrated
contalnlng
petroleum
l
l
detergents,
on plastic
t 26 g] to
and warm
parts.
Wash wrth a soft grlt-free cloth or
sponge
Rinse and dry with a damp grit-free
cloth or chamois
DO NOT USE paper towels, window sprays, scouring cleansers,
or flammable
or toxic solvents like acetone,
gasoline,
carbon
tetrachloride,
etc. These can scratch or damage
the material.
Condenser
coils
Floor under refrigerator
Use vacuum cleaner
with brush attachment
Usual Floor attachment.
l
l
l
l
l
8
Clean dust and lint from condenser
coils behind the refrigerator at
least every other month Be careful, the fins on the coils are
sharp.
Slide refrigerator out away from
wall
Wash floor.
Slide refrigerator back into place.
Check to see if the refrigerator is
level.
Food storage guide
leafy
vegetables
(lettuce. celery and parsley)
Before storing, remove the store wrap and trim off
brursed areas Wash In cool water and dram slightly
dater should be clrnglng to the greens as they go
nto the crrsper ‘his water provides the atmosphere
Jf hrgh humldi+,y necessary
for keeping the leafy
vegetables
fresrl and crisp durrng storage
Vegetables
wlth sklns [tomatoes
flash. dry and s:ore in a crrsper
Fresh meat, prepackaged
by the meat retailer
Store In refrigerator in the origInal wrapping
Refer to
the chart following, for recommended
refrigerator
storage times
Fresh meat, not prepackaged
Remove from the
market wrapping paper, wrap loosely In waxed paper or aluminum foil Refer to chart oh this page for
recommended
storage times
Prepackaged
frozen meat
Place In the freezer
compartment
or freezer tray Immediately
after purchase unless it IS to be defrosted for cooking
Cool wlthin one to two
Cooked meats (leftovers)
hours after cooklng, then cover or wrap tightly with
plastrc wrap or aluminum foil to prevent drying, and
store In the refrigerator. Bones may be removed to
conserve storage space, but meat should be left in as
large a piece as possible
Meats cooked ir liquid for future serving should be
cooled uncovered, wrthtn one to two hours, then cov
ered and stored In the refrigerator To speed cooling,
when meat IS cooled tn liquid, the pan containing the
cooked meat may be set where there IS good circulation of cool air, or t may be cooled by setting the pan
IV cold or runnlnc water
Cured and smoked meats
Keep best in original
wrapping
After opening, rewrap tightly in plastic
wrap
or aluminurrl
foil
Cooked
meat
Wrap or cover tightly
wrap or aluminum3 foil
of Nat’1 Live Stock and Meat
STORAGECHARTFOB FRESHAN0 CUBEDMEAT-
and peppers)
Frults Wash, a:y and store in a crrsper with vegetables such as ‘omatoes
Berries keep better If not
dashed or hulled until ready to use. Sort, then store
berries ID CI loosely closed paper bag and store on
refrrgerator shell
Meat* .Meat ISperrshable and proper care IS essential to marntarnng
I?Skeeping quallt!es Store fresh
meat on the Interior refrigerator shelves. Refer to the
chart on this page for recommended
refrigerator
food storage times
‘Courtesy
Cold cuts Store them in thelrorlgrnal wrapping until
you are ready to use. Once the package
is opened,
tightly rewrap unused cold cuts tn plastic wrap or aluninum foil
with plastic
Board
..... ...............
Variety Wats
Chicken
..........................
Ground Beef.. . . . . . . . . . . . . . . . . . . . .
SteakrandPaasts
................
Cured Meats . . . . . . . . . . . . . . . . . . . . .
Bacon . . . . . . . . . . . . . . . . . . . . . . . . . . . .
Cold Cuts . . . . . . .-. . . . . . . . . , . . . . . . .
1 to2
1 to 2
1 to 2
3to5
7 to10
5to7
3 to5
‘Ifrnec3ii.sstafedadayortwolon~fhantheabove
recamm0nd&lime,wroph&tight~and
store in freezer wt.
NOTE: Fresh fish and shellfrsh should be used the
same day purchased.
Eggs Store wrthout washing In the orrgrnal carton
or use the egg nest In the door
Milk Wipe milk cartons For best storage, place milk
on top Interior shelf
Beverages
Wipe bottles and cans Store on lower
door shelves beneath the egg nest or interior shelves.
Butter
Store dally needs on serving dish In butter
compartment.
When storing an extra supply, wrap in
air-tight packaging
and store in freezer compartment or on top door shelves.
Cheese
Store in orrglnal wrapping
until you are
ready to use Once the package
IS opened,
rewrap
tightly in plastic wrap or aluminum foil Store on interior
refrigerator shelves.
Store catsup, mustard, jelly, olives,
Condiments
pickles, etc on door shelves. NOTE: Store bottled and
canned items on door shelves beneath the egg nest.
leftovers
-Always cover the container with waxed
paper, plasttc wrap or aluminum foil to keep food
from drying Store on refrigerator shelves.
Store on the bottom of the freezer comIce cream
partment. Once package
IS opened,
place a piece
of aluminum foil or waxed paper snugly against the
surface of the ice cream This will prevent ice crystals
from forming
Frozen soups, juices
.Store in freezer compartment
Packaged
frozen food
Store in freezer compart
ment or in the full-width freezer tray.
Frozen meats .Wrap In freezer packaging
material
and store in freezer compartment
or freezer tray
Ice trays
compartment
Place
on the bottom
of the freezer
Vacation
Short vacations.
..
Moving.
No need to shut off the refrigerator If you WIII be
away for less than four weeks. Use up perishables.
Long vacations.
..
Remove all the food If you are going for a month
or more
Move the run switch to OFF, unplug the refrlgeraior
and clean It rinse well and dry Tape rubber or
wood blocks to the door
keeping
It open far
enough for air to get In This WIII keep odor and mold
from building up
WARNING:
Tape blocks out of a child’s reach
. ..do not allow children near the
refrigerator
when the door is
blocked
open. They may become
injured or trapped.
To restart refrigerator, see instructions on page
IO
4.
..
Remove all food. Pack frozen foods In dry ice.
Unplug the refrigerator and clean it thoroughly.
Remove everything that comes out Wrap all parts
well and tape them together so they don’t shift and
rat tie
Screw in the levelling legs, tape the doors
shut, tape the electric cord to the cabinet
When
you get to your new home, put everything back and
refer to page 4.
QUESTIONS?
...call your
COOL:LINE”
service
assistance
telephone
number
(page 111,
If you need service or
assistance, we suggest
you follow these four steps:
I.
Before calling
for assistance..
.
Performance problems often result from little things
You can find and fix yourself without tools of any kind.
If your refrigerator
will not operate:
l Is the power
supply cord plugged Into a live circuit
with the proper voltage? [See page 4.)
l Have You checked
your home’s marn fuses or circuit
breaker box?
l Is the Run Switch on RUN?
If there Is a rattling
or jlngllng
noise, or other
unfamlllar
sounds:
l Is something
on top or behind the refrrgerator makrng norse when the refrigerator is running?
If the light does not work:
l Have you checked
your home’s main fuses or circuit
breaker box?
l Is the power
supply cord plugged into a live circurt
with the proper voltage? (See page 4 )
If the bulb Is burned out:
l See Instructions
for changing
light bulbs on page
5. Use applrance
bulbs only.
If the motor seems to run too much:
l Is the condenser,
behind the refrigerator, free from
dust and lint?
l On hot days. or if the room is warm, the motor natu
rally runs longer
l If the door
has been opened a lot, or if a large
amount of food has been put in, the motor will run
longer to cool down the interior
l Is frost build-up
more than % inch (6 mm]?
Remember:
Motor running time depends on drfferent things number of door openings, amount of
food stored, temperature
of the room, settrng of the
control and damper posItion
2. If you need assistance”.
..
Call Whlrlpool
COOL-LINE o service
asslstance telephone
number. Dlal free from:
Contlnental
U.S. . . . . . . . . . . . . (800) 2531301
Mlchlgan
. . . . . . . . . . . . . . . . . . . (800) 632-2243
. . . . . . . . . . . (800) 253-1121
Alaska & Hawall
and talk wrth one of our trained Consultants. The
Consultant can instruct You in how to obtain satisfactory operation from your appliance
or, if service IS
necessary. recommend
a qualified
service company in Your area
0
FSP
8
FSP IS a reQlSiered
trademark
01 Whirlpocl
Corporai~on
for quollty
parts
took for ttls symbol
of quality
whenever
you need a replacement
part for your Whfrlpool
oppllance
FSP
replacement
parts WIII fit rIghI and work right
because
they are made
lo the same exacting
swclhcatfons
used to build every new
Wh~rlpoo
applfance
3. If you need service*...
Whirlpool has a nationwide
network
of
franchrsed TECH-CARE@
Service
Companies.
TECH-CARE
service
technrcians are trarned
to fulfill the product
warranty and provide
after-warranty
servrce.
1 anywhere in the Unrted
States
To locate
TECH-CARE servrce In your area, call our COOL-LINE
service dssistance telephone number (see Step 2) or
look in your telephone directory Yellow Pages under
APPLIANCES-HOUSEHOLDMAJORSERVICE .3 REPAIR
WHIRLPOOLAPPLIANCES
FRANCHISEDTECH CARESERVICE
OR
S;EftI’I(6 (‘0 MP4\,ES
XYZSERVICE CO
123 MapIP
ELECTRICALAPPLIANCESMAJORREPAIRING
SEXI~I(‘E
XYZSERVICECO
123 Maple
999 9999
h PARTS
WHIRLPOOLAPPLIANCES
FRANCHISEDTECH CARESERVICE
(‘0 MM
VIES
999 9999
OR
WASHING
MACHINES.
DRYERS
6 IRONERSSERVICING
WHlRLPOOLAPPLlANCES
FRANCHISEDTECH-CARESERVICE
SEHI’I(‘E(‘OMP.4VIE,
XYZSERVICE CO
123t4apie
999 9999
4. If you have a problem:” . . .
Call our COOL-LINE service assistance telephone
number [see Step 2) and talk with one of our Consultants, or if You prefer, write to:
Mr. Robert Stanley
Division Vice President
Whirlpool Corporation
2000 US-33, North
Benton Harbor, Ml 49022
‘If you must call or wrote. please provide
model
number, serial number, date of purchase. and a
complete descrrptron of the problem This information IS needed In order to better respond to Your
request for assistance,
7&idJBUOl
Appliances
Making your world a little easier.
Part No. 945957 Rev. B
01985 Whirlpool Corporation
Ice Makers. Dishwashers. BullI-In Ovens and Surface Units. Ranges. krowave
Printed in U.S.A.
Ovens. Trash Compactors, Room Air Condltlonerr. Dehumlditwrs, Automatic Washers, Clothes Ori