1
UNDERCOUNTER
DISHWASHER
III
s. Freezers, Refrigerator-Freezers,
Model DU4500XM
Ice Makers, DIshwashers. Btult-In Ovens and Surface Units. Ranges, MIcrowave Ovens, Trash Compactors, Room Air Condltmners, Dehumldlfl
Contents
BEFORE YOU USE YOUR DISHWASHER.
IMPORTANT SAFETY INSTRUCTIONS ....
PARTS AND FEATURES. ................
FOR BEST RESULTS. .....................
The Filtering System ..................
.....................
PROPERLOADING
Top Rack Loading ...................
Bottom Rack Loading ................
Silverware Basket Loading ...........
ADDING DETERGENT. ..................
RINSE AID DISPENSER. .................
BEFORE STARTING YOUR DISHWASHER
Page
Page
..
2
2
3
4
4
5
5
6
6
7
7
8
01985 Whirlpool
STARTING YOUR DISHWASHER .........
Changing
a Setting .................
Selecting a Cycle ..................
HEAT DRY orAIR DRY? ................
To Add a Dish After Starting ..........
ENERGY SAVING TIPS ..................
SPECIALTIPS ..........................
COMMON DISHWASHING PROBLEMS ..
IF YOU NEED SERVICE OR ASSISTANCE ..
......
I. Before Calling for Assistance
............
2. If You Need Assistance
3. If You Need Service ...............
4. If You Have a Problem .............
8
8
9
9
9
10
11
12
14
14
14
14
14
Corporation
Before you use your dishwasher
It is your personal
responsibility
and obligation
to be sure your dishwasher:
Is installed by a qualified
installer.
l
Has been installed where it is protected
from the elements.
l
Has been installed on a floor strong enough to support its weight.
l
Has been properly
connected
to electricity,
water and drain.’
l
Has been property electrically
grounded.’
l Is not used
by children or anyone unable to operate it properly.
l
Is properly
maintained.
--See installation
instructions for complete
information.
l
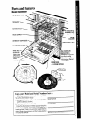
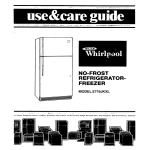
Parts and features
Model DU4500XM
UPPER SPRAY ARM
BOTTOM RACK
RACK BUMPER
WATER
-COLUMN
DETERGENT DISPENSERS
; LOWER SPRAY ARM
SILVERWARE BASK
UFATING
FI
E OVERFLOW
OTECTOR is
esigned to prevent
1 too much water
g from entering the
dishwasher. It is not
removable.
\
DOOR PANEL
- 2 COLOR OPTIONS
EMENT
Removable
Pump Guard
Copy your Model and Serial Numbers here.. .
When you need service or call with a question,
have this information
ready:
1. Complete
Model and Serial Numbers(from
the
plate located
as shown).
2. Purchase date from sales slip.
Copy this information
in these spaces.Keep
this
book, your warranty
and sales slip together
in a
handy place.There
is no warranty
registration
to
return. Proof-of-purchase
is all that is required
for
in-warranty
service.
Model
Serial
Number
Number
Purchase oote
Service
Company
and
Telephone
Number
For Best Results
Your dishwasher
cleans by spraying
a mixture of hot, clean water and detergent
against
soiled surfaces
of dishes. When a cycle
is
started, the dishwasher
fills with water to a bout
the level of the heating element. This water is
pumped
through
the rotating
spray
arms,
drained
through
the filter system which removes
food and soil, and pumped
back
through the rotating spray arms. Soiled water
is pumped
out and replaced
with clean water
during a cycle-the
number of times depends
on the cycle being used.
Load dishes so soiled surfaces
erful spray from rotating
arms.
face
pow-
If-cleaning
filtering system and
removable
pump guard help eliminate
prerinsing by removing
food particles
from the
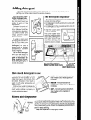
The filtering
system
It is not necessary
to rinse dishes before
putting them into the dishwasher.
Just remove
large pieces and quantities of food and bones.
The filtering system helps keep food particles
out of the wash water. Small particles are flushed
away as water is pumped
out. Larger particles
are trapped
in the pump guard.
To remove the pump guard for cleaning...
I. Walt at least 20 minutes after a cycle for
the heating element to cool down.
2. Unload and remove the bottom rack.
3. Press the outside wall of the pump guard at
the centerto
release the latch.
A. Lift out and rinse clean.
To replace the pump guard...
1. Insert pump guard legs [on inside wall) into
matching
openings
in filter screen.
2. Press down on outside wall until latch snaps
into place.
bottom rack with rack bumpers in
3. Replace
For best cleaning
and drying results, water should
140°F (60°C).
1. Turn on hot water faucet nearest the dishwasher.
until it is as hot as possible.
2. Hold a candy or meat thermometer
in the stream
to measure the temperature.
3. If the temperature
is too low, have a qualified
the water heater thermostat
setting.
A
Check Water
Temperature
be at least
Let water
run
of hot water
person
raise
Proper loading
Always load dishes so soiled surfaces are reached
by spray from rotating
Water must be able to drain off completely
for best drying results. Be careful
items so spray can reach all surfaces.
spray arms.
to Separate
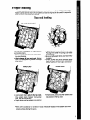
Top rack loading
I
CUP AND GLASS LOAD
The top rack is designed
for cups, glaSSeS
and smaller items.
l Place so open
ends face down for cleaning and draining.
l load
glasses
In top rack only. Bottom
rack is not designed
for glasses. Damage
may occur.
l
Place items in the rows between
prongs.
Placing them over the prongs can lead
to breakage.
Be sure lightweight
items are held firmly
in place.
China, crystal and other delicate
items
must not touch another item during dishwasher operation.
Damage
may occur.
UTENSIL LOAD
MIXED LOAD
Load plastic items only In the top rack.
Only plastic
items marked
“dishwasher
safe” are recommended.
Plastic items can be melted in the bottom
rack.
l
l
l
Items with cooked-on
soiled surfaces facing
or dried-on
the spray.
foods
l
Small bowls, pans and other utensils can
be placed
in the top rack.
should
be loaded
in the bottom
rack with
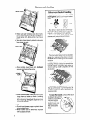
Bottom
rack loading
Silverware
basket loading
Load forks and spoons so they don’t
nest together. Spray can’t reach nested
items. NO
Make sure pot handles and other items
do not stop rotation of either the upper or
lower spray arm. Spray arms must move
freely.
Securely place heavily soiled cookware
face down in rack.
l
l
Place plates, soup bowls, etc., between
prongs and facing the spray.
l
YES
Mix items in each section of the basket. Small items-baby
bottle caps, jar
lids, etc. - can be put in any section.
Make sure sharp items (knives, forks,
skewers, etc.) ore put in point down.
The silverware
basket can be loaded
while it’s in place on the door, or it can
be taken out for loading
on the counter
or table.
It can also be removed
for easy unloading.
Always unload or remove the
basket before unloading
the racks to
avoid
spilling
water droplets
on the
UTENS
LOA
To remove the basket, slide it toward
the top of the door - by the handle. Lift
it off the holding
buttons. Replace
it in
reverse order.
l
Load cookie sheets, cake pans and other
large items at sides or back. Loading
such items in front may keep water spray
from reaching
detergent
dispenser
and
silverware
basket.
NOTE:
Do not load glasses, cups or plastic items
in the bottom rack.
l When
lower rack is removed,
replace
with bumpers in front.
l
To open the basket,
as shown. Be sure the
cover is completely
latched
before
pulling out the
bottom rack and
before closing
the dishwasher
door
unhook
the latch
Adding detergent
The kind and amount of dishwasher
detergent
you use is an important
getting your dishes clean. Read this section carefully.
Use automatic
dlshwasher detergent
only.
Other detergents
are
too mild and much too
sudsy
to work
in the
dishwasher.
Different
brands
of
dishwasher
detergent
have different
amounts
of phosphorus.
Phosphorus softens
water
and
helps
prevent
water
spots on dishes.
The detergent
dispenser
The detergent
dispenser has one section with
a cover and one without.
l
Put detergent
in both sections for cycles with
two washes.
l
Put deteraent
in the covered
section only for
cycles w’ih one wash.
l
Push the cover down
until it is latched.
The cover opens automatically
when the main
wash starts. Detergent
in
1 the open section
falls
into the dishwasher
L
when the door is closed.
.I \ _3.,.:_:..:;,’
_-:?
I& -3
If water
is hard and
phosphorus
content
is
low (8.7% or less], you
may need to use more
detergent
or use a
brand
with a higher
phosphorus
content
(12% or higher).
Do not add detergent
until you are ready
to
wash. Fresh, dry detergent is necessary
for
best washing
results.
Store detergent
tightly in
a cool, dry place.
How much detergent
part of
Use covered section for...
ENERGY SAVING WASH Cycle
Use both
sections for...
HEAVY WASH Cycle
to use
The amount
of detergent
to use
depends
on the hardness of your
water. If too little is used, dishes won’t
be clean. However, if too much is
used in soft water, glassware
will
begin to etch.
Find out your waters hardness by
asking
your local
water department, water softener company
or
county extension
agent.
l
l
l
HARD - Fill 1 or both sections to top
line if water is 8 or more grains of
hardness.
MEDIUM - Fill both sections to
middle line if water is 5 to 7 graifIS
hardness.
SOFT - Fill both sections
IineifwaterisOtoAgrainsof
hardness.
of
to bottom
Rinse aid dispenser
A rinse aid helps keep water from forming droplets and drying as spots. Keep the dispenser
filled with a rinse aid such as
Jet-Dry.” A small amount is released
automatically
during the
final rinse of each cycle. Check the dispenser
periodically
to
see if it needs refilling.
Keep the dispenser
fill cap tightly closed.
Cycle
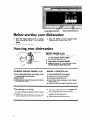
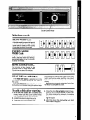
Before starting
Buttons
Option
Selector
Buttons
your dishwasher
1. Spin the Upper Spray Arm to make
sure nothing
will stop it from turning
freely.
2. Close and latch the door.
Starting
Selector
3. Run hot water at sink nearest
washer until it is hot. Turn it off.
dish-
your dishwasher
HEAVY WASH Cycle
1. Make sure Cycle Control Knob points
to dot marked HEAVY WASH.
2. Push HEAVY WASH button.
3. Push button for option desired.
4. Without turning it, pull out the Cycle
Control Knob to start the cycle.
ENERGY SAVING WASH Cycle...
RINSE & HOLD Cycle...
1. Turn Cycle Control Knob until it stops at dot
marked ENERGY SAVING WASH.
2. Select option.
3. Withoutturning
it, pull the Cycle Control Knob
out to start the Cycle.
1.
2.
3.
4.
Changing
a setting
You can change
a setting any-time during
any cycle.
1. Unlatch the door to stop the cycle, but don’t
open it until the spray arms stop spinning.
Push the RINSE HOLD Cycle Button.
Unlatch door and open slightly.
Pull Cycle Control Knob out.
Turn Control Knob clockwise
to dot marked
RINSE & HOLD.
5. Close and latch the door to start the cycle.
2. With the Cycle Control Knob pulled
out,
turn clockwise
to the cycle you want.
3. Be sure the detergent
dispensers
are filled
properly
for the new cycle.
4. Latch the door to start the cycle.
Cycle
Selecting
Control
Knob
a cycle
HEAVY WASH Cycle
A double wash for normal to heavily
soiled
loads. (The Energy Guide
Label data is based on this cycle.)
Cycle time is about 60 minutes.
ENERGY SAVING
WASH Cycle
A light to normal, everyday
soiled
loads. Uses less water and energy
than HEAVY WASH Cycle. Cycle time
is about 55 minutes.
RINSE & HOLD Cycle...
For rinsing
a few items
to be
washed
one or more days later.
Cycle time is about 10 minutes.
HEAT DRY or AIR DRY?
If the HEAT DRY Option is selected, air in the
dishwasher
is heated during the “dry” part or
the cycle.
If the AIR DRY Option is selected, air in the
dishwasher is not heated. Using this option helps
To add a dish after starting
1. To be sure the added
item is washed and
rinsed, make sure the Cycle Control Knob
has not passed ENERGY SAVING WASH.
2. Unlatch the doorto stop the cycle.
3. Open the door and add the dish.
save energy, but dishes ta ke longer
night) and some water spotting
Some items (such as plastics) may
drying.
Keep the door closed to allow the
trol Knob to complete
its cycle.
to dry (overmay result.
need towel
Cycle
Con-
4. Close the door. Do not latch it. Wait 30 seconds for air in the dishwasher
to warm up.
This helps reduce the amount of moisture
that can come from the vent when restat-ting the cycle.
5. Latch the door. The dishwasher
will start
from where it stopped.
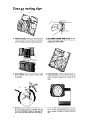
Energy saving tips
You can help save energy
if You:
1. Wash full loads. Running a half-filled
dishwasher uses the same amount of electricity
and hot water as a fully loaded machine.
2. Use ENERGY SAVING WASH Cycle for normally soiled loads. It uses less hot water and
energy than HEAVY WASH.
3. Air dry dishes
drying
cycle.
(overnight).
4. load correctly
for best washing results. lncorrect loading
may cause poor washing
and the need to rewash all or part of the
load.
when you don’t need a rapid
Allow longer
drying
times
5. Don’t pre-rinse
normally
soiled dishes. Select the correct cycle for the load and use
for
the recommended amount of detergent
good washing results without hand rinsing.
10
6. Use your dlshwasher
during off-peak hours.
Local utilities
recommend
this to avoid
heavy usage of energy at certain times of
day.
Special tips on dishwasher use
Remember,
use your dishwasher
only for the job it was designed
Some items are not dishwasher
safe or may require special care.
Read these special tips.
to do.
Aluminum:
Aluminum
loses its bright, shiny appearance
and darkens in color due to the minerals in the water and the alkalinity of the dishwasher
detergent.
If washed in the dishwasher
avoid
placing
directly
in front of detergent
dispenser
where it could be
sprinkled
with undissolved
detergent,
causing spotting, pitting, and
discoloration.
Colored
aluminum:
Follow utensil manufacturers’
cleaning
China:
Load carefully.
other. Use the shortest washing
Hand-painted,
metal-trimmed,
hot water and detergent.
lest
dishwasher
for several weeks,
to see if colors have changed.
hand washed.
Colored
aluminum
instructions.
may
fade.
Do not allow pieces to touch each
cycle [see page9 ),
and antique china may fade due to
one piece by washing
it daily in the
Then compare
it with the rest of the set
Delicate,
antique
items should be
Crystal and glasses:
Load carefully
in top rack only.
Load between
prongs-not
over them -to help prevent bumping
and chipping.
Load a few larger items in the bottom rack to reduce
amount and force of water spray reaching
glassware
from the bottom spray arm.
Use the shortestwashing
cycle(see
page9). Delicate, antique items
should be hand washed.
Flatware:
Salty and acidic
foods may tarnish silver and
stainless flatware if allowed
to remain on the utensils. Rinse flatware
as soon as possible especially
if it is not to be washed
right away.
Clean tarnished
items with silver polish. Antique
finishes may be
removed
by the dishwasher
detergent.
Wash by hand. A film may
form on sterling silver and silver plate items washed in a dishwasher.
This film is caused
by a reaction
of silver with chlorine in the detergent. It can be removed
with silver polish. Gold flatware is not dishwasher safe.
Cast iron
utensils:
The seasoned
finish will be removed
in the dishwasher.
Rusting will result. Wash by hand. To
re-season, coat with unsalted fat and heat in a slow oven for an hour
ortwo.
Plastics:
“Dishwasher
Place in upper rack only. Many plastics will have
Safe” written on them. If in doubt, try one piece.
Non-stick
finish
the dishwasher.
Follow manufacturers’
Utensils:
Most can be washed
suggestions.
in
Wood:
Many wooden
items will warp or lose their finish. Do
not wash cutting boards, wooden salad bowls or knives with wooden
handles in the dishwasher.
Pewter or pewter-like
discolor, and pit. To keep
detergent.
Dishwasher
pewter
materials:
Maystreak,
at its very best, hand wash with mild
care & cleaning:
Regular use of a
soft damp cloth or sponge and a mild detergent
is all that is necessary, in most cases, to keep the outside of your dishwasher
nice
looking and clean. Prolonged
use of hard water may cause a white
film to build up on the inside surfaces. If needed,
clean inside with
dishwasher
detergent
and water.
11
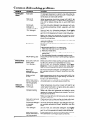
Common dishwashing problems
PROBLEM
Spotting
tllmlng
and
CAUSED BY
SOLUTION
Hard water
Fill detergent
tergent with
be necessary
Water is not
hot enough
Water temperature
should
be at least 140°F (60°C). Set
water heater thermostat
to a higher setting. Run water at
sink until hot before
starting
and/or
use HI-TEMP WASH
Option.
Use more dishwasher
detergent.
Use detergent
with highest available
phosphorus
content...especially
with hard
water.
Not enough
detergent,
or
improper
detergent
“0ld”detergent
Improper
loading
dispensers
to capacity.
Use dishwasher
highest available
phosphorus
content.
to install water softener.
deMay
Use Only fresh, dry dishwasher
detergent.
Store tightly
closed
box, in cool, dry place. Discard old, lumpy detergent. Do not fill dispensers
until ready to start dishwasher.
Make sure dishes and glassware
are loaded
reaches
all surfaces and items drain properly.
erload. Do not nest items.
so spray
Do not ov-
Make sure large items do not block spray from reaching
detergent
dispensers.
Does the rinse aid dispenser
need filling? See instructions
on page 7.
No rinse aid
To
1.
2.
3.
AIR DRY Setting
Small partlcles
deposlted
on
used
Spray arm or arms not
rotating freely
“Old”
detergent
Check spray arms to make sure they turn freely after loading. Be sure a utensil has not prevented
theirturning.
Use only fresh, dry dishwasher
detergent.
Store tlghtly
closed
box in cool, dry place. Discard old, lumpy detergent. Do not fill dispensers
until ready to start dishwasher.
Not enough
detergent,
or
improper
detergent
Use more dishwasher
detergent.
Use detergent
est available
phosphorus
content...especially
water.
Water is not hot
enough
Water temperature
should
be at least 140°F (60°C). Set
water heater thermostat
to a higher setting. Run water at
sink until hot before
starting.
If water pressure is low, do not use water for other purposes
while dishwasher
is running (to assure correct fills).
Water pressure may
be low, dishwasher
is
not fillina orooerlv
Dishes not
washlng clean
remove spots and film, try a vinegar rinse
Wash and rinse load as usual. Use AIR DRY.
Remove all metal items.
Put 2 cups (500 mL) white vinegar in a container
on the
bottom rack.
4. Run dishwasherthrough
a complete
washing
cycle.
Drying without heat may result in some spotting of glasses
and silver.
Water is not
hot enough
Improper
loading
Spray arm or arms not
rotating freely
Not enough
or improper
detergent
detergent
with highwith hard
Water temperature
should
be at least 140°F (6O”C]. Set
water heater thermostat
to a higher setting. Run water at
sink until hot before
starting.
Make sure dishes and glassware
are loaded
so spray
reaches all surfaces and items drain properly.
Do not overload. Do not nest iterns.
Make sure large items do not block spray from reaching
detergent
dispensers.
Check spray arms to make sure they turn freely after loading. Be sure a utensil has not prevented
their turning.
Use more dishwasher
detergent
Use detergent
with highest available
phosphorus
content...especially
with hard
water.
“0ld”detergent.
Use only fresh, dry dishwasher
detergent.
Store tightly
closed
box in cool, dry place. Discard old, lumpy detergent. Do not fill dispensers
until ready to start dishwasher.
Water pressure may
be low, dishwasher
is
not filling properly
If water pressure
while dishwasher
is low, do not use water for other purposes
is running (to assure correct fills].
.--‘*~l.-.._l__l,.-..-.l_
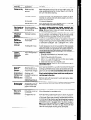
PROBLEM
_ * ..dmm”-ww.
Dlshes not dry
.-.<
I..~r_i.,i
,_
__._~L.
,.
CAUSED BY
=~.. .P-..--d.w.
Water is not hot
enough
Improper
loading
Make sure dishes and glassware
are loaded
reaches all surfaces and items drain properly.
erload. Do not nest Items.
No rinse aid
AIR DRY Setting
..‘,-_,.I
,..
.
~,. _, ,..__ ~‘ _,. _ _.r.- .: .-.
.=SOLUTION
.. .. .,,A..X,c.jm/li..
,_/ _=.:“_ _^
Water temperature
should be at least 140°F (60°C). Set
water heater thermostat
to a higher setting. Run water at
sink until hot before
starting.
so spray
Do not ov-
Fill rinse aid dispenser.
Allow more time when using AIR DRY Option, or use HEAT
DRY. Plastic items may need towel drying.
-.-u
_Y-.==--.----m--_~.~-~
n11_10*..._ i ..-~*.._” I_ .-,- “._ ~__.-._,_.Y- c-j(_.-_*__,.~.i_ /Irk’.Iy.- lii .,^..I-_,/
Aluminum utensils
Slack marks on
Use care In loadlng
alumlnum
utensils,
especially
any
chlna or white
llghtwelght
toll container.
Place so they do not touch
rubbing against items
utenslls
during washing
dlshes.
Remove
black marks with plastic
scouring
pad
and a mild abrasive
cleanser
.. .T*.*.A _i
---~-yLI-~~‘
.-..>P..
Im*,lr
r.l_~~~s.-.k~~j,*sae.m.-*__I_*-c.,.L_..zl 2.-v.* =. v..E.~.“F=--. : . ...B-.*‘~a
Chlpplng
or
Improper
loading
Do not overload.
Load glasses in the top rack only. Load
breaklng
between
prongs,
not over them. Glasses
loaded
over
glassware
prongs will not be supported
and may chip or break.
w-.-w.
.i..sb..~.~~~-w~r,~-.._
*-,m-y -.-_, ~__.j.
_---_____.l
-__-_,__ ..-. *,Ti___ll_i
--3<.rse.ra
Etching Too much detergent
Check for rainbow
hue on glasses. A rainbow
hue is the
permanent
in soft water
first sign of etching [corrosion
of glass). Reduce the amount
fllmlng which
of drshwasher
detergent
Use a detergent
with a lower
cannot be
phosphorus
content.
removed
Inadequate
rinsing
If water pressure is low do not use water for other purposes
Dlshes 8
lnterlor of
dlshwasher
yellow or
brown
Small dark
spots on
flatware
stainless
steel,
silver plate, or
sterllng or rust
spots on
stainless
steel
Bronze tarnish
on silverplate
Water left in
bottom of
dishwasher
used
while dishwasher
is running [to assure correct
water fills].
Make sure dishes and glassware
are loaded
properly
to
assure adequate
rinsing and draining.
Do not overload.
j__-/..-.--~.YIY_~---_L-PI-lIII
,_--._____.ll*,-_i
Iron or manganese
in
Temporary
remedy:
water
1. Set empty dishwasher
for a “one wash”cYcle.
2. Start dishwasher
and unlatch door to stop it when it has
filled for the wash part of the cycle.
3. Add ‘/d to % cup (120 to 240 mL) of citric acid crystals
(usually available
in drugstores].
4. Close and latch door to complete
cycle.
Permanent
solution:
Install an iron or manganese
filter to
home water supply.
-.%a__P_. .E.w_rm”-UI-Lli._. <,_ ..”_,.- I-~Ifnir-~xp--zmr--,,r”~~~~ai.Allowing
salty or
Rinse flatware
that is to stand for several
hours before
acidic foods such as
washing
(use Rinse & Hold]. Clean stained items with silver
mayonnaise,
vinegar,
polish and re-wash. Do not put stalnless
steel and sliver
fruit juices, salad
flatware
In the same sllverware
basket
compartment.
dressings, milk
Direct contact
between
these metals can cause permaproducts to remain on
nent damage
to the sliver.
flatware.
Undissolved
Remove spots with silver polish. Avoid spilling
dry deterdetergent
coming rn
gent on wet flatware.
contact
with flatware
--pm.
I.--I---w
r-.___^
--w-Silverplate
is worn off.
Remove tarnish with silver polish. Have silver replated.
Exposed base metal
takes on a bronzed
hue.
-.-”
-1. I ~.r(-Tl~~.I,~~~~~~~1,~W.CI.~~.--IC.-i.IIII-IYWI---Dishwasher
cycle not
Allow dishwasher
to complete
cycle.
completed
Clogged
gap
drain
air
Some plumbing
codes require use of a drain air gap between an undercounter
dishwasher
and the drain system
of the house. The air gap is usually located
above the sink
or on the top of the counter near the dishwasher
to prevent
the possibility
of water backing
up from the drain into the
dishwasher
due to a plugged
drain. The drain air gap is
NOT a part of the dishwasher
and is NOT covered
by the
dishwasher
warranty.
The drain air gap should be kept
clean to insure proper draining
of the dishwasher.
-7.mxm.s*.
~I~.mFm-a-~.i.~~--*.-<~-7-_r--.l-*-.A-
13
If you need service or assistance, we suggest
you follow these four steps:
1. Before calling for assistance...
3. If you need service” . . .
Performance
problems
often result from little
things you can find and fix yourself without tools
of any kind.
Whirlpool has a nationwide
network
of
franchised
TECHCARE 9 Service Companies.
TECH-CARE
service
technicians
are trained
to fulfill
the product warranty
and provide
afterFRANCHISED
SERVICE
warranty
service,
anywhere
in the
United States. To locate TECH-CARE service in Your
area, call our COOL-LINE service assistance
tele
phone number [see Step 2) or look in Your telephone directory
Yellow Pages under:
1. If dishwasher
won’t run, or stops during cycle:
l
Is door tightly closed and securely latched?
l
Has cycle been correctly
set [and Control
Knob pulled out)?
l
Is water turned on?
l
Has house fuse blown or circuit
breaker
tripped?
l
Is the power
cord
plugged
in [if so
equipped)?
l
Has electrical
power been interrupted?
l
If motor has stopped
because
of overload,
it will automatically
reset itself within a few
minutes.
If motor does not start, call for
service.
2. If water remains in the dishwasher:
l
Has the cycle completed?
l A small
amount of remaining
water is normal.
l
Is drain air gap clogged?
3. If detergent
remains
in the covered
detergent cup:
l
Is the bottom rack in backwards?
[The rack
bumpers should be at the front.)
l
Is the dishwasher
detergent
fresh and dry
without lumps?
l
Is the cycle completed?
2. If you need assistance”‘. . .
Call Whirlpool
COOL-LINE q service
assistance telephone
number. Dial free from:
Continental
U.S. . . . . . . , , . . . . (800) 253-l 301
Michigan..
. . . . . . . . . . . . . . . . . (800) 632-2243
Alaska & Hawaii
. . . . . . . . . . . (800) 253-1121
and talk with one of our trained Consultants.
The
Consultant
can instruct You in how to obtain satisfactory operation
from Your appliance
or, if service is necessary, recommend
a qualified service
company
in your area.
APPLIANCES-HOUSEHOLDMAJOR-SERVICE
h REPAIR
ELECTRICALAPPLIANCESMAJOR-REPAIRING
OR
WHIRLPOOLAPPLIANCES
FRANCHISEDTECH CARESERVICE
.SkH\
XYZSERVICE CO
123 Maple
,(,E COV,‘4
V/E\
sERI’,r‘I;
XYZSERVlCE CO
123 tape
,999 9999
r’,l.\f,‘4
VIE\
,999.9999
OR
WASHING MACHINES.
6 IRONERS-SERVICING
DRYERS
WHIRLPOOLAPPLIANCES
FRANCHISEDTECH-CARESERVICE
SEHi./(
XYLSERVICE CO
123 hIdDie
E ('0 ,,,'.A V/KS
,999 9339
4. If you have a problem”‘. . .
Call our COOL-LINE service
assistance
telephone number (see Step 2) and talk with one of
our Consultants, or if you prefer, write to:
Mr. Robert F.Gunts, Vice President
Whirlpool Corporation
Administrative
Center
2000 US-33 North
Benton Harbor, MI 49022
If You must call or write, please provide:
model
number, serial number, date of purchase,
and a
complete
description
of the problem.
This information is needed
in order to better respond to
Your request for assistance.
FSP IS a registered
trademark
of Whirlpool
Corporation
for
quality ports. took for this
FSP
symbol of quality whenever
port
R you need a replacement
for your Whirlpool
appliance.
FSP replacement
parts
will fit rrght and work right, because
they are
made to the same exacting
specrfications
used to build every new Whirlpool
appliance
0
14
6 PARTS
WHlRLPOOLAPP?lANCES
FRANCHISEDTECH CARESERbsICE
Notes
Making your world a little easier.
Part No. 304083
01985 Whirlpool
Printed in U.S.A.
Corporation
e Makers. Lhshwashets. Bwlt-In Ovens and Surface Unlls. Ranges, M~ctowave Ovens. Trash Compactors. Roam Air Condllloners. Oehumldlflers. Automatic Washers. Clothes Or)