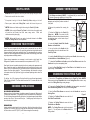
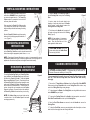
1
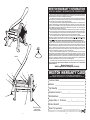
ATTENTION!
All Trademarks and Registered Trademarks are property of the respective companies.
SAVE THESE INSTRUCTIONS!
Refer to them often and use them to instruct others.
RESTAURANT QUALITY
FRENCH FRY
CUTTER
MODEL NO. 36-3501-W
Due to constant factory improvements, the product pictured
might differ slightly from the product received.
REV012611
If any components of this unit are broken, do not operate properly, or for product returns, please
contact Weston Products LLC
Phone: 1-800-814-4895 (Outside the U.S. 440-638-3131)
20365 Progress Drive, Strongsville, Ohio 44149
WestonProducts.com
WESTON WARRANTY INFORMATION
SAVE THIS WARRANTY INFORMATION FOR YOUR RECORDS!
2
6
3
5
Shield
12
Handle
Weston Products LLC warrants to the ORIGINAL RETAIL PURCHASER of this product that if operated in
accordance with the printed instruction accompanying it, then for a period of 1 year from the date of purchase,
the product shall be free from defects in material and workmanship.
The Warranty Card, along with a copy of the original receipt, must be received by Weston Products LLC
within 30 days from purchase date for the warranty to apply. Failure to send the completely filled out Warranty
Card, along with a copy of the original receipt, will void the warranty.
The product must be delivered to or shipped freight prepaid to Weston Products LLC for warranty services,
in either its original packaging or similar packaging affording an equal degree of protection. Damage due to
shipping is not the responsibility of the company. Weston Products LLC charges a $35.00 per hour bench
charge. NOTE: No repairs will be started without the authorization of the customer. The return shipping cost
to the customer will be added to the repair invoice.
Weston Products LLC will repair (or at its discretion, replace) the product free of charge, if in the judgment
of the company, it has been proven to be defective as to seller’s labor and material, within the warranty period.
New or rebuilt replacements for factory defective parts will be supplied for one (1) year from the date of
purchase. Replacement parts are warranted for the remainder of the original warranty period.
For non-warranty repairs, contact Weston Products LLC’s Customer Service at 1-800-814-4895 M-F
8am-5pm EST (outside of the United States 440-638-3131) to obtain a Return Merchandise Authorization
Number (RMA Number). Weston Products LLC will refuse all returns that do not contain this number. DO
NOT RETURN THE UNIT WITHOUT PROPER AUTHORIZATION FROM WESTON PRODUCTS LLC.
LIMITATIONS: The warranty is void if the product is used for any purpose other than that for which it is
designed. The product must not have been previously altered, repaired, or serviced by anyone else other
than Weston Products LLC. If applicable, the serial number must not have been altered or removed. The
product must not have been subjected to accident in transit or while in the customer’s possession, misused,
abused, or operated contrary to the instructions contained in the instruction manual. This includes failure
caused by neglect of reasonable and necessary maintenance, improper line voltage and acts of nature. This
warranty is not transferable and applies only to U.S. and Canadian sales.
Except to the extent prohibited by applicable law, no other warranties whether expressed or implied,
including warranty merchantability and fitness for a particular purpose, shall apply to this product. Under no
circumstances shall Weston Products LLC be liable for consequential damages sustained in connection with
said product and Weston Products LLC neither assumes nor authorizes any representative or other person to
assume for it any obligation or liability other than such as is expressly set forth herein. Any applicable implied
warranties are also limited to the one (1) year period of the limited warranty.
This warranty covers only the product and its specific parts, not the food or other products processed in it.
CUT ALONG THE DOTTED LINE AND SEND THE WARRANTY CARD ALONG WITH A COPY OF YOUR ORIGINAL
PURCHASE RECEIPT TO:
Weston Products LLC
20365 Progress Drive, Strongsville, OH 44149
4
10
9
7
WESTON WARRANTY CARD
1
6
SEND THIS CARD ALONG WITH A COPY OF YOUR ORIGINAL PURCHASE RECEIPT TO:
WESTON WARRANTY, WESTON PRODUCTS LLC, 20365 PROGRESS DRIVE, STRONGSVILLE, OH 44149
3
Customer Name: _________________________________
8
Address: _______________________________________
City/State/Zip: ___________________________________
Telephone Number: (_________) ____________________
E-Mail Address: _________________________________
5
Original Date of Purchase: ______/________/________
Product Model #: _________________________________
11
Suction Cup Feet
and Vertical
Mounting Holes
-2-
Serial # (if applicable): ______________________
-11-
COMPONENT LIST
FOOD SAFETY
There are basic rules to follow when handling food.
They are COOK, SEPARATE, CLEAN, and CHILL.
COOK
It’s crucial to cook food to a safe internal temperature to destroy bacteria that is present.
The safety of hamburgers and other foods made with ground meat has been receiving a
lot of attention lately, and with good reason. When meat is ground, the bacteria present on
the surface ois mixed othroughout
theo ground mixture. If this ground meat is not cooked to
o
at least 160 F to 165 F (71 C to 74 C), bacteria will not be destroyed and there’s a good
chance you will get sick.
Solid pieces of meat like steaks and chops don’t have dangerous bacteria like E. coli on the
inside, so they can be served
moreo rare. Still, any beef cut should be cooked to an internal
o
temperature
of at least 145 F (63 C) (medium rare). The safeo temperature
for poultry is
o
o
o
180 F (82 C) and solid cuts of pork should be cooked to 160 F (71 C). Eggs should be
thoroughly cooked too. If you are making a meringue or other recipe that uses uncooked
eggs, buy specially pasteurized eggs or use prepared meringue powder.
SEPARATE
Foods that will be eaten uncooked and foods that will be cooked before eating MUST
ALWAYS be separated. Cross-contamination occurs when raw meats or eggs come in
contact with foods that will be eaten uncooked. This is a major source of food poisoning.
Always double-wrap raw meats and place them on the lowest shelf in the refrigerator so
there is no way juices can drip onto fresh produce. Then use the raw meats within 1-2 days
of purchase, or freeze for longer storage. Defrost frozen meats in the refrigerator, not on
the counter.
When grilling or cooking raw meats or fish, make sure to place the cooked meat on a
clean platter. Don’t use the same platter you used to carry the food out to the grill. Wash
the utensils used in grilling after the food is turned for the last time on the grill, as well as
spatulas and spoons used for stir-frying or turning meat as it cooks.
Make sure to wash your hands after handling raw meats or raw eggs. Washing hands with
soap and water, or using a pre-moistened antibacterial towelette is absolutely necessary
after you have touched raw meat or raw eggs. Not washing hands and surfaces while
cooking is a major cause of cross-contamination.
CLEAN
Wash your hands and work surfaces frequently when you are cooking. Washing with soap
and warm water for at least 15 seconds, then dry with a paper towel.
CHILL
Chilling
food ois very
important.
The danger zone where bacteria multiply
is between
o
o
o
o
o
40 F and 140 F (4 C and
6 C).o Your refrigerator should be set to 40 F (4 C) or below;
o
your freezer should be 0 F (-17 C) or below. Simple rule: serve hot foods hot, cold foods
cold. Use chafing dishes or hot plates to keep food hot while serving. Use ice water
baths to keep cold foods cold. Never let any food sito at room
temperature for more than
o
2 hours - 1 hour if the ambient temperature is 90 F (32 C) or above. When packing
for a picnic, make sure the foods are already chilled when they go into the insulated
hamper. The hamper won’t chill food - it just keeps food cold when properly packed
with ice. Hot cooked foods should be placed in shallow containers and immediately
refrigerated so they cool rapidly. Make sure to cover foods after they are cool.
DIAGRAM
NUMBER
PART
DESCRIPTION
Push Plate
36-3502
3/8” (1 cm) Cutting Plate
36-3503
Guide Rod (2)
36-3505
Push Rod (2)
36-3506
Handle Bolt & Nut Set
36-3525
Push Plate Screw
36-3508
Push Plate Screw (2)
36-3509
Thumb Nut (3)
36-3510
Washer (3)
36-3511
Guide Rod Nuts
36-3514
Push Rod Bolt
36-3515
Push Rod Nut
36-3516
Push Plate Mounting Bracket 36-3504
Suction Cup Foot with Nut (4 Piece Set) 36-3519
1
2
3
4
5
6
7
8
9
10
11
12
If any components of this unit are broken or the unit does not operate
properly, call Weston Products LLC Toll Free at
1-800-814-4895
Monday thru Friday 8:00am-5:00pm EST. Outside the U.S. call 440-638-3131
ADDITIONAL ACCESSORIES AVAILABLE
PART DESCRIPTION
PART NO.
Food-Grade Silicone Spray
03-0101-W
1/2” (1.3 cm) French Fry Cutting Plate
36-3518
1/4” (0.6 cm) French Fry Cutting Plate
36-3517
These products and many more products can be ordered by visiting
W e s t o n P r o d u c t s . c o m or by calling
Weston Products LLC Toll Free at 1-800-814-4895
Monday thru Friday 8:00am-5:00pm EST. Outside the U.S. call 440-638-3131
NOTE: Special considerations must be made when using venison or other wild game,
since it can become heavily contaminated during field dressing. Venison is often held
at temperatures that could potentially allow bacteria to grow, such as when it is being
transported. Refer to the USDA Meat and Poultry Department for further questions or
information on meat and food safety.
-10-
PART
NUMBER
-3-
RECIPES
GENERAL SAFETY RULES
WARNING!
READ AND FULLY UNDERSTAND ALL
INSTRUCTIONS AND WARNINGS PRIOR TO
USING THIS MACHINE.
YOUR SAFETY IS
MOST IMPORTANT!
FAILURE TO COMPLY
WITH PROCEDURES AND SAFE GUARDS MAY
RESULT IN SERIOUS INJURY OR PROPERTY
DAMAGE. REMEMBER: YOUR PERSONAL
SAFETY IS YOUR RESPONSIBILITY!
1. KEEP FINGERS CLEAR of the Cutting
Blade at all times. NEVER hold the product
with your hands in line of the Cutting Blade.
Failure to keep fingers and hands away from
the Cutting Blade may result in personal
injury.
5. The Manufacturer declines any
responsibility in the case of improper use of
this machine.
6. Be sure the French Fry Cutter is stable
during use. All four feet should be securely
mounted to a level, sturdy, work surface,
2. KEEP CHILDREN AWAY. NEVER and the machine should not move during the
LEAVE THE FRENCH FRY CUTTER cutting process.
UNATTENDED.
7. DO NOT USE this French Fry Cutter for
3. CHECK FOR DAMAGED PARTS. Before frozen foods, boned meat, fish or anything
using the French Fry Cutter, check that all other than food stuffs.
parts are operating properly, and perform
the intended functions. Check for alignment 8. The French Fry Cutter should not be
of moving parts, binding of moving parts, mounted to drywall, paneling or particle
mounting and any other conditions that may board. Only mount the French Fry Cutter to
a solid surface, such as wall studs.
affect the operation.
TEXAN STAR FRIES & DIP
4. When handling the Cutting Plate, it is 9. DO NOT USE the French Fry Cutter while
HIGHLY RECOMMENDED to wear cut- under the influence of drugs or alcohol.
resistant Kevlar gloves.
2 lb of fresh french fries
6 pieces of cooked bacon/crumbled
SAVE THESE INSTRUCTIONS!
Refer to them often and use them to instruct others.
CAUTION SHARP BLADES!
Keep fingers, hands, other body parts and objects clear
of the blade assembly!
5 lb fresh french fries
4 oz cheddar cheese/shredded
3 slices cooked bacon/crumbled
. Cook fries according to directions (cook to golden brown)
. Sprinkle on cheddar cheese and crumbled bacon
. Place into a 350°F (177°C) oven until cheese is melted
DIP
Small bottle of ranch dressing
1/2 package taco seasoning
. Combine all ingredients and mix well
. Serve chilled
AWESOME AUSI FRIES & DIP
.
.
.
.
1 cup colby jack cheese/shredded
Cook fries according to directions (cook to golden brown)
Sprinkle on colby jack cheese and crumbled bacon
Salt according to taste
Place into a 350°F (177°C) oven until cheese is melted
DIP
16 oz bottle ranch dressing
1 tsp cayenne pepper
1 tsp white pepper
1 Tbsp onion powder
1 tsp black pepper
1 tsp dried oregano
1 Tbsp kosher salt
1 tsp dried thyme
2 tsp paprika
1 Tbsp garlic powder
. Combine all ingredients and mix well
. Serve chilled
FRENCH FRIED SWEET POTATOES
4 sweet potatoes*
*Yams are too soft to french fry
.
.
.
.
-4-
Peel and slice raw sweet potatoes in 1/2” (1.3 cm) slices
Soak the slices in ice water for 30 minutes, drain, and dry on paper towels
Fry in hot oil a few at a time, for about 5 minutes
Salt to taste, or sprinkle with cinnamon sugar
-9-
HELPFUL HINTS
. ALWAYS wash the potato to remove any dirt before putting through the cutter.
. Potato can be cut with the skin or without.
. If the potato is too big to fit into the French Fry Cutter, simply cut it in half.
. Place a pan or bowl under Cutting Plate to catch the fries as they are cut.
. NOTE: Make sure all bolts are tight before using the French Fry Cutter.
. NOTE: Before using the French Fry Cutter for the first time, thoroughly wash
all parts that will contact food with warm, soapy water.
Rinse with
clean water and dry thoroughly.
. NOTE: Before and After each use, apply a food-safe lubricant to the Guide
Rods and Cutting Plate for smooth operation.
ASSEMBLY INSTRUCTIONS
CAUTION! Use extreme care when handling the Cutting Plates and the Blades!
The Blades are extremely SHARP! It is suggested that you wear Kevlar CutResistant Gloves when handling the Cutting Plates.
1. Remove French Fry Cutter from the
Push Rods
Figure 1
packaging and verify that you have received all
of the parts.
2. Remove the protective film covering the
Shield.
3. Position the Shield into the French Fry
Cutter body. NOTE: Be certain that the
Shield is positioned in the notches and pushed
the whole way down, so that it rests on top of
the Cutting Plate.
CHOOSING YOUR POTATO
4. Locate the Handle, Handle Bolt, Handle
Washers and Handle Nuts.
French Fries are a popular side dish that are quick to prepare and low cost. Not all
potatoes will make good french fries. For good fries, potatoes need a high solids content
to ensures a distinct, mealy texture and hearty flavor. They also absorb less oil, producing
crispier fries. Most russet potatoes will produce good french fries, although you can also
use purple potatoes and Bintje potatoes.
5. Line up the holes in the Handle with the
corresponding holes in the handle base of the
French Fry Cutter.
Proper storage temperatures are necessary to avoid sweet or dark french fries.
Refrigeration of potatoes is not recommended, store raw potatoes at 55°F (13°C).
Great french fries can be made by keeping the skin on to enhance the appearance and
flavor. French fries made from peeled potatoes should be chilled after cutting in cold
water for 10 to 30 minutes before frying, to ensure maximum crispiness and eliminate the
chance of the fries sticking together. To prevent darkening, add citrus acid or vinegar
to the water solution. Spin dry before frying, to avoid water spattering and to reduce fat
absorption.
Push Rod Bolt
and
Push Rod Nut
Handle
Handle Washer,
Handle Nut
and Handle Bolt
6. Insert the Handle Bolt through the handle base and Handle, then secure using
the Handle Nuts and Handle Washers (Figure 1).
7. To attach the Push Rods to the Handle, position the Push Rods on each side of the
Handle and line up the corresponding holes.
8. Insert the Push Rod Bolt through the Push Rod and the Handle, then secure
together using a Push Rod Nut.
CHANGING THE CUTTING PLATE
To yield ten - 4oz. (113 g) servings of fresh cut french fries you will need approximately
7 lbs. (3.2 kg) of potatoes. The fries should be cooked for 3 ½ minutes with the oil at
360°F (182°C).
1. Remove the 3 Thumb Nuts and Washers from the French Fry Cutter. NOTE:
When removing the last Thumb Nut, hold on to the Cutting Plate, failure to do so, may
result in the Cutting Plate falling causing damage.
COOKING INSTRUCTIONS
2. To remove the Pushing Plate, with the Handle in the down position, remove the 2
Push Plate Mounting Screws from the top of the Pushing Plate.
OIL COOKING INSTRUCTIONS
Always use clean oil to fry potatoes. Vegetable or peanut oil is suggested. Make sure oil
is at the proper temperature. Frying potatoes in cold oil will result in more oil absorption.
The oil is the proper temperature when the fries don’t sink when dropped in and bubbles
remain on top of the oil. Never over fill the fryer. Overfilling may result in limp or the
french fries may stick together.
3. Once the Push Plate Screws are removed, raise the Handle and remove the
Pushing Plate.
Figure 2
4. Replace the Pushing Plate and secure with the 2
Push Plate Thumb Screws.
OVEN METHOD
Another method of making french fries is to bake them. Soak the fresh cut french fries in
cold water for 10 minutes. Place on a cooking pan with raised edges. Salt and coat with
oil. Bake in the oven at 450°F (232°C) for 30 minutes turning them occasionally.
-8-
5. Replace the Cutting Plate and secure with the 3
Thumb Nuts and Washers.
NOTE: The Cutting Plate needs to be facing inward
(Figure 2). The dull portion of the Blades should be
facing outward.
-5-
Cutting
Plate
Blades
facing
inward
VERTICAL MOUNTING INSTRUCTIONS
Make sure the French Fry Cutter is mounted to a
solid surface. DO NOT mount to drywall that has
no structural support behind it. The French Fry
Cutter needs to be mounted to the studs of the
wall or any other solid surface.
Mounting
Hole
on the
Foot
Figure 3
Figure 5
3. Push down on the Handle and the potato will
be forced out through the bottom of the Cutting
Plate (Figure 5).
Mount the French Fry Cutter through the mounting
holes on the 4 feet using appropriate sized bolts (not
included) (Figure 3).
To mount your French Fry Cutter on a table top or stand, simply
lay the French Fry Cutter down onto the legs and secure to the
work surface using the appropriately sized screws (not included).
1. Raise the Handle of the French Fry Cutter so
that the Pushing Plate is away from the Cutting
Plate.
2. Insert a potato into the cutter length- wise
(standing on end) and slowly lower the Handle
until the potato is held securely between the
Pushing Plate and Cutting Plate.
When mounting the French Fry Cutter, position
it at a distance from the floor that is a comfortable
height and will provide the best leverage for cutting
a potato.
HORIZONTAL MOUNTING
INSTRUCTIONS
CUTTING POTATOES
NOTE: For large potatoes, it is necessary
to cut a small flat edge on the end of the
potato. Place the sliced flat end of the
potato against the blade and cut.
Mounting
Hole
on the
Foot
CAUTION! DO NOT hold onto the
potato while pulling the Handle Down.
Serious injury will result.
NOTE: Even though Horizontal Mounting is an option, it is recommended to mount
the French Fry Cutter vertically on a structurally supported wall. More leverage can be
applied when mounted vertically than can be applied mounted horizontally.
CLEANING INSTRUCTIONS
HORIZONTAL SUCTION CUP
MOUNTING INSTRUCTIONS
To install the Suction Cup Feet to your French Fry Cutter,
place the Bolt of each Suction Cup through the holes in
the Feet of the French Fry Cutter. Thread the Nylock
Nut onto each Bolt tightly (Figure 4). Press firmly down on
the French Fry Cutter to create suction between the work
surface and the French Fry Cutter. Suction Cups work
best on smooth, horizontal surfaces. To create more of a
suction, a damp cloth can be swiped across the Suction
Cup prior to adhering. Be certain to check the stability of
the French Fry Cutter to the work surface, prior to using.
Figure 4
3. To remove the Pushing Plate, with the Handle in the down position, remove the 2
Push Plate Thumb Screws from the top of the Pushing Plate.
Nylock Nut
-6-
It is recommended to thoroughly clean your French Fry Cutter before and after
each use. Clean with hot, soapy water, then rinse with clean water and dry
thoroughly.
1. Remove the 3 Thumb Nuts and Washers from the French Fry Cutter. NOTE:
When removing the last Thumb Nut, hold on to the Cutting Plate, failure to do so, may
result in the Cutting Plate falling causing damage.
2. To clean between the Blades of the Cutting Plate, use a long bristle brush to remove
debris. DO NOT use your fingers!
NOTE: The Suction Cups are not meant to be used on
a vertical surface. Use the Suction Cups for horizontal
mounting purposes only.
Suction Cup
Feet (Sold
Separately)
CAUTION! Use extreme care when handling the Cutting Plates and the Blades!
The Blades are extremely SHARP! It is suggested that you wear Kevlar CutResistant Gloves when handling the Cutting Plates.
Suction Cup
Bolt
4. Once the Push Plate Screws are removed, raise the Handle and remove the
Pushing Plate.
5. To clean the Push Plate, remove any remaining debris with a blunt object, such as a
butter knife, then thoroughly clean with a long bristle brush.
-7-