1
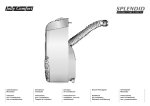
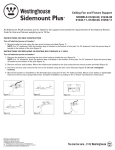
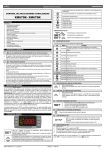
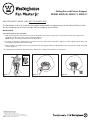
Ceiling Fan and Fixture Support
MODEL 02525-08, 02525-11, 02000-11
FAN ATTACHES TO WOOD JOIST NOT TO PLASTIC BOX
The Fan Master Jr.® is UL listed for fan support and exceeds the requirements of the National Electric Code
for fans weighing up to 70 lbs. and light fixtures weighing up to 150 lbs.
INSTRUCTIONS
Turn off electrical power at breaker!
1. With electrical power off, pull wires into box. Attach the box to the joist, the pins can hold box temporarily against joist.
Install the small screw in the center of the hole (figure 1).
NOTE: Large mounting screws remain inside the box.
2. For New Construction applications, tuck wires into box and put Saf-T-Cap® on (figure 2). Saf-T-Cap® protects bolts and
wiring during painting and sheetrocking.
3. When ceiling is complete, remove cap and install fan mounting bracket (provided with the fan) using the two large mounting
screws (figure 3).
4. Complete fan installation and wiring according to fan or fixture manufacturer’s instructions.
figure 1
Westinghouse Lighting Corporation
Philadelphia, PA 19154-1029, U.S.A.
Westinghouse Lighting Corporation,
a Westinghouse Electric Corporation licensee
“Westinghouse” et “You can be sure. . . if it’s Westinghouse”
sont de marques déposées de Westinghouse Electric Corporation
© 2013 WESTINGHOUSE LIGHTING CORP.
figure 2
figure 3
Soporte para Abanicos de Techo y
Accessorios de Iluminación
MODEL 02525-08, 02525-11, 02000-11
EL VENTILADOR SE SUJETE A LA VIGUETA DE LA MADERA NO A CAJAS PLASTICAS.
Fan Master Jr.® esta listado U.L. para sosten y exceden los requisitos del codigo Eléctrico Nacional para
ventildores y pesando hasta 70 lbs. y adornos de illuminación hasta 150 lbs.
INSTRUCCIONES DE INSTALACION
¡Apague la corriente eléctrica en el disyuntor!
1. Con la corriente eléctrica apagada, hale los cables dentro de la caja. Monte la caja a la viga, los pasadores pueden
sostener temporalmente la caja contra la viga. Introduzca el tornillo pequeño en el centro del orificio. (figura 1).
NOTA: Los tornillos grandes de montaje permanecen dentro de la caja.
2. En construcciones nuevas entre los cables dentro de la caja y pongale la Saf-T-Cap® (figura 2). Saf-T-Cap® proteje las
pernas y cables mientras se pinta ó se instale las planchas de estuco.
3. Cuando el techo este completo, quite el capuchón e instale la abrazadera de montaje (provista con el ventilador) usando
los dos tornillos grandes de montaje (figura 3).
4. Complete la instalácion del ventilador y el cableado de acuerdo a las instrucciones del fabricante.
figura 1
Westinghouse Lighting Corporation
Philadelphia, PA 19154-1029, U.S.A.
Westinghouse Lighting Corporation,
a Westinghouse Electric Corporation licensee
“Westinghouse” et “You can be sure. . . if it’s Westinghouse”
sont de marques déposées de Westinghouse Electric Corporation
© 2013 WESTINGHOUSE LIGHTING CORP.
figura 2
figura 3