1
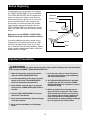
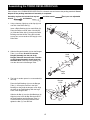
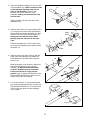
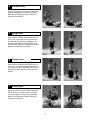
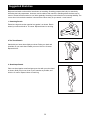
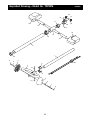
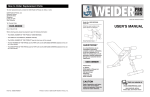
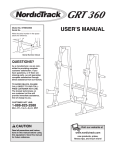
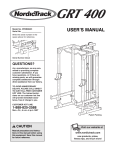
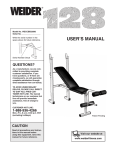
Model No. TDPWM
QUESTIONS?
USERÕS MANUAL
As a manufacturer, we are committed to providing complete
customer satisfaction. If you
have questions, or if there are
missing or damaged parts, we
will guarantee complete satisfaction through direct assistance
from our factory.
TO AVOID UNNECESSARY
DELAYS, PLEASE CALL DIRECT
TO OUR TOLL-FREE CUSTOMER HOT LINE.
The trained technicians on our
customer hot line will provide
immediate assistance, free of
charge to you.
CUSTOMER HOT LINE:
1-800-999-3756
Mon.ÐFri., 6 a.m.Ð6 p.m. MST
Patent Pending
CAUTION
Read all precautions and instructions in this manual before using
this equipment. Save this manual
for future reference.
Visit our website at
www.weiderfitness.com
new products, prizes,
fitness tips, and much more!
Table of Contents
Before Beginning . . . . . . . . . . . . . . . . . . . . . . . . . . . . . . . . . . . . . . . . . . . . . . . . . . . . . . . . . . . . . . . . . . . . . . .3
Important Precautions . . . . . . . . . . . . . . . . . . . . . . . . . . . . . . . . . . . . . . . . . . . . . . . . . . . . . . . . . . . . . . . . . . .3
Assembling Your TORSO DEVELOPER PLUS . . . . . . . . . . . . . . . . . . . . . . . . . . . . . . . . . . . . . . . . . . . . . . . . .4
How to Use Your TORSO DEVELOPER PLUS . . . . . . . . . . . . . . . . . . . . . . . . . . . . . . . . . . . . . . . . . . . . . . . . .6
Exercise Guidelines . . . . . . . . . . . . . . . . . . . . . . . . . . . . . . . . . . . . . . . . . . . . . . . . . . . . . . . . . . . . . . . . . . . . .8
Suggested Stretches . . . . . . . . . . . . . . . . . . . . . . . . . . . . . . . . . . . . . . . . . . . . . . . . . . . . . . . . . . . . . . . . . . . .9
Part List . . . . . . . . . . . . . . . . . . . . . . . . . . . . . . . . . . . . . . . . . . . . . . . . . . . . . . . . . . . . . . . . . . . . . . . . . . . . .10
Exploded Drawing . . . . . . . . . . . . . . . . . . . . . . . . . . . . . . . . . . . . . . . . . . . . . . . . . . . . . . . . . . . . . . . . . . . . .11
Ordering Replacement Parts . . . . . . . . . . . . . . . . . . . . . . . . . . . . . . . . . . . . . . . . . . . . . . . . . . . . . .Back Cover
Limited Warranty . . . . . . . . . . . . . . . . . . . . . . . . . . . . . . . . . . . . . . . . . . . . . . . . . . . . . . . . . . . . . . .Back Cover
WEIDER is a registered trademark of ICON Health & Fitness, Inc.
2
Before Beginning
Congratulations on your purchase of the innovative TORSO DEVELOPER PLUS from WEIDER.
The TORSO DEVELOPER PLUS is designed to
shape your upper abs, obliques, lower abs, and
other muscle groups to give you a firm, flat stomach and toned muscles in only minutes a day.
Used as part of a fitness program that includes
regular aerobic exercise and a proper diet, the
TORSO DEVELOPER PLUS will help you to look
better, feel better, and enjoy the benefits of better
fitness.
Handlebar
Bungee Cords
Knee Pad
Clip Bushing
Before you use the WEIDER¨ TORSO DEVELOPER PLUS, please read this manual carefully.
If you have additional questions, please call our
Customer Service Department toll-free at 1-800999-3756, Monday through Friday, 6 a.m. until
6 p.m. Mountain Time (excluding holidays). Please
note the product model number before calling; the
model number is TDPWM.
Ab Bar
Roller
Important Precautions
WARNING:
To reduce the risk of serious injury, read the following important precautions
before using the WEIDER¨ TORSO DEVELOPER PLUS.
7. If you feel faint, dizzy, or short of breath at
any time while exercising, stop immediately
and begin cooling down.
1. Read all instructions in this manual before
using the TORSO DEVELOPER PLUS.
2. It is the responsibility of the owner to ensure
that all users of the TORSO DEVELOPER
PLUS are informed of all precautions.
8. The TORSO DEVELOPER PLUS is intended
for home use only. Do not use the TORSO
DEVELOPER PLUS in a commercial, rental, or
institutional setting.
3. Keep children under the age of 12 and pets
away from the TORSO DEVELOPER PLUS at
all times.
9. Before you begin this or any exercise program, consult your physician. This is especially important for persons over the age of
35 or persons with pre-existing health problems. ICON assumes no responsibility for
personal injury or property damage sustained
by or through the use of this product.
4. Use the TORSO DEVELOPER PLUS only as
described in this manual.
5. Never release the handlebar while the bungee
cords are stretched.
6. Never twist the Handlebars or the Bungee
Cords.
3
Assembling the TORSO DEVELOPER PLUS
Place all parts of the TORSO DEVELOPER PLUS in a cleared area and remove the packing materials. Do not
dispose of the packing materials until assembly is completed.
Assembly requires the included hat cap tool
wrench
and hammer
and allen wrench
and your own adjustable
.
1. Using a hammer, lightly tap a Hat Cap (8) onto
one end of the Roller Axle (7).
1
6
Insert a Roller Bushing (6) into each Roller (5).
Place the Rollers on both sides of the Ab Bar
(4). Slide the Roller Axle (7) through the Roller
Bushings and the Ab Bar. Using the included
hat cap tool, secure another Hat Cap (8) to the
Roller Axle.
5
4
8
5
6
7
8
2. Slide the Bungee Assembly (9) into the Bungee
Tube (1) as shown. Be sure to insert the
Bungee Assembly into the end of the
Bungee Tube with the small holes. The tabs
on the Bungee Assembly should snap into
the small holes. Slide the Outer Bushing (12)
onto the other end of the Bungee Tube.
2
Small
Holes
1
12
Large
Holes
3. The help of another person is recommended for
this step.
3
Bungee
Cords
Place the Split Bushings (3) over the Bungee
Tube (1). Line up the notches in the Split
Bushings so they hold the bungee cords. Align
the holes in the Split Bushings with the large
holes in the Bungee Tube.
3
10
4
1
Slide the Ab Bar (4) over the Split Bushings (3).
Align the holes in the Ab Bar with the holes in
the Split Bushings and the Bungee Tube (1).
Thread the Bolt (10) through the holes and
tighten the Nut (11) onto the Bolt.
3
11
4
9
4. Insert the Handlebar Bushing (17) into one end
of the Handlebar (14). Make sure that the tabs
on the Handlebar Bushing snap into the
holes in the Handlebar. Insert the Clip
Bushing (13) into the other end of the
Handlebar, making sure that the tabs snap
into the holes.
4
15
17
14
13
15
Slide a Handgrip (15) onto each side of the
Handlebar (14).
5. Slide the Outer Tube (2) over the Bungee Tube
(1) so that the end of the Outer Tube with the
large holes points toward the Ab Bar (4). Slide
the Outer Tube over the Outer Bushing (12),
making sure that the tabs on the Outer
Bushing snap into the holes in the Outer
Tube.
5
14
Small
Holes
1
4
13
2
12
Slide the Handlebar (14) over the Outer Tube
(2) so that the Clip Bushing (13) points toward
the Ab Bar (4).
Large
Holes
Tabs
6. Align the holes in the Outer Tube (2) with the
holes in the Pulley Bushing (18). Attach the
Pulley Bushing to the Outer Tube using two
Screws (19).
6
19
18
2
Wrap the bungee cords around the Pulleys (2)
and attach the bungee cords to the Clip
Bushing (13). Make sure that the bungee
cords are wrapped correctly around the
Pulleys so that they fit snugly into the
grooves. Note: To reduce the resistance of the
TORSO DEVELOPER PLUS, attach only one
bungee cord to the Clip Bushing.
20
19
Bungee
Cords
13
7. For certain exercises, it is recommended that
you use the included Knee Pads (13) with your
TORSO DEVELOPER PLUS. To use the Knee
Pads, simply slide them onto the Handgrips
(15) as shown.
7
15
13
15
13
5
How to use your TORSO DEVELOPER PLUS
The TORSO DEVELOPER PLUS provides exercises for many of the bodyÕs major muscle groups. The following
instructions will lead you through seven recommended exercises to work out your arms, legs, back, and torso.
Make sure to properly stretch before beginning (see page 9).
1
Leg Press
While sitting on a chair, hold the handgrips and
place your feet on the upper portion of the ab
bar. Make sure that the rollers are on the floor.
Extend your legs, pushing the rollers away from
you. Return to the beginning position. Repeat
as many times as desired.
2
Abdominal
This exercise requires the use of the knee pads
(see assembly step 8). Place your TORSO
DEVELOPER PLUS on the floor with the
rollers downward. Kneel on the knee pads and
grasp the top, sides, or bottom of the ab bar.
Extend your body outward, tensing your abdominal muscles. Return to the beginning position.
Repeat as many times as desired.
3
Curl
Stand with the TORSO DEVELOPER PLUS in
front of you. Place your feet on the lower portion of the ab bar. Grasp the handgrips from
beneath. Pull up on the handgrips until your
hands are at chest level. Return to the beginning position. Repeat as many times as desired.
6
4
Shoulder Press
Sit on the floor with your knees over the ab bar.
Grasp the handgrips and push them upward.
Return to the beginning position. Repeat as
many times as desired.
5
Upright Row
Stand with the TORSO DEVELOPER PLUS in
front of you. Place your feet on the lower portion of the ab bar. Grasp the handgrips from
above and pull them upward until they are at
shoulder level. Return to the beginning position.
Repeat as many times as desired.
6
Triceps Press
Kneel with the TORSO DEVELOPER PLUS in
front of you. Grasp the handgrips from above
and extend your arms downward. Return to the
beginning position. Repeat as many times as
desired.
7
Donkey Kick
Sitting on a chair, hold the TORSO DEVELOPER PLUS with one hand and put your knees
over the handgrips. Pull your legs downward.
Return to the beginning position. Repeat as
many times as desired.
7
Exercise Guidelines
HOW TO ADJUST THE RESISTANCE
The TORSO DEVELOPER PLUS offers a variety of
exercises that tone your abdominals, back, arms,
chest, and shoulders. The photographs in this manual
show the proper form for each exercise.
The TORSO DEVELOPER PLUS offers two different
resistance levels to allow you to tailor the intensity of
your exercise. The resistance level is adjusted by connecting or disconnecting the resistance bands.
To tailor the intensity of each exercise to the level
thatÕs right for you, simply change the resistance of the
TORSO DEVELOPER PLUS or change the number of
repetitions that you perform. Start with the lowest
resistance level. When you can easily complete several repetitions of all exercises, move up to the next
resistance level. Be careful to avoid overdoing it during
the first few weeks of your exercise program. It is better to increase the number of repetitions you do than to
increase the resistance of the TORSO DEVELOPER
PLUS too quickly.
To connect one
of the bungee
cords, first hold
the handlebar
at the top of the
outer tube as
shown at the
right. Next, firmly hold the knob
on the end of a
bungee cord,
pull the knob down, and fit the knob into the appropriate
groove in clip bushing. To disconnect a bungee cord,
firmly hold the knob, pull the knob out of the groove in
the clip bushing, and rest the knob in the upper end of
the bungee tube. IMPORTANT: Always keep at least
one bungee cord attached to the slider.
Always begin and end each workout with a few minutes of stretching. Some recommended stretches and
their proper technique are shown on page 9.
Remember to keep plenty of water nearby as you
exercise, and drink periodically to avoid dehydration.
CAUTION: If you feel faint, dizzy, or short of breath
at any time while exercising, stop immediately and
begin cooling down.
If you are just beginning an exercise program, connect
only one bungee cord to the clip bushing. This will give
you the lowest resistance level. When you are ready
for a more advanced resistance level, connect both
bungee cords.
8
Suggested Stretches
Begin and end each workout with a few minutes of stretching. Stretching prepares the body for exercise by
increasing the body temperature, heart rate, and circulation. After exercise, stretching allows the heart rate to
return to normal and the muscles to cool down gradually. Stretching is also effective for increasing flexibility. The
correct form for three basic stretches is shown below. Move slowly as you stretchÑnever bounce.
1. Hamstring Stretch
Extend one leg and rest the opposite foot against it as shown. Reach
toward your toes and hold for 15 counts. Repeat 3 times for each leg.
2. Toe Touch Stretch
Stand with your knees bent slightly as shown. Relax your back and
shoulders as you reach down toward your toes. Hold for 15 counts.
Repeat 3 times.
3. Quadriceps Stretch
Place one hand against a wall and grasp one foot with your other hand
as shown. Hold your foot as close to your buttocks as possible, and
hold for 15 counts. Repeat 3 times for each leg.
9
Part ListÑModel No. TDPWM
Key No.
Qty.
1
2
3
4
5
6
7
8
9
10
11
12
1
1
2
1
2
2
1
2
1
1
1
1
Description
R0500A
Key No.
Qty.
13
14
15
16
17
18
19
20
21
#
#
#
1
1
2
2
1
1
2
2
1
1
1
1
Bungee Tube
Outer Tube
Split Bushing
Ab Bar
Roller
Roller Bushing
Roller Axle
Hat Cap
Bungee Assembly
Bolt
Nut
Outer Bushing
Description
Clip Bushing
Handlebar
Handgrip
Knee Pad
Handlebar Bushing
Pulley Bushing
Screw
Pulley
Pulley Pin
UserÕs Manual
Hat Cap Tool
Allen Wrench
Note: Ò#Ó indicates a non-illustrated part. Specifications are subject to change without notice.
10
Exploded DrawingÑModel No. TDPWM
R0500A
20
21
19
17
16
18
15
20
19
16
14
13
15
2
1
12
8
6
5
9
3
4
10
3
5
11
6
7
8
11
Ordering Replacement Parts
To order replacement parts, simply call our Customer Service Department toll-free at 1-800-999-3756,
Monday through Friday, 6 a.m. until 6 p.m. Mountain Time (excluding holidays).
To help us assist you, please be prepared to give the following information:
¥ The MODEL NUMBER of the product (TDPWM)
¥ The NAME of the product (WEIDER¨ TORSO DEVELOPER PLUS)
¥ The KEY NUMBER and DESCRIPTION of the part(s) (see the Part List and Exploded Drawing on pages 10
and 11).
Please have the TORSO DEVELOPER PLUS near your telephone for reference when calling.
Limited Warranty
ICON Health & Fitness, Inc. (ICON), warrants this product to be free from defects in workmanship and material, under normal use and service conditions, for a period of ninety (90) days from the date of purchase. This
warranty extends only to the original purchaser. ICON's obligation under this warranty is limited to replacing
or repairing, at ICON's option, the product at one of its authorized service centers. All products for which warranty claim is made must be received by ICON at one of its authorized service centers with all freight and
other transportation charges prepaid, accompanied by sufficient proof of purchase. All returns must be preauthorized by ICON. This warranty does not extend to any product or damage to a product caused by or
attributable to freight damage, abuse, misuse, improper or abnormal usage or repairs not provided by an
ICON authorized service center, to products used for commercial or rental purposes, or to products used as
store display models. No other warranty beyond that specifically set forth above is authorized by ICON.
ICON is not responsible or liable for indirect, special or consequential damages arising out of or in connection with the use or performance of the product or damages with respect to any economic loss, loss of property, loss of revenues or profits, loss of enjoyment or use, costs of removal, installation or other consequential damages of whatsoever nature. Some states do not allow the exclusion or limitation of incidental or
consequential damages. Accordingly, the above limitation may not apply to you.
The warranty extended hereunder is in lieu of any and all other warranties and any implied warranties of
merchantability or fitness for a particular purpose is limited in its scope and duration to the terms set forth
herein. Some states do not allow limitations on how long an implied warranty lasts. Accordingly, the above
limitation may not apply to you.
This warranty gives you specific legal rights. You may also have other rights which vary from state to state.
ICON HEALTH & FITNESS, INC., 1500 S. 1000 W., LOGAN, UT 84321-9813
Part No. 166102 R0500A
Printed in USA © 2000 ICON Health & Fitness, Inc.