1
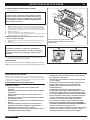
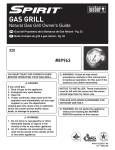
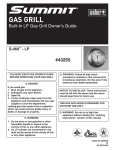
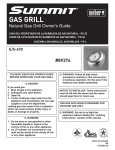
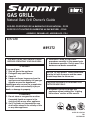
GAS GRILL
Natural Gas Grill Owner’s Guide
GUÍA DEL PROPIETARIO DE LA BARBACOA DE GAS NATURAL - PG 35
GUIDE DE L’UTILISATEUR DU BARBECUE AU GAZ NATUREL - PG 60
ASSEMBLY, ENSAMBLAJE, ASSEMBLAGE - PG 4
E/S-470
#89372
YOU MUST READ THIS OWNER’S GUIDE
BEFORE OPERATING YOUR GAS GRILL
DANGER
If you smell gas:
1. Shut off gas to the appliance.
2. Extinguish any open flames.
3. Open lid.
4. If odor continues, keep away from the
appliance and immediately call your gas
supplier or your fire department.
Leaking gas may cause a fire or explosion
which can cause serious bodily injury or
death, or damage to property.
WARNING:
WARNING: Follow all leak-check
procedures carefully in this manual prior
to barbecue operation. Do this even if the
barbecue was dealer-assembled.
NOTICE TO INSTALLER: These instructions
must be left with the owner and the owner
should keep them for future use.
THIS GAS APPLIANCE IS DESIGNED FOR
OUTDOOR USE ONLY.
WARNING: Do not try to light this
appliance without reading the “Lighting
Instructions” section of this manual.
1. Do not store or use gasoline or other
flammable liquids or vapors in the
vicinity of this or any other appliance.
2. An LP cylinder not connected for use
shall not be stored in the vicinity of this
or any other appliance.
89372 US 03/03/08
NG
US ENGLISH
WARNINGS
2
DANGERS AND WARNINGS
DANGER
Failure to follow the Dangers, Warnings and Cautions contained in this Owner’s Manual may result in serious bodily injury or
death, or in a fire or an explosion causing damage to property.
WARNINGS
Do not store a spare or disconnected liquid propane cylinder under or near this barbecue.
Improper assembly may be dangerous. Please follow the assembly instructions carefully.
After a period of storage, and/or nonuse, the Weber® gas barbecue should be checked for gas leaks and burner obstructions
before use. See instructions in this manual for correct procedures.
Do not operate the Weber® gas barbecue if there is a gas leak present.
Do not use a flame to check for gas leaks.
Combustible materials should never be within 24 inches (61 cm) of the back or sides of your Weber® gas barbecue.
Do not put a barbecue cover or anything flammable on, or in the storage area under the barbecue.
Your Weber® gas barbecue should never be used by children. Accessible parts of the barbecue may be very hot. Keep young
children away while it is in use.
You should exercise reasonable care when operating your Weber® gas barbecue. It will be hot during cooking or cleaning and
should never be left unattended, or moved while in operation.
Should the burners go out while in operation, turn all gas valves off. Open the lid and wait five minutes before attempting to
relight, using the lighting instructions.
Do not use charcoal or lava rock in your Weber® gas barbecue.
Never lean over open grill or place hands or fingers on the front edge of the cooking box.
Should a grease fire occur, turn off all burners and leave lid closed until fire is out.
Do not enlarge valve orifices or burner ports when cleaning the valves or burners.
The Weber® gas barbecue should be thoroughly cleaned on a regular basis.
Liquid propane gas is not natural gas. The conversion or attempted use of natural gas in a liquid propane unit or liquid propane
gas in a natural gas unit is dangerous and will void your warranty.
Do not attempt to disconnect any gas fitting while your barbecue is in operation.
Use heat-resistant barbecue mitts or gloves when operating barbecue.
Keep any electrical supply cord and the fuel supply hose away from any heated surfaces.
Combustion byproducts produced when using this product contain chemicals known to the state of California to cause cancer,
birth defects, or other reproductive harm.
Do not use this barbecue unless all parts are in place. The unit must be properly assembled according to the assembly
instructions.
Do not build this model of grill in any built-in or slide in construction. Ignoring this Warning could cause a fire or an explosion
that can damage property and cause serious bodily injury or death.
Proposition 65 Warning: Handling the brass material on this product exposes you to lead, a chemical known to the state of
California to cause cancer, birth defects or other reproductive harm.
(Wash hands after handling this product.)
LIQUID PROPANE GAS UNITS ONLY:
Use the pressure regulator and hose assembly that is supplied with your Weber® gas barbecue.
Do not attempt to disconnect the gas regulator and hose assembly or any gas fitting while your barbecue is in operation.
A dented or rusty liquid propane cylinder may be hazardous and should be checked by your liquid propane supplier. Do not
use a liquid propane cylinder with a damaged valve.
Although your liquid propane cylinder may appear to be empty, gas may still be present, and the cylinder should be
transported and stored accordingly.
If you see, smell or hear the hiss of escaping gas from the liquid propane cylinder:
1.
2.
3.
Move away from liquid propane cylinder.
Do not attempt to correct the problem yourself.
Call your fire department.
WWW.WEBER.COM®
WARRANTY, GARANTÍA, GARANTIE
3
3
WARRANTY
Weber-Stephen Products Co. (Weber) hereby warrants to the ORIGINAL PURCHASER of this Weber®
gas grill that it will be free of defects in material and workmanship from the date of purchase as follows:
Aluminum castings
Stainless steel Shroud,
Porcelain-enameled shroud,
Cookbox Assembly
Stainless steel burners tubes,
Stainless steel cooking grates,
Stainless steel Flavorizer bars,
Porcelain-enameled cast-iron
cooking grates,
Porcelain-enameled
cooking grates,
Porcelain-enameled
Flavorizer bars,
Infrared Rotisserie Burner,
All remaining parts,
25-years (2 years on paint; excludes fading)
25-years;
25-years
10-years (2 year on paint excludes fading)
10-years
5-years no rust through or burn through
5-years no rust through or burn through
5-year no rust through or burn through
3-years no rust through or burn through
2-years no rust through or burn through
2-years
2-years
When assembled and operated in accordance with the printed instructions accompanying it.
Weber may require reasonable proof of your date of purchase. THEREFORE, YOU SHOULD RETAIN
YOUR SALES SLIP OR INVOICE.
This Limited Warranty shall be limited to the repair or replacement of parts that prove defective under
normal use and service and which on examination shall indicate, to Weber’s satisfaction, they are
defective. Before returning any parts, contact the Customer Service Representative in your area
using the contact information on our website. If Weber confirms the defect and approves the claim,
Weber will elect to replace such parts without charge. If you are required to return defective parts,
transportation charges must be prepaid. Weber will return parts to the purchaser, freight or postage
prepaid.
This Limited Warranty does not cover any failures or operating difficulties due to accident, abuse,
misuse, alteration, misapplication, vandalism, improper installation or improper maintenance or
Weber-Stephen Products Co., (Weber) mediante la presente le garantiza al COMPRADOR ORIGINAL
de esta barbacoa de gas Weber® que la misma estará libre de defectos en cuanto a materiales y
fabricación a partir de la fecha de compra según lo siguiente:
Piezas coladas de aluminio
Cubierta de acero inoxidable,
Cubierta porcelanizada,
Cámara para asar
Tubos de acero inoxidable
de los quemadores,
Parrilas de cocción de
acero inoxidable,
Barras Flavorizer de
acero inoxidable,
Parrillas de cocción de hierro
colado porcelanizado,
Parrillas de cocción porcenlanizadas,
Barras Flavorizer porcelanizadas,
Qumeador infrarrojo del
asador giratorio,
Todas la demás partes,
25-años (2 años para la pintura excluyendo la decoloración)
25-años
25-años
10-años (2 años para la pintura excluyendo la decoloración)
10-años
5-años sin pertoración por fuego u oxidación
5-años sin pertoración por fuego u oxidación
5-años sin pertoración por fuego u oxidación
3-años sin pertoración por fuego u oxidación
2-años sin pertoración por fuego u oxidación
2-años
2-años
service, or failure to perform normal and routine maintenance, including but not limited to damage
caused by insects within the burner tubes, as set out in this owner’s manual.
Deterioration or damage due to severe weather conditions such as hail, hurricanes, earthquakes
or tornadoes, discoloration due to exposure to chemicals either directly or in the atmosphere, is not
covered by this Limited Warranty.
There are no other express warrants except as set forth herein and any applicable implied warranties
of merchantability and fitness are limited in duration to the period of coverage of this express written
Limited Warranty. Some regions do not allow limitation on how long an implied warranty lasts, so this
limitation may not apply to you.
Weber is not liable for any special, indirect or consequential damages. Some regions do not allow the
exclusion or limitation of incidental or consequential damages, so this limitation or exclusion may not
apply to you.
Weber does not authorize any person or company to assume for it any other obligation or liability in
connection with the sale, installation, use, removal, return, or replacement of its equipment; and no
such representations are binding on Weber.
This Warranty applies only to products sold at retail.
WEBER-STEPHEN PRODUCTS CO.
Customer Service Center
1890 Roselle Road, Suite 308
Schaumburg, IL 60195
USA
For replacement parts call:
1-800-446-1071
www.weber.com®
entre los que se incluyen, pero sin limitación, los daños causados por insectos dentro de los tubos
quemadores, según se detalla en este manual del propietario.
Esta Garantía Limitada no cubre el deterioro o daños a causa de condiciones de tiempo inclemente
tales como granizo, huracanes, terremotos o tornados ni tampoco la decoloración por exposición a
sustancias químicas bien sea por contacto directo o por que las mismas contenidas en la atmósfera.
No existe ninguna otra garantía expresa que no sean las las acá indicadas y cualesquier garantías
implícitas de comerciabilidad y aptitud de uso están limitadas en duración al tiempo de cobertura de
esta expresa Garantía Limitada por escrito. Algunas regiones no permiten limitación alguna en el
tiempo que una garantía implícita pueda durar, por lo que esta limitación pudiera no aplicarle a usted.
Weber no se hace responsable de cualesquier daños especiales, indirectos o emergentes. Algunas
regiones no permiten la exclusión o limitación de daños incidentales o emergentes, por lo que esta
limitación o exclusión pudieran no aplicarle a usted.
Weber no autoriza a persona o empresa alguna a asumir en su nombre ninguna obligación o
responsabilidad en relación con la venta, instalación, uso, retiro, devolución o reemplazo de sus
equipos, y ninguna tal representación será vinculante para Weber.
Esta Garantía aplica solo a aquellos productos vendidos al por menor.
Para compras hechas en México
WEBER-STEPHEN PRODUCTS S.A. de C.V.
Marcella No. 338,
Colonia Americana
44160 México, C.P.
México
cuando se ensambla y opera de acuerdo a las instrucciones impresas que la acompañan.
Weber pudiese requerir prueba razonable de la fecha de compra. POR LO TANTO, DEBERÁ
GUARDAR SU RECIBO O FACTURA DE VENTA.
Esta garantía limitada está limitada a la reparación o reemplazo de piezas que resultasen defectuosas
bajo uso y servicio normal y las cuales al examinarse indiquen, a plena satisfacción de Weber, que
efectivamente son piezas defectuosas. Antes de devolver cualquier parte, contacte al Representante
de Atención al Cliente en su área, cuya información de contacto la encontrará en nuestro sitio web. Si
Weber confirma el defecto y aprueba el reclamo, ésta elegirá reparar o reemplazar tal pieza sin cargo
alguno. Si usted tiene que retornarnos las partes defectuosas, los gastos de transporte deben ser
prepagados. Weber retornará las partes al comprador con transporte o franqueo prepagado.
Esta Garantía Limitada no cubre ninguna falla o problema de operación a causa de accidentes,
abuso, mal uso, alteración, uso en aplicaciones indebidas, vandalismo, instalación inapropiada o
mantenimiento o servicio inapropiados, o por no llevar a cabo el mantenimiento normal y rutinario,
WEBER-STEPHEN PRODUCTS CO.
Customer Service Center
1890 Roselle Road, Suite 308
Schaumburg, IL 60195
USA
Weber-Stephen Products Co. (Weber) garantit par le présent document à l’ACHETEUR D’ORIGINE de
ce grill à gaz Weber® que celui-ci ne comportera aucun défaut de pièce ni de main d’oeuvre à compter
de la date d’achat comme suit :
Toute détérioration ou tout dommage résultant de conditions météorologiques graves comme de la
grêle, des ouragans, des séismes ou des tornades, toute décoloration résultant d’une exposition à des
agents chimiques directement ou dans l’atmosphère, n’est pas couverte dans le cadre de la présente
Garantie limitée.
Fonte d’aluminium
Structure en acier inoxydable,
Structure émaillée,
Cuve,
Tubes du brûleur en acier inoxydable,
Grilles de cuisson en acier inoxydable,
Barres Flavorizer en acier inoxydable,
Grilles de cuisson en fonte fer émaillée,
Grilles de cuisson émaillées,
Barres Flavorizer émaillées,
Brûleur de la rôtissoire à infrarouge,
Toutes les autres pièces,
25 ans (2 ans pour lapeinture à l’exception de toute décoloration)
25 ans
25 ans
10 ans (2 ans pour la peinture à l’exception de toute décoloration)
10 ans
5 ans sans trou provoqué par la rouille ou par une brûlure
5 ans sans trou provoqué par la rouille ou par une brûlure
5 ans sans trou provoqué par la rouille ou par une brûlure
3 ans sans trou provoqué par la rouille ou par une brûlure
2 ans sans trou provoqué par la rouille ou par une brûlure
2 ans
2 ans
à condition qu’il ait été assemblé et utilisé conformément aux instructions imprimées qui
l’accompagnent.
Weber peut exiger une preuve raisonnable de votre date d’achat. VOUS DEVRIEZ DONC
CONSERVER VOTRE TICKET DE CAISSE OU VOTRE FACTURE.
La présente Garantie limitée est limitée à la réparation ou au remplacement des pièces qui s’avèrent
défectueuses dans le cadre d’une utilisation normale et d’un entretien normal et dont l’examen indique,
à la satisfaction de Weber, qu’elles sont défectueuses. Avant de retourner toute pièce, veuillez
entrer en contact avec le Représentant du Service clientèle le plus proche grâce aux coordonnées
à votre disposition sur notre site Internet. Si Weber confirme le défaut et approuve la demande,
Weber choisira de remplacer ces pièces sans frais. S’il vous est demandé de retourner les pièces
défectueuses, les frais de transport devront être prépayés. Weber retournera les pièces à l’acheteur,
franco de port.
La présente Garantie limitée ne couvre pas toute défaillance ou difficulté d’utilisation provoquée par un
accident, une utilisation abusive, une mauvaise utilisation, une altération, une mauvaise application, un
acte de vandalisme, une installation incorrecte ou une maintenance ou un entretien incorrects, ou le
défaut d’entretien normal et régulier, y compris mais pas seulement les dommages provoqués par des
insectes à l’intérieur des tubes du brûleur, tel que décrit dans le présent mode d’emploi.
WWW.WEBER.COM®
Para partes de repuesto llame a:
1-800-446-1071
www.weber.com®
Para partes de repuesto llame a:
(52) (33) 3615-0736
www.weber.com®
Il n’existe aucune autre garantie expresse hormis celles exposées dans le présent document et toute
garantie de commercialisation et de bon état induite est limitée en durée à la période de couverture de
la présente Garantie limitée écrite expresse. Certaines régions n’autorisent pas de limitation de durée
de la garantie induite ; il est donc posible que cette limitation ne s’applique pas à vous.
Weber ne peut être tenu pour responsable de tout dommage particulier, induit ou se produisant par
voie de conséquence. Certaines régions n’autorisent pas l’exclusion ou la limitation des dommages
indirects ou se produisant par voie de conséquence ; il est donc possible que cette limitation ou
exclusion ne s’applique pas à vous.
Weber n’autorise aucune personne ou société à présumer en son nom de toute autre obligation
ou responsabilité en relation avec la vente, l’installation, l’utilisation, le retrait, le retour ou le
remplacement de ses équipements ; et aucune de ces représentations ne lie Weber.
La présente Garantie s’applique uniquement aux produits vendus au détail.
WEBER-STEPHEN PRODUCTS CO.
Product Registration
P.O. Box 40530
Burlington, ON L7P 4W1
Pour des pièces de rechange, appelez le :
1-800-265-2150
www.weber.com®
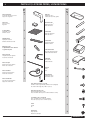
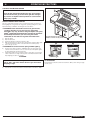
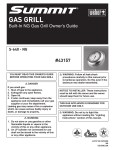
PARTS LIST, LISTE DES PIÈCES, LISTA DE PIEZAS
Catch Pan Holder
Sostenedor del plato recolector
Support de l’égouttoir
Catch Pan
Plato recolector
Egouttoir
Cooking Grate
Parrilla de cocción
Grille de cuisson
Warming Rack
Rejilla para calentar
Grille de maintien au chaud
1
1
Drip Tray
Bandeja de goteo
Plateau de recueil des gouttes
1
Flavorizer® Bar
Barras Flavorizer®
Barre Flavorizer®
8
Smoker Bar
Barra del ahumador
Barre du fumoir
1
Smoker Box
Caja del ahumador
Boîtier du fumoir
1
Side Burner Table
Mesa del quemador lateral
Tablette du brûleur latéral
1
Side Table
Mesa lateral
Tablette latérale
1
Wrench
Llave
Clé
1
3
1
Battery Housing
Compartimiento de las baterías
Logement des piles
1
Rotisserie Fork
Horquilla del asador giratorio
Fourche de la rôtissoire
4
Rotisserie Spit
Espetón del asador giratorio
Brôche de la rôtissoire
470
470
4
1
Rotisserie Motor
Motor del asador giratorio
Moteur de la rôtissoire
1
Rotisserie Bracket
Soporte del asador giratorio
Support de la rôtissoire
1
Nylon Washer
Arandela de nilón
Rondelle de nylon
4
Truss Head Screw (¼-20 x 1 inch)
Tornillo de cabeza segmentada (Tornillo ¼-20 x 1 pulgadas)
Vis à tête bombée large de (¼-20 x 1 pouces)
4
Keps Nut (¼-20 keps nut)
Tuerca keps(Tuerca keps ¼-20)
Ecrou à rondelle dentée (écrou à rondelle dentée de ¼-20)
2
1 inch Bolt (¼-20 x 1 inch Bolt)
Perno 1 pulgada (Perno ¼-20 x 1 pulgadas)
Ecrou de 1 pouce (écrou de ¼-20 x 1 pouce)
Screw
Tornillo
Vis
Plastic Plug
Tapón plástico
Bouchon en plastique
2
3
3
WWW.WEBER.COM®
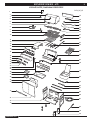
EXPLODED VIEW E/S - 470
5
5
VISION ÉCLATÉE, DIAGRAMA DE DESPIECE
$
%
&
S470_NG_US
&'
'
&(
(
&)
)
&*
*
&+
+
,
&,
$#
'$
'#
'%
$$
$%
$&
$'
'&
''
$(
$)
'(
$*
')
$+
$,
%#
%$
%%
%&
%'
%(
'*
'+
',
%)
%*
%+
%,
(#
($
(%
(&
&#
('
((
&$
()
&%
&&
(*
(+
(,
WWW.WEBER.COM®
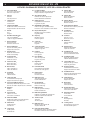
EXPLODED VIEW LIST E/S - 470
6
LISTA DEL DIAGRAMA DE DESPIECE, LISTE DE LA VISION ÉCLATÉE
1.
Shroud Hardware
Accesorios de la cubierta
Structure de protection
21. Large Knob Bezel
Moldura decorativa de la perilla grande
Plaque indicatrice du grand bouton
41. Smoker Box
Caja del ahumador
Boîtier du fumoir
2.
Shroud
Cubierta
Tôle de protection
22. Sear StationTM Knob
Perilla de la estación para dorar
Bouton du brûleur Sear Station
42. Smoker Bar
Barra del ahumador
Barre du fumoir
3.
Thermometer
Termómetro
Thermomètre
23. Battery Housing
Compartimiento de la batería
Logement des piles
43. Smoker Burner
Quemador del ahumador
Brûleur du fumoir
4.
Thermometer Bezel
Moldura decorativa del termómetro
Plaque indicatrice du thermomètre
24. Water Baffle / Heat Shield
Reflector de agua / Pantalla térmica
Protection contre l’eau/Cloison anti-chaleur
44. Sizzle and SearTM Burner
Quemador de la estación para dorar
Brûleur Sear Station
5.
Handle
Asa
Poignée
25. Disposable Drip Pan
Bandeja de goteo desechable
Egouttoir jetable
45. Side Burner
Quemador lateral
Brûleur latéral
6.
Qrill OutTM Handle Light
Luz de asa Qrill OutTM
Lampe de poignée Qrill OutTM
26. Drip Tray
Bandeja de goteo
Plateau-égouttoir
46. Cookbox
Caja de cocción
Boîtier de cuisson
7.
Rotisserie Motor
Motor del asador
Moteur de la rôtissoire
27.
47.
8.
Rotisserie Bracket
Soporte del asador giratorio
Support de la rôtissoire
28. Catch Pan Holder
Soporte del plato recolector
Support d’égouttoir
48. Manifold Hose
Manguera del múltiple
Tuyau du collecteur
9.
Warming Rack
Rejilla de calentamiento
Grille de réchauffage
29. Left Door
Puerta izquierda
Porte gauche
49. Side Burner Lid
Tapa del quemador lateral
Couvercle du brûleur latéral
30. Door Handles
Asas de las puertas
Poignées de portes
50. Side Burner Table
Mesa del quemador lateral
Tablette du brûleur latéral
31. Right Door
Puerta derecha
Porte droite
51.
12. Burner Tubes
Tubos quemadores
Tubes des brûleurs
32. Left Frame Panel
Panel izquierdo del bastidor
Panneau du cadre gauche
52. Right Tool Holder
Portaherramientas derecho
Support d’ustensiles de droite
13. Side Table
Mesa lateral
Tablette latérale
33. Bottom Panel
Panel inferior
Panneau inférieur
53. Side Burner Hose
Manguera del quemador lateral
Tuyau du brûleur latéral
14. Left Tool Holder
Portaherramientas izquierdo
Support d’ustensiles de gauche
34. IR Burner Cover
Tapa del quemador IR
Cache du brûleur IR
54. Frame Support
Soporte del bastidor
Support du cadre
10. Cooking Grates
Parrillas de cocción
Grilles de cuisson
11.
Flavorizor® Bars
Barras Flavorizor®
Barres Flavorizer®
Catch Pan
Plato recolector
Egouttoir
Bulkhead
Tabique divisorio
Cloison
Natural Gas Hose
Manguera del gas natural
Tuyau de gaz naturel
15. Control Panel Wiring Harness
35. Infrared Burner
Quemador infrarrojo
Cableado prefabricado del panel de control
Brûleur à infrarouge
Harnais des câbles du panneau de commande
55. Back Panel
Panel trasero
Panneau arrière
16. Manifold
Múltiple
Collecteur
36. IR Burner Box
Caja del quemador infrarrojo
Boîtier du brûleur IR
56. Right Frame Panel
Panel derecho del bastidor
Panneau du cadre droit
17.
37.
57.
Control Panel
Tablero de control
Panneau de commande
IR Burner Igniter Wire
Cable de encendido del quemador IR
Câble de l’allumeur du brûleur IR
Matchstick Holder
Portacerillos
Porte-allumette
18. Small Knob Bezel
Moldura decorativa de la perilla pequeña
Plaque indicatrice du petit bouton
38. Thermocouple
Termopar
Thermocouple
58. Caster
Rueda giratoria
Roulette
19. Small Knob
Perilla pequeña
Petit bouton
39. IR Burner Hose
Manguera del quemador IR
Tuyau du brûleur IR
59. Locking Caster
Rueda giratoria con bloqueo
Roulette autobloquante
20. Large Knob
Perilla grande
Grand bouton
40. Rotisserie Spit Assembly
Ensamble del espetón del asador giratorio
Ensemble de la broche de la rôtissoire
WWW.WEBER.COM®
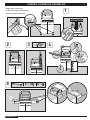
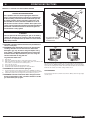
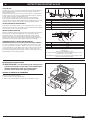
ASSEMBLY, ASSEMBLAGE, ENSAMBLAJE
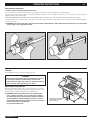
• Adjust doors, if necessary
1
• Si fuese necesario, ajuste la puerta
• Ajustez la porte si nécessaire
2
5
WWW.WEBER.COM®
3
4-
4
4-
7
7
8
6
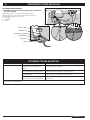
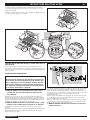
ASSEMBLY, ASSEMBLAGE, ENSAMBLAJE
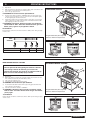
3-
D
Requires 3 “D” alkaline batteries (Included). Use alkaline
batteries only. Do not mix old and new batteries or different types
of batteries (standard, alkaline or rechargeable).
Requiere 3 baterías alcalinas “D” (incluidas).Use solamente
baterías alcalinas. No mezcle baterías nuevas con viejas o
diferentes tipos de baterías entre sí (normales, alcalinas o
recargables).
Fonctionne avec 3 piles alcalines “D” (Fournies). Utilisez des
piles alcalines uniquement. Ne mélangez pas des piles usagées
et des piles neuves ou différents types de piles (ordinaires,
alcalines ou rechargeables).
WWW.WEBER.COM®
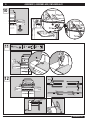
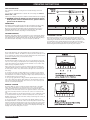
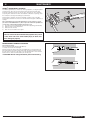
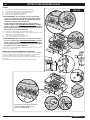
ASSEMBLY, ASSEMBLAGE, ENSAMBLAJE
7
3-
8
9
WWW.WEBER.COM®
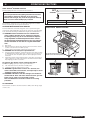
3-
9
9
10
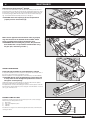
ASSEMBLY, ASSEMBLAGE, ENSAMBLAJE
10
11
2-
2-
12
WWW.WEBER.COM®
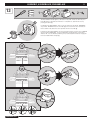
ASSEMBLY, ASSEMBLAGE, ENSAMBLAJE
13
+
AAA
+
AAA
+
AAA
1-
11
11
2-
The Weber Grill Out™ Handle Light has a “Tilt Sensor”: Lid up - ON / Lid Closed - OFF. The power
button (a) activates or deactivates the “Tilt Sensor.” For daytime use, deactivate the sensor by
pressing power button (a).
La Lámpara de Asa Weber Grill Out™ tiene un “sensor de inclinación”: tapa abierta - ENCENDIDA
/ tapa cerrada - APAGADA. El botón de encendido (a) activa o desactiva al “sensor de inclinación”.
Para uso durante el día, desactive al sensor pulsando el botón de encendido (a).
La Lampe de poignée Weber Grill Out™ est pourvu d’un “Détecteur Tilt“ : Couvercle relevé - MARCHE
/ Couvercle fermé - ARRET (OFF). Le bouton d’alimentation électrique (a) active ou désactive le
“Détecteur Tilt.” Pour une utilisation pendant la journée, veuillez désactiver le détecteur en appuyant
sur le bouton d’alimentation électrique (a).
WWW.WEBER.COM®
12
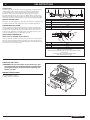
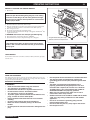
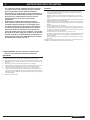
GENERAL INSTRUCTIONS
Your Weber® gas barbecue is a portable outdoor cooking appliance. With the Weber®
gas barbecue you can grill, barbecue, roast and bake with results that are difficult to
duplicate with indoor kitchen appliances. The closed lid and Flavorizer® bars produce
that “outdoor” flavor in the food.
The Weber® gas barbecue is portable so you can easily change its location in your yard
or on your patio. Portability means you can take your Weber® gas barbecue with you if
you move.
The natural gas supply is easy to use and gives you more cooking control than charcoal
fuel.
•
These instructions will give you the minimum requirements for assembling your
Weber® gas barbecue. Please read the instructions carefully before using your
Weber® gas barbecue. Improper assembly can be dangerous.
•
Not for use by children.
•
If there are local codes that apply to portable gas grills, you will have to conform to
them. Installation must conform with local codes or, in the absence of local codes,
with either the National Fuel Gas Code, ANSI Z223.1/NFPA 54, Natural Gas and
Propane Installation Code, CSA B149.1, or Propane Storage and Handling Code,
B149.2, or the Standard for Recreational Vehicles, ANSI A 119.2/NFPA 1192, and
CSA Z240 RV Series, Recreational Vehicle Code, as applicable.
•
This Weber® gas barbecue is designed for natural (piped in city) gas only. Do not
use liquid propane (LP) bottled gas. The valves, orifices and hose are for natural
gas only.
•
Do not use with charcoal fuel.
•
Check that the area under the control panel and the bottom tray are free from
debris that might obstruct the flow of combustion or ventilation air.
WARNING: Only use this barbecue outdoors in a wellventilated area. Do not use in a garage, building, breezeway
or any other enclosed area.
WARNING: Your Weber® gas barbecue shall not be used
under overhead combustible construction.
WARNING: Your Weber® gas barbecue is not intended to be
installed in or on recreational vehicles and/or boats.
WARNING: Do not use the barbecue within 24 inches of
combustible materials. This includes the top, bottom, back or
sides of the grill.
WARNING: The entire cooking box gets hot when in use. Do
not leave unattended.
WARNING: Keep any electrical supply cord and the fuel
supply hose away from any heated surface.
WARNING: Keep the cooking area clear of flammable vapors
and liquids, such as gasoline, alcohol, etc., and combustible
materials.
FOR INSTALLATION IN CANADA
•
These instructions, while generally acceptable, do not necessarily comply with the
Canadian Installation codes, particularly with piping above and below ground. In Canada
the installation of this appliance must comply with local codes and/or Standards CAN/
CGA-B149.1 (Installation Code for Natural Gas Burning Appliances and Equipment).
STORAGE
•
•
•
•
•
The gas must be turned off at the natural gas supply when the Weber® gas
barbecue is not in use.
When the Weber® gas barbecue is stored indoors, the gas supply must be
disconnected.
The Weber® gas barbecue should be checked for gas leaks and any obstructions
in the burner tubes before using. (See Section: “Maintenance/Annual
Maintenance”).
Check that the areas under the control panel and the slide out bottom tray are free
from debris that might obstruct the flow of combustion or ventilation air.
The Spider /Insect Screens should also be checked for any obstructions. (See
Section: "Maintenance/Annual Maintenance").
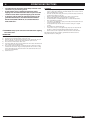
GRILLING METHODS
Note: If grill loses heat while cooking refer to the troubleshooting section of this manual.
WARNING: Do not move the Weber® gas barbecue when
operating or while barbecue is hot.
You can adjust the individual main burners as desired. The control settings are START/
HI, MEDIUM, LOW, or OFF.
Note: The temperature inside your cooking box for the first few uses, while surfaces
are still very reflective, may be hotter than those shown in your cookbook. Cooking
conditions, such as wind and weather, may require the adjustment of the burner
controls to obtain the correct cooking temperatures.
If burners go out during cooking, open lid, turn off all burners and wait five
minutes before relighting.
OPERATING
GAS SUPPLY TESTING
•
Disconnect your Weber® gas barbecue when the gas supply is being tested at high
pressures. This appliance and its individual shutoff valve must be disconnected
from the gas supply piping system during any pressure testing of that system at
test pressures in excess of 1/2 psig (3.5 kPa).
Turn off your Weber® gas barbecue when the gas supply is being tested at low
pressures. This appliance must be isolated from the gas supply piping system by
closing its individual manual shutoff valve during any pressure testing of the gas
supply piping system at the pressure equal to or less than 1/2 psig (3.5 kPa).
WARNING: Check the bottom tray for grease build-up before
each use. Remove excess grease to avoid a grease fire in the
slide out bottom tray.
CLEANING
WARNING: Turn your Weber® gas barbecue off and wait for it
to cool before cleaning.
CAUTION: Do not clean your Flavorizer® bars or cooking
grates in a self-cleaning oven.
Sear Station™ - Your Weber® gas barbecue includes a sear burner for searing thin
meats and fish. The Sear Station™ burner has an on or off control setting that works with
the two adjacent main burners. With the sear and adjacent burners you can effectively
sear meats while using other cooking areas for cooking with moderate heat.
For availability of replacement cooking grates and Flavorizer® bars contact the
Customer Service Representative in your area using the contact information on
our website. Log onto www.weber.com®
Preheating - Your Weber® gas barbecue is an energy-efficient appliance. It operates at
an economical low BTU rate. To preheat: after lighting, close lid and turn all burners to
“START/HI”. Preheating to between 500° and 550° F (260° and 290° C) will take 10 to 15
minutes depending on conditions such as air temperature and wind.
CAUTION: Do not use oven cleaner, abrasive cleansers
(kitchen cleansers), cleaners that contain citrus products, or
abrasive cleaning pads on barbecue or cart surfaces.
Outside surfaces - Use a warm soapy water solution to clean, then rinse with water.
Drippings and grease - The Flavorizer® bars are designed to “smoke” the correct
amount of drippings for flavorful cooking. Excess drippings and grease will accumulate in
the catch pan under the slide out bottom tray. Disposable foil drip pans are available that
fit the catch pan.
WWW.WEBER.COM®
GENERAL INSTRUCTIONS
13
13
Slide out Bottom tray - Remove excess grease, then wash with warm soapy water,
then rinse.
Do not use cleaners that contain acid, mineral spirits or xylene. Rinse well after
cleaning.
Flavorizer® bars and Cooking grates - Clean with a suitable brass bristle brush. As
needed, remove from grill and wash with warm soapy water, then rinse with water.
Preserve Your Stainless Steel - Your grill or its cabinet, lid, control panel and shelves
may be made from stainless steel. To keep the stainless steel looking its best is a
simple matter. Clean it with soap and water, rinse with clear water and wipe dry. For
stubborn particles, the use of a non-metallic brush can be used.
Catch pan - Disposable foil trays are available, or you can line the catch pan with
aluminum foil. To clean the catch pan, wash with warm soapy water, then rinse.
Thermometer - Wipe with warm soapy water; clean with plastic scrub ball.
Inside cooking module - Brush any debris off of burner tubes. DO NOT ENLARGE
BURNER PORTS (OPENINGS). Wash inside of cooking box with warm soapy water
and a water rinse.
Inside Lid - While lid is warm, wipe inside with paper towel to prevent grease build-up.
Flaking built-up grease resembles paint flakes.
IMPORTANT: Do not use a wire brush or abrasive cleaners
on the stainless steel surfaces of your grill as this will cause
scratches.
IMPORTANT: When cleaning surfaces be sure to rub/wipe
in the direction of the grain to preserve the look of your
stainless steel.
Stainless steel surfaces - Wash with a soft cloth and a soap and water solution. Be
careful to scrub with the grain direction of the stainless steel.
GAS INSTRUCTIONS
INSTALL GAS SUPPLY
GENERAL SPECIFICATIONS FOR PIPING
Note: Contact your local municipality for building codes regulating outdoor
gas barbecue installations. In absence of Local Codes, you must conform to
the latest edition of the National Fuel Gas Code: ANSI Z 223.1/NFPA 54, or CAN/
CGA-B149.1, Natural Gas and Propane Installation Code. WE RECOMMEND THAT THIS
INSTALLATION BE DONE BY A PROFESSIONAL.
Some of the following are general requirements taken from the latest edition of the
National Fuel Gas Code: ANSI Z 223.1/NFPA 54, or CAN/CGA-B149.1, Natural Gas and
Propane Installation Code for complete specifications.
•
This barbecue is designed to operate at 4.5 inches of water column pressure (.163
psi).
•
A manual shut-off valve must be installed outdoors, immediately ahead of the
quick disconnect.
•
An additional manual shut-off valve indoors should be installed in the branch fuel
line in an accessible location near the supply line.
•
The quick disconnect connects to a ½ inch NPT thread from the gas source. The
quick disconnect fitting is a hand-operated device that automatically shuts off the
flow of gas from the source when the barbecue is disconnected.
•
The quick disconnect fitting can be installed horizontally, or pointing downward.
Installing the fitting with the open end pointing upward can result in collecting
water and debris.
•
The dust covers (supplied plastic plugs) help keep the open ends of the quick
disconnect fitting clean while disconnected.
•
Pipe compound should be used which is resistant to the action of natural gas
when connections are made.
•
The outdoor connector must be firmly attached to rigid, permanent construction.
WARNING: Do not route the 10 foot hose under a deck. The
hose must be visible.
GAS LINE PIPING
•
If the length of the line required does not exceed 50 feet, use a 5/8" O.D. tube.
One size larger should be used for lengths greater than 50 feet.
•
Gas piping may be copper tubing, type K or L; polyethylene plastic tube, with a
minimum wall thickness of .062 inch; or standard weight (schedule 40) steel or
wrought iron pipe.
•
Copper tubing must be tin-lined if the gas contains more than 0.3 grams of
hydrogen sulfide per 100 cubic feet of gas.
•
Plastic tubing is suitable only for outdoor, underground use.
•
Gas piping in contact with earth, or any other material which may corrode the
piping, must be protected against corrosion in an approved manner.
•
Underground piping must have a minimum of 18" cover.
TEST CONNECTIONS
All connections and joints must be thoroughly tested for leaks in accordance with local
codes and all listed procedures in the latest edition of the National Fuel Gas Code: ANSI
Z 223.1/NFPA 54, or CAN/CGA-B149.1
WWW.WEBER.COM®
DANGER
Do not use an open flame to check for gas leaks. Be sure
there are no sparks or open flames in the area while you
check for gas leaks. This will result in a fire or explosion
which can cause serious bodily injury or death and damage
to property.
14
GAS INSTRUCTIONS
TYPE OF GAS
Your natural gas grill is factory built to operate using natural gas only. Never attempt to
operate your grill on gases other than the type specified on the grill rating plates.
Your grill operates at 4.5” of water column pressure. If replacement of the hose
becomes necessary, factory specified parts are required. See your local dealer.
For safety and design reasons, the conversion of a Weber® grill from operation using
Natural gas to operation using LP gas requires the change out of the entire gas supply
system of the grill. If this becomes necessary, see your dealer for additional information.
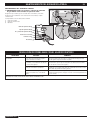
WHAT IS NATURAL GAS?
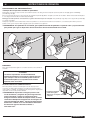
1
Swivel Connection
2
Install covers when hose is disconnected
Natural gas, often called methane, is a safe modern fuel. Natural gas is supplied by your
local utility and should be readily available if your house is already heated with gas.
3
Shut Off Valve
4
Coat this pipe nipple with gas resistant pipe dope
PORTABLE INSTALLATION
5
Socket
Weber® recommends moving the grill at least two (2) feet from the gas supply and
any combustible surfaces. After the gas supply has been run and checked for leaks in
accordance to the assembly instructions, you are ready to grill. To connect the hose
to the gas supply, pull back the outer fitting, insert the hose fitting all of the way, and
release the outer fitting. This process will produce a gas joint.
6
Male Connection
LEAK CHECK PREPARATION
CHECK THAT ALL BURNER VALVES ARE OFF
Valves are shipped in the “OFF” position, but you should check to be sure that they are
turned off. Check by pushing in and turning clockwise. If they do not turn, they are off.
Proceed to the next step. If they do turn continue turning them clockwise until they stop,
then they are off. Proceed to the next step.
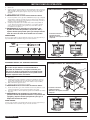
1
2
3
4
Socket
Sleeve
Push Sleeve Back
Plug
Push plug until sleeve snaps forward locking plug in socket.
(This turns on gas automatically.)
When properly assembled the plug cannot be removed without pushing
the sleeve back.
To disconnect, push sleeve back and pull out plug.
(This automatically shuts off gas.)
CHECK FOR GAS LEAKS
WARNING: The gas connections of your Summit® gas grill
have been factory tested. We do however recommend that
you leak check all gas connections before operating your
Summit® gas grill.
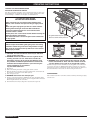
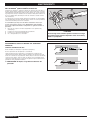
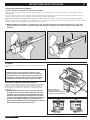
REMOVE CONTROL PANEL
Part required: Phillips Screwdriver.
1) Remove the burner control knobs.
(A)
WWW.WEBER.COM®
GAS INSTRUCTIONS
15
15
2) Remove the two screws that secure the control panel to the frame.
3) Remove the control panel. Tilt panel forward and lift up and away from grill. Be careful
not to break or disconnect the wires for the control panel lights.
Rest the control panel against the left side of the grill (A) exposing the valves, burners,
igniter, and manifold.
(A)
2
3
1
CHECK THE FLEXIBLE HOSE TO MANIFOLD CONNECTION
The natural gas hose has been attached during the manuafacturing process. We
do recommend that the hose to gas manifold connnection be leak tested, following
guidelines in this Owner’s Guide, prior to barbecue operation.
CHECK FOR GAS LEAKS
DANGER
Do not use an open flame to check for gas leaks. Be sure
there are no sparks or open flames in the area while you
check for leaks. Sparks or open flames will result in a fire or
explosion which can cause serious bodily injury or death and
damage to property.
WARNING: You should check for gas leaks every time you
disconnect and reconnect a gas fitting.
Note: All factory-made connections have been thoroughly checked for gas leaks. The
burners have been flame-tested. As a safety precaution however, you should recheck
all fittings for leaks before using your Weber® gas barbecue. Shipping and handling
may loosen or damage a gas fitting.
WARNING: Perform these leak checks even if your barbecue
was dealer or store assembled.
You will need: a soap and water solution, and a rag or brush to apply it.
Make sure side burner is off (See LEAK CHECK PREPARATION). Remove valve
control knob and screws. Remove porcelain top.
To perform leak checks: Slide back the collar of the quick disconnect (1). Push male
fitting of the hose into the quick disconnect, and maintain pressure. Slide the collar
WWW.WEBER.COM®
closed (2). If it does not engage or lock, repeat procedure. Gas will not flow unless the
quick disconnect is properly engaged.
Turn on gas supply.
Check for leaks by wetting the connections with the soap and water solution and
watching for bubbles. If bubbles form or if a bubble grows, there is a leak.
Note: Since some leak test solutions, including soap and water, may be slightly
corrosive, all connections should be rinsed with water after checking for leaks.
WARNING: Do not ignite burners when leak checking.
GAS INSTRUCTIONS
16
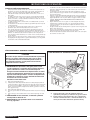
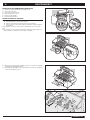
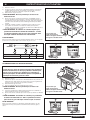
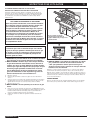
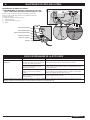
CHECK:
1)
2)
3)
4)
5)
E/S-470
Main gas line to manifold connection.
Rotisserie (I.R. Burner) gas line connection.
Bulkhead and gas supply hose connection.
Bulkhead to regulator connection.
Regulator to hose connection.
WARNING: If there is a leak at connection (1, 2, 3, 4, or 5),
retighten the fitting with a wrench and recheck for leaks with
soap and water solution.
If a leak persists after re-tightening the fitting, turn off the
gas. DO NOT OPERATE THE GRILL. Contact the Customer
Service Representative in your area using the contact
information on our web site. Log onto www.weber.com®.
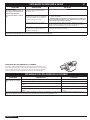
6)
7)
8)
9)
2
Bulk head to side burner hose connection.
Side burner hose to quick disconnect connection, side burner valve and orifice
connections.
Hose to quick disconnect connection.
Valves to manifold connections.
1
WARNING: If there is a leak at connections (6, 7, 8, or 9),
turn off the gas. DO NOT OPERATE THE GRILL. Contact
the Customer Service Representative in your area using the
contact information on our web site.
Log onto www.weber.com®.
When leak checks are complete, turn gas supply off at the source and rinse connections
with water.
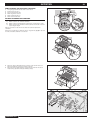
REINSTALL CONTROL PANEL
Parts required: control panel, screws and burner control knobs.
Hook the top edge of the control panel onto the control panel brackets on either side of
the front of the cooking box.
Line up screws with screw holes on both the control panel bracket and the frame.
Tighten screws.
Place corresponding control knobs onto the valve stems.
3
4
5
6
6
8
9
*The grill illustrated may have
slight differences than the model
purchased.
7
WWW.WEBER.COM®
OPERATING INSTRUCTIONS
17
17
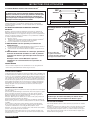
SNAP IGNITION OPERATION
Always open the lid before igniting the burners
Each control knob has its own igniter electrode built in. To create a spark you must push the control knob in (A) and turn to “START/High” (B).
This action will generate gas flow and a spark to the burner lighting tube (C). You will hear a “snap” from the igniter. You will also see a 3˝ - 5˝ orange flame coming from the burner
lighting tube at the left side of the burner (D).
Continue to hold the burner control knob in for two seconds after the “snap”. This will allow gas to flow completely down the burner tube (E) and insure ignition.
Check that the burner is lit by looking through the cooking grates. You should see a flame. If burner does not light on first try, push control knob in and turn to OFF.Repeat lighting
procedure a second time.
WARNING: If the burner still does not light, turn the burner control knob to “OFF” and wait 5 minutes to let the gas clear before
you try again or try to light with a match.
LIGHTING
Summary lighting instructions are inside the left hand cabinet door.
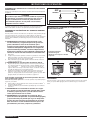
MAIN BURNER LIGHTING
DANGER
Failure to open the lid while igniting the barbecue’s burners,
or not waiting 5 minutes to allow the gas to clear if the
barbecue does not light, may result in an explosive flame-up
which can cause serious bodily injury or death.
1
5
MAIN BURNER SNAP IGNITION
Note: Each control knob snap igniter creates a spark from the igniter electrode to the
burner lighting tube. You generate the energy for the spark by pushing in the control
knob and turning to “START/HI”. This will ignite each individual burner.
WARNING: Check hose before each use of barbecue for
nicks, cracking, abrasions or cuts. If the hose is found to
be damaged in any way, do not use the barbecue. Replace
using only Weber® authorized replacement hose. Contact
the Customer Service Representative in your area using the
contact information on our web site.
Log onto www.weber.com®.
WWW.WEBER.COM®
*The grill illustrated may have
slight differences than the
model purchased.
2 4
3
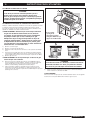
OPERATING INSTRUCTIONS
18
1)
2)
3)
Open the lid.
Make sure all burner control knobs are turned to “OFF”. (Push control knob in and
turn clockwise to ensure that it is in the “OFF” position.)
Turn on the gas supply at source.
MAIN BURNER LIGHTING
1
WARNING: Do not lean over the open barbecue.
4)
5)
Push the control knob in and turn to “START/HI” until you hear the igniter snap continue to hold control knob in for two seconds. This action will spark the igniter,
the burner lighting tube and then main burner.
Check that the burner is lit by looking through the cooking grates. You should see
a flame. If burner does not light on first try, push control knob in and turn to OFF.
Repeat lighting procedure a second time.
5
WARNING: If the burner still does not light, turn the burner
control knob to “OFF” and wait 5 minutes to let the gas clear
before you try again or try to light with a match.
TO EXTINGUISH
Push in and turn each burner control knob clockwise to “OFF” position. Turn gas supply
off at the source.
2 4
3
*The grill illustrated may have slight
differences than the model purchased.
ARRÊTÉ
OFF
APAGADO
2
C
D
D.
OFF
C.
STARTtt/HI
B
4
A
B.
A.
MED.
LOW
MAIN BURNER MANUAL LIGHTING
MAIN BURNER MANUAL LIGHTING
DANGER
1
Failure to open the lid while igniting the barbecue’s burners,
or not waiting 5 minutes to allow the gas to clear if the
barbecue does not light, may result in an explosive flame-up
which can cause serious bodily injury or death.
1)
2)
3)
4)
6
Open the lid.
Make sure all burner control knobs are turned to “OFF”. (Push each knob in and
turn clockwise to ensure they are in the “OFF” position.)
Turn on the gas supply at source.
Put match in the match holder and strike match.
WARNING: Do not lean over open barbecue.
5)
6)
Insert match holder and lit match down through cooking grates and Flavorizer®
bars to ignite the selected burner.
Push the control knob in and turn to “START/HI”.
WARNING: If the burner does not light, turn burner control
knob to “OFF” and wait 5 minutes to let the gas clear before
you try again.
2 5
3
*The grill illustrated may have slight
differences than the model purchased.
TO EXTINGUISH
Push in and turn each burner control knob clockwise to “OFF” position. Turn gas supply
off at the source.
2
6
WWW.WEBER.COM®
OPERATING INSTRUCTIONS
19
19
GRILLING METHODS
Note: If grill looses heat while cooking refer to the troubleshooting section of this
manual.
You can adjust the individual burners as desired. The control settings are START/HI,
MEDIUM, LOW, or OFF.
ARRÊTÉ
OFF
APAGADO
If burners go out during cooking, turn off all burners and wait 5 minutes before relighting.
WARNING: Check the bottom tray and catch pan for grease
build-up before each use. Remove excess grease to avoid a
grease fire in the bottom tray.
C
D
B
A
PREHEATING
Preheating the grill before grilling is important. Light your Summit® gas grill according
to the instructions in this Owner’s Manual. Turn all of the main burners to Start/
Hi, close the lid, and preheat grill with the lid down until grill thermometer reaches
550ºF (260˚-288˚C).This is the recommended broiling temperature. This will take
approximately 10 to 15 minutes, depending on outside temperatures.
D.
C.
B.
A.
OFF
START/HI
MED.
LOW
COVERED COOKING
All grilling is done with the lid down to provide uniform, evenly circulated heat. With the
lid closed, the Summit® gas grill cooks much like a convection oven. The thermometer
in the lid indicates the cooking temperature inside the grill. All preheating and grilling is
done with the lid down. No peeking — heat is lost every time you lift the lid.
FLAVORIZER® SYSTEM
When meat juices drip from the food onto the specially angled Flavorizer® bars,
they create smoke that gives foods an irresistible barbecued flavor. Thanks to the
unique design of the burners, Flavorizer® bars and the flexible temperature controls,
uncontrolled flare-ups are virtually eliminated, because YOU control the flames.
Because of the special design of the Flavorizer® bars and burners, excess fats are
directed through the funnel-shaped bottom tray into the grease catch pan.
The most important thing to know about grilling is which cooking method to use for a
specific food, Direct or Indirect. The difference is simple: place the food directly over the
fire, or arrange the fire on either side of it. Using the right method is the shortest route to
great results—and the best way to ensure doneness safety.
DIRECT COOKING
The Direct Method, similar to broiling, means the food is cooked directly over the heat
source. For even cooking, food should be turned once halfway through the grilling time.
Use the Direct method for foods that take less than 25 minutes to cook: steaks, chops,
kabobs, sausages, vegetables, and more.
Direct cooking is also necessary to sear meats. Searing creates that wonderful crisp,
caramelized texture where the food hits the grate. It also adds great color and flavor to
the entire surface. Steaks, chops, chicken breasts, and larger cuts of meat all benefit
from searing.
1
3
2
4
To sear meats, place them over Direct High heat for 2 to 5 minutes per side. Smaller
pieces require less searing time. Usually after searing you finish cooking the food at a
lower temperature. You can finish cooking fast-cooking foods by the Direct method; use
the Indirect method for longer-cooking foods.
To set up your gas grill for Direct cooking, preheat the grill with all burners on “HI”. Place
food on the cooking grate, and then adjust all burners to the temperature noted in the
recipe. Close the lid of the grill and lift it only to turn food or to test for doneness at the
end of the recommended cooking time.
INDIRECT COOKING
The Indirect Method is similar to roasting, but with the added benefits of that grilled
texture, flavor, and appearance you can’t get from an oven. To set up for Indirect
cooking, gas burners are lit on either side of the food but not directly beneath it. Heat
rises, reflects off the lid and inside surfaces of the grill, and circulates to slowly cook the
food evenly on all sides, much like a convection oven, so there’s no need to turn the
food.
Use the Indirect method for foods that require 25 minutes or more of grilling time or that
are so delicate that direct exposure to the flame would dry them out or scorch them.
Examples include roasts, ribs, whole chickens, turkeys, and other large cuts of meat, as
well as delicate fish fillets.
To set up your gas grill for Indirect cooking, preheat the grill with all burners on “HI”.
Then adjust the burners on each side of the food to the temperature noted in the recipe
and turn off the burner(s) directly below the food. For best results, place roasts, poultry,
or large cuts of meat on a roasting rack set inside a disposable heavy-gauge foil pan.
For longer cooking times, add water to the foil pan to keep drippings from burning. The
drippings can be used to make gravies or sauces.
WWW.WEBER.COM®
1
M
2
3
4
M
OPERATING INSTRUCTIONS
20
GRILLING TIPS & HELPFUL HINTS
•
Always preheat the grill before cooking. Set all burners on “HI” heat and close lid;
heat for 10 minutes, or until thermometer registers 500˚-550˚F (260˚-288˚C).
Sear meats and cook with the lid down for perfectly grilled food every time.
Grilling times in recipes are based on 70˚F (20˚C) weather and little or no wind.
Allow more cooking time on cold or windy days, or at higher altitudes. Allow less
cooking time in extremely hot weather.
Grilling times can vary because of the weather, or the amount, size and shape of
the food being grilled.
The temperature of your Summit® gas grill may run hotter than normal for the first
few uses.
Grilling conditions may require the adjustment of the burner controls to attain the
correct cooking temperatures.
In general, large pieces of meat will require more cooking time per pound than
small pieces of meat. Foods on a crowded cooking grate will require more cooking
time than just a few foods. Foods grilled in containers, such as baked beans, will
require more time if grilled in a deep casserole rather than a shallow baking pan.
•
•
•
•
•
•
•
•
•
•
•
•
•
•
Trim excess fat from steaks, chops and roasts, leaving no more than a scant ¼
inch (6.4mm) of fat. Less fat makes cleanup easier, and is a virtual guarantee
against unwanted flare-ups.
Foods placed on the cooking grate directly above burners may require turning or
moving to a less hot area.
Use tongs rather than a fork for turning and handling meats to avoid losing natural
juices. Use two spatulas for handling large whole fish.
If an unwanted flare-up should occur, turn all burners off and move food to
another area of the cooking grate. Any flames will quickly subside. After flames
subside, relight the grill. NEVER USE WATER TO EXTINGUISH FLAMES ON A
GAS GRILL.
Some foods, such as a casserole or thin fish fillets, will require a container
for grilling. Disposable foil pans are very convenient, but any metal pan with
ovenproof handles can also be used.
Always be sure the bottom tray and grease catch pan are clean and free from
debris.
Do not line the funnel-shaped bottom tray with foil. This could prevent the grease
from flowing into the grease catch pan.
Using a timer will help to alert you when “well-done” is about to become “overdone.”
LIGHTING THE SIDE BURNER
SIDE BURNER LIGHTING
DANGER
Failure to open the lid while igniting the side burner, or not
waiting 5 minutes to allow the gas to clear if the side burner
does not light, may result in an explosive flame-up which can
cause serious bodily injury or death.
1
5
WARNING: Check hose before each use of barbecue for nicks,
cracking, abrasions or cuts. If the hose is found to be damaged
in any way, do not use the barbecue. Replace using only Weber®
authorized replacement hose. Contact the Customer Service
Representative in your area using the contact information on
our web site. Log onto www.weber.com®.
1)
2)
3)
4)
5)
Open the side burner lid.
Check that the side burner valve is turned off (Push control knob in and turn
clockwise to ensure that it is in the “OFF” position), turn all burners not being used
to the “OFF” position (push in and turn clockwise).
Turn the gas supply valve on.
Push down and turn the side burner control valve to “HI”.
Press the igniter button several times so it clicks each time.
CAUTION: Side burner flame may be difficult to see on a
bright sunny day.
WARNING: If the side burner does not light in five (5)
seconds:
a) Turn off the side burner control valve, main burners
and gas supply at source.
b) Wait 5 minutes to let the gas clear before you try
again, or try lighting with a match (see “Manually
Lighting the Side Burner”).
2 4
2
3
WWW.WEBER.COM®
OPERATING INSTRUCTIONS
MANUALLY LIGHTING THE SIDE BURNER
21
MANUAL SIDE BURNER LIGHTING
DANGER
Failure to open the lid while igniting the side burner, or not
waiting 5 minutes to allow the gas to clear if the side burner
does not light, may result in an explosive flare-up that can
cause serious bodily injury or death.
1)
2)
3)
4)
5)
6)
6
1
Open the side burner lid.
Check that the side burner valve is turned off (Push control knob in and turn
clockwise to ensure that it is in the “OFF” position), turn all burners not being used
to the “OFF” position (push in and turn clockwise).
Turn the gas supply valve on.
Put match in a match holder and strike match.
Hold match holder and lit match by either side of the side burner.
Push down and turn the side burner control valve to “HI”.
CAUTION: Side burner flame may be difficult to see on a
bright sunny day.
WARNING: If the side burner does not light in five (5)
seconds:
a) Turn off the side burner control valve, main burners
and gas supply at source.
b) Wait 5 minutes to let the gas clear before you try
again.
5
2
3
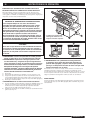
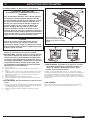
USING THE SEAR STATION™
4 burner
Your Weber® gas barbecue includes a sear burner for searing meats such as steak,
poultry parts, fish, and chops).
Searing is a direct grilling technique which browns the surface of the food at a high
temperature. By searing or browning both sides of the meat you will create a more
desirable flavor by caramelizing the food surface. Searing will also enhance appearance
of the meat with sear marks from the cooking grates. This along with the contrast of
textures and flavors can make food more interesting to the palate
The Sear Station™ burner has an on or off control setting that works with the two
adjacent main burners. With the sear and adjacent burners you can effectively sear
meats while using other cooking areas for grilling with moderate heat.
2
TO USE THE SEAR STATION™
Before searing you should turn all of the main burners on HI for 15 minutes to preheat
the grill. Note: Always grill with the lid closed to allow for maximum heat and to avoid
flare ups.
Once the grill is preheated, turn the outer burners off or down to low. Leave the center
two burners on HI and ignite the Sear Station Burner (See Sear Station™ lighting
Instructions).
Place the meat directly over the Sear Station™. You will Sear each side anywhere from
1 to 4 minutes, depending on the type of meat and thickness. You may turn the food a
quarter turn to make crossing sear marks (1) before you sear the other side in the same
manner.
Once you are done searing you can finish grilling by moving the meat to a more
moderate heat over the outside burners to achieve the desired doneness.
As you gain experience in using your Sear Station™, we encourage you to experiment
with different searing times to find results that work best for your taste.
WWW.WEBER.COM®
21
Sear
Station™
3
Sear Method
Food is placed in the area of intense heat between the lit burners
$
22
OPERATING INSTRUCTIONS
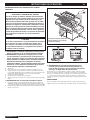
SEAR STATION™ BURNER LIGHTING
Summary lighting instructions are inside the left hand cabinet door.
DANGER
Failure to open the lid while igniting the barbecue’s burners,
or not waiting 5 minutes to allow the gas to clear if the
barbecue does not light, may result in an explosive flame-up
which can cause serious bodily injury or death.
The Sear Station™ burner has an on or off control setting. To ignite the Sear Station™
burner you must first ignite the two adjacent main burners.
ADJACENT MAIN BURNER SNAP IGNITION
ARRÊTÉ
EN MARCHE
OFF
ON
ENCENDIDO
APAGADO
B
A
B.
A.
OFF
ON
SEAR STATION™ BURNER LIGHTING
Note: Each main burner control knob snap igniter creates a spark from the igniter
electrode to the burner lighting tube. You generate the energy for the spark by pushing
in the control knob and turning to “START/HI”. This will ignite each individual burner.
1
WARNING: Check hose before each use of barbecue for
nicks, cracking, abrasions or cuts. If the hose is found to
be damaged in any way, do not use the barbecue. Replace
using only Weber® authorized replacement hose. Contact
the Customer Service Representative in your area using the
contact information on our web site. Log onto www.weber.
com®.
1)
2)
3)
5
2
Open the lid.
Make sure all burner control knobs are turned off. (Push control knob in and turn
clockwise to ensure that it is in the “OFF” position.)
Turn the cylinder on by turning the cylinder valve counterclockwise.
4
WARNING: Do not lean over the open barbecue.
4)
5)
Ignite each adjacent Sear Station™ main burner. Push the control knob in and turn
to “START/HI” until you hear the igniter snap - continue to hold control knob in for
two seconds. This action will spark the igniter, the burner lighting tube and then
main burner.
Check that the burner is lit by looking through the cooking grates. You should see
a flame. If burner does not light on first try, push control knob in and turn to OFF.
Repeat lighting procedure a second time.
7
6
*The grill illustrated may have slight
differences than the model purchased.
2
3
6
To ignite the Sear Station™ burner continue with Step 6.
Sear Burner Lighting: Ignition by an adjacent ignited Main Burner.
6)
7)
Turn -Sear Station™ burner control knob to the ON position.
Verify burner ignition by visual inspection of a flame.
WARNING: If ignition does not occur in 5 seconds, turn
burner control OFF, wait 5 minutes, and repeat steps 6 & 7, or
see Match Lighting instructions.
WARNING: If the burner still does not light, turn the burner
control knob to “OFF” and wait 5 minutes to let the gas clear
before you try again or try to light with a match.
Note: See Maintenance for burner removal and cleaning
procedure.
EN MARCHE
ON
ENCENDIDO
TO EXTINGUISH
Push in and turn each burner control knob clockwise to “OFF” position. Turn gas supply
off at the source.
WWW.WEBER.COM®
OPERATING INSTRUCTIONS
SEAR STATION™ BURNER MANUAL LIGHTING
DANGER
Failure to open the lid while igniting the barbecue’s burners,
or not waiting 5 minutes to allow the gas to clear if the
barbecue does not light, may result in an explosive flame-up
which can cause serious bodily injury or death.
The Sear Station™ burner has an on or off control setting. To ignite the Sear Station™
burner you must first ignite the two adjacent main burners.
23
23
ARRÊTÉ
EN MARCHE
OFF
ON
ENCENDIDO
APAGADO
B
A
B.
A.
OFF
ON
ADJACENT MAIN BURNER SNAP IGNITION
Note: Each main burner control knob snap igniter creates a spark from the igniter
electrode to the burner lighting tube. You generate the energy for the spark by pushing
in the control knob and turning to “START/HI”. This will ignite each individual burner.
1)
2)
3)
Open the lid.
Verify each adjacent Sear Station™ main burner is lit by visual inspection of a
flame.
Put match in the match holder and strike match.
SEAR STATION™ BURNER MANUAL LIGHTING
1
WARNING: Do not lean over open barbecue.
4)
5)
2
Insert match holder and lit match down through cooking grates and Flavorizer®
bars to ignite the Sear Station™ burner.
Push the Sear Station™ control knob in and turn to the ON position.
WARNING: If the burner does not light, turn the burner
control knob to “OFF” and wait 5 minutes to let the gas clear
before you try again.
Note: See Maintenance for burner removal and cleaning
procedure.
3
2
4
5
TO EXTINGUISH
Push in and turn each burner control knob clockwise to “OFF” position. Turn gas supply
off at the source.
*The grill illustrated may have slight
differences than the model purchased.
USING THE SMOKER
The smoker uses presoaked wood chips. For best results with faster cooking foods like
steaks, burgers and chops, etc., we recommend using finer wood chips because they
ignite and create smoke faster. For longer cooking foods such as roasts, chicken and
turkeys, etc., we recommend using larger wood chunks because they ignite slowly and
provide smoke for a longer period of time. As you gain experience in using your smoker,
we encourage you to experiment with different combinations of wood chips and chunks
to find the smoke flavor that best suits your taste.
TO USE THE SMOKER
As a starting point, soak wood chips in water for at least 30 minutes before using. (Wet
wood will produce more smoke flavor.) Place a handful of wood chips or a few larger
chunks in the bottom of the smoker body (1). As you gain experience in smoking,
increase or decrease the amount of wood to suit your taste.
Note: Always grill with the lid closed to allow the smoke to fully penetrate the food.
Light the smoker burner by following the instructions for Lighting The Smoker Burner
After wood starts to smolder turn control knob to “LOW”.
Smoke will start in approximately 10 minutes and last as long as 45 minutes. If you
require more smoke flavor, refill the smoker with wood chips and /or chunks. Keep the
lid of the grill closed while cooking.
Note: After refilling smoker, smoke will take about 10 to 15 minutes to start again.
The smoker may be used to enhance meat, poultry and fish recipes. Cook with the lid
down according to the times indicated in charts or recipes.
DANGER
Do not use any flammable fluid in the smoker to ignite the
wood. This will cause serious bodily injury.
WWW.WEBER.COM®
CLEANING THE SMOKER
Before each use, empty the smoker of ash to allow proper air flow.
Note: Smoking will leave a “smoke” residue on the surface of the smoker. This residue
cannot be removed and will not affect the function of the smoker. To a lesser degree a
“smoke” residue will accumulate on the inside of your gas grill. This residue need not
be removed and will not adversely affect the function of your gas grill.
OPERATING INSTRUCTIONS
24
LIGHTING THE SMOKER BURNER
DANGER
1
Failure to open the lid while igniting the grill, or not waiting
5 minutes to allow the gas to clear if the grill does not light,
may result in an explosive flare-up which can cause serious
bodily injury or death.
7
2
3
8
SMOKER BURNER SNAP IGNITION
Note: The control knob snap igniter creates a spark from the igniter electrode to the
burner lighting tube. You generate the energy for the spark by pushing in the control
knob and turning to “START/HI”. This will ignite the smoker burner.
WARNING: Check hose before each use of grill for nicks,
cracking, abrasions or cuts. If the hose is found to be
damaged in any way, do not use the grill. Replace using only
Weber® authorized replacement hose. Contact the Customer
Service Representative in your area using the contact
information on our web site. Log onto www.weber.com®.
1)
2)
3)
4)
5)
Open the grill lid.
Open smoker box lid.
Fill smoker with water soaked wood chunks or chips.
Make sure that all burner control knobs not being used are turned to “OFF”. (Push
control knob in and turn clockwise to ensure that it is in the “OFF” position).
Turn on the gas at source.
4
6
5
*The grill illustrated may have slight
differences than the model purchased.
4
6
WARNING: Do not lean over the open grill while lighting.
6)
7)
Push the control knob in and turn to “START/HI” until you hear the igniter snap continue to hold control knob in for two seconds. This action will spark the igniter,
the burner lighting tube and then main burner.
Check that the burner is lit by looking through the cooking grates. You should see
a flame. If burner does not light on first try, push control knob in and turn to OFF.
Repeat lighting procedure a second time
DANGER
If the smoker burner does not light, turn the burner control
knob to “OFF” and wait 5 minutes to let the gas clear before
attempting to light.
8)
TO EXTINGUISH
Push in and turn each burner control knob clockwise to “OFF” position. Turn gas supply
off at the source.
Close smoker cover after wood starts to smolder and turn control knob to “LOW”.
WWW.WEBER.COM®
OPERATING INSTRUCTIONS
25
25
MANUALLY LIGHTING THE SMOKER BURNER
1) Open the lid.
1
DANGER
7
Failure to open the lid while igniting the grill, or not waiting
5 minutes to allow the gas to clear if the grill does not light,
may result in an explosive flare-up which can cause serious
bodily injury or death.
9
2
3
10
2) Open smoker box lid
3) Fill smoker with water soaked wood chunks or chips.
4) Make sure that all burner control knobs not being used are turned to “OFF”. (Push
control knob in and turn clockwise to ensure that it is in the “OFF” position.)
5) Turn on the gas at source.
6) Put a match in the match holder and strike the match.
7) Insert match holder and lit match down through cooking grates and Flavorizer® bars
to ignite smoker burner.
4
WARNING: Do not lean over the open grill while lighting.
8
5
8) Push smoker burner control knob in and turn to “START/HI”.
9) Check that the burner is lit by looking down through the cooking grate.
*The grill illustrated may have slight
differences than the model purchased.
DANGER
If the smoker burner does not light, turn the burner control
knob to “OFF” and wait 5 minutes to let the gas clear before
you try again.
4
8
10) Close smoker cover after wood starts to smolder and turn control knob to “LOW”.
TO EXTINGUISH
Push in and turn each burner control knob clockwise to “OFF” position. Turn gas supply
off at the source.
USING THE ROTISSERIE
Note: Before using your rotisserie, measure your food at the widest point. If it exceeds
9½” (241.8mm), it is too large to fit the rotisserie. If it is too large, food can be prepared
using a roast holder and the Indirect Cooking Method.
•
•
IMPORTANT SAFEGUARDS
WARNINGS
•
•
•
•
•
•
•
•
•
•
Read all instructions before using your rotisserie.
This rotisserie is for outdoor use only.
Remove motor and store in a dry place when not in use.
Do not touch hot surfaces. Use barbecue mitts.
This rotisserie is not for use by children.
To protect against electrical hazards do not immerse cord,
plugs, or motor in water or other liquids.
Unplug the motor from outlet when not in use or before
cleaning.
Do not use rotisserie for other than intended use.
Make sure motor is off before placing it on the motor
bracket.
Do not operate the rotisserie motor with a damaged cord or
plug.
WWW.WEBER.COM®
•
•
•
•
•
•
Do not operate the rotisserie motor if it should malfunction.
The rotisserie motor is equipped with a three prong
(grounding) power cord for your protection against shock
hazard.
The power cord should be plugged directly into a
properly grounded three prong receptacle. If use of an
extension cord is required, be sure that it is a minimum
16 AWG(1.3mm), 3-wire, well insulated cord marked for
OUTDOOR USE ONLY and properly grounded.
When using an extension cord, make sure it is not in
contact with a hot or sharp surface.
Outdoor extension cords should be marked with the letters
“W-A” and a tag stating “Suitable for use with outdoor
appliances”.
Do not cut or remove the grounding prong from the
rotisserie motor power cord.
Do not let cord hang over any sharp edge or hot surface.
Do not expose to rain.
26
•
•
•
OPERATING INSTRUCTIONS
To reduce the risk of electric shock, keep extension cord
connection dry and off the ground.
A short power cord is supplied to reduce the risk of
tripping over the cord. Extension cords may be used, but
caution must be taken to prevent tripping over the cord.
In absence of local codes the rotisserie motor must be
grounded electrically in accordance with the National
Electric Code, ANSI / NFPA 70, or Canadian Electrical
Code, CSA C22.1.
COOKING
•
•
•
•
•
•
•
•
•
•
WARNING: Setup up the rotisserie with food before lighting
rotisserie burner.
OPERATING
1)
2)
3)
4)
5)
6)
7)
•
Meats (except poultry and ground meat) should be brought to room temperature
before cooking. (20 to 30 minutes should be adequate for most foods. If frozen
defrost completely before cooking.)
Tie meat or poultry with a string, if necessary, to make the shape as uniform as
possible before putting it on the spit.
Remove cooking grates and warming rack to allow food to turn freely.
Follow lighting instructions for rotisserie burner on next page.
Set rotisserie burner on medium-high based on outside air temperatures.
Place food within area of burner.
If you wish to save drippings for gravy, place a drip pan directly under the food
on top of the Flavorizer® bars.
Food preparation steps are the same for rotisserie cooking as for regular
cooking.
All cooking is done with the lid closed.
If foods are too heavy or are irregular shapes, they may not rotate well and
should be cooked by the Indirect Method without using the rotisserie.
Smoker can be used in conjunction with rotisserie for more smoke flavor.
Note: When using the rotisserie burner, grill thermometer will not reflect the
temperature inside the cooking box.
Remove rotisserie shaft from grill. Remove one spit fork.
Push the rotisserie shaft through the center of the food.
Slide the spit fork onto the shaft. Insert the tines of both spit forks into the food.
The food should be centered on the shaft. Tighten the spit fork screws
Place the motor in the bracket, slide to lock.
Insert the pointed end of the rotisserie shaft into the motor. Place the handle end
of the rotisserie onto the support rollers.
The rotisserie shaft should rotate so that the heavy side of the meat or poultry
rotates down to the bottom. Large cuts may require the removal of the cooking
grates and warming rack to allow full rotation of the shaft. Remount the food if
necessary for better balance.
Turn the motor on.
WWW.WEBER.COM®
OPERATING INSTRUCTIONS
27
27
LIGHTING THE ROTISSERIE BURNER
ROTISSERIE BURNER SNAP IGNITION
1
Note: Each control knob snap igniter creates a spark from the igniter electrode to the
burner lighting tube. You generate the energy for the spark by pushing in the control
knob and turning to “START/HI”. This will ignite each individual burner.
2
ATTENTION: READ BEFORE
LIGHTING ROTISSERIE BURNER
After a period of non-use, before lighting the Rotisserie
Burner, a few seconds must pass for the gas supply line to
fill.
When using the snap igniter you will see a flash of flames
moving from left to right across the Rotisserie Burner
surface, the Rotisserie Burner is not lit until the entire
ceramic surface is aflame.
At this point, start a count of 20 seconds before releasing the
Rotisserie Burner control knob.
The Rotisserie Burner surface will glow red once the burner
is fully ignited.
6
5
3
4
*The grill illustrated may have slight
differences than the model purchased.
DANGER
3
5
Failure to open the lid while igniting the grill, or not waiting
5 minutes to allow the gas to clear if the grill does not light,
may result in an explosive flare-up which can cause serious
bodily injury or death.
CAUTION: The Rotisserie Burner flame may be difficult to
see on a bright sunny day.
WARNING: Check hose before each use of grill for nicks,
cracking, abrasions or cuts. If the hose is found to be
damaged in any way, do not use the grill. Replace using
only a Weber® authorized replacement hose. Contact the
Customer Service Representative in your area using the
contact information on our web site.
Log onto www.weber.com®.
1) Open the lid.
2) Remove the warming rack and the cooking grates from the cookbox.
3) Make sure all burner control knobs are turned to “OFF”. (Push control knob in and
turn clockwise to ensure that it is in the “OFF” position.)
4) Turn on the gas at source.
WARNING: Do not lean over the open grill.
5) Push the control knob in and turn to “START/HI”. This action will spark the igniter
and light the Rotisserie Burner. Continue to use the snap igniter until the Rotisserie
Burner has ignited. Release the control knob.
6) Check that the burner is lit by looking for the rotisserie burner to glow red.
WWW.WEBER.COM®
WARNING: If the rotisserie burner does not light, turn the
burner control knob to “OFF” and wait 5 minutes to let the
gas clear before you try again or try to light with a match.
Note: When using the rotisserie with the lid closed, only light two of the main burners
on each side of the food (See Grilling Methods-Indirect Cooking). Check your food
periodically to prevent over cooking on the outside. Turn off the rotisserie burner once
the food has browned to the desired color. Finish cooking on Indirect heat.
TO EXTINGUISH
Push in and turn each burner control knob clockwise to “OFF” position. Turn gas supply
off at the source.
OPERATING INSTRUCTIONS
28
MANUALLY LIGHTING THE ROTISSERIE BURNER
ATTENTION: READ BEFORE
LIGHTING ROTISSERIE BURNER
6
1
After a period of non-use, before lighting the Rotisserie
Burner, a few seconds must pass for the gas supply line to
fill. When holding a match to the rotisserie burner you will
see a flash of flames moving from left to right across the
Rotisserie Burner surface, the Rotisserie Burner is not lit
until the entire ceramic surface is aflame. At this point, start
a count of 20 seconds before releasing the Rotisserie Burner
control knob. The Rotisserie Burner surface will glow red
once the burner is fully ignited.
2
7
DANGER
Failure to open the lid while igniting the grill, or not waiting
5 minutes to allow the gas to clear if the grill does not light,
may result in an explosive flare-up which can cause serious
bodily injury or death.
3
CAUTION: The Rotisserie Burner flame may be difficult to
see on a sunny day.
WARNING: Check hose before each use of grill for nicks,
cracking, abrasions or cuts. If the hose is found to be
damaged in any way, do not use the grill. Replace using
only a Weber® authorized replacement hose. Contact the
Customer Service Representative in your area using the
contact information on our web site.
Log onto www.weber.com®.
1)
2)
3)
4)
5)
6)
Open the lid.
Remove the warming rack and the cooking grates from the cookbox.
Make sure all burner control knobs are turned to “OFF”. (Push control knob in and
turn clockwise to ensure that it is in the “OFF” position.)
Turn on the gas at source.
Put a match in the match holder and strike the match.
Hold match holder and lit match by right side of rotisserie burner.
WARNING: Do not lean over the open grill.
7)
8)
Push rotisserie burner control knob down and turn to “START/HI”. Continue to
hold the control knob down until twenty (20) seconds after the burner has ignited.
Check that the burner is lit by looking for the rotisserie burner to glow red.
WARNING: If the rotisserie burner does not light, turn the
burner control knob to “OFF” and wait 5 minutes to let the
gas clear before you try again.
4
*The grill illustrated may have
slight differences than the
model purchased.
3
7
Note: When using the rotisserie with the lid closed, only light two of the main burners
under the food (See Grilling Methods-Indirect Cooking). Check your food periodically
to prevent over cooking on the outside. Turn off the rotisserie burner once the food has
browned to the desired color. Finish cooking on Indirect heat.
TO EXTINGUISH
Push in and turn each burner control knob clockwise to “OFF” position. Turn gas supply
off at the source.
WWW.WEBER.COM®
TROUBLESHOOTING
PROBLEM
29
CHECK
CURE
29
Burners burn with a yellow or orange flame, in
conjunction with the smell of gas (This is normal
for the burner lighting tube).
Inspect Spider/Insect Screens for possible obstructions.
(Blockage of holes.)
Clean Spider/Insect Screens. (See Section “Annual
Maintenance”)
Symptoms:
Burner does not light, or flame is low in “HI”
position.
Is fuel hose bent or kinked?
Straighten fuel hose.
Does Burner light with a match?
If you can light Burner with a match, then check the
Crossover® ignition system.
Did you use the snap igniter several times until the main
burner lit (See Lighting Instructions)?
Make sure to hold the control knob in for two seconds after
snapping the igniter and seeing the orange flame from the
burner lighting tube.
Does the igniter work (Do you see a spark when you
repeatedly use the snap igniter?
Try manually lighting the burner (refer to “Main Burner
Manual Lighting”). Call customer service.
Are you preheating barbecue in the prescribed manner?
All burners on HI for 10 to 15 minutes for preheating.
Are the cooking grates and Flavorizer® bars heavily
coated with burned-on grease?
Clean thoroughly. (See Section “Cleaning”)
CAUTION: Do not line the bottom tray
with aluminum foil.
Is the bottom tray “dirty” and not allowing grease to flow
into catch pan?
Clean bottom tray.
Burner flame pattern is erratic. Flame is low when
burner is on “HI”. Flames do not run the whole
length of the burner tube.
Are burners clean?
Clean burners. (See Section “Maintenance”.)
Inside of lid appears to be “peeling.” (Resembles
paint peeling.)
The lid is porcelain enamel or stainless steel, not paint. It
cannot “peel”. What you are seeing is baked on grease
that has turned to carbon and is flaking off.
THIS IS NOT A DEFECT.
Clean thoroughly. (See Section “Cleaning”.)
Cabinet doors are not aligned.
Check the adjustment pin on the bottom of each door.
Loosen adjustment nut/s. Slide door/s until aligned. Tighten
nut.
Experiencing flare-ups:
If problems cannot be corrected by using these methods, please contact the Customer Service Representative in your area using the contact information on our web
site. Log onto www.weber.com®.
SIDE BURNER MAINTENANCE
PROBLEM
CHECK
CURE
Side Burner does not light.
Is gas supply off?
Turn supply on.
Flame is low in “HI” position
Is the fuel hose bent or kinked?
Straighten hose.
Push button ignition does not work.
Does burner light with a match?
If match lights burner, check igniter (see below).
If problems cannot be corrected by using these methods, please contact the Customer Service Representative in your area using the contact information on our web
site. Log onto www.weber.com®.
WWW.WEBER.COM®
SIDE BURNER TROUBLESHOOTING
30
SIDE BURNER MAINTENANCE
WARNING: All gas controls and supply valves should be in
the “OFF” position.
Make sure black wire is connected between the igniter and electrode.
Make sure white wire is connected between the igniter and grounding clip.
Spark should be a white/blue color, not yellow.
1)
Igniter Wire
2)
Ground wire
3)
Burner
Side Burner Grate
Side Burner cap
Side Burner Ring & Head
Igniter Electrode
Control Knob
Igniter
ROTISSERIE TROUBLESHOOTING
PROBLEM
Rotisserie burner does not light.
CHECK
CURE
Did you hold the burner control knob in and
hold in for 20 seconds until after burner
ignited?
Try to relight burner by holding burner control knob in and continue holding in until
20 seconds after burner has ignited.
Did you wait to see the entire ceramic surface
become alight before counting 20 seconds?
When relighting burner by holding burner control knob in, wait to see the entire
ceramic surface become alight before counting 20 seconds?
Did you repeatedly use the snap ignition until
the burner ignited?
After waiting five minutes for gas to clear, try repeatedly using the snap igniter until
the burner ignites (refer to “Lighting the Rotisserie Burner”).
Does the igniter work (Do you see a spark
when you repeatedly use the snap igniter?
Try manually lighting the burner (refer to “Lighting the Rotisserie Burner”). Call
customer service.
If problems cannot be corrected by using these methods, please contact the Customer Service Representative in your area using the contact information on our
web site. Log onto www.weber.com®.
WWW.WEBER.COM®
SEAR BURNER TROUBLESHOOTING
PROBLEM
CHECK
31
31
CURE
Burners burn with a yellow or orange
flame, in conjunction with the smell
of gas (This is normal for the burner
lighting tube).
Inspect Spider/Insect Screens for possible
obstructions. (Blockage of holes.)
Clean Spider/Insect Screens. (See Section “Annual Maintenance”)
Sear Station burner does not light.
Did you ignite the two adjacent main burners
(See Sear Station burner lighting instructions
for safe lighting procedure)
Verify adjacent main burner ignition by visual inspection of a flame.
Does Burner light with a match?
If you can light Burner with a match, then check the Crossover® Channel on the sear
burner. (See Maintenance for burner removal and cleaning procedure.)
Does the igniter work (Do you see a spark
when you repeatedly use the snap igniter?
Try manually lighting the burner (refer to “Lighting the Rotisserie Burner”). Call
customer service.
WARNING: If ignition does not occur in 5 seconds, turn burner control
OFF, wait 5 minutes to let the gas clear before you try again
If problems cannot be corrected by using these methods, please contact the Customer Service Representative in your area using the contact information on our
web site. Log onto www.weber.com®.
OPERATING THE HANDLE LIGHT
The Weber Grill Out™ Handle Light has a built-in “Tilt Sensor.” With the power button (a)
activated, the light will come on when the grill lid is open. The light will turn off when the lid
is closed. For daytime use, deactivate the sensor by pressing power button (a).
HANDLE LIGHT TROUBLESHOOTING
PROBLEM
™
Weber Grill Out Handle
Light does not light.
CHECK
CURE
Are the batteries old?
Replace batteries.
Are the batteries installed correctly?
See assembly illustration.
Is the lid in the up position with the power button ON?
Light will activate when lid is open.
™
Is the Weber Grill Out Handle Light activated?
Press the power button.
Is the Weber Grill Out™ Handle Light positioned correctly on the handle?
Adjust position (See assembly illustration).
If problems cannot be corrected by using these methods, please contact the Customer Service Representative in your area using the contact information on our web
site. Log onto www.weber.com®.
WWW.WEBER.COM®
MAINTENANCE
32
WEBER® SPIDER/INSECT SCREENS
Your Weber® gas barbecue, as well as any outdoor gas appliance, is a target for spiders
and other insects. They can nest in the venturi section (1) of the burner tubes. This
blocks the normal gas flow, and can cause the gas to flow back out of the combustion
air opening. This could result in a fire in and around the combustion air openings, under
the control panel, causing serious damage to your barbecue.
The burner tube combustion air opening is fitted with a stainless steel screen (2) to
prevent spiders and other insects access to the burner tubes through the combustion air
openings.
We recommend that you inspect the Spider/Insect screens at least once a year.
(See Section “Annual Maintenance”.) Also inspect and clean the the Spider/Insect
screens if any of the following symptoms should ever occur:
1)
The smell of gas in conjunction with the burner flames appearing yellow and lazy.
2)
Barbecue does not reach temperature.
3)
Barbecue heats unevenly.
4)
One or more of the burners do not ignite.
DANGER
Failure to correct the above mentioned symptoms may result
in a fire, which can cause serious bodily injury or death, and
cause damage to property.
MAIN BURNER CLEANING PROCEDURE
Turn off the gas supply.
Remove the manifold (See “Replace Main Burners”).
Look inside each burner with a flashlight.
Clean the inside of the burners with a wire (a straightened-out coat hanger will work).
Check and clean the air shutter opening at the ends of the burners. Check and clean
the valve orifices at the base of the valves. Use a Steel bristle brush to clean outside of
burners. This is to make sure all the burner ports are fully open.
CAUTION: Do not enlarge the burner ports when cleaning.
WWW.WEBER.COM®
MAINTENANCE
33
33
REPLACE MAIN BURNERS
1)
2)
3)
4)
5)
6)
Your Summit® gas grill must be off and cool.
Turn gas off at source.
Disconnect gas supply.
Remove cooking grates.
Remove smoker box.
Remove Flavorizer® bars.
REMOVE CONTROL PANEL
7)
Part required: Phillips Screwdriver.
a) Remove the burner control knobs.
b) Remove the two screws that secure the control panel to the frame.
c) Remove the control panel. Tilt panel forward and lift up and away from grill.
Be careful not to break or disconnect the wires for the control panel lights.
Rest the control panel against the left side of the grill (A) exposing the valves, burners,
igniter, and manifold.
c
b
a
8)
9)
Remove the two screws that secure the manifold to the cookbox. Pull manifold
assembly out from the manifold frame.
Pull the selected burner(s) tube(s) from manifold frame and replace with a new
burner tube.
(A)
WWW.WEBER.COM®
34
MAINTENANCE
REMOVING THE SEAR STATION™ BURNER
To remove the Sear Station Burner™, pull the burner tube toward you. This removes it
from the burner tube notch (a.). Then rotate the tube clockwise (b.), taking care to rotate
the burner tube so that the screw at the end of the tube (d.) fits through the notch in the
heat shield opening (e.). When the burner tube is free, remove it from the firebox (c.).
a.
b.
c.
10) To reinstall the manifold assembly, reverse steps 7 through 9.
CAUTION: The burner openings (A) must be positioned
properly over the valve orifices (B).
d.
e.
Make sure the opposite end of the burner tubes (C) properly
align into the slots on the backside of the cookbox. Check
proper assembly before fastening manifold in place.
WARNING: After reinstalling the gas lines, they should be
leak checked with a soap and water solution before using
the grill. (See, “Check for gas leaks.”)
ANNUAL MAINTENANCE
INSPECTION AND CLEANING OF THE SPIDER/INSECT SCREENS
To inspect the Spider/Insect screens, remove the control panel. If there is dust or dirt on
the screens, remove the burners for cleaning the screens.
Brush the Spider/Insect screens lightly with a soft bristle brush (i.e. an old toothbrush).
CAUTION: Do not clean the Spider/Insect screens with hard
or sharp tools. Do not dislodge the Spider/Insect screens or
enlarge the screen openings.
Lightly tap the burner to get debris and dirt out of the burner tube. Once the Spider/
Insect screens and burners are clean replace the burners.
If the Spider/Insect screen becomes damaged or cannot be cleaned, please contact the
Customer Service Representative in your area using the contact information on our web
site. Log onto www.weber.com®.
BURNER FLAME PATTERN
The Weber® gas barbecue burners have been factory set for the correct air and gas
mixture. The correct flame pattern is shown.
1)
Burner tube
2)
Tips occasionally flicker yellow
3)
Light blue
4)
Dark blue
If the flames do not appear to be uniform throughout the burner tube, follow the burner
cleaning procedures.
WWW.WEBER.COM®
BARBACOA DE GAS
Guía del Propietario de la Barbacoa de Gas Natural
ENSAMBLAJE - PG 4
E/S-470
#89372
DEBE LEER ESTA GUÍA DEL PROPIETARIO
ANTES DE PONER A FUNCIONAR LA
BARBACOA DE GAS
PELIGRO
Si huele a gas:
1. Cierre el suministro de gas al artefacto.
2. Apague todas las flamas cerrando la
valvula general de paso.
3. Abra la tapa.
4. Llame inmediatamente a la central de
fugas o a su proveedor de gas.
Una fuga de gas puede provocar un incendio
o explosión que puede resultar en lesiones
corporales serias o la muerte, o daños a la
propiedad.
NOTA IMPORTANTE: Antes de poner a
funcionar la asador, siga cuidadosamente
todos los procedimientos en este manual
para verificar que no existan fugas. Haga
esto aun y cuando la asador haya sido
ensamblada por el distribuidor.
PARA SU SEGURIDAD:
1. No almacene gasolina u otros fluidos
flamables en la cercanía de su aparato.
2. Ningún cilindro de propano licuado que
no esté conectado para su uso deberá
almacenarse cerca de éste o cualquier
otro artefacto doméstico.
AVISO AL INSTALADOR:
Estas instrucciones deben permanecer con el
propietario, quien las deberá guardar para un
futuro uso.
ESTE ARTEFACTO A GAS ESTÁ DISEÑADO
PARA USARSE SOLAMENTE AL AIRE LIBRE.
NOTA IMPORTANTE: No trate de encender
este artefacto sin antes leer la sección
“Instrucciones para encender la asador”
de este manual.
89372 ESNA
NG
36
ADVERTENCIAS
PELIGRO
El hacer caso omiso de los avisos de peligros, advertencias y precauciones contenidos en este Manual del Propietario pudiera
resultar en lesiones corporales serias o la muerte, o en un fuego o explosión que cause daños a la propiedad.
ADVERTENCIAS
No almacene un tanque de propano licuado desconectado o de repuesto debajo o cerca de este asador.
El ensamblaje incorrecto puede ser peligroso. Por favor siga cuidadosamente las instrucciones de ensamblaje.
Tras haber estado guardada o sin uso por algún tiempo, antes de usar la barbacoa de gas Weber® verifique que no existan
fugas de gas o obstrucciones en el quemador. Vea en este manual las instrucciones para los procedimientos correctos.
No opere la barbacoa de gas Weber® si existe una fuga de gas.
No utilice una llama abierta para comprobar la existencia de fugas de gas.
Nunca debe haber materiales combustibles a una distancia menor de 24 pulgadas (60 cm) de la parte superior, inferior, trasera
o lateral de su asador de gas Weber®.
No coloque una funda para barbacoas ni cualquier otra artículo inflamable sobre o dentro del área de almacenaje ubicada
debajo del asador.
Nunca permita que los niños usen la barbacoa de gas Weber®. Algunas partes accesibles de la barbacoa pudieran estar muy
calientes. Mantenga alejados a los niños pequeños mientras ésta se esté usando.
Usted debe proceder con razonable cuidado al usar su barbacoa de gas Weber®. Ésta estará caliente al cocinarse en ella o al
limpiarla, y nunca deberá dejarse desatendida o moverse mientras esté funcionando.
Si llegasen a apagarse los quemadores, cierre todas las válvulas de gas. Abra la tapa y espere cinco minutos antes de tratar de
volver a encender la barbacoa, usando las instrucciones de encendido en este manual.
No use carbón o piedra pómez en su barbacoa de gas Weber®.
No se incline sobre la barbacoa abierta o coloque las manos o dedos en el borde delantero de la caja de cocción.
Si la grasa llegase a agarrar fuego, apague todos los quemadores y mantenga la tapa cerrada hasta que se haya apagado el
fuego.
Al limpiar las válvulas o los quemadores, no ensanche los orificios de las válvulas o las aberturas de los quemadores.
La barbacoa de gas Weber® deberá limpiarse a fondo regularmente.
El propano licuado no es gas natural. El uso de gas natural en una unidad de propano licuado o viceversa, propano licuado en
una de gas natural, es peligroso y anulará su garantía.
Mientras opere la barbacoa, utilice guantes resistentes al calor.
Mantenga alejados de todas las superficie calientes a todo cordón eléctrico y a la manguera de suministro de combustible.
Los subproductos de la combustión producidos al usar este producto contienen sustancias químicas que son conocidas por
el Estado de la California como causantes de cáncer, defectos de nacimiento, u otros daños reproductivos.
No use esta barbacoa a menos que todas sus partes estén colocadas en su sitio. La unidad debe ensamblarse correctamente
de acuerdo con las instrucciones de ensamblaje.
No construya este modelo de barbacoa en ninguna construcción en la que la barbacoa esté incorporada de manera fija o
deslizable. El no acatar esta Advertencia pudiera resultar en un fuego o una explosión que pudiera causar daños a la propiedad
y heridas corporales graves o la muerte.
Propuesta 65 Advertencia: El manipular los materiales de latón en este producto lo exponen al plomo, una sustancia quimica
conocida por el estado de California como causante de cáncer, de defectos de nacimiento o de otros daños reproductivos.
(Lávese las manos después de manipular este producto.)
ÚNICAMENTE UNIDADES DE GAS PROPANO LICUADO
Use el regulador que se suministra con la barbacoa de gas Weber®.
No trate de desconectar el regulador de gas o ninguna conexión de gas mientras esté funcionando la barbacoa.
Un cilindro de propano licuado abollado u oxidado pudiera ser peligroso y deberá ser revisado por su suplidor de propano
licuado. No utilice ningún cilindro de propano licuado con una válvula dañada.
Aunque el cilindro de propano licuado pudiera aparentar estar vacío, algo de gas pudiera aún estar presente, por lo que el
cilindro deberá transportarse y almacenarse tomando esta posibilidad en consideración.
Si usted ve, huele o escucha el silbido de un escape de gas del cilindro de propano licuado:
1. Apártese del cilindro de propano licuado.
2. No trate de corregir el problema usted mismo.
3. Llame al cuerpo de bomberos local.
WWW.WEBER.COM®
INSTRUCCIONES GENERALES
La barbacoa de gas Weber® es un aparato portable para cocinar al aire libre. Con la
barbacoa de gas Weber® usted puede asar de manera convencional, a la barbacoa, y
al horno con unos resultados que son difíciles de duplicar con los artefactos de cocina
de la casa. La tapa cerrada y las barras Flavorizer® le dan a la comida ese sabor a “aire
libre”.
La barbacoa de gas Weber® es portable por lo que usted puede reubicarla fácilmente
de sitio en su jardín o patio. La portabilidad significa que, si usted se muda, se puede
llevar su barbacoa de gas Weber® consigo.
El suministro de gas natural es fácil de usar y le da a usted más control al cocinar que
el carbón.
•
Estas instrucciones le indicarán los requisitos mínimos para ensamblar su
barbacoa de gas Weber®. Por favor lea cuidadosamente las instrucciones antes
de utilizar su barbacoa de gas Weber®. Un ensamblaje incorrecto puede ser
peligroso.
•
No debe ser usado por niños.
•
Si hubiesen códigos locales que aplicasen a las barbacoas de gas portátil, usted
deberá acatarlos. La instalación debe cumplir con los códigos locales o, en
ausencia de estos, bien sea con el “Código nacional de gas combustible”, ANSI
Z223.1/NFPA 54, el “Código de instalaciones de gas natural y propano”, CSA
B149.1, o el “Código de manipulación y almacenaje de propano”, B149.2, o la
“Norma para vehículos recreativos”, ANSI A 119.2/NFPA 1192, y CSA Z240 RV
Series, “Código para vehículos recreativos”, según corresponda.
•
Esta barbacoa de gas Weber® está diseñada