1
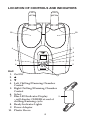
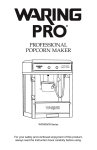
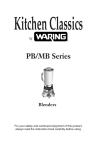
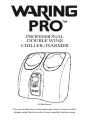
PROFESSIONAL
DOUBLE WINE
CHILLER/WARMER
PC200 Series
For your safety and continued enjoyment of this product,
always read the instruction book carefully before using.
WINE CHILLER/WARMER
Our Double Wine Chiller/Warmer has two separate
internal databases of 33 red, white and Champagne wines.
Simply select your wine from the backlit LCD screen and
the chilling or warming begins. You’ll always know when
your wine is ready because an alarm alerts you when it has
reached the optimum serving temperature.
The Wine Chiller/Warmer has been thoroughly tested
to be certain it meets our own exacting quality control
standards. Please take a few moments to review the
following important information before using the Wine
Chiller/Warmer. Serve wine at the perfect temperature
– every time!
IMPORTANT SAFEGUARDS
All the safety and operating instructions should be read,
adhered to and followed before the unit is operated.
WARNING
1.Close supervision is necessary when this unit is used
by or near children.
2.Use this unit only for its intended use as described in
this manual.
3.Unplug this unit during lightning storms or when
unused for long periods of time.
4. Never drop or insert an object into any opening.
5.Protect the power cord from being walked on or
pinched, particularly at plug outlets, convenience
receptacles and the point where it exits the unit.
6.Do not allow cord to touch hot surfaces. Wrap cord
loosely around the unit when storing.
7.The unit should be situated away from direct
sunlight or heat sources such as radiators, electric
heaters, heat registers, stoves, or other units (including
amplifiers) that produce heat. Avoid placing on top of
stereo equipment that radiates heat.
8.Never block the air opening of the unit with
materials such as clothing, plastic bags or papers, or
place it on a soft surface such as a bed or couch, where
the air openings may be blocked.
9.Do not overload electrical outlet. Use only the power
source as indicated.
10. Do not carry this unit by cord or use cord as handle.
11.Never operate this unit if it has a damaged cord or
plug, if it is not working properly, or if it has been
dropped or damaged or dropped into water. If the
unit’s power supply cord or plug is damaged, do not
attempt to fix it yourself.
12. To avoid the risk of electric shock, do not disassemble or attempt to repair the unit. Incorrect repair can
cause risk of electric shock or injury to persons when unit is used.
13. Do not operate in the presence of explosive and/or flammable fumes.
DANGER
To reduce the risk of electric shock, burns, fire or injury:
1. Always unplug the unit from the electrical outlet
immediately after using.
2. Do not use while bathing or in a shower.
3. Do not place or store unit where it can fall or be pulled into a tub or sink.
4. Do not place in or drop into water or other liquid.
5. Do not reach for unit that has fallen into water.
Unplug it immediately.
6. Care should be taken so that objects do not fall and liquids are not spilled onto the unit.
CAUTION
• TO REDUCE THE RISK OF ELECTRIC SHOCK, DO
NOT REMOVE COVER OR BACK. THERE ARE NO USER-SERVICEABLE PARTS INSIDE.
• TO REDUCE THE RISK OF FIRE OR ELECTRIC
SHOCK, DO NOT EXPOSE THIS UNIT TO WATER
OR MOISTURE.
The lightning flash with arrowhead symbol within an
equilateral triangle is intended to alert the user to the
presence of uninsulated dangerous voltage within the
unit’s enclosure that may be of sufficient magnitude to
constitute a risk of electric shock.
The exclamation point within an equilateral triangle is
intended to alert the user to the presence of important
operating and maintenance (servicing) instructions in
the literature accompanying the unit.
LOCATION OF CONTROLS AND INDICATORS
10
10
8
7
8
6
2
3
4
5
Unit
1. On/Off
1
2. s
3. ▼
4. Left Chilling/Warming Chamber
Control
5. Right Chilling/Warming Chamber
Control
6. Select
9
7. Blue LED Indicator Display
– will display Cheers at end of
chilling/warming cycle
8. Ready Indicator Lights
9. Power Adapter
10. Plastic Sleeve
WINE CHILLER/Warmer OPERATION
Using the Wine Chiller/Warmer
1. I nsert one end of the power adapter into the Wine
Chiller/Warmer (make sure adapter is securely in
place) and plug the other end into an electrical outlet.
2. Insert wine or champagne bottle into the left or right
side aluminum reservoir.
3. Raise the plastic sleeve to cover the bottle.
4. Press On/Off until the display illuminates blue.
5. Press L or R for left or right chilling/warming
chamber.
6. Press SELECT to enter the Wine Library.
7. Press Up/Down keys to select red wine, white wine
or Champagne.
8. Press SELECT again, then press s or ▼ to select your specific wine or Champagne.
9.Press SELECT again and cooling or warming
begins. The LCD indicator display is set up to show
the left and right side preset temperatures and status
(using the bar graph).
10. When cooling/warming process has been completed, LCD will display CHEERS ! and a full
bar graph.
11. After the cooling/warming
process has been completed,
the unit will cycle off for
approximately 3 minutes and
then will automatically resume
the cooling/warming process
to maintain the preset temperature. See conditions below.
Two conditions remain:
1. The bottle is left in the unit over a period of time.
The wine chiller/warmer will cycle to maintain the
preset temperature, which means the current
temperature will fluctuate slightly within 3 to 4 degrees.
2.If the bottle is removed from the wine chiller/warmer
and then put back into it after a few minutes, it will
automatically start chilling/warming to the preset
temperature until the unit is turned off.
Approximate Chilling/Warming Times
Preset Temperature
Time
Red Wine
64ºF
24 minutes
White Wine
48ºF
75 minutes
Champagne
45ºF
95 minutes
* Actual cooling time will depend on room ambient temperature, the
initial temperature of the wine being chilled, the bottle size (as related to
surface contact area to the interior of the bucket), volume of wine in the
bottle, and use of insulation sleeve.
* Starting temperature of approximately 73ºF.
CARE AND MAINTENANCE
Always disconnect before cleaning. Wipe with a damp
cloth, then dry. Do not use abrasive cleaning agents.
©2007 Waring Products
Division of Conair Corporation
150 Milford Road
East Windsor, NJ 08520
www.waringproducts.com
Printed in China
PC200 IB
07WR32145
IB-7664