1
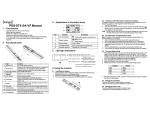
PDSBT-ST43-VP Manual
1. Key features
Color /Monochrome (Mono) scan selection
600/300 dpi resolution scan selection
Built-in BLUETOOTH® wireless technology
Directly save JPEG file to microSD/microSDHC card
Supports microSD/microSDHC card up to 32GB
Driver free to download for Windows® XP, Windows® Vista™,
Windows® 7 and Mac OS® 10.4 or above
(direct plug-in, driver installation not required)
4
Counting indicator
Show scanned files in microSD card
5
Selected resolution
High:600 dpi / Low:300 dpi
4. LED light indications
5.3 Time setting
1.
2.
3.
4.
“GREEN” SCAN LED ON
“GREEN” SCAN LED OFF
2. Functional parts
Press [TIME SET] button to enter time setting mode by using a thin, blunt object,
such as a paperclip to access the button. The LCD screen will read “1##” (step 1) for
the year. “##” is a set of numbers that would be changed to correspond to the actual
time/date setting. The numbers 1-5 in front of “##” indicates each step in the settings.
Press the [C/BW] or [DPI] buttons to select the current Year.
Press
button to confirm setting. The LCD screen will now read “2##.”
Repeat steps 2 and 3 to select the Month, Date, Hour, and Minute.
Indicator
1##
2##
3##
4##
5##
Scan in progress.
Standby / Scan is complete.
------------------------------------------------------------------------------------------------------------“RED” ERROR LED ON
Scanning too fast.
May cause scanning error.
Restart and scan again.
When connected to USB or power adapter: Charging
No error in scanning speed.
Continue scanning process.
When connected to USB or power adapter: Charging
complete.
------------------------------------------------------------------------------------------------------------------------------“BLUE” BT LED ON
Bluetooth wireless technology is enabled
5
“RED” ERROR LED OFF
------------------------------------------------------------------------------------------------------------------------------------------
1
2
Part
Function
﹡Scan will START when
Scan LED indicator
Error LED indicator
Ready for scan: Green LED on
Over speed: Red LED on
Charging battery: Red LED on until complete.
Scanning status display
﹡To END scan, press
3
LCD screen
4
BT LED indicator
5
Scan button
6
Battery door
7
microSD card slot
8
Time set
9
Format button
10
Power / Bluetooth
button
11
USB interface
12
Resolution
13
C/BW
Bluetooth: Blue LED on
In power on mode, press this button to start scanning,
press this button again to stop scanning
For 4.2V rechargeable battery
microSD/microSDHC card storage location.
When Scanner is power on, press to enter Time and Date
setting mode
When Scanner is power on, press this button to format the
microSD/microSDHC card.
Bluetooth On/Off: Switch this key left to [BT] mode to
enable Bluetooth techonolgy
Power On/Off: Switch to [SCAN] mode to turn on scanner
Switch to [OFF] mode to turn off scanner.
Download photo to a computer via USB cable provided.
Select High(600dpi) / Low(300dpi) resolution;
High / Low resolution mode icon will be displayed on status
LCD screen.
Select Color/Mono scan, Color/Mono mode icon will be
displayed on status LCD
3. Explanation of the status icons
Item
Function
Description
1
SD card indicator
Photos will be stored in microSD card
2
Battery indicator
Battery is full
3
Effect indicator
Color or Mono
Empty battery
Note: All contents on the microSD card will be erased during formatting.
1.
Insert a microSD card into the scanner with metal side facing upwards. Then power
on the scanner.
2.
Press the [FORMAT] button with a thin, blunt object, such as the end of a paperclip
to access the button. An “F” shows on the LCD screen.
3.
Press the
button once to begin formatting microSD card.
4.
The SD card indicator
will flash until the formatting process is complete.
button again
5.5 Calibrating your scanner
1.
Charging the battery
2.
1.
Before first using the scanner, it is recommended to charge the battery for 6-8
hours.
2.
To charge, connect the scanner to a (1) USB 2.0 port or (2) an outlet with the power
adapter included. When charging, “Err” (Error) red light will be lit and will turn off
once the battery is fully charged.
Note: Do not remove or the battery from the battery compartment.
3.
4.
5.
5.2
After setting the Minute, “5##”, press the [TIME SET] button again to complete the
Time and Date setting.
5.4 Formatting the microSD memory card
button is pressed
5. Using the scanner
5.1
Setting
Year
Month
Date
Hour
Minute
Inserting a microSD memory card (not included)
To operate the scanner, you must insert a microSD Card (not supplied) to record and store your
pictures. Inserting the microSD memory card:
1.
Turn OFF the scanner.
2.
Insert the microSD card into the microSD card slot (with metal side facing upwards).
6.
5.6
2.
5.7
button once and then release both buttons. SD card indicator
the
will flash and “GREEN” and “RED” LED light will turn on.
Do not move the scanner. Wait until the “RED” LED light turns off. “GREEN” LED
light will stay on.
With only the “GREEN” LED light on, start scanning the white paper by sliding the
scanner across the paper until the “GREEN” LED light turns off. (Slide the scanner
backwards if necessary).
Slide the [POWER] switch to [OFF] to turn off the scanner. Calibration is completed.
Setting the resolution
1.
Gently press in until card is clicked in and latched. The SD card indicator
must
appear on the LCD screen.
Note: Do not force the card into the slot; forcing may damage scanner and the microSD memory
card. Align microSD card position (as marked) and try again.
Clean the glass shield located on the bottom of scanner with the cleaning cloth
provided.
Turn on the scanner by sliding the [POWER] switch to [SCAN] mode. Then place the
scanner on the provided “White Balance Calibration” paper.
Click and hold onto the [C/BW] button. While holding onto the [C/BW] button, press
By pressing the [DPI] resolution button on the scanner, you may choose between
high resolution (600 dpi) and low resolution (300 dpi).
The high or low resolution mode will be displayed on the LCD screen to reflect your
choice.
How to scan
Note: To scan, make sure your scanner is not connected to the computer and that the [BT]
blue light is not on.
1.
Turn on the scanner by sliding the [POWER] switch to [SCAN] mode.
2.
Place the document on a flat surface and hold down the document with one hand.
3.
Place the scanner on the edge of the paper approximately 5/8 to 3/4 of an inch onto
the paper to ensure the most of the document can be scanned. Make sure to keep
the scanning area in between the scanning width indicators marked on the side of
the scanner.
4.
Hold the scanner flat against the material and then press the
once.
button
Resolution
Low resolution : 300x300 dpi(default)
High resolution: 600x600 dpi
Maximum scanning
speed for A5 size
document
Color High resolution: 8 Seconds
Mono High resolution: 6.0 Seconds
Color Low resolution: 3.0 Seconds
Mono Low resolution: 2.0 Seconds
Capacity (Based on 1GB microSD
card. Scan A4 size file, the quantity
of scans varies depending on the
content complexity)
5.
6.
5.8
Slide the scanner slowly, keeping your hand stable to get the best quality picture.
Press the
button again to stop scanning.
Bluetooth®
Bluetooth wireless technology allows a transfer of saved images to most Bluetooth
compatible devices with media file receiving profiles. Magic Wand™ scanner supports
Object Push Profile (OPP) servers/clients and File Transfer Profile (FTP) servers. Please
refer to your Bluetooth enabled device’s user manual or specifications for the appropriate
profiles.
Turn on Bluetooth technology and pair with other compatible device (sold separately).
1.
Slide the [POWER] switch to [BT] to enable Bluetooth wireless technology. “BLUE”
LED light will turn on.
2.
Enable Bluetooth technology on receiver.
3.
Search and pair receiver with “Handy Scanner.”
4.
Input “0000” as the passcode once the receiver detects the scanner. “BLUE” LED
light will flash.
5.
Press
to pair connection between receiver and scanner. “BLUE” LED
light will stop flashing and remain “BLUE” once connection is successfully set up.
Note:
5.9
button must be pressed within one minute or the connection will fail.
Transferring files via Bluetooth technology
After the connection is set up successfully, press the [DPI] or the [C/BW] button to
choose the scan file that will be transferred to the receiver. The scan file number will
display on the LCD screen.
once. The selected file will start
2.
After the scan file is selected, press
to transfer. During a file transfer, “BLUE” LED light will flash.
3.
After the file is transferred, the receiver will indicate file transfer is complete and the
flashing “BLUE” LED light on the scanner will stop blinking. Files in scanner will be
kept unchanged.
Note: The process for receiving files from scanner may differ from each device. Please refer to
your Bluetooth device’s manual for more information. Unpair and delete saved Bluetooth device
from list then search and reconnect to “Handy Scanner” again if necessary.
Black Image
Contact Image Sensor
aged.
Recalibrate the scanner.
Refer to section 5.5
600dpi color: 220 Photos(Min.)
10. ABBYY® OCR Software
600dpi mono: 290 Photos(Min.)
(Optional, not required to install to operate scanner)
300dpi color: 780 Photos(Min.)
Compatible with Windows® XP, Windows® Vista™, Windows® 7 To access the software User’s Manual go to the Help menu for instructions on how to use the OCR software application: 1. Load and open the ABBYY software. 2. Press the “F1” key located on your keyboard to launch the “Help” menu from the software. 3. OR, locate the ABBYY icon found next to the Time indicator on your computer’s taskbar and then right click on the icon to access the “Help” menu. 300dpi mono: 1280 Photos(Min.)
Scan width
Approx. 8.5”
Scan length
300DPI: 53"(Max), 600DPI: 26"(Max)
File format
JPEG
LCD
Auto Power Off
Scanning status display
3 Minutes
USB Port
USB 2.0 high speed
External memory
Standard Battery
microSD/microSDHC card
4.2V Rechargeable Lithium Polymer battery
8. Computer system minimum requirement
Operating System
Windows® XP, Windows® Vista™, Windows® 7 and
Mac OS® 10.4 or above
(direct plug-in, driver installation not required)
CPU
Pentium III or above
RAM
At least 256MB
Interface
USB port
FCC (Federal Communications Commission)
This device complies with Part 15 of the FCC Rules.
Operation is subject to the following two conditions:
(1)
This device may not cause harmful interference, and
(2)
this device must accept any interference received, including interference that may
cause undesired operation.
1.
6. Viewing your scans
1.
2.
Connect your scanner to your computer and then turn on your scanner.
Your computer should recognize the scanner as a “Removable Disk.” Click “Open
folder to view files” to view and import scans.
NOTE: If the Removable Device window did not launch automatically, go to your “My Computer”
(PC) and find the device under Removable Storage.
NOTE: In power off mode, connect your scanner to your computer to charge the battery. OR use
the power adapter that is included.
9. Troubleshooting
Problem
Cause
1. Low battery.
2. Battery not inserted
properly
1. Recharge the battery by
connecting scanner to the
computer via USB cable.
2. Replace or install the
battery correctly
Pictures cannot be
saved when you are
scanning them
1. microSD card has not
been installed correctly.
2. Memory is full
3. The microSD card has
not been formatted
properly
1. Install microSD card with
metal side facing upwards.
2. Download the pictures from
the scanner to the computer
to create storage space
3. Format your microSD card.
Refer to section 5.4
Computer does not
recognize your scanner
when connected. (You
cannot find removable
disk)
Connection failure.
1. Make sure all cable
connections are secured.
Restart the computer if
necessary
2. Try a different USB port.
The battery life is
very short
Use wrong type of battery
Replace with new
4.2V rechargeable battery
Blurry images
1. The lens of scanner is
dirty.
2. Contact Image Sensor
aged.
1. Clean the lens with soft
dry cloth
2. Recalibrate the scanner.
Refer to section 5.5
Scanning speed is too fast
Press the
button to reset and try
re-scanning the document
more slowly
ERR. LED is on when
scanning a document
7. Specifications
Image sensor
Number of sensor
Color Contact Image Sensor
5136 dots(1st~5104 dots available)
Solution
Cannot turn on the
scanner
ERR. LED is on after
powering on the scanner
The calibration data is
reset.
Recalibrate the scanner.
Refer to section 5.5
Windows® XP, Windows® Vista™, Windows® 7 are registered trademarks of Microsoft Corporation. Mac OS® 10.4 is a registered trademark of Apple Inc. ABBYY® is a registered trademark of ABBYY Software Ltd. microSD and microSDHC logo is a trademark of SD-3C, LLC.
The Bluetooth® word mark and logos are registered trademarks owned by Bluetooth SIG, Inc.
All trademarks are the property of their respective owner.
PDSBT-ST43-VP_Manual_11-0615
AM-VPS-43B-GB-R2