1
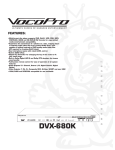
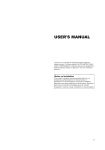
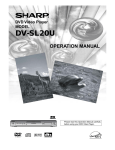
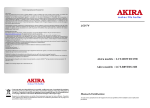
FEATURES:
r
'
s
m
a
n
u
a
l
•Multi-format disc player supports DVD, DivX®, VCD, CDG, MP3,
PHOTO-CD, HDCD and CD/DVD-R RW formats for unparalleled
media entertainment compatibility
•Experience the convenience of a jukebox on a disc, enjoying hours
of selected audio/video files from custom DivX® discs, each
capable of holding hundreds of DVD quality audio/video files
(PC required for creating DivX® discs)
•Dual microphone inputs with individual volume controls
•Built-in ECHO effect
•Digital Key Controller for changing the key of the music to fit
your vocal range via remote or front panel
•Built in Dolby Digital (AC-3) and Dolby DTS decoders for cinema
sound quality
•Full-function remote control for ease of operation of all system
features
•Audio Outputs 5.1 Channel, Stereo L/R, Digital Coaxial, Digital
Optical
•Video Outputs: Y, Cb, Cr, Composite RCA, S-Video, SCART and even VGA!
•100V/240V and NTSC-PAL compatible for use worldwide
R
Karaoke Player
DVX-780K
OPEN/CLOSE
R
PLAY/PAUSE
STOP
PREV
e
Progressive Scan
Digital Key Control DVD/DivX
NEXT
V I D E O
POWER
1
0
MIC
10
ECHO
2
0
10
0
R
1
2
3
4
7
8
9
0
5
6
Digital Key Control
N/P R/L
b
#
10
w
2
DVX-780K
o
MIC
n
CDG
1
Safety Instructions
8. Ventilation - The appliance should be situated so its
location does not interfere with its proper ventilation. For
example, the appliance should not be situated on a bed,
sofa, rug, or similar surface that may block the
ventilation slots.
CAUTION
RISK OF SHOCK
9. Heat - The appliance should be situated away from
heat sources such as radiators, heat registers,
stoves, or other appliances (including amplifiers)
that produce heat.
CAUTION: To reduce the risk of electric shock,
do not remove cover (or back). No userserviceable parts inside. Only refer servicing to
qualified service personnel.
10. Power Sources - The appliance should be
connected to a power supply only of the type described
in the operating instructions or as marked on the
appliance.
Explanation of Graphical Symbols
The lightning flash & arrowhead
symbol, within an equilateral triangle,
is intended to alert you to the
presence of danger.
11. Grounding or Polarization - Precautions should be
taken so that the grounding or polarization means of
an appliance is not defeated.
12. Power-Cord Protection - Power-supply cords
should be routed so that they are not likely to be walked
on or pinched by items placed upon or against them,
paying particular attention to cords at plugs,
convenience receptacles, and the point where they exit
from the appliance.
The exclamation point within an
equilateral triangle is intended to alert
you to the presence of important
operating and servicing instructions.
WARNING
13. Cleaning - Unplug this unit from the wall outlet
before cleaning. Do not use liquid cleaners or
aerosol cleaners. Use a damp cloth for cleaning.
To reduce the risk of fire or electric shock, do
not expose this unit to rain or moisture.
14. Power lines - An outdoor antenna should be
located away from power lines.
1. Read Instructions - All the safety and operating
instructions should be read before the appliance is
operated.
15. Nonuse Periods - The power cord of the appliance
should be unplugged from the outlet when left unused
for a long period of time.
2. Retain Instructions - The safety and operating
instructions should be retained for future reference.
16. Object and Liquid Entry - Care should be taken so
that objects do not fall and liquids are not spilled into the
enclosure through openings.
3. Heed Warnings - All warnings on the appliance and in
the operating instructions should be adhered to.
17. Damage Requiring Service - The appliance should
be serviced by qualified service personnel when:
4. Follow Instructions - All operating and use
instructions should be followed.
A.
B.
C.
D.
The power supply cord or plug has been damaged; or
Objects have fallen into the appliance; or
The appliance has been exposed to rain; or
The appliance does not appear to operate normally
or exhibits a marked change in performance; or
E. The appliance has been dropped, or the enclosure
damaged.
5. Attachments - Do not use attachments not
recommended by the product manufacturer as they may
cause hazards.
6. Water and Moisture - Do not use this unit near water.
For example, near a bathtub or in a wet basement and
the like.
18. Servicing - The user should not attempt to service
the appliance beyond that described in the operating
instructions. All other servicing should be referred to
qualified service personnel.
7. Carts and Stands - The appliance should be used
only with a cart or stand that is recommended by the
manufacturer.
Note:
To CATV system installer's (U.S.A.): This reminder is
provided to call the CATV system installer's attention to
Article 820-40 of the NEC that provides guidelines for
proper grounding and, in particular, specifies that the
cable ground shall be connected as close to the point of
cable entry as practical.
7 A. An appliance and cart combination
should be moved with care. Quick stops,
excessive force, and uneven surfaces may
cause an overturn.
2
FCC INFORMATION (U.S.A.)
1. IMPORTANT NOTICE: DO NOT MODIFY THIS
UNIT!: This product, when installed as indicated in the
instructions contained in this manual, meets FCC
requirements. Modifications not expressly approved by
Vocopro may void your authority, granted by the FCC,
to use this product.
2. IMPORTANT: When connecting this product to
accessories and/or another product use only high
quality shielded cables. Cable(s) supplied with this
product MUST be used. Follow all installation
instructions. Failure to follow instructions could void your
FCC authorization to use this product in the U.S.A.
CAUTION:
READ THIS BEFORE OPERATING YOUR UNIT
1. To ensure the finest performance, please read this
manual carefully. Keep it in a safe place for future reference.
2. Install your unit in a cool, dry, clean place - away from
windows, heat sources, and too much vibration, dust,
moisture or cold. Avoid sources of hum (transformers, v
motors). To prevent fire or electrical shock, do not expose to
rain and water.
3. Do not operate the unit upside-down.
3. NOTE: This product has been tested and found to
comply with the requirements listed in FCC Regulations,
Part 15 for Class "B" digital devices. Compliance with
these requirements provides a reasonable level of
assurances that your use of this product in a residential
environment will not result in harmful interference with
other electronic devices. This equipment
generates/uses radio frequencies and, if not installed
and used according to the instructions found in the
owner's manual, may cause interference harmful to the
operation of other electronic devices. Compliance with
FCC regulations does not guarantee that interference
will not occur in all installations. If this product is found
to be the source of interference, which can be
determined by turning the unit "Off" and "On", please try
to eliminate the problem by using one of the following
measures:
4. Never open the cabinet. If a foreign object drops into the
set, contact your dealer.
Relocate either this product or the device that is being
affected by the interference.
9. This unit consumes a fair amount of power even when the
power switch is turned off. We recommend that you unplug
the power cord from the wall outlet if the unit is not going to
be used for a long time. This will save electricity and help
prevent fire hazards. To disconnect the cord, pull it out by
grasping the plug. Never pull the cord itself.
Use power outlets that are on different branch (circuit
breaker or fuse) circuits or install AC line filter(s).
In the case of radio or TV interference, relocate/reorient
the antenna. If the antenna lead-in is 300-ohm ribbon
lead, change the lead-in to coaxial type cable.
If these corrective measures do not produce satisfactory
results, please contact your local retailer authorized to
distribute Vocopro products. If you can not locate the
appropriate retailer, please contact Vocopro, 1728
Curtiss Court, La Verne, CA 91750.
5. Place the unit in a location with adequate air circulation.
Do not interfere with its proper ventilation; this will cause the
internal temperature to rise and may result in a failure.
6. Do not use force on switches, knobs or cords. When
moving the unit, first turn the unit off. Then gently disconnect
the power plug and the cords connecting to other
equipment. Never pull the cord itself.
7. Do not attempt to clean the unit with chemical solvents:
this might damage the finish. Use a clean, dry cloth.
8. Be sure to read the "Troubleshooting" section on common
operating errors before concluding that your unit is faulty.
10. To prevent lightning damage, pull out the power cord
and remove the antenna cable during an electrical storm.
11. The general digital signals may interfere with other
equipment such as tuners or receivers. Move the system
farther away from such equipment if interference is
observed.
NOTE:
Please check the copyright laws in your country
before recording from records, compact discs,
radio, etc. Recording of copyrighted material may
infringe copyright laws.
CAUTION
The apparatus is not disconnected from the AC power
source so long as it is connected to the wall outlet,
even if the apparatus itself is turned off. To fully insure
that the apparatus is indeed fully void if residual power,
leave unit disconnected from the AC outlet for at least
fifteen seconds.
Voltage Selector (General Model Only)
Be sure to position the voltage selector to match the
voltage of your local power lines before installing the
unit.
220V
110V
3
Welcome...
And Thank you for purchasing the DVX-780K from VocoPro, your ultimate choice in
Karaoke entertainment! With years of experience in the music entertainment business,
VocoPro is a leading manufacturer of Karaoke equipment, and has been providing
patrons of bars, churches, schools, clubs and individual consumers the opportunity to
sound like a star with full-scale club models, in-home systems and mobile units. All our
products offer solid performance and sound reliability, and to further strengthen our
commitment to customer satisfaction, we have customer service and technical support
professionals ready to assist you with your needs. We have provided some contact
information for you below.
VocoPro
1728 Curtiss Court
La Verne, CA 91750
Toll Free: 800-678-5348
TEL: 909-593-8893
FAX: 909-593-8890
VocoPro Company Email Directory
Customer Service & General Information
[email protected]
Tech Support
[email protected]
Remember Our Website
Be sure to visit the VocoPro website www.vocopro.com for the latest information on
new products, packages and promos. And while you're there don't forget to check out
our Club VocoPro for Karaoke news and events, chat rooms, club directories and even
a KJ Service directory!
We look forward to hearing you sound like a PRO, with VocoPro, your ultimate choice in
Karaoke entertainment.
FOR YOUR RECORDS
Please record the model number and serial number below, for easy reference, in case of loss or theft. These
numbers are located on the rear panel of the unit. Space is also provided for other relevant information
Model Number
Serial Number
Date of Purchase
Place of Purchase
4
Listening For A Lifetime
Selecting fine audio equipment such as the unit you've just purchased is only the start of your musical enjoyment. Now it's
time to consider how you can maximize the fun and excitement your equipment offers. VocoPro and the Electronic
Industries Association's Consumer Electronics Group want you to get the most out of your equipment by playing it at a
safe level. One that lets the sound come through loud and clear without annoying blaring or distortion and, most
importantly, without affecting your sensitive hearing.
Sound can be deceiving. Over time your hearing 'comfort level' adapts to a higher volume of sound. So what sounds
'normal' can actually be loud and harmful to your hearing. Guard against this by setting your equipment at a safe level
BEFORE your hearing adapts.
To establish a safe level:
Start your volume control at a low setting.
Slowly increase the sound until you can hear it comfortably and clearly, and without
distortion.
Once you have established a comfortable sound level:
Set the dial and leave it there.
Pay attention to the different levels in various recordings.
Taking a minute to do this now will help to prevent hearing damage or loss in the future. After all, we want you listening for
a lifetime.
Used wisely, your new sound equipment will provide a lifetime of fun and enjoyment. Since hearing damage from loud
noise is often undetectable until it is too late, this manufacturer and the Electronic Industries Association's Consumer
Electronics Group recommend you avoid prolonged exposure to excessive noise. This list of sound levels is included for
your protection.
Some common decibel ranges:
Level
30
40
50
60
70
80
Example
Quiet library, Soft whispers
Living room, Refrigerator, Bedroom away from traffic
Light traffic, Normal Conversation
Air Conditioner at 20 ft., Sewing machine
Vacuum cleaner, Hair dryer, Noisy Restaurant
Average city traffic, Garbage disposals, Alarm clock at 2 ft.
The following noises can be dangerous under constant exposure:
Level
90
100
120
140
180
Example
Subway, Motorcycle, Truck traffic, Lawn Mower
Garbage truck, Chainsaw, Pneumatics drill
Rock band concert in front of speakers
Gunshot blast, Jet plane
Rocket launching pad
-Information courtesy of the Deafness Research Foundation
5
DVX-780K
DVD/DivX/CD/MP3 PLAYER
CONTENTS
SETTING UP PREFERENCES
INTRODUCTION
General setup ................................................ 15
Speaker setup ............................................... 16
Audio setup ...............................................17-18
Karaoke setup ............................................... 18
Preferences setup .......................................... 19
Safety Instructions .......................................... 2
FCC Information ............................................. 3
Welcome ...................................................... 4
Listening for a Lifetime .................................... 5
Table of Contents ........................................... 6
Media supported by your DVX-780K ................. 7
The DivX breakthrough .................................... 7
BASIC OPERATIONS
Play ..............................................................
Stop play .......................................................
Pause ...........................................................
Fast forward/rewind ......................................
Frame advance ..............................................
Slow/fast playback .........................................
DESCRIPTIONS AND FUNCTIONS
Front panel.................................................... 8
Rear panel .................................................... 8
Remote control ......................................... 9-10
GETTING STARTED
ADVANCED OPERATIONS
Connecting to an analog amplifier/2 channel
stereo receiver mixer .................................... 11
Connecting to a TV with RCA connections ........ 11
Connecting to a TV using an RF modulator ....... 11
Connecting to a TV through a VCR .................. 12
Connecting to a TV with S-Video inputs ............ 12
Connecting to a TV with Y Cb Cr Component
Video inputs ................................................ 12
Connecting to HDTV or video monitor .............. 13
Connecting to a Dolby Digital system/DTS
receiver/decoder ......................................... 13
Connecting to Dolby Pro Logic amplifier .......... 13
Connecting to DTS receiver/decoder .............. 14
Connecting to both analog and digital audio ...... 14
Connecting to a SCART jack for European TV .... 14
Scene/track selection.....................................
Searching by scene/track ...............................
Searching by time...........................................
Zooming .......................................................
Subtitles and choosing language .......................
Changing angles .............................................
Repeat playback .............................................
Program play .................................................
MP3 FUNCTIONS AND OPERATIONS
General notes on MP3 discs ............................
Notes on playing MP3 discs .............................
Display indications during playback ....................
Notes on creating MP3 discs ...........................
MP3 Glossary ................................................
MP3 play mode..............................................
MP3 Functions and operations .........................
20
20
20
20
20
20
21
21
21
21
21
22
22
22
23
23
23
23
23
23
24
DivX OPERATIONS
Requirements ................................................ 25
Downloads .................................................... 25
Ripping CDs/AVI conversion ............................ 25
SPECIFICATIONS
Specifications ................................................ 26
6
The DivX Breakthrough
What audiophile or music lover wouldn’t rather compile hours of their favorite music on a single disc instead of worrying about keeping a discchanger constantly refreshed? Wouldn’t you love to load a disc in your player and not have worry about about changing it until you’ve listened
to literally hundreds of CD-quality songs or burn DVD-quality videos on a single data CD? Think of what that could do for archiving hours of your
own home videos in a fraction of the space they take up now! Likewise, for a long time, every Karaoke party has required a large CD library just
to have enough tracks to entertain everyone, having to change discs often to keep the action going. Standard CDs or CD+Gs just don’t offer
enough tracks, and even MP3 discs are limiting. Fortunately, DivX Networks, Inc, an independent company,* has provided an alternative with
their cutting edge compression software utilizing MPEG4 technology.
DivX is analogous for Digital Video what the MP3 was for audio, which means it is capable of advancing all audio and video applications, including Karaoke entertainment. VocoPro recognized the incredible breakthrough that DivX offered our consumers, so we developed our latest series
of players to support DivX discs. Your new DVX-780K is designed with your multi-purpose home entertainment in mind--a player that can do it
all. You will see that creating DivX discs which compile volumes of your recordings and videos is simple. With a PC and two easy downloads,
you will be ready to archive your audio and videos libraries. See the “DivX operations” section of this manual for more information, and in the
meantime, start enjoying all the other features of your DVX-780K!
*DivX Networks, and subsidiaries is not affiliated with VocoPro and VocoPro accepts no responsibility for DivX Networks products. DivX
software is third-party paid (some applications are free for a limited time only), and all inquiries regarding DivX should be directed to www.
divx.com.
Media supported by your DVX-780K
CD
DVD
DivX
CD-R
CD-RW
VCD 1.0/1.1/2.0
HDCD
MP3
WMA
DVD5 (single-sided, single layer)
DVD9 (single-sided, dual layer)
DVD10 (dual-sided, single layer)
DVD18 (dual-sided, dual layer)
SVCD
CVD
DVCD
CD-DA
SACD
Regions and codes:
1
2
3
4
5
6
-
USA, Canada
European countries, Japan, Middle East, South Africa
West Asia (South Korea, Hong Kong, Tawain), Southeast Asia
Australia, Carribean, Mexico, New Zealand
Africa, Russia, India, North Korea, Pakistan
Mainland China
Note on purchasing DVD discs: DVD discs like DVD players have
a code of region. A DVD player can only play DVD discs that
conform to its region code.
Ask your DVD disc dealer to confirm that their DVD discs are consistent with your region code.
7
Descriptions and Functions
1
FRONT
7
8
10
9
Progressive Scan
Digital Key Control DVD/DivX
R
Karaoke Player
DVX-780K
OPEN/CLOSE
R
PLAY/PAUSE
STOP
PREV
NEXT
V I D E O
POWER
CDG
1
MIC
2
1
0
2
FL
FR
SUB
Y
Cb
10
3
Cr
R
ECHO
2
0
10
0
1
2
3
4
7
8
9
0
5
6
Digital Key Control
N/P R/L
b
#
10
11 12 13
6
5
4
14
10
9
8
3
2
1
MIC
Serial No.
VIDEO
Manufactured under License from Dolby Laboratories
DOLBY PRO LOGIC and the double-D symbol are
trademarks of Dolby Laboratories. Confidential
VGA
SL
SR
CENTER
REAR
L
R
4
COAXIAL
5
S-VIDEO
6
CAUTION
trademarks of Dolby Laboratories. Confidential
Manufactured under License from Dolby Laboratories
SCART OUT
OPTICAL
DOLBY PRO LOGIC and the double-D symbol are
RISK OF ELECTRIC SHOCK
DO NOT OPEN
AC IN
~100-240V,50-60HZ
7
FRONT
REAR
1. 5.1 CH. AUDIO OUTPUT jacks - These jacks are for connecting to 5.1 channel ready amplifiers/receivers.
2. COMPONENT VIDEO OUT (Y/Pb/Pr) jacks - These jacks
output VIDEO to a TV or monitor via COMPONENT VIDEO cables. COMPONENT VIDEO outputs the different color signals (Pr/Pb) and luminance signal (Y) separately in order to achieve high fidelity in reproducing colors. The description of the component video output connectors
may differ depending on the TV set or monitor (e.g. Pr/Pb Y, Cr/Cb/Y,
R-Y/B-Y/Y, etc.). Please refer to the operating instructions of the TV
set or monitor for details.
3. VIDEO OUT (RCA) jack - This jack outputs VIDEO to TVs, TFTs and
monitors.
4. AUDIO OUT (RCA) jacks - These audio output jacks provide analog
AUDIO connections to external devices (A/V receivers,TVs, VCRs etc.).
5. COAXIAL OUT jack - This digital output is for connecting devices
with a COAXIAL cable.
6. S-VIDEO jack - This jack outputs VIDEO to a display device (TV,
TFT, etc.) via an S-VIDEO cable. S-VIDEO provides better color separation and better resolution by separating the color and picture signals of
a composite-video signal.
7. OPTICAL OUT jack - This digital out is for connecting devices
with an OPTICAL cable. Please make sure to remove the protective
cover from this jack prior to connecting an OPTICAL cable. When not
using this input, keep the protective cover on to protect it from dust
and foreign material.
8. SCART OUT - Use this jack for connection to European TV systems.
9. VGA - For direct connection to a video monitor.
10. AC IN terminal - Grounded AC power cable connects here.
1. POWER button - This button turns the unit ON/OFF.
2. MIC 1 and MIC 2 inputs - Connect PHONO style MIC
cables (or line cables for wireless systems) here.
3. MIC VOLUME 1 and 2- Individual level control for each mic.
4. ECHO LEVEL - Controls level of ECHO effect on both mics.
5. DISPLAY WINDOW-Shows disc tray status and time display;
a)Disc type, b)Number of tracks or files total, c)Track number or file
currently playing, d)Time display; can be toggled between SINGLE
(track)/CHAPTER ELAPSED, SINGLE/CHAPTER REMAINING, TOTAL
ELAPSED or TOTAL REMAINING using DISPLAY key on remote control.
6. REMOTE SENSOR - This sensor receives infrared signals
transmitted by the REMOTE CONTROL transmitter. Obstacles located
between the remote control and remote sensor should be avoided as
they can preventsignal recognition.
7. OPEN/CLOSE button - Used to OPEN/CLOSE disc trays.
8. PLAY/PAUSE button - This button is used to initiate disc PLAY
9. STOP - Press once to PAUSE playback and enter AUTO STOP
MODE. Press twice to STOP playback. When in AUTO STOP MODE,
playback pauses and the Vocopro screen appears. Pressing PLAY will
resume playback and exit AUTO STOP MODE.
10. PREV / NEXT buttons - Press these buttons to advance to
the NEXT or reverse to the PREVIOUS track.
11. NUMBER PAD - Use these keys to input track # for play or
program
12. N/P - Press to toggle between NTSC (North American) and PAL
(European) video settings.
13. R/L - Will allow you to select between five playback modes for
CDGs and VCDs: LEFT VOCAL, RIGHT VOCAL, MONO LEFT (for Vocal
Cancel), MONO RIGHT and STEREO MODE. In STEREO, audio is standard L/R.
14. KEY CONTROL - See instructions for Remote Control Key
Control.
8
Remote Control
22
21
19 17 15 13
20 18 16 14 12 11
9
3
2
1
LIR
POWER
3
6
AUDIO V-MODE
EJECT PROG CLEAR
DISPLAY
5
2
9
4
8
1
7
27
4
NIP
ANGLE
28
29
SUBTITLE
TIME
32
5
6
VIEW
30
31
33
7
0
RETURN
TITLE
34
35
8
RESUME
SETUP
ENTER
MENU
ZOOM
A-B
VOL
STOP
MUTE
36
REPEAT
SLOW
STEP
Digltal Key Control
37
10
25 23
26 24
18. STOP button - Press this button once to PAUSE playback and
enter AUTO STOP MODE. Press twice to completely STOP playback.
While in AUTO STOP MODE, playback pauses and the Vocopro splash
screen appears. Pressing PLAY will resume playback and exit AUTO
3. DISPLAY button - To access OSD playback displays menu. The
STOP MODE.
different OSD display modes available depend on the type of disc being
19. STEP - Press this button to enter STEP mode playback. In STEP
played.
mode, playback is paused and the track/scene advances only a single
4. L/R - Will allow you to select between five playback modes for CDGs
each time STEP is pressed. To exit STEP mode, hit the ENTER/PLAY
and VCDs: LEFT VOCAL, RIGHT VOCAL, MONO LEFT (for Vocal Cancel),
button.
MONO RIGHT and STEREO mode. In STEREO mode, audio playback is
20. MUTE button - Press to SILENCE audio playback. Video playback
standard L/R audio. In MONO LEFT mode the right, guide vocal chanis not affected while using the menu feature.
nel is removed, and replaced with a duplicate, insturmental left chan21. b (FLAT) Key Control button - Will LOWER key of music output
nel. In MONO R mode, the left channel is removed, and replaced with a
a ½ step.
duplicate right channel of all vocals.
(NATURAL) Key Control button - Will return music output to
5. N/P - Press to toggle between NTSC and PAL video settings. Select 22.
its original, or NATURAL key.
NTSC for North American base video systems and PAL for European
based video systems.
23. POWER button - Press to turn machine ON/OFF.
6. SUBTITLE - Press to access the SUBTITLE selection window.
24. CLEAR - Cancels PROGRAM function.
7. ANGLE - For use only with multi angle coded discs, for example
25. V-MODE - To select video signal output selections for S-VIDEO,
some recorded performances such a sports events, concerts or theatri- INTERLACED TV, COAXIAL or Y,CB,CR.
cal programs. Pressing the button will select various angles of view.
26. AUDIO - For use with DVD only to select languages or switch to
8. RESUME - Returns you to track listing menu from any SETUP
5.1 channel output.
subdirectory.
27. NUMBER pad - Press to select a track or file for direct play9. SETUP - Press to access the main setup MENU.
back.
10. DIRECTION keys - Use these buttons to navigate through the
28. VIEW - When using VCDs, this button will give you 4 options: INvarious menu selections
TRO, DISC, TRACK and EXIT. The 3 menus will show up to 9 TRACKS
or sections to view.
11. ZOOM - Increases the size of the lyrics display during TRACK
playback, or the SCENE view on DVD.
29. TIME - Press this button to view the CURRENT DISC/TRACK
POSITION and/or to manually input a TIME MARKER to start playback
12. REVERSE - Rewinds through current TRACK, or SCENE. Each
from.
time button is pressed, speed will increase; for example, 2X, 4X, 6X,
8X.
30. RETURN - For use with VCDs, this button will return to previous menu or page
13. REPEAT - Press once to access the REPEAT selection window,
press twice to select TRACK REPEAT mode and press a third time to
31. ENTER - To make menu selections, play selected tracks
select DISC REPEAT mode.
32. FORWARD - Advances through current TRACK or SCENE.
14. PLAY / PAUSE button - Press to initiate disc PLAYBACK or
Each time button is pressed, speed will increase. It is also possible to
PAUSE disc playback.
advance to the next TRACK if button is pressed several times.
15. A-B button - This feature creates a segment of a TRACK/
33. TITLE - Press to access the TITLE MENU of a DVD, VCD or
SCENE to “loop” or repeat. Press once to set the A-MARKER where the media disc. Press again to return back to disc playback. If the TITLE
loop will begin. Press a second time to set the B-MARKER where the
MENU button is pressed during disc playback, playback is paused.
loop will end. The loop will start immediately after you set the B-MARKUpon exiting the TITLE MENU, playback is resumed.
ER. Press a third time to CANCEL the A-B loop and resume normal
34. MENU - Press to access a DIGEST or TITLE WINDOW of a
play.
DVD, VCD or media disc. Press again to return back to disc play16. PREVIOUS - Returns to the PREVIOUS track, scene or file.
back. If the MENU button is pressed during disc playback, playback is
paused. Upon exiting the MENU window, playback is resumed.
17. SLOW - Press to execute a SLOW motion playback of a DVD or
Video CD.
35. NEXT - Advances to the NEXT track, scene or file.
36. VOLUME -/+ keys - Press this button to RAISE or LOWER the
master music VOLUME.
37. # (SHARP) Key Control button - Will RAISE key of music output
a ½ step.
1 OPEN/CLOSE button - Press to OPEN and CLOSE the disc tray.
2. PROGRAM button - Press to access the PROGRAM selection
window.
9
Remote Control Operations
Installing the batteries
To install the batteries, first remove the battery compartment lid from the back of the remote control. Insert two AA batteries, ensuring
that the polarities are aligned correctly.
When to replace the batteries
The maximum operational distance between the remote control and the sensor is approximately 23 ft. If this distance decreases, it is
time to replace the batteries.
23 feet
NOTES:
-
When operating the remote control, point the top of the remote control toward the player.
Keep the line of sight between the remote control and player clear of obstacles to prevent signal deflection.
Do not mix new and old batteries or batteries of different types together.
Do not use rechargeable batteries with this remote.
The remote is optimally effective at a range of 20 feet and a 30° angle.
10
Getting Started
FL
FR
SUB
Y
Cb
Cr
VIDEO
SL
SR
CENTER
L
R
COAXIAL
S-VIDEO
Connecting to an analog amplifier/2-channel stereo
receiver/mixer
OPTICAL
Using the supplied RCA patch cable, connect one set of red & white
RCA plugs to the RCA AUDIO OUTPUT jacks on the DVX-580G.
Connect the other set of red & white RCA plugs to the AUDIO
INPUT jacks on your stereo receiver/TV. Depending on the stereo
receiver/TV, the audio input jacks may be labeled AUDIO, LINE, AUX,
VIDEO 1/2/3.
Stereo Channel
STEREO RECEIVER/TV
Connecting to an Analog Amplifier/Mixer
FL
FR
SUB
Y
Cb
Cr
VIDEO
SL
SR
CENTER
L
R
COAXIAL
S-VIDEO
OPTICAL
Connecting to a TV with an RCA Connection
Using either the yellow-ended RCA plug from the included RCA patch cable or a separate RCA patch cable, connect one end to the RCA
VIDEO OUTPUT jack on the DVX-780K and connect the other end to the VIDEO INPUT jack on our TV or monitor device.
U
U
VIDEO
S-VIDEO
Connecting to a TV with an RF Modulator
OPTICAL
If your TV has only a RF-style Jack, such as Antenna In or 75 ohm, and no RCA video input jack, you can connect video with a RF modulator (not supplied). Ask your dealer for details on RF modulator availability and compatibility. Follow the instructions provided with the RF
modulator to connect the DVX-780K to your TV. (General model shown as an example).
11
Getting Started
VIDEO
VIDEO OUT
VIDEO IN
S-VIDEO
OPTICAL
Connecting to a TV with a VCR
You can also use a VCR to connect video to a TV with no RCA video input. You will need an RCA cable and a 75-ohm “coaxial” type cable.
Using the RCA video cable, connect one end to the VIDEO OUTPUT jack on the DVX-780K and connect the other end of the cable to the
Connexting to a TV with a VCR
VIDEO INPUT of a VCR. Then, using the 75-ohm “coaxial” type cable, connect one end to the RF OUTPUT of the VCR, and connect the
other end to the 75-ohm TV ANTENNA INPUT jack. Refer to PREFRENCES, page 19, #5 for instructions on setting VIDEO OUTPUT.
FL
FR
SUB
Y
Cb
Cr
VIDEO
SL
SR
CENTER
L
R
COAXIAL
S-VIDEO
OPTICAL
S-VIDEO IN
Connecting to a TV with S-Video
Using an S-Video cable, connect one end to the DVX-580G’s S-VIDEO OUTPUT jack and connect the other end to the S-VIDEO IN jack on
your television.
Refer to PREFRENCES, page 19, #5 for instructions on setting VIDEO OUTPUT.
FL
FR
SUB
Y
Cb
Cr
VIDEO
SL
SR
CENTER
L
R
COAXIAL
S-VIDEO
S-VIDEO IN
COMPONENT VIDEO
Connecting to a TV with Component Video
OPTICAL
Using 3 appropriate Component Video cables (usually color coded red, blue and green), connect a set of plugs to the COMPONENT
VIDEO OUT jacks (Y Cb Cr) on the DVX-780K and plug the other set of plugs to your COMPONENT VIDEO IN jacks (Y Cb Cr) on your
Connexting to a TV with Component Video
television.
On some TV’s the component video input jacks may be labeled (Y Pb Pr). You will need to press the MODE button on the remote control
to toggle between non-interlaced (HDTV) and interlaced (STANDARD) video output. You can only use the MODE button when there is no
disc inserted in the disc tray. Refer to PREFRENCES, page 19, #5 for instructions on setting VIDEO OUTPUT.
12
Getting Started
Serial No.
Manufactured under License from Dolby Laboratories
DOLBY PRO LOGIC and the double-D symbol are
trademarks of Dolby Laboratories. Confidential
VGA
trademarks of Dolby Laboratories. Confidential
Manufactured under License from Dolby Laboratories
DOLBY PRO LOGIC and the double-D symbol are
OR
HDTV/VIDEO MONITOR
FL
FR
SUB
Y
Cb
Cr
VIDEO
SL
SR
CENTER
L
R
COAXIAL
S-VIDEO
OPTICAL
Connecting to a HDTV or video monitor
To connect video to a HDTV you can use the same connections as for TV with Component Video OR you can connect directly using the
VGA out on the DVX-780K using a HD-15VGA cable. See PREFERENCES, page 19, #5 for instructions on setting VIDEO OUTPUT. You
will need to press the V-MODE button on the remote control to toggle between non-interlaced (HDTV) and interlaced (STANDARD) video
output. You can only use the V-MODE button when there is no disc inserted in the disc tray. You can also connect directly to a video
monitor by using the VGA output on the DVX-780K
FL
FR
SUB
Y
Cb
Cr
VIDEO
SL
SR
CENTER
L
R
COAXIAL
S-VIDEO
Dolby
Digital AC-3
DTS DECODER/RECEIVER
Receiver/Decoder
OPTICAL
-ORConnecting to a Dolby Digital AC-3 Receiver/Decoder
Using either an RCA-ended COAXIAL cable suited for digital audio use or an OPTICAL cable, connect one end to the appropriate jack on
the DVX-780K (Coaxial or Optical) and the other end to the appropriate jack on the AC-3 decoder/receiver (Coaxial or Optical). If you
have both coaxial and optical inputs on your AC-3 decoder/receiver, it is recommended to use an optical connection as those cables
eliminate the possibility of EMI (electromagnetic interference). If your Dolby Digital Receiver does not have a built-in AC-3 decoder, and
has 5.1 channel RCA inputs, you can use the 5.1 channel output jacks on the DVX-580G. Either method will provide for AC-3 decoding.
Refer to PREFRENCES, page 19, #5 for instructions on setting VIDEO OUTPUT.
DOLBY 5.1 AMPLIFIER
Connecting to a Dolby Pro Logic Amplifier
FL
FR
SUB
Y
Cb
Cr
VIDEO
SL
SR
CENTER
L
R
COAXIAL
S-VIDEO
OPTICAL
Using six RCA patch cables, connect the plugs from one side of the cables to the FL, FR, CENTER, SL, SR and SW outputs on the DVXConnecting to a Dolby 5.1 Amplifier
580G.
Connect all the plugs from the other side to the FL, FR, CENTER, SL, SR and SW inputs your Dolby Pro Logic amplifier. Refer to PREFRENCES, page 19, #5 for instructions on setting VIDEO OUTPUT.
13
Getting Started
FL
FR
SUB
Y
Cb
Cr
VIDEO
SL
SR
CENTER
L
R
COAXIAL
S-VIDEO
DTS DECODER/RECEIVER
OPTICAL
-ORConnecting to a DTS Receiver/Decoder
Using either an RCA-ended COAXIAL cable suited for digital audio use or an OPTICAL cable, connect one end to the appropriate jack on
the DVX-780K (Coaxial or Optical) and the other end to the appropriate jack on the DTS receiver (Coaxial or Optical). If you have both
coaxial and optical inputs on your DTS decoder/receiver, it is recommended to use an optical connection as those cables eliminate the
possibility of EMI (electromagnetic interference). If your DTS receiver does not have a built-in DTS decoder, and has 5.1 channel RCA inputs, you can use the 5.1 channel output jacks on the DVX-580G. Either method will provide for DTS decoding. Refer to PREFRENCES,
page 19, #5 for instructions on setting VIDEO OUTPUT.
FL
FR
SUB
Y
Cb
Cr
VIDEO
SL
SR
CENTER
L
R
COAXIAL
S-VIDEO
DOLBY DTS/AC-3 RECEIVER
OPTICAL
and
Connecting both Analog and Digital Audio
To do this you will need a Dolby Digital DTS/AC-3 receiver with analog audio inputs. Use optical for video and digital audio and L/R RCA
audio for Karaoke features.
VGA
SCART OUT
HDTV/VIDEO MONITOR
Connecting to European TV systems using SCART cable
You can connect directly to a European TV system using the SCART OUT on the DVX-780K. Be sure to refer to PREFRENCES, page 19,
#5 for instructions on setting VIDEO OUTPUT.
14
SETTING UP PREFERENCES
Press SETUP on the remote control to get into the SETUP menus.
GENERAL PAGE
SETUP MENU-MAIN PAGE
GENERAL SETUP
SPEAKER SETUP
AUDIO SETUP
KARAOKE SETUP
DIVX (R) REGISTRATION
PREFERENCE
TV DISPLAY
PIC MODE
ANGLE MARK
OSD LANG
CAPTIONS
SCR SAVER
EXIT SETUP
MAIN PAGE
NORMAL/PS
NORMAL/LB
WIDE
Use direction keys to access desired subdirectories and ON/OFF selections within menus below, then press ENTER when your choice is
highlighted.
GENERAL SETUP
Press SETUP on remote control. Make sure the GENERAL SETUP subdirectory in the menu is highlighted and press ENTER.
1. Setting TV DISPLAY mode.
GENERAL PAGE
TV DISPLAY
PIC MODE
ANGLE MARK
OSD LANG
CAPTIONS
SCR SAVER
AUTO
FILM
VIDEO
SMART
SUPERSMART
You can choose between NORMAL/PANORAMA, NORMAL/LETTERBOX or WIDE SCREEN display for viewing.
MAIN PAGE
2. Setting PIC MODE.
You can select AUTO and the DVX-780K will automatically recognize the input type, or select FILM, VIDEO or SMART SUPERSMART.
3. Setting ANGLE MARK
When watching certain recorded performances or athletic events, having ANGLE MARK set to ON will allow you to watch the program
from
different angles. See “Advanced operations” section for more information on this. ANGLE MARK is only applicable to discs which offer
changing viewing angle.
4. Setting OSD LANGUAGE
This function allows you to select you screen display language
from several options.
GENERAL PAGE
TV DISPLAY
PIC MODE
ANGLE MARK
OSD LANG
CAPTIONS
SCR SAVER
MAIN PAGE
5. Setting CAPTIONS
ON to show CAPTIONS, OFF to hide them.
ENGLISH
FRENCH
GERMAN
ITALIAN
PORTUGESE
SPANISH
RUSSIAN
6. Setting SCREEN SAVER
When there is no disc or the player is idle for a period of
time, screen saver will appear if this setting is ON.
15
SETTING UP PREFERENCES
SPEAKER SETUP
SPEAKER SETUP
DOWNMIX
CENTER
REAR
SUBWOOFER
CENTER DELAY
REAR DELAY
TEST TONE
MAIN PAGE
LT/RT
STEREO
VSS
5.1 CHANNEL
1. DOWNMIX
If the disc has PRO LOGIC Dolby Stereo, select LT/RT. For other
stereo, select STEREO.
SPEAKER SETUP
DOWNMIX
CENTER
REAR
SUBWOOFER
CENTER DELAY
REAR DELAY
TEST TONE
5MS
3MS
1MS
OFF
MAIN PAGE
2. CENTER
ON: Center speaker will process audio output signal when playing
discs.
OFF: No audio output from center speaker.
3. REAR
ON: LS (Left surround) and RS (right surround) channels active.
OFF: Standard stereo
4. SUBWOOFER
Switch on for subwoofer speaker output.
5. CENTER DELAY
Center signal output can delay for up to 5 milliseconds using
fader shown in picture.
SPEAKER SETUP
DOWNMIX
CENTER
REAR
SUBWOOFER
CENTER DELAY
REAR DELAY
TEST TONE
15MS
9MS
3MS
OFF
MAIN PAGE
6. REAR DELAY
LS/RS output can delay for 15 milliseconds. using fader shown
in picture.
SPEAKER SETUP
DOWNMIX
CENTER
REAR
SUBWOOFER
CENTER DELAY
REAR DELAY
TEST TONE
MAIN PAGE
ON
OFF
7. TEST TONE
After all channels are set up to your preferences, you can test all
output
channels by setting TEST TONE to ON.
16
SETTING UP PREFERENCES
AUDIO SETUP
AUDIO SETUP
SPDIF OUTPUT
PRO LOGIC
LPCM OUTPUT
DYNAMIC
OFF
SPDIF/RAW
SPDIF/PCM
1. SPDIF OUTPUT
SPDIF/RAW: When using digital output to connect amplifier with
Dolby decoding, select this otion.
SPDIF/PCM: When using stereo amplifier to play Dolby digital
discs, select this mode.
MAIN PAGE
AUDIO SETUP
SPDIF OUTPUT
PRO LOGIC
LPCM OUTPUT
DYNAMIC
OFF
ON
AUTO
MAIN PAGE
2. PRO LOGIC
Use to set Dolby surround
AUDIO SETUP
SPDIF OUTPUT
PRO LOGIC
LPCM OUTPUT
DYNAMIC
LPCM 48K
LPCM 96K
3. LPCM OUTPUT
Choose between 48KHz or 96KHz. With Karaoke discs (CD+Gs),
it is suggested that you use
48KHz. With 96KHz, output may be delayed.
MAIN PAGE
AUDIO SETUP
SPDIF OUTPUT
PRO LOGIC
LPCM OUTPUT
DYNAMIC
FULL
6/8
4/8
2/8
OFF
4. DYNAMIC
You can adjust the line-out ratio for different audio effect. To use
this feature, DOWNMIX must be OFF.
MAIN PAGE
17
SETTING UP PREFERENCES
AUDIO SETUP
DIVX (R) REGISTRATION
Your registration code is: 9vvokl
Please USE this code to register this player with
the DivX(R) Video On Demand service.
This will allow you to rent and purchase videos
using the DivX(R) Video On Demand format.
To learn more go to www.divx.com/vod
DONE
5. KARAOKE SETUP
This preference must be set ON to enjoy Digital Key Control (available from the remote control only with the 580G).
Press ENTER when ON is highlighted
To use this feature, DOWNMIX must be OFF.
6. DIVX (R) REGISTRATION
Go here to find registration code for www.divx.com Video On
Demand services.
18
SETTING UP PREFERENCES
PREFERENCES
PREFERENCE PAGE
TV TYPE
AUDIO
SUBTITLE
DISC MENU
PARENTAL
VIDEO OUTPUT
PASSWORD
DEFAULTS
SETUP MP3
MAIN PAGE
SET TV STANDARD
PREFERENCE PAGE
MULTI
NTSC
PAL
1. TV TYPE
Set to match output to match TV set’s system format, for example
NTSC for American systems or PAL for European.
TV TYPE
ENGLISH
AUDIO
FRENCH
SPANISH
SUBTITLE
CHINESE
DISC MENU
JAPANESE
PARENTAL
GERMAN
VIDEO OUTPUT
PASSWORD
INDONISIA
DEFAULTS
RUSSIAN
SETUP MP3
MAIN PAGE
PREFERRED AUDIO LANGUAGE
2. AUDIO
Sets language for compatible discs only.
PREFERENCE PAGE
PREFERENCE PAGE
TV TYPE
ENGLISH
AUDIO
FRENCH
SPANISH
SUBTITLE
CHINESE
DISC MENU
PARENTAL
JAPANESE
GERMAN
VIDEO OUTPUT
PASSWORD
INDONISIA
DEFAULTS
RUSSIAN
SETUP MP3
OFF
MAIN PAGE
PREFERRED SUBTITLE LANGUAGE
3. SUBTITLE
Select preferred subtitle language.
TV TYPE
ENGLISH
AUDIO
FRENCH
SPANISH
SUBTITLE
CHINESE
DISC MENU
JAPANESE
PARENTAL
GERMAN
VIDEO OUTPUT
PASSWORD
INDONISIA
DEFAULTS
RUSSIAN
SETUP MP3
MAIN PAGE
PREFERRED MENU LANGUAGE
4. DISC MENU
Sets language of menus for compatible discs only.
PREFERENCE PAGE
PREFERENCE PAGE
TV TYPE
1G
AUDIO
2
3 PG
SUBTITLE
4 PG-13
DISC MENU
PARENTAL
5
VIDEO OUTPUT 6 PG-R
PASSWORD
7 NC-17
DEFAULTS
ADULT
SETUP MP3
8 NO PARENTAL
MAIN PAGE
SET PARENTAL CONTROL
5. PARENTAL
You can set passwords to play video discs of any rating Select rating from list and hit ENTER. You will see INPUT PASSWORD. Use
number pad to enter 3308 to access play for that rating.
TV TYPE
AUDIO
SUBTITLE
DISC MENU
PARENTAL
VIDEO OUTPUT
PASSWORD
DEFAULTS
SETUP MP3
MAIN PAGE
SELECT VIDEO OUTPUT
6. VIDEO OUTPUT
With the DVX-780K, you can select between SVIDEO OUTPUT,
YCBCR OUTPUT (Component Video) or YPBPR OUTPUT (Progressive Scan Video) or VGA.
PREFERENCE PAGE
PASSWORD VERIFY PAGE
TV TYPE
AUDIO
SUBTITLE
DISC MENU
PARENTAL
VIDEO OUTPUT
PASSWORD
DEFAULTS
SETUP MP3
MAIN PAGE
SETUP MP3
INPUT PASSWORD:
PLEASE ENTER PASSWORD
7. PASSWORD
To CHANGE PASSWORD, use this menu and type in 3308 to access CHANGE.
8. DEFAULTS
To reset, highlight RESET and press ENTER.
S-VIDEO OUTPUT
YCB CR OUTPUT
SCART
YPB PR OUTPUT
VGA
NO MENU
WITH MENU
9. SETUP MP3
You can choose to have an MP3 disc play in a similar mode to a
standard disc by choosing NO MENU, or use the SMART NAVI
menu to select tracks and
PLAY MODE by selecting WITH MENU here.
19
BASIC OPERATIONS
Playback
Getting ready to play
· Turn on the TV and set its video source (Video 1, Video 3, etc.)
to the channel the DVX-780K is
connected to.
· Turn on the audio equipment connected to the unit. Set its input
source to the channel that the DVX-780K is connected.
RETURN
SETUP
BUTTONS FOR
TITLE/CHAPTER
SELECTION
ENTER
TITLE
MENU
A -B
1) Press POWER
When the unit turns on you will see the LED glow red and see the
VocoPro screens on your TV.
2) Press OPEN/CLOSE to load CD
3) Load a DISC label side up and press OPEN/CLOSE again to
close tray After the disc tray closes, the disc will automatically
start playing. If it does not auto-start, press PLAY.
SLOW
STOP
VOL
Initial Playback
REPEAT
When loading a DVD, the menu screen may be displayed first for
that disc. With CD+G, and other discs, use the <>^# buttons to
select the TITLE/CHAPTER or other type of file you want to view,
then press ENTER to start viewing or playback.
TITLE
MENU
VOL
To stop playback
Press the STOP button.
If the unit is left for 20 minutes without any operations, it will automatically enter STANDBY mode.
If the screensaver is enabled in standby mode, any subsequent
operation will cancel it and get you back to a menu.
Discs will continue to spin while the MENU screen is displayed.
When you are finished using the unit, turn the power off.
Pausing playback
Press the PLAY/PAUSE key during playback
To return to normal playback
Press PLAY/PAUSE again.
Pausing Playback
Fast forward/Reverse
Press the <</>> buttons.
Each time you press the << (REVERSE) or >> (FORWARD) button, the
search speed increases.
To return to normal playback, press the PLAY button. There is no
audio during fast forward/reverse.
SLOW
VOL
Frame advance
Fast Forward/Reverse
SLOW
STOP
STEP
VOL
Press STEP during playback.
Each time you press the STEP button, the program advances one
frame. There is no audio during STEP playback.
To return to normal playback
Press PLAY.
MUTE
Slow/fast Playback
SLOW
Frame Advance
STOP
P
VOL
Press SLOW during playback.
Each time SLOW is pressed, the play speed changes.
There is no audio during SLOW playback. Available SLOW playback
speeds differ from DVD to VCD. To return to normal playback, press
PLAY.
MUTE
20
ADVANCED OPERATIONS
Scene/track selection
To skip to the next chapter or track
Press >>I during playback. The disc position advances one CHAPTER or TRACK each time the button is pressed.
To skip to the desired track directly using the number buttons
During playback or in stop mode, press the desired track number
using the number pad on the remote control and then ENTER.
REPEAT
TITLE
NIP
1
2
AB
MENU
SUBTITLE
4
5
ANGLE
7
RESUME
0
To return to the previous chapter or track Press the I<< twice in
rapid succession to return to the beginning of the previous
chapter or track. Scene/Track Selection
NIP
1
2
3
SUBTITLE
4
5
6
ANGLE
7
8
9
RESUME
0
3
VIEW
When using these features with a VCD1.1 disc with PBC on, you
may be returned to the main menu.
Numeric Keypad Track
TITLE 01/78 CHAPTER 001/001
Selection
TIME
PRESS TIME ONCE
Searching by time
Press TIME during playback.
A TIME search window will appear on screen with an input box
for chapters/titles
and time. Enter time of desired section using number
Searching
by chapter/track
pad.
To select start time
When at the search window, using the number buttons on the remote control, input the time that you want playback to start from.
Searching by chapter/track
When at the search window, using the number buttons on the remote control, input the numbers for the chapter/track you want to view.
SETUP
RETURN
NIP
1
2
3
SUBTITLE
4
5
6
ANGLE
7
8
9
RESUME
0
VIEW
TIME
ENTER
Zooming
The image on the screen is enlarged in steps by pressing the
ZOOM button repeatedly. You can move the ZOOM area by using
the direction keys To cancel the ZOOM function, press ZOOM until
it cycles back to a normal view.
The zoom function may not work with some discs and when used
in conjunction with the SLOW or ANGLE functions.
Displaying subtitles and choosing language
Press the SUBTITLE button.
Each time the SUBTITLE button is pressed, a different language
will display as the default subtitle language. Subtitle language options are dependent upon the disc manufacturer.
To remove subtitles
Press the SUBTITLE button until subtitles are off.
21
ADVANCED OPERATIONS
ANGLE INDICATOR
1/3
NIP
1
2
3
SUB ITLE
4
5
6
ANGLE
7
8
9
0
VIEW
TIME
ME
2/3
ANGLE BUTTON
3/3
Changing Angles
When playing a DVD with multi-angles recorded, you can select the angle you want to view. During playback, when a multi-angle scene
comes on, the angle symbol is displayed to queue you. When you see this option appear, press the ANGLE button to change. Each time
CHANGING
ANGLES
ANGLE is pressed, the next available viewing angle is initiated
until returning
to the original angle. Other features including zoom and A-B
prevent the changing of viewing angles.
Repeat Playback
Press REPEAT to repeat a track/scene
Pressing REPEAT once will repeat that track/scene only.
To repeat a chapter/title
Pressing REPEAT twice selects between TITLE and CHAPTER repeat modes.
To cancel REPEAT mode
Press the PLAY button, or cycle through the REPEAT options until REPEAT OFF is initiated.
Programmed Playback
Press PROGRAM in stop mode.
You can select up to 99 tracks to program. The program is maintained until the STOP button is pressed twice, the disc is removed or
the unit is turned off.
To program tracks
Use the direction keys or number buttons to select a track. Once selected, press PROGRAM to enter it into the program. Repeat this
procedure till you are complete with your program.
To start playback of a program
Press PLAY immediately following the above.
To cancel a program
You can cancel a program by pressing the STOP button twice, removing the disc is removed or turning off the unit.
Note: This function does not work unless you turn PBC off.
22
MP3 FUNCTIONS AND OPERATIONS
The DVX-780K can play back MP3 files recorded to CD-ROM, CD-R or CD-RW discs.
Notes on MP3 discs
An MP3 file stores audio data that has been compressed using the MPEG1 encoding scheme. Although PC terminology regarding MP3s
and storage is, “files” and “folders”, in this manual we refer to them as “tracks and albums”.
Notes on playing MP3s
· An MP3 track must be recorded on a disc in the format compliant with ISO9660. Track order may differ from MP3 player to MP3
player.
· The maximum allowable number of tracks and/or albums located on a disc is 900, including the root albums (directory).
· The maximum allowable depth of a nested folder is 127, including files.
· If a disc contains both audio as well as MP3 tracks, it will not play in the DVX-580G.
· Multi-session discs are limited to a total of 20 sessions.
· MP3 playback is optimal with MP3s encoded with a sampling rate of 44.1 kHz and a fixed bit rate of 128 kbps.
· The unit may not play MP3 tracks recorded using a packet writing utility.
· The unit can only play back MP3 tracks having a file extension of “.mp3”.
· It may take 30 seconds or more before the unit can start playback of MP3’s. This time depends on the number of recorded tracks and
the complexity of the album tree.
· If you play a non-MP3 track that has the “.mp3” file extension, the unit will skip to the next valid track automatically.
· Digital recordings with this unit cannot be done while playing back MP3 discs.
Notes on display indications during playback
· Up to 8 characters are displayed for the name of an album or track.
· Characters other than uppercase letters (“A” to “Z”), numerals (“0” to “9”) and underscore (“_”) may not be displayed, or may be displayed in different characters.
· The elapsed playing time may not be displayed correctly for MP3 tracks.
· Depending on the condition of the recording equipment or the CD-R/RW disc itself, a false album or track which cannot by played on
the unit may be displayed on a TV screen.
Notes on creating MP3 discs
· When converting audio data to MP3, create MP3 files with a sampling frequency of 44.1 kHz and a fixed bit rate of 128 kbps.
· When creating MP3 discs, do not store more than 900 albums and/or tracks in a disc.
· To play tracks in the order they were recorded, ensure your encoding software is set up to auto arrange by name, or use only one
album (if they are already alphabetized) or place a three digit number in front of each track to set an order manually.
Recommended = 001-Song.mp3, 002-Song.mp3, 003-Song.mp3…
Not Recommended = 1-Song.mp3, 5-Song.mp3, 10-Song.mp3…
MP3 Glossary
File Extension - A 3-character string added to a file name under the Windows or DOS environment is called a “file extension”. A file extension is used mainly to identify types of files. The file extension for MP3 files is “.mp3”.
ISO 9660 - ISO stands for the “International Organization for Standardization”. ISO 9660 determines the file structure for CD-ROMs. This
unit can play MP3 files recorded in the format compliant with ISO 9660.
Nesting of folders (albums) - To organize all your data files stored in a PC, you can store related files in a folder. A folder can contain
other folders as well as files. For example, FOLDER A can contain FOLDER B (as well as files) and FOLDER B can contain FOLDER C (as
well as other files).
Session - A session is one uninterrupted section of written data on a disc. A multi-session disc is a disc that has more than two sessions.
MP3 play mode
Load an MP3 disc.
The disc will automatically load and display the MP3 window. It may take up to 20 seconds for an MP3 disc to be read depending on
the complexity of the file structure.
Enabling Smart Navigation.
Smart Navigation enables you to select one of 10 available MP3 playback modes.
If Smart Navigation is disabled, MP3 discs will autoplay with no menu options when inserted. You should still be able to forward or
reverse tracks like a standard CD. To enable Smart Navigation see the PREFERENCES section.
23
MP3 FUNCTIONS AND OPERATIONS
SMART NAVI
ROOT
ROOT
Track 1
Track 2
Track 3
Track 4
Track 5
PLAY MODE
SINGLE
Selecting an MP3 PLAY MODE:
In order to see this menu automatcially when you load and MP3 disc, SETUP MP3 under PREFERENCES must have WITH MENU selected There are 10 available MP3 play modes to choose from. Use the direction keys to locate PLAY MODE field at bottom of SMART
NAVI menu and up or down keys to select any of
the following:
1. SINGLE mode
Plays files in a folder sequentially. Use the direction keys to move back to the track you want to play and press ENTER. Skipping tracks
is not available in Single Mode.
2. REP-ONE mode
Repeats a single file. Use the direction key to move to the track you want to play and press ENTER. Track will repeat until operation is
stopped.
3. FOLDER mode
Plays all files within a selected folder. Use the direction keys to select folder and press ENTER. Skipping tracks is not available in Folder
Mode
4. FOLDER REPEAT mode
Repeats all files within a selected folder until operation is stopped.
5. DISC SCAN mode
Plays the first 10 seconds of all files on the disc. Use the direction keys to select the MP3 file you want to start playback with. Press
STOP to cancel DISC SCAN MODE.
6. DISC mode
Plays all files on the disc sequentially. Playback will stop after all files have been played once.
7. DISC REPEAT mode
Repeats all files on the disc infinitely until operation is stopped.
8. RANDOM mode
Plays all files on a disc in a random order
9. SHUFFLE ON mode
Plays files from a selected folder in a random order. Use the direction keys to select folder. Playback is limited to one folder and will
stop after all files have been played once
10. PROGRAM mode
Plays user-programmed playlists from files in a selected folder. Use direction keys to find the files to program. Press ENTER after each
file you want to add to program. Repeat process until program is complete. Press the STOP button to end file program selection.
Press ENTER to begin playback.
24
DivX operations
In order to turn CDGs into DivX discs, you need to download three programs: 1) DivX Codec, a compressor/decompressor to compress
converted files and compile DivX discs,
2) a CDG Ripper which will allow you to copy or “rip” CDGs to your PC as a CDG Bin file and 3) Power CDG to AVI Converter to covert
these CDG Bin files to DivX format (AVI files).
Requirements
PC with internet connection
Hardware: CDG compatible CD or DVD drives; Yamaha, Liteon, Sony HP and Plextor are known for CDG compatible drives.
Software: DivX Codec , CDG Ripper and Power CDG to AVI Converter
You can download
1. DivX Codec at: http://www.divx.com. This program is free.
2. CDG Ripper at: http://www.tricerasoft.com/cgi-bin/download.asp?prg=CDD1
3. Power CDG to AVI Converter at: http://www.powerkaraoke.net/download/powercdg2avi.exe
Follow each website’s directions for download of these programs.
We have provided basic instructions for ripping CDGs and Converting these files to AVI files. Refer to the help menu for each program
for further assistance.*
To Rip CDGs
1.
2.
3.
4.
5.
6.
Insert CDG into your CD or DVD drive on your PC.
Create a new folder on your hard drive and name it “CDG,” for example.
At the bottom of the screen select OUTPUT PATH to your new folder as the destination.
Select all tracks and click on CONVERT.
Select EXTRACT TO BIN
Set default in QUICK OPTION to STEREO. Do not click on VOCAL REMOVE.
Each song should take approximately one minute for the ripping process to finalize, depending on your system.
You will see fle names Track01.BIN, Track02.BIN, etc. when disc has been ripped.
To convert from CDG BIN files to AVI files
1.
2.
3.
4.
5.
6.
7.
Create a new folder in your hard drive and name it “CDGDIVX,” for example.
Open the program and select BATCH for batch encoding.
Click ADD and select the BIN files you previously created with the CDG ripper from the appropriate folder. Click OPEN.
Click on VIDEO COMPRESSION and select DivX Pro 5.1.1 Codec and click OK
Click on AUDIO COMPRESSION and select MPEG LAYER-3. Under ATTRIBUTE select 48KBIT 22050 STEREO and click OK.
Click OUTPUT DIRECTLY. Click BROWSE and select your CDGDIVX folder.
Click CONVERT
Each file should take approximately one minute to encode, depending on your system. The final files should each have an AVI extension
and each file should be at least 10MB or less.
* DivX Networks, Inc, Tricerasoft, Power Karaoke and the Power CDG to AVI Converter are not affiliated with VocoPro. VocoPro makes
no claims about their products and assumes no responsibility
for the effectiveness of them.
25
SPECIFICATIONS
Supported Disc Formats: DVD, SVCD, HDCD, VCD 2.0-3.0, MP3, Audio CD
Supported Discs: 12 cm single sided, single layer
12 cm single sided, double layer
12 cm double sided, single layer
12 cm double sided, double layer
8 cm single sided, single layer
8 cm single sided, double layer
8 cm double sided, single layer
8 cm double sided, double layer
Video System: NTSC (525/60, 625/50) PAL (625/50, 525/60)
Video Output Level: 1.0 V rms (75 Ω Unbalanced)
S-Video Output: Y: 1.0 V rms (75 Ω Unbalanced)
C: 0.286 Vp-p (75 Ω) NTSC
0.3 Vp-p (75 Ω) PAL
1 Mini Din 4-pin
YUV Video Output: Y: 1.0 V rms z(75 ohms Unbalanced)
Cr: 0.7 Vp-p (75 ΩUnbalanced)
Cb: 0.7 Vp-p (75 Ω Unbalanced)
3 RCA Jacks
Audio System: MPEG 1-2
Linear PCM Audio
Dolby Digital (AC-3)
DTS
Digital Output: 0.5 V rms(75 Ω)
Optical Output
Coaxial Output
Analog Output: 2.0 V rms(1kHz, 0dB, 330 Ω)
2 RCA Jacks
DVD Linear Audio Characteristics
Frequency Response: 4Hz-22kHz (Fs=48kHz)
4Hz-44kHz (Fs=96kHz)
S/N Ratio: 105dB (Fs=48kHz, 24-bit PCM)
Dynamic Range: 105dB (Fs=48kHz, 24-bit PCM)
Maximum Audio Distortion: 0.05% (Fs=48kHz, 24-bit PCM)
Audio Characteristics
Frequency Response: 20Hz-20kHz (+/- 1dB)
S/N Ratio: > 80dB (EIAJ)
Dynamic Range: 90dB (EIAJ)
Power Supply: 110-240V~50/60Hz
Power Consumption: 25 W
26
www.vocopro.com