1
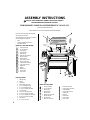
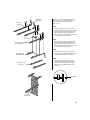
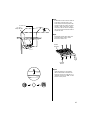
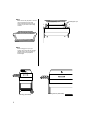
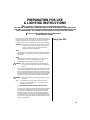
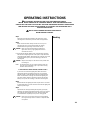
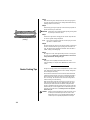
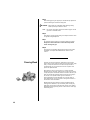
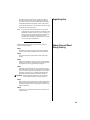
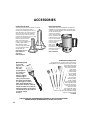
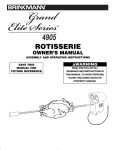
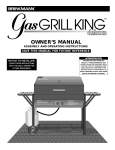
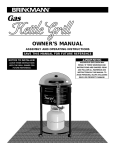
Heavy-Duty Outdoor Charcoal Grills & Smokers
OWNER’S MANUAL
ASSEMBLY AND OPERATING INSTRUCTIONS
WARNING
READ AND FOLLOW ALL WARNINGS AND
INSTRUCTIONS IN THIS MANUAL TO AVOID
PERSONAL INJURY OR PROPERTY DAMAGE.
IMPORTANT SAFETY WARNINGS
WE WANT YOU TO ASSEMBLE AND USE YOUR GRILL AS SAFELY AS POSSIBLE.
THE PURPOSE OF THIS SAFETY ALERT SYMBOL
IS TO ATTRACT YOUR ATTENTION TO POSSIBLE HAZARDS AS YOU ASSEMBLE AND USE YOUR GRILL.
WHEN YOU SEE THE SAFETY ALERT SYMBOL, PAY CLOSE ATTENTION TO THE INFORMATION WHICH FOLLOWS!
READ ALL SAFETY WARNINGS AND INSTRUCTIONS CAREFULLY
BEFORE ASSEMBLING AND OPERATING YOUR GRILL.
WARNING
1
•
Only use this grill on a hard, level, non-combustible, stable surface (concrete, ground, etc.) capable of supporting the weight of
the grill. Never use on wooden or other surfaces that could burn.
•
Proper clearance of 10 feet between the grill and combustible material (bushes, trees, wooden decks, fences, buildings, etc.) or
construction should be maintained at all times when grill is in use. Do not place grill under a roof overhang or other enclosed area.
•
For household use only. Do not use this grill for other than its intended purpose.
•
For outdoor use only. Do not operate grill indoors or in an enclosed area.
•
Use caution when assembling and operating your grill to avoid scrapes or cuts from sharp edges of metal parts.
•
We recommend the use of a Charcoal Chimney Starter to avoid the dangers associated with charcoal lighting fluid. If you choose
to use charcoal lighting fluid, only use lighting fluid approved for lighting charcoal. Carefully read manufacturer’s warnings and
instructions on the charcoal lighting fluid and charcoal prior to the use of their product. Store charcoal lighting fluid safely away
from grill.
•
When using charcoal lighting fluid, allow charcoal to burn with grill lid and dampers open until covered with a light ash
(approximately 20 minutes). This will allow charcoal lighting fluid to burn off. Failure to do this could trap fumes from charcoal
lighting fluid in grill and may result in a flash fire or explosion when lid is opened.
•
Never use charcoal that has been pre-treated with lighter fluid. Use only a high grade plain charcoal or charcoal/wood mixture.
•
Do not use gasoline, kerosene or alcohol for lighting charcoal. Use of any of these or similar products could cause an explosion
possibly leading to severe bodily injury.
•
Never add charcoal lighting fluid to hot or even warm coals as flashback may occur causing severe burns.
•
Place grill in an area where children and pets cannot come into contact with unit. Close supervision is necessary when
grill is in use.
•
Do not leave grill unattended when in use.
•
When adding charcoal and/or wood, use extreme caution and follow instructions in “Adding Charcoal/Wood During Cooking”
section of this manual.
•
Never move grill when it is in use or when it contains hot coals or ashes.
•
Do not store or use grill near gasoline or other flammable liquids, gases or where flammable vapors may be present.
•
When grilling, grease from meat may drip into the charcoal and cause a grease fire. If this should happen close lid and side air
vents to suffocate the flame. Do not use water to extinguish grease fires.
•
Use caution since flames can flare-up when fresh air suddenly comes in contact with fire. When opening the lid, keep hands, face
and body a safe distance from hot steam and flame flare-ups.
WARNING
•
Do not exceed a temperature of 400°F. Do not allow charcoal and/or wood to rest on the walls of grill. Doing so will greatly
reduce the life of the metal and finish of your grill.
•
Do not wear loose clothing or allow hair to hang freely while using grill.
•
Use caution when reaching into or under grill. Always wear oven mitts or gloves to protect your hands from burns. Avoid
touching hot surfaces.
•
When opening lid, make sure it is pushed all the way back so it rests against the lid support brackets. If lid is not resting against
support brackets, it could fall back to a closed position and cause bodily injury.
•
In windy weather, place grill in an outdoor area that is protected from the wind.
•
Close lid and all air vents to suffocate flame.
•
Never leave coals and ashes in grill unattended. Before grill can be left unattended, remaining coals and ashes must be removed
from grill. Use caution to protect yourself and property. Carefully place remaining coals and ashes in a non-combustible metal
container and saturate completely with water. Allow coals and water to remain in metal container 24 hours prior to disposing.
•
Extinguished coals and ashes should be placed a safe distance from all structures and combustible materials.
•
With a garden hose, completely wet the surface beneath and around grill to extinguish any ashes, coals or embers which may
have fallen during the cooking or cleaning process.
•
After each use, clean the grill thoroughly and reapply a light coat of oil to interior to prevent rusting. Cover the grill to protect it
from excessive rusting.
•
Use caution when lifting or moving grill to prevent strains and back injuries.
•
We advise that a fire extinguisher be on hand. Refer to your local authority to determine proper size and type of fire extinguisher.
•
Accessory attachments not manufactured by The Brinkmann Corporation for this particular product are not recommended and
may lead to personal injury or property damage.
•
Store the grill out of reach of children and in a dry location when not in use.
•
Do not attempt to service grill other than normal maintenance as explained in “After-Use Safety” and “Proper Care &
Maintenance” sections of this manual. Repairs should be performed by The Brinkmann Corporation only.
•
Properly dispose of all packaging material.
USE CAUTION AND COMMON SENSE WHEN OPERATING YOUR GRILL.
FAILURE TO ADHERE TO SAFETY WARNING AND GUIDELINES IN THIS MANUAL COULD RESULT
IN BODILY INJURY OR PROPERTY DAMAGE.
SAVE THIS MANUAL FOR FUTURE REFERENCE.
2
ASSEMBLY INSTRUCTIONS
READ ALL SAFETY WARNINGS & ASSEMBLY INSTRUCTIONS CAREFULLY
BEFORE ASSEMBLING OR OPERATING YOUR GRILL.
FOR MISSING PARTS, PLEASE CALL CUSTOMER SERVICE AT 1-800-527-0717.
(Proof of purchase will be required.)
Inspect contents of the box to ensure all parts are included and undamaged.
3
We recommend two people work together
when assembling this unit.
6
4
The following tools are required to assemble
this Grill King/Grill King Deluxe:
•
•
•
5
Pliers
Phillips & Flathead Screwdrivers
Adjustable Wrench
(Damper goes
inside grill) 2
PARTS LIST - GRILL KING DELUXE:
1
2
3
4
5
6
7
8
9
10
11
12
13
14
15
16
17
1
4
1
1
1
2
1
2
1
6
2
2
1
2
2
2
2
Cooking chamber
Air vent dampers
Cooking grill
Charcoal grate
Charcoal tray
Charcoal tray adjusters
Wooden handle
Handle spacers
Wire rack (for wood)
Wooden shelf slats
Legs (without axle hole)
Legs (with axle hole)
Wheel axle
Wheels
Wheel hubs
Hood hinges
Hood stops
10
7
17
8
16
1
(Grill King
Deluxe) 11
(Grill King
Deluxe)
12
Shelf Brackets
(Grill King)
11B
(Grill King)
11A
13
9
14
15
Parts Bag Contains:
1
2
2
2
4
2
2
2
20
8
16
12
2
12
3
Heat indicator
Hinges
Hood stops
Plastic wheel push caps
6 x 5 mm hexagonal nuts
5 x 4 mm hexagonal nuts
5 x 75 mm Phillips head bolts
spring washers
6 x 3.5 mm hexagonal nuts
6 x 36 mm Phillips head bolts
6 x 12 mm Phillips hex head bolts
6 x 50 mm Phillips head bolts
Flat washers
6 x 3.5 mm hex nuts
PARTS LIST - GRILL KING:
1
2
3
4
5
6
7
8
9
1
4
1
1
1
2
1
2
1
Cooking chamber
Air vent dampers
Cooking grill
Charcoal grate
Charcoal tray
Charcoal tray adjusters
Wooden handle
Handle spacers
Wire rack (for wood)
10
11A
11B
12A
13
14
15
16
17
3
2
2
2
1
2
2
2
2
Wooden shelf slats
Legs (without axle hole)
Shelf Brackets
Legs (with axle hole)
Wheel axle
Wheels
Wheel hubs
Hood hinges
Hood stops
(Grill King)
12A
Shelf Bracket
(Grill King)
Front Leg
(Grill King)
Choose a good, cleared assembly area and get a
friend to help you put your grill together. Lay
cardboard down to protect grill finish and
assembly area.
Step 1
Stand body of grill on one end. Insert shelf
brackets into legs without axle holes (Grill King
only). Align the bolt holes in the longer set of
legs to bolt holes in the body. Insert two 6 x
50mm screws through each leg and secure with
nut (hand tighten only at this point).
Air
Vent
Step 2
With the help of a friend, turn the body to the
opposite side. Align the bolt holes in the short
legs to bolt holes in the body. Insert two 6 x
50mm screws through each leg and secure with
nut (hand tighten only at this point).
Front (Long) Leg
(Grill King Deluxe)
Step 3
Rear (Short) Leg
(Grill King Deluxe)
Insert wire wood rack (curved ends pointed
down) into holes on bracket near bottom of legs
then tighten all bolts and nuts until secure.
Step 4
Rear (Short) Leg
(Grill King)
Insert axle through axle holes in short legs.
Place wheels on axles with recessed hubs
facing out. Insert wheel cap through center of
wheel to secure the wheel to the axle. Push
until secure.
Push Cap
curved end
pointed down
4
Step 5
With the help of a friend, set the unit
upright. Try to minimize stress on the legs
of the grill.
Step 6
Attach hood stops to the outside back of
the body using 6 x 12 mm Phillips hex
head screws. Thread screws into welded
nuts and tighten until secure.
Hood
Hinge
Step 7
Attach the hinges (with the spine side out)
to the outside back of the body using 6 x
12 mm Phillips hex head screws. Thread
screws into welded nuts but do not
tighten at this point. Place lid over the
body and attach hinges to the outside
back of the lid using 6 x 12 mm Phillips
hex head screws. Thread screws into
welded nuts. Tighten all hinge screws on
lid and body until secure.
Hood
Stop
Step 8
Attach handle to the lid using 5 x 75mm
screws, flat washers, spacers, spring
washers and nuts. The heads of the
screws should be slightly recessed into
the wooden handle when fully tightened.
6 x 50mm
Screws
5
Step 8
To attach all four vent covers to insides of
lid and body, place vent cover on the
inside of the unit with the adjustment tab
sticking through one of the air vent holes.
Using 6 x 12mm screw and nut, secure
vent cover to the unit. Do not overtighten
the nut as this will make the vent difficult
to open and close.
6 x 5mm nut
6 x 12mm
Phillips Hex Bolt
Step 9
Attach three wooden slats to each set of
side shelf supports using 6 x 50mm
bolts and 6 x 3.5mm nuts.
Wooden
Shelf Slat
Leg/Shelf
Bracket
Step 10
Install heat indicator in lid by aligning
tabs on heat indicator with slots in the
opening on front of lid. Insert and turn 4
revolution until the word “IDEAL” on heat
indicator is at top of dial.
DALLAS, TX 75244
BRINKMANN
BRINKMANN
DALLAS, TX 75244
6
Step 11
Attach charcoal tray adjusters to charcoal
tray with adjustment hooks facing
inward. Place charcoal grate on top of
charcoal tray and lower inside cooking
chamber.
Grill Support Lips
Step 12
Place cooking grill on top of grill
supports lips with curved ends inserted
through holes in rear grill support lip.
Position charcoal tray adjusters to
desired height.
Grill King (Assembled)
7
Grill King Deluxe (Assembled)
PREPARATION FOR USE
& LIGHTING INSTRUCTIONS
PLACE THE GRILL OUTDOORS ON A HARD, LEVEL, NON-COMBUSTIBLE SURFACE
AWAY FROM ROOF OVERHANG OR ANY COMBUSTIBLE MATERIAL. NEVER USE ON WOODEN OR OTHER SURFACES THAT
COULD BURN. PLACE THE GRILL AWAY FROM OPEN WINDOWS OR DOORS TO PREVENT SMOKE FROM ENTERING YOUR
HOUSE. IN WINDY WEATHER, PLACE THE GRILL IN AN OUTDOOR AREA THAT IS PROTECTED FROM THE WIND.
READ ALL SAFETY WARNINGS AND INSTRUCTIONS CAREFULLY
BEFORE OPERATING YOUR GRILL.
Prior to your first use of the Brinkmann Grill King, follow the instructions
below carefully to cure your grill. Curing your grill will minimize damage to
the exterior finish as well as rid the grill of paint odor that can impart
unnatural flavors to the first meal prepared on your Brinkmann Grill King.
Curing Your Grill
IMPORTANT: To protect your grill from excessive rust, the unit must be
properly cured and covered at all times when not in use. A
cover for your Grill King may be ordered directly from
Brinkmann by calling 1-800-468-5252.
Step 1
Lightly coat all interior surfaces of the Grill King including cooking grill
with vegetable oil or vegetable oil spray. Do not coat charcoal grate or
charcoal tray.
Step 2
Follow the instructions below carefully to build a fire. You may use
charcoal and/or wood as fuel in the Grill King (see “Adding
Charcoal/Wood During Cooking” section of this manual).
WARNING:
Never use charcoal that has been pre-treated with lighter
fluid. Use only a high grade plain charcoal or charcoal/wood
mixture.
If using a Charcoal Chimney Starter, follow all manufacturer’s warnings
and instructions regarding the use of their product. Start with 8 to 10
pounds of charcoal for Grill King Deluxe (3 to 4 pounds for Grill King).
This should be enough charcoal to cook with, once the curing process
has been completed. Open the side air vents halfway. When charcoal is
burning strong, carefully place hot coals in center of charcoal grate.
WARNING:
NOTE:
Keep hot coals away from side air vent to prevent coals from
falling out.
To extend the life of your grill, make sure that hot coals and
wood do not touch the walls of grill or lay inside of cooking
chamber under charcoal tray.
IF USING CHARCOAL CHIMNEY STARTER, PROCEED TO STEP 5
If you choose to use charcoal lighting fluid, ONLY use charcoal lighting
fluid approved for lighting charcoal. Do not use gasoline, kerosene,
alcohol or other flammable material for lighting charcoal. Follow all
manufacturer’s warnings and instructions regarding the use of their
product. Start with 8 to 10 pounds of charcoal for Grill King Deluxe
(3 to 4 pounds for Grill King). This should be enough charcoal to cook
with, once the curing process has been completed. Place the charcoal
in center of charcoal grate.
8
Step 3
Saturate charcoal with lighting fluid. With lid open wait 2 to 3 minutes
to allow lighting fluid to soak into charcoal. Store charcoal lighting
fluid safely away from the grill.
Step 4
Open the side air vents approximately half way. With grill lid open,
stand back and carefully light charcoal and allow to burn until covered
with a light ash (approximately 20 minutes).
WARNING:
BRINKMANN
DALLAS, TX 75244
Charcoal lighting fluid must be allowed to completely burn off
prior to closing grill lid (approximately 20 minutes). Failure to
do this could trap fumes from charcoal lighting fluid in grill
and may result in a
flash-fire or explosion when lid is opened.
Step 5
With coals burning strong, close the lid. Allow the temperature to
reach the “IDEAL” range on the heat indicator. Maintain this
temperature for 2 hours.
Step 6
Increase the temperature to the lower portion of the “HOT” range on
the heat indicator . This can be achieved by opening the side air vents
and adding more charcoal and/or wood (see “Adding Charcoal/Wood
During Cooking” section of this manual). Maintain this temperature for
1 hour then allow unit to cool completely.
NOTE:
BRINKMANN
DALLAS, TX 75244
It is important that the exterior of the grill is not scraped or
rubbed during the curing process.
IMPORTANT: To protect your smoker from excessive rust, the unit must
be cured periodically and covered at all times when not in
use. A smoker cover can be ordered directly from
Brinkmann by calling 1-800-468-5252.
YOUR BRINKMANN GRILL KING IS NOW CURED
AND READY FOR USE.
9
OPERATING INSTRUCTIONS
PLACE THE GRILL OUTDOORS ON A HARD, LEVEL, NON-COMBUSTIBLE SURFACE
AWAY FROM ROOF OVERHANG OR ANY COMBUSTIBLE MATERIAL. NEVER USE ON WOODEN OR OTHER
SURFACES THAT COULD BURN. PLACE THE GRILL AWAY FROM OPEN WINDOWS OR DOORS TO PREVENT SMOKE
FROM ENTERING YOUR HOUSE. IN WINDY WEATHER, PLACE THE GRILL IN AN OUTDOOR AREA THAT IS
PROTECTED FROM THE WIND.
READ ALL SAFETY WARNINGS AND INSTRUCTIONS CAREFULLY
BEFORE OPERATING YOUR GRILL.
Step 1
With charcoal tray adjusters attached to the charcoal tray, place
charcoal grate on charcoal tray and lower inside cooking chamber.
Smoking
Step 2
Follow instructions below carefully to build a fire. You may use
charcoal and/or wood as fuel in the Grill King (see “Adding
Charcoal/Wood During Cooking” section of this manual).
WARNING:
Never use charcoal that has been pre-treated with
lighter fluid. Use only a high grade plain charcoal or
charcoal/wood mixture.
If using a Charcoal Chimney Starter, follow all manufacturer’s warnings
and instructions regarding the use of their product. Open the side air
vents approximately halfway. Carefully place 5 to 6 pounds of hot coals
for Grill King Deluxe (2 to 3 pounds for Grill King) on left side of
charcoal grate.
WARNING:
NOTE:
Keep hot coals away from the side air vent to prevent coals
from falling out.
To extend the life of your grill, make sure that hot coals and
wood do not touch the walls of grill or lay inside of cooking
chamber under charcoal tray.
IF USING CHARCOAL CHIMNEY STARTER, PROCEED TO STEP 5
If you choose to use charcoal lighting fluid, ONLY use charcoal
lighting fluid approved for lighting charcoal. Do not use gasoline,
kerosene, alcohol or other flammable material for lighting charcoal.
Follow all manufacturer’s warnings and instructions regarding the
use of their product. Place 5 to 6 pounds of charcoal for Grill King
Deluxe (2 to 3 pounds for Grill King) on left side of charcoal grate.
Step 3
Saturate charcoal with lighting fluid. With lid open wait 2 to 3 minutes
to allow lighting fluid to soak into charcoal. Store charcoal lighting fluid
safely away from the grill.
Step 4
Open the side air vents approximately half way. With grill lid open,
stand back and carefully light charcoal and allow to burn until covered
with a light ash (approximately 20 minutes). Charcoal lighting fluid
must be allowed to completely burn off prior to closing grill lid.
WARNING:
Failure to do this could trap fumes from charcoal lighting
fluid in grill and may result in a flash-fire or explosion when
lid is opened.
10
Step 5
With coals burning well, carefully add wood chunks using long cooking tongs (see “Flavoring Wood” and “Adding Charcoal/Wood During
Cooking” sections of this manual.)
Step 6
Place cooking grill on grill support lips. Use charcoal tray adjusters to
position charcoal tray to lowest level.
WARNING:
Always wear oven mitts/gloves when adjusting cooking levels
to protect your hands from burns.
Step 7
Lower Charcoal Tray Level
(Smoking)
Place food on right side of cooking grill and close lid. Adjust the side
air vents to regulate cooking temperature.
NOTE:
Do not fully close side air vents and lid unless trying to cool the
grill down or suffocate a flame.
Step 8
By closing the side air vents more, the burning intensity is slowed and
smoke is contained within the grill, imparting more smoke flavor to
food. The ideal smoking temperature is between 175°F and 250°F or
“IDEAL” reading on the heat gauge.
Step 9
For large cuts of meat, allow approximately one hour of cooking time
per pound of meat. Always use a meat thermometer to ensure food
is fully cooked before removing from grill.
Step 10
Allow grill to cool completely, then follow instructions in the
“After-Use Safety” and “Proper Care & Maintenance” sections of this
manual.
Smoke Cooking Tips
During the smoking process, avoid the temptation to open lid to check
food. Opening the lid allows heat and smoke to escape, making additional cooking time necessary.
Food closest to the charcoal will cook and brown faster. Rotate food
midway through the cooking cycle. If food is excessively browned or
flavored with smoke, wrap food in aluminum foil after the first few
hours of smoking. This will allow food to continue cooking without
further browning or smoke flavoring.
When cooking fish or extra lean cuts of meat, you may want to try
water smoking to keep the food moist. Before starting a fire, place
charcoal tray to lowest level. Use a flat bottom metal pan shallow
enough to fit between charcoal grate and cooking grill as a water pan.
Set the metal pan on charcoal grate under food and cooking grill. Fill
with water or marinade until q full. Build your fire on the opposite
side of water pan.
CAUTION:
11
Always use oven mitts/gloves to protect your hands. Liquid
in water pan will be extremely hot and can scald or burn.
Always allow liquid to cool completely before handling. Do
not allow liquid to completely evaporate from water pan.
Step 1
Lightly coat all interior surfaces of the Grill King including cooking grill
with vegetable oil or vegetable oil spray. Do not coat charcoal grate or
charcoal tray.
Grilling/Searing
Step 2
Follow the instructions below carefully to build a fire. You may use
charcoal and/or wood as fuel in the Grill King (see “Adding
Charcoal/Wood During Cooking” section of this manual).
WARNING:
Never use charcoal that has been pre-treated with lighter
fluid. Use only a high grade plain charcoal or charcoal/wood
mixture.
If using a Charcoal Chimney Starter, follow all manufacturer’s warnings
and instructions regarding the use of their product. Start with 8 to 10
pounds of charcoal for Grill King Deluxe (3 to 4 pounds for Grill King).
This should be enough charcoal to cook with, once the curing process
has been completed. Open the side air vents halfway. When charcoal is
burning strong, carefully place hot coals in center of charcoal grate.
WARNING:
NOTE:
Middle Charcoal Tray Level
(Grilling)
Keep hot coals away from side air vent to prevent coals from
falling out.
To extend the life of your grill, make sure that hot coals and
wood do not touch the walls of grill or lay inside of cooking
chamber under charcoal tray.
IF USING CHARCOAL CHIMNEY STARTER, PROCEED TO STEP 5
If you choose to use charcoal lighting fluid, ONLY use charcoal lighting
fluid approved for lighting charcoal. Do not use gasoline, kerosene,
alcohol or other flammable material for lighting charcoal. Follow all
manufacturer’s warnings and instructions regarding the use of their
product. Start with 8 to 10 pounds of charcoal for Grill King Deluxe
(3 to 4 pounds for Grill King). This should be enough charcoal to cook
with, once the curing process has been completed. Place the charcoal
in center of charcoal grate.
High Charcoal Tray Level
(Searing)
Step 3
Saturate charcoal with lighting fluid. With lid open wait 2 to 3 minutes
to allow lighting fluid to soak into charcoal. Store charcoal lighting fluid
safely away from the grill.
Step 4
Open the side air vents approximately half way. With grill lid open,
stand back and carefully light charcoal and allow to burn until covered
with a light ash (approximately 20 minutes).
WARNING:
Charcoal lighting fluid must be allowed to completely burn off
prior to closing grill lid (approximately 20 minutes). Failure to
do this could trap fumes from charcoal lighting fluid in grill
and may result in a
flash-fire or explosion when lid is opened.
12
Step 5
Place cooking grill on grill support lips. Use charcoal tray adjusters to
position charcoal grate to desired cooking level.
WARNING:
NOTE:
Always wear oven mitts/gloves when adjusting cooking
levels to protect your hands from burns.
Do not fully close side air vents and lid unless trying to cool the
grill down or suffocate a flame.
Step 6
Place food on cooking grill and close grill lid. Adjust the side air vents
to regulate cooking temperature.
Step 7
By closing the side air vents more, the burning intensity is slowed.
Always use a meat thermometer to ensure food is fully cooked
before removing from grill.
Step 8
Allow grill to cool completely, then follow instructions in the “AfterUse Safety” and “Proper Care & Maintenance” sections of this
manual.
Flavoring Wood
To obtain your favorite smoke flavor, experiment by using chunks,
sticks or chips of flavor producing wood such as hickory, pecan, apple,
cherry, or mesquite. Most fruit or nut tree wood may be used for
smoke flavoring. Do not use resinous wood such as pine as it will
produce an unpleasant taste.
Wood chunks or sticks 3" to 4" long and 1" to 2" thick work best.
Unless the wood is still green, soak the wood in water for 30 minutes
or wrap each piece in foil and tear several small holes in the foil to produce more smoke and prevent the wood from burning too quickly. A
lot of wood is not required to obtain a good smoke flavor. A
recommended amount for the Grill King is 5 to 6 wood chunks or
sticks. Experiment by using more wood for stronger smoke flavor or
less wood for milder smoke flavor.
Additional flavoring wood should not have to be added during the
cooking process. However, it may be necessary when cooking very
large pieces of food. Follow instructions and cautions in the “Adding
Charcoal/Wood During Cooking” section of this manual to avoid injury
while adding wood.
13
To increase heat and air circulation, fully open side air vents. If
increased air circulation does not raise temperature sufficiently,
more wood and/or charcoal may be needed. Follow instructions in
“Adding Charcoal/Wood During Cooking” section of this manual.
Regulating Heat
To maintain the temperature, more wood and/or charcoal may need
to be added during the cooking cycle.
NOTE:
Dry wood burns hotter than charcoal, so you may want to
increase the ratio of wood to charcoal to increase the cooking
temperature. Hardwood such as oak, hickory, mesquite, fruit
and nut wood are an excellent fuel because of their burning
rate. When using wood as fuel, make sure the wood is
seasoned and dry. DO NOT use resinous wood such as pine
as it will produce an unpleasant taste.
Additional charcoal and/or wood may be required to maintain or
increase cooking temperature.
Step 1
Adding Charcoal/Wood
During Cooking
Stand back and carefully open grill lid. Use caution since flames
can flare-up when fresh air suddenly comes in contact with fire.
Step 2
Fully close lower side air vents to prevent embers from falling
through.
Step 3
Wearing oven mitts/gloves, remove food from cooking grill. Place
charcoal tray on bottom of cooking chamber by removing charcoal
tray adjusters from cooking grill. Remove cooking grill.
Step 4
Stand back a safe distance and use long cooking tongs to lightly
brush aside ashes on hot coals. Use cooking tongs to add charcoal
and/or wood to charcoal grate, being careful not to stir-up ashes
and sparks. If necessary, use your Charcoal Chimney Starter to
light additional charcoal and/or wood and add to existing fire.
WARNING:
Never add charcoal lighting fluid to hot or even warm
coals as flashback may occur causing severe burns.
Step 5
When charcoal is burning strong again, wear oven mitts/gloves and
carefully place cooking grill on top of grill support brackets. Use
charcoal tray adjusters to position cooking grill to desired cooking
level and replace food.
Step 6
Close the grill lid, open the lower side air vents and allow food to
continue cooking.
14
AFTER-USE SAFETY
WARNING
•
Close lid and all dampers to extinguish fire.
•
Always allow grill and all components to cool completely before handling.
•
Never leave coals and ashes in grill unattended. Make sure coals and ashes are completely extinguished before removing.
•
Before grill can be left unattended, remaining coals and ashes must be removed from grill. Use caution to protect yourself
and property. Place remaining coals and ashes in a non-combustible metal container and completely saturate with water.
Allow coals and water to remain in metal container 24 hours prior to disposing.
•
Extinguished coals and ashes should be placed a safe distance from all structures and combustible materials.
•
With a garden hose, completely wet surface beneath and around the grill to extinguish any ashes, coals or embers which
may have fallen during the cooking or cleaning process.
•
Cover and store grill in a protected area away from children and pets.
Proper Care
& Maintenance
15
•
Cure your grill periodically throughout the year to protect
against excessive rust.
•
To protect your grill from excessive rust, the unit must be properly
cured and covered at all times when not in use. A smoker cover may
be ordered directly from Brinkmann by calling 1-800-468-5252.
•
Wash cooking grill and charcoal grate with hot, soapy water, rinse
well and dry. Lightly coat grill with vegetable oil or vegetable oil spray.
•
Clean inside and outside of grill by wiping off with a damp cloth. Apply
a light coat of vegetable oil or vegetable oil spray to the interior surface
to prevent rusting. Do not coat charcoal grate or charcoal tray.
•
If rust appears on the exterior surface of your grill, clean and buff the
affected area with steel wool or fine grit emery cloth. Touch-up with a
good quality high-temperature resistant paint.
•
Never apply paint to the interior surface. Rust spots on the interior
surface can be buffed, cleaned, then lightly coated with vegetable oil or
vegetable oil spray to minimize rusting.
ACCESSORIES
The Art of Smoke Cooking Cookbook
Contains 40 exciting yet simple recipes using the delicious technique of smoke cooking.
Beautifully photographed full-color, sixty-six page hardback cookbook presents old favorites
as well as new recipes such as smoked meatballs & spaghetti, smoked pizza, smoked
tomato soup and smoked peach cobbler.
Model 812-3327-0
Smoke’N Spice Seasoning
Hickory & Mesquite Smoking Wood
These custom blended spices are a
delicious marinade seasoning for
smoke cooking and grilling.
Contains no MSG. Available in red
and white meat varieties in a
money-saving 2-pack.
Model 812-3322-0
Select hickory or mesquite wood chunks greatly
enhance the flavor of meat and vegetables when
smoking or grilling. Can also be used as fuel instead of
charcoal. Packaged in 10 lb. bag, these chunks work
great with either charcoal, electric or LP gas smokers.
Model 812-3450-0 (Hickory)
Model 812-3440-0 (Mesquite)
BBQ Clip-on Portable Light
Professional Shish-Kabob Skewers
These heavy-duty, 18" shish-kabob skewers
are extra-long for fabulous restaurant
style kabobs. Made of rust
resistant stainless
steel to last for years.
Ideal for use in our
Smoke’N Pit horizontal
smokers and grills.
Set of 12
812-2904-0
This powerful, portable light clips onto your
grill to brighten your evening barbecues.
The built-in reflector provides maximum
illumination for a variety of uses. Features
include long-life soft white fluorescent bulb,
conveniently located ON/OFF switch, heavy-duty
plastic clip that clamps to most surfaces, and
a flexible goose neck with swivel control.
Uses 4AA batteries (not included).
812-5060-0
Rib Rack
Chrome-plated
rack can greatly
increase the
cooking capacity
of your smoker. Holds
ribs, chicken halves, potatoes
and corn vertically to triple cooking capacity. Allows
smoke, steam and heat to penetrate food evenly.
Model 600-0062-3
Smoker’s Blend Charcoal
This blend of all natural hardwood charcoal and
smoking wood briquets burns longer than regular
charcoal and also adds smoke without adding wood
chunks. The result is a deeper, richer smoked flavor.
Available in hickory or mesquite in a 10 lb. bag.
Model 812-4040-0 (Hickory)
Model 812-4030-0 (Mesquite)
LOOK FOR THESE AND OTHER BRINKMANN ACCESSORIES AT YOUR LOCAL RETAILER WHERE
SMOKERS ARE SOLD, OR ORDER DIRECT BY CALLING 1-800-468-5252.
16
ACCESSORIES
Chicken and Turkey Racks
Deluxe Charcoal Starter
These chromed steel racks hold chicken, cornish hen,
duck or turkey upright and are ideal for
smoking or oven roasting poultry. The rack
allows the meat to cook from the inside as
well as from the outside. This speeds up
cooking time, seals in flavorful juices and
promotes even browning of skin. It’s a lower
fat way to cook poultry because
excess fat drips off the meat.
When oven roasting, place
poultry on rack in a shallow pan
of water to steam baste to
tender perfection. When
smoking, simply place poultry
on rack atop the grill. Makes
carving easier, too.
Chicken Racks (set of 2)
Model 885-9015-0
The Brinkmann Deluxe Charcoal Starter is the fastest and
healthiest way to light charcoal without using lighter fluid.
Just place crumpled newspaper under the charcoal starter,
fill with charcoal and light.
You’ll have hot, glowing
coals in about 15 minutes
with no unpleasant fumes
to affect the flavor of your
food. Our unique design
allows you to pour the hot
coals from the top or
simply slide the
grate out and
lift to release
hot coals through
the bottom of starter into
your smoker or grill.
Model 812-4080-0
Turkey Rack
Model 885-9025-0
The Ultimate 5-Piece BBQ Tool Set
Multi-Purpose Spatula
If you could
have only one
BBQ tool,
this multipurpose spatula
is it! Aside from
being a great
spatula, it features
a serrated edge for
cutting, a bottle opener,
and special grooved edges
for cleaning grills. Made of
heavy-gauge stainless steel to
last for years. Beautiful rosewood
handles are slotted and riveted for
maximum strength and durability.
Includes leather hanging straps for
convenient storage.
812-5047-0
You’ll be the envy of your fellow outdoor chefs with this
ultimate BBQ tool set. It’s sleek ergonomic design combined
with durable, heavy-gauge
stainless steel construction
is truly impressive. Extrawide, polished
utensils provide
precise handling
and control when
flipping, basting
and turning your
food on the grill.
Beautifully crafted,
smooth rosewood
handles are oval-shaped
to fit comfortably in your
hand and are extra-long to
keep your hands safely
away from the fire.
The five-piece set includes
tongs, spatula, fork, basting
brush, and a grill brush. Includes leather hanging
straps for convenient storage.
812-5045-0
LOOK FOR THESE AND OTHER BRINKMANN ACCESSORIES AT YOUR LOCAL RETAILER WHERE
SMOKERS ARE SOLD, OR ORDER DIRECT BY CALLING 1-800-468-5252.
17
ACCESSORIES
Grill King/Grill King Deluxe Smoker Cover
R
Our heavy-duty, durable vinyl cover with felt backing provides years of protection
for Brinkmann Grill King. This top-of-the-line cover comes with closure strips at both ends to
prevent cover from slipping or blowing off. Black.
Grill King: Model 812-3210-0
Grill King Deluxe: Model 812-3200-0
Meatloaf Basket
Smoker Basket
The unique basket weave prevents meatloaf from
falling through the grill while allowing smoke,
steam and heat to flow into the food. Also,
provides a
convenient
method for
lifting your
meatloaf in
and out of the
smoker.
Model 400-0073-0
Stainless Steel Wood Chip Smoking Box
Rugged stainless steel smoking box allows wood chips to burn longer
for richer smoke flavor and provides
easy cleanup of ashes. Ideal for
charcoal, electric, gas smokers
and grills.
Model 812-3311-0
Commercial-Quality Meat Thermometer
200
An essential tool when cooking all types of meat. Get perfectly smoked
roasts, briskets and turkeys without cutting into the meat.
Commercial-quality thermostat features an easy-toread 2w" dial with a 52" stem. Features Fahrenheit
18
and Centigrade readings and National Livestock and
0
85
Meat Board recommended
80
160
77
temperatures. Also features the
140
newly recommended 170°F internal temperature
70
0
12
for fresh pork. Stainless steel construction and
60
dishwasher safe.
Model 812-4100-0
POULTRY
LAMB
BEEF WELL
PORK
VEAL
The unique basket
weave prevents
food from falling
through the grill
while allowing smoke,
steam and heat to flow into the food. Great for fish,
shrimp, vegetables and hors d’oeuvres. Also,
provides a convenient method for lifting food in and
out of the smoker. Great for large cuts of meat such
as turkeys and roasts.
Model 400-0074-0
Meat Tenderizing Machine
The Jaccard Meat Tenderizing Machine’s Stainless
Steel blades penetrate meat in a single stroke. Easy
to use with one hand. This tenderizer makes any cut
of meat
unbelievably
tender and
allows marinade
and smoke to
penetrate deeply
into meat. Also
reduces cooking
time and helps
retain flavorful
juices. Made
from ABS plastic with stainless steel blades.
Completely dishwasher safe. Protective cover
included.
16 Blade Tenderizer
Model 812-5016-0
HAM
BEEF MED.
BEEF RARE
COOKED HAM
48 Blade Tenderizer
Model 812-5048-0
LOOK FOR THESE AND OTHER BRINKMANN ACCESSORIES AT YOUR LOCAL RETAILER WHERE
SMOKERS ARE SOLD, OR ORDER DIRECT BY CALLING 1-800-468-5252.
18
©1999 The Brinkmann Corporation
Dallas, Texas 75244 U.S.A
www.brinkmanncorp.com
ONE YEAR LIMITED WARRANTY
For one year from date of purchase, The Brinkmann Corporation warrants the Grill King/Grill King Deluxe against defects due to
workmanship or materials to the original purchaser. The Brinkmann Corporation’s obligations under this warranty are limited to
the following guidelines:
•
This warranty does not cover grills that have been altered or damaged due to: normal wear, rust, abuse, improper
maintenance, improper use, disassembly of parts and/or attempted repair by anyone other than an authorized employee of
The Brinkmann Corporation.
•
This warranty does not cover surface scratches or heat damage to the finish, which is considered normal wear.
•
The Brinkmann Corporation may elect to repair or replace damaged units covered by the terms of this warranty.
•
This warranty extends to the original purchaser only and is not transferable or assignable to subsequent purchasers.
The Brinkmann Corporation requires reasonable proof of purchase. Therefore, we strongly recommend that you retain your sales
receipt or invoice. To obtain replacement parts for your Grill King/Grill King Deluxe under the terms of this warranty, please call
Customer Service Department at 1-800-527-0717. A receipt will be required. The Brinkmann Corporation will not be
responsible for any cookers forwarded to us without prior authorization. Grill King/Grill King Deluxe must be returned to the
original place of purchase for replacement of the unit.
EXCEPT AS ABOVE STATED, THE BRINKMANN CORPORATION MAKES NO OTHER EXPRESS WARRANTY.
THE IMPLIED WARRANTIES OF MERCHANTABILITY AND FITNESS FOR A PARTICULAR PURPOSE ARE LIMITED IN DURATION
TO ONE YEAR FROM THE DATE OF PURCHASE. SOME STATES DO NOT ALLOW LIMITATIONS ON HOW LONG AN IMPLIED
WARRANTY LASTS, SO THE ABOVE LIMITATION MAY NOT APPLY TO YOU.
ANY LIABILITY FOR INDIRECT, INCIDENTAL OR CONSEQUENTIAL DAMAGES ARISING FROM THE FAILURE OF THE
GRILL KING/GRILL KING DELUXE TO COMPLY WITH THIS WARRANTY OR ANY IMPLIED WARRANTY IS EXCLUDED.
CUSTOMER ACKNOWLEDGES THAT THE PURCHASE PRICE CHARGED IS BASED UPON THE LIMITATIONS CONTAINED IN THE
WARRANTY SET OUT ABOVE. SOME STATES DO NOT ALLOW THE EXCLUSION OR LIMITATION OF INCIDENTAL OR
CONSEQUENTIAL DAMAGES, SO THE ABOVE LIMITATION OR EXCLUSION MAY NOT APPLY TO YOU. THIS WARRANTY GIVES
YOU SPECIFIC LEGAL RIGHTS, AND YOU MAY ALSO HAVE OTHER RIGHTS WHICH VARY FROM STATE TO STATE.
9/99
Owner’s Manual for Models
810-3210-0 & 810-3200-0