1
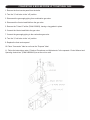
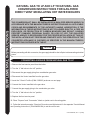
NATURAL GAS TO LP AND LP TO NATURAL GAS
CONVERSION INSTRUCTIONS FOR GAS-FIRED
DIRECT VENT MODULATING HOT WATER BOILERS
SUPPLEMENTAL INSTRUCTIONS
!
WARNING
!
THIS CONVERSION KIT SHALL BE INSTALLED BY A QUALIFIED SERVICE AGENCY IN
ACCORDANCE WITH THE MANUFACTURER’S INSTRUCTIONS AND ALL APPLICABLE
CODES AND REQUIREMENTS OF THE AUTHORITY HAVING JURISDICTION. IF THE
INFORMATION IN THESE INSTRUCTIONS IS NOT FOLLOWED EXACTLY, A FIRE, AN
EXPLOSION, OR PRODUCTION OF CARBON MONOXIDE MAY RESULT, CAUSING
PROPERTY DAMAGE, PERSONAL INJURY, OR LOSS OF LIFE. THE QUALIFIED
SERVICE AGENCY IS RESPONSIBLE FOR THE PROPER INSTALLATION OF THIS KIT.
THE INSTALLATION IS NOT PROPER AND COMPLETE UNTIL THE OPERATION OF THE
CONVERTED APPLIANCE IS CHECKED AS SPECIFIED IN THE MANUFACTURER’S
INSTRUCTIONS SUPPLIED WITH THE KIT.
!
CAUTION
!
Before proceeding with this conversion, the gas supply should be shut off prior to disconnecting electrical
power.
CONVERTING A BOILER FROM NATURAL GAS TO LP
1. Remove the front service panel from the boiler.
2. Turn the ½” ball valve to the “off” position.
3. Disconnect the gas supply piping from combination gas valve.
4. Disconnect the Venturi manifold from the gas valve.
5. Insert the 7.0mm LP orifice (P/N# 1350023) as shown on next page.
6. Connect the Venturi manifold to the gas valve.
7. Connect the gas supply piping to the combustion gas valve.
8. Turn the ½” ball valve to the “on” position.
9. Replace the front service panel.
10. Place “Propane” and “Conversion” labels on jacket next to the rating plate.
11. Follow the instructions under “Checkout Procedures and Adjustments” in the separate “Control Manual
and Operating Instructions” (P/N# 240006104) to set the unit on rate.
P/N 240005545, Rev. 1.1 [04/06]
CONVERTING A BOILER FROM LP TO NATURAL GAS
1. Remove the front service panel from the boiler.
2. Turn the ½” ball valve to the “off” position.
3. Disconnect the gas supply piping from combination gas valve.
4. Disconnect the Venturi manifold from the gas valve.
5. Remove the 7.0mm LP orifice (P/N# 1350023), leaving o-ring gasket in place.
6. Connect the Venturi manifold to the gas valve.
7. Connect the gas supply piping to the combustion gas valve.
8. Turn the ½” ball valve to the “on” position.
9. Replace the front service panel.
10. Place “Conversion” label on unit over the “Propane” label.
11. Follow the instructions under “Checkout Procedures and Adjustments” in the separate “Control Manual and
Operating Instructions” (P/N# 240006104) to set the unit on rate.