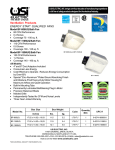
1
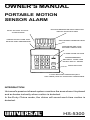
OWNER'S MANUAL
PORTABLE MOTION
SENSOR ALARM
BUILT-IN HIGH OUTPUT
105 dB ALARM
VERIFICATION TONE FOR
KEYPAD AND ARM/DISARM
MOTION SENSOR DETECTS MOTION
AND ACTIVATES ALARM
ADJUSTABLE SENSOR HEAD
PROGRAM AND LOW
BATTERY INDICATOR
ALARM CHIME OPTION
PROGRAMMABLE
SECURITY CODE AND
ENTRY DELAY TIMING
PANIC BUTTON
9 VOLT BATTERY OPERATED (NOT
INCLUDED) AND AC ADAPTOR COMPATIBLE
INTRODUCTION
Universal's passive infrared system monitors the area where it is placed
and activates instantly when motion is detected.
In the Entry Chime mode, the chime will sound each time motion is
detected.
HS-5300
IMPORTANT SAFETY TIPS
1. Do not install the alarm where it will be exposed to direct sunlight or rain.
2. The alarm siren is very loud. Never put the product close to your ear.
3. The sensor should be directed away from heat sources such as radiators, heating
ducts and stoves.
4. If the product goes off at random, it may be located too close to a heat source.
Changing the location or direction of the sensor alarm can remedy this.
5. The sensor alarm can provide valuable protection for your home and property if
utilized properly. However, this unit cannot guarantee complete protection against
burglary or robbery. Therefore, the manufacturer will not be held responsible for any
loss or damages which could occur.
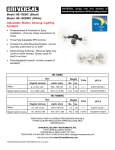
INSTALLATION
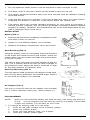
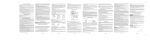
Battery (FIG. 1)
1. Remove the screw from the battery compartment cover
and slide it down to remove.
2. Install a 9 Volt Alkaline battery (not included).
3. Replace the battery compartment cover and screw.
FIG. 1
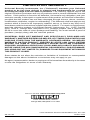
Wall Mounting (FIG. 2)
Using the battery cover as a template, mark the locations
of the holes and install anchors and screws. Place the
sensor alarm over the screws and slide the product down
to secure in place.
The sensor alarm should be mounted between 3 and 6.5
feet (1 to 2 meters) above the floor for best coverage of
the protection area. Adjust the sensor head left or right
for the best direction of detection area.
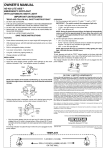
Shelf Top Mounting (FIG. 3)
FIG. 2
Turn the sensor head clockwise 180 degrees to the back,
then turn the head upwards to the desired angle. Place it
on the shelf top location you selected.
FIG. 3
AC Adaptor (FIG. 4)
Use only a 9 Volt DC 200 mA AC Adaptor (not included)
with a 3.5mm diameter male plug, center positive (+).
PROGRAMMING
NOTE:
FIG. 4
When you first install the battery, the initial security code set by the factory is
"0-0-0." You can program your own security code (up to 6 digits). If more than
6 digits are entered, you will hear an error tone.
1. To change an existing code to a new code:
a.
Enter the old code number (0-0-0 is factory preset).
b.
Press the "PROG" button.
c.
Enter your new security code (1 to 6 digits).
d.
Press the "PROG" button again.
2. To program the alarm timing:
a. Press the "PROG" button.
b. Press either 1, 2 or 3 for different
1 = 30 seconds alarm - 2 cycles,
2 = 60 seconds alarm - 2 cycles,
3 = 90 seconds alarm - 2 cycles,
timing:
30 seconds rest in between (preset timing).
30 seconds rest in between.
60 seconds rest in between.
3. To program the entry delay timing:
a. Press the "PROG" button.
b. Press either 7, 8 or 9 for different timing:
7 = 15 seconds delay (preset timing).
8 = 10 seconds delay.
9 = 5 seconds delay.
NOTE:
Programming can only be performed in the "Disarm" mode. When the unit is in
"Arm" mode, no programming is allowed for added protection.
OPERATION
1. To arm the product:
a. Enter your security code (or "0-0-0" if you did not change the code).
b. Press "ARM." You will hear three short beeps to confirm the unit is armed.
NOTE:
Be sure to switch off the chime switch before arming. There will be a 60
second exit delay after arming the unit.
2. To disarm the product:
a. Enter your security code.
b. Press "DISARM." You will hear one long beep to confirm the product is disarmed.
3. Chime on/off:
a. Slide the chime switch to "ON."
b. Wait 60 seconds for the sensor to warm up. Then, when motion is detected, the
product will sound the chime.
c.
Slide the switch to "OFF" to turn the chime function off.
NOTE:
When the sensor alarm is in "Arm" mode, the chime will not function.
4. Panic button:
a. Press the "PANIC" button to trigger the alarm immediately for 30 seconds.
b. To stop the alarm, enter your security code and press "DISARM."
TESTING THE DETECTION AREA
After selecting a location for installation of the sensor alarm, turn the chime on and wait
for 60 seconds to warm up. Then, move or walk in front of the sensor alarm. When the
product detects motion, the chime will sound. The chime will not sound if you walk
beyond the detection range. By testing the detection range, you can adjust the location
and the sensor angle for best coverage. Turn the chime off after completing the test.
LOW BATTERY INDICATOR
When the 9 Volt battery is low, the LED indicator will flash once every three seconds to
indicate low battery - in Arm mode only. To conserve power, the LED will not indicate
low battery in Disarm mode.
NOTE:
The low battery LED indicator lets you know when it is time to change the
battery. Insert a new 9 Volt Alkaline battery immediately or the sensor may not
detect properly.
INTRUSION MEMORY INDICATOR
When you disarm the product, if the LED indicator flashes three times, this indicates that
there has been an intrusion during the last arming mode. Be sure to check your home/
office thoroughly after entering.
TROUBLESHOOTING
If the product has operational problems during the programming procedure, does not
function properly or if you forget your security code, remove the battery, wait about three
minutes and then replace the battery. The system will reset to the initial normal state for
reprogramming.
LIMITED 90 DAY WARRANTY
Universal Security Instruments, Inc. ("Universal") warrants your Universal
product to be free from defects in material and workmanship for a period
of ninety (90) days from the date of purchase. This warranty applies only to the
original consumer purchaser and only to products used in normal residential use and
service. If this product is found to be defective, Universal's only obligation, and your
exclusive remedy, is the repair or replacement of the product, at Universal's discretion,
provided that the product has not been damaged through misuse, abuse, accident,
modifications, alteration, neglect or mishandling. This Warranty shall not apply to any
product which is found to be improperly installed, set-up, or used in any way not in
accordance with the instructions supplied with the product. For repair or replacement,
send the defective product to Universal Security Instruments, Inc., 11407 Cronhill
Drive, Suite A, Owings Mills, Maryland 21117, postage prepaid, with a payment of
$5.00 to cover the costs of return postage and handling. You must include a proof of
purchase (receipt) along with the returned product.
UNIVERSAL DOES NOT WARRANT AND SPECIFICALLY DISCLAIMS ANY
WARRANTY, WHETHER EXPRESS OR IMPLIED, OF FITNESS FOR A PARTICULAR
PURPOSE OTHER THAN THE WARRANTY CONTAINED HEREIN. NO IMPLIED
WARRANTY ON THIS PRODUCT, CREATED BY STATE LAW, SHALL EXTEND
BEYOND THE TERM OF THIS WARRANTY UNLESS SUCH LAW OTHERWISE
PROVIDES. UNIVERSAL SPECIFICALLY DISCLAIMS ANY LIABILITY AND SHALL
NOT BE LIABLE FOR ANY CONSEQUENTIAL OR INCIDENTAL LOSS OR DAMAGE,
INCLUDING, BUT NOT LIMITED TO, DAMAGES TO ANY EQUIPMENT WITH WHICH
THIS PRODUCT IS USED.
Some states do not allow the exclusion or limitation of incidental or consequential
damages so the above limitations or exclusions may not apply to you.
No agent, representative, dealer or employee of Universal has the authority to increase
or alter the obligations or terms of this Warranty.
Visit Us on the Web! www.universalsecurity.com
11407 Cronhill Drive, Suite A
Owings Mills, Maryland 21117 USA
288-3151-00A
©1997 UNIVERSAL SECURITY INSTRUMENTS, INC,. Rev. 2009
Printed in China