1
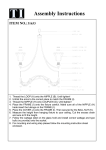
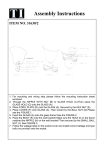
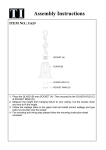
Assembly Instructions
ITEM NO.: 31634
1. Thread the LOOP (A) onto the NIPPLE (B). Until tighten!
2. Put down the SMALL FRAME (F) onto the fixture! See the FIGURE 1 FIGURE 2
& FIGURE 3. Please pay more attention to do not scratch the finish.
3. Unfold the arms to the correct place to match the FRAME (F) & FRAME (J).
4. Thread the NIPPLE (I) onto COUPLEN (H). Until tighten!
5. Place the SMALL FRAME (F) & BIG FRAME (J) onto the fixture careful. Make
sure all of the NIPPLE (I) hade insert the tubings on the FRAME.
6. Place the COVER (K) onto the FRAME. Then secured by the BALL NUT (L).
7. Measure the height from hanging fixture to your ceiling. Cut the excess chain
and wire to fit the height.
8. Follow the wattage label on the glass hold and install correct wattage and type
bulb (no provide) onto the socket.
9. For mounting and wiring step please follow the mounting instruction sheet
enclosed.
Assembly Instructions
ITEM NO.: 31633/31634
PICTURE 1
PICTURE 4
PICTURE 2
PICTURE 5
PICTURE 3
PICTURE 6
PICTURE 7
STEP-BY-STEP ASSEMBLY GUIDE
1.
CAREFULLY REMOVE FIXTURE OUT OF THE BOX.(PICTURE 1)
2.
THREAD THE LOOP ONTO THE NIPPLE ON THE FIXTURE.
3. PUT THE BOTTOM FRAME ON TOP OF A PIECE OF CLOTH OR CARPET AND AVOID ANY
SCRATCHES ON THE FIXTURES.(PICTURE 2)
4. SPREAD OUT AND ADJUST ARMS EVENLY ON THE FIXTURE.(PICTURE 3)
5. TREAD THE NIPPLE ONTO THE BOTTOM OF EACH ARM AS SHOWN.(PICTURE 4)
6. CAREFULLY INSERT THE NIPPLE INTO EACH TUBE ON THE FRAME.(PICTURE 5)
7. SECURE NIPPLE AND FRAME WITH BOTTOM CAP AND BALL NUT AS SHOWN.(PICTURE 6)
8. FIXTURE ASSEMBLY IS COMPLETED.(PICTURE 7)