Transcript
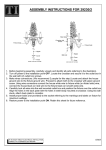
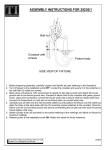
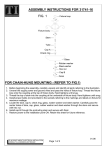
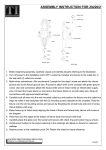
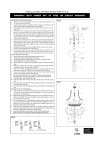
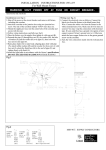
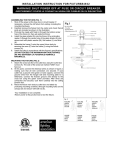
ASSEMBLY INSTRUCTIONS FOR 29231
Crossbar with screws
Canopy assembly
Leaves (a)
Fixture body
Coupling
Nipple
Cap
Finial
1. With power to the installation point OFF, attach the crossbar with (2) mounting screws to ceiling
mounted outlet box with (2) outlet box screws.
2. Make wires connections: (We recommend 2 people for this step). Position the fixture pan under
the outlet box. Attach house ground wire to fixture ground wire. Proceed to attach both to the
crossbar using ground screw. Using wire connectors connect the house white wire to the fixture
white wire (or ribbed side); connect the house black (or red) wire to the fixture black wire (or
smooth side).
3. Carefully tuck all wires into the ceiling mounted outlet box and position the fixture over the outlet
box. Align and pass the (2) mounting screws attached to crossbar through (2) mounting holes in
fixture pan. Locate (2) ball nuts and thread it onto ends of mounting screws. Hands tighten until
snug to secure fixture to ceiling. Be sure there are no trapped or pinched wires.
4. Place leaves (a) over the protruding nipple at top of fixture body, then thread canopy assembly
onto the protruding nipple until snug.
5. Thread nipple into the coupling at bottom of fixture body.
6. Locate cap and leaves (b) carefully, place them over the nipple and secure with finial.
7. Install proper bulbs to each socket referring to the markings and labels on fixture for maximum
wattage.
8. Place glass over each socket.
9. Restore power to the installation point ON. Retain this sheet for future reference.
IF IN DOUBT ABOUT ELECTRICAL INSTALLATION,
CONSULT A LICENSED ELECTRICIAN!
07.07