1
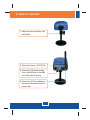
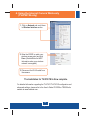
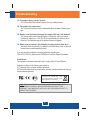
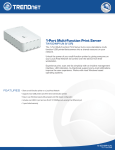
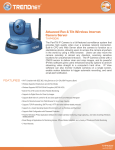
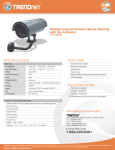
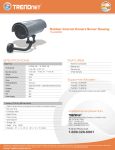
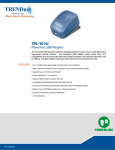
Quick Installation Guide
TV-IP201
TV-IP201W
Table ofofContents
Table
Contents
English ......................................................................................................
1. Before You Start .................................................................................
2. How to Connect .................................................................................
3. Configure the Internet Camera ..........................................................
4. Using the Internet Camera Wirelessly (TV-IP201W only) ..................
1
1
2
3
4
Troubleshooting ........................................................................................ 5
Version 01.23.2006
1. Before You Start
Package Content
TV-IP201/TV-IP201W
Antenna (TV-IP201W)
Metal Stand
Utility CD-ROM
AC Power Adapter
Quick Installation Guide
System Requirements
10/100Mbps Ethernet
CPU: Intel Celeron 1.1Ghz or above
Memory: 512MB or above
Web Browser: Microsoft Internet Explorer 5.0 or above,
Netscape 6.0 or above
VGA Resolution: 800 x 600 or above
Application
Parking
Monitoring
Office Monitoring
(TV-IP201W)
(TV-IP201)
Workstation with
PCI Adapter
(TE100-PCIWN)
Wireless Access Point
(TEW-430APB)
Firewall Router
(TW100-BRF114)
Front Gate
Monitoring
Internet
(TV-IP201)
Cable/DSL
Modem
Warehouse
Monitoring
(TV-IP201W)
1
English
2. How to Connect
1. Mount the Internet Camera to the
metal stand.
2. Attach the Antenna. (TV-IP201W)
3. Connect a RJ-45 network cable
from a Switch/Router to the LAN
port of the Internet Camera.
4. Connect the AC Power Adapter to
the Internet Camera and then to a
power outlet.
2
English
3. Configure the Internet Camera
Note: To access and configure the Internet Camera, both the Internet Camera
and your computer's network adapter must be on the same network segment.
1. Open your web browser, type
http://192.168.0.30 in the Address
bar, and press Enter.
2. To access the configuration page,
click System Administration.
3. Enter username and password,
then click OK.
Username: admin
Password: admin
4. Click on Network, configure
network settings to match your
network segment (i.e.
192.168.1.207), and then click
Save.
The Installation for TV-IP201 is Now complete.
3
English
4. Using the Internet Camera Wirelessly
(TV-IP201W only)
1. Click on Network and scroll down
to Wireless Interface section.
2. Enter the ESSID to match your
wireless access point and click
Save. (Enable/Enter the WEP
information when your wireless
network is encrypted)
3. Disconnect the RJ-45 cable from
the camera.
The Installation for TV-IP201W is Now complete.
For detailed information regarding the TV-IP201/TV-IP201W configuration and
advanced settings, please refer to the User's Guide CD-ROM or TRENDnet's
website at www.trendnet.com.
4
English
Troubleshooting
Q1: The image is blurry. How do I fix this?
A1: You can adjust the Internet Camera's focus by rotating the lens.
Q2: Can I replace the camera lens?
A2: The Internet Camera's Lens is replaceable with a standard CS-Mount type
lens.
Q3: How do I view the Internet Camera's live images within my Local Network?
A3: Open a web browser (Internet Explorer or Netscape), type your Internet
Camera's IP address (i.e.: 192.168.1.203) in the Address bar, and then hit the
Enter key. The Welcome page of the Internet Camera will appear.
Q4: When I view the camera in AciveX mode, the image does not load, why?
A4: Please make sure ActiveX is enabled for Internet Explorer, refer to your web
browser's user manual regarding ActiveX.
If you still encounter problems or have any questions regarding the
TV-IP201/TV-IP201W, please contact TRENDnet's Technical Support Department.
Certifications
This equipment has been tested and found to comply with FCC and CE Rules.
Operation is subject to the following two conditions:
(1) This device may not cause harmful interference.
(2) This device must accept any interference received. Including interference that may
cause undesired operation.
Waste electrical and electronic products must not
be disposed of with household waste. Please
recycle where facilities exist. Check with you Local
Authority or Retailer for recycling advice.
NOTE: THE MANUFACTURER IS NOT RESPONSIBLE FOR ANY RADIO OR TV
INTERFERENCE CAUSED BY UNAUTHORIZED MODIFICATIONS TO THIS
EQUIPMENT. SUCH MODIFICATIONS COULD VOID THE USER’S AUTHORITY TO
OPERATE THE EQUIPMENT.
5
TRENDnet Technical Support
US/Canada Support Center European Support Center
Contact
Contact
Telephone: 1(888) 777-1550
Fax:
1(310) 626-6267
Email: [email protected]
Telephone:
Deutsch : +49 (0) 6331 / 268-460
Français : +49 (0) 6331 / 268-461
0800-907-161 (numéro vert)
Español : +49 (0) 6331 / 268-462
English : +49 (0) 6331 / 268-463
Italiano : +49 (0) 6331 / 268-464
Dutch
: +49 (0) 6331 / 268-465
Fax: +49 (0) 6331 / 268-466
Tech Support Hours
7:30am - 6:00pm
Pacific Standard Time
Monday - Friday
Tech Support Hours
8:00am - 6:00pm
Middle European Time
Monday - Friday
Product Warranty Registration
Please take a moment to register your product online.
Go to TRENDnet’s website at http://www.trendnet.com
3135 Kashiwa Street
Torrance, CA 90505
USA
Copyright ©2006. All Rights Reserved. TRENDnet.