1
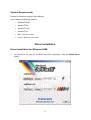
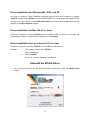
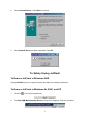
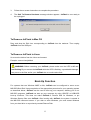
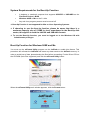
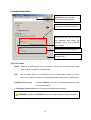
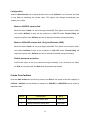
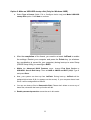
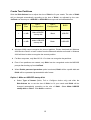
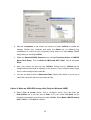
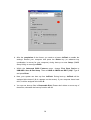
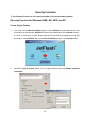
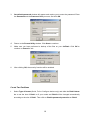
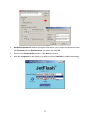
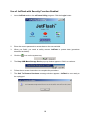
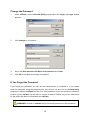
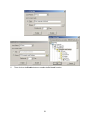
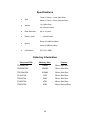
128MB~8GB JetFlash™
User’s Manual
P/N: TS128M~8GJF2A
( Version 1.1 )
Table of Contents
Introduction
Package Contents ....................................................................................................1
Features ....................................................................................................................1
System Requirements ..............................................................................................2
Driver Installation
Driver Installation for Windows 98SE .....................................................................2
Driver Installation for Windows Me, 2000, and XP .................................................4
Driver Installation for Mac OS 9.0 or Later .............................................................4
Driver Installation for Linux Kernel 2.4.2 or Later..................................................4
Uninstall the Win98 Driver .........................................................................4
To Safely Unplug JetFlash
To Remove JetFlash in Windows 98SE ..................................................................5
To Remove JetFlash in Windows Me, 2000, and XP ..............................................5
To Remove JetFlash in Mac OS...............................................................................6
To Remove JetFlash in Linux ..................................................................................6
Boot-Up Function
System Requirements for Boot-Up Function .........................................................7
Boot-Up Function for Windows 98SE and Me........................................................7
Format Introduction .................................................................................................8
Create One Partition.................................................................................................9
Create Two Partitions .............................................................................................12
Security Function
Security Function for Windows 98SE, Me, 2000, and XP ....................................15
Use of JetFlash with Security Function Enabled.................................................18
Change the Password ............................................................................................19
If You Forget the Password ...................................................................................19
PC-Lock Function
Use of JetFlash with PC-Lock Function Enabled ................................................20
Specifications ..................................................................................................22
Ordering Information ...................................................................................22
JetFlash Limited Warranty
Introduction
Thank you very much for purchasing Transcend’s JetFlash™. This small device is designed
to expedite exchanging huge amounts of data between any desktop or notebook computer
with a USB port. With higher storage capacity and a much faster data transfer rates than
other typical portable storage media, it can easily replace floppy diskettes and hard disks. In
addition, its mobility, superior data retention ability, and impressive appearance will provide
you with a brand-new data-storage experience.
Package Contents
The JetFlash package includes the following items:
•
JetFlash
•
Label
•
Neck Strap
•
Driver CD
•
USB Extension Cable
•
Quick Installation Guide
Features
•
Fully compatible with USB 2.0 specification
•
Easy Plug and Play installation
•
Driverless (Only Windows® 98SE needs the enclosed driver)
•
Powered via the USB port. No external power or battery needed
•
Security Function: Password protection provided
•
Boot-Up Function: Makes JetFlash a bootable device
•
PC-Lock Function: Makes JetFlash a key to lock your computer
•
LED indicates the usage status of the JetFlash
1
System Requirements
Desktop or notebook computer with USB port
One of following operating systems:
•
Windows® 98SE
•
Windows® Me
•
Windows® 2000
•
Windows® XP
•
Mac™ OS 9.0 or later
•
Linux™ Kernel 2.4.2 or later
Driver Installation
Driver Installation for Windows 98SE
1.
Put the Driver CD into the CD-ROM (Auto-Run supported). Click the Win98 Driver
button.
2
2.
Select Install or update driver. Click Start to continue.
3.
After Install or update driver is completed, click OK.
4.
Plug JetFlash into an available USB port. A new Removable Disk drive with a newly
assigned drive letter appears in the My Computer window.
3
Driver Installation for Windows Me, 2000, and XP
No driver is required. These Windows operating systems have built-in drivers to support
JetFlash. Simply plug JetFlash into an available USB port, and Windows will install the files
needed to use your device. A new Removable Disk drive with a newly assigned drive letter
appears in the My Computer window.
Driver Installation for Mac OS 9.0 or Later
No driver is required. Just plug JetFlash into an available USB port and your computer will
automatically detect it. A new Disk icon appears on the Desktop.
Driver Installation for Linux Kernel 2.4.2 or Later
No driver is required. Just plug JetFlash into the USB port and mount it.
Example:
1.
First create a directory for JetFlash
mkdir /mnt/jetflash
2.
Mount JetFlash
mount –a –t msdos /dev/sda1 /mnt/jetflash
Uninstall the Win98 Driver
1.
Put the Driver CD into the CD-ROM (Auto-Run supported). Click the Win98 Driver
button.
4
2.
Select Uninstall driver. Click Start to continue.
3.
After Uninstall driver has been completed, click OK.
To Safely Unplug JetFlash
To Remove JetFlash in Windows 98SE
Unplug JetFlash from your system directly when data is not being transferred.
To Remove JetFlash in Windows Me, 2000, and XP
1.
Click the
icon on the system tray.
2.
The Stop USB Mass Storage Device pop-up menu appears. Click it to continue.
5
3.
Follow the on-screen instructions to complete the procedure.
4.
The Safe To Remove Hardware message window appears. JetFlash is now ready to
be unplugged.
To Remove JetFlash in Mac OS
Drag and drop the Disk icon corresponding to JetFlash into the trashcan. Then unplug
JetFlash from the USB port.
To Remove JetFlash in Linux
Un-mount the device from the Linux environment.
Example: umount /mnt/jetflash
WARNING: Before removing your JetFlash, please make sure the LED is off and
not flashing! If you remove the JetFlash while the LED is flashing, unpredictable damage
may occur to the files and/or your JetFlash due to a write cache fault.
Boot-Up Function
For systems that use Windows 98SE or Me, JetFlash can be configured to serve as an
MS-DOS Boot Disk. Upon completion of the appropriate procedure for your operating system
as described below, JetFlash can be used to boot up your computer, allowing you to run
MS-DOS programs. JetFlash can start up your computer by using USB-ZIP or USB-HDD
boot-up functions. This does not make JetFlash a Rescue Disk for Windows, or put
Windows Startup files onto JetFlash. After booting with JetFlash, the system is started in
the MS-DOS command screen. If you wish to enter Windows, you must restart Windows
from your hard drive or a previously created Rescue Disk.
6
System Requirements for the Boot-Up Function
•
A desktop or notebook computer that supports USB-ZIP or USB-HDD as the
First Boot Device in BIOS
•
Windows 98SE or Me on the C: drive
•
Any anti-virus program present must be turned off
Boot-Up Function is not supported for Mac or Linux Operating Systems.
If choosing to use the Boot-Up function, please be aware that there is a
maximum capacity size of 512MB (or less) apportioned to the Boot-Up disk
sector; this applies to both the USB-ZIP and USB-HDD formats.
To use the Boot-Up function, you must be logged on to the Windows OS with
Administrator privileges.
Boot-Up Function for Windows 98SE and Me
You must run the mFormat Utility program on the JetFlash to enable this feature. This
procedure will reformat the JetFlash and erase any data saved to the JetFlash memory. In
order to avoid loss of data, please backup the files before proceeding. Put the Driver CD into
the CD-ROM (Auto-Run supported) and click the mFormat Utility button.
When the mFormat Utility main window appears, click the Format button.
7
Format Introduction
JetFlash Product Number,
Drive Letter and Capacity
Information of Partitioned Disk 1
Disk-Volume bar. Use it to make
two partitions and adjust the
capacity sizes. The minimum
size is 2MB.
Information of Partitioned Disk 2
Progress bar
Type of Format
Quick: Erase and check blocks at the same time. If there are any bad blocks, mark
them as Bad and perform a DOS format.
Full:
Do a Surface Scan for a Read/Write Check. A Read/Write Check can find if
there is any bad block which will be marked as Bad and perform a DOS format.
Configure device only:
Partition JetFlash, and set up password protection and
boot-up information.
Configure device only cannot be setup under password protection.
WARNING: All data on JetFlash will be lost during execution of this procedure!
8
Configuration
Slide the Disk-Volume bar to adjust the disk size of your JetFlash. You can make one disk
or two disks by adjusting the volume sizes. The options will change automatically and
enable your choice.
Make an USB-ZIP startup disk:
When the size of Disk 1 is set to be larger than 2MB. This option can be chosen and it
can enable JetFlash to boot up the computer in USB-ZIP mode. Format Utility will
copy boot-up files onto JetFlash and set up startup information during formatting.
Make an USB-HDD startup disk: (Only for Windows 98SE)
When the size of Disk 1 is set to be larger than 2MB. This option can be chosen and it
can enable JetFlash to boot up the computer in USB-HDD mode. Format Utility will
copy boot-up files onto JetFlash and set up startup information during formatting.
Enable password protection:
Choose this option to set up a password during formatting. If you format as two disks,
the Disk 1 is a public disk and Disk 2 will be password protected.
Create One Partition
Slide the Disk-Volume bar all the way down to set Disk 1 size equal to the total capacity of
JetFlash. JetFlash can be enabled to setup to an USB-ZIP or USB-HDD boot-up mode as
indicated below.
Option
Configuration
1
Make USB-ZIP startup disk
2
Make USB-HDD startup disk
9
BIOS
USB-ZIP
USB-HDD
Option 1: Make an USB-ZIP startup disk
a. Select Type of format (Quick, Full or Configure device only) and Make USB-ZIP
startup disk option. Click Start to continue.
b. After the completion of the format, you need to re-insert JetFlash to enable the
settings. Restart your computer and press the Delete key (or whatever key
combination is correct for your computer) during boot-up to enter Setup (CMOS
Setup Utility) to reconfigure BIOS.
c. Within the Advanced BIOS Features menu, change First Boot Device to USB-ZIP.
Save & Exit Setup. Then at SAVE to CMOS and EXIT (Y/N)? Type Y and press
Enter.
d. Now, your system can boot from JetFlash. During the boot-up, JetFlash will be
assigned a drive letter A (A : \ > appears on the screen). If your computer has a
floppy drive, it will be assigned drive letter B.
e. You can see boot-up files in Removable Disk. Please don’t delete or move any of
these files, otherwise the boot-up function will fail.
10
Option 2: Make an USB-HDD startup disk (Only for Windows 98SE)
a. Select Type of format (Quick, Full or Configure device only) and Make USB-HDD
startup disk option. Click Start to continue.
b. After the completion of the format, you need to re-insert JetFlash to enable
the settings. Restart your computer and press the Delete key (or whatever
key combination is correct for your computer) during boot-up to enter Setup
(CMOS Setup Utility) to reconfigure BIOS.
c. Within the Advanced BIOS Features menu, change First Boot Device to
USB-HDD. Save & Exit Setup. Then at SAVE to CMOS and EXIT (Y/N)? Type Y
and press Enter.
d. Now, your system can boot up from JetFlash. During boot-up, JetFlash will be
assigned drive letter C (C: \ > appears on the screen). If your computer has a hard
Drive, it will be assigned drive letter D.
e. You can see boot-up files in Removable Disk. Please don’t delete or move any of
these files, otherwise the boot-up function will fail.
Enable password protection cannot be set in this mode.
11
Create Two Partitions
Slide the Disk-Volume bar to adjust the size of Disk1 to fit your needs. The size of Disk2
will be changed automatically according to the size of Disk1, as adjusted by the user.
JetFlash can be setup to a USB-ZIP or USB-HDD boot-up mode as indicated below.
Option
Disk 1
Size
Disk 1
Configuration
Disk 2
Configuration
BIOS
1
>2 MB
Make USB-ZIP
startup disk
Blank
USB-ZIP
2
>2 MB
Make USB-HDD
startup disk
Blank
USB-HDD
Windows 2000 cannot recognize the second partition. Please download the Windows
2000 Service Pack 3 or later version from the Microsoft website and install it. Windows
2000 will then be able to recognize the second partition.
For Mac computers, only Mac OS 10.1.5 or later can recognize the partitions.
Even if two partitions are created, only Disk1 can be recognized under the MS-DOS
prompt after booting up from JetFlash.
When Enable password protection option is selected, Disk1 will be a public disk and
Disk2 will be a password-protected disk after format.
Option 1: Make an USB-ZIP startup disk
a. Select Type of format (Quick, Full or Configure device only) and slide the
Disk-Volume bar to set the size of Disk1 to fit your needs and Disk2 will be
changed automatically according to the size of Disk1. Select Make USB-ZIP
startup disk on Disk 1. Click Start to continue.
12
b. After the completion of the format, you need to re-insert JetFlash to enable the
settings. Restart your computer and press the Delete key (or whatever key
combination is correct for your computer) during boot-up to enter Setup (CMOS
Setup Utility) to reconfigure BIOS.
c. Within the Advanced BIOS Features menu, change First Boot Device to USB-ZIP.
Save & Exit Setup. Then at SAVE to CMOS and EXIT (Y/N)? Type Y and press
Enter.
d. Now, your system can boot up from JetFlash. During boot-up, JetFlash will be
assigned drive letter A (A : \ > appears on the screen). If your computer has a floppy
drive, it will be assigned drive letter B.
e. You can see boot-up files in Removable Disk. Please don’t delete or move any of
these files, otherwise the boot-up function will fail.
Option 2: Make an USB-HDD startup disk (Only for Windows 98SE)
a. Select Type of format (Quick, Full or Configure device only) and slide the
Disk-Volume bar to set the size of Disk1 to fit your needs and Disk2 will be
changed automatically according to the size of Disk1. Select Make USB-ZIP startup
disk on Disk 1. Click Start to continue.
13
b. After the completion of the format, you need to re-insert JetFlash to enable the
settings. Restart your computer and press the Delete key (or whatever key
combination is correct for your computer) during boot-up to enter Setup (CMOS
Setup Utility) to reconfigure BIOS.
c. Within the Advanced BIOS Features menu, change First Boot Device to
USB-HDD. Save & Exit Setup. Then at SAVE to CMOS and EXIT (Y/N)? Type Y
and press Enter.
d. Now, your system can boot up from JetFlash. During boot-up, JetFlash will be
assigned drive letter C (C: \ > appears on the screen). If your computer has a hard
drive, it will be assigned drive letter D.
e. You can see boot-up files in Removable Disk. Please don’t delete or move any of
these files, otherwise the boot-up function will fail.
14
Security Function
The Security Function is not supported by Mac or Linux Operating Systems.
Security Function for Windows 98SE, Me, 2000, and XP
Create Single Partition
1.
You must run the mFormat Utility program on the JetFlash to enable this feature. This
procedure will reformat the JetFlash and erase any data saved to the JetFlash memory.
In order to avoid loss of data, please backup the files before proceeding through this
procedure. Insert JetFlash and run the mFormat Utility program. Click Format button.
2.
Select the Type of format (Quick, Full or Configure device only) and Enable password
protection.
15
3.
Set default password window will appear and require you to enter the password. Enter
the Password and the Password hint you want, and click OK.
4.
Return to the Format Utility window. Click Start to continue.
5.
Make sure you have performed a backup of the files on your JetFlash. Click OK to
continue or Cancel to exit.
6.
After clicking OK, the security function will be enabled.
Create Two Partitions
1.
Select Type of format (Quick, Full or Configure device only) and slide the Disk-Volume
bar to set the size of Disk1 to fit your needs and Disk2 will be changed automatically
according to the size of Disk1. Then click on Enable password protection on Disk2.
16
2.
Set default password window will appear and require you to enter the password. Enter
the Password and the Password hint you want, and click OK.
3.
Return to the Format Utility window. Click Start to continue.
4.
After the completion of the format, you need to re-insert JetFlash to enable the settings.
17
Use of JetFlash with Security Function Enabled
1.
Insert JetFlash and run the mFormat Utility program. Click the Login button.
2.
Enter the correct password to access data on the secured disk.
3.
When you finish, you need to safely remove JetFlash to protect data (procedure
described as below).
icon on the system tray.
4.
Click the
5.
The Stop USB Mass Storage Device pop-up window appears. Click it to continue.
6.
Follow the on-screen instructions to complete the procedure.
7.
The Safe To Remove Hardware message window appears. JetFlash is now ready to
be unplugged.
18
Change the Password
1.
Insert JetFlash, run the mFormat Utility program and click Login, the Login window
appears.
2.
Click Change >> to continue.
3.
Key in the New password, Re-Enter new password and a Hint.
4.
Click OK to complete the change of password.
If You Forget the Password
If you forget your password, you can use the password hint to remember it. If you cannot
recall the password using the password hint, then all you can do is run the Format Utility
program to reformat JetFlash and set up a new password. If you had previously created a
partition on the JetFlash you will have a chance to make a backup copy of the data stored
on the public disk before re-formatting the JetFlash.
WARNING: All data on JetFlash will be lost during execution of this procedure!
19
PC-Lock Function
Once the PC-Lock function is enabled, you can use the JetFlash as a key to lock your
computer, protecting it from being used by unauthorized persons.
The PC-Lock function is not supported on Mac and Linux Operating Systems.
To use the PC-Lock function, you must login into the Windows OS with Administrator
rights.
Use of JetFlash with PC-Lock Function Enabled
1.
Put the Driver CD into the CD-ROM drive (Auto-Run supported). Plug your JetFlash
into an available USB port of your computer and select the mFormat Utility Tool button.
2.
The mFormat Utility window appears. Select the PC-Lock button.
3.
The PC-Lock Setting window will appear. Select the Lock Period.
4.
Select Lock Screen Mode (Text mode or Picture mode) to protect your computer
from use by others.
20
5.
Then click on the Enable button to enable the PC-Lock function.
21
Specifications
75mm x 25mm x 11mm (Mini Size)
Size:
88mm x 33mm x 15mm (Normal Size)
15 g (Mini Size)
Weight:
24 g (Normal Size)
Data Retention:
Up to 10 years
Erase Cycles:
> 100,000 times
Read 10.0 MB/sec (Max.)
Speed:
Write 8.0 MB/sec (Max.)
Certificates:
CE, FCC, BSMI
Ordering Information
Transcend P/N
Memory Size
Feature
TS128MJF2A
128MB
Silver, Mini Size
TS256MJF2A
256MB
Silver, Mini Size
TS512MJF2A
512MB
Silver, Mini Size
TS1GJF2A
1GB
Silver, Mini Size
TS2GJF2A
2GB
Silver, Mini Size
TS4GJF2A
4GB
Silver, Mini Size
TS8GJF2A
8GB
Silver, Normal Size
22
JetFlash Limited Warranty
“Above and beyond” is the standard we set ourselves for customer service at
Transcend. We consistently position ourselves to be significantly above the industry
norm. It’s all part of our commitment to Customer Satisfaction.
All Transcend Information, Inc. (Transcend) products are warranted and tested to be free
from defects in material and workmanship and to conform to the published specifications.
Should your Transcend JetFlash malfunction during normal use in its recommended
environment due to improper workmanship or materials within the warranty period,
Transcend will repair or replace your product with a comparable product. This warranty is
subject to the conditions and limitations set forth herein.
Duration of Warranty: Transcend JetFlash are covered by this warranty for a period of two
(2) years from the date of purchase. Transcend will inspect the product and make the
determination as to whether the product is eligible for repair or replacement. The decision by
Transcend regarding eligibility of the product for repair or replacement will be final and
binding. Transcend reserves the right to provide a functionally equivalent refurbished
replacement product.
Limitations: This warranty does not apply to products that fail due to accident, abuse,
mishandling, improper installation, alteration, acts of nature, improper usage, or problems
with electrical power. Transcend JetFlash must be used with devices that conform to the
recommended industry standards. Transcend will not be liable for damages resulting from a
third party device that causes the Transcend product to fail. Transcend shall in no event be
liable for any consequential, indirect, or incidental damages, lost profits, lost business
investments, lost goodwill, or interference with business relationships as a result of lost data.
Transcend is also not responsible for damage or failure of any third party equipment, even if
Transcend has been advised of the possibility. This limitation does not apply to the extent
that it is illegal or unenforceable under applicable law.
Disclaimer: The foregoing limited warranty is exclusive, with no other warranties, implied or
statutory, including, but not limited to any implied warranty of merchantability or fitness for a
particular purpose. This warranty is not affected in any part by Transcend providing technical
support or advice.
Online Registration: To expedite warranty service, please register your Transcend Product
within 30 days of purchase.
Register online at http://www.transcendusa.com/TsClub/index.asp.
Transcend Information, Inc.
www.transcendusa.com
The Transcend logo is a registered trademark of Transcend Information, Inc.
*All logos and marks are trademarks of their respective companies.