Transcript
Quick
Installation Guide
Wireless N USB Adapter
MODEL NO. TL-WN727N
For more information, please visit our website: http://www.tp-link.com
7106505090 REV5.0.0
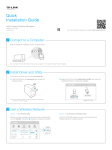
1 Connect to a Computer
Option 1: Directly
Option 2: Via the USB Extension Cable
Note: In Windows XP, a Found New Hardware Wizard window will appear when the adapter is detected. Please click Cancel.
2 Install Driver and Utility
You can also download the driver and utility at www.tp-link.com/en/
A: Insert the CD and run the Autorun.exe from the pop-up
Autoplay window.
B: Select TL-WN727N and click Install Driver and Utility, then follow the
InstallShield Wizard to complete the installation.
Setup Wizard
TL-WR743ND
TL-WN727N
Install Driver and Utility
User Guide
Note: In some operating systems, the CD screen will pop up automatically.
Otherwise, run the CD manually.
Browse CD
EXIT
3 Join a Wireless Network
For Windows 8.1, TP-LINK Utility is not supported, please use the Windows built-in Wireless Utility to join a network.
Option 1: Via TP-LINK Utility
Option 2: Via Wi-Fi Protected Setup (WPS)
Select your preferred wireless network from the pop-up utility window
and click Connect. The symbol
indicates a successful connection.
A: Press the WPS button on your router.
B: Within 2 minutes, press and hold the WPS button on the adapter until the
following screen appears.
Configuring the wireless network.
Status
WPS
Network Name(SSID)
TP-LINK_A
Network
Security
WPA/WPA2-Personal
Connect automatically
Profile
Advanced
Channel
Network Na
Signal
6 (2.4G)
TP-LINK_A
Connecting to the network…
Connect
34567_TEST
WPA/WPA2-Personal
abcdef_0903
None
9 (2.4G)
AAAAAA
None
5 (2.4G)
2 (2.4G)
34567_TEST
C: When you are prompted “Successfully connected to the network by
WPS!”, click OK.
Option 3: Via Windows Wireless Utility
With the TP-LINK Utility closed, you can use the Windows built-in Wireless Utility to join a wireless network.

