1
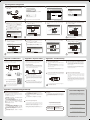
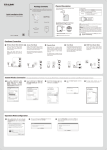
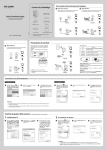
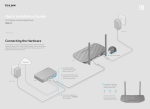
Physical Description
Package Contents
Before hardware connection, please write down the
TL-WR710N LED Guide:
Wireless Password and SSID found on the label of your
Status
LED
TL-WR710N. Both are case-sensitive.
The device is working properly.
Solid Blue
System is booting.
The Ethernet Cable or USB Device is
connecting to the product.
Blinking
Quick Installation Guide
150Mbp
s TL-WR7
10N
150Mbps Wireless N Mini Pocket Router - Advanced Edition
.CQT8JSFMFTT/.JOJ1PDLFU3PVUFS
"EWBODFE&EJUJPO
.PEFM 5-83/
1PXFS7_)["
%FGBVMU"DDFTT
IUUQUQMJOLMPHJOOFU
6TFSOBNFBENJO
1BTTXPSEBENJO
TL-WR710N
Ethernet Cable
IC: 8853A-WR710N
Model:TL-WR710N(US)
S/N:XXXXXXXXXXXX
Ver:1.0
MAC:B0487A663D6C
Wireless Password/PIN:12345678
SSID:TP-LINK_663D6C
USB
Model:TL-WR710N(US)
S/N:XXXXXXXXXXXX
Ver:1.0
MAC:B0487A663D6C
ResetResets the TL-WR710N to factory default settings.
Wireless Password/PIN:12345678
SSID:TP-LINK_663D6C
LAN/WAN: Must use this port to connect to your Modem while in Router
mode. For all other modes, use it as an additional LAN port.
LAN: Connect your ethernet enabled devices for wired network access.
In client mode, use it to give wireless access to a wired-only device. In
access point mode, use it to receive network access from your local
network.
REV1.0.0
TL-WR710N
QIG
7106504219
MODEL NO.
MODEL NO.
TL-WR710N
LAN
USBConnect a USB Flash drive or External Hard Drive for file
sharing. It can also be used as a charging station for mobile devices.
150Mbps Wireless N Mini Pocket Router - Advanced Edition
Resource CD for User Guide Only
Reset LAN/WAN
For more detailed information about Reset, please refer to
Appendix: Troubleshooting.
Wireless Password/PIN: Default Password
SSID: Default Network Name
Operating Modes
Wireless Router Mode (Default)
1
Client Mode
2
Create an instant password-protected wireless
network with an NAT Firewall and share internet with
multiple devices. This mode is suitable for hotel
rooms and home networks.
3
4
Repeater Mode
Use as a wireless adapter for wired-only Ethernet
enabled devices. This mode is suitable for
connecting Smart TVs, game consoles, or computers
to your wireless network.
Repeat signal from an existing wireless network.
This mode is suitable to extend wireless coverage,
reaching devices that were previously too far from
your primary router to maintain a stable wireless
connection.
(Note: if the hotel’s Internet has an authentication
process, you will need to authenticate only once and
only on one device)
Access Point Mode
5
Create a wireless network from an Ethernet
connection. This mode is suitable for dorm rooms
or homes if there's already a wired router but you
need a wireless hotspot.
WISP Client Router Mode
Use as a client router to receive internet access
from a Wireless Internet Service Provider (WISP),
and share that access with local devices.
(Note: if the hotel’s Internet has an authentication
process, you will need to authenticate it on EACH
device.)
The repeated signal will display the same network
name and password as your existing wireless
network.
Protected by NAT Firewall
def
Wired Ethernet
Connection
Wired Ethernet
Connection
Instant Wireless Connection
1
Plug the TL-WR710N into a power outlet that is
near your modem or a wired ethernet connection.
Wait until the LED is blinking.
2
The examples illustrated below are from Windows 7. If you are using a different Windows, or a Mac Operating System, your screenshots may look different, but the procedure is the same.
If you are connecting the TL-WR710N directly to
your cable modem, you must first power reset the
modem and wait until its ONLINE LED is solid.
Then use an ethernet cable to connect to your
modem via the LAN/WAN port on the TL-WR710N.
3
Click the Wireless Network icon on your desktop
(
or
). Select the Default SSID of the
TL-WR710N, then click Connect.
4
Enter the Default Password, then click OK or
Next.
5
TP-LINK_XXXXXX
Connections are available
In either case, wait until the LED is solid blue.
Internet access
Wireless Network Connection
Wireless Network Connection
TP-LINK_XXXXXX
TP-LINK_ XXXXXX
Connect automatically
USB
Reset LAN/WAN
LAN
Connect
Connected
TP-LINK_Home
TP-LINK_Home
TP-LINK_Guest
TP-LINK_Guest
TP-LINK_Neighbor
TP-LINK_Neighbor
Free Public WiFi
Free Public WiFi
Wired Ethernet
Connection
successfully
Currently connected to:
Not Connected
If you are connecting the TL-WR710N to an existing
network, simply plug the ethernet cable into the
LAN/WAN port and to your network.
Congratulations! You have
connected to your network!
Open Network and Sharing Center
Open Network and Sharing Center
eset LAN/WAN
Customizing your Wireless Network Name & Password (Optional)
1
Open a web browser and go to the page
http://tplinklogin.net.
2
To customise your Wireless Network Name Click
on “Wireless” from the menu on the left.
3
In the “Wireless Network Name” box, type in
your new Wireless Name. Then click “Save”
4
To customise your Wireless Password, click
“Wireless” from the menu on the left, then click
“Wireless Security”.
Disable Security
Wireless Network Name:
Region:
Warning:
Status
Quick Setup
Status
Working Mode
INSERT CUSTOM SSID HERE
11bgn mixed
Channel Width:
Auto
Channel:
Auto
WPA/WPA2 - Personal (Recommended)
Status
Enable Wireless Router Radio
Enable SSID Broadcast
Enable WDS Bridging
LAN
Save
Version:
- Wireless Security
- Wireless MAC Filtering
- Wireless Advanced
Parental Control
- Wireless Statistics
Access Control
DHCP
AES
INSERT CUSTOM PASSWORD HERE
WPA/WPA2 - Enterprise
- Wireless Settings
Security
WPA2-PSK
(You can enter ASCII characters between 8 and 63 or Hexdecimal
Seconds (Keep it default if you are not sure, m
Wireless Ne
Wireless
Forwarding
Encryption:
Automatic
Automatic
Radius Server IP:
Radius Port:
Ch
(1-65535, 0 stands for default port 1812)
1812
Radius Password:
Group Update Key Period:
(In seconds, minimum is 30, 0 means no upda
0
USB Settings
Advanced Routing
Bandwidth Control
Encryption:
Wireless Password:
Group Update Key Period:
Network
DHCP
Version:
Wireless Set
WPS
Working Mode
Network
USB Settings
(Also called the SSID)
United States
Ensure you select a correct country to conform local law.
Incorrect settings may cause interference.
Quick Setup
Mode:
WPS
Wireless
admin
In the “Wireless Password” box under
“WPA/WPA2 - Personal (Recommended)” type
in your new wireless Password. Then click “Save”.
Wireless Settings
Wireless Settings
http://tplinklogin.net
Enter the login username: admin and
password: admin.
5
Wireless
Forwarding
WEP
Type:
Automatic
IP & MAC Binding
Security
Dynamic DNS
Parental Control
System Tools
Access Control
Key 1:
Advanced Routing
Key 2:
Bandwidth Control
Key 3:
Disabled
IP & MAC Binding
Key 4:
Disabled
WEP Key Format:
Key Selected:
Hexadecimal
WEP Key
Disabled
Disabled
Dynamic DNS
System Tools
Key Type
Save
Operating Mode Configuration
1
Plug your TL-WR710N into a power outlet and use its LAN
port to connect your computer via Ethernet cable.
Disconnect from all wireless networks, and wait until the
LED is solid blue.
2
3
Open a web browser and go to the page http://tplinklogin.net.
After a successful login, click “Quick Setup” from the menu to
configure your TL-WR710N. Click “Next”.
4
Choose the Working Mode you need, then click “Next” and refer to
the sections below for further instruction.
Working Mode
http://tplinklogin.net
Start >> Working Mode >> Wireless >> Finish
Wireless Router
Status
Access Point
Quick Setup
Quick Setup
Repeater
WPS
Enter the login username: admin and password: admin.
Client
Working Mode
WISP Client Router
The quick setup will tell you how to configure the basic network parameters.
Network
Wireless
To continue, please click the Next button.
DHCP
To exit, please click the Exit button.
Back
USB Settings
admin
Next
Forwarding
Security
Exit
Next
Parental Control
Access Control
Advanced Routing
USB
Reset LAN/WAN
Bandwidth Control
LAN
IP & MAC Binding
Dynamic DNS
AN
System Tools
LAN
The login username and password are case sensitive.
Wireless Router Mode
1
Repeater/Client Mode
Choose your WAN Connection Type:
2 Set your wireless parameters. If desired, you may change your
1
Wireless Network Name, Wireless Security Mode, or Password.
Click “Next”
Next and then “Reboot”.
Reboot .
If you don't know your connection type, you may select
“Auto-Detect”. Before continuing, you must be connected to
your existing network or modem via the LAN/WAN Port.
Quick Setup - Wireless
If you select PPPoE, then enter the User Name and Password
given to you by your ISP, and click “Next”.
Wireless Network Name:
Region:
If you select Dynamic IP, click “Next” and continue to step 2.
Warning:
2
Quick Setup - Wireless
Start >> Working Mode >> WAN Connection Type >> Wireless >> Finish
Wireless Radio:
The examples illustrated below are from Repeater Mode, but the procedure is similar for Client Mode.
Click “Survey” button to find the available wireless networks.
Then select the SSID of your target network and click
“Connect”.
Quick Setup - Wireless
Start >> Working Mode >> Wireless >> Finish
Start >> Working Mode >> Wireless >> Finish
Repeater Mode Setting:
Disable
(Also called the SSID)
INSERT CUSTOM SSID HERE
Repeater Mode Setting:
Universal Repeater
Repeater Mode:
United States
WDS Repeater
Universal Repeater
Repeater Mode:
(Also called the SSID)
Wireless Name of Root AP:
Ensure you select a correct country to conform local law.
Incorrect settings may cause interference.
The target network‘s SSID will be automatically filled into the
wireless setting page. Select the Security Mode and enter the
Password. Then click “Next“.
Next .
Wireless Name of Root AP:
MAC Address of Root AP:
Mode:
If you select Static IP, then enter the IP Address and Subnet
Next .
Mask given to you by your ISP, and click “Next”.
Channel Width:
Auto
Channel:
Auto
Region:
Warning:
Wireless Security:
Quick Setup - WAN Connection Type
PSK Password:
The Quick Setup is preparing to set up your connection type of WAN port.
The Router will try to detect the internet connection type your ISP provides if you select the Auto-Detect option.
Otherwise, you will need to specify the connection type manually.
You can click the Survey Button to scan the network SSIDs,
and then choose the target one to setup the connection.
United States
Region:
United States
Ensure you select a correct country to conform local law.
Incorrect settings may cause interference.
Warning:
No Security
Wireless Security Mode:
Most Secure (WPA-PSK/WPA2-PSK)
All security settings, for example the wireless password should match the Root AP.
Disable Security
WPA-PSK/WPA2-PSK
Start >> Working Mode >> WAN Connection Type >> Wireless >> Finish
Survey
Ensure you select a correct country to conform local law.
Incorrect settings may cause interference.
Wireless Security Mode:
All security settings, for example the wireless password should match the Root AP.
If you choose No Security mode, the wireless stations will be able to connect
the AP without encryption. It is recommended strongly that you choose one of
following options to enable security.
INSERT CUSTOM PASSWORD HERE
(Also called the SSID)
94-0C-6D-2F-3C-BE
You can click the Survey Button to scan the network SSIDs,
and then choose the target one to setup the connection.
11bgn mixed
WDS Repeater
TP-LINK_Network
MAC Address of Root AP:
Survey
Wireless Password:
1234567890
If you choose No Security mode, the wireless stations will be able to connect
the AP without encryption. It is recommended strongly that you choose one of
following options to enable security.
(You can enter ASCII characters between 8 and 63 or Hexadecimal characters betwee
No Change
Back
Auto-Detect - Let the Router automatically detect the connection type your ISP provides.
PPPoE - Usually for ADSL Modem and you will need a PPPoE username and password from your ISP.
Back
Next
Back
Next
Next
Dynamic IP - Usually for Cable Modem and the router will automatically obtain an IP address from the DHCP server.
Static IP - This type of connection uses a permenant, fixed (static) IP address that your ISP assigned.
Back
Next
f the
h rebooting,
b
h networkk according
d
After
reconnect to the
to
“Instant Wireless Connection”.
Access Point Mode
1
After the rebooting, reconnect to the network according to
“Instant Wireless Connection”.
WISP Client Router Mode
1
Set your wireless parameters. If desired, you may change your
Wireless Network Name, Wireless Security Mode, or Password.
Click “Next” and then “Reboot”.
Choose your WAN Connection Type:
2
If you select PPPoE, then enter the User Name and Password
given to you by your ISP, and click “Next”.
Click “Survey” button to find the available wireless networks.
Then select the SSID of your target network and click “Connect”.
3
Quick Setup - Wireless
If you select Dynamic IP, click “Next” and continue to step 2
Quick Setup - Wireless
Quick Setup - Wireless
Start >> Working Mode >> WAN Connection Type >> Wireless >> Finish
Start >> Working Mode >> WAN Connection Type >> Wireless >> Finish
Client Setting
Start >> Working Mode >> Wireless >> Finish
If you select Static IP, then enter the IP Address and Subnet
Mask given to you by your ISP, and click “Next”.
AP Mode setting:
Wireless Network Name:
Region:
Warning:
(Also called the SSID)
INSERT CUSTOM SSID HERE
Mode:
Wireless Security Mode:
Key Type:
Quick Setup - WAN Connection Type
SSID:
Example: 00-1D-0F-11-22-33
Start >> Working Mode >> WAN Connection Type >> Wireless >> Finish
Auto
The Quick Setup is preparing to set up your connection type of WAN port.
1
Back
Auth Type:
open
Local SSID:
1234567890
Wireless Password:
TP-LINK_2046F2
Most Secure (WPA/WPA2-PSK)
1234567890
(You can enter ASCII or Hexdecimal characters. For hexdecimal, the length should
be between 8 and 64 characters; for ASCII, the length should be between 8 and 63
characters. For good security it should be of ample length and should not be a
commonly known phrase.
Next
Back
Next
Back
Next
After the rebooting, reconnect to the network according
accordin to
“Instant Wireless Connection”.
Appendix 1: USB Features
Appendix 2: Repeater Mode
Storage Sharingand Media Server
Optimization Guide
The USB port on the TL-WR710N can be used to share files, media,
and local storage space across your network.
Reset LAN/WAN
open
Password:
Wireless Security Mode:
(You can enter ASCII or Hexdecimal characters. For hexdecimal, the length should
be between 8 and 64 characters; for ASCII, the length should be between 8 and 63
characters. For good security it should be of ample length and should not be a
commonly known phrase.
After the rebooting,
rebooting reconnect to the network according to
“Instant Wireless Connection”.
USB
Example: 00-1D-0F-11-22-33
1
Auth Type:
Local SSID:
Most Secure (WPA/WPA2-PSK)
Wireless Password:
Static IP - This type of connection uses a permenant, fixed (static) IP address that your ISP assigned.
Back
WPA-PSK/WPA2-PSK
AP Setting
Wireless Security Mode:
Dynamic IP - Usually for Cable Modem and the router will automatically obtain an IP address from the DHCP server.
Next
94-0C-6D-2F-3C-BE
Key Type:
WEP Index:
AP Setting
PPPoE - Usually for ADSL Modem and you will need a PPPoE username and password from your ISP.
INSERT CUSTOM PASSWORD HERE
(You can enter ASCII or Hexdecimal characters. For hexdecimal, the length should
be between 8 and 64 characters; for ASCII, the length should be between 8 and 63
characters. For good security it should be of ample length and should not be a
commonly known phrase.
TP-LINK_Network
BSSID:
Survey
WPA-PSK/WPA2-PSK
WEP Index:
Password:
11bgn mixed
Most Secure (WPA/WPA2-PSK)
Wireless Password:
INSERT CUSTOM SSID HERE
Survey
Auto
Channel:
Channel Width:
Client Setting
SSID:
BSSID:
United States
Ensure you select a correct country to conform local law.
Incorrect settings may cause interference.
The target network’s SSID and BSSID will automatically fill the
relevent wireless setting boxes. Select the Key type and enter the
Password. Click “Next”
Next and then “Reboot”.
Reboot .
Appendix 3: Troubleshooting
1
When choosing an ideal location to optimize the performance of
repeater mode, please keep the points below in mind.
3
Restore the TL-WR710N to its factory default settings (see
below).
I cannot access Internet via my Cable Modem. What do I do?
Reset the cable modem by powering it off, and then powering
it back on. Wait until its ONLINE LED is solid. Next, unplug the
TL-WR710N and plug it back in. This will allow you to access
Internet in most cases.
To log in the Web Management page, use the default user
name and password: admin, admin.
The Best Way is Half-Way
Generally, the ideal location for your TL-WR710N is half-way
between your wireless router and your Wi-Fi enabled devices.
If that is not possible, placing the TL-WR710N closer to your
wireless router will ensure stable performance.
LAN
What can I do if I forget my password?
To connect to the Wireless Network, use the default
password on the label.
If the above does not work and you are unsure which mode
the TL-WR710N is in, please reset the TL-WR710N so that it
defaults back to Router Mode.
Try to configure your Router once again by following the
instructions in the previous steps of the QIG.
USB
Res
2
Local Storage Sharing
With the Router powered on, use a pin to press and hold the
Reset button for about 5 seconds.
Less Obstacles = Better Performance
Try to choose a location that will minimize the number of
obstacles between the TL-WR710N and your wireless router.
Open corridors or other spacious locations will typically
provide better conditions for performance than a crowded
room.
Media Sharing
How do I restore my TL-WR710N to factory defaultsettings?
USB
Scan the QR code to access the Application
Guide for USB features on
SB
Reset LAN/WAN
LAN
Reset LA
Less Interference = More Stability.
http://www.tp-link.com/app/usb
You may be experiencing frequent wireless drops due to an often
changing channel setting. In this case, setting your wireless
channel setting to a static channel between 1 and 11 will prevent
the wireless frequency from changing, and likely stabilize your
network connection.
Upon reset, the device will clear all previous configurations
and default to router mode.
Appendix 3: Troubleshooting (Continued)
For Mac OS:
Click the Apple icon on the upper left corner of your screen.
Go to System Preferences -> Network.
Select “Airport” from the left menu bar and then click
“Advanced” for wireless configuration, or “Ethernet” for wired
configuration.
Set “Configure IPv4” to “Using DHCP”, then click “Apply”.
5 The TL-WR710N is on and I am connected, but I cannot access
the Web Management Page through my browser.
You need change your computer’s configuration settings to “obtain
an IP address automatically” and “obtain DNS server address
automatically.”
Please refer to the instructions below:
For Windows 8:
Go to Metro Interface -> Control Panel -> View network
status and tasks -> Change adapter settings.
Right click “Wireless Network Connection”or "Local Area
Connection", and select “Properties”.
Double click “Internet Protocol Version 4 (TCP/IPv4)” in the
list.
Set the TCP/IP Protocol to "Obtain an IP address
automatically", then click OK.
What can I do if my wireless keeps dropping?
By default, your wireless channel setting is set to “auto” This
setting causes the TL-WR710N to select the least congested
channel between 1 and 11, allowing you to achieve the best
performance.
Try to choose a location that minimizes interference from
devices operating on the same wireless frequency, such as
cordless phones bluetooth devices, and microwave ovens.
You can also use the USB port to charge your phone or tablet!
For more detailed information about USB features, you may
refer to the User Guide on the Resource CD.
For Windows 7:
Go to Start -> Control Panel -> View network status and
tasks -> Change adapter settings.
Right click “Wireless Network Connection”or "Local Area
Connection", and select “Properties”.
Double click “Internet Protocol Version 4 (TCP/IPv4)” in the
list.
Set the TCP/IP Protocol to "Obtain an IP address
automatically", then click OK.
4
6
7
What can I do if I want to switch the Operating Mode or change
some settings?
In any time if you want to change the Operating Mode, please refer
to the "Operating Mode Configuration" Section to change the
mode. You may also change any settings via the Web management
page.
Personal Configuration
Please use the space below to write down your
custom Wireless Network Name (SSID) and password,
and Web Management Page User Name and Password
Wireless Network Name (SSID)
What can I do if my signal strength is low?
Low signal strength can be caused by obstruction from walls or
objects. If you are receiving low signal strength, try to place your
TL-WR710N in a higher location, keeping it away from
obstructed locations like under or behind a desk.
Generally speaking, putting your TL-WR710N in a location
central to your home will maximize your signal coverage.
For more troubleshooting support, please visit:
http://www.tp-link.com/en/support/faq
or contact our Unlimited 24/7 Technical Support
Unlimited 24/7 USA/Canada
Toll Free: +1 866 225 8139
Technical Support
Wireless Password
Web Management Page User Name
Email: [email protected]
Web Management Page Password
TP-LINK TECHNOLOGIES CO., LTD.
www.tp-link.com