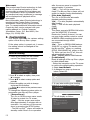
1
Blu-ray Disc™ Player
BDX1300KB
Owner’s Manual
1 Important
English
Safety and important notice
•
•
•
•
•
•
Warning:
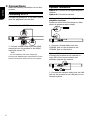
Risk of overheating! Never install the product in a
confined space. Always leave a space of at least
10cm around the product for ventilation. Ensure
curtains or other objects never cover the
ventilation slots on the product.
Never place the product, remote control or
batteries near naked flames or other heat
sources, including direct sunlight.
Only use this product indoors. Keep this product
away from water, moisture and liquid-filled
objects.
Never place this product on other electrical
equipment.
Keep away from this product during lightning
storms.
Where the mains plug or an appliance coupler is
used as the disconnect device, the disconnect
device shall remain readily operable.
LASER
CAUTION:
USE OF CONTROLS OR ADJUSTMENTS OR
PERFORMANCE OF PROCEDURES OTHER THAN
THOSE SPECIFIED HEREIN MAY RESULT IN
HAZARDOUS RADIATION EXPOSURE.
CAUTION:
VISIBLE AND INVISIBLE LASER RADIATION
WHEN OPEN AND INTERLOCKS DEFEATED. DO
NOT STARE INTO BEAM.
LOCATION:
INSIDE, NEAR THE DECK MECHANISM.
EU Conformity Statement
This product is marked with "CE" and complies
therefore with the applicable harmonized
European standards listed under the Low
Voltage Directive 2006/95/EC and the EMC
Directive 2004/108/EC. ErP Directive 2009/125/
EC
Responsible for CE-marking is
TOSHIBA INFORMATION SYSTEMS (U.K.) LTD,
Toshiba Court, Weybridge Business Park,
Addlestone Road, Weybridge,Surrey,KT15 2UL,
United Kingdom
2
Disposal of your old product and
batteries
Pb,Hg,Cd
Following information is only valid for EUmember States:
Disposal of products
The crossed out wheeled dust bin symbol
indicates that products must be collected and
disposed of separately from household waste.
Integrated batteries and accumulators can
be disposed of with the product. They will be
separated at the recycling centres.
The black bar indicates that the product was
placed on the market after August 13, 2005.
By participating in separate collection of
products and batteries, you will help to assure
the proper disposal of products and batteries
and thus help to prevent potential negative
consequences for the environment and human
health.
For more detailed information about the
collection and recycling programmes available
in your country, please visit our website
(http://www.recycle-more.co.uk/ ) or
alternatively please contact your retailer where
the product was purchased.
Disposal of batteries and/or accumulators
The crossed out wheeled dust bin symbol
indicates that batteries and/or accumulators
must be collected and disposed of separately
from household waste.
If the battery or accumulator contains more
than the specified values of lead (Pb),
mercury (Hg), and/or cadmium (Cd) defined in
the Battery Directive (2006/66/EC), then the
chemical symbols for lead (Pb), mercury (Hg)
and/or cadmium (Cd) will appear below the
crossed out wheeled dust bin symbol.
By participating in separate collection of
batteries, you will help to assure the proper
disposal of products and batteries and
thus help to prevent potential negative
consequences for the environment and
human health.
For more detailed information about the
collection and recycling programmes available
in your country, please visit our website
(http://www.recycle-more.co.uk/ ) or
alternatively please contact your retailer
where the product was purchased.
General Information
This appliance may be fitted with a nonrewireable plug. If it is necessary to change the
fuse in a non-rewireable plug the fuse cover must
be refitted. If the fuse cover is lost or damaged,
the plug must not be used until a replacement
available from the appliance manufacturer is
obtained. If the plug has to be changed because
it is not suitable for your socket, or becomes
damaged, it should be cut off and an appropriate
plug fitted following the wiring instructions below.
The plug removed must be disposed of safely as
it is hazardous if inserted into a live socket.
Copyright notice
This product incorporates copyright
protection technology that is protected by
U.S. patents and other intellectual
property rights. Use of this copyright
protection technology must be authorized
by Rovi Corporation, and is intended for
home and other limited viewing uses only
unless otherwise authorized by Rovi
Corporation. Reverse engineering or
disassembly is prohibited.
English
IMPORTANT
The wires in this mains lead are coloured
in accordance with the following code:
BLUE: NEUTRAL
BROWN: LIVE
As the colours of the wires in the mains
lead of this unit may not correspond with
the coloured markings identifying the
terminals in your plug, proceed as follows:
The wire that is coloured blue must be
connected to the terminal in the plug
which is marked with the letter N or
coloured black.
The wire that is coloured brown must be
connected to the terminal which is marked
with the letter L or coloured red.
Do not connect either wire to the earth
terminal which is marked by the letter E or
by the safety earth symbol
or coloured
green or green-and-yellow.
Use a 5A BS1362 fuse which is approved
by ASTA or BSI. Always replace the fuse
cover after changing the fuse.
Manufactured under license from Dolby
Laboratories. Dolby and the double-D
symbol are trademarks of Dolby
Laboratories.
Manufactured under license under U.S.
Patent Nos: 5,956,674; 5,974,380;
6,226,616; 6,487,535; 7,392,195;
7,272,567; 7,333,929; 7,212,872 & other
U.S. and worldwide patents issued &
pending. DTS-HD, the Symbol, & DTS-HD
and the Symbol together are registered
trademarks & DTS-HD Master Audio |
Essential is a trademark of DTS, Inc.
Product includes software. © DTS, Inc. All
Rights Reserved.
‘AVCHD’ and the ‘AVCHD’ logo are
trademarks of Panasonic Corporation and
Sony Corporation.
‘DVD Video’ is a trademark of DVD Format/
Logo Licensing Corporation.
Notice for Trademark
HDMI, the HDMI logo and High-Definition
Multimedia Interface are trademarks or
registered trademarks of HDMI Licensing
LLC in the United States and other
countries.
Oracle and Java are registered trademarks
of Oracle and/or its affiliates. Other names
may be trademarks of their respective
owners.
BONUSVIEW ™
Blu-ray DiscTM, Blu-rayTM, BD-LiveTM,
BONUSVIEWTM, and the logos are
trademarks of the Blu-ray Disc Association.
3
2 Your Product
English
Feature highlights
High-Definition entertainment
Watch high-definition content disc with
HDTV (High Definition Television). Connect
it through a high speed HDMI cable. You
can enjoy excellent picture quality up to
1080p resolution with the frame rate of 24
frames per second with progressive scan
output.
BD-LiveTM
Connect this player to the movie studios
website via the LAN jack to access a
variety of up-to-date content (e.g.
refreshed previews and exclusive special
features).
Blu-ray Disc TM Java
Blu-ray Disc TM Java(BD-J) Application
The BD-ROM format supports Java for
interactive functions. “BD-J” offers content
providers almost unlimited functionality
when creating interactive BD-ROM titles.
4
English
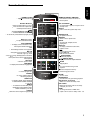
Remote Control
OPEN/CLOSE
• Open/ Close the disc tray
Number Buttons
Select numbered items in a menu
Press to enter track/ chapter/ title
numbers/password directly
CLEAR
• To clear an entry or the bookmark and program you set
MC(Media Center)
• To open/close Media Center
POP UP/MENU
• To display a menu included on many
Blu-ray Disc™/DVD video discs
OK
• Acknowledge/ Confirm menu selection
• Navigation/ Cursor buttons for moving
to the left / right / up / down
• Press
during JPEG playback to rotate the
current photo track, but the JPEG playback
will be paused
RETURN
• Return to previous menu
TOP MENU
• To display the disc title during playback
PROGRAM
• To access program list.
DIGEST
• To access JPEG thumbnail
view during playback
SUBTITLE
• To display subtitle; press repeatedly
to select different subtitles available
in your disc
AUDIO
• To select the sound stream; press
repeatedly to select different audio
streams available in your disc
ANGLE
• Switch the camera angle during playback
REMOTE SIGNAL EMITTER
• Point remote control to the sensor on
the front panel
ON / STANDBY
• To switch the Blu-ray Disc™ Player to ON or
standby mode
SETUP
Enters or exits the system setup menu
REPEAT A-B
• To repeat from A to B
REPEAT
• Selects various repeat mode.
GOTO
• To goto a title, chapter, track or
playing time
DISPLAY
• To display a window to locate a title,
chapter or track
/
Instant replay/instant search
F.R & F.F
Fast reverse/ fast forward
/
PLAY/PAUSE
• Start/Pause playback
PREV & NEXT
• Skip to previous/next chapter/ title/track
STOP
• Stop playback
• Do a slow forward during normal
playback
• Advance the picture frame by
frame during pause mode
ZOOM
• To zoom out/in
BOOKMARK
• To bookmark at any point during playback
PIP (Picture in Picture)
• Switch on or off the secondary video
PIP AUDIO
Switch the secondary audio of secondary
video(PIP) to on or off
HDMI
• To change resolution of HDMI video
output to fit TV. Such as 1080p, 1080i… etc.
5
3 Connections
English
Make the following connection to use this
product.
Connecting to a TV
Connect the product to TV via HDMI jack to
view the playback from the disc.
Connect to the HDMI Jack
Optional Connection
Option 1: Connect to the digital amplifier/
receiver
Option 2: Connect to network
Option 1: Connect to the digital
amplifier/receiver
Route the sound from this player to other
device to enhance audio output.
DIGITAL AUDIO
INPUT
COAXIAL
HDMI IN
1. Connect a HDMI cable from the HDMI
output jack on this product to the HDMI
input jack on the TV.
Note:
– You can optimize the video output by
pressing the HDMI button repeatedly to select
the best resolution which the TV can support.
1. Connect a coaxial cable from the
COAXIAL jack on this product to the
COAXIAL jack on the device.
Option 2: Connect to network
Connect this product to the network to
enjoy BD-LiveTM bonus content and
software upgrade by network.
1. Connect the network cable from the LAN
jack on the product to the LAN jack on the
network system.
6
Connect USB device
English
A USB flash drive provides an additional
memory to software upgrade and enjoy
BD-LiveTM bonus content.
You can also enjoy playing back MP3/JPEG/
MPEG4/ files stored in the USB flash drive.
1. Connect the USB flash drive to the USB
jack on this product.
Notes:
- To enjoy BD-Live™ bonus content, as your
local storage, use a 1 GB or larger USB
flash drive.
- For some Blu-rayTM discs with BD-LiveTM
feature, you may need to plug in the USB flash
drive before loading the disc. Otherwise, the
disc may not playback.
- TOSHIBA does not guarantee 100%
compatibility with all USB flash drives.
Connect Power
1. Connect the AC power cable to:
- the wall socket.
• The product is ready to be set up for use.
Notes:
– Before connecting the AC power cord, ensure
you have completed all other connections.
– Risk of product damage! Ensure that the power
supply voltage corresponds to the voltage printed
on the back of the unit.
– The type plate is located on the back of the unit.
7
4 Preparation
English
Always follow the instructions in this chapter
in sequence.
Note:
- Use of controls or adjustments or
performance of procedures other than herein
may result in hazardous radiation exposure or
other unsafe operation.
Find the correct viewing input
1. Press 1 to turn on this product.
2. Turn on the TV and switch to the correct
video-in input (refer to the TV user manual
on how to select the correct input).
Prepare the remote control
Initial Setting
When you turn on this unit for the first time,
you need to follow these steps.
1. A welcome page will be displayed when
this product is powered on.
2. Press OK to enter language setting.
3. Select your desired language,
resolution and aspect ratio using /, then
press OK.
4. Press SETUP to exit the Setup menu.
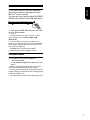
1. Open the battery compartment.
2. Insert one R03 battery with correct
polarity (+/-) as indicated.
3. Close the battery compartment.
Notes:
- If you are not going to use the remote control
for a long time, remove the battery.
- Risk of explosion! Keep battery away from
heat, sunshine or fire. Never discard battery in
fire.
Use the SETUP menu
1. Press SETUP to display the Setup menu
when the Blu-ray DiscTM Player is playing or
no disc. And press SETUP to exit the Setup
menu.
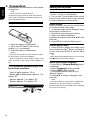
• The maximum operable ranges from
the unit are as follows.
- Line of sight: approx. 10 m
- Either side of the centre: approx. 7 m
within 30°
- Above: approx. 7 m within 30°
- Below: approx. 7 m within 30°
7m
8
Setting up the player
10 m
7m
Tip:
- When playing high-definition sources, you must press
STOP button to enter SETUP interface.
Select menu display language
1. Press SETUP, [General Setting] menu
is displayed.
2. Select [Language], then press .
3. Select [OSD], then press .
- The language options may vary for
different regions.
4. Press / to select a language, then
press OK.
Note:
- If this disc player is connected to a HDMI CEC
compliant TV, skip this setting. It switches
automatically to the same OSD menu language
as per your TV setting.
Playback Functions
Basic Playback
1. Press button on the front panel or the
remote control, your Blu-ray Disc™ player
will turn on.
The unit will take around 20 seconds to
warm up. When the power supply is first
switched on, the setup of the Power Down
Mode is in Normal mode.
2. Turn on the TV, and then select the input
setting on the TV that matches the
connection method you used to connect your
player.
3. Press OPEN/CLOSE Z to slide out the disc
tray.
4. Place a disc on the disc tray with the label
facing up, and then press OPEN/CLOSE Z to
slide back and close the disc tray.
The disc loading time depends on the types
of disc you are loading, and loading a Blu-ray
DiscTM will take longer time.
5. If the disc does not start playing
automatically, please press B/X to start
playback.
6. If a Blu-ray DiscTM or DVD menu displays,
use cursor buttons to select PLAY. Then,
press OK to confirm.
7. To eject the disc, press OPEN/CLOSE Z.
Pause playback
1. Press B/X to pause playback. The
sound will be muted.
2. Press B/X to resume the playback.
Stop playback
1. Press STOP button once to go to resume
mode, the TV screen will show the resume logo.
2. Press STOP twice to stop the playback
completely.
3. Press B/X to resume playback from the
point where playback is stopped or from the
beginning of the disc after the playback is
completely stopped.
Not all Blu-rayTM discs support the resume
feature.
Fast Forward and Fast Reverse
how many times you pressed the button. The
speed will increase through the following
sequence:
2X, 4X, 8X, 16X, 32X
2. Press B/X to resume playback.
3. Press F.R m to fast reverse through the
disc. The fast reverse speed changes based on
how many times you pressed the button.
The speed will increase through the
following sequence:
2X, 4X, 8X, 16X, 32X
4. Press B/X to resume playback.
Instant Search and Instant Replay
1. During playback, press and hold M button,
you can search 30 seconds forward.
2. During playback, press and hold m
button, you can instant replay the content
from 10 seconds before.
Previous and Next
During playback, press PREV . button,
and you can skip back to the previous
chapter or track. Each press of this button
will allow you to skip a chapter or track till
the beginning of the disc.
Press of NEXT > button during playback
will allow you to skip the playback to next
chapter or track.
Slow Forward
1. Press =B during normal playback. The slow
forward speed is 1/16 in default.
2. To change slow forward speed, press =B
repeatedly, and the slow forward speed will be
changed in the following sequence: 1/16, 1/8,
1/4, 1/2, normal.
3. To exit slow forward mode and return to
normal playback, press B/X.
Step Forward
Use this feature to help you to enjoy the
video frame by frame.
1. Press B/X during normal playback,
then playback will change to pause state.
2. Press ==B repeatedly to advance the
picture frame by frame.
3. Press B/X to resume normal playback.
HDMI
When there is file or disc being played, it is
not allowed to switch resolution through
the HDMI button of the Remote Control.
1. Press F.F M to fast forward through the
disc. The fast forward speed changes based on
9
English
5 Playback
Advanced Playback
English
DISPLAY
Press this button and the screen will display
some information about disc, such as: Title
number, Chapter number, Track number,
Elapsed Time, Mode, Audio, Angle, and
Subtitle languages. Press this button again to
turn off the information display.
During DVD/CD playback, you may edit the
chapter and track.
REPEAT
Press REPEAT repeatedly to select different
repeat modes.
Blu-ray DiscTM: Repeat Chapter and Title.
DVD: Repeat Chapter, Title and All.
VCD PBC Off/CD-DA/JPEG/MP3: Repeat Track
and All.
A-B
To play certain section within the video or
song, press A-B button to set the start point.
Then, press A-B button again to set the end
point and complete the setting. The selected
section will be played repeatedly.
Press A-B button the third time to cancel this
function.
The end point cannot be set until 5 seconds
of playback has elapsed from the start point.
Not all Blu-rayTM discs support the repeat A-B
feature.
GOTO
During playback, press GOTO button to edit
Title, Chapter, and Time.
Press / and OK button on the remote
control to select Title, Chapter, or Time. Then
press the numeric buttons or / and then
press OK. The playback will skip to the
desired location.
For Time Search, press / to select Title
or Chapter time search.
SUBTITLE
Press this button repeatedly and the screen
will display “X/XX XXX” or “Off”. The “X”
indicates the current number of this
language; “XX” indicates the total number of
language; “XXX” indicates the language.
The number of available languages depends
on the disc.
RETURN
Press this button to return to the previous
on-screen menu in setup menu such as
External Memory Information, Parental
Control, Country Code, etc.
During MP3/JPEG/VIDEO playback, press
RETURN once, it will return back to Media
Center page.
During VCD disc playback and PBC On is
selected, press the button to return to PBC
Menu.
ANGLE
During playback, press this button to change
the angle of the picture. The screen will
display “Angle X/X.” The first “X” indicates the
current number of angle, and the second “X”
10
indicates total number of angle.
Not all Blu-rayTM or DVD has the multi-angle
feature. The screen will take around 5
seconds to change.
TOP MENU
You may press this button at any time, and
the Blu-ray DiscTM or DVD video disc
playback will pop up the disc menu.
POP UP/MENU
During Blu-ray DiscTM playback, press POP
UP/MENU to display the disc title, and the
playback will not be stopped even the menu
is on the screen.
1. Press the /// buttons to select an
option, then press OK to confirm.
2. Press POP UP/MENU to close the
menu.
During DVD playback, press POP UP/MENU
to open the disc menu.
During VCD playback, press POP UP/MENU
to switch PBC On/Off.
During displaying USB and Data Disc file
content in media center, press POP UP/MENU
to add the Photo/Music/Video files to the
playlist.
1.Press /// buttons to select an
option under the Photo/ Music/ Video files.
2. In the file browser, press to select the
file(s) to be added to the playlist. "√ "
will appear beside the selected files.
3. Press POP UP/MENU button, a pop up
menu will appear, then press / and OK
button to select "Add to Playlist" to add the
files to the Playlist. "Select all" and "Clear all"
options are also available. Select "Cancel" to
exit the pop up menu.
All the selected files will be added to the
"Playlist" folder. You can play or delete the
files in the playlist.
Press POP UP/MENU to delete the selected
files in"Playlist".
SETUP
Press the SETUP button, and the screen will
display some information about the player,
such as:
• General Setting
• Display Setting
• Audio Setting
• System Information
PROGRAM
During CD/DVD/VCD playback, you can press
this button to edit the sequence of the
playlist.
BOOKMARK
During VCD/DVD/ disc playback, press
the BOOKMARK button to add the
bookmark; press and hold for a few
seconds to display the list of bookmark
which you added before on the screen,
then you can press the OK button to select
the bookmark or CLEAR button to delete
the bookmark.
AUDIO
Press AUDIO button on the remote control to
select the audio streams that set within the
frozen as a still picture during the process of playback
to let the user has a better view of certain picture. To
continue playback, select Still Off.
[Instant Search]: Instant search 30 seconds
forward.
[Instant Replay]: Replay the content from 10 seconds
before.
Tip:
- The specified operation for each item will vary with
disc types. And some items are available only when
the disc is supportable.
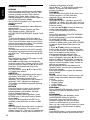
Blu-ray DiscTM BONUSVIEWTM
Playing Secondary Video (Picture-in-Picture) and
Secondary Audio is for Blu-ray DiscTM only.
Secondary video can be played from a disc
compatible with the Picture-in-Picture (PIP) function.
For the playback method, refer to the instructions
for the disc.
1. Turn on secondary video by pressing the PIP
button.
2. Press the PIP AUDIO button to select the
secondary audio, and select an option except Off.
The secondary audio is opened, you can hear the
disc secondary video sound.
In order to hear the secondary audio, the PIP
feature on the disc must be turned on.
3. Press the PIP button again to turn off the
secondary video.
Primary video
Secondary video
with Secondary Audio
This function is not available when the primary
video is played in Search, Slow-Motion, or Frameby-Frame or Fast Forward/ Reverse mode.
To listen to the secondary audio, the digital audio
output must be set to "Bitstream", "Re-encode" or
"PCM". Otherwise, only the primary audio can be
heard.
Notes:
- Not all the Blu-ray™ discs can support this
function.
-High Definition PIP (Second Video) is not supported.
[Subtitle Style]: When you play the Blu-ray DiscTM or
DVD disc and if it has external subtitle, you will see it
in OSC menu.
[Bitrate]: Use / to select audio or video bitrate.
[Still Off]: Close the Still feature of DVD disc.
For some DVD discs, a certain video picture will be
11
English
Blu-rayTM or DVD disc.
The screen will display:
AUDIO: X / XX XXX XXXX
“X” - The Current Audio Stream Number
“XX” - The total number of Audio Stream
“XXX” - Audio Language
“XXXX” - Audio Technology
MC
Press this button to play media files in the USB.
ZOOM
Press ZOOM button repeatedly to Zoom in/out
playback in the video.
Zoom mode : Zoom 2x -> Zoom 3x -> Zoom
4x -> Zoom 1/2 -> Zoom 1/3 -> Zoom 1/4.
DIGEST
During playback of JPEG disc, press DIGEST
to view a page of 12 thumbnail images.
- Use /// to select an image.
Press OK to view the selected image in
full-screen and subsequent images will be
displayed one after another automatically.
to view the
- Press PREV /NEXT
previous or next thumbnail screen.
PIP AUDIO
Press PIP AUDIO button to open the
secondary audio of secondary video(PIP’s
sub-window video).
OSC
Press OSC to open On Screen Control menu
during playback. In this menu, you can make
some playback-related control.
The on screen control contains following
items:
[Title]: The title in current playback/titles in
total. Select your desired title to playback.
[Chapter]: The chapter in current playback/
chapters in total. Select your desired chapter
to playback.
[Time]: View the elapsed/remaining playback
time of title/chapter. Use / to view: the
elapsed playback time of title, the remaining
playback time of title, the elapsed playback
time of chapter, and the remaining playback
time of chapter.
[Mode]: Select playback mode among
shuffle, random, and normal.
[Audio]: The Blu-ray DiscTM/DVD disc’s
soundtrack language. Use / to view the
audio available in the disc and select your
desired Audio type.
[Angle]: The angle view of current playback/
the angles in total. Please reference
Playback > Angle to see more detailed info.
Use / to select your desired angle view.
[Subtitle]: The Subtitle in current playback.
Use / to view the subtitles available in
the disc and select your desired subtitle type
or turn it off.
English
Watermark
This product uses Cinavia technology to limit
the use of unauthorized copies of some
commercially-produced film and videos and
their soundtracks. When a prohibited use of
an unauthorized copy is detected, a message
will be displayed and playback will be
interrupted.
More information about Cinavia technology is
provided at the Cinavia Online Consumer
Information Center at http://www.cinavia.
com. To request additional information about
Cinavia by mail, send a postcard with your
mailing address to: Cinavia Consumer
Information Center, P.O. Box 86851, San
Diego, CA, 92138, USA.
6 Customizing
This section describes the various setting
option of this Blu-ray DiscTM player.
If the setup option is greyed out, it means
the setting cannot be changed at the
current state.
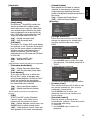
General Setting
1. Press SETUP button on the remote
control.The Setup Menu appears.
General Setting
System
Screen Saver
On
Language
Disc Auto Playback
On
Playback
CEC
On
Security
Load Default
More...
Network
Upgrade
More...
Move cursor key to select menu option
then use “OK” key to select
SETUP Exit
2. Press to select an option, then press
to access.
3. Press / to select a setup option and
press .
4. Select the setting you wish to change
and press OK to confirm.
- Press to return to the previous menu.
[System]
To change the following system option to
personalize your Blu-ray DiscTM player.
• [Screen Saver]
Turn On or Off the screen saver mode.
It helps to protect the TV screen.
{ On } – Set the screen saver active
after approximately 5 minutes with no
operation. You can turn off the screen
saver by pressing the SETUP button.
- The Blu-ray DiscTM player will switch to
standby mode if there is no operation
12
after the screen saver is engaged for
approximately 10 minutes.
{ Off } – Turn off the screen saver
mode. The Blu-ray DiscTM player will not
switch to standby mode automatically.
• [Disc Auto Playback]
Turn On or Off the disc automatic
playback switching mode.
{On} – The disc playback automatically
after loading.
{Off} – Turn off disc auto playback
mode.
• [CEC]
This player supports REGZA-LINK which
uses the HDMI CEC (Consumer
Electronics Control) protocol. You can
use one single remote control to control
all REGZA-LINK-compliant devices that
are connected through HDMI
connectors.
{On} - Turns on REGZA-LINK features.
-With CEC on, during TV standby with
the Blu-ray DiscTM player on, pressing
SETUP, PLAY/PAUSE will power on the
TV. When you turn the TV off, this unit
will automatically turn off.
{Off} - Disables REGZA-LINK features.
• [Load Default]
Reset all settings of Blu-ray DiscTM player
to initial default state.
- Follow the instruction on the TV screen
to confirm the default setting operation.
1. Select Load Default.
2. A dialogue box pops up shown as
below. Select OK.
Load Default
Do you want to load default?
Cancel
OK
3. It may take awhile when loading
default is in progress. Please wait...
Load Default
Loading default, please wait...
30%
4. TV will display as follow:
Welcome
to the Toshiba Blu-ray Disc Player Setting
Wizard.
Some simple settings are suggested before you
begin. You can also access detailed settings
from the Setup Menu.
OK
Next
Choose
English
an OSD language before starting.
The language selected will be applied not only
here but also in other OSD windows, menus
etc.
Previous
OK
Next
6. Press OK, enter Resolution setting.
Auto
Choose
a resolution that fits your TV.
480i/576i
Change will be applied immediately, you have
15s to determine whether to save the setting
or rollback to prior resolution. Better
performance will be provided by an HDMI
connection!
480p/576p
720p
1080i
1080p
Previous
OK
Next
Press / to select an option. Press OK.
Select "Yes" or "No" using /.
Resolution
has been changed!
14s
Yes
Does everything looks all right with this
resolution? Press Yes if you want to apply it.
Press No to rollback to previous one.
Previous
No
OK
Next
7. Press OK, enter Aspect ratio setting.
Choose
an aspect ratio that fits your TV.
The change will be applied in the next page.
Determine whether to save the setting or
rollback to the previous aspect ratio.
Previous
16:9 Full
16:9 Normal
4:3 Pan&Scan
4:3 Letterbox
OK
Next
Press / to select an option. Press OK.
1. Insert the disc or connect the USB flash
drive which contains the upgrade file
package.
2. Follow the instruction on the TV
screen to confirm upgrade operation.
- The system will reboot after 5 seconds or
OK key is pressed.
Notes:
- If set [Disc Auto Playback] to [Off], after you
insert the disc that contains the upgraded
information to upgrade system, you have to start
upgrade from this option of SETUP Menu.
- If the upgrade file package did not pass the
verification, error prompt is displayed , check the
package again (such as the package is not
complete)
- Make sure the firmware version is not an old
version.
- When you upgrade the system using USB flash
drive, you should make a new folder named
UPG_ALL, and copy the upgrade file into this
folder.
SW upgrade by Internet introduction
There are two modes to upgrade via
internet : Automatic Mode and Interactive
Mode.
Automatic Mode:
The player will check the internet whether it
is connected automatically when powered on.
If connected, player will try to connect the
Toshiba server to check if there is new
firmware for the player.
If yes, the player will pop up a message on
the screen to inform you that an upgrading
firmware is available on the internet. You can
choose whether to upgrade or not.
Upgrade
Setting
wizard is complete!
New software found! Upgrade?
Now press the OK button to finish and return
to the Setup Menu.
Cancel
Previous
OK
Finish
8. Press OK to return to [General Setting]
Menu.
• [Upgrade]
For software upgrades to enhance
performance, you could select the
following upgrade method and start to
upgrade.
{Disc}/{USB Storage}/{Internet}
SW upgrade by Disc/USB Storage
Upgrade the software from the disc or USB
flash drive.
OK
Start
Interactive Mode:
You can also do Internet upgrade via setup
menu.
You should make sure that the player is
connected to the internet first.
Press SETUP button of the remote control,
then choose "System -> Upgrade ->
Network" and press OK button. Then the
player will connect the Toshiba server to
check if there is new firmware for the player.
13
English
5. Press OK, enter language setting.
Press/ to select a language option.
Upgrade
2. Follow the instruction on the TV
screen to select {Information}.
English
Connecting to the server. Please wait!
General Setting
Screen Save
Information
Disc Auto Playback
Off
Language
Playback
CEC
On
Security
Disc Auto Upgrade
On
Network
Load Default
More...
Erase
System
If yes, the player will pop up a message on
the screen and you can choose whether to
upgrade or not.
Upgrade
New software found! Upgrade?
Cancel
OK
Start
If no, the player will pop up a message on
the screen to inform you that there is no new
firmware for the player.
Upgrade
Current version is latest. Update is not
available.
Cancel
Remark :
If you choose to upgrade the new FW ,
1.The player will begin to download the
upgrade file and pop up a message to show
the progress.
Upgrade
Downloading upgrade file.Please wait!
Cancel
2. When download is finished, the player will
pop up a message for you, and you can choose
whether to proceed with the upgrading or not.
If you choose to upgrade, the player will begin
to upgrade, and pop up a message to show the
progress. When upgrade is done, the player
will restart.
Attention! Do NOT cut off the power supply
when the firmware is upgrading! Or the
player might become unworkable.
• [External Memory]
External Memory would be used in BDLiveTM function. When you plug in the
USB flash drive which has at least 1GB
free space to play BD-LiveTM function,
the Blu-ray DiscTM system would make a
directory named BUDA automatically.
Information will display the Free size.
1. Press OK.
Free size is : 0MB
Move cursor key to select menu option
then use “OK ” key to select
On
RETURN Return
3.Press OK to select "Erase", the data in
the BUDA folder will be cleared.
• [Power Down Mode]
Quick Start can reduce the time of Power
On or Power Off significantly. But the
power consumption is higher in Quick Start
mode.
Setting methods:
Setup Menu -> General Setting -> System
-> Power Down Mode -> Normal/Quick
Start (Default as Normal).
Choose Quick Start to go into Quick Start
mode. This mode will only be activated
upon your next standby Off/On.
Generally, in Normal mode, Power On or
Power Off takes longer time and its
standby power consumption is low. In
Quick Start mode, Power On or Power Off
takes shorter time and its standby power
consumption is higher.
Notes:
- Please be noted that the responding time to
the video output varies for different TV,
therefore the responding time to power on the
TV in Quick Start mode may vary.
- The player will reset to Normal mode
whenever the AC power recovers from a loss.
[Language]
Set up the OSD(On-Screen Display), Menu,
Audio and Subtitle default language for the
player.
General Setting
System
OSD
English
Language
Menu
English
Playback
Audio
English
Security
Subtitle
English
Network
Move cursor key to select menu option
then use “OK ” key to select
SETUP Exit
• [OSD]
Select the default on-screen display language.
• [Menu]
Select the default menu language.
• [Audio]
Select the default audio language.
• [Subtitle]
Select the default subtitle language.
14
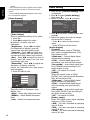
[Playback]
System
Angle Mark
On
Language
PIP Mark
On
Playback
Secondary Audio...
On
Security
Last Memory
On
Network
PBC
On
Move cursor key to select menu option
then use “OK ” key to select
• [Angle Mark]
SETUP
Exit
Some Blu-rayTM discs/DVDs contain the
scenes recorded with multiple angles,
which allow you to enjoy the videos with
your desired angles, therefore the angle
mark is displayed only when the Blu-ray
Disc™/DVD disc is supportable for multiangle and Angle Mark is set to ON.
{On} – Display the angle mark.
{Off} – Hide the angle mark.
• [PIP Mark]
The Picture -In- Picture (PIP) mode display
two pictures on the TV screen at the same
time, the full screen picture is called Main
Window and the small inset window is
called Sub Window. The PIP mark is
displayed when in PIP mode and PIP Mark
is set to ON.
{On} – Display the PIP mark.
{Off} – Hide the PIP mark.
Note:
-High Definition PIP (Second Video) is not supported.
• [Secondary Audio Mark]
{On} – Display Secondary Audio Mark.
{Off} – Hide the Secondary Audio Mark.
• [Last Memory]
If you open the disc tray or switch this
Blu-ray Disc™ player to standby state
during normal playback, the Blu-ray Disc™
player can memorize the end playing
point, the player will start playback from
the memorized point next time.
{On} – Active Last Memory feature.
{Off} – Disable Last Memory feature.
Note:
-Not all the Blu-rayTM discs can support this
function.
• [PBC]
VCD2.0 has PBC control (Playback
Control) menu, which allow you to
interact with the system via menu.
{On} – Display playback control menu, use
NUMBER keys to select desired option.
{Off} – Hide playback control menu and
start playback from track1 automatically.
Allow people who are deaf or hearing
impaired, to have access to television
programming by displaying the audio
portion of a television programme as text on
the screen.
{On} – Display the Closed Caption .
{Off} – Hide the Closed Caption.
[Security]
General Setting
System
Change Password
More...
Language
Country Code
More...
Playback
Parental Control
More...
Security
Network
Move cursor key to select menu option
then use “OK ” key to select
SETUP Exit
• [Change password]
Follow the instruction on the TV set or
change the password for locked discs
and play restricted Blu-rayTM discs/
DVDs.
General Setting
System
Language
Playback
Security
Network
Screen Save
Off
Change Password
Disc Auto Playback
On
CEC
On
Disc Auto Upgrade
On
Load Default
More...
Please enter current password:
Move cursor key to select menu option
then use “OK ” key to select
RETURN Return
1. Use NUMBER keys to enter four digit
old password. The default password is
"0000".
2. Enter the new password.
General Setting
System
Language
Playback
Security
Network
Screen Save
Off
Change Password
Disc Auto Playback
On
CEC
New password :
On
Disc Auto Upgrade
Confirm password :
Load Default
Move cursor key to select menu option
then use “OK ” key to select
On
More...
RETURN Return
3. Enter the new password again to confirm.
• [Country Code]
This ensures that you will be able to see
the scenes intended for your current
residential Country/Area.
Use NUMBER Keys to enter your
password, then you can choose your
Country/Area.
• [Parental Control]
Restricts access to discs that are
unsuitable for children. These discs must
be recorded with rating.
1. Press OK.
2. Use NUMBER keys to enter the
password.
15
English
• [Closed Caption]
General Setting
General Setting
System
English
Language
Playback
Screen Save
Off
Parental Control
Disc Auto Playback
On
Enter
CECpassword:
On
Security
Disc Auto Upgrade
On
Network
Load Default
More...
Move cursor key to select menu option
then use “OK ” key to select
RETURN Return
3. Select a rating level, then press OK.
General Setting
System
Language
Playback
Screen Save
Off
Parental Control
Disc Auto Playback
On
Select level:
Off
CEC
On
[1] KID SAFE
Security
[2] G
Disc Auto Upgrade
On
Network
Load Default
More...
Off
RETURN Return
Items
Description
KID SAFE Safe for kids
G
All children and general guidance
PG
Parental guidance
PG-13
Parental guidance for children under 13
PGR
Parental guidance Recommended
R
Restricted viewing
NC-17
No one 17 and under allowed
ADULT
Adult only
Notes:
- Rated discs above the level you set in [Parental
Control] require a password to be entered.
- The ratings are country dependent. To allow
all discs to play, select 'Off'.
[Network]
General Setting
System
IP Setting
Language
Connection Test
Playback
BD-Live Connecti...
Security
Information
Network
External Control...
Move cursor key to select menu option
then use “OK ” key to select
SETUP Exit
To enjoy BD-Live™ bonus contents, set
up the network connection.
Note:
- Ensure that the network cable is properly
connected and the router is switched on.
1. Connect the Blu-ray Disc™ player to
the broadband modem or router.
2. In the Setup menu, select [Network],
then press .
3. Select [IP Setting] in the menu, then
press OK to select [Auto]. An IP address
is obtained automatically.
If no IP address is obtained, select
[Manual] to input IP Address, Subnet
Mask, Default Gateway, DNS1/DNS2
16
and press OK to re-connect again to the
network. It will try to obtain the IP
address again.
4. Press RETURN or press OK to exit.
Notes:
- During [Manual] mode, if the number is entered
incorrectly, press to erase the number.
- A contract with the provider is needed to connect to
the Internet.
- This player does not support automatic detection of
cross-cables. Use the straight (standard) LAN cable.
- Loading BD-Live™ content from the internet may
take some time, depending on the file size and the
speed of the internet connection.
• [IP Setting]
{Auto} – Auto obtain network information.
{Manual} – Manual setup network
information.
• [Connection Test]
Display Network connection status
information.
• [BD-Live Connection]
{Permitted} – During playback of
BD-Live™ disc, the disc may
automatically download all information
from appointed network.
{Partial Permitted} – During
playback of BD-Live™ disc, the disc may
automatically download partial of the
information from appointed network.
{Prohibited} – Disable downloading
information from network.
• [Information]
Display all Network Information.
• [External Control Setting]
Set up the External Control Setting
information.
{Device Name}
Input the Device Name (to control the
Blu-ray DiscTM player from the iPhone
etc.) by using the on-screen software
keyboard.
Strings(1-15 characters), [A-Z][A-Z0-9]*
{User Name}
Input the User Name (to control the
Blu-ray DiscTM player from the iPhone
etc.) by using the on-screen software
keyboard.
Strings(Max. 16 characters), [a-zA-Z0-9]
[a-zA-Z0-9_-¥.]*
{Password}
Input the Password (to control the Blu-ray
DiscTM player from the iPhone etc.) by
using the on-screen software keyboard.
Strings(Max. 16 characters), [a-zA-Z0-9]
[a-zA-Z0-9_-¥.]*
Display Setting
1. Press SETUP, [General Setting] menu
is displayed.
2. Press to select [Display Setting],
then press .
3. Select an option, press to access.
Display Setting
TV
TV Screen
Video Process
Resolution
Auto
Color Space
YCbCr422
16:9 Full
HDMI Deep Color
Off
HDMI 1080/24p
On
Move cursor key to select menu option
then use “OK ” key to select
SETUP Exit
4. Press / to select a setup option and
press .
5. Select the setting you wish to change
and press OK to confirm.
- Press to return to the previous
menu.
- Press SETUP to exit the menu.
[TV]
• [TV Screen]
Select the screen format according to
how you want the picture to appear on
the TV.
{16:9 Full} – For a disc with the aspect
ratio of 4:3, the output video is
stretched into 16:9 full screen.
{16:9 Normal} – For a disc with the
aspect ratio of 4:3, the output video is
resized vertically to match what will be
seen on the display.
{4:3 Pan&Scan} – For standard TV, it
displays a wide picture on the entire
screen and cuts off the redundant
portions.
{4:3 Letterbox} – For standard TV, it
displays a wide picture with two black
borders on the top and bottom of 4:3
screen.
• [Resolution]
Select a video output resolution that is
compatible with your TV display
capability.
{Auto} – Select the most suitable
resolution according to the TV .
{480i/576i}, {480p/576p}, {720p},
{1080i}, {1080p}
– Select a video resolution setting that is
best supported by the TV. See TV
manual for details.
• [Color Space]
Select a predefined Colour space of
picture.
{RGB} – Select RGB Colour space.
{YCbCr} – Select YCbCr Colour space.
{YCbCr422} – Select YCbCr422 Colour
space.
{Full RGB} – Select Full RGB Colour
space.
• [HDMI Deep Color]
This feature is available only when the
display device is connected by a HDMI
cable, and when it supports Deep Colour
feature.
{30 bits} – Output 30 bits Colour.
{36 bits} – Output 36 bits Colour.
{Off} – Output standard 24 bits Colour.
Note:
-When the colour space is "YCbCr422", even if
HDMI Deep Color is set to 30bits/36bits, it is not
output with Deep Colour.
• [HDMI 1080/24p]
{On} – Enable 1080/24p video
resolution setting.
{Off} – Disable 1080/24p video
resolution setting.
Notes about HDMI 1080/24p:
If you want the 1080/24p output, it should fulfill
below 3 conditions:
1.TV supports the 1080/24p display;
2.Player choose the 1080/24p option in the setup
menu;
3.Media must be the 1080/24p video.
17
English
{Port Number}
Port Number should be 80 or integer from
2000 to 10000, the default value is 4000.
Note:
- Toshiba does not guarantee normal operation with
all connected devices.
(*)Notes:
- Strings(1-15 characters), [A-Z][A-Z0-9]*
You can input 1-15 characters in Device Name,
[A-Z] represent the first character, you can only
choose from capital letter A to Z. [A-Z0-9]
represent the rest of the characters, you can
choose from capital letters A to Z or numbers
from 0 to 9.
- Strings(Max. 16 characters), [a-zA-Z0-9]
[a-zA-Z0-9_-¥.]*
You can input 1-16 characters in User Name
and Password, [a-zA-Z0-9] represent the first
character, you can choose from both the
lower-case a to z and capital letters A to Z or
number from 0 to 9.[a-zA-Z0-9_-¥.] represent
the rest of the characters, you can choose from
both the lower-case a to z and capital letters A
to Z, numbers from 0-9 or symbols.
English
Notes:
- This resolution becomes effective only when
the playing Blu-ray Disc™ contents are Film
source.
- During HDMI 1080/24p playback, there will
be no composite output.
[Video Process]
Display Setting
Video Adjust
More...
Video Process
Sharpness
Low
Audio Output
SETUP Exit
• [Video Adjust]
Select a predefined setting of the video.
1. Press OK.
2. Press/ to adjust the video
Brightness, Contrast, Hue and
Saturation.
{Brightness} - Press t/ to adjust
the brightness of display, goes left
means dark and right means bright.
{Contrast} - Press t/ to adjust the
contrast of display, goes left means low
contrast and right means high contrast.
{Hue} - Press t/ to adjust the Hue of
display, goes left means low hue and
right means high hue.
{Saturation} - Press t/ to adjust the
saturation of display, goes left
means low Saturation and right means
high saturation.
3. Press RETURN to exit.
Brightness
Contrast
Hue
Saturation
Change
RETURN Exit
• [Sharpness]
Select the level of sharpness: High,
Middle, Low.
{High} - Select High sharpness level.
{Middle} - Select Middle sharpness
level.
{Low} - Select Low sharpness level.
18
1. Press SETUP, [General Setting] menu
is displayed.
2. Press to select [Audio Setting],
then press .
3. Select an option, press to access.
Audio Setting
TV
Move cursor key to select menu option
then use “OK ” key to select
Audio Setting
Coaxial
PCM
HDMI
PCM
Down_samp
48K
Dolby DRC
Auto
Move cursor key to select menu option
then use “OK ” key to select
SETUP Exit
4. Press / to select a setup option and
press
5. Select the setting you wish to change
and press OK to confirm.
- Press to return to the previous
menu.
- Press SETUP to exit the menu.
[Audio Output]
• [Coaxial]
Select the output mode of COAXIAL
jack, options include Bitstream, PCM,
Re-encode and Off.
{Bitstream} – Output digital signal
without any processing.
{PCM} – Output digital signal with
processing, only two channels export.
{Re-encode} – Auto select signal type
from COAXIAL jack according to the
Audio stream on disc.
{Off} – No output for Coaxial.
• [HDMI]
Select the output mode of HDMI
OUTPUT jack, options include Bitstream,
PCM, Re-encode and Off.
{Bitstream} – Output HDMI digital
signal without any processing.
{PCM} – Output HDMI digital signal
with processing, only two channels
export.
{Re-encode} – Auto select signal type
from HDMI OUTPUT jack according to
the Audio stream on disc.
{Off} – No output for HDMI.
• [Down_samp]
Select the digital audio signal sampling
frequency. (Only Coaxial)
{48K} – For discs recorded at sampling
rate of 48 kHz.
{96K} – For discs recorded at sampling
rate of 96 kHz.
{192K} – For discs recorded at sampling
rate of 192 kHz.
System Information
1. Press SETUP, [General Setting] menu
is displayed.
2. Press to select [System
Information].
- The current software version and MAC
address will be displayed.
- Press to return to the previous
menu.
- Press SETUP to exit the menu.
System Information
Software version: V XX
MAC: E8-9D-87-XX-XX-XX
Move cursor key to select menu option
then use “OK ” key to select
7 Specification
Playable media
This product can play:
• Blu-ray Disc™-Video, BD-R/RE2.0, BDAV
• DVD, DVD-Video, DVD+R/+RW,
DVD-R/-RW, DVD+R/-R DL (Dual Layer)
• Video CD/SVCD
• Audio CD, CD-R/CD-RW
• AVCHD
• USB flash drive
This owner’s manual is designed to show you
how to setup and operate the most commonly
used functions.
If you want to view advanced functions for
your Blu-ray Disc™ player, you can do so by
visiting www.Toshiba-om.net
If you wish to view the advanced functions but
do not have access to a computer or the
internet, please contact your nearest owner’s
manual Helpline from the number
U.K. 0844 856 0730
Please note the telephone number applies to
advanced owner’s manual enquiries and not
general operation of the Blu-ray Disc™ player.
SETUP Exit
19
English
• [Dolby DRC]
Select the Dynamic Range Control mode
which makes it available to listen to a
movie at a low volume without losing
sound clarity.
{Off} – Non-dynamic range compress.
{On} – Dynamic range compress.
{Auto} – Adjust the DRC according to
input audio.
The setting of Auto is effective for Dolby
TrueHD.
English
20