1
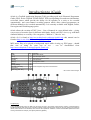
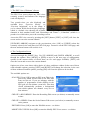
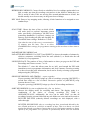
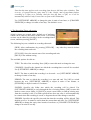
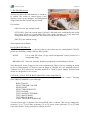
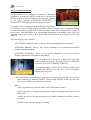
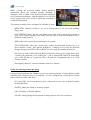
v2.0 user guide v2.0 user guide Page 1 Introduction to iGuide iGuide is a Topfield Application Program (TAP) providing a grid-style Electronic Programme Guide (EPG) for the Topfield TF5800 DVB-T PVR, incorporating now-and-next information, series-link timers which provide the ability for all episodes in a series to be recorded automatically, and cross-channel recording patterns which allow related programmes on different channels to be recorded automatically. It is currently available with English, Polish, Norwegian and Welsh language packs. iGuide allows the creation of EPG Views – lists of channels in a user-defined order – giving easy access to favourites lists for different individuals, family-safe EPG views (e.g. with adult channels hidden) or even Sky+ like categories (‘Children’s’, ‘Movies’ etc.). iGuide v2.0 is found at http://www.shinyford.co.uk/toppy/iguide2.zip; this manual can be found at http://www.shinyford.co.uk/toppy/iguide2.pdf. MP3 music files, to be played as background music while viewing e.g. EPG pages – should that sort of thing be your cup of tea – can be downloaded from http://www.shinyford.co.uk/toppy/iguide_music.zip. Key [LIST] [EXIT] [ARCHIVE] [GUIDE] [MENU] [INFO] [LEFT], [RIGHT] [CH. UP]*, [CH. DN.]* [UP], [DN.] [VOL. UP], [VOL. DN.] No. 1 2 3 4 5 a b c d e Function EPG Views screen See description below Recordings & Timers screens Grid-style EPG Configuration screen Show/navigate through now-and-next banner * also causes channel change The [EXIT] key: In any standard iGuide screen, the [EXIT] key will return the user to the currently tuned channel. However, if pressed during a standard broadcast while there are no on-screen graphics present, the [EXIT] key causes the next key press to be ignored by iGuide, and so allows it to be handled by other TAPs or the Topfield OS. Therefore, to access the standard Topfield menu when viewing a broadcast for example, press [EXIT] followed by [MENU]. v2.0 user guide Page 2 Starting iGuide If iGuide is installed in the /ProgramFiles/Auto Start directory it will be loaded whenever the TF5800 is switched on; this is the recommended option. It can also be started manually, if installed elsewhere, through the usual Topfield TAP loading interface. iGuide’s support files are stored in a directory at /ProgramFiles/Settings/iguide; if this does not already exist, iGuide will create it when it first boots. Certain configuration files (described below in the Support Files section) are included in the iGuide distribution zipfile. If you wish to use any of these – for example, channel and channel group logos from files logo.dat and cglogo.dat – then /ProgramFiles/Settings/iguide must be created and appropriate files copied into it before iGuide starts. But none of these are actively necessary – iGuide is able to work out of the box. Note that earlier versions of iGuide could potentially store their configuration files in other places on disc, e.g. /ProgramFiles/iguide or /ProgramFiles/Auto Start/iguide. If no /ProgramFiles/Settings/iguide directory exists, but such a directory does exist elsewhere, then iGuide v2.0 will automatically move it to the correct location at start up: existing configuration will continue. Do not create /ProgramFiles/Settings/iguide if you are upgrading iGuide, and wish to preserve an existing configuration (including series-link patterns and EPG Views). The contents of the earlier directory will not be copied over if a directory exists in the correct, new location. iGuide: key features iGuide has a number of key features that set it apart from other EPG replacements. Some of these features are an intuitive part of the user interface; others are additions of functionality that you may, or may not, use. Either way, it’s a good idea to be aware of them before reading on into the main body of the user guide below. 1. Series-link patterns Series link patterns can be set up to create timers for any programme that matches certain criteria. These criteria, which are editable, include: channel or channel group (see below); title (may contain wildcards); days of the week; portion of the day. Keywords can also be added to a pattern. If a pattern contains keywords, then rather than matching programme titles, programmes whose descriptions contain the keywords will be matched. Patterns can also be given a percentage of ‘uniqueness’. Programmes have to be unique – that is, unlike an existing recording or timer within a margin of error – to match the pattern. This mechanism effectively stops multiple copies of the same episode of a series being recorded. v2.0 user guide Page 3 Note that there is a TAP called CRID available from bdb’s stable, which finds and adds series link data to programme descriptions when broadcast by a channel. If this TAP is running alongside iGuide, then iGuide uses this extra data to make its series link pattern matching more accurate and quicker. If possible, please install and run CRID alongside iGuide. 2. Channel groups A channel group is a collection of channels that acts as a pseudo-channel for series link patterns, so that a pattern can match programmes from more than one channel. Five default channels are provided with iGuide: all BBC channels, all ITV channels, Channel 4 group (excludes Film4), Channel 5 group and all channels. Others can be added as the user sees fit. 3. ‘IntuiLeap’ homing-in navigation When playing back a recording, you will often want to quickly move beyond, say, a commercial break. iGuide’s IntuiLeap navigation makes this a very quick process, by homing in on the desired restart point. Initial key-clicks move five minutes in one direction or the other; subsequent key-clicks move back and forth in increasingly small amounts, until the correct point is located. Two IntuiLeap modes are available: ‘increasing small’ diminishes the amount jumped on each key press – this is the most efficient method, but not necessarily the most intuitive; ‘diminishes on direction change’ mode only changes the jump amount when the direction of travel changes – slightly less efficient, but easier to understand what’s going on. 4. ‘May I Suggest...’ predictive programming The May I Suggest... feature attempts to identify programmes you may like but not already know about, based on recordings you’ve already made and indicated you enjoyed. Again, fuzzy logic is used to compare upcoming programmes with existing recordings. If no recordings have already been identified, May I Suggest... falls back to a Tivoemulation mode, in which every episode of the Simpsons is recorded. 5. Thumbnailing Thumbnails can be manually or automatically generated for recordings, including thumbnails of the ‘last viewed’ position in a recording. 6. Multi-recording playout Completed recordings can be marked as part of a playout collection. Initiating play on a marked recording results in the entire collection being played out one after the other, in a user-defined sequence. This allows multiple recordings to be played in a set order in one go, for e.g. archiving to DVD or tape. v2.0 user guide Page 4 7. Contiguous programme recordings Recordings are automatically padded at either end with user-definable values. However, if two programmes are to be recorded following each other on the same channel, there’s no possibility of padding. This means that, if the programmes each record into their own file on disk, the end of the first may appear in the recording of the second, or vice versa (well, not exactly vice versa but you know what I mean). iGuide provides a ‘contiguous recordings’ mechanism, whereby recordings that follow each other on the same channel are recorded into a single master file. This is invisible to the user, as iGuide manages its recordings to make it appear that each is separate, with the appropriate amount of padding before and after. 8. iGuideSMS recording by text iGuide provides a mechanism to allow timers to be set remotely via SMS text. Note that this requires that a mobile phone with an RS232 GSM modem interface be attached to the Toppy’s serial port. Currently the Nokia 6310 and Seimens ME45 have been tested with this interface. See the iGuideSMS quick guide below for further details. v2.0 user guide Page 5 iGuide: control screens 1. The EPG Grid Screen The EPG Grid screen shows programme information for seven to ten channels at a time, over a certain time window (the size of which can be chosen as described below). The channels displayed are taken from, and ordered by, the current EPG View (see below). Access the EPG grid screen by pressing the [GUIDE] button. [GUIDE] or [EXIT] will close the screen and revert to the current channel. Other key actions: [RED/GREEN]: Move a page up/down i.e. to the previous/next set of channels [YELLOW/BLUE]: Move forward/back 24 hours [UP/DOWN]: Move to the previous/next channel in the list [LEFT/RIGHT]: Move to the previous/next programme on the current channel, or backward/forward by half an hour if the previous/next programme is not on the current screen. [CH DN/UP]: Move to the previous/next programme on the current channel. If that’s off the screen, move the grid back/forth in time to view the programme. [REW/FFW]: Move one page back/forward in time (i.e. if you’re looking at a grid covering 3.00pm to 6.00pm [REW] will move to a page covering 12.00pm to 3.00pm; [FFW] will move to a page covering 6.00pm to 9.00pm). [PIP]: Change the size of the time window. Pressing [PIP] repeatedly will cycle through time periods from 1 hour to 4 hours in half-hour chunks. The greater the time period, the more programmes are shown at once but with less detail for each programme title. [OK]: If the programme currently selected in the grid is a “NO INFORMATION” event, pressing [OK] triggers an attempt to get EPG information for the channel and repopulate the screen. If that’s not the case and the currently selected programme is on now, pressing [OK] tunes to it. Otherwise, pressing [OK] acts as if [REC] were pressed (see below). This functionality is optional – see the Configuration screen section below for information on enabling/disabling this feature. v2.0 user guide [REC]: Page 6 If the programme currently selected in the grid has a series-link recording, pressing [REC] enters the Edit Pattern screen (see below) for this series-link. If that’s not the case and the currently selected programme has a recording, pressing [REC] tries to turn this into a series-link recording. If that’s not the case and the currently selected programme has a watch timer, pressing [REC] turns this into a ‘Recording’ timer. If that’s not the case then pressing [REC] creates a Recording timer for the currently selected programme. Note that it is only possible to set two simultaneous recordings. If you try to set a third recording at the same time as two existing timers, you will be warned of the clash in a popup – press any key to continue. [WHITE]: As [REC], except that in the last instance a Watch timer is created rather than a Recording timer. [PAUSE]: If the currently selected programme has a recording, enter the recording edit screen for it. [STOP]: If the programme currently selected in the grid has a recording, a watch timer or a series-link, you will be asked if you really want to delete it: pressing the [YELLOW] key will confirm this, causing the recording to be deleted. If the recording was part of a series link, other recordings on the same pattern will remain; recording of future editions of the episode just deleted will be inhibited by the fact that you’ve just deleted this one – iGuide keeps a record of deletions, and assumes that a deleted episode is definitely not wanted. If you want to record a future edition of the episode, you will need to either manually set a recording for it, or ‘refresh’ the series link pattern (see below). [INFO]: Show full information for the currently selected programme in a popup window; press any key to exit the window. [SLOW]: Toggle between EPG grid mode and single-channel per page mode. [PLAY]: Exit the screen and tune to the currently selected channel. [RECALL]: Repopulate EPG information for the currently selected channel. [TEXT]: Start a search. Pressing [TEXT] opens a prompt which asks for a series of comma-delimited search terms to be typed in, using the standard editing keys in Edit Mode (see below) Press [BLUE] to toggle between just searching programme titles and searching both titles and descriptions; press [FFW] or [REW] to cycle through the genre list, to enable search by a particular genre. v2.0 user guide Page 7 2. The Recordings and Timers Screen The Recordings and Timers screen shows subfolders in the current folder, recordings available to play in the current folder, and upcoming timers waiting to happen, ordered by time. At the top of the Recordings and Timers screen is a line representing the hard disk, separated into two regions: used (dark turquoise in the images) and unused (light turquoise). The disk space taken by the currently selected recording (if post-record) or timer (if pre-record – approximate) is also shown as a portion of the bar (yellow in the lower image). Figures also show the number of hours recorded, waiting to be recorded (‘reserved’) and (approximately) remaining. The lower pane of the screen will show (a portion of) the information for a selected recording. If available and enabled (see Configuration page section below) a thumbnail scene from the recording is also shown. This defaults to the ‘last viewed’ scene, but up to six thumbnails spread across the recording will be generated, either when chosen by the user (see [SWAP/PIP] in this section below) or automatically overnight. Access the recordings and timers screen by pressing the [ARCHIVE] button. [EXIT] will close the screen and revert to the current channel. Recording and timers may be split into separate screens, according to a Configuration choice. If this is in effect, pressing [ARCHIVE] while in one of the screens will toggle to the other; if it is not in effect, [ARCHIVE] acts as [EXIT], returning to the current broadcast again. Other key actions: [RED]: Moves a page up i.e. to the previous seven events [GREEN]: Moves a page down [YELLOW]: ‘First’ or ‘Up’: Jumps to the first item in the current folder (i.e. the highest up the list) or, if that item is currently highlighted and you’re looking at a subfolder, causes iGuide to navigate up to the parent folder and display its contents instead. [BLUE]: Asks for confirmation to delete the currently selected recording, timer or series. Pressing [YELLOW] will confirm the deletion; any other key cancels. [UP/DOWN]: Move to the previous/next event. v2.0 user guide Page 8 [LEFT/RIGHT]: This causes the number of minutes displayed for a recording to go down/up, so as to change the play position – changing the ‘minutes viewed’ this way allows quick navigation to known points in a recording. Note that the display for a completed recording need not just show the number of minutes already viewed. If a completed recording is currently selected, it will display as “RECORDED” if it has yet to be played, “START” or “END” if the playback position is in the first or last minute of the recording respectively, or “xx MINS VIEWED” if partly viewed. [REW/FFW]: As [LEFT/RIGHT] but in intervals of 15 minutes. [CH UP/DOWN]: Tick or untick a recording or timer to mark it as a favourite for the purposes of May I Suggest... matching. If ticked, a recording will be used as an example of the sort of thing you enjoy watching by MIS when it searches for new programmes. Visually, ticking a recording adds an image of a heart at the left side of its info bar. [GUIDE]: Goes to the EPG View screen. If the currently selected row is an upcoming timer, centres the EPG view screen on that event; otherwise, the channel of the currently selected recording, at the current time. [PLAY]: Tries to play the current recording (NB: this won’t work if it’s an upcoming timer that has not yet started). [SLOW]: Toggle the view of recordings and timers between alphabetical ordering, and ordering by time (that is, by time and date of the broadcast). [PAUSE]: If the currently selected row shows a recording or timer, enters the Recording Edit page (see below) for it. [REC] If the currently selected row shows a recording or timer which is part of a series link, enters the edit screen for that pattern. If the currently selected recording or timer is not part of a series link, causes a series link to be created based on the timed programme and then enters the edit screen for that pattern. [INFO]: Show full information for the currently selected recording or timer, in a popup window; press any key to exit the window. [0-9]: Set the playout precedence for a completed recording, or delete the precedence if [0] pressed. See [OK] below for playout mode. [OK]: If the currently selected row shows a completed recording or currently recording programme, plays it. If the currently selected row shows a folder, enters it. If the currently selected recording/timer is an upcoming timer that is part of a series link, pressing [OK] enters the Series Link Pattern Edit screen (see below). v2.0 user guide Page 9 If the currently selected recording/timer is an upcoming timer that is not part of a series link, pressing [OK] enters the Recording/Timer Edit screen (see below). Note that playback will start at: the current thumbnail position (if a new thumbnail has been chosen more recently than the ‘minutes’ playback changed; otherwise, the number of minutes into the recording stated in the information bar if changed; otherwise the last position played. Note also that, if the currently selected recording has a precedence set, playout mode is initiated. In playout mode all recordings that have had a precedence set will be played out sequentially until all have been played. Lower precedence recordings play before higher; where two recordings have the same precedence set, the earlier plays first. [SWAP/PIP]: Enable ‘thumbnails’ mode if not already enabled, and if the currently selected row is a completed recording, show the first thumbnail for it. If not already generated or the key pressed was [PIP], (re-)generate thumbnails. If thumbnails are already enabled and displayed, and a completed recording currently selected, cycle to its next thumbnail. v2.0 user guide Page 10 3. The EPG View (‘Welcome’) Screen The EPG View screen shows any EPG views currently created, and indicates the language each will display in. Two pseudo-views are also displayed and available here: “Freeview line-up” (or “Freeview holynieath” as in the image, if you’ve chosen Welsh for the display language) which is a default view showing all available channels in their standard order; and “Recordings and Timers” (“Cofnodiau”) which is a pseudo-view which takes you to the recordings screen. Access the EPG view screen by pressing the [LIST] button. [EXIT] or [LIST] will close the screen and revert to the current channel. [UP/DOWN ARROW] navigates to the previous/next view. [OK] or [GUIDE] selects the currently selected view and enters its EPG Grid page. From now on the EPG Grid page, and the now-and-next banner will use this view. 4. The Configuration Screen Accessed through the [MENU] key. Use [UP ARROW] and [DOWN ARROW] to scroll through the options. Press [MENU] or [RED] to move to the next page of configuration options (in the current release of iGuide there are five such pages available). [EXIT] will close the screen and revert to the current channel. Options are of two sorts: those with a choice of values, and those without. In the case of those with selectable options, pressing [LEFT] and [RIGHT] will change the selection; in the case of those without selectable options, pressing [OK] will cause the option to be invoked. The available options are: SCAN EPG: Press [OK] to start an EPG scan. This is the process by which iGuide loads in all EPG data from over the air. If you are unhappy with the number of programmes iGuide displays in the EPG grid you can initiate a scan here. Note that iGuide automatically performs a background scan which updates one channel every two to four minutes. CREATE A RECORDING: Enter the Recording Edit screen (see below) to manually create a timer CREATE A SERIES: Enter the Series Pattern Edit screen (see below) to manually create a series pattern. EDIT SKIN: Press [OK] to enter the Edit Skin screen – see below. MODIFY EPG VIEWS: Press [OK] to enter the Modify EPG Views screen – see below. v2.0 user guide Page 11 REFRESH RECORDINGS: Causes iGuide to rebuild its list of recordings against what’s on disk, to make sure that all recordings exist and are in the folders it thinks they are. This is useful if other TAPs are moving files around unbeknownst to iGuide, but should actually never be necessary in the general run of things. KEY MAP: Enters a key mapping mode, allowing iGuide functions to be assigned to nonstandard keys. SCAN TIME: Choose the time of day at which iGuide will wake itself to perform important system tasks, specifically: performing a full EPG scan; generating thumbnails if required; clearing out memory and reloading all data; and checking for iGuideSMS timer settings. Defaults to 3.55am. Note that the time of this scan is constrained to 55 minutes past the hour. This is to allow iGuideSMS timer settings for programmes starting at the next hour to have time to get set. PAD BEFORE RECORDING and PAD AFTER RECORDING: Use [LEFT] and [RIGHT] to choose the number of minutes by which to commence recording before the start (default 3) or finish after the end (default 10) of a programme. LINES PER PAGE: The number of lines of information to show per page on the EPG and Recordings and Timers screens: 7 to 10. The default is 7, since this allows room for an ‘info’ area beneath the EPG with immediate access to programme information, and ‘help’ buttons. Choosing a setting 8 or above loses this extra information, but it can be seen by selecting a programme and pressing the [INFO] key. SHOW RECORDINGS AND TIMERS…: apart; together: If apart pressing [ARCHIVE] brings up a list of recordings; pressing [ARCHIVE] a second time swaps to a list of timers. Successive presses of [ARCHIVE] swap between the two views. If together pressing [ARCHIVE] brings up a list of all recordings and timers. SORT RECORDINGS: by time or alphabetically; flat; inc. deletes: Chooses the display mode for recording and timers. The display mode is a combination of the choice of viewing recordings BY TIME or ALPHABETICALLY; additionally, the view can be made FLAT (so that all recordings from the current folder and any sub-folders are seen) and can be made to INCLUDE DELETES (whereby deleted recordings are also displayed, with a strike-through). DELETED RECORDINGS: after a recording has been viewed and deleted by the user, iGuide archives its record for a number of days. This is so that it can check against the deleted recording to ensure that no series link pattern matches a future repeat of the programme. It is possible to permanently delete such an archived v2.0 user guide Page 12 recording by deleting it a second time from the recordings/timers screen when it is viewed there. KEEP CONTIGUOUS RECORDINGS...: apart; together: The apart setting places recordings of programmes in succession on the same channel in separate recording files. This is easier to handle, but means that padding between the two needs to be nil: therefore, the end of the first programme may actually be found in the recording of the second. The together setting places recordings of contiguous programmes on a single channel into a single on-disk recording, and manages information to ensure that each appears separate from the others. MAY I SUGGEST: Enables the May I Suggest feature of iGuide which attempts to predict programmes you may like but not yet know about, based on your existing recordings. The options are no which disables it, or 5, 10 or 15 suggestions. See the section above for a full description of MIS. NAVIGATION: The number of lines to scroll the EPG page by, when pressing the [UP/DOWN ARROW] in the EPG grid screen while the highlighted programme is in either the first or last row. Use [LEFT/RIGHT ARROW] to choose one of: full page – the default behaviour, all seven visible channels are replaced with the next/previous seven full page, keep current channel – the current channel moves to the top or bottom position as appropriate and the next/previous six channels are displayed half page – the current channels scroll up or down as appropriate such that the current highlighted channel takes the middle position, and the next/previous three channels are displayed above or below as necessary. one channel at a time – the current channels scroll up or down as appropriate by one line, and the next/previous channel selected and displayed. GMT OFFSET YEAR-END and GMT OFFSET MID-YEAR: The offset, in hours, from GMT in Northern hemisphere winter and summer respectively: defaults to the UK 0 and +1. Daylight Savings Time is calculated according to the European (and Australian) standard: DST begins (ends) on the last Sunday in March at 2.00am; it ends (begins) on the last Sunday in October at 2.00am USE [REC] FOR WATCH: If set to ‘yes’, pressing [REC] (or, possibly, [OK]) on a selected programme in the EPG grid or now-and-next banner will have the default action of setting a watch timer. If set to ‘no’, the default action is to set a recording timer. USE OK TO SET TIMER: Sets whether or not to allow [OK] to be used to set timers and change recording status to Series Link in the EPG and Recordings and Timers pages. For some people, using [OK] in this way is intuitive and useful; for others, it causes a large number of timers to be set by mistake. v2.0 user guide Page 13 KEEP RECORDING INFO FOR…: After a recording has been viewed and deleted iGuide will keep information about it for a certain number of days in order to stop a repeat of the show being recorded (assuming it was recorded via series link defined as unique – see below). This option allows you to define how long to keep such a record for before deleting it. KEY SET: maximal; minimal If maximal, iGuide takes control of all the keys as described in this guide, preventing the key presses being picked up by other TAPs or the standard TF5800 user interface. (Note that keys will be passed through to other TAPs if the [EXIT] key is pressed first while viewing a ‘normal’ programme – that’s one without the now-and-next banner or other iGuide screen.) If minimal, only [INFO] and [LIST] are acquired by iGuide, so that only the nowand-next banner and EPG View screen can be entered. This leaves most keys on the remote available to other TAPs. (Note that, once in now-and-next or the EPG View screen in ‘minimal’ key set mode, iGuide uses the keys as described in this guide, up until the point at which its screens are left again.) EPG WIDTH: The number of minutes to show per page of the EPG grid (also selectable by use of the [PAUSE] key in the EPG Grid screen itself. VIEW EPG AS A GRID?: Choose ‘yes’ for the standard grid view, or ‘no’ for a singlechannel-per-page view. EPG JUMP: the number of hours forward or backward that iGuide will use when [REW] or [FFW] are pressed during EPG grid view. Defaults to 24. SHOW RECORDING THUMBNAILS: Sets whether or not to show thumbnails by default in the Recordings and Timers pages. NOW-AND-NEXT BANNER TIME: Use [LEFT] and [RIGHT] to choose the number of seconds (default 10) the now-and-next banner remains on screen following a keystroke. HOME-IN ALGORITHM: When playing a recording and wishing to navigate quickly past, say, the adverts, iGuide provides a homing-in navigation algorithm called ‘IntuiLeap’. IntuiLeap actually employs one of two basic algorithms: increasingly small and diminishes on direction change. The former is more efficient, diminishing the amount jumped on each key; this can, however, feel anti-intuitive. The latter is less efficient but more intuitive, diminishing the amount jumped only when changing direction. Choose the most appropriate algorithm for your use from this option. v2.0 user guide Page 14 JUMP PERIOD: The number of minutes forward or backward that IntuiLeap will initially use when starting a home-in navigation. Defaults to five minutes. BACKGROUND IMAGE/SOUND: Allows the user to choose whether or not to have background music (or silence) in iGuide pages, and whether or not to view the currently broadcast programme through those pages. The choices are: iGuide/iGuide: the background image used is as set in the skin, and background music found in the /ProgramFiles/iguide folder is played (or silence if nonesuch exists). iGuide/broadcast: the background image used is as set in the skin, but the soundtrack from the currently tuned channel continues. broadcast/broadcast: the background image used is transparent so the the currently tuned channel can be seen and heard behind whatever pages iGuide shows. CREATE ALL TIMERS: By default iGuide will only create a small number of timers for future recordings, typically ten. This is for efficiency’s sake: iGuide updates its timers whenever a new recording is added or an old one deleted, to make best use of the tuners, and actually adding real timers is a slow process. Whenever a recording starts, the list of timers is updated again and new timers added – so the fact that not all timers are created at once should never be a problem. However, some other TAPs benefit if all timers are created – they also need to know if a recording is coming up. Set this option to ‘no’ (the default) if iGuide is the only TAP running that needs to know about all timers, or ‘yes’ if other TAPs also need this information. iGuideSMS PHONE ATTACHED or iGuideSMS NO PHONE ATTACHED: Shows the status of the iGuideSMS companion TAP, which allows timers to be set by sending an SMS text to a mobile phone connected to the Toppy by a serial cable. See the iGuideSMS quick guide below for further details. RELOAD: Causes iGuide to re-initialise – useful if, for example, new logo files have been added into the iguide directory, or config files manually edited. EXIT iGuide: Causes the TAP to unload itself from memory. Pressing [WHITE] at any time while viewing one of the Configuration screens has the same effect. CREDITS: Use [OK] to select. (I got bored. ) v2.0 user guide Page 15 5. The Modify EPG Views Screen The Modify EPG View screen lists the current user-defined EPG views and allows certain actions to be taken out on them. The Modify EPG Views screen is entered from the Configuration screen. [EXIT] will navigate to the EPG Views screen. [OK]: If in ‘select’ mode, drops the currently selected channel at its current position. If not, enters the Edit EPG View screen for the currently selected view [RED]: Selects/unselects the current view so that it can be moved up and down the list. [GREEN]: Allows you to rename the current view by entering Edit Mode (see below) [YELLOW]: Creates a new EPG View (if there’s enough room for another one). [BLUE]: Deletes the currently selected EPG View. [YELLOW] must be pressed next to complete the deletion; any other key cancels. [UP/DOWN ARROW]: Moves to the previous/next EPG view, or, if in select mode, moves the current view up/down the list. [LEFT/RIGHT ARROW]: Allows you to change the language of the currently selected view. By default iGuide has an inbuilt English language pack. Other languages can be added by creation of “xxxxxx.igs” files, containing required words and phrases in the appropriate language: “cymraeg.igs”, “polski.igs” and “norsk.igs” are provided, but iGuide will support as many languages as there are .igs files at its start time. (NB: “english.igs” is also provided as an example, but is not actually required.) 6. The Edit EPG View Screen The Edit EPG View screen allows channels to be reordered and hidden or unhidden within the current EPG view. [RED]: Hides or unhides the current channel. Note that the Freeview Line-Up EPG View acts as a master for all the others: any channels hidden here are automatically and irrevocably hidden in all other views. Channels hidden in the current view are indicated as such with a single strike-through. Channels hidden in the Freeview LineUp view are indicated as such with a double strike-through. Channels hidden in both the current and the Freeview Line-Up views have a triple strike-through. [YELLOW]: Saves the current state of the EPG view and exits to the Modify EPG Views screen [BLUE]: Exits to the Modify EPG Views screen without saving [OK]: Selects the current channel so that it can be moved up and down the list, or, if already in select mode, cancels it. [UP/DOWN ARROW]: Moves to the previous/next channel, or, if in select mode, moves the current channel up/down the list. [CH UP/DOWN]: Moves to the previous/next page of channels, or, if in select mode, moves the current channel up/down one page in the list. v2.0 user guide Page 16 7. The Series-Link Pattern Edit Screen iGuide implements series links by creating patterns that match on to programmes in the EPG. Generally the defaults will match successfully, but the settings can be adjusted in this screen. [RED]: After confirmation (by pressing [YELLOW]; any other key cancels) deletes the current series link and exits. [GREEN]: ‘Refreshes’ the current pattern by removing any information regarding deleted recordings which match it. Use this if a pattern should be matching a programme but isn’t; alternatively, set a manual recording for the programme – it will automatically be picked up by the series. [YELLOW]: Saves the current state of the series link and exits [BLUE]: Exits without saving Use [UP ARROW] and [DOWN ARROW] to scroll through the options. The available options are: TITLE: The title of the programme to match against. Press [OK] to enter edit mode to change the title – see below. The title can contain wildcards: ‘?’ ‘*’ ‘\’ matches any single character matches zero or more arbitrary characters matches the next character exactly, so allowing titles to include the characters ‘?’ and ‘*’. The title can contain multiple different patterns, separated by the bar (‘|’) character. Examples: Pattern to match Doctor Who D*r Who Doctor Who|Dr Wh? Doctor Who*|Dr Who* *Who*\? Possible matching programme titles Doctor Who Doctor Who Dr Who The Dog Botherer Who Came To Dinner Doctor Who Dr Who Dr Why Doctor Who Dr Who Doctor Who And The Daleks Dr Who Confidential Doctor Who? Who Wants To Be A Millionaire? CHANNEL: The channel the programmes will be found on. Use [LEFT/RIGHT ARROW] to change. v2.0 user guide Page 17 Note that iGuide provides channel groups so that series links can span multiple channels. To choose a channel group, select a standard broadcast channel, and then press [CH+]. This will select the first appropriate channel group for the base channel. [CH+] and [CH-] will take you through appropriate channel groups, and/or back to the base channel: [LEFT/RIGHT] BBC2 [LEFT/RIGHT] [CH+/CH-] ITV1 [CH+/CH-] [LEFT/RIGHT] C4 [LEFT/RIGHT] [CH+/CH-] ALL BBC CHANNELS ALL ITV CHANNELS CHANNEL 4 GROUP [CH+/CH-] [CH+/CH-] [CH+/CH-] ALL CHANNELS ALL CHANNELS ALL CHANNELS Available channel groups can also be found at the end of the channel list. By default five channel groups are provided: “All channels”, “All BBC channels”, “All ITV channels”, “C4, E4, More4, Film4" (the Channel 4 group) and “five, five life, five US" (the channel five group). Other channel groups can be created by editing the configuration files (see below). DAYS: The days on which to search for matching programmes. By default this is every day, but can be changed to any individual day, weekdays, weekend or weekdays + Saturday using the [LEFT/RIGHT ARROW] keys. PERIOD: A block of time on the identified days in which to search for programmes – a programme is deemed to be in a block if it starts or ends in the block. By default this block is the quadrant of the day (0000-0600, 0600-1200, 1200-1800 or 1800-0000) in which the original programme appears, or two such quadrants if it spans them. This default sorts out most things – e.g. it’ll get all the weekday episodes of EastEnders but not the Sunday omnibus – but it can be changed at will. Use [OK] to swap focus between the start and end periods, and [LEFT/RIGHT ARROW] to change these times (it’ll make more sense if and when you try it). If end time is less than start time, the block is deemed to be overnight. KEYWORDS: A series of keywords (actually phrases) separated by commas. If this list exists, the pattern matches on the existence of all keywords in a programme’s title and/or description. A keyword can be preceded by a minus sign, in which case the pattern will fail to match any programme whose title or description contains the remainder of the keyword. Examples: Keywords to match Who, Doctor –Who, Doctor Possible matching programme titles Doctor Who Doctor Kildare Note that if keywords are defined for a pattern, they supercede the title pattern: this means that any programmes, regardless of their name, will be captured by the series link if they contain the appropriate keywords. Beware! v2.0 user guide Page 18 UNIQUE: A programme is said to be unique if its description and title are different to those of other programmes matching the same pattern. Using the “UNIQUE” setting you can choose to stop any future “copies” (repeats) of a programme getting timers set for them, once one version of that particular episode has been recorded successfully. For example, every episode of EastEnders on BBC1 is repeated later in the day on BBC3. If a pattern is created for all EastEnders episodes on all BBC channels with UNIQUE set to “yes”, then iGuide will note that the BBC3 episode is a copy of the earlier BBC1 episode, and not set a timer for it. More importantly, if the BBC1 episode fails to record then iGuide will create a timer for the BBC3 episode in its place. In iGuide, it is possible to have gradations of uniqueness (despite what Simon Fisher1 may maintain). iGuide uses a simple statistical analysis to compare two programme descriptions to see if they are the same as each other. This is useful where, for example, the BBC1 episode of EastEnders is described as “Billy buys Peggy a metronome”, while the BBC3 episode describes it as “Billy buys Peggy a metronome. Followed by the news” – we can see they’re the same episode, even though the descriptions are different. iGuide potentially allows a certain degree of difference so that these will match. The UNIQUE settings (changed by using the [LEFT/RIGHT ARROW] therefore can be one of: yes: If the description and title match exactly (other than for punctuation and case) the second programme will not have a timer created for it. no: We don’t care about a recorded episode being unique, so every episode will be recorded regardless. xx%: Programmes will be considered the same – i.e. the second episode will not have a timer set for it – if they are statistically xx% similar to each other. The default of 70% seems to work fairly well in most cases where there’s doubt. Note that the UNIQUE setting is made largely redundant by bdb’s CRID TAP – since each series and episode is uniquely identified by a crid code, there is no need to analyse the description to see if a show is a repeat. However, UNIQUE is still useful if CRID is not running, and for those channels which are still not broadcasting crid codes consistently. FOLDER: Specifies the folder into which the pattern’s recordings will be placed. Use [LEFT/RIGHT ARROW] to cycle through the list of existing folders; [OK] to enter Edit Mode to create a new folder; or [SLOW] to create a new folder (or find an existing one) from the pattern’s title. If a folder specified here does not exist, it will automatically be created when the pattern is saved, or forgotten about if the changes are cancelled. EXPIRES: Specifies the time at which recordings made through this pattern will be automatically deleted after they have finished recording – useful, for example, if you want to set a series pattern for the daily news, but aren’t interested in keeping yesterday’s recording after today’s has been recorded. 1 Google it. Go on. Google it. v2.0 user guide Page 19 Note that this time applies to the recording from the next full hour after it finishes. That is to say, if a pattern has an expiry time of 1 day 3 hours, and a programme finishes recording at 1.25pm on a Tuesday, then the next full hour is 2pm, so it will be automatically deleted 1 day 3 hours later at 5pm on the Wednesday. Use [LEFT/RIGHT ARROW] to change the time in units of one hour, or [CHANNEL UP/DOWN] to change it in units of one day. The default is never. 8. The Recording/Timer edit screen iGuide’s timers are created with a default set of attributes, which can be edited as necessary in this screen. A recording or timer can be edited by selecting it in the recordings/timers screen, and then pressing [PAUSE]. The following keys are available in recording edit mode: [RED]: After confirmation (by pressing [YELLOW] – any other key cancels) deletes the recording/timer and exits. [YELLOW]: Saves the current state of the recording and exits [BLUE]: Exits without saving The available options for edit are: TITLE: The title of the recording. Press [OK] to enter edit mode to change the text. CHANNEL: Specifies the channel on which the recording/timer was/will be recorded. Use [LEFT/RIGHT ARROW] to change. DATE: The date on which the recording is to be made – use [LEFT/RIGHT ARROW] to change in units of one day. PERIOD: The time at which the recording is to start and end. Use [OK] to switch between the two, [LEFT/RIGHT ARROW] to adjust in units of one minute, or [FFW/REW] to adjust in units of 15 minutes. FOLDER: Specifies the folder into which the recording will be placed. Use [LEFT/RIGHT ARROW] to cycle through the list of existing folders; [OK] to enter edit mode to create a new folder; or [SLOW] to create a new folder (or find an existing one) from the recording’s title. If a folder specified here does not exist, it will automatically be created when the recording is saved, or forgotten about if the changes cancelled. EXPIRES: Specifies the specific time and date that the recording will be deleted. This defaults to never. It cannot be earlier than the current date and time. Use [LEFT/RIGHT ARROW] to change the expiry time in units of one hour, or [CHANNEL UP/DOWN] to change it in units of one day. v2.0 user guide Page 20 9. The Edit Skin Screen This screen allows the look and feel of iGuide to be edited. The colour of various parts of the display screen can be changed, and background images and skin files loaded and previewed. Key actions: [OK]: Preview any changes made. [YELLOW]: Saves the current state of iGuide’s skin and exits; incidentally, this action also causes iGuide to re-parse MP3 files in the iguide directory, so if you want new background music just upload the files and resave the current skin here. [BLUE]: Exits without saving Three options are available: BACKGROUND IMAGE: All JPEG images in the iguide directory that are the correct size for a background (720x576 pixels) are listed here, along with two other options: NONE: Use a solid fill colour (“Logo tint & background” below) instead of a background image. BROADCAST: Show the currently broadcast programme as a backdrop to iGuide. Note that pixels on the Toppy screen are not symmetrical. Thus if you are creating an image to use as a background, it is best to create an image of 720x540 for a 4:3 standard screen or 720x405 for a 16:9 widescreen, and then stretch it to 720x576 pixels. Images provided with iGuide are designed for 16:9 screen. COLOUR (“LOGO TINT & BACKGROUND” in the image above): Various different parts of the screen can be assigned different colours. Pressing [LEFT/RIGHT ARROW] cycles through: BAR COLOUR SELECTED BAR COLOUR HIGHTLIGHT SELECTED HIGHLIGHT TEXT ON BAR TEXT ON SELECTED BAR TEXT ABOVE BARS TEXT BELOW BARS LOGO TINT & BACKGROUND As each colour type is displayed its current RGB value is shown. This can be changed by pressing: [1] or [7] (red value up/down); [2] or [8] (green value up/down); [3] or [9] (blue value up or down). At any point press [OK] to preview. v2.0 user guide Page 21 LOAD SKIN FROM FILE: This option (navigated again through [LEFT/RIGHT ARROW]) lists skin files found in the iguide directory. Skin files can be either native iGuide files (with a .skn extension) or MyStuff skin files (.mcf extension) from which iGuide makes an educated guess as to appropriate colour schemes. Press OK to preview a skin. v2.0 user guide Page 22 The Now-and-next Banner During playback of a recording or viewing of a broadcast programme, pressing the [INFO] or [OK] keys will bring up the Now and Next banner. If there are no on-screen graphics at the time, pressing [UP/DOWN/LEFT/RIGHT] or [CHANNEL UP/DOWN] will also bring up the banner. The banner shows information about individual programmes on a channel, or the currently playing recording. If the description is for a playing recording or current broadcast, a progress bar is shown giving a visual representation of how much has been viewed. If the description is for a programme (rather than a recording) a short “next” bar above the banner gives a little lead-in information regarding the next programme on the same channel. The following keys are available: [LEFT/RIGHT ARROW]: Move to the previous/next programme on the channel [UP/DOWN ARROW]: Move to the current programme on the previous/next channel (without changing channel). [CHANNEL UP/DOWN]: Move to the current programme on the previous/next channel, and retune to that channel immediately. [0-9]: A channel can be navigated to directly by typing the channel number in and then pressing [OK]. If a wrong digit is pressed, press [LEFT ARROW] to delete it. As a channel number is typed iGuide will show information regarding that channel, and the title of the programme currently showing on it. [OK]: If the banner is describing the programme currently being broadcast on a channel other than the one currently tuned to, retune to that channel. If that’s not the case then act as if [REC] were pressed (see below). [REC]: If the programme being looked at has a series-link pattern, delete it. If that’s not the case and the programme has a normal recording, turn it into a series link pattern. If that’s not the case and the programme has a watch recording, turn it into a normal recording. If that’s not the case then set up a recording. v2.0 user guide Page 23 When viewing the now/next banner during playback, information about the currently playing recording is displayed. This is similar to the now/next banner displayed for a broadcast programme, with the addition of a red caret on the progress bar at the point at which the recording is currently being played. The current recording can be navigated in a number of ways: [REW/FFW]: Initiates rewind (x1, x2, x3) or fast-forward (x2, x4, x6) in the standard Toppy way. [LEFT/RIGHT]: Moves the red caret point left or right of the current play position in steps of 1% of the recording: press [OK] when the caret is at the desired point to move playback to that position. [RED]: Move the current play position back 10 seconds. [YELLOW/BLUE]: Move the current play position back/forward respectively by a given amount of time. This amount defaults to 3 minutes. Every time the direction changes (going from [YELLOW] to [BLUE] or vice versa) the amount used halves. Successively using [YELLOW] and [BLUE], therefore, allows you to easily home in on a point in the playback you’re looking for – just as using REW and FFW would help you to find the start of a particular Boney M track on a compilation tape in a 1970s cassette recorder. Pressing any other key resets the amount of time to 3 minutes. Other keys during normal operation During normal operation and whether or not a now-and-next banner is being displayed (and assuming that a maximal key set is enabled – see the configuration section above) iGuide takes control of certain other keys: [0-9] and [OK]: As for now-and-next above, allows the user to enter a channel number and navigate there. [MUTE]: Mutes the sound or un-mutes it again. [OPT]: Enables or disables subtitles [SLOW]: Starts playing the last played recording from its last-viewed position. v2.0 user guide Page 24 Edit Mode There are a number of circumstances in which things need to be edited – EPG View names, pattern titles and keywords, for example. At these times iGuide enters Edit Mode, allowing text to be entered via the remote control. Text is entered using the number keys in a system similar to that of a mobile phone. Pressing a number key repeatedly cycles through the following characters: 1 2 3 4 5 6 7 8 9 0 PERIOD, COMMA, DASH, QUOTE, ‘(‘, ‘)’, ‘$’, ‘£’, ‘!’, ‘1’ ‘A’, ‘B’, ‘C’, ‘2’ ‘D’, ‘E’, ‘F’, ‘3’ ‘G’, ‘H’, ‘I’, ‘4’ ‘J’, ‘K’, ‘L’, ‘5’ ‘M’, ‘N’, ‘O’, ‘6’ ‘P’, ‘Q’, ‘R’, ‘S’, ‘7’ ‘T’, ‘U’, ‘V’, ‘8’ ‘W’, ‘X’, ‘Y’, ‘Z’, ‘9’ SPACE, ‘*’, ‘?’, DOUBLE-QUOTE, ‘\’, ‘|’, ‘[‘, ‘]’ ‘0’ As with some mobile phones, pausing a short period forces the cursor to move on one character, so multiple characters from the same key can be entered. For example, to produce the letters ‘C’ and ‘A’ for the word ‘CAR’, press the [2] key three times in quick succession for the letter ‘C’ and then pause. After a short period the cursor will move forward one space, allowing you to press the [2] key again to produce the letter ‘A’. Other key actions are available in edit mode: [RED]: Change case from lower to upper or vice versa [GREEN]: Delete one character [YELLOW]: Clear the line completely [OK]: Finish editing and save the result [EXIT]: Finish editing but don’t save the result v2.0 user guide Page 25 iGuideSMS Quick Guide: iGuide provides a mechanism to allow timers to be set remotely via SMS text. This requires that a mobile phone with an RS232 GSM modem interface be attached to the Toppy’s serial port, and that the iGuideSMS companion TAP – bundled with iGuide – be running. To install iGuideSMS simply place the TAP in the /ProgramFiles/Auto Start directory. Pressing [RECALL] (or another, user-defined key) will bring up a configuration screen for iGuideSMS where the options defined below can be set, and information about any attached phone can be seen. Configuring the Phone To use iGuideSMS find an appropriate mobile phone with a GSM modem and an RS232 serial cable interface: currently the Nokia 6310 and Siemens ME45 have been tested. Enable the phone with an appropriate SIM card – a PAYG tariff supporting cheap text messaging is best. Connect the phone to the serial port using the manufacturer’s approved RS232 cable. Ensure that hardware flow control is disabled. Enter the config screens and find the ‘iGuideSMS ’ option: this should tell you that a phone is attached. Press [OK] to bring up a data screen concerning the attached phone – make, model, charge, baud and master number. Master Number The setting of a Master number allows iGuideSMS to inform the Toppy’s owner if a text has been received from an unknown phone by sending appropriate information to the master number when such a text is received. To enable a master number, create an address book entry on the phone’s SIM card called ‘Master’, and assign this an appropriate phone number – for example, the number of the main user’s mobile phone. In the iGuideSMS configuration screen select the ‘CALL’ option and choose one of: ‘no-one’ (received texts are processed silently) ‘originator’ (responses to received texts are sent to the text’s originating phone) ‘master’ (responses are sent to the number created for ‘Master’ above) ‘originator and master’ (responses are sent to both originator and master) Texting a Timer Request Text messages sent to the connected phone need to include enough information for iGuide to deduce the action to be taken. Include in the SMS message some or all of the following pieces of information– it’s likely that the programme will be identifiable from only a subset of these – separated by a period followed by a space (‘. ’). Title: the name of the show, excluding punctuation. Channel: the name of the channel, or a synonym for it as defined in the iguide.syn file. v2.0 user guide Date: Page 26 the date of the broadcast, in the form dd/mm/yyyy or dd/mm. This could also be one of: today, tomorrow, monday, tuesday, wednesday, thursday, friday, saturday, sunday; or an abbreviation of one of those terms. Note that weekday names are assumed to refer to days beyond today – if today were Tuesday, then ‘tue’ would refer to a week’s time. Note also that these keywords need to be expressed in English, not the language of the currently active EPG view. Time: a time (HHMM) or time period (HHMM-HHMM) which will coincide with the required programme. A number of flags can also be added, as single characters terminated with a period and a space: P: create a series link pattern for the programme, when found. A: create separate timers for all events matching D: delete the timer if it exists, rather than creating a timer if it doesn’t Examples: ‘Today. Doctor Who. BBC3’ ‘Blue Peter. Wed. CBBC’ ‘ITV2. 23/11. 2130-2200’ Division of Labour Earlier versions of iGuide included the iGuideSMS functionality in the main TAP, so why farm it out to a companion? The basic rationale is this: iGuideSMS deals with receiving SMS messages from the attached phone, communicating messages to other TAPs and sending messages out again. It doesn’t care about the content of those messages. iGuide analyses any message it receives from iGuideSMS, acts upon it and returns an appropriate response to iGuideSMS to be sent back. By splitting the functionality into two, iGuideSMS can easily also provide SMS messaging services to other TAPs. v2.0 user guide Page 27 The Support Files iGuide requires a number of support files to aid its configuration. Some are compulsory, others are not. If a compulsory file does not exist one will be created. All exist in the same directory as the iGuide TAP or, just to make it neater, in an iguide directory which is itself in the same directory as the iGuide TAP, if one exists. Configuration files are human-editable, but a bit esoteric: where it’s useful, they are described more fully in sections below. The following files may be found: iguide.igc: basic configuration data including channel groups, EPG views and options selections (see below) iguide.igr: a list of the current recordings and timers xxxxx.epg: a list of the current EPG data, updated automatically overnight or created through the configuration screen, for channel xxxxx. These files are found in the iguide/epg directory iguide.syn: a list of channel names, and synonyms for those names, used by iGuideSMS as described above. This can be edited to change/add synonyms and channels. xxxxx.skn & xxxxx.mcf: skin files defining colours (see below) and background image (in the case of .skn files only). On start up iGuide will try to load iguide.skn and, failing that, iguide.mcf. .mcf skin files are in a standard MyStuff format; iGuide tries to make best use of the colours in these files by mapping entries onto its own requirements. xxxxx.igs: multiple language files holding date-time representations and iGuide’s strings in appropriate languages: english.igs, cymraeg.igs, polski.igs and norsk.igs are provided as standard. Other languages can be added by creating new .igs files in the same format; make sure exactly the same number of strings are provided, and that the file ends with the string “EOF”. xxxxx.mp3: All valid MP3 files with a .mp3 extension in the iguide directory will be played in turn by iGuide as background music; if you don’t want background music, delete all .mp3 files from the iguide directory. Music is provided for use with iGuide in the zipfile at http://www.shinyford.co.uk/toppy/iguide_music.zip. This music is copyright Kevin MacLeod2 and licensed under Creative Commons Attribution 2.03,4. logo.dat: channel logos as created by the UK Timers logo TAP. cglogo.dat: bespoke logos for e.g. the channel groups, in the same format as logo.dat. 2 3 4 http://incompetech.com http://creativecommons.org/licenses/by/2.0/ I’d also add Oscar Peterson’s rendition of the Girl from Ipanema if you have a copy to hand. It rocks. (Well, jazzes.) v2.0 user guide Page 28 The iguide.igc configuration file A typical .igc may have the following content: 108| NAVIG|0|full page| PADBEFORE|2|3 mins| PADAFTER|3|5 mins| NAN_TIME|5|10 secs| KEEP_REC|0|30 days| RT_MODE|1|apart| EPG_W|4|180 mins| KEY_SET|1|maximal| PAGESZ|0|7| RCONTIG|0|together| ALPHA|0|by time| SUMGMTOFF|13|+1| WINGMTOFF|12|0| MIS|0|no| SMS_RESP|3|originator and iGuideSMS master| SMS_ON|0|no| USE_OK|0|no| BACKGR|1|iGuide/broadcast| THUMBS|1|yes| HOMEIN|0|increasingly small| EOF| Nic's EPG| !ALL!|3|REDHOTTV|TalkSport|Smile TV| Nic's EPG|english|1|18|BBC ONE|BBC TWO|BBC THREE| BBC FOUR|CBeebies|BBC Radio 4|BBC 7|ITV1|ITV2|ITV3|ITV4|CITV| five|SKY THREE|Channel 4|E4|More 4|FilmFour| Sam's EPG|english|2|2|CBeebies|CITV| EOF| 5| All channels|1|*| All BBC channels|2|*BBC*|Cbeebies| All ITV channels|1|*ITV*| Channel Four group|4|Channel 4|E4|More 4|Film4| Channel Five group|1|Five*| BBC ONE|1|/Data Files/Dr Who/Doctor Who||32|1080|1440|16| EOF| clouds.skn| The iguide.epc file can be edited, but its structure is not very obvious, so let’s take each block in turn: Block 1: version identifier 108| This is the version identifier for the configuration file. As iGuide develops, more and different information needs to be stored in the configuration file, and so the version number goes up. iGuide is aware of these changes and will load earlier versions of configuration files happily should you upgrade. v2.0 user guide Page 29 Block 2: current options settings NAVIG|0|full page| PADBEFORE|2|3 mins| PADAFTER|3|5 mins| NAN_TIME|5|10 secs| KEEP_REC|0|30 days| RT_MODE|1|apart| EPG_W|4|180 mins| KEY_SET|1|maximal| PAGESZ|0|7| RCONTIG|0|together| ALPHA|0|by time| SUMGMTOFF|13|+1| WINGMTOFF|12|0| MIS|0|no| SMS_RESP|3|originator and iGuideSMS master| SMS_ON|0|no| USE_OK|0|no| BACKGR|1|iGuide/broadcast| THUMBS|1|yes| HOMEIN|0|increasingly small| EOF| This is the current set of selections for iGuide’s options. Each option entry has three settings: an identifier name; the current value of the option, as set by the user; and a description of that value’s meaning, in the context of the option. This latter is not really necessary, but it does make the options more human-readable. The final EOF marks the end of the options list. Block 3: current EPG view Nic's EPG| This specifies the name of the EPG View currently being used as the default. Block 4: Freeview Line-Up’s hidden channels !ALL!|3|REDHOTTV|TalkSport|Smile TV| This block specifies the the channels that are hidden in the Freeview Line-Up EPG view, and therefore unavailable to any EPG view. Block 5: EPG view definitions Nic's EPG|english|1|18|BBC ONE|BBC TWO|BBC THREE|BBC FOUR|CBeebies|BBC Radio 4|BBC 7|ITV1|ITV2|ITV3|ITV4|CITV|five|SKY THREE|Channel 4|E4|More 4|FilmFour| Sam's EPG|english|2|2|CBeebies|CITV| EOF| The next block specifies the EPG Views, and terminates the list with the string “EOF” – don’t delete this or it’ll get very confused. Each EPG View is defined as: name|language|id|number of channels|channel 0 name|…|channel N name| v2.0 user guide Page 30 Block 6: Channel group definitions 5| All channels|1|*| All BBC channels|2|*BBC*|Cbeebies| All ITV channels|1|*ITV*| Channel Four group|4|Channel 4|E4|More 4|Film4| Channel Five group|1|Five*| This block specifies the channel groups, being groups of channels across which a series link pattern could match. A channel is said to belong to a channel group if its name matches one of a number of patterns attached to that group; so, BBC channels as defined above are all channels with BBC somewhere in the name, or the Cbeebies channel; ITV channels just have ITV in the name; and so on. The channel groups defined in the example here are the default groups: if no iguide.epc file exists, these channel groups are defined automatically. Note that if an iguide.epc file does exist, but contains no channel group definitions, then only “All channels” is created by default. The first integer (5 above) is the number of groups in total. Following lines define a group thus: group name|number of patterns|pattern 0|…|pattern N| Block 7: Series link pattern definitions BBC ONE|1|/Data Files/Dr Who/Doctor Who||32|1080|1440|16| EOF| This block specifies the series-link patterns for each channel or channel group. One channel/group per line, the block terminated again with an “EOF” string. Each line has the following format: channel/group name|number of patterns|patterns Each pattern has the following format: programme title pattern|keywords|integer representing days|start time|end time| unique value The start time and end time in the pattern line above are the number of minutes since the start of a day: 1080 = 6.00pm, 1440 = midnight. Note that the programme title pattern may contain a ‘path’ like portion at the beginning. If it exists, this specifies the folder into which iGuide will move successfully recorded programmes matching the pattern. If no path-like portion exists, the recorded programme will remain in /Data Files. Block 8: current skin file clouds.skn| The name of the file containing the current skin definition – see below. v2.0 user guide Page 31 The iguide.skn configuration file The iguide.skn file consists of 13 lines separated by commas or whitespace: Background image Bar colour Highlight colour on bar Bar colour when selected Highlight colour on bar when selected Bar colour when selected for movement Text colour on bar Text colour on selected bar Text colour against background above the bars Text colour against background below the bars A ‘red’ colour for programmes that are recording A ‘blue’ colour for programmes that are being watched Background colour in the absence of a background image The background image line can be one of: NONE: there is no background image, so use the background colour instead XXXXXX.JPG: a jpeg image to display as background, found in the same directory as the skin file. All other lines define colours. Each can be one of: RRR,GGG,BBB: three integers below 256 defining the red, green and blue components of the on-screen colour. CCCCC: a single integer with a high bit set (0x8000) representing the RGB8888 encoding of the colour #RRGGBB: a hex number for the colour, where RR, GG and BB are two-digit hex values for the red, green and blue components. If you spot any problems or bugs with iGuide v2.0, or have any suggestions for improvements or future features, please let me know. [email protected] Many thanks. © Nic Ford, March 2008 Offered as freeware without warranty of any kind.