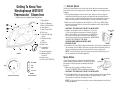
1
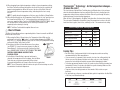
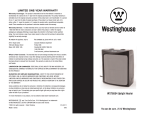
LIMITED ONE-YEAR WARRANTY
Warranty Coverage: This product is warranted to be free from defects in materials or workmanship
for a period of one (1) year from the original purchase date. This product warranty is extended only
to the original consumer purchaser of the product and is not transferable. For a period of one (1)
year from the date of original purchase of the product, our Repair Center will, at its option, either (1)
repair the product or (2) replace the product with a reconditioned comparable model. These remedies
are the purchaser's exclusive remedies under this warranty.
Warranty Service: To obtain warranty service, you must call our warranty service number at
1-800-233-9054 for return instructions on how to deliver the product, in either the original packaging
or packaging affording an equal degree of protection to the Repair Center specified below. You
must enclose a copy of your sales receipt or other proof of purchase to demonstrate eligibility for
warranty coverage.
To return the appliance, ship to:
To contact us, please write to, call, or email:
ATTN: Repair Center
708 South Missouri Street
Macon, MO 63552 USA
Consumer Relations Department
PO Box 7366
Columbia, MO 65205-7366 USA
Phone: 1-800-233-9054
Email: [email protected]
Thermocolor ™ Steam Iron
What Is Not Covered: This warranty does not cover damage resulting from misuse, accident,
commercial use, improper service or any other damage caused by anything other than defects in
material or workmanship during ordinary consumer use. This warranty is invalid if the serial number
has been altered or removed from the product. This warranty is valid only in the United States
and Canada.
LIMITATION ON DAMAGES: THERE SHALL BE NO LIABILITY FOR ANY INCIDENTAL OR
CONSEQUENTIAL DAMAGES FOR BREACH OF ANY EXPRESS OR IMPLIED WARRANTY OR
CONDITION ON THIS PRODUCT.
DURATION OF IMPLIED WARRANTIES: EXCEPT TO THE EXTENT PROHIBITED BY APPLICABLE LAW,
ALL IMPLIED WARRANTIES AND CONDITIONS, INCLUDING, WITHOUT LIMITATION, IMPLIED
WARRANTIES AND CONDITIONS OF MERCHANTABILITY AND FITNESS FOR A PARTICULAR
PURPOSE OR USE ON THIS PRODUCT ARE LIMITED IN DURATION TO THE DURATION OF THIS
WARRANTY.
Some jurisdictions do not allow the exclusion or limitation of incidental or consequential damages, or
allow limitations on how long an implied warranty lasts, so the above limitations or exclusions may
not apply to you. This warranty gives you specific legal rights and you may have other rights under
the laws of your jurisdiction.
WST5017
For more information on our products, visit our website: www.maxim-toastmaster.com.
WESTINGHOUSE, and “YOU CAN BE SURE...IF IT’S WESTINGHOUSE” are trademarks of
WESTINGHOUSE ELECTRIC CORPORATION and used under license.
©2006 All rights reserved.
Made in China
P/N 61863
4/06
As the temperature changes...So does the color!
IMPORTANT SAFEGUARDS
When using your Iron, basic safety precautions should always be followed, including
the following:
1. Read all instructions.
2. Use iron only for its intended use.
3. To protect against a risk of electric shock, do not immerse the Iron in water or
other liquids.
4. The Iron should always be turned to “min” position before plugging or unplugging
from outlet. Never yank cord to disconnect from outlet; instead, grasp plug and
pull to disconnect.
5. Do not allow cord to touch hot surfaces. Let iron cool completely before putting
away. Loop cord loosely around iron when storing.
6. Always disconnect iron from electrical outlet when filling with water or emptying
and when not in use.
7. Do not operate iron with a damaged cord or if the Iron has been dropped or
damaged. To avoid the risk of electric shock, do not disassemble the Iron.
Incorrect reassembly can cause a risk of electric shock when the Iron is used.
Contact Consumer Service for examination and repair.
8. Close supervision is necessary for any appliance being used by or near children.
Do not leave iron unattended while connected or on an ironing board.
9. Burns can occur from touching hot metal parts, hot water, or steam. Use
caution when you turn a steam iron upside down -- there may be hot water
in the Water Tank.
2. Filling the Water Tank: Place the Iron in the horizontal position (on its Soleplate).
Using the Filler Cup provided, slowly pour water through the Water Fill Opening
until the Water Tank is filled to the Maximum Water Level Line; DO NOT
OVERFILL. (See FIGURE 5.)
IMPORTANT: Use tap water or distilled water only. Do not use chemically
descaled water or any other liquids. DO NOT put any chemical cleaning agents
or solvents into the Water Tank.
3. With the Water Tank full, stand the Iron in the vertical position (on its Heel Rest)
on a heat resistant surface and plug into a 120V outlet. An audible beep will sound
and the Water Tank will glow blue.
4. Turn the Temperature Control Dial to the “max” (RED) setting. The red Thermostat
Light will illuminate, indicating that the Iron is heating. Once the Iron has reached
the set temperature, a final audible beep will sound and the red Thermostat Light
will go off, indicating that the Iron is ready for use.
5. Hold the Iron horizontally over a basin or bowl, and turn the Steam Control Dial to
the “ ” position -- continue to hold the Steam Control Dial in this position until
the Water Tank is empty. Water and steam will flush the scale and dust through
the Soleplate and into the basin.
CAUTION: AVOID COMING IN CONTACT WITH ESCAPING STEAM.
NOTE: To prevent Auto Shut-Off, gently move the Iron back and forth while
self-cleaning.
6. When the Water Tank is empty, release the Steam Control Dial and turn it to the
“X” (no steam) position. Turn the Temperature Control Dial to the “min” position
and unplug the Iron. Stand the Iron back in the vertical position (on its Heel Rest)
and allow it to cool completely before storing.
Anti-Scale
SPECIAL INSTRUCTIONS
1. To avoid a circuit overload, do not operate another high wattage appliance on the
same circuit.
2. If an extension cord is absolutely necessary, a 15-ampere cord should be used.
Cords rated for less amperage may overheat. Care should be taken to arrange the
cord so that it cannot be pulled or tripped over.
This Iron features an anti-scale agent that helps prevent the build-up of scale.
CAUTION: To prevent damage to the Iron or the Ceramic Soleplate, never use a
descaling solution.
Storing the Iron
Remove the cord from the outlet by grasping the plug -- NEVER pull on the cord.
Empty the Water Tank after each use, (see EMPTYING THE WATER TANK). Allow the
Iron to COOL COMPLETELY before storing. To protect the Ceramic Soleplate, stand
the Iron in an upright position on its Heel Rest. Wrap the cord loosely around the base
of the Iron.
SAVE THESE INSTRUCTIONS
For Household Use Only
1
10
USER MAINTENANCE INSTRUCTIONS
This appliance requires little maintenance. It contains no user serviceable parts. Do
not try to repair it yourself. Any servicing requiring disassembly must be performed
by a qualified appliance repair technician.
Emptying the Water Tank
The Water Tank should be emptied after each use.
1. When finished ironing, turn the Temperature Control Dial to the
“min” position; turn the Steam Control Dial to the “X” (no
steam) position, and unplug the Iron.
2. While the Iron is still warm, hold it over a sink and turn upside
down, allowing water to drain from the Water Fill Opening (see
FIGURE 10).
3. Turn the Iron back to the horizontal position. Press the Blast of
Steam and Spray Buttons to release any water (see FIGURE 11).
The warmth of the Iron should dry out any remaining water.
CAUTION: AVOID COMING IN CONTACT WITH WATER OR
ESCAPING STEAM.
FIGURE 10
CAUTION: Unplug the Iron from the electrical outlet and allow it to cool completely
before cleaning and storing. Never immerse the Iron in water or any other liquid.
NOTE: Do not put any chemical cleaning agents or solvents in the Water Tank, or on
any part of the Iron.
1. Moisten a soft cloth with a dab of vinegar to remove spots from the Ceramic
Soleplate. Take care not to scratch the Soleplate.
CAUTION: Never use scouring pads or abrasive cleaners on the Ceramic
Soleplate, as this may scratch the surface.
2. Wipe the outside surfaces of the Iron with a damp cloth. If necessary, use a small
amount of mild detergent to clean.
3. Before using again, preheat and move the iron over an old cloth several times to
remove any residue from the Ceramic Soleplate.
Self-Clean Function
It is advised to use the Self-Clean function after every 5 uses to prevent harmful
mineral build-up that can clog the Iron and prevent proper heating and steaming.
1. With the Iron unplugged, turn the Temperature Control Dial to the “min” position
and the Steam Control Dial to the “X” (no steam) position. Make sure that the Iron
has cooled completely.
CAUTION: IF THE IRON IS HOT, DO NOT FILL WITH WATER.
9
CAUTION HOT SURFACES: This appliance generates heat and escaping steam during
use. Proper precautions must be taken to prevent the risk of burns, fires or other
injury to persons or damage to property.
1. All users of this appliance must read and understand this Owner’s Manual before
operating or cleaning this appliance.
2. The cord to this appliance should be plugged into a 120V AC electrical outlet only.
3. If this appliance begins to malfunction during use, immediately unplug the cord. Do
not use or attempt to repair the malfunctioning appliance.
4. Do not leave this appliance unattended during use.
Polarized Plug
This appliance has a polarized plug (one blade is wider than the other). To reduce the
risk of electric shock, this plug is intended to fit into a polarized outlet only one way. If
the plug does not fit fully in the outlet, reverse the plug. If it still does not fit, contact a
qualified electrician. Do not attempt to modify the plug in any way.
FIGURE 11
Care and Cleaning
ADDITIONAL IMPORTANT SAFEGUARDS
Electric Power
If the electrical circuit is overloaded with other appliances, your appliance may
not operate properly. It should be operated on a separate electrical circuit from
other appliances.
Electrical Specifications
120V ~ 60Hz 1400W
Auto Shut-Off
For added safety, the Iron will shut off automatically when either of the following
instances occurs:
• The Iron is left standing in the vertical position (on its Heel Rest) for more than
15 minutes.
• The Iron is left in the horizontal position (on its Soleplate) for more than 30 seconds.
When the Iron switches into Auto Shut-Off mode, the green Auto Shut-Off Light will
illuminate and will flash until the Iron is moved or unplugged.
2
Getting To Know Your
Westinghouse WST5017
Thermocolor™ Steam Iron
Product may vary slightly from illustrations.
1. Spray Nozzle
2. Water Fill Opening
3. Blast of Steam Button
4. Spray Button
5. Steam Control Dial
6. Pivot Cord
7. Auto Shut-Off Light
(green)
8. Thermostat Light
(red)
9. Heel Rest
10. Water Tank
11. Temperature
Control Dial
12. Ceramic Soleplate
13. Maximum Water
Level Line
14. Steam Vents
15. Filler Cup (P/N 50759)
FIGURE 1
X
NO STEAM
1
LOW
2
HIGH
Self-Clean
FIGURE 2:
Temperature Control Dial
FIGURE 3:
Steam Control Dial
3
Vertical Steam
The Blast of Steam Button can be used in the vertical position to remove wrinkles
from clothes while on the hanger, and to freshen the appearance of hanging curtains
or drapes.
1. When steaming drapes or curtains on the rods, make sure there is adequate
ventilation behind the fabric to prevent moisture build-up and mildew. Always
make sure there is nothing behind the fabric that may be damaged by the steam.
Before steaming clothes, check that pockets, turn-ups, and cuffs are empty.
2. Make sure that the Temperature Control Dial is set to the “max” (RED) setting
before releasing vertical blasts of steam. For maximum results, keep the Water
Tank at least half full.
CAUTION: IF THE IRON IS HOT, DO NOT FILL WITH WATER.
3. Hold the Iron upright so that the Soleplate is 7-15 inches
Blast of Steam
Button
(18-38 cm) away from the garment or material. Press the
Blast of Steam Button once, then release (see FIGURE 8). It
may be necessary to press the Blast of Steam Button 2-3
times successively to release the initial burst. DO NOT HOLD
THE BLAST OF STEAM BUTTON DOWN.
CAUTION: AVOID COMING IN CONTACT WITH
ESCAPING STEAM.
FIGURE 8
4. As the Blast of Steam Button is pressed and steam is released, the temperature of
the Iron drops; thus the Water Tank color may cycle down momentarily. Allow at
least 4 seconds between blasts of steam to allow the Iron to regain heat.
NOTE: The red Thermostat Light will continue to cycle off and on during use as
the Iron maintains the desired temperature.
Spray Button
Spray Button
Use the Spray Button for moistening dry, difficult fabrics,
and for handling stubborn wrinkles. The Spray function is
Spray Nozzle
also handy to moisten creases accidentally ironed into
the fabric.
1. Make sure there is water in the Water Tank (see
FIGURE 9
FILLING THE WATER TANK for detailed instructions).
CAUTION: IF THE IRON IS HOT, DO NOT FILL WITH WATER.
2. Aim the Spray Nozzle at the desired target, and then firmly press the Spray Button
(see FIGURE 9). It may be necessary to press the Spray Button 2-3 times
successively to release the initial spray of water.
NOTE: The Spray function can be used on any heat setting and does not affect the
ironing temperature.
8
9. When changing from a higher temperature setting to a lower temperature setting,
the Water Tank will cycle down through the colors until the Iron has cooled to the
proper ironing temperature. When this occurs, the color of the Water Tank will
correspond with the new temperature setting, indicating that the Iron is ready
for use.
NOTE: To quickly drop the temperature of the Iron, press the Blast of Steam Button.
10. When finished ironing, turn the Temperature Control Dial to the “min” position; turn
the Steam Control Dial to the “X” (no steam) position, and unplug the Iron. If
necessary, empty the Water Tank (see USER MAINTENANCE INSTRUCTIONS). Stand
the Iron back in the vertical position (on its Heel Rest) and allow it to cool
completely before cleaning or storing.
NOTE: The Water Tank should be emptied after each use.
Thermocolor™ Technology: As the temperature changes…
So does the color!
This Iron features a lighted Water Tank that glows in different colors to let you know
when the desired temperature has been reached. When the Iron is heating up or the
temperature setting has been adjusted, the Water Tank will cycle through the colors,
indicating changes in actual ironing temperature.
When the Iron is first plugged in, the Water Tank glows blue, the lowest heat setting.
The color-coded Temperature Control Dial shows the progression in color as the Iron
heats from blue to green, then to lilac, and finally to red -- the maximum heat setting.
Fabric/Temperature Setting Guide
FABRIC
Blast of Steam
The Blast of Steam Button releases a penetrating blast of steam to smooth out difficult
wrinkles and to iron faster.
1. When using the Blast of Steam feature, the Temperature Control Dial must be
positioned to at least the “ ” symbol -- located midway between the GREEN (• •)
and LILAC (• • •) settings. For best results, use the “max” (RED) temperature setting
and keep the Water Tank at least half full.
Blast of Steam
Button
2. Firmly press the Blast of Steam Button once, then release
(see FIGURE 7). It may be necessary to press the Blast of
Steam Button 2 -3 times successively to release the initial
burst. DO NOT HOLD THE BLAST OF STEAM BUTTON DOWN.
CAUTION: AVOID COMING IN CONTACT WITH
ESCAPING STEAM.
3. As the Blast of Steam Button is pressed and steam is
FIGURE 7
released, the temperature of the Iron drops; thus the Water
Tank color may cycle down momentarily. Allow at least
4 seconds between Blasts of Steam to allow the Iron to regain heat.
NOTE: The red Thermostat Light will continue to cycle off and on during use as the
Iron maintains the desired temperature.
7
TEMPERATURE
COLOR
min
Blue
Nylon, Acrylics, Polyester
•
Blue
Wool, Polyester blends
••
Green
Cotton, Linen
•••
Lilac
Cotton, Linen
max
Red
Delicate, Silk
FIGURE 4
Ironing Tips
• For best results, check garment labels for the temperature and steam setting
recommended by the fabric manufacturer.
• If you are unsure of a garment’s fabric content, start on a low setting and test the
Iron on an area of the garment that does not show, such as a seam. Gradually
increase the heat setting until wrinkles remove without damaging the fabric.
• To freshen up garments made of velvet, felt, suede or velour, hold the steaming Iron
horizontally 2 inches (5 cm) above the fabric for a gentle steaming. Make sure the
Iron does not come in contact with the fabric.
• To prevent shine, iron dark garments or those made of silk, acetate or rayon
inside out.
• For quick and easy reference, a condensed fabric guide is imprinted on the Heel Rest
of the Iron (see illustration below).
4
OPERATING INSTRUCTIONS
Using as a Steam Iron
The Iron can be used on the dry setting with or without water in the Water Tank.
However, it is best to avoid having water in the Water Tank while dry ironing.
1. Turn the Temperature Control Dial to the “min” position and the Steam Control
Dial to the “X” (no steam) position.
2. Stand the Iron in the vertical position (on its Heel Rest) on a heat resistant surface
and plug into a 120V outlet. An audible beep will sound and the Water Tank will
glow blue.
3. Turn the Temperature Control Dial to the desired setting (See FIGURE 4 for basic
fabric/temperature guidelines or check the condensed fabric guide imprinted on
the Heel Rest of the Iron.) The red Thermostat Light will illuminate, indicating that
the Iron is heating.
NOTE: For best results, check garment labels for the temperature setting
recommended by the fabric manufacturer.
4. As the Iron is heating, the Water Tank will cycle through each color until the
desired setting is reached. Once the Iron has reached the set temperature, an
audible beep will sound and the red Thermostat Light will go off, indicating that
the Iron is ready for use.
NOTE: The red Thermostat Light will continue to cycle off and on during use as
the Iron maintains the desired temperature.
5. When changing from a higher temperature setting to a lower temperature setting,
the Water Tank will cycle down through the colors until the Iron has cooled to the
proper ironing temperature. When this occurs, the color of the Water Tank will
correspond with the new temperature setting, indicating that the Iron is ready
for use.
6. When finished ironing, turn the Temperature Control Dial to the “min” position
and unplug the Iron. Stand the Iron back in the vertical position (on its Heel Rest)
and allow it to cool completely before cleaning or storing.
WARNING: Never fill the Water Tank while the Iron is still hot.
When steam ironing, the Temperature Control Dial must be positioned to at least the
“ ” symbol -- located midway between the GREEN (• •) and LILAC (• • •) settings.
1. Turn the Temperature Control Dial to the “min” position and the Steam Control
Dial to the “X” (no steam) position.
2. Make sure that the Iron is unplugged and has cooled completely before filling.
CAUTION: IF THE IRON IS HOT, DO NOT FILL WITH WATER.
3. Filling the Water Tank: Place the Iron in the horizontal
position (on its Soleplate). Using the Filler Cup
provided, slowly pour water through the Water Fill
Opening until the Water Tank is filled to the Maximum
Water Level Line; DO NOT OVERFILL. (See FIGURE 5.)
IMPORTANT: Use tap water or distilled water only.
MAX
Do not use chemically descaled water or any
FIGURE 5
other liquids.
4. With the Water Tank full, stand the Iron in the vertical position (on its Heel Rest)
on a heat resistant surface and plug into a 120V outlet. An audible beep will sound
and the Water Tank will glow blue.
5. Turn the Temperature Control Dial to the desired setting, between the “ ”
and “ ” symbols. (See FIGURE 4 for basic fabric/temperature guidelines or
check the condensed fabric guide imprinted on the Heel Rest of the Iron.) The red
Thermostat Light will illuminate, indicating that the Iron is heating.
NOTE: For best results, check garment labels for the temperature setting
recommended by the fabric manufacturer.
6. As the Iron is heating, the Water Tank will cycle through each color until the
desired setting is reached. Once the Iron has reached the set temperature, an
audible beep will sound and the red Thermostat Light will go off, indicating that
the Iron is ready for use.
NOTE: The red Thermostat Light will continue to cycle off and on during use as
the Iron maintains the desired temperature.
Steam Control Dial
7. Turn the Steam Control Dial to the desired
setting: “X” = no steam, “1” = low, “2” = high
(see FIGURE 6).
NOTE: For optimum steam output, the
Temperature Control Dial should be set to the
“max” (RED) position.
CAUTION: AVOID COMING IN CONTACT WITH
FIGURE 6
ESCAPING STEAM.
8. Press the Blast of Steam and Spray Buttons as needed (see
the following sections for a complete description of these features).
5
6
Before First Use
1. Remove all packaging materials from the Ceramic Soleplate and the body of the
Iron. Unwind and straighten the power cord.
2. Flush the Steam Vents using the Self-Clean function (see USER MAINTENANCE
INSTRUCTIONS).
NOTE: When the Iron is used for the first time, you may notice a slight amount
of smoke; this is normal and will stop after a few minutes as the Iron continues
to heat.
Using as a Dry Iron
9. When changing from a higher temperature setting to a lower temperature setting,
the Water Tank will cycle down through the colors until the Iron has cooled to the
proper ironing temperature. When this occurs, the color of the Water Tank will
correspond with the new temperature setting, indicating that the Iron is ready
for use.
NOTE: To quickly drop the temperature of the Iron, press the Blast of Steam Button.
10. When finished ironing, turn the Temperature Control Dial to the “min” position; turn
the Steam Control Dial to the “X” (no steam) position, and unplug the Iron. If
necessary, empty the Water Tank (see USER MAINTENANCE INSTRUCTIONS). Stand
the Iron back in the vertical position (on its Heel Rest) and allow it to cool
completely before cleaning or storing.
NOTE: The Water Tank should be emptied after each use.
Thermocolor™ Technology: As the temperature changes…
So does the color!
This Iron features a lighted Water Tank that glows in different colors to let you know
when the desired temperature has been reached. When the Iron is heating up or the
temperature setting has been adjusted, the Water Tank will cycle through the colors,
indicating changes in actual ironing temperature.
When the Iron is first plugged in, the Water Tank glows blue, the lowest heat setting.
The color-coded Temperature Control Dial shows the progression in color as the Iron
heats from blue to green, then to lilac, and finally to red -- the maximum heat setting.
Fabric/Temperature Setting Guide
FABRIC
Blast of Steam
The Blast of Steam Button releases a penetrating blast of steam to smooth out difficult
wrinkles and to iron faster.
1. When using the Blast of Steam feature, the Temperature Control Dial must be
positioned to at least the “ ” symbol -- located midway between the GREEN (• •)
and LILAC (• • •) settings. For best results, use the “max” (RED) temperature setting
and keep the Water Tank at least half full.
Blast of Steam
Button
2. Firmly press the Blast of Steam Button once, then release
(see FIGURE 7). It may be necessary to press the Blast of
Steam Button 2 -3 times successively to release the initial
burst. DO NOT HOLD THE BLAST OF STEAM BUTTON DOWN.
CAUTION: AVOID COMING IN CONTACT WITH
ESCAPING STEAM.
3. As the Blast of Steam Button is pressed and steam is
FIGURE 7
released, the temperature of the Iron drops; thus the Water
Tank color may cycle down momentarily. Allow at least
4 seconds between Blasts of Steam to allow the Iron to regain heat.
NOTE: The red Thermostat Light will continue to cycle off and on during use as the
Iron maintains the desired temperature.
7
TEMPERATURE
COLOR
min
Blue
Nylon, Acrylics, Polyester
•
Blue
Wool, Polyester blends
••
Green
Cotton, Linen
•••
Lilac
Cotton, Linen
max
Red
Delicate, Silk
FIGURE 4
Ironing Tips
• For best results, check garment labels for the temperature and steam setting
recommended by the fabric manufacturer.
• If you are unsure of a garment’s fabric content, start on a low setting and test the
Iron on an area of the garment that does not show, such as a seam. Gradually
increase the heat setting until wrinkles remove without damaging the fabric.
• To freshen up garments made of velvet, felt, suede or velour, hold the steaming Iron
horizontally 2 inches (5 cm) above the fabric for a gentle steaming. Make sure the
Iron does not come in contact with the fabric.
• To prevent shine, iron dark garments or those made of silk, acetate or rayon
inside out.
• For quick and easy reference, a condensed fabric guide is imprinted on the Heel Rest
of the Iron (see illustration below).
4
Getting To Know Your
Westinghouse WST5017
Thermocolor™ Steam Iron
Product may vary slightly from illustrations.
1. Spray Nozzle
2. Water Fill Opening
3. Blast of Steam Button
4. Spray Button
5. Steam Control Dial
6. Pivot Cord
7. Auto Shut-Off Light
(green)
8. Thermostat Light
(red)
9. Heel Rest
10. Water Tank
11. Temperature
Control Dial
12. Ceramic Soleplate
13. Maximum Water
Level Line
14. Steam Vents
15. Filler Cup (P/N 50759)
FIGURE 1
X
NO STEAM
1
LOW
2
HIGH
Self-Clean
FIGURE 2:
Temperature Control Dial
FIGURE 3:
Steam Control Dial
3
Vertical Steam
The Blast of Steam Button can be used in the vertical position to remove wrinkles
from clothes while on the hanger, and to freshen the appearance of hanging curtains
or drapes.
1. When steaming drapes or curtains on the rods, make sure there is adequate
ventilation behind the fabric to prevent moisture build-up and mildew. Always
make sure there is nothing behind the fabric that may be damaged by the steam.
Before steaming clothes, check that pockets, turn-ups, and cuffs are empty.
2. Make sure that the Temperature Control Dial is set to the “max” (RED) setting
before releasing vertical blasts of steam. For maximum results, keep the Water
Tank at least half full.
CAUTION: IF THE IRON IS HOT, DO NOT FILL WITH WATER.
3. Hold the Iron upright so that the Soleplate is 7-15 inches
Blast of Steam
Button
(18-38 cm) away from the garment or material. Press the
Blast of Steam Button once, then release (see FIGURE 8). It
may be necessary to press the Blast of Steam Button 2-3
times successively to release the initial burst. DO NOT HOLD
THE BLAST OF STEAM BUTTON DOWN.
CAUTION: AVOID COMING IN CONTACT WITH
ESCAPING STEAM.
FIGURE 8
4. As the Blast of Steam Button is pressed and steam is released, the temperature of
the Iron drops; thus the Water Tank color may cycle down momentarily. Allow at
least 4 seconds between blasts of steam to allow the Iron to regain heat.
NOTE: The red Thermostat Light will continue to cycle off and on during use as
the Iron maintains the desired temperature.
Spray Button
Spray Button
Use the Spray Button for moistening dry, difficult fabrics,
and for handling stubborn wrinkles. The Spray function is
Spray Nozzle
also handy to moisten creases accidentally ironed into
the fabric.
1. Make sure there is water in the Water Tank (see
FIGURE 9
FILLING THE WATER TANK for detailed instructions).
CAUTION: IF THE IRON IS HOT, DO NOT FILL WITH WATER.
2. Aim the Spray Nozzle at the desired target, and then firmly press the Spray Button
(see FIGURE 9). It may be necessary to press the Spray Button 2-3 times
successively to release the initial spray of water.
NOTE: The Spray function can be used on any heat setting and does not affect the
ironing temperature.
8
USER MAINTENANCE INSTRUCTIONS
This appliance requires little maintenance. It contains no user serviceable parts. Do
not try to repair it yourself. Any servicing requiring disassembly must be performed
by a qualified appliance repair technician.
Emptying the Water Tank
The Water Tank should be emptied after each use.
1. When finished ironing, turn the Temperature Control Dial to the
“min” position; turn the Steam Control Dial to the “X” (no
steam) position, and unplug the Iron.
2. While the Iron is still warm, hold it over a sink and turn upside
down, allowing water to drain from the Water Fill Opening (see
FIGURE 10).
3. Turn the Iron back to the horizontal position. Press the Blast of
Steam and Spray Buttons to release any water (see FIGURE 11).
The warmth of the Iron should dry out any remaining water.
CAUTION: AVOID COMING IN CONTACT WITH WATER OR
ESCAPING STEAM.
FIGURE 10
CAUTION: Unplug the Iron from the electrical outlet and allow it to cool completely
before cleaning and storing. Never immerse the Iron in water or any other liquid.
NOTE: Do not put any chemical cleaning agents or solvents in the Water Tank, or on
any part of the Iron.
1. Moisten a soft cloth with a dab of vinegar to remove spots from the Ceramic
Soleplate. Take care not to scratch the Soleplate.
CAUTION: Never use scouring pads or abrasive cleaners on the Ceramic
Soleplate, as this may scratch the surface.
2. Wipe the outside surfaces of the Iron with a damp cloth. If necessary, use a small
amount of mild detergent to clean.
3. Before using again, preheat and move the iron over an old cloth several times to
remove any residue from the Ceramic Soleplate.
Self-Clean Function
It is advised to use the Self-Clean function after every 5 uses to prevent harmful
mineral build-up that can clog the Iron and prevent proper heating and steaming.
1. With the Iron unplugged, turn the Temperature Control Dial to the “min” position
and the Steam Control Dial to the “X” (no steam) position. Make sure that the Iron
has cooled completely.
CAUTION: IF THE IRON IS HOT, DO NOT FILL WITH WATER.
9
CAUTION HOT SURFACES: This appliance generates heat and escaping steam during
use. Proper precautions must be taken to prevent the risk of burns, fires or other
injury to persons or damage to property.
1. All users of this appliance must read and understand this Owner’s Manual before
operating or cleaning this appliance.
2. The cord to this appliance should be plugged into a 120V AC electrical outlet only.
3. If this appliance begins to malfunction during use, immediately unplug the cord. Do
not use or attempt to repair the malfunctioning appliance.
4. Do not leave this appliance unattended during use.
Polarized Plug
This appliance has a polarized plug (one blade is wider than the other). To reduce the
risk of electric shock, this plug is intended to fit into a polarized outlet only one way. If
the plug does not fit fully in the outlet, reverse the plug. If it still does not fit, contact a
qualified electrician. Do not attempt to modify the plug in any way.
FIGURE 11
Care and Cleaning
ADDITIONAL IMPORTANT SAFEGUARDS
Electric Power
If the electrical circuit is overloaded with other appliances, your appliance may
not operate properly. It should be operated on a separate electrical circuit from
other appliances.
Electrical Specifications
120V ~ 60Hz 1400W
Auto Shut-Off
For added safety, the Iron will shut off automatically when either of the following
instances occurs:
• The Iron is left standing in the vertical position (on its Heel Rest) for more than
15 minutes.
• The Iron is left in the horizontal position (on its Soleplate) for more than 30 seconds.
When the Iron switches into Auto Shut-Off mode, the green Auto Shut-Off Light will
illuminate and will flash until the Iron is moved or unplugged.
2
IMPORTANT SAFEGUARDS
When using your Iron, basic safety precautions should always be followed, including
the following:
1. Read all instructions.
2. Use iron only for its intended use.
3. To protect against a risk of electric shock, do not immerse the Iron in water or
other liquids.
4. The Iron should always be turned to “min” position before plugging or unplugging
from outlet. Never yank cord to disconnect from outlet; instead, grasp plug and
pull to disconnect.
5. Do not allow cord to touch hot surfaces. Let iron cool completely before putting
away. Loop cord loosely around iron when storing.
6. Always disconnect iron from electrical outlet when filling with water or emptying
and when not in use.
7. Do not operate iron with a damaged cord or if the Iron has been dropped or
damaged. To avoid the risk of electric shock, do not disassemble the Iron.
Incorrect reassembly can cause a risk of electric shock when the Iron is used.
Contact Consumer Service for examination and repair.
8. Close supervision is necessary for any appliance being used by or near children.
Do not leave iron unattended while connected or on an ironing board.
9. Burns can occur from touching hot metal parts, hot water, or steam. Use
caution when you turn a steam iron upside down -- there may be hot water
in the Water Tank.
2. Filling the Water Tank: Place the Iron in the horizontal position (on its Soleplate).
Using the Filler Cup provided, slowly pour water through the Water Fill Opening
until the Water Tank is filled to the Maximum Water Level Line; DO NOT
OVERFILL. (See FIGURE 5.)
IMPORTANT: Use tap water or distilled water only. Do not use chemically
descaled water or any other liquids. DO NOT put any chemical cleaning agents
or solvents into the Water Tank.
3. With the Water Tank full, stand the Iron in the vertical position (on its Heel Rest)
on a heat resistant surface and plug into a 120V outlet. An audible beep will sound
and the Water Tank will glow blue.
4. Turn the Temperature Control Dial to the “max” (RED) setting. The red Thermostat
Light will illuminate, indicating that the Iron is heating. Once the Iron has reached
the set temperature, a final audible beep will sound and the red Thermostat Light
will go off, indicating that the Iron is ready for use.
5. Hold the Iron horizontally over a basin or bowl, and turn the Steam Control Dial to
the “ ” position -- continue to hold the Steam Control Dial in this position until
the Water Tank is empty. Water and steam will flush the scale and dust through
the Soleplate and into the basin.
CAUTION: AVOID COMING IN CONTACT WITH ESCAPING STEAM.
NOTE: To prevent Auto Shut-Off, gently move the Iron back and forth while
self-cleaning.
6. When the Water Tank is empty, release the Steam Control Dial and turn it to the
“X” (no steam) position. Turn the Temperature Control Dial to the “min” position
and unplug the Iron. Stand the Iron back in the vertical position (on its Heel Rest)
and allow it to cool completely before storing.
Anti-Scale
SPECIAL INSTRUCTIONS
1. To avoid a circuit overload, do not operate another high wattage appliance on the
same circuit.
2. If an extension cord is absolutely necessary, a 15-ampere cord should be used.
Cords rated for less amperage may overheat. Care should be taken to arrange the
cord so that it cannot be pulled or tripped over.
This Iron features an anti-scale agent that helps prevent the build-up of scale.
CAUTION: To prevent damage to the Iron or the Ceramic Soleplate, never use a
descaling solution.
Storing the Iron
Remove the cord from the outlet by grasping the plug -- NEVER pull on the cord.
Empty the Water Tank after each use, (see EMPTYING THE WATER TANK). Allow the
Iron to COOL COMPLETELY before storing. To protect the Ceramic Soleplate, stand
the Iron in an upright position on its Heel Rest. Wrap the cord loosely around the base
of the Iron.
SAVE THESE INSTRUCTIONS
For Household Use Only
1
10
LIMITED ONE-YEAR WARRANTY
Warranty Coverage: This product is warranted to be free from defects in materials or workmanship
for a period of one (1) year from the original purchase date. This product warranty is extended only
to the original consumer purchaser of the product and is not transferable. For a period of one (1)
year from the date of original purchase of the product, our Repair Center will, at its option, either (1)
repair the product or (2) replace the product with a reconditioned comparable model. These remedies
are the purchaser's exclusive remedies under this warranty.
Warranty Service: To obtain warranty service, you must call our warranty service number at
1-800-233-9054 for return instructions on how to deliver the product, in either the original packaging
or packaging affording an equal degree of protection to the Repair Center specified below. You
must enclose a copy of your sales receipt or other proof of purchase to demonstrate eligibility for
warranty coverage.
To return the appliance, ship to:
To contact us, please write to, call, or email:
ATTN: Repair Center
708 South Missouri Street
Macon, MO 63552 USA
Consumer Relations Department
PO Box 7366
Columbia, MO 65205-7366 USA
Phone: 1-800-233-9054
Email: [email protected]
Thermocolor ™ Steam Iron
What Is Not Covered: This warranty does not cover damage resulting from misuse, accident,
commercial use, improper service or any other damage caused by anything other than defects in
material or workmanship during ordinary consumer use. This warranty is invalid if the serial number
has been altered or removed from the product. This warranty is valid only in the United States
and Canada.
LIMITATION ON DAMAGES: THERE SHALL BE NO LIABILITY FOR ANY INCIDENTAL OR
CONSEQUENTIAL DAMAGES FOR BREACH OF ANY EXPRESS OR IMPLIED WARRANTY OR
CONDITION ON THIS PRODUCT.
DURATION OF IMPLIED WARRANTIES: EXCEPT TO THE EXTENT PROHIBITED BY APPLICABLE LAW,
ALL IMPLIED WARRANTIES AND CONDITIONS, INCLUDING, WITHOUT LIMITATION, IMPLIED
WARRANTIES AND CONDITIONS OF MERCHANTABILITY AND FITNESS FOR A PARTICULAR
PURPOSE OR USE ON THIS PRODUCT ARE LIMITED IN DURATION TO THE DURATION OF THIS
WARRANTY.
Some jurisdictions do not allow the exclusion or limitation of incidental or consequential damages, or
allow limitations on how long an implied warranty lasts, so the above limitations or exclusions may
not apply to you. This warranty gives you specific legal rights and you may have other rights under
the laws of your jurisdiction.
WST5017
For more information on our products, visit our website: www.maxim-toastmaster.com.
WESTINGHOUSE, and “YOU CAN BE SURE...IF IT’S WESTINGHOUSE” are trademarks of
WESTINGHOUSE ELECTRIC CORPORATION and used under license.
©2006 All rights reserved.
Made in China
P/N 61863
4/06
As the temperature changes...So does the color!