1
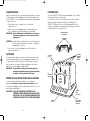
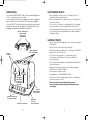
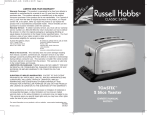
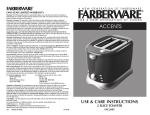
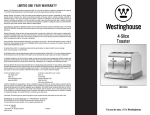
RH4T9379_IB_27-4-05
4/27/05 5:56 PM
Page 1
LIMITED ONE-YEAR WARRANTY
Warranty Coverage: This product is warranted to be free from defects in
materials or workmanship for a period of one (1) year from the original
purchase date. This product warranty is extended only to the original
consumer purchaser of the product and is not transferable. For a period of
one (1) year from the date of original purchase of the product, our Repair
Center will, at its option, either (1) repair the product or (2) replace the
product with a reconditioned comparable model. These remedies are the
purchaser's exclusive remedies under this warranty.
Warranty Service: To obtain warranty service, you must call our warranty
service number at 1-800-233-9054 for return instructions on how to deliver
the product, in either the original packaging or packaging affording an
equal degree of protection to the Repair Center specified below. You must
enclose a copy of your sales receipt or other proof of purchase to
demonstrate eligibility for warranty coverage.
To return the appliance, ship to:
ATTN: Repair Center
708 South Missouri Street
Macon, MO 63552 USA
To contact us, please write to, call, or email:
Consumer Relations Department
PO Box 7366
Columbia MO 65205-7366 USA
1-800-233-9054
E-mail:
[email protected]
What Is Not Covered: This warranty does not cover damage resulting
from misuse, accident, commercial use, improper service or any other
damage caused by anything other than defects in material or workmanship
during ordinary consumer use. This warranty is invalid if the serial number
has been altered or removed from the product. This warranty is valid only
in the United States and Canada.
LIMITATION ON DAMAGES: THERE SHALL BE NO LIABILITY FOR ANY
INCIDENTAL OR CONSEQUENTIAL DAMAGES FOR BREACH OF ANY
EXPRESS OR IMPLIED WARRANTY OR CONDITION ON THIS
PRODUCT.
DURATION OF IMPLIED WARRANTIES: EXCEPT TO THE EXTENT
PROHIBITED BY APPLICABLE LAW, ALL IMPLIED WARRANTIES AND
CONDITIONS, INCLUDING, WITHOUT LIMITATION, IMPLIED
WARRANTIES AND CONDITIONS OF MERCHANTABILITY AND
FITNESS FOR A PARTICULAR PURPOSE OR USE ON THIS PRODUCT
ARE LIMITED IN DURATION TO THE DURATION OF THIS WARRANTY.
Some jurisdictions do not allow the exclusion or limitation of incidental or
consequential damages, or allow limitations on how long an implied
warranty lasts, so the above limitations or exclusions may not apply to you.
This warranty gives you specific legal rights and you may have other rights
under the laws of your jurisdiction.
TOASTEC™
4 Slice Toaster
OWNER’S MANUAL
For more information on our products, visit our website: www.maxim-toastmaster.com.
P/N 60980
Printed in China
4/05 Rev1
RH4T9379
RH4T9379_IB_27-4-05
4/27/05 5:56 PM
Page 3
IMPORTANT SAFEGUARDS
When using electrical appliance, basic safety precautions should
always be followed, including the following:
1. Read all instructions before use.
2. Do not touch hot surfaces. Use handles or knobs.
3. To protect against electrical shock, do not immerse cord, plug, or
the appliance in water or other liquid.
4. Close supervision is necessary when any appliance is used
near children.
5. Unplug product from wall outlet when not in use and before
cleaning. Allow to cool thoroughly before putting on or taking off
parts and before cleaning.
6. Do not operate this or any appliance with a frayed or damaged
cord or plug or after the appliance malfunctions or has been
dropped or damaged in any manner. Contact Consumer Service.
7. The use of accessory attachments not recommended by the
appliance manufacturer may cause injuries.
GARANTIE LIMITÉE D'UN AN
Couverture : Le présent produit est garanti contre les pièces
défectueuses et les vices de fabrication pour une période de un (1) an à
compter de la date d'achat initiale. La présente garantie est offerte
seulement à l'acheteur initial et n'est pas transférable. Au cours de la
période d'un (1) an suivant la date d'achat initiale du produit, le centre de
réparation pourra, à son gré, choisir de 1) réparer le produit ou 2)
remplacer celui-ci par un modèle remis à neuf comparable. Ces recours
sont les seuls offerts à l'acheteur en vertu de la présente garantie.
Service de garantie: Pour obtenir un service de garantie, vous devez
composer le numéro de notre service de garantie au 1-800-233-9054 pour
des directives sur le mode de renvoi du produit, soit dans son emballage
original, soit dans un emballage offrant un degré de protection égal au
centre de réparation indiqué ci-dessous. Vous devez y inclure une copie
de votre reçu ou toute autre preuve d'achat afin de prouver votre
admissibilité à la couverture de la garantie.
Pour retourner le produit, veuillez l'expédier à :
Vous pouvez communiquer avec nous par la
poste, par téléphone ou par courrier
électronique aux coordonnées suivantes :
ATTN: Repair Center
708 South Missouri Street
Macon, MO 63552 USA
Consumer Relations Department
PO Box 7366
Columbia MO 65205-7366 USA
1-800-233-9054
Adresse de courrier électronique:
[email protected]
8. Do not use outdoors.
9. Do not let the cord hang over edge of table or counter, or touch
hot surfaces.
10. Do not place on or near a hot gas or electric burner, or in a
heated oven.
11. To disconnect, press the “CANCEL” Button(s), then remove plug
from wall outlet.
12. Do not use appliance for other than intended use.
13. Oversized foods, metal foil packages, or utensils must not
be inserted in a Toaster as they may involve a risk of fire or
electrical shock.
14. A fire may occur if Toaster is covered or touching flammable
material, including curtains, draperies, walls, and the like, when
in operation.
15. Do not attempt to dislodge food when Toaster is plugged in.
SAVE THESE INSTRUCTIONS
FOR HOUSEHOLD USE ONLY
Dommages non couverts : La présente garantie ne couvre pas les
dommages causés par le mauvais usage, les accidents, l'usage
commercial, le mauvais entretien ou par toute autre dommage occasionné
autrement que par la défectuosité des pièces ou les vices de fabrication
survenus dans le cadre de l'utilisation normale par l'acheteur. La présente
garantie n'est pas valide si le numéro de série a été modifié ou enlevé du
produit. Cette garantie n'est valide qu'aux États-Unis et au Canada.
LIMITATION DES DOMMAGES : AUCUNE RESPOSABILITÉ N'EST
ASSUMÉE QUANT À UN DOMMAGE ACCESSOIRE OU CONSÉCUTIF
DÉCOULANT DE LA VIOLATION D'UNE GARANTIE OU CONDITION
EXPRESSE OU IMPLICITE À L'ÉGARD DE CE PRODUIT.
DURÉE DES GARANTIES IMPLICITES : SAUF DANS LA MESURE OÙ
ELLES SONT INTERDITES PAR LES LOIS APPLICABLES, TOUTES LES
GARANTEIS OU CONDITIONS IMPLICITES, Y COMPRIS, NOTAMMENT,
TOUTES LES GARANTIES OU CONDITIONS IMPLICITES DE QUALITIÉ
MARCHANDE ET D'ADAPTABILITÉ À UNE FIN OU À UN USAGE
PARTICULIER QUANT À CE PRODUIT SONT LIMITÉES À LA DURÉE
DE LA PRÉSENTE GARANTIE.
Certains territoires ne permettent pas l'exclusion ou la limitation des
dommages accessoires ou consécutifs ni ne permettent des limitations de
la durée d'une garantie implicite, de sorte que les limitations ou les
exclusions précitées peuvent ne pas s'appliquer à vous. La présente
garantie limitée vous donne des droits légaux spécifiques et vous pouvez
avoir d'autres droits en vertu des lois de votre territoire.
Pour obtenir plus de renseignements sur nos produits, veuillez consulter notre site Web
au : www.maxim-toastmaster.com.
1
Imprimé en Chine
Nº de Pièce 60980
4/05 Rev1
RH4T9379_IB_27-4-05
4/27/05 5:56 PM
Page 5
Conseils d’entretien
Additional Important Safeguards
Cet appareil ne nécessite qu’un entretien minimum. Il ne contient
aucune pièce pouvant être réparée par l’utilisateur. Ne pas
essayer de réparer l’appareil par vos propres moyens. Contacter
un technicien qualifié si l’appareil doit faire l’objet d’un entretien
quelconque.
WARNING: ELECTRICAL SHOCK HAZARD. Never attempt to dislodge
food inside the Toaster while the Toaster is plugged in.
Doing so could cause an electrical shock hazard or a
risk of fire.
ENTRETIEN ET NETTOYAGE
• Débrancher le grille-pain de la prise de courant et laisser
refroidir l’appareil avant de procéder à un nettoyage
quelconque.
• Essuyer les surfaces extérieures avec un chiffon doux et
humide. Si cela s’avère nécessaire, utiliser un peu de savon
liquide doux.
• Ne pas laisser quoi que ce soit pénétrer dans les fentes, car
ceci risquerait d’endommager les éléments.
• Ne pas utiliser d'agents nettoyants ou de solvants abrasifs.
• Ne jamais immerger l’appareil dans l'eau ou dans tout autre
liquide.
NETTOYAGE DES PLATEAUX RAMASSE-MIETTES
• Débrancher le grille-pain de la prise de courant et laisser
complètement refroidir l’appareil.
• Tirer pour faire sortir le/les plateaux ramasse-miettes de la
section arrière du bas du grille-pain.
• Essuyer le/les plateaux ramasse-miettes avec un chiffon
propre humide. Toujours bien sécher le/les plateaux
ramasse-miettes avant de le/les replacer dans le grille-pain.
REMARQUE : Nous vous conseillons de vider le/les plateaux
ramasse-miettes dans l'évier ou une boîte à ordures.
• Ne pas faire fonctionner le grille-pain sans les deux plateaux
ramasse-miettes qui doivent être installés comme il se doit.
RANGEMENT
Débrancher l’appareil, le laisser refroidir, et le nettoyer avant de le
ranger. Ranger l’appareil dans sa boîte, dans un endroit propre et
sec. Ne jamais ranger le grille-pain lorsque celui-ci est encore chaud
ou branché dans une prise. Ne jamais enrouler le cordon et le serrer
autour de l’appareil ; ranger le cordon à l’endroit prévu à cet effet
sous le grille-pain. Ne pas tendre le cordon à l’endroit où celui-ci
s’engage dans l’appareil car il risquerait de s’user ou de casser.
21
CAUTION: This appliance is hot during operation and retains heat for
some time after turning off. Always use oven mitts when
handling hot materials and allow metal parts to cool
before cleaning. Do not place anything other than the
Bun Warmer Accessory provided, on top of the Toaster
while it is operating or while it is hot.
CAUTION: This appliance generates heat during use. Proper
precautions must be taken to prevent the risk of burns,
fires or other damage to persons or property.
1. All users of this appliance must read and understand this
Owner’s Manual before operating or cleaning this appliance.
2. The cord to this appliance should be plugged into a 120V AC
electrical outlet only.
3. Do not leave this appliance unattended during use.
4. If this appliance begins to malfunction during use, immediately
press the “CANCEL” Button(s) and unplug the cord. Do not use
or attempt to repair the malfunctioning appliance.
5. Use the Toaster on a hard, flat surface. Do not place it near a
flame or heat or on a soft surface (such as carpet). Avoid
placing it where it may tip over during use. Dropping the Toaster
could cause it to malfunction.
6. Avoid electric shock by unplugging the Toaster before cleaning.
7. THIS APPLIANCE IS FOR HOUSEHOLD USE ONLY.
CAUTION:
• DO NOT toast Toaster pastries with runny fillings or frosting.
• DO NOT toast torn slices of bread.
• DO NOT place buttered bread or wrapped food into
the Toaster.
• DO NOT toast small-size breads like “melba,” mini-baguettes,
breadsticks, etc.
2
RH4T9379_IB_27-4-05
4/27/05 5:56 PM
Page 7
POLARIZED PLUG
This appliance has a polarized plug (one blade is wider than the
other). To reduce the risk of electric shock, this plug is intended to
fit into a polarized outlet only one way. If the plug does not fit fully
in the outlet, reverse the plug. If it still does not fit, contact a
qualified electrician. Do not attempt to modify the plug in
any way.
SHORT CORD INSTRUCTIONS
A short power supply cord is provided to reduce the risk resulting
from becoming entangled in or tripping over a longer cord.
Longer detachable power-supply cords or extension cords are
available and may be used if care is exercised in their use.
If a longer detachable power-supply or extension cord is used,
(1) the marked electrical rating of the cord set or extension cord
should be at least as great as the electrical rating of the
appliance, and (2) the cord should be arranged so that it will not
drape over the countertop or tabletop where it can be pulled on
by children or tripped over accidentally.
ELECTRIC POWER
If the electric circuit is overloaded with other appliances, your
appliance may not operate. It should be operated on a separate
electrical circuit.
PLASTICIZER WARNING
CAUTION: To prevent Plasticizers from migrating from the
finish of the counter top or table top or other furniture, place
NON-PLASTIC coasters or place mats between the appliance
and the finish of the counter top or table top.
Failure to do so may cause the finish to darken, permanent
blemishes may occur or stains can appear.
3
CONSEILS EN VUE DE L'OBTENTION DE RESULTATS
OPTIMUMS
• Lorsque vous grillez plus d’une tranche de pain, utiliser des
tranches de la même dimension, épaisseur, et fraîcheur.
• Le pain non frais ou plus mince grille plus vite que le pain frais
ou épais, il faut donc utiliser un réglage plus bas.
• Ne pas utiliser des tranches de pain déchirées, dont les bords
sont tournés, ou d’une forme inhabituelle, car elles pourrait
entraver le mécanisme du levier et provoquer un incendie.
• Les produits à base de pain sucré (madeleines, pains aux
fruits, etc.) grillent beaucoup plus rapidement que du pain
ordinaire, et doivent donc être grillés sur un réglage plus bas.
POINTS IMPORTANTS
• Retirer tout le matériel d’emballage des aliments avant de les
placer dans les fentes de grillage.
• Pour des résultas optimums, nettoyer le tiroir
ramasse-miettes fréquemment.
• Les différentes variétés de pain nécessitent des réglages de
couleur différents. Appuyer sur le bouton d’annulation "CANCEL
à tout moment afin de vérifier la couleur du pain grillé.
• Ne pas bloquer les ouvertures du haut. Ne pas recouvrir les
ouvertures du haut d’objets (à l’exception de l’accessoire
chauffe-brioche fourni).
• Ne pas faire griller du pain standard ou pita beurré. Le beurre
fondu provoquerait un incendie.
• Le pain qui a été grillé sans être beurré peut être réchauffé.
Utiliser le bouton de réchauffage " REHEAT ".
• Ne jamais immerger le grille-pain dans l’eau.
• Cet appareil est EXCLUSIVEMENT RESERVE A UN USAGE
MENAGER.
• Aucun élément de cet appareil ne peut être réparé par
l’utilisateur. Ne pas essayer de réparer cet appareil par vos
propres moyens.
• Ne jamais utiliser une fourchette ou un ustensile à rebord
tranchant pour déloger un morceau de pain grillé, car ceci
risquerait d’endommager l’élément chauffant ou de causer
des blessures.
20
RH4T9379_IB_27-4-05
4/27/05 5:56 PM
Page 9
CHAUFFE-BRIOCHE
INTRODUCTION
Placer le chauffe-brioche sur le haut du grille-pain, avec les pieds
à l’intérieur des fentes de grillage. Ceci permet de maintenir les
volets TOASTEC™ ouverts, permettant ainsi à la chaleur d’atteindre
le chauffe-brioche.
1. Placer les brioches, croissants, etc., sur le haut du
chauffe-brioche.
2. Placer le bouton de réglage de la couleur du pain entre
2 et 3, et abaisser le levier de grillage correspondant.
REMARQUE : Lors de l’utilisation du chauffe-brioche, ne pas placer
le bouton de réglage de la couleur sur une position
supérieure à 3.
The new TOASTEC™ SYSTEM crisps bread rapidly on the outside,
while keeping it moist on the inside.
Lowering one or both of the Toasting Levers closes the Bread
Guides, holding the bread centrally in the toasting slots.
TOASTEC™ Shutters at the top of the bread guides block the
escape of heated air, accelerating the browning process and
cutting the amount of energy used.
Bun Warmer Rack
(P/N 21694)
Bun Warmer
Handles
ATTENTION : Ne pas utiliser le chauffe-brioche pour réchauffer des
brioches surgelées, beurrées, enrobées, comportant
du glaçage, ou fourrées.
3. Une fois que le levier de grillage est remonté, retirer les
brioches réchauffées.
PATISSERIES
Pour des résultats optimum, veuillez vous référer aux instructions
de réchauffage mentionnées sur l’emballage de la pâte. Si rien
n'y figure, placer le(s) bouton(s) de sélection de la couleur du
pain sur la position centrale. Certaines pâtisseries nécessitent
parfois un cycle de grillage supplémentaire.
REMARQUE : Ne pas utiliser ce grille-pain pour faire griller des
pâtisseries comportant du glaçage qui peut tourner
en liquide, ou des garnitures à découvert.
Legs
4 Toasting
Slots with
TOASTEC™
Shutters
2 Toasting
Levers
2
Browning
Selectors
RETIRER DU PAIN GRILLE COINCE DANS L’APPAREIL
Si un morceau de pain grillé venait à se coincer dans le
grille-pain, débrancher ce dernier et le laisser refroidir. Appuyer
sur le levier de grillage. Tourner le grille-pain à l’envers, et secouer
pour déloger le pain grillé.
EXTRA
LIFT
For
easier
removal
of small
items
2 Crumb
Trays
(P/N 21717)
IMPORTANT : NE JAMAIS UTILISER UNE FOURCHETTE OU UN
USTENSILE A REBORD TRANCHANT POUR DELOGER DU
PAIN GRILLE, CAR CECI RISQUERAIT D’ENDOMMAGER
L’ELEMENT CHAUFFANT OU DE CAUSER DES BLESSURES.
Cord
Storage Wrap
(On bottom
of Toaster)
Control
Panel
19
4
RH4T9379_IB_27-4-05
4/27/05 5:56 PM
Page 11
Operating Instructions
BEFORE USING FOR THE FIRST TIME
1. Carefully unpack your Toaster and remove all packaging
materials. Remove any labels from the outer stainless steel
surfaces.
2. To remove any dust that may have accumulated during
packaging, simply wipe the Toaster exterior with a clean,
damp cloth.
3. Do not use abrasive cleansers.
4. Do not put the Toaster, cord or plug in water.
5. Before making toast for the first time, operate both pairs of the
Toasting Slots without bread and with both Browning Selectors
set at the maximum setting. This will help to burn off any dust
etc. which may have accumulated on the elements. The new
elements may give off an unpleasant smell but this should not
be a cause for alarm. Make sure the room is well ventilated
while doing this.
TO OPERATE TOASTER
1. Position the Toaster on a firm, level, heat-resistant surface,
clear of curtains, draperies, and other combustible materials.
WARNING: Do not place the Toaster on or near items that may
become damaged even by moderate sources of heat.
2. Unwrap power cord from Cord Storage Wrap on the
underside of the Toaster.
3. Plug the power cord into a 120V AC electrical outlet.
CONTROL PANEL
BOUTONS D’ANNULATION
Le grille-pain est équipé de deux boutons d'annulation, un pour
chaque fente.
Appuyer sur le bouton d’annulation de cuisson correspondant pour
arrêter le grillage du pain avant la fin. Les éléments cessent alors de
fonctionner tandis que le pain est éjecté et que le(s) voyant(s)
d’annulation s'éteint/s'éteignent.
POUR RECHAUFFER DU PAIN GRILLE
Le grille-pain comprend une fonction spécifique qui permet de
réchauffer le pain grillé, tout en annulant le fonctionnement du
bouton de réglage de la couleur.
Pour réchauffer du pain grillé refroidi, placez celui-ci dans l’une
des fentes de grillage, abaisser le levier de grillage, puis appuyer
sur le bouton de réchauffage " REHEAT. Le voyant "REHEAT"
s’illumine pour indiquer que cette fonction est en cours
d’opération, et que le pain grillé va être brièvement réchauffé
avant de remonter.
REMARQUE: Le bouton de réchauffage du pain contrôle les quatre
fentes. Il n'est pas possible de programmer le grille-pain pour
réchauffer du pain grillé tout en grillant du pain frais.
ATTENTION : Ne réchauffer que du pain ordinaire non beurré.
PAIN SURGELE
Laisser les boutons de réglage de la couleur sur sa position habituelle
et placer le pain surgelé dans les fentes de grillage ; abaisser le levier
de grillage, et appuyer ensuite sur le bouton de décongélation
"FROZEN". Le voyant de décongélation s’illumine et reste allumé
jusqu'à ce que le processus de grillage soit terminé. Le temps de
cuisson est automatiquement réglé afin d’assurer le même niveau de
grillage que pour du pain frais.
REMARQUE: Le bouton de décongélation contrôle les quatre
fentes. Il n'est pas possible de programmer le grille-pain pour
faire griller du pain congelé et décongelé dans un même temps.
Lights
Buttons
5
18
RH4T9379_IB_27-4-05
4/27/05 5:56 PM
Page 13
TOASTING BREAD
PANNEAU DE COMMANDE
1
2
3
4
Voyants
lumineux
Boutons
(1) Annulation
(2) Réchauffer
(3) Décongélation
(4) Annulation
POUR FAIRE GRILLER DU PAIN
1. Centrer le pain (épaisseur maximale du pain : 35 mm) dans
les fentes de grillage.
2. Tourner l'un des boutons de réglage de la couleur du pain, ou
les deux sur la position de grillage du pain souhaitée.
REMARQUE : Le réglage de la couleur du pain est électronique :
le fait de déplacer le ou les boutons de réglage
après avoir commencé à faire griller du pain, ne
change pas le degré de cuisson de ce dernier.
3. Appuyer au maximum sur l'un des leviers de grillage ou les
deux — Le ou les levier(s) se bloquent uniquement si le
grille-pain est branché dans une prise de courant. Chaque
levier entraîne le fonctionnement d'un couple de fentes de
grillage du painen.
Les voyants d’annulation de cuisson s’allument et restent
allumés jusqu'à ce que le processus de grillage du pain se soit
arrêté, soit automatiquement lorsque le pain est cuit, soit
manuellement en appuyant sur les boutons d’annulation.
4. Si vous choisissez de n'utiliser qu'une fente de grillage du pain,
veillez à ne rien introduire dans l'autre fente, dans la mesure
où les deux fentes chauffents lorsqu'on abaisse le levier.
5. Lorsque le cycle de grillage est terminé, le pain remonte
automatiquement.
6. REMONTEE ULTRA-HAUTE : Lors du grillage d’aliments de petite
taille (bagels, crumpets (crêpes anglaises), etc), vous pouvez
faire remonter le levier de grillage plus haut afin de permettre
une récupération plus facile de ce type d'aliments.
REMARQUE : Ne pas faire fonctionner le grille-pain sans les deux
plateaux ramasse-miettes qui doivent être installés
comme il se doit.
17
1. Center the bread (maximum thickness of bread 1-1/4 inches
/35mm) in the Toasting Slots.
2. Set one or both of the Browning Selectors to the degree of
browning required.
NOTE: The Browning Control is electronic — moving the Browning
Selector(s) after toasting has started will not change the
degree of browning.
3. Press one or both of the Toasting Levers down fully — the
Lever(s) will not lock down unless the Toaster is plugged in to
an electrical outlet. Each Toasting Lever operates one pair of
Toasting Slots.
The CANCEL Light(s) will illuminate, and will stay on until the
toasting cycle is stopped, either automatically, when the toast
is ready, or manually, if you press the CANCEL Button(s).
4. When using only one of the Toasting Slots in a pair, do not
allow anything to enter the other Slot, as both Slots will be
heating when the Lever is lowered.
5. When the toasting cycle is completed, the toast will pop up.
6. EXTRA LIFT: When toasting small items (bagels, crumpets, etc.)
the Toasting Lever(s) may be raised further, to allow them to
be removed more easily.
NOTE: Do not operate the Toaster unless both Crumb Trays are in
position and correctly fitted.
CANCEL BUTTONS
There are 2 CANCEL Buttons, one for each pair of Slots.
If you wish to stop the toasting cycle before it is complete, press
the appropriate CANCEL Button. The elements will be turned off,
the toast will pop up, and the CANCEL Light(s) will go out.
REHEATING TOAST
This Toaster has a special setting for reheating toast, which
overrides the Browning Selector(s).
To reheat toast which has cooled, place it in one of the toasting
slots, lower the Toasting Lever, then press the REHEAT Button. The
REHEAT Light will illuminate, to show that this feature is operating,
and the toast will be given a short burst of heat before popping up.
NOTE: The REHEAT Button affects all four Slots. You CANNOT
program the Toaster to REHEAT toast and make fresh
toast at the same time.
CAUTION: Only reheat plain, unbuttered toast.
6
RH4T9379_IB_27-4-05
4/27/05 5:56 PM
Page 15
FROZEN BREAD
Leave the Browning Selector(s) at its normal setting, place the
frozen bread into the toasting slots, lower the Toasting Lever, then
press the FROZEN Button. The FROZEN Light will illuminate, and will
stay on until toasting is complete.
The toasting time will be altered automatically to give the same
degree of browning you get with unfrozen bread.
NOTE: The FROZEN Button affects all four Slots. You CANNOT
program the Toaster to toast FROZEN bread and unfrozen
bread at the same time.
THE BUN WARMER
Place the Bun Warmer on top of one pair of Toasting Slots, with
the Legs inside the Toasting Slots. This will keep the TOASTEC™
Shutters open, allowing the heat to reach the Bun Warmer.
1. Place the buns, croissants, etc., to be warmed on top of the
Bun Warmer.
2. Turn the appropriate Browning Selector between the 2 and 3,
and lower the corresponding Toasting Lever.
NOTE: When using the Bun Warmer, do not set the Browning
Selector above 3.
CAUTION: Do not use the Bun Warmer to warm frozen, buttered,
coated, iced or filled buns.
3. When the Toasting Lever pops up, remove the warmed buns.
PASTRY
For best results, follow the instructions printed on the pastry
package. If the package does not have instructions, position the
Browning Selector(s) in the middle. Some pastries may require a
second toasting cycle.
NOTE: Do not use this Toaster for toasting pastry items with runnytype frosting or open fillings.
Mode d’emploi
AVANT D’UTILISER LE GRILLE-PAIN POUR LA
PREMIERE FOIS
1. Déballer soigneusement votre grille-pain et enlever tout le
matériel d’emballage. Retirer toutes les étiquettes des
surfaces extérieures en acier inoxydable.
2. Afin d’éliminer les poussières accumulées lors de l’emballage,
essuyer simplement l’extérieur du grille-pain avec un chiffon
propre et humide.
3. Ne pas utiliser d'agents nettoyants abrasifs.
4. Ne pas immerger le grille-pain, le cordon, ou la fiche dans
l’eau.
5. Avant d’utiliser le grille-pain pour la première fois, faire
fonctionner les deux fentes de grillage sans y placer de pain,
en veillant à ce que les deux boutons de réglage de la
couleur du pain soient sur la position la plus élevée. Ceci
aidera à éliminer les poussières, etc., qui ont pu s’accumuler
sur les éléments. Les nouveaux éléments peuvent émettre une
odeur déplaisante, mais ceci ne doit pas vous alarmer.
S’assurer que la pièce est bien aérée avant d’entamer cette
procédure.
UTILISATION DU GRILLE-PAIN
1. Positionner le grille-pain sur une surface ferme, plane, et à
l’épreuve de la chaleur, loin des rideaux, des tentures, et
autres matériaux combustibles.
AVERTISSEMENT : Ne pas placer le grille-pain sur ou à proximité
d’objets qui pourraient être endommagés par une source de
chaleur moyennement élevée.
2. Dérouler le cordon de son rangement situé sous le grille-pain.
3. Brancher le cordon d’alimentation à une prise 120V CA.
REMOVING LODGED TOAST
If a piece of toast becomes lodged in the Toaster, unplug the
Toaster and allow to cool. Press the Toasting Lever down. Turn the
Toaster upside down, and shake the toast loose.
IMPORTANT: NEVER USE A FORK OR SHARP-EDGED UTENSIL TO
REMOVE TOAST, BECAUSE THAT MAY DAMAGE THE
HEATING ELEMENT OR CAUSE INJURY.
7
16
RH4T9379_IB_27-4-05
4/27/05 5:56 PM
Page 17
HINTS FOR BEST RESULTS
INTRODUCTION
™
Le nouveau SYSTEME TOASTEC grille l’extérieur du pain rapidement,
tout en conservant un intérieur moelleux.
Lorsqu'on abaisse l'un des leviers de grillage ou les deux, les guides du
pain se referment et le retiennent au centre des fentes de grillage.
Les volets TOASTEC™ situés à l’extrémité supérieure des guides du pain
empêchent l’air chaud de s’échapper, accélérant ainsi le processus
de grillage et réduisant la quantité d’énergie utilisée.
Grille du chauffe-brioche
(Pièce N° 21694)
Poignées du
chauffe-brioche
• When toasting more than one slice of bread, use slices of
similar size, thickness and freshness.
• Old or thin bread will cook faster than fresh or thick bread, so
use a lower setting.
• Do not use torn, curled up, or odd-shaped slices of bread as
these may jam the lever mechanism and could catch fire.
• Sweet bread products (tea cakes, fruit loaf, etc.) brown much
more quickly than ordinary bread, and should be toasted on
the lighter settings.
IMPORTANT POINTS
Pieds
4 Fentes de grillage
avec volets TOASTEC™
2 Leviers
de grillage
REMONTEE
ULTRA-HAUTE
permettant la
récupération
des aliments de
petite taille.
• Remove all protective wrappings from food before placing in
Toasting Slots.
• For best results, clean Crumb Trays frequently.
• Different breads require different color settings. Press CANCEL
at any time to check toast color.
• Do not block top openings. Do not place any object
(other than the Bun Warmer Accessory provided) over
the top openings.
• Do not toast buttered bread or buttered pita bread. Melted
butter will cause fire.
• Bread which has been toasted, but not buttered may be
reheated. Use the REHEAT feature.
• Never immerse Toaster in water.
• This appliance is for HOUSEHOLD USE ONLY!
• There are no user-serviceable parts inside. Do not attempt to
service this product yourself.
• Never use a fork or sharp-edged utensil to remove
toast, because that may damage the heating element or
cause injury.
Plateaux
ramasse-miettes
(Pièce N° 21717)
2 Boutons de réglage de
la couleur du pain grillé
Rangement
du cordon
Panneau de commande
15
(Sous le grille-pain)
8
RH4T9379_IB_27-4-05
4/27/05 5:56 PM
Page 19
User Maintenance Instructions
This appliance requires little maintenance. It contains no
user serviceable parts. Do not try to repair it yourself.
Contact a qualified appliance repair technician if the
product requires servicing.
CARE AND CLEANING
• Unplug the Toaster from the electrical outlet and let it cool
down fully before attempting any cleaning operation.
• Wipe the outside surfaces with a soft damp cloth. If
necessary, use a little mild liquid soap.
• Do not allow anything to enter the slots, as this might damage
the elements.
• Do not use harsh or abrasive cleaning agents or solvents.
• Do not immerse the Toaster in water or any other liquid.
INSTRUCTIONS CONCERNANT LE CORDON COURT
L'appareil est livré avec un cordon d'alimentation court afin de
réduire le risque de blessures liées au fait de se prendre les pieds
ou de trébucher sur un cordon plus long.
Il existe des cordons d’alimentation détachables plus longs et des
rallonges qui peuvent être utilisés à condition de prendre quelques
précautions.
Si un cordon d’alimentation plus long ou une rallonge s’avère
nécessaire, (1) le cordon ou la rallonge doit au minimum présenter
des caractéristiques nominales aussi importantes que celles de
l’appareil électroménager et (2) être disposé de façon à ne pas
retomber du plan de travail ou de la table, où un enfant pourrait tirer
dessus, ou trébucher sur ce dernier accidentellement.
ALIMENTATION ELECTRIQUE
Si le circuit électrique est surchargé par d’autres appareils, l’appareil
peut ne pas fonctionner correctement. Dans la mesure du possible, il
doit être branché sur un circuit électrique indépendant.
AVERTISSEMENT : PLASTIFIANTS
CLEANING THE CRUMB TRAYS
• Unplug the Toaster from the electrical outlet and let it cool
down fully.
• Pull the Crumb Tray(s) out from the bottom rear of the Toaster.
• Wipe the Crumb Tray(s) with a clean, damp cloth. Always
dry the Crumb Tray(s) thoroughly before replacing them in
the Toaster.
NOTE: We suggest that you empty the Crumb Tray(s) over a sink or
over a garbage can.
• Do not operate the Toaster unless both Crumb Trays are in
position and correctly fitted.
ATTENTION : Afin d’éviter la migration des plastifiants de la finition
du plan de travail, de la table, ou d’un autre meuble, placer des
dessous-de-verre ou des napperons SANS PLASTIQUE entre
l’appareil et la finition du plan de travail ou de la table.
Le non respect des indications données ci-dessus pourrait entraîner
le noircissement de la finition, la formation d'imperfections de nature
permanente, ou l'apparition de taches.
TO STORE
Unplug unit, allow to cool, and clean before storing. Store Toaster
in its box in a clean, dry place. Never store Toaster while it is hot or
still plugged in. Never wrap cord tightly around the appliance,
use the Cord Storage area on the bottom of the Toaster. Do not
put any stress on the cord where it enters the unit, as it could
cause the cord to fray and break.
9
14
RH4T9379_IB_27-4-05
4/27/05 5:56 PM
Page 1
LIMITED ONE-YEAR WARRANTY
Warranty Coverage: This product is warranted to be free from defects in
materials or workmanship for a period of one (1) year from the original
purchase date. This product warranty is extended only to the original
consumer purchaser of the product and is not transferable. For a period of
one (1) year from the date of original purchase of the product, our Repair
Center will, at its option, either (1) repair the product or (2) replace the
product with a reconditioned comparable model. These remedies are the
purchaser's exclusive remedies under this warranty.
Warranty Service: To obtain warranty service, you must call our warranty
service number at 1-800-233-9054 for return instructions on how to deliver
the product, in either the original packaging or packaging affording an
equal degree of protection to the Repair Center specified below. You must
enclose a copy of your sales receipt or other proof of purchase to
demonstrate eligibility for warranty coverage.
To return the appliance, ship to:
ATTN: Repair Center
708 South Missouri Street
Macon, MO 63552 USA
To contact us, please write to, call, or email:
Consumer Relations Department
PO Box 7366
Columbia MO 65205-7366 USA
1-800-233-9054
E-mail:
[email protected]
What Is Not Covered: This warranty does not cover damage resulting
from misuse, accident, commercial use, improper service or any other
damage caused by anything other than defects in material or workmanship
during ordinary consumer use. This warranty is invalid if the serial number
has been altered or removed from the product. This warranty is valid only
in the United States and Canada.
LIMITATION ON DAMAGES: THERE SHALL BE NO LIABILITY FOR ANY
INCIDENTAL OR CONSEQUENTIAL DAMAGES FOR BREACH OF ANY
EXPRESS OR IMPLIED WARRANTY OR CONDITION ON THIS
PRODUCT.
DURATION OF IMPLIED WARRANTIES: EXCEPT TO THE EXTENT
PROHIBITED BY APPLICABLE LAW, ALL IMPLIED WARRANTIES AND
CONDITIONS, INCLUDING, WITHOUT LIMITATION, IMPLIED
WARRANTIES AND CONDITIONS OF MERCHANTABILITY AND
FITNESS FOR A PARTICULAR PURPOSE OR USE ON THIS PRODUCT
ARE LIMITED IN DURATION TO THE DURATION OF THIS WARRANTY.
Some jurisdictions do not allow the exclusion or limitation of incidental or
consequential damages, or allow limitations on how long an implied
warranty lasts, so the above limitations or exclusions may not apply to you.
This warranty gives you specific legal rights and you may have other rights
under the laws of your jurisdiction.
TOASTEC™
4 Slice Toaster
OWNER’S MANUAL
For more information on our products, visit our website: www.maxim-toastmaster.com.
P/N 60980
Printed in China
4/05 Rev1
RH4T9379