1
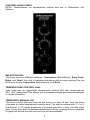
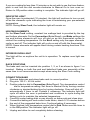
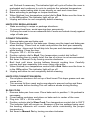
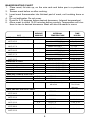
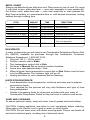
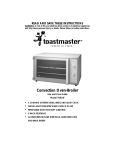
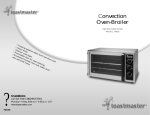
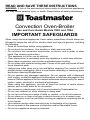
READ AND SAVE THESE INSTRUCTIONS
WARNING: A risk of fire and electrical shock exists in all electrical appliances
and may cause personal injury or death. Please follow all safety instructions.
Convection Oven-Broiler
Use and Care Guide Models 7093 and 7094
IMPORTANT SAFEGUARDS
When using electrical appliances, basic safety precautions should always be
followed to reduce the risk of fire, electric shock and injury to persons, including
the following:
• Read all instructions before using appliance.
• Do not touch hot surfaces. Use handles or dials and oven mitts.
• Do not place this convection oven-broiler or electric cord in water or other
liquid. See cleaning instructions.
• This appliance is not for use by children.
• Close supervision is necessary when any appliance is used near children.
• Never leave convection oven-broiler unattended when broiling.
• Do not clean with metal scouring pads. Pieces of the pad may break off and
touch electrical parts.
• Unplug from outlet when not in use and before cleaning. Turn control to OFF
position before unplugging. Allow to cool before attaching or removing parts
and before cleaning the appliance.
• Do not operate any damaged appliance. Do not operate with a damaged
cord or plug, or after the appliance malfunctions or has been damaged in any
manner. Return appliance to the nearest authorized service facility for examination, repair, electrical or mechanical adjustment.
• When using this appliance, provide at least four inches of space above,
behind, and on both sides for air circulation.
• Use accessory attachments only if recommended by Toastmaster Inc.
• Do not use outdoors or while standing in damp area.
• Do not let cord hang over edge of table or counter, or touch hot surfaces.
• Do not place on or near a hot gas or electric burner or in a heated oven.
• Extreme caution must be used when moving an appliance containing hot oil
or hot liquids.
• Use extreme caution when removing tray or disposing of hot grease.
• Do not operate in the presence of explosive and/or flammable fumes.
• Do not use appliance except as intended.
SAVE THESE INSTRUCTIONS
THIS PRODUCT FOR HOUSEHOLD USE ONLY
CAUTION: A short power supply cord is provided to reduce the risk of personal
injury resulting from becoming entangled in or tripping over a longer cord.
Extension cords are available from local hardware stores and may be used if
care is exercised in their use. If an extension cord is required, special care and
caution is necessary. Also the cord must be: (1) marked with an electrical
rating of 125 V, and at least 13 A., 1625 W., and (2) the cord must be arranged
so that it will not drape over the countertop or tabletop where it can be pulled
on by children or tripped over accidentally.
POLARIZED PLUG: This appliance has a polarized plug, (one blade is wider
than the other). As a safety feature to reduce the risk of electrical shock, this
plug is intended to fit in a polarized outlet only one way. If the plug does not fit
fully in the outlet, reverse the plug. If it still does not fit, contact a qualified
electrician. Do not attempt to defeat this safety feature.
ELECTRIC POWER: If electric circuit is overloaded with other appliances, your
appliance may not operate properly. It should be operated on a separate
electric circuit from other operating appliances.
GETTING TO KNOW YOUR CONVECTION OVEN-BROILER
A convection oven circulates heated air continuously throughout the oven cavity
to maintain uniform temperature around the food.This constant, gentle air flow
is what seals in juices, promotes browning and shortens cooking time without
turning and basting. Your Toastmaster® convection oven can bake, roast, broil,
and dehydrate. Your oven also allows you the flexibility of a regular bake mode
so you can prepare recipes with leavening agent such as yeast, baking powder,
baking soda, or eggs in the traditional manner. The slow cook cycle cooks
similar to a crock pot.
OVEN RACK AND PAN POSITIONS
3
2
1
BAKE RACK
BAKE/BROIL PAN
ASSEMBLY
Figure 1
2
CONTROL BAKE PANEL
NOTE: Temperatures on temperature control dial are in Fahrenheit, not
Celsius.
SELECTOR DIAL
The oven has four different settings: Convection (Bake/Roast), Slow Cook,
Bake, and Broil. Turn dial to indicator line above dial to select setting.The fan
will be on during Convection (Bake/Roast), and Broil.
TEMPERATURE CONTROL DIAL
Your oven has an adjustable temperature control dial with temperatures
200°-450° Fahrenheit.This allows you to prepare recipes according to package
or recipe directions.
TIMER WITH MANUAL ON
The timer control dial also acts as the oven’s on and off dial. Turn the timer
clockwise to select appropriate cooking time. The dial is marked with 1, 2 or 3
Hrs (hours) in 15 minute segments. If cooking less than 1 hour, turn the timer
past 1 hour, then back to desired cooking time. When cooking time is complete,
a signal will sound and the unit will turn off automatically.
3
If you are cooking for less than 15 minutes or do not wish to use the timer feature,
push in and turn the dial counter-clockwise to Manual On to turn oven on.
Return to Off position when cooking is complete. The indicator light will go off.
INDICATOR LIGHT
Once the oven is preheated (10 minutes), the light will continue to turn on and
off as the elements cycle indicating the oven is maintaining your pre-selected
temperature.
NOTE: During Slow Cook, the indicator light will remain on.
HEATING ELEMENTS
On the Slow Cook setting, constant low wattage heat is provided by the top
and bottom elements. On the Convection (Bake/Roast), and Bake settings the
top and bottom elements will turn off and on as the thermostat cycles to
control the cooking temperature. On the Broil setting only the upper elements
cycle on and off. The indicator light will cycle on and off with the thermostat.
NOTE: Some elements will appear black during certain heating functions. This
is normal.
INTERIOR OVEN LIGHT
The light will be on anytime the unit is in operation. To replace oven light see
page 10.
RACK POSITIONS
The bake rack can be inserted into position 1, 2, or 3 as shown in figure 1 or
inverted. Baking on both the rack and bake/broil bake pan assembly at the
same time is not recommended except when using the Slow Cook setting.
CONVECTION BAKE
1. Remove bake pan and place bake rack in correct position.
2. Plug into 120 V ~ 60 Hz outlet.
3. Position selector dial to Convection (Bake/Roast). Turn temperature control
dial to temperature setting. Set timer to Manual On by turning counterclockwise or desired baking time by turning clockwise. Oven will shut off
automatically if timer is set. Preheat if necessary. The indicator light will
cycle off when the oven is preheated and continues to cycle during the
baking cycle to maintain the selected temperature.
4. Carefully center baking dish or pan directly on bake rack and close door.
5. Convection baking will cook some foods faster; check 5-10 minutes before
the end of the suggested bake time. Continue baking if necessary.
6. When finished, turn temperature control dial to Deh. Make sure the timer is
in the Off position.The indicator light will go off.
7. Unplug and allow to cool completely before cleaning.
4
HINTS FOR CONVECTION BAKE
• For best results, place bake rack in position 2 and leave at least 1/2 inch
space on all sides of bake pan for air circulation.
• Dark or dull pans absorb heat faster; foods will bake more rapidly and
crusts will brown more easily than in shiny bake pans. Use of glass baking
containers may add to the total cooking time required. Shallow baking
containers are best because they allow maximum air flow.
CONVECTION ROAST
1. Remove bake pan and bake rack.
2. Place bake pan in position 1.The bake pan must be placed below the food
to prevent grease from coming in contact with heating elements and to
reduce clean-up.
3. Put seasoned meat, fat side up, in center of bake rack. Insert bake rack in
position 2. Do not cover.
4. Plug into 120 V ~ 60 Hz outlet.
5. Position selector dial to Convection (Bake/Roast). Turn temperature control
dial to 325°F (standard roasting temperature). It is not necessary to preheat your oven. Since meats and poultry roast up to 25% faster in a
convection oven, a meat thermometer should always be used to gauge
internal temperature. The thermometer should always be inserted into
thickest portion of roast away from bones or fatty areas. Check progress
two-thirds into the cooking process to ensure meat does not overcook.
6. Set timer to Manual On by turning counter-clockwise or desired roasting
time by turning clockwise. Oven will shut off automatically if timer is set.
7. When finished, position temperature control dial to Deh. Make sure the
timer is in the Off position.The indicator light will go off.
8. Unplug and allow to cool completely before cleaning.
HINTS FOR CONVECTION ROAST
•
Roasting is recommended for large, tender cuts of meat and poultry.
Seasoning prior to cooking adds to the flavor and the aroma during cooking.
•
A layer of fat on the top of the roast promotes better browning and provides
natural basting.
•
A meat thermometer inserted into the center of the meat should always be
used to ensure desired doneness.
•
When roasting meats with a high fat content, the broil bake pan may fill
with grease before cooking is completed. Carefully remove the bake pan
using oven mitts and empty. Replace for continued roasting.
REGULAR BAKE
1. Remove bake pan and place bake rack into position.
2. Plug into 120 V ~ 60 Hz outlet.
3. Position selector dial to Bake. Turn temperature control dial to temperature
setting. Set timer to Manual On by turning counter-clockwise or to desired
baking time by turning clockwise. Oven will shut off automatically if timer is
5
4.
5.
6.
7.
set. Preheat if necessary. The indicator light will cycle off when the oven is
preheated and continues to cycle to maintain the selected temperature.
Carefully center baking dish or pan directly on rack and close door.
Bake according to package or recipe directions.
When finished, turn temperature control dial to Deh. Make sure the timer is
in the Off position.The indicator light will go off.
Unplug and allow to cool completely before cleaning.
HINTS FOR REGULAR BAKE
•
Bake according to recipe or package directions.
•
To prevent heat loss, avoid opening door excessively.
•
Foil may be used to cover casserole dish if ends are tucked closely against
edge of bake pan.
CONVECTION BROIL
1. Remove bake pan and bake rack.
2. Place the broil insert in the bake pan. Always use the insert and bake pan
when broiling. Place food on insert and position the broil pan assembly
in the oven. Juices and fat will drip into the pan and decrease spattering
while broiling. Close the door.
3. Plug into 120 V ~ 60 Hz outlet.
4. Position selector dial to Broil. Turn temperature control dial to Broil.
5. Since broiling time is usually brief, the use of a timer is not recommended.
Set timer to Manual On by turning counter-clockwise.
6. Broil food until done, turning halfway through cooking time. Carefully
remove broil pan assembly from oven using oven mitts.
7. When finished, turn temperature control dial to Deh. Make sure the timer is
in the Off position.The indicator light will go off.
8. Unplug and allow to cool completely before cleaning.
HINTS FOR CONVECTION BROIL
•
Do not place aluminum foil on top of broil insert.This traps grease and can
cause a fire.
•
Trim excess fat from meat and score edges to prevent curling and thaw
frozen meats before broiling.This will reduce smoke during broiling.
SLOW COOK
1. Remove bake pan from oven. Place bake rack in position 1. No preheat is
necessary.
2. Cover baking container and place on bake rack in center of the oven.
3. Plug into 120 V ~ 60 Hz outlet.
4. Position selector dial to Slow Cook. Turn temperature control dial to 250°F.
The indicator light will remain on. Because of the low wattage being used,
the heating elements will remain dark while maintaining the proper
t e m p e ra t u r e.
5. Set timer to Manual On by turning counter-clockwise.
6
6. Do not open the door during the first two hours of the slow cook period.
7. When finished, make sure the timer is in the Off position.The indicator light
will go off.
8. Unplug and allow to cool completely before cleaning.
HINTS FOR SLOW COOK
•
Most crock pot recipes may be used in slow cook by using the following
guidelines.
•
All baking dishes should be covered. Aluminum foil may be used if ends
are tucked against edge of pan.
•
Oven-proof glass and ceramic dishes are recommended. Aluminum foil
pans and pans that will rust such as cast iron or tin should not be used.
•
Separate dishes can cook simultaneously, yet food retains its own flavor.
Select foods that will take the same amount of time to cook.
•
Milk, cream and sour cream may curdle. It is best to add them in the last
hour of cooking. If a recipe specifies one of these ingredients as the only
liquid in the cooking process, try substituting evaporated milk, water or
condensed soup, such as cream of mushroom or chicken soup.
•
Slow cooking enhances the flavor of spices and salt; we recommend you
reduce seasoning in your own recipes.
•
Pre-cooked spaghetti and pasta products should be added in the last hour
of slow cooking.
7
BAKE/ROASTING CHART
1. Place meat, fat side up, on the wire rack and bake pan in a preheated
oven.
2. Season meat before or after cooking.
3. Insert meat thermometer into thickest part of meat, not touching bone or
fat.
4. Do not add water. Do not cover.
5. Roast to 5-10 degrees below desired doneness, (internal temperature).
6. Allow meat to stand 15-20 minutes before serving. Temperature will continue to rise to desired doneness. Meat will also be easier to carve.
WEIGHT/
CUT
AMOUNT
BEEF 350°-425°F/177°-218°C
boneless top sirloin roast (tri-tip)
1 1/2 - 2
425°F/218°C
ribeye roast, small end
4-6
350°F/177°C
tenderloin roast
2-3
425°F/218°C
rib roast
4-5
350°F/177°C
round sirloin tip roast
3-4
325°F/170°C
PORK 325°F/170°C
boneless loin roast
2-4
loin back ribs (spareribs)
2-4
country-style ribs
2-4
sirloin roast
3-4
tenderloin
2-3
HAM (fully cooked) 325°F/170°C
boneless
5-6
bone-in
5-7
FISH 450°F/232°C
fillets
2 - 4 fillets
INTERNAL
TEMPERATURE
POULTRY 325°-375°F/170°-190°C
Cornish hens
1 - 2 hens
375°F/190°C
turkey breast boneless
2 1/2 - 3
325°F/170°C
turkey breast
4-6
325°F/170°C
6-8
chicken, fryer whole
2 1/2 - 4
375°F/190°C
chicken, roaster whole
4-6
325°F/170°C
8
TIME
HOURS
medium rare 135°F/57°C
medium 150°F/66°C
medium rare 135°F/57°C
medium 150°F/66°C
medium rare 135°F/57°C
medium 150°F/66°C
medium rare 135°F/57°C
medium 150°F/66°C
medium rare 135°F/57°C
medium 150°F/66°C
30 - 40 minutes
40 - 45 minutes
1 3/4 - 2
2 - 2 1/2
30 - 40 minutes
40 - 50 minutes
1 3/4 - 3
2 1/2 - 3 3/4
1 3/4 - 2
2 1/4 - 2 1/2
well 160°-170°F/71°-77°C
well 160°-170°F/71°-77°C
well 160°-170°F/71°/77°C
well 160°-170°F/71°-77°C
well 160°-170°F/71°-77°C
1 - 1 1/4
1 1/4 - 1 3/4
1 1/2 - 1 3/4
2 - 3 1/2
1 1/2 - 2
140°F/60°C
140°F/60°C
1 1/4 - 2 1/2
2-4
until fish flakes easily
with a fork
4 - 6 minutes
Per 1/2 inch
thickness
185°F/85°C
1 - 1 1/2
170°F/77°C
1 1/2 - 2 1/4
170°F/77°C
170°F/77°C
185°F/85°C
1 1/2 - 2 1/4
2 1/2 - 3 1/2
1 - 1 3/4
185°F/85°C
1 3/4 - 3 1/2
BROIL CHART
Always use bake/broil pan with wire rack. Place meat on top of rack. For meat
1 inch thick or less, place broil pan — wire rack assembly in oven position #3.
For thicker meat, place broil pan — wire rack assembly in oven position #2.
Broil food according to recommended time or until desired doneness, turning
halfway through cooking time.
FOOD
bacon
chicken
frankfurters
fish fillet, 1/2 inch thick
hamburgers (4 oz each)
pork chops, 1 inch thick
sausage, fresh
AMOUNT
to fit tray
to fit tray
to fit tray
to fit tray
to fit tray
to fit tray
to fit tray
TIME
8-10 minutes
20-40 minutes
10-20 minutes
5-9 minutes
10-20 minutes
20-40 minutes
20-30 minutes
steak, 1 inch thick
to fit tray
15-25 minutes
DIRECTIONS
broil until done
broil until done
turn frequently for even browning
broil until done
minimum time for rare
broil until done
if sausage links: pierce skin with
fork, turn frequently
minimum time for rare
DEHYDRATE
In order to dehydrate you will need to use Toastmaster Dehydration Racks (Part
No. 999032) available for purchase through the Toastmaster Consumer
Relations Department, 1-800-947-3744.
1. Plug into 120 V ~ 60 Hz outlet.
2. Position selector dial to Bake.
3. Turn temperature control dial to Deh.
4. Set timer to Manual On by turning counter-clockwise.
5. Leave door ajar approximately 1 inch.
6. When finished, leave temperature control dial on Deh. Make sure the timer
is in the Off position.The indicator light will go off.
7. Unplug and allow to cool completely before cleaning.
HINTS FOR DEHYDRATE
•
Food dehydration is an inexpensive, nutritious and easy way to prepare
convenience foods.
•
Time required for the process will vary with thickness and type of food
being dehydrated.
•
Guides to preparing foods for drying are included with your order of
Toastmaster Dehydration Racks or may be found in various cook books.
CARE AND CLEANING
To assure optimum safety, keep unit clean, free of grease and food buildup.
CAUTION: Unplug appliance and allow to cool completely before cleaning.
Never place unit, electric cord or plug in water or other liquids.
CAUTION: Do not clean oven with metal scouring pads. Pieces can break off
and touch electrical parts, creating risk of electrical shock.
9
CLEAN-UP OF BAKE/BROIL BAKE PAN, BROIL INSERT AND RACK
1. Always unplug and allow to cool completely before cleaning or moving.
2. Remove bake pan and bake rack.
3. Clean with a mild or non-abrasive cleaner and a plastic scouring pad.
4. Rinse and dry thoroughly.
CLEAN-UP OF NON-STICK WALLS AND INTERIOR
1. Always unplug and allow to cool completely before cleaning or moving.
2. Remove bake pan and bake rack.
3. Clean interior after each use to avoid buildup.
4. Clean with a mild or non-abrasive cleaner and a plastic scouring pad. Do
not rub too hard as surface can be scratched.
5. Rinse and dry thoroughly before closing door.
CLEAN-UP OF OVEN DOOR AND EXTERIOR
The door can be removed for easier cleaning. To remove it, open fully and lift,
clearing the hinge pins. Do not put in dishwasher. To replace, slide the door over
the hinge pins, being sure to gently push door all the way down on pins to avoid
glass breakage.
1.
2.
3.
Always unplug and allow to cool completely before cleaning or moving.
Clean with glass cleaner or mild detergent and damp cloth or plastic scouring
pad. Do not use an abrasive cleaner or pad as they might mar the finish.
Rinse and dry thoroughly with a clean cloth. Allow to dry before closing
door.
TO REPLACE OVEN LIGHT
1. Unplug unit and allow oven to cool completely.
2. Remove screw from oven light bracket, holding onto bracket to prevent
glass from falling.
3. Remove bracket and glass.
4. Remove bulb by turning counter-clockwise.
5. Replace with new bulb, turning clockwise.
6. Replace glass and bracket, being sure the two tabs on the bracket are in
the slots provided for them on the oven wall.
7. Replace bracket screw.
NOTE: Use only a GE S-6 or equivalent 6-watt, 120 volt bulb. Do not operate
the oven without the oven lamp glass in place.
Any servicing requiring disassembly other than the above cleaning and bulb
replacement must be performed by an authorized service center
10
SERVICE INFORMATION
Please refer to warranty statement to determine if in-warranty service applies.
This appliance must be serviced by a Toastmaster authorized service center.
Unauthorized service will void your warranty. Consult your phone directory
under “Appliances-Household-Small-Service and Repair”, or call 1-800-9473744 in the U.S. and Canada, 52-5-397-2848 in Mexico.
Products must be adequately protected to avoid shipping damage. Surround
your appliance with three inches of protective padding and include a note
explaining the problem you have experienced. We recommend insuring your
package. No CODs accepted.
ONE YEAR LIMITED WARRANTY
Toastmaster Inc. warrants this product, to original purchaser, for one year from purchase date to be free of defects in material and workmanship.
This warranty is the only written or express warranty given by Toastmaster Inc.This warranty gives you specific legal rights.You
may have other rights which vary from state to state. ANY OTHER RIGHT WHICH YOU MAY HAVE, INCLUDING ANY IMPLIED
WARRANTY OF MERCHANTABILITY OR FITNESS FOR A PARTICULAR PURPOSE IS LIMITED IN DURATION TO THE
DURATION OF THIS WARRANTY.
Defective product may be brought or sent (freight prepaid) to an authorized service center listed in the phone book, or to
Service Department, Toastmaster Inc., 708 South Missouri St., Macon, MO 63552, for free repair or replacement at our option.
Your remedy does not include:cost of inconvenience, damage due to product failure, transportation damages, misuse, abuse ,
accident or the like, or commercial use. IN NO EVENT SHALL TOASTMASTER INC. BE LIABLE FOR INCIDENTAL OR CONSEQUENTIAL DAMAGES.
Some states do not allow limitations on how long an implied warranty lasts, or allow the exclusion or limitation of incidental or
consequential damages, so the above limitations or exclusions may not apply to you.
For information, write Consumer Claims Manager, at the Macon address. Send name, address, zip, telephone area code and
daytime number, model, serial number, and purchase date.
KEEP DATED SALES RECEIPT FOR WARRANTY SERVICE.
Keep this booklet. Record the following for reference:
Date purchased _____________________________________________________
Model number _______________________________________________________
Date Code (on back of oven) ___________________________________________
PART NO. 30576P04
ESPECIFICACIONES TÉCHNICAS
Potencia nominal (Watts)
1478 W
Tensión de alimentación o tensión nominal (Volts)
127 V ~
Frencuencia de operación o frecuencia nominal (Hertz)
60 Hz