1
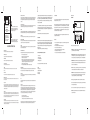
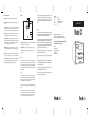
(REMOTE CONTROL NOT PICTURED)
The Model CD plays CD and CD-R audio compact discs. Attempting to play other disc formats such as CD-RW, CD3
(3” CD singles), DVD, CD-ROM, DTS, MP3, or specially shaped audio discs will void your warranty and cause your
CD player to malfunction. If a disc becomes jammed inside the player and will not eject, contact your dealer for service. Any attempt at removing the disc or repairing the unit yourself will void your warranty and may cause additional
damage.
REAR PANEL
10. MUTE: (Remote only): Press to mute the Model CD’s output. Press again to restore the audio output.
11. DIRECT ACCESS 1-10 (Remote only): Using the numbered buttons 1-10, input the number of the track you wish
to listen to.
12. 10+ (Remote only): For tracks above 10, use the 10+ button. For example, to listen to track 14, press the 10+ button followed by the #4 button. For tracks 20 and above, press the 10+ button twice. For example, to listen to track
21, press the 10+ button two times followed by the #1 button. The display will show the track number selected.
15. REPEAT (Remote only): Press once to repeat a track. The display will show Repeat 1. Press a second time to
repeat the entire disc. The display will show Repeat All. Press a third time to cancel the Repeat feature or press
Stop.
Warranty:
Tivoli Audio manufactures its products to very high standards and we are confident our products will perform
well for many years. Accordingly, we warranty this product against manufacturing defects in material and workmanship to the original owner, for a period of one year from the original date of purchase.
2. MINI LINE OUTPUT: This jack accepts a 1/8” stereo male mini plug and may be used as a second output.
This warranty does not extend to damage caused by improper use/installation, faulty ancillary equipment, modifications, unauthorized repair, shipping damage or loss, abuse, accidents, use on improper voltage/current,
lightning or other acts of God, normal wear and tear, commercial use, or purchases from unauthorized dealers.
Proof of purchase as evidence the unit was purchased from an authorized dealer within the warranty period
may be required for warranty service. Should service be necessary, DO NOT return the product without first
contacting your dealer or Tivoli Audio. This warranty is non-transferable.
3. 11.5AC/12-16VDC: Connect the included external AC power supply to this input, or use an optional
DC power supply.
Please resist the temptation to take apart the Model CD. There are no user serviceable parts, and any attempt
at modifying or repairing your CD player will void the warranty.
Placement:
Tivoli Audio will not pay for loss of time, inconvenience, loss of use of your product, or damaged caused by this
product.
1. RIGHT/LEFT RCA OUTPUT: Connect the included stereo RCA cable from the RCA outputs to the auxiliary input of
your Tivoli Audio radio. See section marked “Connection Guide.”
16. SHUF (Remote only): Press once to hear the disc’s tracks in random order. The display will show Shuffle. Press
Shuf a second time to cancel the shuffle feature or press Stop. It is normal for tracks to repeat during Shuffle play.
17. Battery Compartment (Remote only): To replace the remote’s battery, turn the remote control upside down, slide
the bottom tab to the right and pull out the battery holder.Remove the old battery and replace with a fresh 3V
Lithium button cell with the positive side (+) facing up. Slide the battery holder back in place.
Model CDTM
CD and audio CD-R
Front-loading, stereo compact disc player
8 3/8"W x 4 1/2"H x 5 15/16" D
5 lbs
OWNER'S MANUAL
MODEL CD
13. INTRO (Remote Only): Press once to start playback at Track 1 and audition the first 10 seconds of each track on
the disc. The display will show Intro. Press Intro a second time to cancel the Intro feature or press Stop.
14. VOL+/VOL- (Remote only): Repeatedly press the Vol+ button to raise the output level or the Vol- button to lower
the output level of the Model CD. The display will show the volume adjustment from 0 to 14. Although CD recording levels vary, we recommend level 10 for use with our Tivoli Audio radios. If the audio sounds distorted, reduce
the volume level. These buttons will not control the volume of Tivoli Audio radios.
Specifications:
Model:
Formats:
Type:
Dimensions:
Weight:
Your Model CD incorporates excellent shock protection, but it is not skip proof. We recommend you place your Model
CD on a flat, level surface that is not subject to vibration. Do not position the unit vertically. Lighting, static electricity,
and other electronic influences can affect the operation of the Model CD. If this occurs, turn the player Off, unplug it for
several minutes, reconnect the power and the player will return to normal operation. If the Model CD affects the reception of your Tivoli Audio radio or other tuner, keep it turned off when using the radio or increase the distance between
the radio and the Model CD.
This warranty gives you specific legal rights, and you may also have other rights which vary from state to state.
Some states do not allow limitations on implied warranties or the exclusion of consequential damages, therefore, these restrictions may not apply to you.
Cleaning:
Please complete and return the enclosed card within 30 days of purchase to register your product for warranty
coverage, or you may register on-line at: www.tivoliaudio.com
Never use any harsh cleansers or solvents or abrasive pads on your Model CD. The face may be cleaned with a soft
cloth. Take care not to rub too hard. For the wood cabinet, a liquid polish usually provides better results than spray-on
waxes. Note that since the cabinet is natural wood, there may not be an exact color/grain match between the Model
CD and other Tivoli Audio models. You may also notice the wood darken over time.
We do not recommend the use of lens cleaning discs, as these could permanently scratch the lens and void you warranty. Other after market accessories such as CD stabilizing rings or mats may also damage your Model CD and void
you warranty.
Disc cleaning: Dirty discs can affect playback and sound quality. If a CD is dirty, gently wipe it with a soft, damp cloth.
Be sure no water remains on the disc prior to inserting in to the Model CD. Do not clean discs with record cleaner or
other chemicals. Discs with severe scratches may not play properly. Do not insert a cracked or warped CD. Do not
expose CD’s to long periods of direct sunlight or heat, or stack them outside of their protective jewel cases.
If you purchased an extended warranty from your dealer and service is required after the manufacture’s warranty has expired, you should contact your dealer to obtain service.
Model CD
™
All specifications subject to change without notice.
Tivoli Audio reserves the right to make product changes without notice.
Tivoli Audio, the Tivoli Audio logo, and Model CD are trademarks of Tivoli Audio, LLC.
For more information about other exciting audio products by Tivoli Audio,
please visit our web sites or contact us directly:
Tivoli Audio
One Broadway, Suite 600
Cambridge, Massachusetts 02142
Tel: 877-297-9479
www.tivoliaudio.com
GROUNDING OR POLARIZATION
This product may be equipped with a polarized alternating-current line plug (a plug having one blade wider than the other). This plug will
fit into the power outlet only one way. This is a safety feature. If you are unable to insert the plug fully into the outlet, try reversing the
plug. If the plug should still fail to fit, contact your electrician to replace your obsolete outlet. Do not defeat the safety purpose of the
polarized plug.
CAUTION
RISK OF
ELECTRIC SHOCK
DO NOT OPEN
ATTENTION
RISQUE DE CHOC ELECTRIQUE,
NE PAS OUVRIR
PRECAUCION
RIESGO DE CHOQUE ELECTRICO
NO ABRIR
CAUTION: TO REDUCE THE RISK OF
ELECTRIC SHOCK, DO NOT
REMOVE COVER (OR BACK).
NO USER-SERVICEABLE PARTS
INSIDE.
REFER SERVICING TO QUALIFIED
SERVICE PERSONNEL.
This symbol is intended to alert the user to the presence
of uninsulated “dangerous voltage” within the product’s
enclosure that may be of sufficient magnitude to constitute a risk of electric shock to persons.
POWER CORD PROTECTION
Power-supply cords should be routed so that they are not likely to be walked-on or pinched by items placed upon or against them. Pay
particular attention to cords at plugs, convenience receptacles, and the point where they exit from the product.
LIGHTNING
For added protection for this product during a lightning storm, or when it is left unattended and unused for long periods of time, unplug it from
the wall outlet and disconnect the antenna or cable system. This will prevent damage to the product due to lightning and power-line surges.
Congratulations on purchasing Tivoli Audio’s Model CD. The Model CD provides excellent sound quality and shock protection in an elegant, compact package. Its unique front-loading slot design makes inserting and removing a CD quick
and easy and allows for more placement flexibility. The Model CD’s furniture-grade wood cabinet makes it a perfect
companion piece to Tivoli Audio’s radios, or makes a handsome addition to an existing stereo system. We wish you
many years of pleasurable listening.
In order to take full advantage of what your Model CD is capable of, please take a moment to fully read this owner’s
manual. If you have any questions, do not hesitate to contact your dealer or Tivoli Audio directly. It is a good idea to
save the carton and original packing should you ever need to ship your Model CD, as shipping damage is not covered
by the factory warranty.
On behalf of all of us, thank you for choosing Tivoli Audio, and enjoy your new Model CD!
OVERLOADING
Do not overload wall outlets, extension cords, or integral convenience receptacles as this can result in a risk of fire or electric shock.
This symbol is intended to alert the user to the presence
of important operating and maintenance (servicing)
instructions in the literature accompanying the appliance.
IMPORTANT SAFETY INSTRUCTIONS
READ INSTRUCTIONS
All the safety and operating instructions should be read before operating this product.
RETAIN INSTRUCTIONS
The safety and operating instructions should be retained for future reference.
HEED WARNINGS
All warnings on the product and in the operating instructions should be adhered to.
FOLLOW INSTRUCTIONS
All operating and use instructions should be followed.
OBJECT AND LIQUID ENTRY
Never push objects of any kind into this product through openings as they may touch dangerous voltage points or short-out parts which
could result in fire or electric shock. Never spill liquid of any kind on the product.
SERVICING
Do not attempt to service this product yourself as opening or removing covers may expose you to dangerous voltage or other hazards.
Refer all servicing to qualified service personnel.
DAMAGE REQUIRING SERVICE
Unplug this product from the wall outlet and refer servicing to qualified service personnel under the following conditions:
a.
b.
c.
d.
When the power-supply cord or plug is damaged.
If liquid has been spilled, or objects have fallen into the product.
If the product has been exposed to rain or water.
If the product does not operate normally by following the operating instructions. Adjust only those controls that are
covered by the operating instructions as an improper adjustment of other controls may result in damage and will
often require extensive work by a qualified technician to restore the product to its normal operation.
e. If the product has been dropped or damaged in any way.
f. When the product exhibits a distinct change in performance – this indicates a need for service.
CLEANING
Unplug the product from the wall outlet before cleaning. Do not use liquid cleaners or aerosol cleaners. Use a damp cloth
for cleaning.
REPLACEMENT PARTS
When replacement parts are required, be sure the service technician has used replacement parts specified by the manufacturer or have
the same characteristics as the original part. Unauthorized substitutions may result in fire, electric shock or other hazards.
ATTACHMENTS
Do not use attachments not recommended by the product manufacturer as they may cause hazards.
SAFETY CHECK
Upon completion of any service or repairs to this product, ask the service technician to perform safety checks to determine that the product is in proper operating condition.
WATER AND MOISTURE
Do not use this product near water – for example, near a bath tub, wash bowl, kitchen sink, laundry tub, in a wet basement, or near a
swimming pool and the like.
ACCESSORIES
Do not place this product on an unstable cart, stand, tripod, bracket or table. The product may fall, causing serious damage to a child or
adult, and serious damage to the product. Use only with a cart, stand, tripod, bracket or table recommended by the manufacturer, or sold
with the product. Any mounting of the product should follow the manufacturer’s instructions, and should use a mounting accessory recommended by the manufacturer.
VENTILATION
Slots and openings in the cabinet are provided for ventilation and to ensure reliable operation of the product and to protect it from overheating. These openings must not be blocked or covered. The openings should never be blocked by placing the product on a bed, sofa,
rug or other similar surface. This product should not be placed in a built-in installation such as a bookcase or rack unless proper ventillation is provided or the manufacturer’s instructions have been adhered to.
HEAT
The product should be situated away from heat sources such as radiators, heat registers, stoves or other products (including amplifiers)
that produce heat.
NOTIFICATION
This equipment has been tested and found to comply with the limits for a digital device, pursuant to Part 15 of the FCC Rules. These
limits are designed to provide reasonable protection against harmful interference in a residential installation. This product generates,
uses, and can radiate radio frequency energy and, if not installed and used in accordance with the instructions, may cause harmful interference with radio communications. However, there is no guarantee that interference will not occur in a particular installation. If this
equipment does cause harmful interference to radio or television reception, which can be determined by turning the equipment off and
on, the user is encouraged to try to correct the interference by one or more of the following measures:
l
l
l
POWER SOURCES
This product should be operated only from the type of power source indicated on the marking label. If you are not sure of the type of
power supply to your home, consult your product dealer or local power company. For products intended to operate from battery power, or
other sources, refer to the operating instructions.
Reorient or relocate the receiving antennas.
Increase the separation between the equipment and the receiver.
Connect the equipment to an outlet on a circuit different from that to which the receiver is connected.
This product utilizes a laser. Use of controls or adjustments or performance of procedures other than those specified herein may result in
hazardous radiation exposure. Do not open the panels and do not repair yourself. Refer servicing to qualified personnel only.
Connection Guide:
Guide to features:
FRONT PANEL
Before operating the Model CD, wait until the unit has reached room temperature. Otherwise, condensation may form
inside the player and it may not operate correctly.
With all components turned off, connect the red male RCA from the supplied audio cable to the Model CD’s rear panel
red female RCA audio output marked “RIGHT”. Connect the white male RCA to the Model CD’s rear panel white RCA
audio output marked “LEFT”. Now connect the 1/8" male stereo mini plug to the rear auxiliary mini audio input on your
Tivoli Audio radio. When using your Model CD, your Tivoli Audio radio’s volume control may need to be adjusted to a
level other than what it is normally set to for radio listening.
Connect the included power supply to the rear panel 11.5AC input, plug it into a wall outlet, turn the unit on, insert a
disc and playback will start automatically.
About Tivoli Audio:
Other advice:
Tivoli Audio was started by Tom DeVesto with the goal of bringing simple to use, high-quality audio products to the consumer at reasonable prices. As the CEO and head of research and development at his former company, Cambridge
SoundWorks*, Tom was responsible for the development of many of the best-selling home entertainment and multimedia products on the market today. He also held senior management positions in product development for both
Advent and Kloss Video.
*Cambridge SoundWorks is a registered trademark of Creative Labs, Singapore.
Packed with your Tivoli Audio Model CD you should find:
• 1 3' connecting cable
• 1 external power supply
• 1 remote control with battery
• 1 warranty registration card
Please contact your dealer or Tivoli Audio if any of these items are missing.
Tivoli Audio
1 Broadway, Suite 600
Cambridge, Massachusetts 02141
Tel: 877-297-9479
www.tivoliaudio.com
•
•
•
•
•
•
Do not move the Model CD while a disc is playing. Doing so could scratch the disc and damage parts inside the
player, voiding your warranty.
Do not insert anything other than an audio CD in the front loader slot.
Do not insert a disc if one is already inside the player.
Leaving a disc inside the Model CD when the unit is off is not recommended.
Do not ship the Model CD with a CD inside the unit.
Remove an ejected disc in a straight, horizontal position, and avoid bending the disc.
Functions 4,5,6,7 and 8 are duplicated on the remote control.
1. POWER: Push the Power button in to turn the Model CD On and the LED will illuminate. Push the Power button
again to turn the Model CD Off and the LED will extinguish.
2. DISPLAY: Displays individual track number, track time, and playback information about the inserted disc. A track
matrix indicating all tracks (up to 16) on the disc will also be displayed. The display will be blank if a CD is not
inside the player. If the player becomes damaged and the display cracks, do not touch the liquid crystal fluid.
3. INSERTION SLOT: Gently insert a CD with the label side (the side with printing) facing up. The side without the
printing should face down. The disc will be drawn in automatically and playback will start automatically. Do not
insert a disc if one is already inside the player.
4. EJECT: To remove the disc, press the Eject button, grasp the disc when it comes out in a straight, horizontal position and avoid bending the disc. The LCD will be blank when a disc is not inside the Model CD.
5. PLAY/PAUSE: Press to initiate playback. The display will show the Play arrow and the track’s elapsed playing
time. Press again during play to pause playback. The display will show the Pause bars. Press a third time to
resume playback. Playback will stop once the disc’s last track has finished playing.
6. STOP: Stop disc play. The display will show the total number of tracks and total time of the inserted disc.
7. I<< >>I: Advance to the beginning of the next track or to the beginning of a preceding track. The track number of
the track being played will be displayed.
8. << >>: Press to hear fast forward or reverse playback. Press again to resume normal playback or press Play.
9. SENSOR: Receives signals from the included remote control. Obstructing this window will affect the remote’s
ability to control the Model CD.