1
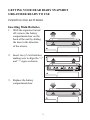
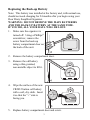
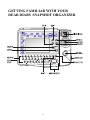
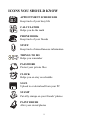
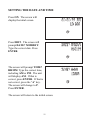
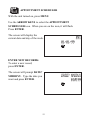
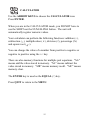
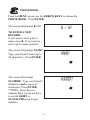
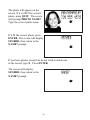
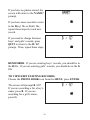
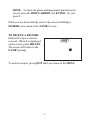
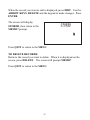
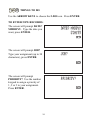
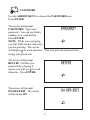
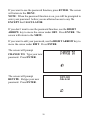
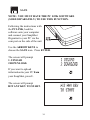
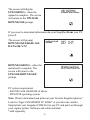
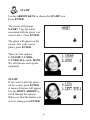
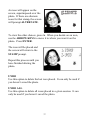
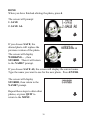
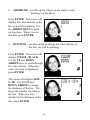
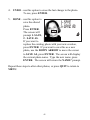
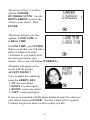
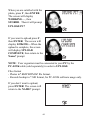
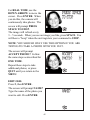
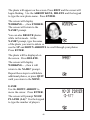
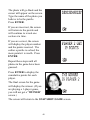
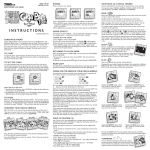
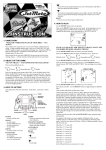
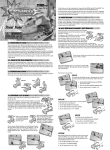
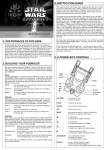
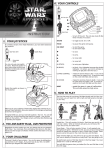
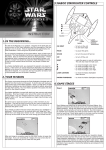
DEAR DIARY SNAPSHOT ORGANIZER
THE DIGITAL PHOTO ALBUM AND
ORGANIZER ALL IN ONE!
Contents
Getting Your Dear Diary SnapShot Organizer Ready to Use
Opening Your Dear Diary SnapShot Organizer
Getting Familiar with Your Dear Diary
Icons You Should Know
Appointment Scheduler
Calculator
Phone Book
Stuff
Things To Do
Password
Clock
Save
Stamp
Paint Brush
Snapshots
Stretched Image
Split Image
Flipped Image
Cautions
90-Day Limited Warranty
1
2
5
6
9
12
15
16
22
24
27
30
34
36
39
42
49
53
56
58
59
GETTING YOUR DEAR DIARY SNAPSHOT
ORGANIZER READY TO USE
INSERTING THE BATTERIES
Inserting Main Batteries
1.
With the organizer turned
off, remove the battery
compartment door on the
back of the unit by sliding
the door in the direction
of the arrows.
2.
Insert two (2) AA batteries,
making sure to align the “+”
and “-“ signs as shown.
3.
Replace the battery
compartment door.
2
Replacing the Back-up Battery
Note: This battery was installed at the factory and, with normal use,
should not need changing for 24 months after you begin using your
Dear Diary SnapShot Organizer.
WARNING: DO NOT REMOVE THE MAIN BATTERIES
AND THE BACK UP BATTERY AT THE SAME TIME.
IF YOU DO, ALL YOUR DATA WILL BE LOST.
1.
Make sure the organizer is
turned off. Using a Phillips®
screwdriver, remove the
screw from the back-up
battery compartment door on
the back of the unit.
2.
Remove the battery compartment door.
3.
Remove the old battery
using a thin, pointed,
non-metallic object to lift it.
4.
Wipe the surface of the new
CR2032 button cell battery
with a soft, dry cloth. Insert
it so that the “+” side is
facing you.
5.
Replace battery compartment door and screw.
3
To ensure proper function:
•
DO NOT MIX OLD AND NEW BATTERIES
•
DO NOT MIX ALKALINE, STANDARD OR RECHARGEABLE BATTERIES
•
BATTERY INSTALLATION SHOULD BE DONE BY AN ADULT
•
NON-RECHARGEABLE BATTERIES ARE NOT TO BE RECHARGED
•
RECHARGEABLE BATTERIES ARE TO BE REMOVED FROM THE TOY
BEFORE BEING CHARGED (IF REMOVABLE)
•
RECHARGEABLE BATTERIES ARE ONLY TO BE CHARGED UNDER ADULT
SUPERVISION (IF REMOVABLE)
•
ONLY BATTERIES OF THE SAME OR EQUIVALENT TYPE AS
•
BATTERIES ARE TO BE INSERTED WITH THE CORRECT POLARITY
•
EXHAUSTED BATTERIES ARE TO BE REMOVED FROM THE TOY
•
THE SUPPLY TERMINALS ARE NOT TO BE SHORT-CIRCUITED
RECOMMENDED ARE TO BE USED
4
OPENING YOUR DEAR DIARY SNAPSHOT
ORGANIZER
To open the cover on your organizer, press and hold the purple
button and lift the colored lid.
5
GETTING FAMILIAR WITH YOUR
DEAR DIARY SNAPSHOT ORGANIZER
6
VIEWFINDER – Used to frame your subject when taking a photo
SEARCH – Used to search for a specific record in a file
LENS – Used to take digital photos
DELETE – Used to erase information
ENTER/= – Used to confirm data (photos or text) in the unit; also
used as the “equal” function when using the calculator
CONTRAST – Used to adjust the contrast of the LCD screen
NUM/ALPHA – Used to automatically access the second function
(except calculator functions) associated with a key on the keypad
ARROW KEYS – Used to move the cursor around the LCD; also
assigned mathematical functions when using the calculator
SHIFT – Used to access the second function associated with a key
on the keypad
COM PORT – Used to connect your SnapShot Organizer to your PC
KEYPAD – Used to type alpha-numeric information into your unit;
also assigned mathematical functions when using the calculator
MENU – Used to retrieve the menu icons
ON/OFF – Used to turn the unit on and off
EDIT – Used to edit a record
QUIT – Used to exit a screen
7
RESET FUNCTION
By pressing the reset button on
the bottom of the unit, you can
delete all the data previously
stored. A message on the
screen will ask you , “ERASE
MEMORY OK? Y/N.” By
pressing Y (yes), all data will
be erased. Pressing N (no) will
return you to the clock display screen.
Be sure to press the reset button and clear all data before using your
Dear Diary SnapShot Organizer for the first time.
SETTING THE CONTRAST
You can set the contrast level of
the LCD by turning the wheel
on the side of the unit.
8
ICONS YOU SHOULD KNOW
APPOINTMENT SCHEDULER
Keep track of your busy life
CALCULATOR
Helps you do the math
PHONE BOOK
Keep track of your friends
STUFF
Keep track of miscellaneous information
THINGS TO DO
Helps you remember
PASSWORD
Protect your private files
CLOCK
Helps you on stay on schedule
SAVE
Upload to or download from your PC
STAMP
Put silly stamps on your friends’ photos
PAINT BRUSH
Alter your stored photos
9
SNAPSHOTS
Take a photo
STRETCHED IMAGE
Stretch your friends’ photos
SPLIT IMAGE
Mix and match parts of your friends’ photos
FLIPPED IMAGE
Flip your photos vertically or horizontally to make new
ones
10
SETTING THE DATE AND TIME
Press ON. The screen will
display the intial screen
Press EDIT. The screen will
prompt DATE? MMDDYY.
Type the correct date. Press
ENTER.
The screen will prompt TIME?
HHMM. Type the correct time,
including AM or PM. The unit
will display AM. If that is
correct, press ENTER. If that is
not correct, press the “A” key.
The screen will change to P.
Press ENTER.
The screen will return to the initial screen.
11
APPOINTMENT SCHEDULER
With the unit turned on, press MENU.
Use the ARROW KEYS to select the APPOINTMENT
SCHEDULER icon. When you are on the icon, it will flash.
Press ENTER.
The screen will display the
current date and day of the week.
ENTER NEW RECORDS:
To enter a new record,
press ENTER .
The screen will prompt DATE?
MMDDYY. Type the date you
want and press ENTER.
12
The screen will prompt
MESSAGE? Type your
message, up to 30 characters (this
includes spaces). As you fill a
line, the cursor will automatically
move to the next line. When you
have finished typing, press
ENTER.
The screen will display STORED, then it will return to the first
screen.
TO VIEW/EDIT RECORDS:
After choosing the
APPOINTMENT SCHEDULER
icon, use the ARROW KEYS to
scroll through the file one day at
a time. If a date has a record
attached to it, the screen will
display the date, marked with
***. To view this entry, press
ENTER.
If the record is longer than what
can be displayed on a single
screen, you will see an arrow at
the end of the line. Use the UP
and DOWN ARROW KEYS to
scroll through the record.
13
To edit this entry, press EDIT.
The screen will prompt DATE?
MMDDYY.
Type the date you want to edit
then press ENTER. If the date
you want to edit is the one
displayed, press ENTER.
The message will be displayed. Use the ARROW KEYS to place
the cursor at the point you want to change. Use the DELETE key to
erase characters if necessary. Type your new, or additional
information.
NOTE: YOU CAN ONLY ENTER 30 CHARACTERS FOR ANY
GIVEN DATE, SO USE ABBREVIATIONS WHENEVER
POSSIBLE.
DELETE A RECORD:
After choosing the APPOINTMENT SCHEDULER icon, use the
ARROW KEYS to scroll to the record you want to delete. Press
ENTER.
The record will be displayed. Press DELETE.
When you have finished any of these functions, press QUIT to
return to the MENU.
14
CALCULATOR
Use the ARROW KEYS to choose the CALCULATOR icon.
Press ENTER.
When you are in the CALCULATOR mode, you DO NOT have to
use the SHIFT nor the NUM/ALPHA button. The unit will
automatically register numeric values.
Your calculator can perform the following functions: addition (+),
subtraction ( ), multiplication ( X ), division (÷), percentage (%)
and square root ( ).
You can change the value of a number from positive to negative or
negative to positive using the +/- key.
There are also memory functions for multiple part equations. "M+"
means add the value stored in memory. "M-" means subtract the
value stored in memory. "MR" means memory recall. "MC" means
memory clear.
The ENTER key is used as the EQUAL (=) key.
Press QUIT to return to the MENU.
15
PHONE BOOK
From the MENU screen, use the ARROW KEYS to choose the
PHONE BOOK. Press ENTER.
The screen will prompt B / G?
TO ENTER A NEW
RECORD:
If you want to enter a boy’s
name, press B. If you want to
enter a girl’s name, press G.
The screen will prompt NAME?
Type your friend’s name (up to
20 characters). Press ENTER.
The screen will prompt
NUMBER? Type your friend’s
telephone number (up to 12
characters). Press ENTER.
**NOTE: Since this is a
numeric field, you do not have
to use the SHIFT or
NUM/ALPHA keys to type
numbers.
16
The screen will prompt
ADDRESS? Type your friend’s
address (up to 30 characters).
Press ENTER. **NOTE: Since
this is an alpha/numeric field, you
will need to use the SHIFT or
NUM/ALPHA keys to type
numbers.
The screen wil prompt
BIRTH?MMDD Type the
month and day of your friend’s
birthdate. Press ENTER.
If you have photos stored, the
unit will prompt ATTACH
PHOTO? If you want to attach
a photo, press ENTER.
(How to store photos will be
explained later.)
The screen will prompt PHOTO
NAME? Type the name you
used to store the photo.
17
The photo will appear on the
screen. If it is NOT the correct
photo, press QUIT. The screen
will prompt PHOTO NAME?
Type the correct photo name.
If it IS the correct photo, press
ENTER. The screen will display
STORED, then return to the
NAME? prompt.
If you have photos stored, but do not wish to attach one
to the record, type N. Press ENTER.
The screen will display
STORED, then return to the
NAME? prompt.
18
If you have no photos stored, the
screen will return to the NAME?
prompt.
If you have more records to enter
in the B(oy) file or G(irl) file,
repeat these steps for each new
record.
If you need to change between
boys’ and girls’ records, press
QUIT to return to the B / G?
prompt. Then, repeat these steps.
REMEMBER: If you are entering boys’ records, you should be in
the B file. If you are entering girls’ records, you should be in the G
file.
TO VIEW/EDIT EXISTING RECORDS:
Choose the PHONE BOOK icon from the MENU, press ENTER.
The screen will prompt B / G?
If you are searching a for a boy’s
name, press B. If you are
searching for a girl’s name,
press G.
19
The screen will prompt NAME?
You can search two ways.
1. Enter the name of the
person you wish to view
and press SEARCH. The
record will appear. Use
the UP and DOWN
ARROW keys to scroll
through the information in the record.
2. Press the LEFT and RIGHT ARROW keys to scroll
alphabetically through all records in the file. Use the UP
and DOWN ARROW keys to scroll through the information
in the record.
After viewing a record, press QUIT to return to the NAME? screen.
If you want to EDIT the record once it is on the screen, press EDIT.
Use DELETE and the keypad to change the information. As you
finish editing each screen, press ENTER.
If you have a photo attached to the record, the last screen will
display the photo and give you options. There are three options:
REMOVE, CHANGE, DONE.
REMOVE – to remove the photo from the record, press 1.
CHANGE – to change the
photo attached to the
record, press 2. The screen
will prompt PHOTO
NAME? To attach a new
photo, follow the steps
described previously.
20
DONE – To leave the photo unchanged and attached to the
record, press the DOWN ARROW and ENTER. Or, just
press 3.
When you are done with the record, the screen will display
STORED, then return to the NAME? screen.
TO DELETE A RECORD:
Follow the steps to retrieve
a record. When it is displayed
on the screen, press DELETE.
The screen will return to the
NAME? prompt.
To end the session, press QUIT until you return to the MENU.
21
STUFF
Use the ARROW KEYS to choose the STUFF icon. Press ENTER.
TO ENTER A NEW RECORD:
The screen will prompt MEMO?
Use the keypad to type a note to
yourself (up to 30 characters).
Press ENTER.
The screen will display STORED,
then return to the MEMO?
prompt.
Type another note, or press QUIT
to return to the MENU.
TO VIEW/EDIT EXISTING RECORDS:
From the MEMO? prompt, use
the LEFT and RIGHT ARROW
KEYS to scroll through the
existing records.
Use the UP and DOWN ARROW
keys to scroll through the
information in a record.
22
When the record you want to edit is displayed, press EDIT. Use the
ARROW KEYS, DELETE and the keypad to make changes. Press
ENTER.
The screen will display
STORED, then return to the
MEMO? prompt.
Press QUIT to return to the MENU.
TO DELETE RECORDS:
Retrieve the record you want to delete. When it is displayed on the
screen, press DELETE. The screen will prompt MEMO?
Press QUIT to return to the MENU.
23
THINGS TO DO
Use the ARROW KEYS to choose the 2-DO icon. Press ENTER.
TO ENTER NEW RECORDS:
The screen will prompt DATE?
MMDDYY. Type the date you
want, press ENTER.
The screen will prompt JOB?
Type your assignment (up to 30
characters), press ENTER.
The screen will prompt
PRIORITY? Use the number
keypad to assign a priority of
1, 2 or 3 to your assignment.
Press ENTER.
24
The screen will display
STORED, then return to the
DATE? prompt.
Repeat these steps for
additional assignments, or press
QUIT to return to the MENU.
NOTE: Your assignments will be filed as follows:
1. By priority
2. By date
3. Alphabetically
In other words, all your #1 priority assignments, in date order, will
be displayed before any of your #2 priority assignments, which will
be displayed before any of your priority #3 assignments.
TO VIEW/EDIT EXISTING RECORDS:
You can retrieve existing records in two ways:
1. From the DATE? prompt, press the DOWN ARROW . Use
the UP and DOWN ARROW keys to view information in the
record displayed. Use the RIGHT and LEFT ARROW keys
to move between records.
2. When the DATE? prompt is on the screen, type the date you
want to view and press SEARCH. The first record for that
date will be displayed. Use the UP and DOWN ARROW
keys to view information in the record. Use the RIGHT and
LEFT ARROW keys to move between records.
When the record you want to edit is displayed, press EDIT.
25
The screen will show the
DATE? screen. Type the date
you want and press ENTER.
The screen will display the
assignment. Use the ARROW
KEYS, DELETE and the
keypad to type your changes.
Press ENTER.
The screen will display the priority previously entered. Assign a
priority (1, 2 or 3) and press ENTER.
The screen will display
STORED, then return to the
DATE? prompt.
Press QUIT to return to the
MENU.
TO DELETE EXISTING RECORDS:
Retrieve the message you want
to delete. When it is displayed
on the screen, press DELETE.
The screen will return to the
DATE? prompt.
Press QUIT to return to the
MENU.
26
PASSWORD
Use the ARROW KEYS to choose the PASSWORD icon.
Press ENTER.
The screen will prompt
PASSWORD. Type your
password. You can use letters,
numbers or a combination.
Press ENTER.
NOTE: While you are typing,
you will NOT see the characters
you are pressing. The screen
will display for each character. This is to prevent someone from
seeing your password.
The screen will prompt
RETYPE. Confirm you
password by retyping it.
Again, you will see for each
character. Press ENTER.
The screen will prompt
ON/OFF/EDIT. The cursor
will be under ON.
27
If you want to use the password function, press ENTER. The screen
will return to the MENU.
NOTE: When the password function is on, you will be prompted to
enter your password before you are allowed access to any file
EXCEPT the CALCULATOR.
If you don’t want to use the password function, use the RIGHT
ARROW key to move the cursor under OFF. Press ENTER. The
screen will return to the MENU.
If you want to edit your password, use the RIGHT ARROW key to
move the cursor under EDIT. Press ENTER.
The screen will prompt
CHANGE TO. Type your new
password. Press ENTER.
The screen will prompt
RETYPE. Retype your new
password. Press ENTER.
28
Screen will prompt
ON/OFF/EDIT. Follow the
steps outlined previously.
IMPORTANT: YOU MUST REMEMBER YOUR
PASSWORD. WRITE IT DOWN SOMEWHERE IF
NECESSARY. IF YOU FORGET YOUR PASSWORD, YOU
WILL BE LOCKED OUT OF YOUR FILES. THE ONLY
WAY TO RE-ENTER THEM WILL BE TO RESET YOUR
UNIT. THIS WILL DELETE YOUR PASSWORD, BUT IT
WILL ALSO DELETE ALL THE OTHER DATA,
INCLUDING PHOTOS, IN YOUR ORGANIZER.
29
CLOCK
TO CHANGE THE INITIAL SETTINGS OF YOUR ORGANIZER
Press MENU, then EDIT.
The screen will prompt:
1 HOUR-12
2 DATE-MM/DD
To change your clock from a
standard 12-hour (AM/PM)
clock to a 24 hour (military)
clock. Press 1.
To change your calendar from a
Month/Date (American) calendar
to a Date/Month calendar,
press 2.
You can change any combination
of these options.
Press QUIT to return to the
MENU.
TO ENTER A NEW RECORD:
Use the ARROW KEYS to choose the CLOCK icon.
Press ENTER.
The screen will prompt DATE?
MMDDYY. Type the date of
your appointment. Press
ENTER.
30
The screen will prompt TIME?
HHMM. Type the time of your
appointment. The screen will
show A or P (indicating AM or
PM) based on the current time.
Press A to change this, if
necessary. Press ENTER.
The screen will prompt
MESSAGE? Use the keypad
to type your message (up to 30
characters). Press ENTER.
The screen will display
STORED, then return to the
DATE? prompt.
Repeat these steps for additional
appointments, or press QUIT to
return to the MENU.
You have now set the alarm. When the main clock displays the time
you entered, an alarm will sound and the screen will display your
appointment. Even if your unit is turned off, the alarm will sound
and the message will be displayed. To turn off the alarm, press
QUIT.
31
TO VIEW/EDIT EXISTING RECORDS:
There are two ways to retrieve files for viewing/editing.
1. From the DATE? prompt, press SEARCH. This will allow
you to scroll through all the records for the current date.
The screen will display the first record in the file. Use the
UP and DOWN ARROW keys to scroll through the
information in a record. Use the RIGHT and LEFT ARROW
keys to scroll between records.
2.
From the DATE? prompt, press the DOWN ARROW.
Then, use the RIGHT and LEFT ARROW keys to scroll
through ALL the records.
When the record you want to
edit is displayed, press EDIT.
The screen will prompt DATE?
MMDDYY. Type the correct
date. Press ENTER.
The screen will prompt TIME?
HHMM. Type the correct time.
Press ENTER.
32
The screen will prompt
MESSAGE? Use the ARROW
KEYS, DELETE and the
keypad to change the
information. Press ENTER.
The screen will display
STORED, then return to the
DATE? prompt.
Press QUIT to return to the
MENU.
TO DELETE AN EXISTING RECORD:
Retrieve the record you want to delete. When the record is
displayed, press DELETE.
The screen will return to the
DATE? prompt.
Press QUIT to return to the
MENU.
33
SAVE
NOTE: YOU MUST HAVE THE PC LINK SOFTWARE
(SOLD SEPARATELY) TO USE THIS FUNCTION.
Following the instructions with
the PC LINK, load the
software onto your computer
and connect your SnapShot
Organizer to your PC via the
com port on the side of the unit
Use the ARROW KEYS to
choose the SAVE icon. Press ENTER.
The screen will prompt
1. UPLOAD
2.DOWNLOAD.
If you want to upload
information to your PC from
your SnapShot, press 1.
The screen will prompt
HIT ANY KEY TO START.
34
The screen will display
UPLOADING... when the
upload is complete. The screen
will return to the UPLOAD
DOWNLOAD prompt.
If you want to download information to your SnapShot from your PC,
press 2.
The screen will prompt
DOWNLOAD ERASE ALL
DATA OK Y/N?
DOWNLOADING... when the
download is complete. The
screen will return to the
UPLOAD DOWNLOAD
prompt.
PC system requirement
- 486 DX2 with 16M RAM of above.
- WIN95/98 operating system.
Note: Want to download and print out your favorite Snapshot photos?
Look for Tiger’s SNAPSHOT PC LINK* at your favorite retailer.
Simply link your Snapshot COM Port to any PC and print out through
your regular printer. Software and cable included.
*sold separately
35
STAMP
Use the ARROW KEYS to choose the STAMP icon.
Press ENTER.
The screen will prompt
NAME? Type the name
associated with the photo you
want to alter. Press ENTER.
The photo will appear on the
screen. If it is the correct
photo, press ENTER.
There are four options:
1. STAMP, 2. UNDO,
3. UNDO ALL and 4. DONE.
We will discuss each option
separately.
STAMP
If you want to alter the photo
on the screen, press ENTER.
A menu of choices will appear.
Use the DOWN ARROW to
scroll through the options.
When you find the feature you
want to stamp, press ENTER.
36
An icon will appear on the
screen, superimposed over the
photo. If there are alternate
icons for that stamp, the screen
will prompt ALTERNATE.
To view the other choices, press A. When you decide on an icon,
use the ARROW KEYS to move it to where you want it on the
photo. Press ENTER.
The icon will be placed and
the screen will return to the
STAMP prompt.
Repeat this process until you
have finished altering the
photo.
UNDO
Use this option to delete the last icon placed. It can only be used if
you haven’t saved the photo.
UNDO ALL
Use this option to delete all icons placed in a given session. It can
only be used if you haven’t saved the photo.
37
DONE
When you have finished altering the photo, press 4.
The screen will prompt:
1. SAVE
2. SAVE AS.
If you choose SAVE, the
altered photo will replace the
previous version of the photo.
The screen will display
WORKING. . ., then
STORED. Then it will return
to the NAME? prompt.
If you choose SAVE AS, the screen will display the current name.
Type the name you want to use for the new photo. Press ENTER.
The screen will display
STORED, then return to the
NAME? prompt.
Repeat these steps to alter other
photos, or press QUIT to
return to the MENU.
38
PAINT BRUSH
Use the ARROW KEYS to choose the PAINT BRUSH icon.
Press ENTER.
The screen will prompt
NAME? Type the name of the
photo you want to alter.
Press ENTER.
The photo will be displayed on
the screen. Press ENTER.
The screen will prompt you
with several options. Each
option will be discussed
separately.
1.
CURSOR – use this option to put the cursor into the
position on the photo that you want to alter
Press ENTER. The screen will prompt
CURSOR, and a flashing “+” will appear on the
photo. Use the ARROW KEYS to move the
cursor around the photo until it is in the
position you want. Press ENTER.
NOTE: YOU WILL HAVE TO PLACE THE CURSOR FOR
EACH CHANGE.
39
2.
AIR BRUSH – use this option when you are ready to start
“painting” on the photo.
Press ENTER. The screen will
display the color and size of the
line you will be painting. Use
the ARROW KEYS to paint
on the photo. When you are
finished, press ENTER.
3.
SETTINGS – use this option to change the color and size of
the line you will be painting
Press ENTER. The screen will
display COLOR : BLACK.
Use the UP and DOWN
ARROW keys to scroll through
the color choices. When the
color you want is displayed,
press ENTER.
The screen will display SIZE
(1-10). Use the UP and
DOWN ARROW to change
the thickness of the line. The
larger the number, the thicker
the line. When you have
decided on the thickness of the
line, press ENTER.
40
4.
UNDO – use this option to erase the last change to the photo.
To use, press ENTER.
5.
DONE – use this option to
save the altered
photo.
Press ENTER.
The screen will
prompt 1. SAVE,
2. SAVE AS.
If you want to
replace the existing photo with your new creation,
press ENTER. If you want to save this as a new
photo, use the DOWN ARROW to move the cursor
to SAVE AS, press ENTER. The screen will display
the current photo name. Type the new name, press
ENTER. The screen will return the NAME? prompt.
Repeat these steps to alter other photos, or press QUIT to return to
MENU.
41
SNAPSHOTS
NOTE: In case of extreme darkness OR brightness of the lighting
conditions, picture quality may be affected, try to be in normal
lighting conditions when you take pictures.
Use the ARROW KEYS to choose the SNAP SHOTS icon.
Press ENTER.
The screen will display two
options: 1. SNAP SHOT and
2. GAME. Each will be
discussed separately.
SNAP SHOT
Press ENTER. The screen will
display 2 options: 1. CREATE
NEW and 2. EDIT OLD.
CREATE NEW:
Press ENTER. The screen will
prompt NAME? Type the name
you want attached to your photo.
Press ENTER.
42
The screen will give you three
options: INDOOR,
OUTDOOR, SUNNY. Use the
DOWN ARROW to move the
cursor to your choice. Press
ENTER.
The screen will give you two
options: 1. ONE TIME, or
2. REAL TIME.
For ONE TIME, press ENTER.
When you do this, you will take a
photo of whatever is in the
viewfinder, so you want to have
the camera pointed at your
subject. The screen will display WORKING. . .
The photo will appear on the
screen with the prompt
ACCEPT PHOTO?
You can adjust the contrast by
using the ARROW KEY:
1. UP: fine tune darker
2. DOWN: fine tune lighter
3. RIGHT: coarse tune darker
4. LEFT: coarse tune lighter
If you are not satisfied with the photo displayed, point the camera at
your subject and press ENTER. The above steps will be repeated.
Continue this process until you have a photo you like.
43
When you are satisfied with the
photo, press Y, then ENTER.
The screen will display
WORKING. . ., then
STORED. Then it will prompt
UPLOAD PC?
If you want to upload press Y,
then ENTER. The screen will
display LINKING... When the
upload is complete, the screen
will display UPLOAD
COMPLETE, then return to the
Name? prompt
NOTE: Your organizer must be connected to your PC by the
PC-LINK cable (sold separately) in order to UPLOAD.
Files format
- Photos in*.BMP BITMAP file format.
- Records backup in *.SSI format, for PC-LINK software usage only.
If you don’t want to upload,
press ENTER The screen will
return to the NAME? prompt.
44
For REAL TIME, use the
DOWN ARROW to move the
cursor. Press ENTER. When
you do this, the camera will
continuously take photos. The
screen will prompt PRESS
SPACE TO STOP.
The image will refresh every
3 – 5 seconds. When you see an image you like, press SPACE. You
will hear a "beep" when the unit registers your command to STOP.
NOTE: YOU SHOULD ONLY USE THIS OPTION IF YOU ARE
TRYING TO TAKE A PHOTO WITH YOU IN IT.
The screen will prompt
ACCEPT PHOTO? Follow
the same steps as described for
ONE TIME.
Repeat these steps to take
additional photos, or press
QUIT until you return to the
MENU.
EDIT OLD:
Press 2, then ENTER.
The screen will prompt NAME?
Type the name of the photo you
want to edit. Press ENTER.
45
The photo will appear on the screen. Press EDIT and the cursor will
begin flashing. Use the ARROW KEYS, DELETE and the keypad
to type the new photo name. Press ENTER.
The screen will display
WORKING. . ., then STORED.
The screen will return to the
NAME? prompt.
You can also DELETE photos
while in this mode. At the
NAME? prompt, type the name
of the photo you want to delete or
use the UP and DOWN ARROWS to scroll through your photos.
Press ENTER.
The photo will be displayed on
the screen. Press DELETE.
The screen will display
WORKING. . ., then it will
return to the NAME? prompt.
Repeat these steps to edit/delete
additional photos, or press QUIT
until you return to the MENU.
GAME
Use the DOWN ARROW to
move the cursor. Press ENTER.
The screen will prompt NO OF
PLAYER (1-4)? Use the keypad
to type the number of players.
46
The screen will prompt NO OF
PHOTO. It will also give you a
range of numbers. The range is
determined by the number of
NAMED photos stored in your
organizer. In other words, if you
have only one named photo stored,
you would only have one photo
available for the game. If you have 6 named photos, you would be
given a range of 1 - 6; 15 named photos stored, a range of 1 - 15.
NOTE: If you have photos stored, but never assigned names to them,
you will be unable to play the game. The screen will prompt NOT
ENOUGH PHOTO TO PLAY.
Each photo will be a “round.” Players will earn points for each
“round” they solve. Use the keypad to type the number of photos you
want to use in the game. Press ENTER.
The screen will prompt PRESS
ENTER TO START.
Press ENTER.
The photo area on the screen will
be black. Every 3-5 seconds, a
portion of the photo will be
revealed. When a player knows
which photo it is, press ENTER.
The screen will prompt WHICH
PLAYER. Use the keypad to
enter the player’s number. Press
ENTER.
(If you are playing a 1-player
game, you will not receive this
prompt.)
47
The photo will go black and the
cursor will appear on the screen.
Type the name of the photo you
believe to be the puzzle.
Press ENTER.
If you are incorrect, the screen
will return to the puzzle and
will continue to reveal one
section at a time.
If you are correct, the screen
will display the player number
and the points received. The
earlier a puzzle is solved, the
more points it is worth. Press
ENTER.
Repeat these steps until all
photos in the game have been
guessed.
Press ENTER to display the
cumulative points for each
player.
The final screen for the game
will display the winner. (If you
are playing a 1-player game,
you will not get a “WINNER”
screen.)
The screen will return to the SNAP SHOT/GAME screen.
48
STRETCHED IMAGE
Use the ARROW KEYS to choose the STRETCHED IMAGE icon.
Press ENTER.
The screen will display two
options: 1. STRETCH and
2. ZOOM
STRETCH
To stretch a photo, press ENTER.
The screen will prompt NAME?
Type the name of the photo you
want to alter or use the UP and
DOWN ARROW keys to scroll
through your photos. Press
ENTER.
The photo will appear on the
screen along with two choices:
1. UNDO and 2. UNDO ALL.
Use the ARROW KEYS to
alter the photo. To UNDO the
last change, press 1. To UNDO
ALL changes made during this
session, press 2.
When you are done altering the photo, press ENTER.
49
The screen will prompt
1. SAVE and 2. SAVE AS.
If you want the altered photo to
replace the existing photo, press
ENTER. If you want to save
the altered photo with a new
name, press 2.
The cursor will appear on the screen. Use the ARROW KEYS,
DELETE and the keypad to type the new name for the photo.
Press ENTER.
The screen will prompt
WORKING. . ., then STORED.
The screen will return to the
NAME? prompt.
Repeat these steps if you want
to alter other photos, or press
QUIT to return to the MENU.
50
ZOOM
To ZOOM in on a photo, press 2.
The screen will prompt
NAME? Use the keypad to
type the name of the photo you
want to alter, or use the UP and
DOWN ARROW keys to
scroll through your photos.
Press ENTER.
The photo will appear on the screen. Press ENTER.
The screen will prompt ZOOM
CURSOR. A pointer will be
in front of ZOOM. Use the
ARROW KEYS to zoom in
and out. Between each level of
zoom, the screen will display
WORKING. . .
Once you have altered a photo you may wish to relocate the image
on the screen. To do this, press C. Use the ARROW KEYS to
move the photo.
To go back to ZOOM, press Z.
When you are done altering the photo, press S.
51
The screen will prompt
1. SAVE and 2. SAVE AS.
If you want the altered photo to
replace the existing photo, press
ENTER. The screen will
display WORKING. . ., then
STORED. The screen will
return to the NAME? prompt.
If you want to save the altered photo as a new record, press 2.
The cursor will appear on the screen. Use the ARROW KEYS,
DELETE and the keypad to type the new name for the photo. Press
ENTER.
The screen will display
WORKING. . ., then
STORED. The screen will
return to the NAME? prompt.
Repeat these steps if you want
to alter more photos, or press
QUIT to return to the MENU.
52
SPLIT IMAGE
Use the ARROW KEYS to choose the SPLIT IMAGE icon.
Press ENTER.
The screen will prompt
PHOTO 1? Use the keypad to
type the name of the first photo,
or use the ARROW KEYS to
scroll through your photos.
Press ENTER.
The screen will prompt
PHOTO2? Use the keypad to
type the name of the second
photo, or use the ARROW
KEYS to scroll through you
photos. Press ENTER.
The screen will prompt MARK
BLOCK BEGIN.
A cursor will appear in the
center of PHOTO 2.
Use the ARROW KEYS to
position the cursor. When it is
in place, press ENTER.
53
The screen will prompt MARK
BLOCK END. Use the arrow
keys to block a square on the
photo. When the area you want
to use is outlined, press
ENTER.
The section of the photo that
was BLOCKED will appear on
the screen superimposed over
the image of PHOTO 1. The
screen will prompt CURSOR
UNDO ADUST.
A pointer will be in front of
CURSOR. Use the ARROW KEYS to move the superimposed
image around the screen.
Press A, the pointer will move to be in front of ADJUST. Use the
ARROW KEYS to expand or condense the superimposed area.
Press U, to UNDO your
changes. The screen will
prompt 1. UNDO and 2. UNDO
ALL.
To UNDO the last change,
press 1.
To UNDO ALL changes made
in this session, press 2.
54
When you are done,
press ENTER.
The screen will prompt
1. SAVE and 2. SAVE AS
If you want the altered photo
to replace PHOTO 1,
press ENTER.
The screen will display
WORKING. . ., then
STORED. The screen will
return to the PHOTO 1?
prompt.
To save the altered photo as a
new record, press 2.
The cursor will appear on the screen. Use the ARROW KEYS,
DELETE and the keypad to type the new name for the photo. Press
ENTER.
The screen will return to the
PHOTO 1? prompt.
Repeat these steps if you want
to alter additional photos, or
press QUIT to return to the
MENU.
55
FLIPPED IMAGE
Use the ARROW KEYS to choose the FLIPPED IMAGE icon.
Press ENTER.
The screen will prompt NAME?
Use the keypad to type the name
of the photo you want to alter or
use the ARROW KEYS to scroll
through your photos. Press
ENTER.
The screen will display options
1. MIRROR 2. FLIP 3. UNDO
4. DONE Two options will
appear on the screen at a time.
If you want to turn the image 180
degrees horizontally (left/right),
press 1.
If you want to turn the image 180
degrees vertically (up/down),
press 2.
If you want to erase the last
change you made, press 3.
When you have finished, press 4.
56
The screen will prompt
1. SAVE and 2. SAVE AS
If you want the altered photo to
replace the existing one, press 1.
The screen will display
WORKING. . ., then STORED.
The screen will return to the NAME? prompt.
If you want to save the altered photo as a new record, press 2.
The cursor will appear on the screen. Use the ARROW KEYS,
DELETE and the keypad to type the new name for the photo.
Press ENTER.
The screen will display
WORKING. . ., then STORED.
The screen will return to the
NAME? prompt.
Repeat these steps to alter
additional photos, or press
QUIT to return to the MENU.
57
Cautions
High temperature will destroy the unit.
Do not leave unit in direct sunlight.
Do not press the liquid crystal display and
avoid heavy shock or the display may fail.
Do not use a pencil or pin to press the
RESET button. Use a ball-point pen.
Clean only with a piece of soft dry cloth.
58
90-DAY LIMITED WARRANTY
Tiger Electronics, Ltd. (Tiger) warrants to the original consumer purchaser of this product
that the product will be free from defects in materials or workmanship for 90 days from the
date of original purchase. This warranty does not cover damages resulting from accident,
negligence, improper service or use or other causes not arising out of defects in materials
or workmanship.
During this 90-day warranty period, the product will either be repaired or replaced (at
Tiger’s option) without charge to the purchaser, when returned with proof of the date of
purchase to either the dealer or to Tiger.
Product returned to Tiger without proof of the date of purchase or after the 90-day warranty
period has expired, but prior to one year from the original date of purchase, will be repaired
or replaced (at Tiger’s option) for a service fee of U.S. $46.00. Payments must be by check
or money order payable to Tiger Electronics, Ltd.
The foregoing states the purchaser’s sole and exclusive remedy for any breach of
warranty with respect to the product.
All product returned must be shipped prepaid and insured for loss or damage to:
Tiger Repair Department
1000 N. Butterfield Road, Unit 1023
Vernon Hills, IL 6006l, U.S.A.
The product should be carefully packed in the original box or other packing materials
sufficient to avoid damage during shipment. Include a complete written description of the
defect, a check if product is beyond the 90-day warranty period, and your printed name,
address and telephone number.
THIS WARRANTY IS IN LIEU OF ALL OTHER WARRANTIES AND NO
OTHER REPRESENTATIONS OR CLAIMS OF ANY NATURE SHALL BE
BINDING ON OR OBLIGATE TIGER IN ANY WAY. ANY IMPLIED
WARRANTIES APPLICABLE TO THIS PRODUCT, INCLUDING WARRANTIES
OF MERCHANTABILITY AND FITNESS FOR A PARTICULAR PURPOSE, ARE
LIMITED TO THE NINETY (90) DAY PERIOD DESCRIBED ABOVE. IN NO
EVENT WILL TIGER BE LIABLE FOR ANY SPECIAL, INCIDENTAL, OR
CONSEQUENTIAL DAMAGES RESULTING FROM POSSESSION, USE, OR
MALFUNCTION OF THIS PRODUCT.
Some states do not allow limitations as to how long an implied warranty lasts and/or
exclusions or limitations of incidental or consequential damages, so the above limitations
and/or exclusions of liability may not apply to you. This warranty gives you specific rights,
and you may also have other rights which vary from state to state.
For more information about Tiger Electronics, our products and special promotions,
please visit our web site at: www.tigertoys.com
59
Ages 6 & up
Model 71-555
®
®
INSTRUCTIONS
60
®,TM & © 1999 Tiger Electronics, Ltd.
980 Woodlands Parkway, Vernon Hills, Illinois 60061, U.S.A.
www.tigertoys.com
PRINTED IN CHINA
61
715550001WTI-02