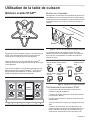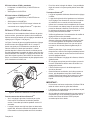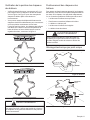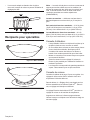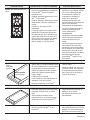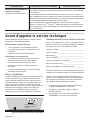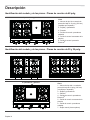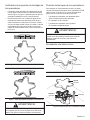
1
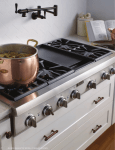
USE AND CARE GUIDE
THERMADOR PROFESSIONAL® RANGETOPS
GUIDE D'UTILISATION ET
D'ENTRETIEN
Tables de cuisson PROFESSIONALmc de THERMADOR
MANUAL DE USO Y CUIDADO
Placas de cocción PROFESSIONAL® de THERMADOR
Models/
Modèles/
Modelos:
PCG30
PCG36
PCG48
Congratulations on your recent THERMADOR® purchase! Whether you are a dedicated chef or simply a connoisseur of the
art of cooking, owning a THERMADOR kitchen is the ultimate expression of personal style, good taste and an appreciation
for the complete culinary experience. Our award-winning products have been empowering culinary enthusiasts for more
than eleven decades.
Before you begin using your new THERMADOR product, please take a moment to review the Use and Care Guide. You
will find the answers to all of your questions as well as some very important safety information. Pay special attention to the
Important Safety Instructions located at the beginning of the manual. Your THERMADOR product is ready and waiting to
be used for your next gourmet creation!
Our products are handcrafted with the highest quality authentic materials to ensure years of reliable service. In the unlikely
event that you have a service question, please have your model and serial numbers of your product available. You can find
this information beneath the control panel area of the range.
We realize that you have made a considerable investment in your kitchen. Please feel free to share your THERMADOR
kitchen photos and remodeling stories with us. Follow us on Twitter or post your kitchen photos on Facebook. We would
love to hear from you!
THERMADOR wishes you many years of creative cooking.
Félicitations pour votre récent achat THERMADORmc! Que vous soyez un chef enthousiaste ou un simple connaisseur de
l’art culinaire, le fait de posséder une cuisine THERMADOR représente l’expression ultime de votre style personnel, de
votre bon goût et de votre intérêt à vivre une expérience culinaire complète. Nos produits primés permettent à des adeptes
de la bonne bouffe d’atteindre de nouveaux sommets depuis plus de onze décennies.
Avant de commencer à utiliser votre nouveau produit THERMADOR, veuillez prendre un moment pour examiner ce guide
d’utilisation et d’entretien. Vous trouverez des réponses à toutes vos questions ainsi que quelques renseignements
essentiels en matière de sécurité. Portez une attention particulière aux Instructions de sécurité importantes se trouvant
au début du guide. Votre produit THERMADOR est prêt et n’attend plus que vous l’utilisiez pour votre prochaine création
gastronomique!
Nos produits sont fabriqués à la main avec des matériaux authentiques de haute qualité afin d’assurer des années de
service fiable. Dans l’éventualité improbable où vous auriez une question relativement à l’entretien, veuillez avoir à la
portée de la main le numéro de série et de modèle de votre produit. Ces renseignements se trouvent sous le rebord du bâti
de la table de cuisson.
Nous savons bien que vous avez investi une somme considérable dans votre cuisine. N’hésitez pas à partager avec nous
les photos de votre cuisine THERMADOR et les anecdotes relatives au remodelage de votre cuisine. Suivez-nous sur
Twitter ou affichez des photos de votre cuisine sur Facebook. Nous serions ravis d’avoir de vos nouvelles!
THERMADOR vous souhaite de nombreuses années de gastronomie créative.
¡Enhorabuena por la reciente compra de su THERMADOR®! Que Usted sea un gran jefe de cocina o un simple aficionado
del arte culinario, el hecho de poseer una cocina THERMADOR es la última expresión de su estilo personal, de su buen
gusto y de su apreciación de una experiencia culinaria completa. Nuestros premiados productos permiten al entusiasta de
la cocina explorar este mundo desde hace más de once décadas.
Antes de comenzar a utilizar sur nuevo producto THERMADOR, tómese un momento para echar un vistazo a este manual
de uso y mantenimiento. Encontrará respuestas a todas sus preguntas además de informaciones esenciales en materia de
seguridad. Ponga especial atención a las Instrucciones de seguridad importantes, situadas al principio del manual. ¡Su
producto THERMADOR está listo y solo espera a que Usted lo use para su próxima creación gastronómica!
Nuestros productos se fabrican a mano con materiales auténticos de alta calidad a fin de garantizar años de servicio fiable.
En el caso improbable en que Usted tenga una pregunta relativa al mantenimiento, tenga a mano el número de serie y el
modelo de su producto. Puede encontrar esta información en la parte inferior del armazón de la placa de cocción.
Nos damos cuenta de que Usted invirtió una suma considerable en su cocina. No dude en compartir con nosotros las fotos
de su cocina THERMADOR y anécdotas acerca de la reforma de su cocina. Síganos en Twitter o publique fotos de su
cocina en Facebook. ¡Estaremos encantados de tener noticias suyas!
¡THERMADOR le desea varios años de gastronomía creativa!
Table of Contents
Safety . . . . . . . . . . . . . . . . . . . . . . . . . . . . . . . . . . . . . . . . . . . . . . . . . . . . . . . . 1
Important Safety Instructions . . . . . . . . . . . . . . . . . . . . . . . . . . . . . . . . . . . . . . . . . . . . 1
Before You Begin . . . . . . . . . . . . . . . . . . . . . . . . . . . . . . . . . . . . . . . . . . . . . . . 6
Description . . . . . . . . . . . . . . . . . . . . . . . . . . . . . . . . . . . . . . . . . . . . . . . . . . . . 7
48” Rangetop Identification . . . . . . . . . . . . . . . . . . . . . . . . . . . . . . . . . . . . . . . . . . . . . 7
30” & 36” Rangetop Identification . . . . . . . . . . . . . . . . . . . . . . . . . . . . . . . . . . . . . . . 7
Using the Rangetop . . . . . . . . . . . . . . . . . . . . . . . . . . . . . . . . . . . . . . . . . . . . . 8
Sealed STAR® Burners . . . . . . . . . . . . . . . . . . . . . . . . . . . . . . . . . . . . . . . . . . . . . . . . 8
Cookware Recommendations . . . . . . . . . . . . . . . . . . . . . . . . . . . . . . . . . . . . . . . . . . 12
Specialty Cookware . . . . . . . . . . . . . . . . . . . . . . . . . . . . . . . . . . . . . . . . . . . . . . . . . . 13
Surface Burner Cooking Guide . . . . . . . . . . . . . . . . . . . . . . . . . . . . . . . . . . . . . . . . . 14
Using the Electric Griddle . . . . . . . . . . . . . . . . . . . . . . . . . . . . . . . . . . . . . . . . . . . . . 16
Maintenance and Care . . . . . . . . . . . . . . . . . . . . . . . . . . . . . . . . . . . . . . . . . . 18
Do-It-Yourself Maintenance . . . . . . . . . . . . . . . . . . . . . . . . . . . . . . . . . . . . . . . . . . . . 18
Rangetop Cleaning Tips . . . . . . . . . . . . . . . . . . . . . . . . . . . . . . . . . . . . . . . . . . . . . . 18
Cleaning Recommendations . . . . . . . . . . . . . . . . . . . . . . . . . . . . . . . . . . . . . . . . . . . 19
Before Calling Service . . . . . . . . . . . . . . . . . . . . . . . . . . . . . . . . . . . . . . . . . . 21
Data Rating Label . . . . . . . . . . . . . . . . . . . . . . . . . . . . . . . . . . . . . . . . . . . . . . . . . . . 21
Service Information . . . . . . . . . . . . . . . . . . . . . . . . . . . . . . . . . . . . . . . . . . . . . . . . . . 21
Statement of Limited Product Warranty . . . . . . . . . . . . . . . . . . . . . . . . . . . 22
THERMADOR® Customer Support, Accessories & Parts. . . . . . . back page
This THERMADOR® appliance is made
by BSH Home Appliances Corporation
1901 Main Street, Suite 600
Irvine, CA 92614
Questions?
1-800-735-4328
www.thermador.com
We look forward to hearing from you!
Safety
IMPORTANT SAFETY INSTRUCTIONS
Read and Save These Instructions
PLEASE READ CAREFULLY
WARNING:
If the information in this manual is not
followed exactly, a fire or explosion may
result causing property damage, personal
injury or death.
— Do not store or use gasoline or other flammable
vapors and liquids in the vicinity of this or any other
appliance.
— WHAT TO DO IF YOU SMELL GAS
• Do not try to light any appliance.
• Do not touch any electrical switch.
• Do not use any phone in your building.
• Immediately call your gas supplier from a
neighbor’s phone. Follow the gas supplier’s
instructions.
• If you cannot reach your gas supplier, call
the fire department.
— Installation and service must be performed by a
qualified installer, service agency or the gas supplier.
WARNING:
Improper installation, adjustment, alteration, service or
maintenance can cause injury or property damage.
Refer to this manual. For assistance or additional
information consult a qualified installer, service agency,
manufacturer (dealer) or the gas supplier.
Gas Type Verification
Rangetops are shipped by the factory to operate on natural
gas. Verify the type of gas supplied to the location. Ensure
that the appliance is connected to the type of gas for which
it is certified. All models are certified for use with natural
gas. Field conversion of the appliance for use with propane
gas supply will require a conversion kit (PLPKIT). Field
conversion must be done by qualified service personnel
only.
CAUTION:
When connecting the unit to propane gas, make certain
the propane gas tank is equipped with its own highpressure regulator in addition to the pressure regulator
supplied with the rangetop. The maximum gas
pressure to this appliance must not exceed 14.0”
water column (34.9 mb) from the propane gas tank to
the pressure regulator.
IMPORTANT:
When installing against a combustible surface, a Low
Backguard is required. A THERMADOR® Low Backguard
must be purchased separately. See the Installation Manual
for backguard and installation information.
When using the Flush Island Trim, THERMADOR
recommends a minimum 12” (305 mm) rear clearance to a
combustible surface (see the Installation Manual for
clearance requirements). Clearances from noncombustible materials are not part of the ANSI Z21.1 scope
and are not certified by CSA. Clearances of less than 12”
(305 mm) must be approved by the local codes and/or by
the local authority having jurisdiction.
For Massachusetts Installations:
1. Installation must be performed by a qualified or
licensed contractor, plumber or gas fitter qualified or
licensed by the state, province or region where this
appliance is being installed.
2. Shut-off valve must be a “T” handle gas cock.
3. Flexible gas connector must not be longer than 36”
(914mm).
Before using the rangetop, ensure that it is equipped with a
proper backguard. Refer to the Installation Manual
accompanying this appliance for more information.
WARNING:
To avoid possible burn or fire hazard, a back guard
designed specifically for this rangetop must be installed
whenever the rangetop is used.
English 1
IMPORTANT SAFETY INSTRUCTIONS
Read and Save These Instructions
Electrical Requirements
WARNING:
IN CASE OF AN ELECTRICAL FAILURE
If for any reason a gas control knob is turned ON and
there is no electrical power to operate the electronic
igniters on the rangetop STAR® burners, turn OFF the
gas control knob and wait 5 minutes for the gas to
dissipate before lighting the STAR burner manually.
To light the STAR burners manually, carefully hold a
lighted match to the STAR burner ports and turn the gas
control knob to HI. During a power failure, you can use
the standard rangetop STAR burners, but each must be
lit with a match.
DO NOT attempt to light the two left XLO® STAR
burners manually. These STAR burners are equipped
with the ExtraLow® feature and cannot be lit manually.
It is the personal responsibility and obligation of you, the
user, to have this appliance connected to the electrical
power supply by a qualified electrician, in accordance with
the National Electrical Code and/or applicable local codes
and ordinances.
All rangetop models require an electrical circuit rated at 120
volts, 60 Hz., 10 Amps, except models with electric griddle
require 15 Amp circuits.
CAUTION:
FOR PERSONAL SAFETY, THIS APPLIANCE MUST
BE CONNECTED TO A PROPERLY GROUNDED AND
POLARIZED ELECTRICAL POWER SUPPLY.
Always disconnect the electrical plug from the wall
receptacle before servicing this unit.
See the Installation Manual for electrical requirements and
grounding instructions.
Safety Codes and Standards
This appliance complies with the following Standards:
• UL 858, The Standard for the Safety of Household
Electric Ranges
• ANSI Z21.1, The American National Standard for
Household Cooking Gas Appliances
• CAN 1-1.1-M81, Domestic Gas Ranges
• CSA C22.2 No. 61, Household Cooking Ranges
Check your local building codes for the proper method of
installation. In the absence of local codes, this unit should
be installed in accordance with the National Fuel Gas Code
No. Z223.1 current issue and the National Electrical Code
ANSI/NFPA No. 70 current issue or the Can - B149
Installation Codes for Gas Burning Appliances and C22.1
Canadian Electrical Code Part 1.
It is the responsibility of the owner and the installer to
determine if additional requirements and/or standards
apply to specific installations.
When properly cared for, your new THERMADOR
PROFESSIONAL® rangetop has been designed to be a
safe, reliable appliance. However, use extreme care when
using this restaurant caliber rangetop as this type of
appliance provides intense heat. When using kitchen
appliances, basic safety precautions must be followed,
including the following:
Read this Use and Care Guide carefully before using your
new rangetop to reduce the risk of fire, electrical shock, or
injury to persons.
Insure proper installation and servicing. Follow the
Installation Manual provided with this product. Have the
rangetop installed and electrically grounded by a qualified
technician.
Have the installer show you where the electric circuit
breaker and the gas supply shut off valve are located so
you know how and where to turn off the gas and electricity
to the rangetop.
In the event a STAR® burner goes out and gas escapes,
open a window or a door. DO NOT attempt to use the
rangetop until the gas has had time to dissipate. Wait at
least 5 minutes before using the rangetop.
DO NOT repair or replace any part of the appliance unless
specifically recommended in this manual. All servicing
should be referred to a qualified technician.
English 2
IMPORTANT SAFETY INSTRUCTIONS
Read and Save These Instructions
WARNING:
TO REDUCE THE RISK OF INJURY TO PERSONS, IN
THE EVENT OF A GREASE FIRE, OBSERVE THE
FOLLOWING:
• Smother flames with a close-fitting lid, cookie sheet,
or other metal tray, then turn off the gas burner or the
electric element. Be careful to prevent burns. If the
flames do not go out immediately, evacuate and call
the fire department.
• Never pick up a flaming pan — You may be burned.
• DO NOT USE WATER, including wet dish cloths or
towels — a violent steam explosion will result.
• Use an extinguisher only if:
• You know you have a class ABC extinguisher
and you already know how to operate it.
• The fire is small and contained in the area where
it started.
• The fire department is being called.
• You can fight the fire with your back to an exit.
Child Safety
When children become old enough to use the appliance, it
is the legal responsibility of the parents or legal guardians
to ensure that they are instructed in safe operation of the
appliance by qualified persons.
WARNING:
DO NOT store items of interest to children above or at
the back of the rangetop. If children should climb onto
the appliance to reach these items, they could be
seriously injured.
DO NOT allow anyone to climb, stand, lean, sit, or hang on
any part of an appliance. This can damage the appliance,
and the unit may tip over, potentially causing severe injury.
DO NOT allow children to use this appliance unless closely
supervised by an adult.
Children and pets should not be left alone or unattended in
the area where the appliance is in use. They should never
be allowed to play in its vicinity, whether or not the
appliance is in use.
NEVER use any part of the rangetop for storage.
Flammable materials can catch fire and plastic items may
melt or ignite. DO NOT hang articles from any part of the
appliance. Some fabrics are quite flammable and may
catch on fire.
If the rangetop is near a window, be certain the curtains do
not blow over or near the rangetop burners; they could
catch on fire.
WARNING:
TO REDUCE THE RISK OF A GREASE FIRE:
• Never leave surface units unattended at high
settings. Boilovers cause smoking and greasy
spillovers that may ignite. Heat oils slowly on low or
medium settings.
• Always turn hood ON when cooking at high heat or
when flambéing food (i.e. Crepes Suzette, Cherries
Jubilee, Peppercorn Beef Flambé).
• Clean hood filters frequently. Grease should not be
allowed to accumulate on fan or filter.
• Use proper pan size. Always use cookware
appropriate for the size of the rangetop burner.
ALWAYS have a working smoke detector near the kitchen.
In the event that personal clothing or hair catches fire, drop
and roll immediately to extinguish flames.
Have an appropriate fire extinguisher available nearby,
highly visible, and easily accessible near the cooking
appliance.
Smother flames from food fires, other than grease fires,
with baking soda. Never use water on cooking fires.
Whenever possible, do not operate the ventilation system
during a rangetop fire. However, DO NOT reach through
fire to turn it off.
NEVER let clothing, potholders, or other flammable
materials come in contact with or too close to any burner or
burner grate until it has cooled. Fabric may ignite and result
in personal injury.
Use only dry potholders: moist or damp potholders on hot
surfaces may cause burns from steam. DO NOT use a
towel or other bulky cloth in place of potholders. DO NOT
let potholders touch hot burners or burner grates.
English 3
IMPORTANT SAFETY INSTRUCTIONS
Read and Save These Instructions
For personal safety, wear proper apparel. Loose fitting
garments or hanging sleeves should never be worn while
using this appliance. Some synthetic fabrics are highly
flammable and should not be worn while cooking.
DO NOT use aluminum foil to line any part of the rangetop.
Use of a foil liner could result in a shock or fire hazard, or
the obstruction of the flow of combustion and ventilation air.
Foil is an excellent heat insulator and heat will be trapped
beneath it. This will upset the cooking performance and can
damage the finish of the rangetop.
WARNING:
The appliance is for cooking. Based on safety
considerations, never use the rangetop to warm or heat
a room. Doing so may result in carbon monoxide
poisoning and overheating of the unit. Also, such use
can damage the rangetop parts.
When using the rangetop: DO NOT TOUCH THE BURNER
GRATES OR THE IMMEDIATE SURROUNDING AREA.
Areas adjacent to the burners may become hot enough to
cause burns.
Always use pots and pans that have flat bottoms large
enough to cover the burner. The use of undersized pots
and pans could expose a portion of the flame and may
result in ignition of clothing.
WARNING:
Avoid using high flame setting with a pan larger than the
grate or with one that spans more than one burner, such
as a griddle, for prolonged periods of time. This can
result in poor combustion that generates harmful byproducts.
To minimize the risk of burns, ignition of flammable
materials and unintentional spillage, position handles of
pots and pans inward so they do not extend over adjacent
work areas, cooking areas, or the edge of the rangetop.
DO NOT use pots or pans on the grill plate accessory
(purchased separately). Bakeware, such as large
casserole pans, cookie sheets, etc., should never be used
on the rangetop.
DO NOT use flammable cleaners to clean the rangetop.
Never leave the rangetop unattended when using high
flame settings. Boil overs cause smoking and greasy
spillovers that may ignite. Also, if the burner flames and
igniter are smothered with spillage, unburned gas will
escape into the room. See page 1 regarding gas leaks.
Only certain types of glass, heatproof glass-ceramic,
ceramic, earthenware, or other glazed cookware are
suitable for cooking on the rangetop burners. This type of
cookware may break with sudden temperature changes.
Use only on low or medium heat settings according to the
utensil manufacturer’s directions.
DO NOT heat or warm unopened food containers. Build-up
of pressure may cause the container to burst and cause
injury.
During cooking, set the burner control so that the flame
heats only the bottom of the pan and does not extend
beyond the bottom of the pan.
Use caution to insure that drafts like those from forced air
vents or fans do not blow flammable material toward the
flames or push the flames so that they extend beyond the
edges of the pot.
English 4
Hold the handle of the pan to prevent movement when
stirring or turning food.
Remove the optional cutting board or griddle cover
accessory, which is stored on top of the griddle plate,
before operating the griddle or any adjacent burners.
GREASE IS FLAMMABLE. Let hot grease cool before
attempting to handle it. Avoid letting grease deposits
collect. Clean after each use.
For proper lighting and performance of the burners, keep
the igniter ports clean. It is necessary to clean the ports
when there is a boil over or when the burner does not light
even though the electronic igniters activate. See cleaning
instructions for the “Brass Burner Base and Cast Iron Cap”.
Clean the rangetop with caution. Avoid steam burns; DO
NOT use a wet sponge or cloth to clean the rangetop while
it is hot. Some cleaners produce noxious fumes if applied
to a hot surface. Follow directions provided by the cleaner
manufacturer.
IMPORTANT SAFETY INSTRUCTIONS
Read and Save These Instructions
IMPORTANT SAFETY NOTICE:
WARNING:
After a spill or boil over, turn off the burner and using
caution due to possible hot surfaces, clean around the
burner and burner ports. After cleaning, check for proper
operation.
Be sure all rangetop controls are turned off and the
rangetop is cool before using any type of aerosol cleaner
on or around the rangetop. The chemical that produces the
spraying action could, in the presence of heat, ignite or
cause metal parts to corrode.
DO NOT obstruct the flow of combustion or ventilation air.
WARNING:
DO NOT block or obstruct the flow of air
through the ventilation openings. The vent
is located at the back of the appliance. The
vent needs to be unobstructed and open to
provide necessary airflow that is important
for proper performance.
Low Back
Vent
DO NOT touch vent area while the
appliance is on and for several minutes
after the appliance is off. Some parts of the
vent and surrounding areas become hot
enough to cause burns. Allow appliance
sufficient time to cool before touching or
cleaning vent areas.
The California Safe Drinking Water and Toxic Enforcement
Act requires the Governor of California to publish a list of
substances known to the state to cause cancer, birth
defects, or other reproductive harm, and requires
businesses to warn customers of potential exposure to
such substances.
The burning of gas cooking fuel can generate some byproducts which are on the list. Exposure to these
substances can be minimized by:
1. Providing good ventilation when cooking with gas.
2. Operating the unit according to the instructions in this
manual.
DO NOT store or use corrosive chemicals, vapors,
flammables, or nonfood products in or near this appliance.
It is specifically designed for use when heating or cooking
food. The use of corrosive chemicals while heating or
cleaning will damage the appliance and could result in
injury.
WARNING:
This appliance should not be installed with a ventilation
system that directs air in a downward direction toward
the range. This type of ventilation system may cause
ignition and combustion problems with the appliance
resulting in personal injury, property damage, or
unintended operation. Ventilating systems that direct the
air upwards do not have any restriction.
DO NOT position plastic or other heatsensitive items on or near the vent. These
items could melt or ignite.
Service should only be done by authorized technicians.
Technicians must disconnect the power supply before
servicing this unit.
To avoid a fire hazard, grease accumulation must be
prevented by frequently cleaning the ventilation hood and
filters.
In case of fire or when intentionally “flaming” liquor or other
spirits on the rangetop, follow manufacturer’s instructions.
Use caution when cooking foods with high alcohol content
(e.g. rum, brandy, bourbon). Alcohol evaporates at high
temperatures. There is a risk of burning as the alcohol
vapors may catch fire. Use only small quantities of alcohol
in foods.
English 5
Before You Begin
Before using your rangetop for the first time check that you have these items:
Table 1: Rangetop Accessories and Parts
DESCRIPTION
30" 4-Burner
36" 4-Burner
w/ Griddle
36" 6-Burner
48" 6-Burner
w/ Griddle
STAR® Burner Caps
4
4
6
6
Burner Grates
2
2
3
3
Center Grate
1
—
—
—
Titanium Coated Aluminum Griddle
—
1
—
1
Flush Island Trim*
1
1
1
1
Product Registration Card
1
1
1
1
Installation Manual
1
1
1
1
Use and Care Guide
1
1
1
1
*All models are supplied with a Flush Island Trim; however, see Warning on page 5 concerning spacing behind the
rangetop when using the rangetop with the Flush Island Trim.
Remove all packaging materials and
temporary labels from rangetop. Please,
recycle the packaging material as all
THERMADOR® packaging is recyclable.
1. Check that you have the items listed in Table 1.
2. Record the Model and Serial number on page 21.
The model and serial numbers are found on the Rating
Label Plate. The Rating Label Plate is located on the
front, underside of the chassis (see Figure 20 on
Page 21). The model and serial number must be
provided when calling Customer Support for
assistance. Enter this information on the Product
Registration Card included with this product then mail it
to the indicated address.
3. Optional Accessories: Grill Plate (PA12GRILHC), 12”
Cutting Board (PA12CHPBLK), Griddle/Grill Cover
(PA12CVRJ), Wok Support Ring (PWOKRINGHC), and
other accessories may be purchased separately from
your THERMADOR® dealer.
English 6
The THERMADOR PROFESSIONAL® rangetop
occasionally has a smell or smoke when first used. These
smells or smoke comes from the burning off of
manufacturing residues and is typical of any new appliance
regardless of manufacturer.
Please note that some pets or humans can be sensitive to
the odors created during any high heat cooking whether it
is a manufacturing residue burn off or food so it is
recommended that those potentially affected be removed
from the kitchen area.
IMPORTANT:
All knobs must be set to OFF before powering up the
rangetop.
To prevent unintended operation at power up, please set
all knobs to OFF.
Description
Model and Parts Identification — 48” Rangetop
6 Burners and Griddle
1
Key
1 – Flush Island Trim or 12” (305 mm)
Low Backguard (ordered
separately)
3
2
2
2
2 – Burner Grates & Burners
3 – Griddle
4 – Control Knobs, Standard Burners
5 – Control Knob, Griddle Thermostat
6 – Control Knobs, ExtraLow® Burners
6
4
4
5
Model and Parts Identification — 30” and 36” Rangetop
4 Burners and Center Grate
6 Burners
7
4 Burners and Griddle
1
Key
1 – Flush Island Trim or 12” (305 mm)
Low Backguard (ordered separately)
3
2
2
2 – Burner Grates & Burners
3 – Griddle
4 – Control Knobs, ExtraLow® Burners
5 – Control Knob, Griddle Thermostat
6 – Control Knobs, Standard Burners
7 – Center Grate (shown in top view)
4
5
6
English 7
Using the Rangetop
Sealed STAR® Burners
Control Knobs
Typically, a pair of control knobs is located on the control
panel, directly in front of the pair of gas STAR burners they
control — with one gas burner positioned in front of the
other on the rangetop.
BU
RN
ER
Star ®
OFF
Bezel
HI
OFF
ME
HI
OFF
ME
HI
Knob
ME
Figure 1: STAR Brass Burner Base
Figure 3: Standard STAR Burner Control Knob
The rangetop features four or six gas surface STAR®
burners; all burners are rated at 18,000 BTU/HR (15,000
BTU/ HR using Propane).
The symbol near each burner control knob identifies the
burner position on the rangetop. The symbols shown in
Figure 4 are indicative of 48” rangetop models.
Each burner has a unique QuickClean® base feature which
allows the burner and area around the burner to be easier
to clean.
Left Rear
Center Rear
Right Rear
On all models, the two left burners have the exclusive
ExtraLow® feature, any remaining burners are Standard.
Each STAR burner has its own control knob.
Griddle
Left Front
ExtraLow
Center Front
Right Front
Standard
Standard
Figure 4: Rangetop Symbols
Griddle
Operation of the STAR Burners
•
•
ExtraLow
Standard
Standard
•
•
Figure 2: Burner Power Features
English 8
•
Press in on the knob and turn it counter-clockwise to
the HI setting.
The igniter for the selected burner sparks to ignite the
burner.
After flame ignition, the igniter stops sparking.
Rotate the knob to any flame setting between HI and
SIM.
A blue light is positioned between the burner controls.
The light turns on when the control knob is rotated to
an active mode. It is off when the control knob is in the
OFF position.
BTU Output for Standard STAR® Burners
ExtraLow® Techniques
•
•
•
HI is equivalent to 18,000 BTU / HR (15,000 BTU / HR
using Propane).
SIM is equivalent to 2,100 BTU / HR.
•
BTU Output for ExtraLow® STAR® Burners
•
•
•
HI is equivalent to 18,000 BTU / HR (15,000 BTU / HR
using Propane).
SIM is equivalent to 3,000 BTU / HR.
XLO® is equivalent to 375 BTU / HR when the control
knob is adjusted to the lowest setting in the ExtraLow
range.
ExtraLow® STAR® Burners
•
•
•
•
The controls for the two left burners, front and rear, have
flame settings even lower than the standard SIM settings.
Figure 5 shows that the control knob has an additional
range between the SIM and XLO settings. When the knob
is set within this range, the flame cycles off and on. By
varying the length of time the flame is off and on, the heat is
reduced even further to cook delicate foods. For example,
these very low settings are suitable for simmering and
poaching, melting chocolate and butter, holding cooked
foods at temperatures without scorching or burning, etc.
F
•
•
•
•
•
F
XLO
OF
There may be bubbling when the flame cycles on and
no bubbles when the flame is off. Even when the flame
is off, there will be steam and a slight quiver on the
liquid’s surface.
IMPORTANT:
XLO
ExtraLow
Range
OF
•
The type and quantity of food affects which setting to
use.
The pan selected affects the setting. Its size, type,
material, and whether a lid is used, all affect the
consistency of the cooking temperature.
To maintain a low or simmer heat, bring food to a
rolling boil. Stir well, then cover the pan and lower the
heat to a setting just below SIM.
Check periodically to see if the control knob should be
turned to another setting.
If an over-size pan is used, the simmer action may
occur mainly in the center of the pan. To equalize the
temperature throughout the food, stir the food around
the outer edges of the pan into the food in the center.
It is normal to stir food occasionally while simmering.
This is especially important when simmering for several
hours, such as for a homemade spaghetti sauce or
beans.
When lowering the flame setting, adjust it in small
steps.
If the setting is too low to hold a simmer, bring the food
back to a boil before re-setting to a higher heat.
It is normal not to see simmer bubbles immediately
after the food has been stirred.
•
For proper combustion, DO NOT use the rangetop
without the burner grates in place.
There is a slight sound associated with gas combustion
and ignition. This is normal.
On rangetops using propane (LP) gas, a slight “pop”
sound may be heard from the STAR burner ports a few
seconds after the burner has been turned off.
WARNING:
Figure 5: ExtraLow STAR Burner Control Knob
Operation of the ExtraLow® Burner
•
•
•
XLO, the very lowest setting, is achieved by cycling the
flame on for approximately 7 seconds and off for 53
seconds of each minute.
When the knob is rotated just beyond the SIM setting,
the flame will cycle on for approximately 54 seconds
and off for 6 seconds of each minute.
To vary the amount of low heat, the control can be set
anywhere within the SIM and XLO range marked on
the knob.
This product contains or, through ordinary use for its
intended purpose, facilitates emission of chemicals or
other substances known to the State of California to
cause cancer and/or birth defects or other reproductive
harm. To minimize exposure to these chemicals:
1) The burners should be adjusted by a certified
installer or agency to ensure proper combustion.
2) Ensure proper ventilation with an open window
or use a ventilation fan or hood when cooking
with gas.
3) ALWAYS operate the unit according to the
instructions in this manual.
English 9
Checking Burner Cap Placement
Burner Cap Placement
•
The burner caps must be properly placed on the burner
bases for the rangetop to function properly. If the burner
cap is not properly placed, one or more of the following
problems may occur:
• Burner flames are too high.
• Flames shoot out of burners.
• Burners do not ignite.
• Burner flames light unevenly.
• Burner emits gas odor.
•
Check each burner to make sure there is no gap
between the burner cap and burner base. See Figure 6
and Figure 7 for examples of correct and incorrect
placements of the burner cap.
You may gently try to move the burner caps from side
to side to check if the caps are properly placed on the
burner bases. When properly placed, each burner cap
will rest flat on top of its burner base, and completely
cover the star-shape of the burner base when viewed
from the top as shown in Figure 6.
WARNING:
To prevent burns, do not touch burner caps or grates
while hot. Turn the rangetop off and allow the burners to
cool.
Electronic Single Point Ignition
Star ®
Figure 6: Correct Burner Cap Placement
Igniter
Figure 8: Igniter
Burner Cap
Star ®
Burner Base
Igniter
Figure 7: Incorrect Burner Cap Placement
WARNING:
Figure 9: STAR Burner Components
To prevent flare-ups and avoid the creation of harmful
by-products, do not use the rangetop without all burner
caps and all burner grates properly positioned.
English 10
Each STAR® burner has its own electronic igniter that
sparks when the burner is turned on. Each burner
should light in 4 seconds or less. If a burner does not
light, check to see that the burner cap is positioned
correctly on the base (see Figure 6 and Figure 7).
If a burner fails to ignite, refer to “Before Calling For Service”
on page 21.
Flame Height
•
•
•
Automatic Re-Ignition
If any one or more burners blow out, the electronic igniter
automatically activates to re-light the flame. DO NOT touch
the STAR burners when the igniters are active.
The correct flame height depends on 1) size and
material of pan being used; 2) food being cooked; and
3) amount of liquid in the pan.
Never extend the flame beyond the base of the pan.
Use a low or medium flame for pan materials that
conduct the heat slowly, such as porcelain coated steel
or glass-ceramic.
Flame Description
CAUTION:
Dark Blue
Secondary Cone
DO NOT touch the STAR burners when the igniters are
sparking. Ensure that the knobs are set to OFF and the
burners and caps have cooled before touching.
Light Blue
Power Failure
•
•
•
•
•
•
•
In the event of a power failure, only the Standard
burners can be manually lit. It is necessary to light each
one individually.
If the rangetop is being used when the power failure
occurs, turn all knobs to the OFF position.
The standard STAR burners can be lit by holding a
match at the ports and turning the control knob to the
HI position. Wait until the flame is burning all around
the burner cap before adjusting the flame to the
desired level.
DO NOT attempt to light the two left XLO® burners
manually during a power failure. These burners are
equipped with the ExtraLow® feature and cannot be lit
manually.
If an ExtraLow burner is on when a power failure
occurs, it cannot be turned back on until the knob is
first turned to the OFF position.
The griddle or grill accessory cannot be used during a
power failure.
If you smell gas, refer to safety precautions listed on
page 1.
Primary Cone
Figure 10: Flame Colors
•
•
•
•
The burner flame color should be blue with no yellow
on the tips. It is common to see orange in the flame
color; this indicates the burning of airborne impurities
and will disappear with use.
With propane (LP) gas, slight yellow tips on the primary
cone are normal.
The flame should burn completely around the burner
cap. If it doesn’t, check that the cap is positioned
correctly on the base and that the ports are not
blocked.
The flame should be stable with no excessive noise or
fluttering.
WARNING:
In the event of a power failure, turn all knobs to the OFF
position. Only the standard burners can be lit manually.
English 11
Cookware Recommendations
WARNING:
•
•
•
To avoid risk of serious injury, damage to appliance or
cookware, please observe the following:
•
•
•
Bakeware, such as large casserole pans, cookie
sheets, etc. should never be used on the rangetop.
Placement of large stock pots should be staggered
when used on the rangetop.
Select the base diameter to match the diameter of the
flame. The diameter of the flame should be the same
size as the pan base or slightly smaller. Oversize or
undersize pans sacrifice cooking performance. A 5½”
(140 mm) base size is generally the smallest
recommended.
•
Do not let plastic, paper or cloth come in contact with a
hot burner grate. They may melt or catch fire.
Never let a pan boil dry. This can damage your pan and
the cooking surface.
Professional quality pans with metal handles are
recommended because plastic handles can melt or
blister if the flame extends up the side of the pan.
Professional quality pans are found at restaurant
supply stores and gourmet specialty shops. All
cookware should have these characteristics: good heat
conductivity, good balance, correctly sized base
diameter, a heavy, flat base, and a proper fitting lid.
For best cooking results, the flame should be contained
under the bottom of the pan.
Figure 13: Flat Base Pan
•
Figure 11: Base Diameter
•
•
Avoid using high flame setting with a pan larger than
the grate or with one that spans more than one burner,
such as a griddle, for prolonged periods of time. This
can result in poor combustion that generates harmful
by-products.
Balance is important for stability and even cooking. The
handle must not be heavier than the pan and tilt it
unevenly. A pan must sit level on the grate without
rocking or wobbling.
•
•
Aluminum and copper are pan materials that conduct
the heat quickly and evenly. These metals are
sometimes attached to the base or in the core between
stainless steel.
A heavy, flat base is more apt to remain flat when
heated. Pan bases that are warped, dented, ridged or
too lightweight will heat unevenly. Heat and cool pans
gradually to avoid sudden temperature changes which
tend to distort cookware. Do not add cold water to a hot
pan.
A properly fitting lid will shorten cooking time and make
it possible to use lower heat settings.
Figure 12: Balanced Pan
•
Food packaged in aluminum foil should not be placed
directly on the burner grate. Aluminum foil can melt
during cooking.
English 12
Figure 14: Covered Pan
Specialty Cookware
Canning Tips:
•
•
•
•
•
Figure 15: Flat-bottom Wok Pan
A flat base pan is preferred to one with a concave,
convex or rippled base.
When using two canners at the same time, use
staggered burners. Do not block air to the burners. A
flame needs the right amount of air for complete
combustion.
Use a cover on a canner when bringing the contents to
a boil.
Once the contents have reached a boil on HI, use the
lowest flame possible to maintain the boil or pressure.
Canning produces a large amount of steam. Take
precautions to prevent burns.
Suggestions for Using the
Recommendations
Use the chart starting on page 14 as a guide. The settings
you use will vary depending on the pans selected and the
starting temperature of the food.
On the chart, the “Finish Setting” has been separated for
the Standard and ExtraLow® STAR® burners. There may
or may not be a change between the two burner settings.
Figure 16: Round-Bottom Wok in Support Ring
Woks — Either flat-based or round-bottom woks with the
accessory ring can be used on all models. Round bottom
woks must be used with a support ring. The Wok pan and
the porcelain-coated cast iron wok support ring must be
purchased separately (PWOKRINGHC).
The ExtraLow setting can be either a cooking or a holding
setting.
Raise or lower the flame setting gradually. Allow time for
the pan and the food to adjust to the new setting.
Canners and Stock Pots — Select one with a base
diameter that extends no more than 2” (51 mm) beyond the
grate.
Standard Size Water Bath Canner — 21 to 22 quarts
(19.95 to 20.9 liters), with an 11” to 12” base (279–305 mm)
and a 9” to 11” depth (229–279 mm).
Standard Size Pressure Canner — 8 to 22 quarts (7.6 to
20.9 liters), with an 8” to 11” base (203–279 mm) and a 6½”
to 12” depth (165–305mm).
English 13
Surface Burner Cooking Guide
Food
Finish Setting
Standard STAR®
Burners
Start Setting
Finish Setting ExtraLow®
(XLO®) STAR® Burners
BEVERAGES
Cocoa
MED – heat milk, cover
SIM – finish heating
XLO – keep warm, cover*
BREADS
French Toast,
Pancakes, Grilled
Sandwiches
MED – preheat skillet
SIM to MED – cook
Same as for Standard STAR
Burners
BUTTER
Melting
SIM – to start melting
CEREALS
Cornmeal, Grits,
Oatmeal
HI – cover, bring water to a
boil, add cereal
CHOCOLATE
Melting
XLO – may be stirred to
hasten melting
DESSERTS
Candy
SIM to MED – cook
following recipe
SIM to MED
Same as for Standard STAR
Burners
Pudding and Pie Filling
Mix
SIM to MED SIM – cook
according to package
directions
SIM
Same as for Standard STAR
Burners
Pudding
SIM to MED SIM – bring
milk to a boil
SIM
Same as for Standard STAR
Burners
EGGS
Cooked in Shell
Allow 5 – 10 minutes to melt
SIM to MED – finish
cooking according to
package directions
Same as for Standard STAR
Burners
XLO – to hold, cover*
XLO – allow 10 – 15 minutes
to melt
XLO – to hold*
MED HI – cover eggs with
water, add lid, bring to boil
XLO – cook 3 – 4 minutes for
soft cooked; or 15 – 20
minutes for hard cooked
Fried, Scrambled
SIM to MED – melt butter,
add eggs
SIM finish cooking
Same as for Standard STAR
Burners
XLO – to hold for a short
period*
Poached
HI – bring water to the
boiling point, add eggs
SIM to MED – finish
heating
Same as for Standard STAR
Burners
MED HI – until meat starts
to sizzle
SIM to MED – finish
cooking
Same as for Standard STAR
Burners
MEAT, FISH, POULTRY
Bacon, Sausage
Patties
Braising: Swiss Steak,
Pot Roast, Stew Meat
MED HI – melt fat, then
brown on MED HI, add
liquid, cover
Quick Frying:
Breakfast Steaks
MED HI – preheat skillet
MED HI – fry quickly
Same as for Standard STAR
Burners
Frying: Chicken
MED HI – heat oil, then
brown on MED
SIM – cover, finish
cooking
Same as for Standard STAR
Burners
Deep Frying: Shrimp
MED HI – heat oil
MED to MED HI – to
maintain temperature
Same as for Standard STAR
Burners
* These foods should be stirred occasionally.
English 14
XLO – Simmer until tender
Food
Start Setting
Finish Setting
Standard STAR®
Burners
Finish Setting ExtraLow®
(XLO®) STAR® Burners
Pan Frying: Lamb
Chops, Thin Steaks,
Hamburgers, Link
Sausage
MED HI – preheat skillet
Poaching: Chicken,
whole or pieces, Fish
MED HI – Cover, bring
liquids to a boil
To finish cooking
Simmering: Stewed
Chicken, Corned Beef,
Tongue, etc.
HI – cover, bring liquid to a
boil
XLO – to simmer slowly
XLO – to hold, cover
MED – brown meat
Same as for Standard Burners
XLO – to hold
PASTAS
Macaroni, Noodles,
Spaghetti
HI – bring water to a boil,
add pasta
MED HI to HI – to
maintain a rolling boil
Same as for Standard Burners
POPCORN
(use a heavy, flat
bottom pan)
HI – cover, heat until
kernels start to pop
MED HI – finish popping
Same as for Standard Burners
PRESSURE COOKER
Meat
MED HI to HI – build up
pressure
SIM to MED – maintain
pressure
Same as for Standard Burners
HI – build up pressure
SIM to MED – maintain
pressure
Same as for Standard Burners
RICE
HI – cover, bring water and
rice to a boil
SIM – to maintain Low
Boil. Cover and cook until
water is absorbed
Same as for Standard Burners
XLO – to hold, cover
SAUCES
Tomato Base
MED HI – cook meat/
vegetables, follow recipe
SIM – to maintain simmer
XLO – simmer to thicken
sauce, uncovered
White, Cream,
Bernaise,
MED – melt fat, follow
recipe
SIM – finish cooking
XLO – to hold, cover*
Hollandaise
XLO
Vegetables
XLO – to hold, lowest setting
for short period, stir frequently
SOUPS, STOCK
HI – cover, bring liquid to a
boil
SIM to maintain simmer
Simmer XLO – to hold, cover*
VEGETABLES
Fresh
HI – cover, bring water and
vegetables to a boil
SIM to MED – cook 10
minutes, or until tender
Same as for Standard Burners
XLO – to hold, cover
Frozen
HI – cover, bring water and
vegetables to a boil
SIM to MED – cook
according to package
directions
Same as for Standard Burners
Deep Frying
HI – heat oil
MED to MED HI –
maintain frying
temperature
Same as for Standard Burners
In Pouch
HI – bring water and pouch
to a boil
SIM to MED – cook
according to package
directions
Same as for Standard Burners
Saute
HI – heat oil or melt butter,
add vegetables
SIM to MED – cook to
desired doneness
Same as for Standard Burners
Stir Fry
HI – heat oil, add
vegetables
HI to MED HI – finish
cooking
Same as for Standard Burners
* These foods should be stirred occasionally.
English 15
Using the Electric Griddle (available on some models)
Description
The built-in griddle is made of restaurant-quality aluminum
that has a non-stick titanium coating. This produces a
surface with even heat that is easy to clean.
GRID
DLE
|
A maple cutting board (PA12CHPBLK), stainless steel
cover (PA12CVRJ), and coated-aluminum grill plate
(PA12GRILHC) are available as accessories and are
purchased separately. The maple cutting board and
stainless steel cover are sized to fit on top of the surface
when the griddle is not being used. The titanium-coated
aluminum grill plate accessory is designed to replace the
griddle plate. See the instructions that come with the grill
plate accessory for more details.
|
|
Figure 17: Griddle Control Knob
The maple cutting board and stainless steel cover must be
removed before turning the griddle on.
•
•
•
•
•
The griddle is electronically controlled with
temperatures marked on the knob from 150 – 500°F
(66 – 260°C).
There are no fixed settings on the knob.
Press and turn the knob clockwise to the temperature
setting.
The griddle plate (or grill plate accessory) must always
be in place when the griddle is turned on.
The electric griddle element is rated 120 volts AC,
1,630 watts.
CAUTION:
The griddle element is hot after use. Allow sufficient time
for griddle components to cool before cleaning.
Preparing the Griddle
If the rangetop is equipped with an electric griddle, check
the griddle frame adjustment by pouring two tablespoons of
water on the back of the griddle plate. The water should
slowly roll into the grease tray. If not, adjust the two screws
under the back of the frame. Start with one half turn
counterclockwise (CCW) of the screws. Further adjustment
should be made by one-quarter turn until water slowly flows
into the grease tray (Figure 18).
Move griddle
plate to the
side and turn
leveling screws
WARNING:
To avoid risk of injury, NEVER operate griddle without
the griddle plate installed. NEVER use griddle in a
manner that is not prescribed by the Use and Care
Guide.
Figure 18: Griddle Plate Leveling Screws
The griddle plate should be washed with warm soapy water
then rinsed with clear water prior to use. The griddle may
be used without any butter, margarine or oil. However, a
very small amount may be used to flavor foods.
Any utensil may be used on the griddle surface. Care
should be taken that the surface is not gouged when
utensils are used. DO NOT cut directly on the griddle plate.
English 16
Griddle Grease Tray
NOTICE:
Griddle/Grill performance may vary if there is an excessive
amount of airflow in the vicinity of the appliance. The
excessive airflow could be from an air-conditioning register
or ceiling fan blowing at the rangetop. This could create
longer than normal heat-up time, or it could cause the
Griddle/Grill temperature to be higher or lower than the
knob setting.
Grease Tray
NOTE:
Having a properly installed ventilation hood is not
considered a source of excessive airflow.
Griddle Cooking Recommendations
FOOD
SETTING
Figure 19: Grease Tray
Eggs
325°F – 350°F
(160°C – 180°C)
•
Bacon, Breakfast Sausage
375°F – 400°F
(190°C – 200°C)
•
Toasted Sandwiches
350°F – 375°F
(180°C – 190°C)
•
Boneless Chicken Breasts
375°F – 400°F
(190°C – 200°C)
Cooking on the Griddle
Boneless Pork Chops,
1" (25.4 mm) thick
375°F – 400°F
(190°C – 200°C)
Steaks, 1" (25.4 mm) thick
400°F – 425°F
(200°C – 220°C)
Ground Beef Patties, 6 ounces
375°F – 400°F
(190°C – 200°C)
Hot Dogs
350°F – 375°F
(180°C – 190°C)
Ham Slices, ½” (12.7 mm) thick
350°F – 375°F
(180°C – 190°C)
Pancakes, French Toast
400°F – 425°F
(200°C – 220°C)
Potatoes, Hash Browns
375°F – 400°F
(190°C – 200°C)
Clean the tray after every use. When removing the tray,
use care when tipping it so that the contents do not
spill.
The griddle plate and its grease tray are dishwasher
safe.
After cooling, pour the grease into a grease-resistant
container for disposal.
1. Turn the knob to the appropriate cooking temperature
to preheat the griddle.
2. Preheat until the griddle light goes off.
3. Add butter, margarine, oil or shortening if desired.
English 17
Maintenance and Care
Do-It-Yourself Maintenance
Power Failure
In the event of a power failure, only the standard burners
can be lit manually. It is necessary to light each standard
burner individually.
If the cooktop is being used when the power failure occurs
turn all of the burner control knobs to the OFF position. The
standard burners can be lit by holding a match at the ports
and turning the control knob to the HI position. Wait until
the flame is burning all the way around the burner cap
before adjusting the flame to the desired height.
The two ExtraLow® burners on the left side cannot be used
during a power failure. Be sure to turn them OFF if a power
failure occurs because they will not turn back on until the
control knobs are turned OFF and then turned back on
again. See “WHAT TO DO IF YOU SMELL GAS” on
page 1.
If you have low gas pressure, contact your gas company.
Intermittent or Constant Igniter Sparking
Intermittent or constant sparking of the sealed gas surface burners can result from a number of preventable conditions.
Eliminate these conditions as indicated in the following chart.
SYMPTOM
Intermittent sparking
CAUSE
•
REMEDY
Ceramic igniter is wet or dirty.
®
•
Carefully dry or clean igniter.
•
STAR burner ports are clogged.
•
Clean ports on STAR burner cap with a
wire, a needle or straightened paper clip.
More than four clicks of
igniter before lighting
•
Improper fit of STAR burner cap
onto STAR burner base.
•
Align STAR burner cap properly on
STAR burner base.
Constant Sparking
•
Rangetop is not properly grounded.
•
Refer to Installation Manual. Have a
qualified electrician ground the rangetop
properly.
•
Electrical power supply is incorrectly
polarized.
•
Refer to the Installation Manual.
Have a qualified electrician ground the
rangetop properly.
Rangetop Cleaning Tips
•
•
•
Use the mildest cleaning procedure that will do the job
efficiently and effectively. Some cleaners of the same
type are harsher than others. Try on a small
inconspicuous area first.
The porcelain enamel finish is acid resistant, but not
acid proof. Acidic foods, such as citrus juices,
tomatoes, rhubarb, vinegar, alcohol or milk, should be
wiped up and not allowed to bake onto the porcelain
during the next use.
Always rub metal finishes in the direction of the polish
lines for maximum effectiveness and to avoid marring
the surface.
English 18
•
•
•
Use only clean soft cloths, sponges, paper towels,
fibrous brushes, plastic, non-metal or steel wool soap
pads for cleaning and scouring, as recommended in
the chart.
Most exterior parts of this appliance can be cleaned
with hot sudsy water (except the various items
specifically identified otherwise). When rinsing is
required, rinse thoroughly.
Always wipe dry immediately to avoid water marks.
Brand Names
The use of brand names is intended only to indicate a type of cleaner. This does not constitute an endorsement. The
omission of any brand name cleaner does not imply its adequacy or inadequacy. Many products are regional in distribution
and can be found in local markets. It is imperative that all cleaning products be used in strict accordance with the
instructions on its package. The following chart gives directions for cleaning this rangetop.
Cleaning Recommendations
SUGGESTED
CLEANERS
PART/MATERIAL
Brass Burner Base and Cast Iron Cap
•
•
•
•
•
IMPORTANT
REMINDERS
Hot sudsy water; rinse and dry
thoroughly.
Mild abrasive cleansers: Bon-ami®,
Cameo® Aluminum and Stainless
Steel Cleaner, Wright's® All Purpose
Brass Polish.
Liquid cleaners: Kleen King®.
Stiff nylon bristle tooth brush to clean
port openings.
After cleaning, make sure that the
STAR burner cap is correctly seated
on the STAR burner base.
•
DO NOT scratch or gouge
the port openings of STAR
burner cap.
Igniters/Ceramic
•
Use a cotton swab dampened with
water, Formula 409® or Fantastic®.
•
DO NOT use sharp tools to
scrape the igniters. The
igniters are fragile. If an
igniter is damaged, it may
not light the burner.
Control Knobs/ Metal
Bezels/Chrome
•
Hot sudsy water; rinse and dry
immediately.
•
•
DO NOT soak knobs.
DO NOT force knobs onto
wrong valve shaft.
Exterior Finish/ Back Guard
Stainless Steel
•
Nonabrasive cleaners: hot water and
detergent, ammonia, Fantastik®,
Formula 409®. Rinse and dry
immediately.
Cleaner polish: Stainless Steel
Magic® to protect the finish from
staining and pitting; enhances
appearance.
Hard water spots: household vinegar.
Mild Abrasive Cleaners: Siege®
Stainless Steel and Aluminum
Cleaner, Kleen King® Stainless Steel
liquid cleaner.
Heat discoloration: Cameo®,
Barkeepers Friend®, Zud®, Wright's®
All Purpose Brass Polish.
•
Stainless steel resists most
food stains and pit marks
providing the surface is kept
clean and protected.
NEVER allow food stains or
salt to remain on stainless
steel for any length of time.
Rub lightly in the direction of
polish lines.
Chlorine or chlorine
compounds in some
cleaners are corrosive to
stainless steel. Check
ingredients on label.
•
•
•
•
•
•
•
English 19
SUGGESTED
CLEANERS
PART/MATERIAL
Grates/ Porcelain Enamel on Cast Iron
•
•
•
•
IMPORTANT
REMINDERS
Nonabrasive cleaners: hot water and •
detergent, Fantastik®, Formula 409®.
Rinse and dry immediately.
Mild abrasive cleaners: Bon-ami® and •
Soft Scrub®.
Abrasive cleaners for stubborn stains:
soap-filled steel wool pad.
Lestoil® or other degreaser.
•
•
The grates are heavy; use
care when lifting. Place on a
protected surface.
Blisters/ crazing/ chips are
common due to the extreme
temperatures on grate
fingers and rapid
temperature changes.
Acidic and sugar-laden
spills deteriorate the
enamel. Remove soil
immediately.
Abrasive cleaners, used too
vigorously or too often can
eventually mar the enamel.
Griddle Grease Tray/ Aluminum with non-stick titanium coating
•
Grease
Tray
Lift handle and
remove tray
•
•
•
Remove grease tray and discard
grease into a grease resistant
container for disposal. Wash grease
tray in warm soapy water or place in
dishwasher.
Clean the grease tray after each use.
Wash in detergent and hot water;
rinse and dry.
Stubborn soil: Soft Scrub®.
•
•
Empty grease tray after
each use.
Remove tray after grease
has cooled. Be careful not to
fill it so full that tipping to
remove it spills the grease.
Griddle/ Aluminum with non-stick titanium coating
•
•
Surface Spill Trays
Porcelain Enamel (gloss finish)
Wipe griddle surface with warm soapy •
water then rinse with warm water.
Wipe dry with a soft cloth.
If food particles stick to the griddle
plate, remove with a mild abrasive
•
cleaner such as Soft Scrub®.
NEVER flood a hot griddle
with cold water. This can
warp or crack the aluminum
plate.
DO NOT clean any part of
the grill or griddle in a selfcleaning oven.
A cleaner such as Soft Scrub® may be used. Apply with a damp sponge or
cloth according to the manufacturer’s instructions. Rinse thoroughly and
wipe dry with a soft cloth.
If cleaners such as Bar Keeper’s Friend®, Bon Ami®, Comet® or Ajax® are
used, apply with a damp sponge or cloth according to the manufacturer’s
directions. Rub lightly as these cleansers may scratch the finish. Rinse
thoroughly and wipe dry with a soft cloth.
For burned on foods, soap filled fiber or steel wool pads such as S.O.S.® or
Brillo® may be used. Dampen the pad and rub gently. Care must be taken as
these may scratch the finish. Rinse thoroughly and wipe dry with a soft cloth.
English 20
Before Calling For Service
Before calling for service, check the following to avoid
unnecessary service charges.
Be sure to check these items first:
•
•
•
Is there a power outage in the area?
Is the household fuse blown or the circuit breaker
tripped?
Is the rangetop disconnected from the electrical
supply?
Service Information
For handy reference, copy the information below from the
data rating plate. Keep your invoice for Warranty validation.
Model Number __________________________________
Serial Number ___________________________________
Date of Purchase ________________________________
Dealer’s Name __________________________________
If the Burners do not Ignite:
•
•
•
•
Are the burner caps properly aligned and seated in the
burner bases?
Are the burner ports clogged?
Is a fuse blown or is the circuit breaker tripped?
Is the manual shut-off valve closed, preventing the flow
of gas?
Data Rating Label
The data rating plate showing the model and serial
numbers of your rangetop is located on the underside of
the rangetop chassis near the front. This information is
required if customer service is requested. Before
installation, the model and serial numbers should be
entered in the appropriate spaces on this page. After
installation, accessing the information is difficult.
Dealer’s Phone Number ___________________________
Service Center's Name ____________________________
Service Center’s Phone Number ____________________
Also, enter this information on the Product Registration
Form included with this product, then mail it to the indicated
address.
Register your BSH product to ensure timely service and
access to your product related information. You may
register your product through one of the following ways:
1. Mail in the completed THERMADOR® Product
Registration card.
2. Register your product online at www.thermador.com.
3. Call us at THERMADOR customer service at
1-800-735-4328.
Product Rating
Label/Serial Tag
Figure 20: Rating Label Location
English 21
Statement of Limited Product Warranty
What this Warranty Covers & Who it
Applies to
The limited warranty provided by BSH Home Appliances
Corporation (BSH) in this Statement of Limited Product
Warranty applies only to the THERMADOR® appliance
sold to you, the first using purchaser, provided that the
Product was purchased:
•
•
•
For your normal, household (non-commercial) use, and
has in fact at all times only been used for normal
household purposes.
New at retail (not a display, “as is”, or previously
returned model), and not for resale, or commercial use.
Within the United States or Canada, and has at all
times remained within the country of original purchase.
The warranties stated herein apply only to the first
purchaser of the Product and are not transferable.
Please make sure to return your registration card; while not
necessary to effectuate warranty coverage, it is the best
way for BSH to notify you in the unlikely event of a safety
notice or product recall.
How Long the Warranty Lasts
Product built preceding January 1, 2012 with a number
of FD911299999 or lower: BSH warrants that the Product
is free from defects in materials and workmanship for a
period of three hundred and sixty-five (365) days from the
date of purchase. The foregoing timeline begins to run
upon the date of purchase, and shall not be stalled, tolled,
extended, or suspended, for any reason whatsoever.
become the property of BSH at its sole option. All replaced
and/or repaired parts shall assume the identity of the
original part for purposes of this warranty and this warranty
shall not be extended with respect to such parts. BSH's
sole liability and responsibility hereunder is to repair
manufacturer-defective Product only, using a BSHauthorized service provider during normal business hours.
For safety and property damage concerns, BSH highly
recommends that you do not attempt to repair the Product
yourself, or use an un-authorized servicer; BSH will have
no responsibility or liability for repairs or work performed by
a non-authorized servicer. If you choose to have someone
other than an authorized service provider work on your
Product, THIS WARRANTY WILL AUTOMATICALLY
BECOME NULL AND VOID. Authorized service providers
are those persons or companies that have been specially
trained on BSH products, and who possess, in BSH's
opinion, a superior reputation for customer service and
technical ability (note that they are independent entities
and are not agents, partners, affiliates or representatives of
BSH). Notwithstanding the foregoing, BSH will not incur
any liability, or have responsibility, for the Product if it is
located in a remote area (more than 100 miles from an
authorized service provider) or is reasonably inaccessible,
hazardous, threatening, or treacherous locale,
surroundings, or environment; in any such event, if you
request, BSH would still pay for labor and parts and ship
the parts to the nearest authorized service provider, but you
would still be fully liable and responsible for any travel time
or other special charges by the service company, assuming
they agree to make the service call.
Out of Warranty Product
Product built subsequent to January 1, 2012 with a
number of FD920100000 or higher: BSH warrants that
the Product is free from defects in materials and
workmanship for a period of seven hundred and thirty (730)
days from the date of purchase. The foregoing timeline
begins to run upon the date of purchase, and shall not be
stalled, tolled, extended, or suspended, for any reason
whatsoever.
BSH is under no obligation, at law or otherwise, to provide
you with any concessions, including repairs, pro-rates, or
Product replacement, once this warranty has expired.
Repair/Replace as Your Exclusive
Remedy
•
During this warranty period, BSH or one of its authorized
service providers will repair your Product without charge to
you (subject to certain limitations stated herein) if your
Product proves to have been manufactured with a defect in
materials or workmanship. If reasonable attempts to repair
the Product have been made without success, then BSH
will replace your Product (upgraded models may be
available to you, in the sole discretion of BSH, for an
additional charge). All removed parts and components shall
English 22
Warranty Exclusions
The warranty coverage described herein excludes all
defects or damage that are not the direct fault of BSH,
including without limitation, one or more of the following:
•
Use of the Product in anything other than its normal,
customary and intended manner (including without
limitation, any form of commercial use, use or storage
of an indoor product outdoors, use of the Product in
conjunction with air or water-going vessels).
Any party's willful misconduct, negligence, misuse,
abuse, accidents, neglect, improper operation, failure
to maintain, improper or negligent installation,
tampering, failure to follow operating instructions,
mishandling, unauthorized service (including selfperformed “fixing” or expl