1
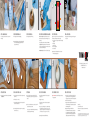
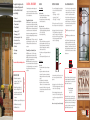
Developed for fiberglass doors, this
kit contains everything you need to
create the authentic look of real
wood, including:
• 1 Foam brush
• 1 Pair of one-size-fits-all gloves
• 1 3" natural brush
• 1 2" synthetic brush
• 1 Staining rag – 4" x 4"
• 2 Cleaning rags – 8" x 8"
• 1 Bottle of mineral spirits – 4 fl. oz.
• 1 Can of stain – 16 fl. oz.
• 1 Can of topcoat – 20 fl. oz.
• 2 Stir sticks
• 2 Test samples
• Instructions
• Do Not sand the door.
LONG-TERM MAINTENANCE
To avoid inhaling any fumes when using stains, paints
or topcoats, it is extremely important to use adequate
ventilation. Keep all materials out of the reach of children.
Close all containers after use.
Before Staining
1. Choose a standard paint stripper. Paint or stain and topcoat
can be removed with most methylene chloride-based
strippers, such as:
• Bix Quick Stripper™ • Bix Tuff Job™
• Savogran SuperStrip™ • Kutzit™
• Dad’s Easy Stripper™ • 3-M Safest Strip®
• To check for loss of gloss or roughness of your door’s
topcoat over time, save your color test sample and
compare it, periodically, to your door. Store your
sample in a cool, dry place away from the sun.
• All exterior finishes are affected by exposure to sun,
weathering, moisture and air pollutants. Typical
durability of the topcoat is 3–5 years. When the gloss
has decreased or the topcoat feels rough, it’s time to
re-apply a new layer of topcoat.
Therma-Tru Topcoat for Same-Day Stain
90˚
50˚
• Do Not stain or topcoat while dew is present.
• Do Not stain in direct sunlight.
STRIPPING TO REFINISH
CAUTION: Combustible. Contains petroleum distillates.
Keep away from heat, sparks and flames. Avoid breathing
the vapors. Avoid contact with skin. Do not take internally.
NOTICE: Reports have associated repeated and prolonged
occupational overexposure to solvents with permanent
brain and nervous system damage. Intentional misuse by
deliberately concentrating and inhaling contents may be
harmful or fatal.
FIRST AID: If swallowed, DO NOT induce vomiting. Call
a physician immediately. In case of skin or eye contact,
flush thoroughly with water. If irritation continues, see
a physician.
BEFORE YOU START
• Do stain all exposed edges and
ends of your fiberglass door. All
wood surfaces exposed to weather
should be finished within 2 weeks
of exposure.
REPAIRS
Therma-Tru Same-Day Stain
Please read carefully before finishing your door.
• Do stain when temperatures
are between 50° and 90° F and
humidity is below 85%.
CAUTION – PLEASE READ!
CAUTION: Do not freeze. DO NOT take internally.
Avoid breathing the vapors. Avoid contact with skin.
NOTICE: Contains small quantities of biocide/fungicide.
Avoid pollution of waterways and sewers.
FIRST AID: If swallowed, induce vomiting or a physician
may recover the materials from the stomach by aspiration.
Call a physician immediately. In case of eye contact, flush
thoroughly with water. If irritation continues, see
a physician.
Fine white scratches:
• Wipe surface with mineral spirits or an all-purpose
cleaner. Scratches should disappear.
• If using an all-purpose cleaner, rinse door thoroughly
and allow to dry completely.
Light scratches or scuffs:
• Lightly spray the scratched area with buff primer or
smooth the area by buffing in the grain direction with
a 3M™ Scotch Brite™ pad.
• Allow to dry before finishing.
Deep scratches:
• Fill the scratch with a wood crayon or scratch pencil
(available at any hardware store). Body filler or epoxy
fiberglass filler products may be used if sanding is
minimized. Grain detail may have to be manually
etched into any of these fillers.
• Wipe off any excess with a rag dampened with mineral
spirits.
• Follow the repair details for light scratches or scuffs.
NOTE: Some products may warn, Not For Use on Fiberglass.
However, these products can be used safely on fiberglass doors.
2. Apply stripper to doorlite frames first and raised panel inserts
second (see illustration). Remove the Stripper within 2–3
minutes. These components have a factory-applied primer
which may be removed with long exposure to paint strippers.
Follow the paint stripper manufacturer’s directions and
cautions for use of the paint stripper.
1
DO NOT reuse topcoat more than 3 years old.
DO NOT use any topcoat that has been frozen.
New Therma-Tru Same-Day Stain and topcoat may be
purchased from any Therma-Tru dealer or by calling
1-877-997-8246. Should you prefer to paint your door,
rather than stain it, Therma-Tru can also assist you with
that. For helpful painting tips and products, as well as a
list of Therma-Tru dealers in your area, visit our Web site
at thermatru.com.
After Staining
2
Fine scratches:
• Wipe surface with mineral spirits or an all-purpose
cleaner.
• Apply stain to scratched area with cotton swab or
an artist brush. Fine scratches can be touched up by
daubing stain onto the area even with topcoat already
applied.
• Wipe off stain until color match is achieved.
• Apply a fine coat of topcoat over the restained
scratch area. Use a clean cotton swab or small brush
(approximately 1⁄2" width or less) to apply a very thin
coat of topcoat over the repaired area. Blend as needed
but don’t over brush.
Use a brass wire brush, nylon bristle brush or grade 000 steel
wool for easier removal of paint and stain from the wood
grain texture.
3. Apply stripper to the rest of the door. Work on small areas at
a time. Follow the paint stripper manufacturer’s directions and
cautions for correct use of the paint stripper.
4. Wash off remaining stripper. After the stain or paint has
been removed, scrub the door with an all-purpose cleaner
to completely remove any stripper residue. Rinse well and
wipe dry.
Make sure door is completely clean and dry before refinishing.
If Therma-Tru Same-Day Stain™ and Topcoat is applied
according to manufacturer’s instructions and fails to
give complete satisfaction for 5 years from the date of
purchase, return the empty can to:
Therma-Tru Corporation
601 RE Jones Road
Butler, IN 46721
and Therma-Tru will replace it free of charge. Please
include your name, address and phone number. This
warranty does not include labor or cost of labor for the
application of any stain or topcoat. This warranty gives
you specific legal rights and you may also have other
rights which may vary from state to state.
SAME-DAY
STAIN
™
Fiberglass Door Finishing Kit
Easy-To-Follow Instructions
1
2
3
4
5
1
4
5a
3
2
5
STEP 1: CLEAN THE DOOR
STEP 2: PREPARE THE DOOR
STEP 3: STIR THE STAIN
STEP 4: PRACTICE WITH PROVIDED SAMPLES
STEP 5: APPLY STAIN
STEP 5a: APPLY STAIN
Use a cleaning rag to clean the entire surface of your door with
mineral spirits.
Mask off any glass, hardware and weather-stripping.
Stir well. Improperly mixed stain will not dry.
Stain Color Test Sample. This sample should match the color of your
unfinished door. Use this sample to do the following quick color test
before staining.
Apply stain to one section of the door at a time in the order indicated. Use
the techniques provided in Steps 5a and 5b for best results.
1. Door frame, wood door edges, brick mould, mullions and astragals
(if applicable)
2. Interior panels
3. Interior flat sections
4. Glass frame (if applicable)
5. Exterior flat sections
A. Using just the tip of the foam brush, apply stain to the deep grooves in
the door panels.
Tip: Weather-stripping may be removed from jambs by gently pulling
it out. Re-insert weather-stripping by pushing it in after door is
completely finished and dry.
Using the staining rag, work the stain into the grain in a circular or
cross-grain motion. For lighter shades, wait a few minutes, then rub off
excess stain. For darker shades, repeat. If you want to start over, the stain
can be easily removed with mineral spirits.
Remaining Test Sample. Set it aside for now; you’ll be using it in Step 8.
Tip: Unprimed wood should be treated with a wood conditioner or
mineral spirits prior to applying stain.
5b
6
7
8
9
10
STEP 5b: APPLY STAIN
STEP 6: EVEN OUT THE COLOR
STEP 7: BLEND
STEP 8: TEST FOR DRYNESS
STEP 9: STIR THE TOPCOAT
STEP 10: APPLY TOPCOAT
B. Using the staining rag, work the stain into the grain in a circular or
cross-grain motion.
A. Use the staining rag to wipe stain in the direction of the grain, removing
any swirl marks.
A. Use the 3" natural brush to ensure an even application by lightly
brushing stained areas – especially in the deep grooves and corners in
the panels.
A. Use remaining test sample to determine if stain is dry enough for
applying topcoat.
Tip: DO NOT SHAKE. This causes bubbles in the topcoat and can cause
improper application.
A.
B. Allow stain to dry for 10–15 minutes.
C. Using the staining rag and wiping in the direction of the grain, wipe off
excess stain to the shade you desire.
Tip: For darker applications, first allow stain to dry 2–4 hours, then apply
an additional coat or coats.
Tip: DO NOT use 3" natural brush to remove excess stain, as the stain will
dry too quickly and gum up the brush.
If you get excess stain on the brush while blending, clean brush using
a cleaning rag dampened with mineral spirits.
B. Apply stain to test sample.
C. Allow stain to dry for at least 6 hours before testing for dryness and
applying topcoat.
D. To test, place a piece of masking tape on the test sample. Rub the tape
down well with a hard object and then remove the tape. Your stain is
completely dry when the tape can be removed without taking any of the
stain off the sample. If it is not dry, test again every hour until dry.
Tip: Heavy applications may require additional time to dry.
Wetting the tips of the 2" synthetic brush, apply a very thin first layer of
topcoat. Work in the same order in which you applied the stain. Also
apply topcoat to both test samples. Clean brush with detergent and water.
B. Wait 2–3 hours for the first layer to dry.
C. Apply second thin layer of topcoat with the brush. Surfaces should look
wet but not milky. Also apply second layer to both test samples. Clean
brush with detergent and water.
Tip: The topcoat is milky in appearance but will dry clear.
DO NOT OVER BRUSH. This may cause the topcoat to ball up or
loosen stain. Should this happen, wait about 30 minutes until the
topcoat is dry. Remove any flawed topcoat by gently wiping with a
cleaning rag. Touch up the area with a thin layer of fresh topcoat.
1750 Indian Wood Circle, Maumee, OH 43537
1-800-THERMATRU (843-7628)
www.thermatru.com
Patent Pending
©2008 Therma-Tru Corporation
Therma-Tru Doors in an operating company of Fortune Brands, Inc.
Part # MAFSI08
3M is a registered trademark of Minnesota Mining and Manufacturing Co.; Dad’s and Dad’s Easy
Spray are trademarks of Sansher Corp.; Bix is a registered trademark of Bix Manufacturing Corp.;
Savogran and Super Strip are registered trademarks of the Savogran Company.