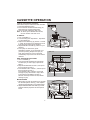
1
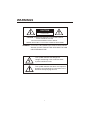
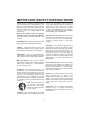
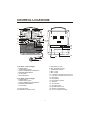
SME-378
DUAL CASSETTE
KARAOKE SYSTEM
OWNER'S MANUAL
Please read before using this unit.
The Singing Machine is a registered trademark of The Singing Machine Co., Inc.
WARNINGS
CAUTION
RISK OF ELECTRIC SHOCK
DO NOT OPEN
CAUTION: TO REDUCE THE RISK OF ELECTRIC SHOCK
DO NOT REMOVE COVER
NO USER-SERVICEABLE PARTS INSIDE.
REFER SERVICING TO QUALIFIED SERVICE PERSONNEL
WARNING : TO AVOID THE HAZARDS OF FIRE OR ELECTRICAL
SHOCK, DO NOT EXPOSE THIS APPLIANCE TO RAIN
OR OTHER MOISTURE.
This symbol indicates that dangerous
voltage constituting a risk of electric shock
is present within this unit.
This symbol indicates that there are important
operating and maintenance instructions in the
literature accompanying this unit.
1
IMPORTANT SAFETY INSTRUCTIONS
Careful attention is devoted to quality standards
in the manufacture of your Singing Machine, and
safety is a major factor in its design. However,
safety is also your responsibility. This section lists
important information that will help you properly
use and enjoy your Singing Machine and
accessories.
Read all the included safety and operating
instructions before using your Singing Machine.
Follow them closely, and retain them for future
reference.
protect from overheating. Do not block or
cover these openings, and do not place the
product on a bed, sofa, rug, or other
similar surface. Do not place the product
in a built - in installation such as a bookcase
or rack unless it provides proper ventilation
as specified by the manufacturer.
Power Sources - Operate this product using only
the power source indicated on its marking label.
If you are not sure of your home’s power type,
consult your product dealer or local power
company.
Head Warnings - Follow all warnings on the
product and in the operating instructions.
Polarization - This product is equipped with a
polarized AC line plug (a plug having on blade
wider than the other). This plug will fit in the power
outlet only on way. This is a safely feature. If you
cannot insert the plug fully not the outlet. Try
reversing the plug. If the plug still doesn’t fit,
contact your electrician to replace your obsolete
outlet. Do not defeat the safety purpose of the
polarized plug. If you need and extension, use
polarized cord.
Cleaning - Unplug this product from the wall
outlet before cleaning. Use only a damp cloth for
cleaning. Do not use liquid or aerosol cleaners
Attachments - Do not use attachments /
accessories not recommended by the product
manufacturer, as they might create a hazard.
Water and Moisture - Do not use this product
near water (for example, near a bathtub, washbowl,
kitchen sink, or laundry tub; in a wet basement;
or near a swimming pool).
Power-Cord Protection - Route power-supply
cord so they are not likely to be walked on or
pinched by items placed on or against them,
playing particular attention to cords at plugs,
convenience receptacles, and the point where
they exit from the product.
Accessories - Do not place this product on an
unstable cart, stand, tripod, bracket, or table. The
product may fall, causing serious injury to a child
or adult, and serious damage to the product. Use
only with a cart, stand, tripod, bracket, or table
recommended by the manufacturer or sold with
the product. Follow the manufacturer’s instructions
for mounting and use a recommended mounting
accessory.
Lightning - For added protection for this product
during a lightning storm, or when it is left
unattended and unused for long periods of time,
unplug it from the wall outlet and disconnect the
antenna or cable system. This will prevent damage
to the product due to lightning and power-line
surges.
Carts - Move the product on a
cart carefully. Quick stops,
excessive force, and uneven
surfaces my cause the product
/ cart to overturn.
Overloading - Do not overload wall outlets,
extension cord, or integral convenience
receptacles, as this can result in a risk of fire or
electric shock.
Ventilation - Slot and openings in the cabinet
provide ventilation, ensure reliable operation, and
2
Wall or Ceiling Mount - The product should be
mounted to a wall or ceiling only as recommended
by the manufacturer.
Objects and Liquids - Never push objects of any
kind into this product through openings, as they
may touch dangerous voltage points or short out
parts that could result in a fire or electric shock.
Never spill liquid of any kind on the product.
Heart - The product should be situated away
from heat sources such as radiators, heat registers,
stoves, or other products (including amplifiers)
that produce heat.
Servicing - Do not attempt to service this product
yourself, as opening or removing covers may
expose you to dangerous voltage or other hazards.
Refer all servicing to qualified service personnel.
Power Lines - Locate an outdoor antenna away
from power lines.
Damage Requiring Service - Unplug this product
from the wall outlet and refer servicing to qualified,
service personnel under the following conditions:
•When the power-supply cord or plug is damage.
•If liquid has been spilled or objects have fallen
into the product.
•If the product has been exposed to rain or water.
•If the product does not operate normally by
following the operating instructions. Adjust only
those controls that are covered by the operating
instructions, as an improper adjustment of
other controls may result in damage and will
often require extensive work by a qualified
technician to restore the product to normal
operation.
•If the product has been dropped or damaged
in any way.
•When the product exhibits a distinct change in
performance.
Nonuse Periods - Unplug the product's power cord
when you will not use it for extended periods.
Outdoor Antenna Grounding - If an outside
antenna or cable system is connected to the
product, ground the antenna or cable system so
as to provide some protection against voltage
surges an built-up static charges. Article 810 of
the National Electrical code, ANSI/NFPA 70,
provides information about proper grounding of
the mast and supporting structure, grounding of
the lead-in wires to an antenna discharge unit,
size of grounding conductors, location of antenna
discharge unit, connection to grounding
electrodes, and requirements for the grounding
electrode. See the example below.
Replacement Parts - When replacement parts
are required, be sure the service technician uses
replacement parts specified by the manufacturer
of having the same characteristics as the original
part. Unauthorized substitutions may result in fire,
electric shock, or other hazards.
ANTENNA
LEAD IN
WIRE
DROUND CLAMP
ANTENNA
DISCHARGE UNIT
(NEC SECTION 810-20)
ELECTRIC SERVICE
EQUIPMENT
Safety Check - Upon completion of service or
repairs to this product, ask the service technician
to perform safety checks to determine that the
product is in proper operating condition.
GROUND CONDUCTORS
(NEC SECTION 810-21)
GROUND CLAMPS
NEC-NATIONAL ELECTRICAL CODE
S2898A
SERVICE AND REPAIR
Should your unit ever need service or repair, please contact
The Singing Machine Co., Inc.
6601 Lyons Road, Bldg. 7A Coconut Creek, FL 33073-9902, U.S.A.
TEL: (954)596-1000
FAX: (954)596-2000
3
POWER SERVICE GROUNDING
ELECTRODE SYSTEM
(NEC ART 250 PART H)
INTRODUCTION
Congratulations on the purchase of your new Singing Machine unit, which will provided you with many
years of fun and entertainment. Although it is full of features, it is easy to use. Just a few simple
instructions and will become an expert.
Before you use your unit, please glace through this manual to familiarize yourself with all of the features
available and the sections of the manual that describe their operation. Next go to the section for the
specific operation you wish to perform.
As a reminder here are the general features listed for the unit:
--- AC/DC Operation
--- Auxiliary Input Jack
--- Professional Microphone with ON/OFF Switch
--- Dual Cassette Decks
--- Dual Mic Input Jacks
---
Auxiliary Output Jack
--- Preset Vocal Echo
---
Microphone Holder
--- Microphone Volume Controls
CONNECTING POWER
DC OPERATION
1. Lift cover to reveal battery compartment. Insert six (6) "C" size alkaline batteries (not provided) as
indicated.
2. Replace cover tightly before operating.
3. When not using batteries for a long period of time, remove batteries to prevent leakage in
compartment. Replace all batteries at the same time.
AC OPERATION
Plug in polarized AC line cord into AC wall outlet/voltage, where applicable.
Note: Unit will not operate on batteries while line cord is plugged into wall.
4
CONTROL LOCATIONS
2
1
DECK 2
DECK 1
SME-378
11
5
3
6
8
PLAYBACK
10
RECORD/PLAY
AUTOMATIC LEVEL CONTROL
12
CASSETTE PLAYER/RECORDER
MIC VOLUME
MASTER VOLUME
POWER
D U A L
TA P E
BALANCE
MUSIC
VOICE
D E C K
FUNCTION
R E C O R D I N G
TAPE
AUX
S T U D I O
MIC 1
MIC 2
4
9
7
AUX
OUT
15
20
AUX
IN
16
17
18
19
14
13
1. For Deck 1 (Left to Right)
--- PAUSE Button
--- STOP/EJECT Button
--- FAST FORWARD (F.FWD) Button
--- REWIND (REW) Button
--- PLAY Button
--- RECORD Button
5. BALANCE Control
6. MIC VOLUME Control
7. FUNCTION Selector
8. MIC 1 Input
9. MIC 2 Input
10. Cassette Compartment For Deck 1
11. Cassette Compartment For Deck 2
12. Mic Holder
13. Microphone
14. Mic ON/OFF Switch
15. Speaker
16. AUX IN Jack
17. AUX OUT Jack
18. HEADPHONE Jack
19. Battery Compartment
20. AC Line Cord (Polarized)
2. For Deck 2 (Left to Right)
--- PAUSE Button
--- STOP/EJECT Button
--- FAST FORWARD (F.FWD) Button
--- REWIND (REW) Button
--- PLAY Button
3. Power OFF/ON
4. MASTER VOLUME Control
5
CASSETTE OPERATION
Loading and Unloading Cassettes
Follow these steps to load and unload cassettes.
1. Press STOP/EJECT button.
2. Insert cassette with desired side facing you,
tape surface up. Avoid touching tape.
3. Close cassette holder/tape deck cover.
Note: To unload, press STOP/EJECT button,
remove cassette and close cover.
PLAYBACK
1. Turn on POWER (1).
2. Load cassette(s) into Tape Deck 1, Tape Deck
2 or both Decks (2).
3. Depress PLAY Button(s) (3) of Deck 1 or Deck
2. If both PLAY Buttons are depressed, sound
from both decks will be mixed together.
4. Adjust MASTER VOLUME (4) Control to your
pleasure.
5. To stop tape on either Deck, press
STOP/EJECT Button (5) on that Deck once.
(A second pressing will eject the tape.) Or,
when tape reaches its end, that deck will
automatically stop and its PLAY button will be
released.
DUAL TAPE DECK AUTO START
1. Turn on POWER (1).
2. Load prerecorded cassettes into both decks
The first tape you wish to play is placed into
Deck 2.
3. Depress PAUSE button of Deck 2, then press
the PLAY button of Deck 2.
4. Press PAUSE button of Deck 1, and then press
the PLAY button of Deck 1.
Press PAUSE button of Deck 2, Deck 2 will
be begun to play. When Deck 2 stops, either
by pressing the STOP/EJECT button or
because of the tape reaches its end, DECK 1
will begin to play.
DECK 2
DECK 1
SME-378
DECK 2
PLAYBACK
RECORD/PLAY
PLAYBACK
AUTOMATIC LEVEL CONTROL
CASSETTE PLAYER/RECORDER
MIC VOLUME
MASTER VOLUME
SME-378
5
2
3
DECK 2
DECK 1
SME-378
PLAYBACK
RECORD/PLAY
AUTOMATIC LEVEL CONTROL
CASSETTE PLAYER/RECORDER
MIC VOLUME
MASTER VOLUME
POWER
DUAL TAPE DECK
BALANCE
MUSIC
FUNCTION
RECORDING
VOICE
TAPE
AUX
4
STUDIO
MIC 1
MIC 2
1
MICROPHONES
1. When either or both microphones are plugged
into the Microphone Jacks (1), their output is
mixed with the playback from cassette tapes.
2. Adjust MICROPHONE VOLUME (2) for best
balance between playback and microphone
levels.
DECK 2
DECK 1
SME-378
PLAYBACK
AUTOMATIC LEVEL CONTROL
RECORD/PLAY
CASSETTE PLAYER/RECORDER
MIC VOLUME
MASTER VOLUME
POWER
DUAL TAPE DECK
BALANCE
MUSIC
VOICE
FUNCTION
RECORDING
TAPE
AUX
STUDIO
MIC 1
2
6
MIC 2
1
SING ALONG - Tape
1. Follow instructions for PLAYBACK. Either tape deck may be used for playback, but using
Deck 1 will permit recording Sing Along performances.
2. Follow instructions for Microphone.
3. Adjust MASTER VOLUME/MICROPHONE VOLUME. Your voice will be combined with the
playback output and will be heard through the loudspeaker.
4. With Singing Machine or similar multiplex cassettes, you can sing duets along with the
pre-recorded artist and background music.
RECORDING SING ALONG - Tape
1. Load a blank cassette in Tape Deck 1.
2. Load a Singing Machine or similar multiplex tape or any other pre-recorded tape into Tape Deck 2.
3. Start Tape Deck 2 by pressing PLAY Button.
4. Press both RECORD and PLAY Buttons of Tape Deck 1 at the same time. The combined output
of your voice and the playback of Tape Deck 2 will be recorded on the blank tape in Tape Deck 1.
ADDING EXTRA VOICE(S) / DUBBING OR COPYING
1. Follow directions for Recording Sing Along - Tape, loading your recorded Sing Along tape into Tape Deck 2.
2. Load another blank tape into Tape Deck 1.
3. Follow Steps 4 and 5 for Recording Sing Along - Tape. Your voice will again be added, allowing
you to sing duets with your own voice. If you use the microphone input for an instrument, you
can record that at a separate time than you voice performance.
Note: If you simply want to make a dub or copy, load the tape you wish to copy in Tape Deck 2 and a blank
tape in Tape Deck 1. Turn Microphone ON/OFF Switch to OFF position, or unplug the microphone(s).
SING ALONG WITH A VIDEO CASSETTE
SING ALONG WITH A VIDEO CASSETTE ( See Page 8 )
Follow these steps to sing along with a video cassette.
1. Connect a VCR's Left or Right audio outputs (AUX OUT) to the system's AUX IN jack.
2. Plug in the microphone(s) into either of the MIC jacks.
3. Load the video cassette and then start playback.
4. Turn on the TV (that is already connected to the VCR). If it is a Karaoke Video Cassette, the lyrics
will show on the screen and will also let you adjust the volume of both the pre-recorded vocal
and background music.
Note: Do not put the system too close ( minimum 6 feet ) to your TV Set.
AUXILIARY INPUT
1. Plug auxiliary device into socket on back of the unit. Output of device will be heard through karaoke system.
2. AUX signal will mix with output of Tape Decks 1 or 2 for Sing Along.
3. Follow Sing Along and Recording Sing Along instructions.
AUXILIARY INPUT JACK - let you connect another audio input source, such as a stereo VCR or a Radio
Tuner, so you can sing along with the source.
AUXILIARY OUTPUT JACK - let you connect another audio output component, such as an equalizer/
booster or a PA system.
HEADPHONE JACK - let you connect to your headphone.
7
CONNECTIONS SING ALONG WITH A VIDEO CASSETTE
VIDEO
IN
AUX
OUT
( MUST CONNECT )
AUX
OUT
AUX
IN
AUX
IN
( L or R )
( CONNECT FOR RECORDING )
AUDIO
OUT
R
L
VIDEO
OUT
VHS
AMPLIFIER
LOUDSPEAKERS
Warning: Your TV set and the recording studio should be kept at least 6 ft. away from
each other. Otherwise, distortion may occur on the TV screen.
8
SPECIFICATIONS
Recording System -------------------------------------------------------------------------------------- DC Bias
Erasing System ------------------------------------------------------------------------------- Magnetic Erase
Fast Forward & Rewind ---------------------------------------------------------------150 seconds ( C60 )
Frequency Response ----------------------------------------------------------------------------- 50 - 20K Hz
Power Requirements -------------------------------------------------------------- AC 110V/120V 60 Hz
( Where Applicable ) -------------------------------------------- or
AC 220V/240V 50 Hz
--------------------------------------------------- DC 9V (6 x "C" Cells)
Dimensions ( H x W x D ) ------------------------------14 x 11.8 x 6.2 Inches/35.6 x 30 x 15.8 cm
Weight ------------------------------------------------------------------------------------------ 5.8 Lbs/2.6Kgs
Specifications are typical, individual units might vary. They are subject to continuous improvement
without notice and without incurring any obligation.
9
The Singing Machine Co., Inc.
PRINTED IN CHINA
6601 Lyons Road, Bldg. 7A Coconut Creek, FL 33073-9902, U.S.A.
visit our website : www.singingmachine.com
TEL: (954)596-1000
FAX: (954)596-2000