1
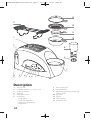
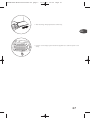
Réf. NC00013044 • Tefal • Sous réserve de modifications • Conception & réalisation : JPM & Associés • marketing-design-communication • 09/2009
TOASTN'EGG-NC00013044:Mise en page 1
16/10/09
10:38
TOAST'N EGG
www.tefal.com
Page b
NL
DE
EN
DA
NO
SV
FI
TOASTN'EGG-NC00013044:Mise en page 1
16/10/09
10:38
Page 46
13
2*
12
11
1
10
3
8
9
7
4
5
6
a b
c
d
Description
1.
2.
3.
4.
5.
6.
slots for bread
roll heating accessory (* according to model)
carriage control lever
crumb tray
toasting level control
control panel
a. toast button
b. toast and eggs button
c. all functions cancel button
d. eggs button
46
7.
8.
9.
10.
11.
12.
13.
water-heating bowl
measuring beaker
egg piercing spike with protection cap
(caution - sharp)
egg holder
egg pan
steam accessory
transparent cover
TOASTN'EGG-NC00013044:Mise en page 1
16/10/09
13:40
Page 47
Safety instructions
Important safeguards
This appliance is not intended to be operated using an external timer or separate remote control system.
For your safety, this appliance conforms with applicable standards and regulations (Directives on low
voltage, electromagnetic compatibility, materials in contact with foodstuffs, environment, etc.)
• Check that the electricity supply voltage corresponds to the voltage indicated on the appliance (ac current only).
• Given the many standards in effect, if this toaster is used in a country other than the country where it was purchased,
have it checked by an approved service centre (see enclosed after sales service information).
• Check that the electricity installation is sufficient to supply the power required by this appliance.
• Always plug the toaster into an earthed socket.
• Use extension leads which are in good condition, with an earthed connection, and with a minimum rating of 10A.
To prevent any accidents
When using electrical appliances, basic safety precautions should always be followed:
DO:
• Carefully read and follow all the instructions for use.
This appliance is not intended for use by persons (including children) with reduced physical, sensory
or mental capabilities, or lack of experience and knowledge, unless they have been given
supervision or instruction concerning use of the appliance by a a person responsible for their safety.
Children should be supervised to ensure that they do not play with the appliance.
• The toaster must always be used in the upright position, never on its side or tilted forwards or backwards.
Before each use make sure that the crumb tray is fitted correctly.
• Regularly remove crumbs from the crumb tray.
• The bread control lever must be in the "Up" position before plugging in or unplugging the appliance.
• Unplug the appliance if it shows any working abnormalities.
• Unplug from the power socket when not in use during and before cleaning. Allow to cool down before cleaning or storing.
• To unplug remove the plug from the wall socket (when the toasting cycle is finished).
• If the bread jams in the slots after toasting and the elements do not switch off, unplug immediately and wait
for the appliance to cool before attempting to remove the bread.
• Bread can burn; Therefore do not use this appliance near any flammable materials such as curtains, under
shelving or under wall cupboards.
• Use on a flat, stable heat-resistant work surface, away from any contact with water and never use underneath a
built in kitchen alcove.
• After steam-cooking, the plastic water-heating tank is very hot. Wear oven gloves when removing food (eggs,
meat...) and be careful to avoid being scalded by steam rising directly towards face and hands.
DO NOT:
• Do not let the toaster operate unattended, particularly when toasting for the first time or when settings have been changed.
• Do not store the cord or the plug between the slots in the appliance.
• Do not unplug the appliance by pulling on the cord.
• Do not move or carry the appliance during use.
Children must be supervised to ensure that they do not play with the appliance.
• Do not leave the appliance within the reach of children.
• Do not use outdoors. Avoid excessively humid environments.
• Do not use the appliance for any other use other than that for which it was designed.
• Do not touch the metal parts or hot surfaces of the appliance when it is working.
• Oversized foods, metal foil packages, or utensils (spoon, knife, etc.) must not be inserted into a toaster as they
may cause an electric shock or fire.
• Do not use accessory attachments that are not recommended by the manufacturer as this may be dangerous.
47
EN
TOASTN'EGG-NC00013044:Mise en page 1
16/10/09
10:38
Page 48
• To protect yourself against an electrical shock do not immerse the cord, plugs, or appliance in water or other liquids.
Do not place any sugar coated type of bread in the toaster or anything that may melt or drop into
the toaster, do not toast small pieces of bread or croutons as this may cause damage to the
toaster or risk a fire.
Do not try to toast very thick slices of bread that could become stuck in the toasting slots.
• Do not use this appliance if:
- it has a damaged cord.
- the appliance has been dropped and has visible damage or does not operate properly.
In any of these instances, the appliance must be sent to an approved service centre to avoid any risk of danger.
Refer to the guarantee enclosed.
• If the supply cord is damaged, it must be replaced by the manufacturer, its service agent or similary qualified
persons in order to avoid a hazard.
• Do not let the cord hang over the edge of the worktop or come into contact with hot surfaces.
• Do not place on or near a gas burner, electric ring/hob, or near a heated oven.
• Do not cover this appliance while in use.
The bread may burn, therefore do not use the toaster near or below combustible material, such as
curtains (shelving, cupboards…).
• Do not put paper towels, cardboard or plastic in, on or under the toaster.
If flames were to arise from parts of the toaster, never attempt to extinguish them with water.
Unplug the appliance and smother the flames with a damp cloth.
• Do not attempt to dislodge food once the toasting cycle is engaged.
• Do not use this appliance as a source of heating or drying.
• Do not use the toaster for cooking, grilling or defrosting frozen food other than bread products.
• Do not use the appliance to toast bread and warm croissants (or similar products) at the same time (depending on model).
• Do not use any abrasive cleaning agents (no soda-based scouring products, no scouring pads...), no metallic
utensils, metal scouring pads etc.
• For appliances with a metallic finish: Do not use any cleaning products designed for metals: use a soft cloth with
a window or glass cleaner.
• Do not cook food (eggs, meat...) without water, as this could damage the heating elements.
• Only warm PRE-COOKED food and meat such as pre-cooked mushrooms, pre-cooked bacon, pre-cooked
sausages and pre-cooked ham.
• Caution : Avoid injuries from the egg piercer
• Keep your face well away from the appliance while the eggs are cooking or when you open the cover, as hot steam is emitted.
Any commercial use, inappropriate use or failure to comply with the instructions, the manufacturer accepts no
responsibility and the guarantee will not apply.
• This appliance is intended to be used in household only.
It is not intended to be used in following applications, and the guarantee will not apply for:
- staff kitchen areas in shops, offices and other working environments;
- farm houses;
- by clients in hotels, motels and other residential type environments;
- bed and breakfast type environments
SAVE THESE INSTRUCTIONS
Environment protection first !
Your appliance contains valuable materials which can be recovered or recycled.
Leave it at a local civic waste collection point.
If you have any product problems or queries, please contact our Customer Relations Team first for expert help and advice:
0845 602 1454 - UK
(01) 677 4003 - Ireland
or consult our website - www.tefal.co.uk
48
TOASTN'EGG-NC00013044:Mise en page 1
16/10/09
10:38
Page 49
DO NOT
• Never immerse the toaster or place it under running water.
EN
• Do not run the appliance close to or under inflammable materials like
curtains or shelves.
• Do not put the appliance in the dishwasher.
• Do not cover the slots of the toaster when in use.
49
TOASTN'EGG-NC00013044:Mise en page 1
16/10/09
10:38
Page 50
• Never introduce objects into the appliance.
• Do not place the lid or any other parts on top of the toaster.
Before using your appliance for the first time
• Unpack your appliance and remove all labels, carefully read the
directions for use before using the appliance for the first time.
• Clean your appliance and all the items with water and washing up liquid.
50
TOASTN'EGG-NC00013044:Mise en page 1
16/10/09
10:38
Page 51
Toaster (before first use)
• Plug in the appliance.
Select maximum toasting level.
EN
OK
max.
• Press on
, the light flashes.
X3
• Operate the toaster part 3 times in succession, without inserting any bread.
Lower the carriage lever until it clicks in place. The light remains on
constantly and the cycle begins.
> 10 min.
• Once the cycles have finished, let the appliance cool down.
51
TOASTN'EGG-NC00013044:Mise en page 1
16/10/09
10:38
Page 52
Egg cooker (before first use)
• Fill the measuring beaker (medium level 1) with water and pour it into
the water heating tank.
• Install all elements without adding the eggs. Plug in the appliance.
• Press on
and run the appliance empty.
< 5 min.
• The appliance will stop as soon as there is no more water in the heating
tank.
52
TOASTN'EGG-NC00013044:Mise en page 1
16/10/09
10:38
Page 53
> 10 min.
• Let then the appliance cool down.
EN
When used for the first time, some odour may be given off. This is quite normal.
Use
Cooking different food at the same time
FUNCTIONS
Toast
Hard-boiled
eggs
Poached
eggs
Heating up
meat
Poached eggs +
heating up
meat
Heating
up rolls*
Toast
Hard-boiled eggs
Poached eggs
Heating up meat
Poached eggs +
heating up meat
Heating up rolls*
* according to models
53
TOASTN'EGG-NC00013044:Mise en page 1
16/10/09
10:38
Page 54
Toasting bread
• Insert the bread into the slots. Check that the crumb tray is properly in place.
Plug in the appliance.
OK
• Set the toasting level to your taste. From 1 lightly browned to 5 well
browned.
• Press on
, The light flashes.
• Lower the carriage lever until it clicks in place. The light will remain on and
toasting will start.
54
TOASTN'EGG-NC00013044:Mise en page 1
16/10/09
10:38
Page 55
• Once the cycle is finished, the carriage will rise automatically and the
light will go off. Raise the carriage lever to remove the toast more
easily.
HIGH LIFT
EN
Do not toast bread that has been buttered prior to toasting.
Stop / eject
• Press the
selected.
key at any time to stop any of the cooking functions
• The bread and the carriage will rise automatically and the light will go off.
OK
• Egg cooking will stop.
• If you do not lower the carriage after pressing
and
, the lights will go off after 5 minutes.
55
TOASTN'EGG-NC00013044:Mise en page 1
16/10/09
10:38
Page 56
Heating croissants, rolls and Viennese pastries
(* according to model)
Do not heat fatty or sugary food that is likely to melt and run. To toast currant buns,
remove the raisins that are likely to fall free from the bun as they could fall inside the
toaster and damage the appliance.
• Unfold the roll heating accessory fully and fit it above the toaster slots.
• Plug in the appliance.
OK
• Position the setting button to 1.
• Place croissants, rolls, brioches, sweet rolls, etc. on the support.
56
TOASTN'EGG-NC00013044:Mise en page 1
16/10/09
• Press on
10:38
Page 57
, The light flashes.
EN
• Lower the carriage lever until it clicks in place. The light remains on
constantly and the cycle begins. The carriage level will rise automatically at
the end of toasting.
• Use oven gloves or tongs to turn croissants or rolls over if necessary (tongs
not supplied with the product).
> 1-2 min.
• Or for further warming leave the croissants or rolls on the heating accessory
for a further 2 minutes.
57
TOASTN'EGG-NC00013044:Mise en page 1
16/10/09
10:38
Page 58
Cooking eggs
A) Cooking table for hard-boiled eggs, boiled eggs and soft-boiled eggs
Preparation
Cooking
method
Number of eggs
HARD
1
2
3
4
MEDIUM
1
2
3
4
SOFT
1
2
3
4
Water level
(accessories needed
to cook eggs)
Hard-boiled
Boiled
Soft -boiled
For example to cook 3 medium boiled eggs, pour water into the beaker up to the 3rd graduated level on
medium gauge. For 4 hard boiled eggs, pour water into the beaker up to the 4th graduated level on hard
gauge.
A1) To cook hard-boiled eggs, boiled eggs and soft-boiled eggs
The measuring beaker is fitted with an egg piercing spike underneath.
• Fill the measuring beaker according to the number of eggs to boil and
type of boiled egg required (see table above).
• You can adjust the amount of water
according to your taste.
The result of boiling may vary according to the size, temperature and freshness of the
egg. After a few tests, you will know the best way to proceed according to your taste
and the type of egg yolk you wish to obtain.
58
TOASTN'EGG-NC00013044:Mise en page 1
16/10/09
10:38
Page 59
• Pour water from the measuring beaker into the water heating tank and fit
the egg accessory.
EN
The egg must be pierced at the large rounded end to avoid the shell bursting during
boiling.
• Remove the protection cap.
• Pierce the large rounded end of the egg with the spike on the underside
of the measuring beaker.
• Place the eggs in the holder accessory, small end down. Close with the
cover.
• Plug in the appliance.
OK
59
TOASTN'EGG-NC00013044:Mise en page 1
16/10/09
10:38
Page 60
• Press on
, the light flashes.
• Cooking will start.
• The eggs are ready when there is no more water in the water-heating
tank. The appliance will stop automatically.
• If you wish to continue boiling the eggs, our more water into the water
heating tank, wait a few seconds and press the
button.
• You can stop the boiling at any moment by pressing the
button.
Hot steam will escape out when opening the lid. Do not put your hands and face over the appliance.
HINT: When making hard boiled egg, quickly put the cooked eggs in cold water. The shells will
come off more easily and your eggs will keep all their flavour!
B) Table to cook poached eggs, scrambled eggs and omelettes
Preparation
Cooking
method
Maximum
number of eggs
Water level
(accessories needed
to cook eggs)
Poached egg
Scrambled egg
Omelette
MEDIUM:
well cooked
SOFT:
lightly cooked
MEDIUM:
well cooked
SOFT:
lightly cooked
MEDIUM:
well cooked
SOFT:
lightly cooked
1
1
1
For example, to make 1 well cooked poached egg, pour water into the beaker up to the poached egg /
medium graduation.
60
TOASTN'EGG-NC00013044:Mise en page 1
16/10/09
10:38
Page 61
B1) To cook poached eggs, scrambled eggs and omelettes
• Fill the measuring beaker according to the degree of cooking required (see
cooking table above).
EN
The poaching results may vary according to the size, temperature and freshness of the
egg. After a few tests, you will know the best way to proceed according to your taste and
what sort of egg you want to obtain.
• Pour the water from the measuring beaker into the water-heating bowl
and put the egg holder in place.
• Lightly spray oil on egg tray, break an egg in the pan. Place the egg tray
on the egg accessory. Close the cover.
• Plug in the appliance.
OK
61
TOASTN'EGG-NC00013044:Mise en page 1
16/10/09
10:38
Page 62
• Press on
, the light flashes.
• Cooking will start.
• The eggs are ready when there is no more water in the water-heating
tank. The appliance will stop automatically.
• If you wish to continue poaching the egg, pour more water into the water
heating tank, wait a few seconds and press the
button.
Hot steam will escape out when opening the lid. Do not put your hands and face over the appliance.
• You can stop the poaching at any moment by pressing the
button.
To make scrambled egg or an omelette, the procedure is the same as above. All you need to do is to beat the
eggs lightly with a wooden spoon during cooking but remember to be careful of hot steam.
Cooking eggs, toasting bread and heating up
pre-cooked dishes
You can simultaneously cook eggs (poached eggs, hard-boiled eggs or omelettes), toast bread and steam
heat pre-cooked food (bacon, ham, sausage, etc.).
You cannot re-heat hard-boiled eggs.
1st stage: eggs and pre-cooked dishes
• Fill the measuring beaker according to the type of cooking required and the
number of eggs.
62
TOASTN'EGG-NC00013044:Mise en page 1
16/10/09
10:38
Page 63
• Pour water into the water heating tank and fit the egg accessory.
EN
• For hard-boiled eggs, pierce the large rounded end of the egg with the
spike on the underside of the measuring beaker.
• Place the eggs in the holder accessory, small end down.
Close with the cover.
• For poached eggs, lightly oil the egg dish. Break the egg. Fit the egg dish on
the egg accessory.
63
TOASTN'EGG-NC00013044:Mise en page 1
16/10/09
10:38
Page 64
• Position the steam accessory then add food to be warmed.
Close the lid.
2nd stage: bread
• Insert the bread into the slots. Plug in the appliance.
OK
• Set the toasting level to your taste.
• Press on
64
, the light flashes.
TOASTN'EGG-NC00013044:Mise en page 1
16/10/09
10:38
Page 65
• Lower the carriage lever until it clicks in place.
EN
• The 3 lights are on. Toasting and cooking will start.
• At the end of the toasting cycle, the carriage will rise automatically and the
light
will go off.
You can start a second toasting cycle while cooking the eggs.
• When the egg is ready, both
and
lights go out. The
appliance will stop automatically when there is no more water in the water
heating tank.
• You can stop the cooking process at any moment by pressing the
button.
65
TOASTN'EGG-NC00013044:Mise en page 1
16/10/09
10:38
Page 66
Maintenance and cleaning
• Before maintenance, cleaning or putting the appliance away, unplug from
the mains supply and let the appliance cool down.
> 10 min.
OK
• Clean the outside of the appliance with a soft cloth or a moist sponge with
a little washing up liquid. Dry.
• Remove traces of lime deposit from the water tank after each use.
Using a damp sponge soaked in white vinegar.
• Empty and clean the crumb tray regularly.
66
TOASTN'EGG-NC00013044:Mise en page 1
16/10/09
10:38
Page 67
• After cleaning, always replace the crumb tray.
EN
• Use the cord storage system under the appliance to tuck the power cord
away.
67