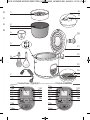
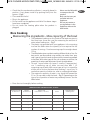
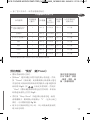
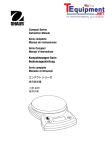
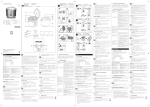
1
RICE COOKER MICROCOMPUTER_NC00112493_NC00021289 24/04/12 07:33 PageA Réf. NC00112493 • 04/2012 • Subject to modifications JPM & Associés • marketing-design-communication RICE COOKER MICROCOMPUTER_NC00112493_NC00021289 24/04/12 07:33 PageB EN MICROCOMPUTER ZH TH MS www.tefal.com RICE COOKER MICROCOMPUTER_NC00112493_NC00021289 24/04/12 07:33 PageC N 8 1 9 H H 2 3 MS 4 10 5 11 12 6 13 14 15 7 Control box / 控制面板 / แผงควบคุมการทำงาน / Kotak kawalan 13a 13b 13c 13d 13e 13f 13g 13h 13i 13a 13b 13c 13d 13e 13f 13g 13h 13i 13j 13l 13j 13l 13k 13k 13m 13m RICE COOKER MICROCOMPUTER_NC00112493_NC00021289 24/04/12 07:33 PageD RICE COOKER MICROCOMPUTER_NC00112493_NC00021289 24/04/12 07:33 Page2 Important safeguards Safety instructions • Read and follow the instructions for use. Keep them safe. • This appliance is not intended to be operated using an external timer or separate remote control system. For your safety, this appliance complies with the safety regulations and directives in effect at the time of manufacture (Low-voltage Directive, Electromagnetic Compatibility, Food Contact Materials Regulations, Environment…). • Check that the power supply voltage corresponds to that shown on the appliance (alternating current). • Given the diverse standards in effect, if the appliance is used in a country other than that in which it is purchased, have it checked by an approved service centre. • Do not place the appliance near a heat source or in a hot oven, as serious damage could result. • This appliance is designed for domestic use only. In case of professional use, inappropriate use or failure to comply with the instructions, the manufacturer accepts no responsibility and the guarantee does not apply. • It is not intended to be used in the following applications, and the guarantee will not apply for: - staff kitchen areas in shops, offices and other working environments; - farm houses; - by clients in hotels, motels and other residential type environments; - bed and breakfast type environments. Connecting to the power supply • Do not use the appliance if: - the appliance or the cord is damaged. - the appliance has fallen or shows visible damage or does not work properly. In these cases, the appliance must be sent to your nearest approved service centre to avoid any possible danger. Do not take the appliance apart yourself. • Do not leave the cord hanging. • Always plug the appliance into an earthed socket. • Do not use an extension cord. If you accept liability for doing so, only use an extension cord which is in good condition, has an earthed plug and is suited to the power of the appliance. • Do not unplug the appliance by pulling on the cord. • Always unplug the appliance: - immediately after use, - when moving it, - prior to any cleaning or maintenance, - if it fails to function correctly. Using • Use a flat, stable, heat-resistant work surface away from any water splashes. • Never leave the appliance in operation unattended. Keep away from children. • This appliance is not intended for use by persons (including children) with reduced physical, sensory or mental capabilities, or lack of experience and knowledge, unless they have been 2 RICE COOKER MICROCOMPUTER_NC00112493_NC00021289 24/04/12 07:33 Page3 • • • • • • • • • • • • • • • • • given supervision or instruction concerning use of the appliance by a person responsible for their safety. Children should be supervised to ensure that they do not play with the appliance. Burns can occur by touching the hot surface of the appliance, hot water, steam or food. Never try to operate the appliance when the bowl is empty or without the bowl. The cooking function/knob must be allowed to operate freely. Do not prevent or obstruct the function from automatically changing to the keep warm function. Do not remove the bowl while the appliance is working. Do not touch the inner and outside lid after finished the cooking. Because it will produce the hot temperature during the cooking function. Do not move the product with open lid. Do not put the appliance directly onto a hot surface, or any other source of heat or flame, as it will cause a failure or danger. The bowl and the heating plate should be in direct contact. Any object or food inserted between these two parts would with the correct operation. Do not put any food or water into the appliance until the bowl is in place. Respect the levels indicated in the recipes. During cooking, the appliance gives out heat and steam. Keep face and hands away from the hot appliance and from the steam outlet. Do not obstruct the steam outlet. Do not immerse the body in water nor pour water into it, only into the bowl. Should any part of your appliance catch fire, do not attempt to put it out with water, use a damp teatowel. Any service repair should only be made by a service centre with original spare parts. If your appliance is fitted with a removable power cord: if the power cord is damaged, it must be replaced by a special cord or unit available from a Tefal authorised service centre. If your appliance is fitted with a fixed power cord: if the power supply cord is damaged, it must be replaced by a Tefal authorised service centre or a similarly qualified person in order to avoid any danger. EN ZH TH MS Protect the environment • Your appliance has been designed to run for many years. However, when you decide to replace it, remember to think about how you can contribute to protecting the environment. • Before discarding your appliance you should remove the battery from the timer and dispose of it at a local civic waste collection centre (according to model). Environment protection first! i Your appliance contains valuable materials which can be recovered or recycled. ‹ Leave it at a local civic waste collection point. 3 RICE COOKER MICROCOMPUTER_NC00112493_NC00021289 24/04/12 07:33 Page4 Description 1. 2. 3. 4. 5. 6. 7. 8. 9. 10. 11. 12. 13. Steam basket Graduation for water and rice Removable non- stick bowl Measuring cup Spoon support Spoons Power cord Lid opening button Lid Handle Micro pressure valve Lid Condensation collector Control box a. Display of finishing time and the condition of keep warm. 14. 15. b. Quick cooking indicator light c. Expert cooking indicator light d. Congee cooking indicator light e. Reheat indicator light f. Porridge cooking indicator light g. Soup cooking indicator light h. Steam cooking indicator light i. Cake cooking indicator light j. "KEEP WARM/CANCEL" key k. "MENU" key l. "START" key m. "PRESET" key Hotplate Sensor Before the first use Unpack the appliance • Remove the appliance from the packaging and unpack all the accessories and printed documents. • Open the lid by pressing the opening button located on the handle – Fig.1. • Install the spoon support: insert the plastic hook of the support in the hole located under product ring, and slide it downwards – Fig.2. Read the instructions and carefully follow the operating method. Clean the appliance • Remove the ceramic bowl and the micro pressure valve. • Clean the bowl and the micro pressure valve with a sponge and washing-up liquid. Wipe the outside of the appliance and the metal parts of the lid with a damp cloth. • Dry carefully. • Make sure the micro pressure valve is correctly placed in position – Fig.3. Using your rice cooker For all 8 functions • Carefully wipe the outside of the bowl (especially the bottom). Make sure that there are no foreign residues or liquid underneath the bowl and on the hotplate – Fig.4. • Place the bowl into the appliance – Fig.5, making sure that it is correctly positioned. • Slightly rotate the bowl in both directions, so as to ensure good contact between the bottom of the bowl and the hotplate. 4 Never place your hand on the steam vent during cooking, as there is a danger of burns. If you wish to change the selected cooking menu of an error, press "CANCEL" key and choose the menu you want. RICE COOKER MICROCOMPUTER_NC00112493_NC00021289 24/04/12 07:33 Page5 • Check that the condensation collector is correctly placed in position, if not, please install it by pushing firmly into the groove – Fig.6. • Close and lock the lid. • Plug in the appliance. • Do not switch on the appliance until all of the above stages have been completed. • Do not touch the heating plate when the product is plugged. Never use the lid handle to transport the full product. Only use the inner pot provided with the appliance. Do not pour water or put ingredients in the appliance without the bowl inside. EN ZH TH MS Rice Cooking Measuring the ingredients - Max capacity of the bowl • The graduated markings on the inside of the bowl are given in liters and cups, these are used for measuring the amount of water when cooking rice – Fig.7. • The plastic cup provided with your appliance is for measuring rice and the table states the quantity of rice required for the number of servings. 1 level measuring cup of rice weighs about 150 g. • The table below gives a guide to cooking different kinds of rice. For best results, we recommend using ordinary rice rather than ‘easy cook’ type of rice which tends to give a stickier rice and may adhere to the base. With other types of rice, such as brown or wild rice, the quantities of water need adjustment check the table below. • To cook 1 cup of white rice (serves 2 small or 1 large portion), use 1 measuring cup of white rice and then add 1 1/2 measuring cup of water. With some types of rice it is normal for a little rice to stick on the base when cooking 1 cup of rice. To cook other quantity of white rice, refer to cooking guide below. • The maximum quantity of water + rice should not exceed the 5,5 or 10 cup mark inside the bowl – Fig.7. Depending on the type of rice, quantities of water may need adjustment. See the table below. • Rinse the rice thoroughly before cooking. COOKING GUIDE FOR WHITE RICE -10 CUPS Measuring cups of white rice Weight of white rice Water level in the bowl ( + the rice) Serves Approximative cooking time* 38 min 2 300 g 2 cup mark 3per.-4per. 4 600 g 4 cup mark 5per.-6per. 42 min 6 900 g 6 cup mark 8per.-10per. 46 min 8 1200 g 8 cup mark 11per. 50 min 10 1500 g 10 cup mark 13per. 54 min 5 RICE COOKER MICROCOMPUTER_NC00112493_NC00021289 24/04/12 07:33 Page6 • Rinse the rice thoroughly before cooking except for risotto rice. COOKING GUIDE FOR OTHER TYPES OF RICE Type of rice Measuring cup of rice Weight of white rice Water level in the bowl ( + the rice) Serves Approximative cooking time* Rice cooking Round white rice (Italian rice often a stickier rice) 4 600 g 4 cup mark 5per.-6per. 40 min Whole grain Brown rice 4,5 cup mark 5per.-6per. 41 min 4 600 g Risotto rice (Arborio type) 4 600 g 4 cup mark 4per.-5per. 41 min Glutinous rice 4 620 g 4 cup mark 5per.-6per. 38 min Brown rice 4 570 g 4,5 cup mark 5per.-6per. 51 min Japanese rice 4 580 g 4 cup mark 5per.-6per. 32 min Fragrant rice 4 640 g 4 cup mark 5per.-6per. 42 min * The rice cooker will automatically determine the exact cooking time depending on the quantity of water and rice placed in the bowl. Cooking with delayed start - “Preset” function • It is possible to delay the time for starting cooking. • Press “Menu” key until the indicator light of the required function turns on; then press “Preset” key, and then digital screen will display the minimum preset time of the selected function (the preset time flickers, indicating preset time is not selected yet) – Fig.8. Press to set required preset time and the press “Start” key (preset time will include cooking time, i.e. it will end cook when the preset time is over) – Fig.9. • After cooking, the “Keep Warm” indicator light will turn on and beep several times and the digital screen will display “b”, indicating it’s time to open the lid and serve the rice – Fig.10. • The maximum preset time is 15 hours. After reaching 15 hours, it will return to the defaulted minimum preset hours. Cooking with delayed start is for the following modes : Quick, Expert, Congee, Porridge, Soup and Steam. Quick cooking The rice cooker itself determines the exact cooking time depending on the quantity of water and ingredients placed in the bowl (see cooking table above for a guide to times). 6 The cooking times given in the tables are only approximate and for your guidance. • Place the appliance on a flat, stable, heat-resistant work surface away from water splashes and any other sources of heat. • Pour the required quantity of rice into the bowl using the measuring cup provided. Then fill with cold water up to the corresponding “CUP” mark printed in the bowl (See cooking guide above) – Fig.7. RICE COOKER MICROCOMPUTER_NC00112493_NC00021289 24/04/12 07:33 Page7 • Close the lid. Note: Always add the rice first otherwise you will have too much water. • The “Quick” Function is for rice cooking only; preset of time available, with preset time range of between 2 to 15 hours. • Press “Menu” key under standby status until the “Quick” indicator light turns on, the digital screen will display “--“ and the “Start” indicator light will flicker – Fig.11. Press the “Start” key, the cooker will enter “Quick” cooking model, the “Start” indicator light will remain on and the digital screen will display “--“ – Fig.12. • When the inner pot is dry, the cooker will beep once, the digital screen will display “12”, indicating the 12 minutes countdown for automatic simmering. • After the countdown, the “Keep Warm” indicator light will turn on and the cooker will beep for several times and the digital screen will display “b”. Open the lid; stir the rice with paddle to avoid lumping. The cooked rice can either be served immediately or kept warm for a proper duration – Fig.10. • This function features short cooking time and is convenient for users who are in a hurry. It is suitable for cooking moderate volume of rice. • After each use empty and clean the condensation collector. EN ZH TH MS Some recommendations for best results when cooking rice • Measure out the rice and rinse it thoroughly under running water in a sieve for a long time (except for risotto rice which should not be rinsed). Then place the rice in the bowl together with the corresponding quantity of water. • Make sure that the rice is well distributed around the whole surface of the bowl, in order to allow even cooking. • Add salt to your personal taste if required. • Water may be substituted to stock. If using stock, there is the risks of rice browning a bit in the bottom. • Do not open the lid during cooking as steam will escape and this will affect the cooking time and the taste. • On completion of cooking, when the “KEEP WARM” indicate light is on, stir the rice and then leave it in the rice cooker for a few minutes longer in order to get perfect rice with separate grains. 7 RICE COOKER MICROCOMPUTER_NC00112493_NC00021289 24/04/12 07:33 Page8 Expert Cooking • The “Expert” Function is for rice cooking only; preset of time is available, with the preset time range of between 2 to 15 hours. • Press “Menu” key under standby status until the “Expert” indicator light turns on, the digital screen will display “--“ and the “Start” indicator light will flicker – Fig.13. Press the “Start” key, the cooker will enter “Expert” cooking model, the “Start” indicator light will remain on and the digital screen will display “--“ – Fig.12. • When the inner pot is dry, the cooker will beep once and the digital screen will display “20”, indicating 20 minutes countdown for automatic simmering. • After the countdown, the “Keep Warm” indicator light will turn on and the cooker will beep for several times and the digital screen will display “b”. Open the lid; stir the rice with paddle to avoid lumping. The cooked rice can either be served immediately or kept warm for a proper duration – Fig.10. • This cooking function takes slightly longer cooking time but the end result is the cooked rice become fluffy and testy, it is especially working well for delicate rice type that is not easily cooked. Congee cooking To cook congee • The preset of time is available for the “Congee” Function, with the preset time range of between 2 to 15 hours. • Press “Menu” key under standby status until the “Congee” cooking indicator light turns on, the digital screen will display “--“ and the “Start” indicator light will flicker – Fig.14. Press the “Start” key, the cooker will enter “Congee” cooking model, the “Start” indicator light will remain on and the digital screen will display “--“ – Fig.12. • When the temperature of the water in the pot reaches the setting value, the digital screen will display “40”, indicating the cooker starts to count down from 40 minutes. • At the end of the countdown, the “Keep Warm” indicator light will turn on, the cooker will beep for several times and the digital screen will display “b”, indicating it’s time for opening the lid and serving the congee – Fig.10. • This function takes slightly longer cooking time but the end result is desired taste of congee. Reheat Function 8 • The preset of time is not available for the “Reheat” Function. • Press “Menu” key under standby status until the “Reheat” cooking indicator light turns on, the digital screen will display RICE COOKER MICROCOMPUTER_NC00112493_NC00021289 24/04/12 07:33 Page9 “--“ and the “Start” indicator light will flicker – Fig.15. Press the “Start” key, the cooker will enter “Reheat” cooking model, the “Start” indicator light will remain on and the digital screen will display “--“ – Fig.12. • After reheating, the “Keep Warm” indicator light turns on, the cooker will beep for several times and the digital screen will display “b”, indicating its time to open the lid and serve the rice – Fig.10. EN ZH TH MS Porridge Cooking To cook porridge • The preset of time is available for the “Porridge” Function, with the preset time range of between 2 to 15 hours. • Press “Menu” key under standby status until the “Porridge” cooking indicator light turns on, the digital screen will display “--“ and the “Start” indicator light will flicker – Fig.16. Press the “Start” key, the cooker will enter “Porridge” cooking model, the “Start” indicator light will remain on and the digital screen will display “--“ – Fig.12. • When the temperature of the water in the pot reaches the setting value, the digital screen will display “20”, indicating the cooker starts to count down from 20 minutes. • At the end of the countdown, the “Keep Warm” indicator light will turn on, the cooker will beep for several times and the digital screen will display “b”, indicating it’s time for opening the lid and serving the porridge – Fig.10. • This function takes shorter cooking time and the end result is desired taste of porridge. Soup Cooking To cook soup • The preset of time is available for the “Soup” Function, with the preset time range of between 4 to 15 hours. • Press “Menu” key under standby status until the “Soup” cooking indicator light turns on, the digital screen will display “3“ and the “Start” indicator light will flicker – Fig.17. Press the “Start” key, the cooker will enter 3 hours’ “Soup” cooking model, the “Start” indicator light will remain on and the digital screen will display “--“ – Fig.12. • After two hours’ stewing, the digital screen will display “60”, indicating the cooker starts to count down from 60 minutes. • At the end of the countdown, the “Keep Warm” indicator light will turn on, the cooker will beep several times and the digital screen will display “b”, indicating it’s time for opening the lid and serving the soup – Fig.10. 9 RICE COOKER MICROCOMPUTER_NC00112493_NC00021289 24/04/12 07:33 Page10 Steam cooking (for vegetables, fish, etc.) Measuring the ingredients • The maximum quantity of water in the bowl should not exceed the maximum CUP mark shown in “CUP” on the bowl – Fig.7. Exceeding this level may cause overflow during use. • The water level should be lower than the steam basket. Preparation • Pour water into the bowl, never exceed the maximum CUP mark. • Place the steam basket in the bowl – Fig.20. • Add the ingredients in the steam basket. To steam cook • The preset of time is available for the “Steam” Function, with the preset time range of between 2 to 15 hours. • Press “Menu” key under standby status until the “Steam” indicator light turns on, the digital screen will display “1“ and the “Start” indicator light will flicker – Fig.18. Press the “Start” key, the cooker will enter 1 hour’s “Steam” cooking model, the “Start” indicator light will remain on and the digital screen will display “--“ – Fig.12. • After steaming for an hour, the “Keep Warm” indicator light will turn on, the cooker will beep several times and the digital screen will display “b”, indicating it’s time for opening the lid and serving the food – Fig.10. Cake Cooking To cook cake • Press “Menu” key under standby status until the “cake” indicator light turns on, the digital screen will display “--“ and the “Start” indicator light will flicker – Fig.19. Press the “Start” key, the cooker will enter “Cake” cooking model, the “Start” indicator light will remain on and the digital screen will display “--“ – Fig.12. • After “Cake” cooking, the “Keep Warm” indicator light will turn on and beep for several times and the digital screen will display “b”, the cooker will enter “Keep Warm” status – Fig.10. Automatic keep warm function • The preset of time is not available for the “Keep Warm/Cancel” Function. • Press “Keep Warm/Cancel” key under standby status, the “Keep Warm/Cancel” indicator light turns on and the digital screen will display “b”, indicating the cooker enters keep10 warm status – Fig.10. Do not use keep warm function on cold food. RICE COOKER MICROCOMPUTER_NC00112493_NC00021289 24/04/12 07:33 Page11 • Press “Keep Warm/Cancel” key under function setting status or working model to cancel all the setting and return to standby status. EN ZH On completion of cooking The escaping steam is very hot. Never remove the bowl after cooking without protective oven gloves. • • • • TH Open the lid. Serve the food using the plastic spoon supplied with the appliance and reclose the lid. The food remaining in the bowl will keep warm for any second servings. Don't forget to press "CANCEL" key after keep warm. MS Cleaning and Maintenance Condensation collector • The condensation collector should be emptied and cleaned after each use. • To remove the collector, press on each side of the plastic cover and remove. • To put the plastic cover back, push firmly into the groove. Bowl, steam basket, condensation collector, micro pressure valve and the steam basket • When clean the micro-pressure valve, please remove it from the lid and open it by rotating in the direction of “open” – Fig.21. After cleaning it, please wipe dry it and meet the two triangle in the two parts together – Fig.21, and rotate it in the direction of “close” until you heard “ka”, then put it back to the lid of the rice cooker. • Use hot water, washing up liquid and a sponge to clean the bowl, the condensation collector – Fig.22, the micro pressure valve – Fig.23, the spoons and the cup. Scouring powders and metal sponges are not recommended. • If food has stuck to the bottom, allow the bowl to soak for a while before washing it. • Dry the bowl carefully. • Do not immerse the appliance in water, nor pour water into it, only into the bowl. Taking care of the ceramic bowl • To keep the ceramic coating quality of the bowl for as long as possible, it is recommended not to cut food in it. • Use plastic or wooden utensils and not metal ones when stirring or serving food to avoid damaging the bowl surface. • To avoid any risk of corrosion, do not pour vinegar into the bowl. 11 RICE COOKER MICROCOMPUTER_NC00112493_NC00021289 24/04/12 07:33 Page12 • The colour of the bowl surface may change after using for the first time or after longer use. This change in colour is due to the action of steam and water and does not have any effect on the use of the Rice Cooker, nor is it dangerous for your health. It is perfectly safe to continue using it. Cleaning and care of the other parts of the appliance • Unplug the appliance before cleaning. • Clean the outside of the Rice Cooker, the inside of the lid – Fig.24 and the cord with a damp cloth and wipe dry. Do not use abrasive products. • Do not use water to clean the interior of the appliance body as it could damage the heat sensor. Technical troubleshooting guide Malfunction description Causes Solution Any indicator lamp off and no heating. Rice cooker not plugged. Verify the main plug is well engaged in the product body. Any Indicator lamp off and heating. Problem of The connection of the indicator lamp or Indicator lamp is damaged. Send to authorized service center for repair. Cooking Indicator lamp off, keep warm indicator on. Cook button is not in cooking position. Put the cook button in low position (cooking). Lid is badly closed. Open and close again the lid. Micropressure valve not well positioned or uncomplete. Stop the cooking (unplug the product) and check the valve is complete (2 parts locked together) and well positioned. Lid or micropressure valve gasket is damaged. Send to authorized service center for repair. Rice half cooked or overtime cooking. Too much or not enough water compared to rice quantity. Refer to IFU for water quantity. Rice half cooked or overtime cooking. Not sufficiently simmered. Simmer as required in IFU cooking paragraph. Steam leakage during using. Automatic warm-keeping fails (product stay in cooking position, or no heating). Water leakage on the table. Send to authorized service center for repair. Dew collector missing or dew collector overflow. Empty the dew collector for each use verify good positionning of the dew collector. Remark : if inner bowl is deformed, do not use it anymore and get a replacement bowl from the authorized service center for repair. 12 RICE COOKER MICROCOMPUTER_NC00112493_NC00021289 24/04/12 07:33 Page13 安全指示 EN 安全事項 ZH • 請細閱並遵照使用說明,說明書宜妥為保存。 TH • 該電器產品無需使用外部定時開關或單獨的遙控系統即可正常工作。 該電器產品符合所有相關的安全法規,包括低電壓指令、電磁兼容性法規以 MS 及食品接觸材料法規和環境法規。 • 檢查產品銘牌上的額定電源電壓與供電電源電壓相符(交流電) • 基於各地的標準有異,如果您在購買國以外的國家使用本產品,請先將產品 送交到認可的服務中心進行檢查。 • 切勿將本產品放近發熱處或開著的焗爐,因為這樣可能會導致本產品嚴重受 損。 • 本產品只供家居用途,倘用作專業用途、使用不當或沒有遵照使用說明者, 生產商一概不負責任,而保修條款亦不適用。 • 該電器產品僅為家用設計。請不要在下列保修涵蓋範圍以外的情形下使用 -商店、辦公室和其他職業環境中的員工專用廚房中, -農場中, -酒店或汽車旅館的顧客,或其他住宅樓宇, -住宿加早餐型的旅館和其他類似環境。 連接電源 • 在以下情況下切勿使用本產品: -本產品或電源線損毀。 -本產品跌壞了、出現明顯損毀或不能正常操作。 假如出現以上情況,必需將本產品送交最近的認可服務中心,以免構成潛在 危險。切勿自行拆開本產品。 • 請勿讓電源線隨意懸垂。 • 務必確保該產品接在接地插座上。 • 請勿使用延長線。如果您自己承擔責任,那麽可以使用完好的、與該產品功 率相符的接地延長線。 • 不要用拉、扯、拽電源線的方式來拔取電源插頭。 • 以下情況下,請務必斷開該電器產品: -即時使用後, -移動時, -維護或清潔前, -不能正常工作時。 使用本產品 • 將本產品放在穩固防熱的平坦工作面上,並避免被水濺濕。 • 切勿在無人照看的情況下讓產品工作。不要把產品放於兒童可接觸處。 • 該電器產品不適用於以下人士(包括兒童):身體、感官或心智有缺陷的人 13 RICE COOKER MICROCOMPUTER_NC00112493_NC00021289 24/04/12 07:33 Page14 • • • • • • • • • • • • • • • • • • 士,缺乏相關經驗或知識的人士。下列情況除外:有專人協助並負責他們的 安全,有他人指導或提前接受該設備的使用說明指導。 兒童必需在監督下使用本產品,以確保不會將之用作戲耍。 本產品運行時會產生高溫,請勿接觸產品的暖熱部位、熱水、蒸汽及食物。 內鍋沒有水或食物或沒有放置內鍋時切勿操作本產品。 煮飯功能/掣的操作不得受阻。切勿阻止或阻礙煮飯功能自動跳至保溫。 本產品操作期間切勿移走內鍋。 切勿將本產品直接放在燙熱面上、其他發熱源或火焰上,因為這樣會令其失 靈或構成危險。 由於在烹調時鍋蓋會產生炎熱高溫,故完成烹調後,請勿觸摸內外鍋蓋。 鍋蓋打開時,請勿移動本產品。 內鍋應該直接接觸發熱板,在兩者之間放置任何物件或食物均會干擾本產品 的正確操作。 放好內鍋後才可放入食物或水。 根據內鍋的刻度來調節米、水比例。 在烹調期間,產品會產生高溫和蒸汽。請將手和臉部遠離蒸汽孔。亦不要阻 塞蒸汽出口。 切勿將煲身浸入水中或倒水在煲身上。水只能倒進內鍋。 如果本產品有任何部位著火,切勿嘗試用水滅火,應該利用濕碗布冚熄火焰。 一切零件處理必需由備有原裝零件的服務中心進行。 如有問題或查詢,請跟我們的客戶關係組聯絡或瀏覽我們的網站: groupeseb.com。 產品的電源線可移除者:若電源線損壞,必需以特福認可服務中心出售的特 種電線或型號替換。 產品的電源線不可移除者:若電源線損壞,必需由特福認可服務中心或相類 的合資格人士更換,以防發生危險。 保護環境 • 本產品可供使用多年,但如果你要更換新的,請想想自己可以如何出一分力 保護環境。 • 掉棄本產品前必需先拿走計時器的電池,並將之棄置在當地的家居廢物收集 中心(視乎型號) 保護環境為上﹗ i 本產品含可以回收或循環再造的寶貴物料。 ‹ 請將之送往家居廢物收集站。 14 RICE COOKER MICROCOMPUTER_NC00112493_NC00021289 24/04/12 07:33 Page15 目錄 1. 2. 3. 4. 5. 6. 7. 8. 9. 10. 11. 12. 13. EN 蒸籠 水和米刻度 陶晶內鍋 量杯 湯勺支架 飯勺和湯勺 電源線 開蓋按鈕 煲蓋手挽 微壓閥 煲蓋 露水收集器 控制面板 a. 完成時間顯示和保溫狀態 b. 快煮指示燈 c. 精煮指示燈 d. 煲粥指示燈 e. 翻熱指示燈 f. 稀飯指示燈 g. 煲湯指示燈 h. 蒸煮指示燈 i. 焗蛋糕指示燈 j. “保溫/取消”鍵 k. 選項鍵 l. 開始鍵 m. “預設”鍵 14. 15. ZH TH MS 發熱板 感應器 初次使用前 電飯煲開封 • 從包裝中取出電飯煲,拆除各附件和包裝資料。 • 按下手挽上的按鈕,打開電飯煲蓋Fig.1。 • 安裝湯勺支架:將架的勾插入固定環下的洞中, 然後向下滑動 Fig.2。 閱讀使用書, 按照操作方法小心 操作。 清洗電飯煲 • 移除陶晶內鍋和微壓閥。 • 用海綿及洗潔精清洗陶晶內鍋和微壓閥。 用濕布擦拭產品外部及煲蓋的金屬部份。 • 小心擦乾。 • 確保微壓閥位置正確 Fig.3。 使用電飯煲 使用全部8種功能 • 仔細擦拭陶晶內鍋外部(尤其是煲底)。 確保煲底和發熱板上沒有異物或液體Fig.4。 • 將陶晶內鍋放入電飯煲 Fig.5,確保內鍋位置正確。 • 輕輕將陶晶內鍋朝兩邊轉動,確保煲底和發熱板接 觸良好。 • 檢查露水收集器的位置是否正確。 如否,請將露水收集器穩固地裝入安裝槽內。 烹飪過程中,切勿 將手放在排氣孔上 ,以防燙傷。 如果想改變誤選的 烹飪功能,按下“ 取消”鍵,然後選 擇所需功能。 15 RICE COOKER MICROCOMPUTER_NC00112493_NC00021289 24/04/12 07:33 Page16 • • • • 關上並扣好電飯煲蓋。 電飯煲插上電源。 以上步驟全部完成後電飯煲方可通電。 當電源接通時請勿接觸發熱板。 盛滿食物時切勿持 著蓋柄運送。 只可使用隨電飯煲 提供的內鍋。 請勿在沒有內鍋的 情況將水或其他食 材放入飯煲內。 煮飯 量度米和水–陶晶內鍋的最大容量 • 陶晶內鍋內側有“升”及“杯”兩種刻度標記,用於 煮飯時測量水的份量Fig.7。 • 電飯煲附帶塑膠杯用來量米。表中列出不同人數所需 的米量。1量杯平杯的米約重150克。 • 下表提供不同類型的米的煮法。為達到最佳效果,建議 烹調一般的米, 而非黏身、可能黏煲底的“易煮”米。烹調其他種類的 米時,如糙米或菰米,所需水量應亦應有所調節,請見 下表。 • 煮1量杯白米(供2小份量或1份量),用1量杯白米,然 後加入1.5量杯水。 某些種類的米煮1量杯米時可能會黏煲底。煮食其他份 量的白米請參考以下煮食建議。 • 米和水的總量最多不應超過內鍋內側5.5或10杯水位線 Fig.7,視乎不同種類的米需要加入的水量也不同。詳見 下表。 • 米煮前應徹底淘洗。 白米的烹調方法 白米的量杯數量 白米重量 內鍋中的水位(加入米) 可供享用人數 大約烹調時間* 16 2 300克 2杯刻度 3到 4人 4 600克 4杯刻度 5到 6人 38分鐘 42分鐘 6 900克 6杯刻度 8到10人 46分鐘 8 1200克 8杯刻度 11人 50分鐘 10 1500克 10杯刻度 13人 54分鐘 RICE COOKER MICROCOMPUTER_NC00112493_NC00021289 24/04/12 07:33 Page17 • 除了意大利米外,米煮前應徹底淘洗。 EN 不同種類米的烹調方法 ZH 內鍋中的 可供享用 水位 人數 (加入米) 大約烹調時間* 煮飯功能 米的種類 用米數量 (量杯) 白米重量 圓白大米(意大利大米– 通常為較黏身米) 4 600克 4杯刻度 5到6人 40分鐘 全麥糙米 4 600克 4.5杯刻度 5到6人 41分鐘 意大利米(短圓梗米) 4 600克 4杯刻度 4到5人 41分鐘 糯米 4 620克 4杯刻度 5到6人 38分鐘 糙米 4 570克 4.5杯刻度 5到6人 51分鐘 日本米 4 580克 4杯刻度 5到6人 32分鐘 香米 4 640克 4杯刻度 5到6人 42分鐘 TH MS * 電飯煲根據陶晶內鍋中米量和水量自行決定準確的烹調時間。 預約煮飯-“預設”鍵(Preset) • 開始煮飯時間可預約。 • 按Meun”(選項)鍵至所需功能的顯示燈亮起,然後 按“Preset”(預設)鍵。此時數碼顯示屏會顯示選定 預約烹煮功能適用 於以下模式:快煮 、精煮、煲粥、稀 飯、煲湯和蒸煮 功能的最少預設時間(預設時間閃動表示還未選取預 設時間)Fig.8。按 以設定所需時間,然後按 “Start”(開始)鍵(預設時間包括烹煮時間,即預設 時間過後會停止烹煮)Fig.9。 • 煮好後“KeepWarm”(保溫)顯示燈會亮起,飯煲 會鳴響數次,數碼顯示屏會顯示“b”。這表示飯已 做好,可以開啟煲蓋Fig.10。 • 最多可以預設時間至15小時。15小時後飯煲會回復 最少設定時間。 17 RICE COOKER MICROCOMPUTER_NC00112493_NC00021289 24/04/12 07:33 Page18 快煮 電飯煲會根據內鍋 中的水量和材料份 量自行決定準確的 烹調時間 (有關具體煮飯時間, 請參閱上表)。 表中只列出大約的烹調時間並僅供參考。 • 將電飯煲置放在平坦、穩固、耐熱、 遠離被水濺濕及其他熱源的平面。 • 用電飯煲附送的量杯將所需的米倒入內鍋中。然後將 凍水加入至內鍋中相應的水位(詳見上表)Fig.7。 • 蓋上煲蓋。 注意:先加米以防水加太多。 • “Quick”(快煮)功能只適用於煮飯。此功能可以預設 時間,時間是2至15小時。 • 在待機狀態下按”“Menu”(選項)鍵,直至 “Quick”(快煮)功能顯示燈亮起。此時顯示屏會顯示 “--”,“Start”(開始)顯示燈會閃動Fig.11。按下 開始鍵,飯煲會進入“快煮”模式,”開始”顯示燈 會一直亮著,顯示屏會顯示“--”Fig.12。 • 內鍋無水時飯煲會鳴響一次,顯示屏會顯示“12”, 這表示倒數12分鐘後自動燉飯。 • 倒數完畢“保溫”顯示燈會亮起,飯煲會鳴響數次, 顯示屏會顯示“b”。打開煲蓋以飯勺攪飯以防結塊。 此時可以立刻享用或將飯作適當時間保溫Fig.10。 • 這項功能是短時間烹煮,時間緊迫時最合用,適合煮 一般份量的飯。 • 每次使用後,清空及清洗露水收集器。 達到煮飯最佳效果的建議 • 米量好後,用筲箕在水喉下徹底沖洗一段長時間(不 用淘洗的意大利米除外)。 然後將洗淨的米和相應份量的水加入內鍋中。 • 確保米均勻攤鋪在煲中以使烹調均勻。 • 可根據個人味道加鹽調味。 • 可用清湯代替水,但煲底的米有可能會輕微燒焦。 • 煮飯時切勿打開煲蓋,否則蒸汽溢出會影響烹調時 間及米飯味道。 • 煮飯完成,“保溫”指示燈亮著時,攪拌米飯,然 後讓米飯放煲中數分鐘,這樣能讓米飯粒粒分明。 精煮 • “Expert”(精煮)功能只用於煮飯。此功能可以預設時 間,時數是2至15小時。 18 RICE COOKER MICROCOMPUTER_NC00112493_NC00021289 24/04/12 07:33 Page19 • 在 待 機 狀 態 下 按 ” “Menu”(選 項 )鍵 , 直 至 “Expert”(精煮)功能顯示燈亮起。此時顯示屏會顯示 “--”, “Start” (開始)顯示燈會閃動 Fig.13。按下 開始鍵,飯煲會進入 “精煮”模式,”開始”顯示燈 會一直亮著,顯示屏會顯示“--”Fig.12。 • 內鍋無水時飯煲會鳴響一次,顯示屏會顯示“20”, 這表示倒數20分鐘後自動燉飯。 • 倒數完畢“保溫”顯示燈會亮起,飯煲會鳴響數次, 顯示屏會顯示“b”。打開煲蓋以飯勺攪飯以防結團。 此時可以立刻用飯或將飯作適當時間保溫Fig.10。 • 雖然這項烹煮功能需時稍長,但煮出的飯鬆軟可口, 尤其適合煮不易熟的米種。 EN ZH TH MS 煲粥 煲粥 • “Congee”(煲粥)功能可以預設時間,時間是2至15小時。 • 在 待 機 狀 態 下 按 ” “Menu”(選 項 )鍵 , 直 至 “Congee”(粥)功能顯示燈亮起。此時顯示屏會顯 示“--”,“Start”(開始)顯示燈會閃動Fig.14。 按下開始鍵,飯煲會進入煮 “粥”模式,”開始” 顯示燈會一直亮著,顯示屏會顯示“--”Fig.12。 • 鍋內的水溫達至設定值時顯示屏會顯示“40”,這 表示飯煲開始倒數40分鐘。 • 倒數完畢”保溫” 顯示燈會亮起,飯煲會鳴響數次, 顯 示 屏 會 顯 示 ”b”, 這 表 示 可 開 啟 煲 蓋 和 享 用 Fig.10。 • 雖然這項烹煮功能需時稍長,但可以煮出美味的粥。 翻熱功能 • “Reheat”(翻熱)功能不可以預設時間。 • 在 待 機 狀 態 下 按 ” “Menu”(選 項 )鍵 , 直 至 “Reheat”(翻熱)功能顯示燈亮起。此時顯示屏會顯示 “--”,“Start”(開始)顯示燈會閃動 Fig.15。按下開 始鍵,飯煲會進入 “翻熱”模式,”開始”顯示燈會 一直亮著,顯示屏會顯示“--”Fig.12。 • 翻熱後”保溫”顯示燈會亮起,並且鳴響數次,而數 碼顯示屏會顯示”b”,這表示食物已翻熱好,可以開 啟煲蓋和享用Fig.10。 19 RICE COOKER MICROCOMPUTER_NC00112493_NC00021289 24/04/12 07:33 Page20 烹調稀飯 煮稀飯 • “Porridge”(稀飯)功能可以預設時間,時間是2至 15小時。 • 在 待 機 狀 態 下 按 ” “Menu”(選 項 )鍵 , 直 至 “Porridge”(稀飯)功能顯示燈亮起。此時顯示屏會 顯示“--”,“Start”(開始)顯示燈會閃動Fig.16。 按下開始鍵,飯煲會進入煮“稀飯”模式,”開始” 顯示燈會一直亮著,顯示屏會顯示“--”Fig.12。 • 鍋內的水溫達至設定值時顯示屏會顯示“20”,這 表示飯煲開始倒數20分鐘。 • 倒數完畢“保溫”顯示燈會亮起,飯煲會鳴響數次 ,顯示屏會顯示“b”。 這表示稀飯已做好,可以 開啟煲蓋和享用Fig.10。 • 這項烹煮功能需時較短,而且可以煮出美味的稀飯。 煲湯 煲湯 • “Soup”(煲湯)功能可以預設時間,時間是4至15小時。 • 在待機狀態下按”“Menu”(選項)鍵,直至 “Soup”(煲湯)功能顯示燈亮起。此時顯示屏會顯示 “3”,“Start”(開始)顯示燈會閃動 Fig.17。按下 開始鍵,飯煲會進入3小時的煲”湯”模式,”開始” 顯示燈會一直亮著,顯示屏會顯示“--” Fig.12。 • 燉湯兩小時後,數碼顯示屏會顯示“60”,這表示飯 煲開始倒數60分鐘。 • 倒數完畢”保溫”顯示燈會亮起,飯煲會鳴響數次, 顯示屏會顯示”b”。這表示湯已做好,可以開啟煲 蓋和享用 Fig.10。 蒸煮(如蔬菜、魚類等) 量度材料 • 內鍋中的最大水量不應超過內鍋的最大“杯”刻度 中的最高水位Fig.7。超過該水位有可能導致煮食過 程中溢出水。 • 水面應低於蒸籠。 20 RICE COOKER MICROCOMPUTER_NC00112493_NC00021289 24/04/12 07:33 Page21 準備運作 EN • 內鍋中加入水。水量不能超過內鍋的最大“杯” 刻度中的最高水位。 • 將蒸籠放入內鍋中Fig.20。 • 將材料放入蒸籠。 ZH TH MS 蒸煮 • “Steam”(蒸煮)功能可以預設時間,時間是2至15 小時。 • 在 待 機 狀 態 下 按 ” “Menu”(選 項 )鍵 , 直 至 “Steam”(蒸煮)功能顯示燈亮起。此時顯示屏會顯 示“1”,“Start”(開始)顯示燈會閃動 Fig.18。 按下開始鍵,飯煲會進入1小時的 “蒸煮”模式,” 開始”顯示燈會一直亮著,顯示屏會顯示“--”Fig.12。 • 蒸煮一小時後,“保溫”顯示燈會亮起,飯煲會鳴 響數次,顯示屏會顯示“b”。 這表示食物已蒸好 ,可以開啟煲蓋和享用Fig.10。 蛋糕的蒸焗 蒸焗蛋糕 • 在待機狀態下按“Menu” (選項)鍵,直至“Cake” (蛋糕)功能顯示燈亮起。此時顯示屏會顯示 “--”, “Start”(開始)顯示燈會閃動 Fig.19。按下開始鍵,飯 煲會進入 “蛋糕”模式,”開始”顯示燈會一直亮著 ,顯示屏會顯示“--” Fig.12。圖18 • 蛋糕做好後,“保溫”顯示燈會亮起,飯煲會鳴響數 次,顯示屏會顯示“b”,飯煲會進入“保溫”狀態 Fig.10。 自動保溫功能 • “Keep Warm/Cancel”(保溫/取消)功能不可以預設 時間。 • 在待機狀態下按”Keep Warm/Cancel” (保溫/取消) 鍵,直至“保溫/取消”功能顯示燈亮起及顯示屏顯 示“b”。這表示飯煲進入保溫狀態 Fig.10。 • 在功能設置或工作狀態中,按“保溫/取消”鍵可取 消所有設置,回到待機狀態。 請勿將保溫功能用 在冷食上。 21 RICE COOKER MICROCOMPUTER_NC00112493_NC00021289 24/04/12 07:33 Page22 烹調完成 溢出的蒸汽非常高 溫。 烹飪結束時, 請不要在沒戴手套 的情況下直接觸碰 內鍋。 • • • • 打開煲蓋。 用電飯煲附設的膠湯勺將食物取出,然後再蓋上煲蓋。 煲內的食物將處於保溫狀態,可再次享用。 保溫完成後切記按“取消”鍵。 清潔和保養 露水收集器 • 每次使用後清空及清洗露水收集器。 • 按露水收集器的塑膠蓋兩端將其取出。 • 將露水收集器穏固地插回固定槽中。 內鍋、蒸籠、露水收集器及微壓閥 • 清洗微壓閥時,請將微壓閥從煲蓋上取下, 然後沿“開啟”方向旋轉,將微壓閥打開Fig.21。 清洗完畢後,擦乾微壓閥,並對準兩個配件中的三角形 Fig.21, 沿“關閉”方向旋轉,直到發出“咔”聲,然後將其 放回電飯煲蓋。 • 用熱水、洗潔精及海綿清洗內鍋、露水收集器Fig.22、 微壓閥 Fig.23、湯勺及量杯。 不建議使用去污粉及金屬百潔布。 • 如果煲底上黏上食物,清洗前先將內鍋浸泡一會兒。 • 小心擦乾內鍋。 • 切勿將電飯煲放在水中,或將水倒入其中,只能將水 倒入內鍋中。 陶晶內鍋保養 • 建議勿在陶晶內鍋內切食物,好使塗層能盡量長久 保持完好。 • 攪拌食物或取出食物時請使用塑膠或木制器具,切 勿使用金屬器具,以免損壞內鍋表面。 • 為防止腐蝕,切勿將醋加入內鍋。 • 初次使用或多次使用後,內鍋表面的顏色可能會產 生變化。這是由於蒸汽及水的作用造成, 不會影響電飯煲的使用,亦不會對人體有害。電飯 22 煲仍可繼續放心使用。 RICE COOKER MICROCOMPUTER_NC00112493_NC00021289 24/04/12 07:33 Page23 電飯煲其他配件的清洗及保養 EN ZH • 清洗電飯煲前將電源拔除。 • 用濕布擦拭電飯煲外部、煲蓋內側Fig.24 及電源線,然 TH 後擦乾。 切勿使用腐蝕性或具磨損性的清潔產品。 MS • 切勿用水清洗電飯煲內部,以免損壞熱力感應器。 技術疑難排解 失靈情況 原因 解決方法 有顯示燈不亮而且不發 熱 飯煲未插掣 檢查電源線插頭是否牢 插在飯煲 有顯示燈不亮但發熱 顯示燈的連接問題或顯 示燈損壞 送交認可服務中心維修 煮飯顯示燈不亮但保溫 顯示燈亮 煮飯鈕並非處於煮飯位 置 將煮飯鈕調校至低位(煮 飯) 未妥善蓋上 打開蓋再蓋上 微壓閥未放好或不完整 停止煮飯(拔掉電源線) 並檢查閥是否完整(兩部 分互相緊鎖)和安放妥當 蓋或微壓閥墊片損壞 送交認可服務中心維修 飯半熟或煮飯時間過長 相對於米量放水太多或 太少 有關水量的資料可查閱 「使用說明」 飯半熟或煮飯時間過長 燉不熟 燉煮可參照「使用說明 」的有關段落 使用時洩漏蒸汽 自動保溫功能失靈(飯煲 維持在煮飯狀態或不發 熱) 漏水到檯上 送交認可服務中心維修 沒有安放露水收集器或 收集器滿溢 每次使用後必需清空露 水收集器,並且檢查收 集器是否放妥 註:假如內鍋變了形,切勿使用,送交認可服務中心維修 23 RICE COOKER MICROCOMPUTER_NC00112493_NC00021289 24/04/12 07:33 Page24 การป้องกันที่สำคัญ คำแนะนำเพื่อความปลอดภัย • อ่านและทำตามคำแนะนำการใช้งาน • เครือ่ งใช้ไฟฟ้านี้ไม่ได้ผลิตขึ้นเพื่อใช้เป็นเครื่องตั้งเวลา หรือ รีโมตคอนโทรล เครื่องใช้ไฟฟ้านี้ผลิตขึ้นตามมาตรฐานความปลอดภัยและสภาวะการใช้งานเพื่อความปลอดภัย (ข้อกำหนดมาตรฐานอุปกรณ์ในระดับแรงดันต่ำ, ความเข้ากันได้ทางแม่เหล็กไฟฟ้า, ระเบียบว่าด้วยวัตถุที่สัมผัสกับอาหาร, สิ่งแวดล้อม…) • ตรวจสอบแรงดันไฟฟ้าของตัวจ่ายไฟตรงตามที่แสดงบนเครื่องใช้ (กระแสไฟฟ้าสลับ) • เมื่อนำเครื่องใช้ไฟฟ้าไปใช้งานนอกประเทศ ต้องนำเครื่องใช้ไฟฟ้านี้ไปตรวจสอบการใช้งานที่เหมาะสมกับประเทศนั้น ที่ศูนย์บริการ ก่อนการใช้งานจริง • อย่าวางเครื่องใช้ไฟฟ้าใกล้แหล่งให้ความร้อนหรือในเตาไฟร้อน ซึ่งอาจก่อให้เกิดความเสียหายอย่างรุนแรงได้ • เครื่องใช้ไฟฟ้านี้ถูกออกแบบมาเพื่อให้ใช้ภายในประเทศเท่านั้น บริษัทจะไม่รับประกันความเสียหาย อันเกิดมาจากการใช้งานที่ไม่เหมาะสม หรือไม่ปฏิบัติตามคำแนะนำ • เครื่องใช้ไฟฟ้านี้ไม่ได้สร้างขึ้นเพื่อใช้งานดังต่อไปนี้และไม่รับประกันเมื่อใช้กับ: - พื้นที่ในครัวของร้านค้า, สำนักงาน และสภาพแวดล้อมการทำงานอื่นๆ; - โรงนา่; - ลูกค้าของโรงแรม, โมเต็ล และสภาพแวดล้อมประเภทอื่นๆ ที่มีผู้อาศัยอยู่; - สภาพแวดล้อมที่เป็นห้องพักพร้อมบริการอาหาร การเชื่อมต่อกับตัวจ่ายไฟ • ห้ามใช้เมื่อ: - เครื่องใช้ไฟฟ้าหรือสายไฟชำรุด - เครื่องใช้ไฟฟ้าตกหล่นหรือพบเห็นว่ามีความเสียหายหรือใช้งานไม่ได้ ในกรณีดังกล่าว ต้องส่งเครื่องใช้ไฟฟ้าไปยังศูนย์บริการที่ได้รับการรับรองที่ใกล้ที่สุดเพื่อป้องกันอันตรายที่อาจเกิดขึ้น อย่าแยกชิ้นส่วนด้วยตนเอง • อย่าแขวนสายไฟทิ้งไว้ • เสียบปลั๊กเครื่องใช้เข้ากับช่องเสียบปลั๊กไฟที่เดินสายดินไว้เสมอ • อย่าใช้สายพ่วง แต่หากต้องการใช้ ให้ใช้สายพ่วงที่อยู่ในสภาพดีเท่านั้น โดยเสียบปลั๊กไฟเข้ากับเต้ารับที่ต่อสายดินและเหมาะกับกำลังไฟฟ้าของเครื่องใช้ไฟฟ้า • อย่าถอดปลั๊กโดยการดึงที่สายไฟ • ถอดปลั๊กเครื่องใช้ไฟฟ้าเสมอเมื่อ: - หลังใช้งานเสร็จในทันที - เมื่อเคลื่อนย้าย - ก่อนทำความสะอาดหรือดูแลรักษา - เมื่อเครื่องเกิดการทำงานที่ผิดปกติ การใช้งาน • ใช้พื้นผิวงานที่ราบ มั่นคง ทนต่อความร้อน วางให้ห่างจากน้ำที่กระเด็น 24 RICE COOKER MICROCOMPUTER_NC00112493_NC00021289 24/04/12 07:33 Page25 • อย่าปล่อยให้เครื่องใช้ทำงานโดยไม่ได้เฝ้าดู วางให้ห่างจากเด็ก • เครือ่ งใช้นี้มิได้ถูกออกแบบมาสำหรับการใช้งานโดยบุคคล (รวมถึงเด็ก) ที่มีความบกพร่องทางร่างกายและทางประสาทสัมผัสหรือทางจิต ตลอดจนบุคคลที่ปราศจากความรู้และประสบการณ์ในการใช้งาน ยกเว้นในกรณีที่บุคคลเหล่านี้อยู่ภายใต้การดูแลหรือได้รับคำแนะนำในการใช้งานจากผู้ที่มีหน้าที่ดูแลรับผิดชอบ ความปลอดภัยของพวกเขา และปฏิบัติตามคำแนะนำของคู่มือการใช้งาน • ควรดูแลไม่ให้เด็กเล่นเครื่องใช้ไฟฟ้านี้ • อาจถูกเผาไหม้ได้หากสัมผัสกับพื้นผิวที่ร้อนของเครื่องใช้ไฟฟ้านี้ หรือ น้ำร้อน หรือ ไอน้ำ หรืออาหาร • อย่าใช้งานเครื่องใช้ไฟฟ้านี้ ในขณะที่หม้อชั้นในไม่มีอาหารอยู่ หรือไม่มีหม้อชั้นใน • ต้องให้ฟังก์ชั่น/ปุ่มประกอบอาหารทำงานด้วยตัวมันเอง อย่าขัดขวางหรือเปลี่ยนไปที่ฟังก์ชั่นอุ่นอาหาร • ห้ามนำหม้อชั้นในออกขณะที่เครื่องใช้ไฟฟ้ากำลังทำงาน • อย่าสัมผัสฝาภายในและภายนอกหลังประกอบอาหารเสร็จ เนื่องจากอาจเกิดความร้อนระหว่างการประกอบอาหาร • อย่าเคลื่อนย้ายเครื่องขณะที่ฝาเปิดอยู่ • ห้ามวางเครื่องใช้ไฟฟ้าบนพื้นผิวที่ร้อน หรือแหล่งความร้อนหรือเปลวไฟใดๆ ซึ่งอาจเป็นสาเหตุให้เกิดความขัดข้องหรือความเสียหายได้ • หม้อชั้นในและแผ่นทำความร้อนควรสัมผัสกันโดยตรง • อย่าใส่อาหารหรือน้ำลงในเครื่องใช้ไฟฟ้าจนกว่าหม้อชั้นในจะถูกวางในตำแหน่งที่เหมาะสม • ปฏิบัติตามขั้นตอนที่ระบุในวิธีปรุงอาหาร • ในระหว่างการประกอบอาหาร เครื่องใช้ไฟฟ้านี้จะปล่อยความร้อนและไอน้ำออกมา เอาหน้าและมือออกห่างจากเครื่องใช้ อย่าให้หน้าและมือเข้าใกล้ช่องระบายไอน้ำ อย่าขวางช่องระบายไอน้ำ • อย่าจุ่มเครื่องใช้ไฟฟ้านี้ลงในน้ำหรือเทน้ำลงบนเครื่องใช้ไฟฟ้านี้ ให้เทน้ำลงในหม้อชั้นในเท่านั้น • หากชิ้นส่วนใดของเครื่องใช้เกิดไฟไหม้อย่าพยายามที่จะขจัดออกด้วยน้ำ ให้ใช้ผ้าชุบน้ำหมาดๆ เช็ด • การต่อเติมใดๆ ควรทำโดยศูนย์บริการที่มีอะไหล่แท้ • หากสายไฟที่ให้มากับเครื่องใช้ไฟฟ้านี้ คือ สายไฟแบบถอดเก็บได้: ในกรณีสายไฟชำรุด ต้องเปลี่ยนด้วยสายไฟเฉพาะหรือสายไฟที่ซื้อจากศูนย์บริการแต่งตั้งของทีฟาล์วเท่านั้น • หากสายไฟที่ให้มากับเครื่องใช้ไฟฟ้านี้ คือ สายไฟแบบติดมากับตัวเครื่อง: ในกรณีสายตัวจ่ายไฟชำรุด ต้องเปลี่ยนโดยศูนย์บริการแต่งตั้งของทีฟาล์วหรือบุคคลที่มีประสบการณ์เท่านั้น เพื่อป้องกันอันตรายที่อาจเกิดขึ้นได้ EN ZH TH MS รักษาสิ่งแวดล้อม • เครื่องใช้ไฟฟ้านี้ออกแบบให้ใช้งานได้ยาวนาน อย่างไรก็ตามเมื่อต้องการเปลี่ยนใหม่ โปรดคำนึงว่าท่านสามารถช่วยรักษาสิ่งแวดล้อมได้อย่างไร • ก่อนทิ้งเครื่องใช้ไฟฟ้านี้ควรถอดแบตเตอรี่ออกจากเครื่องบันทึกเวลาและนำไปทิ้งที่ศูนย์เก็บขยะของท้องถิ่น (ตามต้นแบบ) รักษาสิ่งแวดล้อมเป็นอันดับแรก! i เครื่องใช้ไฟฟ้านี้ประกอบด้วยวัสดุที่มีค่าซึ่งสามารถนำกลับมาใช้ประโยชน์หรือนำกลับมาใช้ได้ใหม่ ‹ ทิ้งไว้ที่จุดเก็บขยะของท้องถิ่น 25 RICE COOKER MICROCOMPUTER_NC00112493_NC00021289 24/04/12 07:33 Page26 ส่วนประกอบ 1. 2. 3. 4. 5. 6. 7. 8. 9. 10. 11. 12. 13. ถาดนึ่งอาหาร มาตรบอกระดับน้ำ หม้อเซรามิกถอดได้ ถ้วยตวงข้าว ที่เก็บทัพพี ทัพพี สายไฟ ปุ่มเปิดฝา ด้ามจับฝา ฝาระบายไอน้ำ ไมโคร-เพรสเชอร์ วาล์ว ฝาปิด ถาดรองไอน้ำ แผงควบคุมการทำงาน a. หน้าจอแสดงเวลา b. ไฟแสดงสถานะการหุงด่วน c. ไฟแสดงสถานะหุงพิถีพิถัน d. ไฟแสดงสถานะการทำข้าวต้ม/โจ๊ก e. ไฟแสดงสถานะอุ่นอาหาร f. ไฟแสดงสถานะทำโจ๊ก g. ไฟแสดงสถานะการทำซุป h. ไฟแสดงสถานะนึ่ง i. ไฟแสดงสถานะทำเค้ก j. ปุ่ม “อุ่น/ยกเลิก” k. ปุ่ม เลือกเมนู l. ปุ่ม เรื่มประกอบอาหาร m. ปุ่ม “ตั้งค่า” 14. 15. แผ่นความร้อน เซนเซอร์ ก่อนการใช้งานครั้งแรก การถอดตัวเครื่อง • นำตัวเครื่อง อุปกรณ์เสริม และเอกสารต่างๆ ออกจากกล่อง • เปิดฝาปิดโดยกดปุ่มเปิดฝาบริเวณด้ามจับฝา - Fig.1. • ใส่ท่เี ก็บทัพพี โดยเกี่ยวตะขอพลาสติกของที่เก็บทัพพีเข้ากับห่วงวงแหวนและกดลง - Fig.2. อ่านคู่มือการใช้งานและปฏิบัติ ตาม วิธีการใช้งานอย่างระมัดระวัง การทำความสะอาด ถอดหม้อเซรามิกและไมโครเพรสเซอร์วาล์ว ทำความสะอาดหม้อชัน้ ในและฝาระบายไอน้ำ ไมโครเพรสเชอร์ วาล์วด้วยฟองน้ำและ น้ำยาล้างจาน เช็ดทำความสะอาดภายนอกตัวเครือ่ งและส่วนทีเ่ ป็นโลหะของฝาปิดด้วย ผ้าเปียกหมาด ๆ • ปล่อยทิ้งไว้ให้แห้ง • แน่ใจว่า ฝาระบายไอน้ำ ไมโคร-เพรสเชอร์ วาล์วอยู่ในตำแหน่งที่ถูกต้อง - Fig.3. • • การใช้งานหม้อหุงข้าว สำหรับ 8 โปรแกรมการทำงาน • เช็ดทำความสะอาดภายนอกหม้อชัน้ ใน (โดยเฉพาะก้นหม้อ) ด้วยความระมัดระวัง แน่ใจว่า ไม่มีวัตถุใดๆ หรือน้ำอยู่ใต้ก้นหม้อและบนแผ่นทำความร้อน - Fig.4. • วางหม้อชัน้ ในข้างในตัวเครือ่ ง - Fig.5 แน่ใจว่า วางในตำแหน่งทีถ่ กู ต้อง • หมุนหม้อชั้นในไปทางซ้ายและขวา เพื่อแน่ใจว่า ก้นหม้อชั้นในสัมผัสกับแผ่นทำความร้อน • ตรวจสอบว่า ถาดรองไอน้ำอยู่ในตำแหน่งที่ถูกต้อง ถ้าไม่ถูกต้อง ให้นำไปใส่ ที่ช่องด้านข้างตัวเครื่องแล้วดันให้แน่น - Fig.6. 26 ไม่ควรวางมือบนช่องระบายไอน้ำ ระหว่างเครื่องทำงาน เพราะอาจเกิด แผลลวกไหม้ หากคุณต้องการเปลีย่ นโปรแกรม การทำงาน ทำได้โดยกดปุ่ม “ยกเลิก” RICE COOKER MICROCOMPUTER_NC00112493_NC00021289 24/04/12 07:33 Page27 และเลือกโปรแกรมที่คุณต้องการ EN ใหม่ ZH ห้ามหิ้วด้ามจับไปมา ในขณะที่มีอาหาร อยู่เต็ม TH ให้ใช้หม้อชั้นในที่ให้มากับ MS เครื่องใช้ไฟฟ้านี้เท่านั้น ห้ามเทน้ำหรือส่วนประกอบ อาหารต่างๆ ลงในเครื่องใช้ไฟฟ้านี้ในขณะที ่ไม่มี หม้อชั้นใน • ปิดและล็อคฝาปิด • เสียบปลั๊ก • ไม่ควรเปิดสวิทช์ หากขั้นตอนดังกล่างข้างต้นไม่เสร็จสมบูรณ์ • ห้ามสัมผัสแผ่นทำความร้อนในขณะที่เครื่องใช้ไฟฟ้าเสียบปลั๊กอยู่ โปรแกรมหุงข้าว การตวง – ความจุสูงสุดของหม้อชั้นใน • มาตรบอกระดับน้ำภายในหม้อชัน้ ในแสดงทัง้ แบบลิตรและแบบถ้วยใช้สำหรับการหุงข้าว - Fig.7. • ถ้วยตวงข้าวพลาสติกมาพร้อมกับตัวเครือ่ ง ใช้สำหรับตวงข้าวทีต่ อ้ งการหุง หนึง่ ถ้วยตวง ข้าวมีนำ้ หนักประมาณ 150 กรัม • ตารางด้านล่างนี้เป็นคำแนะนำสำหรับการหุงข้าวชนิดต่างๆ เพื่อให้ได้ ผลลัพธ์ที่ดีที่สุดแนะนำให้ใช้ข้าวทั่วไปในการหุงข้าว สำหรับข้าวชนิด อื่นๆ เช่น ข้าวแดง หรือข้าวป่า ปริมาณน้ำจำเป็นต้องถูกปรับตาม ประเภทของข้าว กรุณาดูตารางด้านล่าง • การหุงข้าวขาวหนึ่งถ้วยตวง (สำหรับเสิร์ฟ 2 ที่เล็ก หรือ 1 ที่ใหญ่) ตวงข้าวขาวหนึ่งถ้วย ตวงและเติมน้ำที่ระดับหนึ่งถ้วยครึ่ง สำหรับข้าวบางชนิดเป็นเรื่องปกติที่ข้าวจะติดก้นหม้อเล็ก น้อย เมื่อหุงข้าวหนึ่งถ้วยตวง การหุงข้าวขาวที่ปริมาณต่างๆ กรุณาดูตารางด้านล่าง • ปริมาณสูงสุดของน้ำและข้าวไม่ควรเกินที่ระดับ 5,5 หรือ 10 ถ้วยตามระดับมาตรบอก ระดับน้ำข้างในหม้อชั้นใน - Fig.7 ขึ้นอยู่กับชนิดของข้าว ปริมาณของน้ำอาจจำเป็นต้อง ถูกปรับ กรุณาดูตารางด้านล่าง • ซาวข้าวก่อนหุง ตารางแนะนำการหุงข้าวขาว ปริมาณข้าวขาว น้ำหนักข้าวขาว (ถ้วยตวง) 2 4 6 8 10 300 กรัม 600 กรัม 900 กรัม 1200 กรัม 1500 กรัม ระดับน้ำในหม้อชัน้ ใน (รวมข้าว) เสิร์ฟ เวลาที่ใช้ในการหุงโดยประมาณ* 2 ถ้วย 4 ถ้วย 6 ถ้วย 8 ถ้วย 10 ถ้วย 3-4 คน 5-6 คน 8-10 คน 11 คน 13 คน 38 นาที 42 นาที 46 นาที 50 นาที 54 นาที 27 RICE COOKER MICROCOMPUTER_NC00112493_NC00021289 24/04/12 07:33 Page28 • ซาวข้าวก่อนหุง ยกเว้นข้าวริซอตโต้ ตารางแนะนำการหุงชนิดต่างๆ ชนิดข้าว ปริมาณข้าว ระดับน้ำในหม้อชัน้ น้ำหนักข้าว เสิร์ฟ (ถ้วยตวง) ใน (รวมข้าว) เวลาที่ใช้ในการหุงโดยประมาณ* หุงด่วน ข้าวขาวอิตาเลียน (Round white rice) 4 600 กรัม 4 ถ้วย 5-6 คน 40 นาที ข้าวขัดสีน้อย 4 600 กรัม 4.5 ถ้วย 5-6 คน 41 นาที ข้าวริซอตโต้ (พันธุอ์ าร์บอริโอ) 4 600 กรัม 4 ถ้วย 4-5 คน 41 นาที ข้าวเหนียว 4 620 กรัม 4 ถ้วย 5-6 คน 38 นาที ข้าวแดง 4 570 กรัม 4.5 ถ้วย 5-6 คน 51 นาที ข้าวญี่ปุ่น 4 580 กรัม 4 ถ้วย 5-6 คน 32 นาที ข้าวหอม 4 640 กรัม 4 ถ้วย 5-6 คน 42 นาที *หม้อหุงข้าวจะกำหนดเวลาที่ใช้ในการหุงอย่างอัตโนมัติ ขึ้นอยู่กับปริมาณน้ำและข้าวที่ใส่ลงในหม้อชั้นใน หุงข้าวโดยการตั้งเวลาเริ่ม - ฟังก์ชัน “Preset”การหุงโดยการตั้งเวลาเริ่มใช้สำห • คุณสามารถหุงข้าวโดยตั้งเวลาหุงได้ • กดปุม่ “Menu” จนกว่าไฟแสดงสถานะของฟังก์ชันที่ต้องการจะสว่างขึ้น แล้วจึงกดปุ่ม “Preset” และหน้าจอดิจิตอลจะแสดงเวลาตั้งล่วงหน้าต่ำสุดของฟังก์ชันที่เลือก (เวลาตั้งล่วงหน้ากะพริบ แสดงว่ายังไม่ได้เลือกเวลาตั้งล่วงหน้า) - Fig.8. กด เพื่อกำหนดเวลาตั้งล่วงหน้า แล้วจึงกดปุ่ม “Start” (เวลาตั้งล่วงหน้าจะรวมเวลาในการหุง กล่าวคือ จะสิ้นสุดการหุงเมื่อหมดเวลาตั้งล่วงหน้า) - Fig.9. • หลังจากการหุง ไฟแสดงสถานะ “Keep Warm” จะสว่างขึ้นและจะส่งเสียงเตือนหลายครั้ง และหน้าจอดิจิตอลจะแสดงเป็น “b” แสดงว่าถึงเวลาเปิดฝาและตักข้าวได้ - Fig.10. • เวลาตั้งสูงสุดคือ 15 ชั่วโมง หลังจากถึง 15 ชั่วโมง เวลาจะกลับไปเป็นจำนวนชั่วโมงที่ตั้งต่ำสุดตามค่าเริ่มต้น 28 รับ วิธีหุงดังต่อไปนี้: หุงด่วน หุงพิถีพิถัน โจ๊ก ข้าวต้ม ซุป และ นึ่ง RICE COOKER MICROCOMPUTER_NC00112493_NC00021289 24/04/12 07:33 Page29 หุงข้าวและหุงด่วน หม้อหุงข้าวจะกำหนดเวลาที่ ใช้ในการหุงอย่างอัตโนมัติ ขึ้นอยู่กับปริมาณน้ำและข้าวที่ ใส่ลงในหม้อชั้นใน (ดูตาราง แนะนำการหุงด้านบน) EN เวลาที่ใช้ในการหุงตามตารางเป็นเพียงเวลาประมาณเพื่อเป็นคำแนะนำสำหรับคุณ • วางเครื่องบนพื้นผิวที่ราบเรียบ มั่นคง ทนความร้อน ห่างจากน้ำและความร้อน • ใส่ข้าวในหม้อชั้นในโดยใช้ถ้วยตวงในการตวง จากนั้นใส่น้ำในหม้อโดยดูระดับน้ำจากมาตรบอกระดับน้ำภายในหม้อ (ดูตารางแนะนำการหุงด้านบน) - Fig.7. • ปิดฝาปิด หมายเหตุ: ควรใส่ข้าวลงในหม้อก่อน มิฉะนั้นคุณจะใส่น้ำมากเกินไป ZH TH MS • ฟังก์ชัน “Quick” เป็นฟังก์ชันสำหรับการหุงข้าวเท่านั้น สามารถใช้การตั้งเวลาได้ โดยมีช่วงการตั้งเวลาระหว่าง 2 ถึง 15 ชั่วโมง • กดปุ่ม “Menu” ใต้สถานะรอจนกว่าไฟแสดงสถานะ “Quick” จะสว่างขึ้น • • • • หน้าจอดิจิตอลจะแสดงเป็น “--“ และไฟแสดงสถานะ “Start” .จะกะพริบ - Fig.11. กดปุ่ม “Start” หม้อหุงข้าวจะป้อนรูปแบบการหุงแบบ “Quick” ไฟแสดงสถานะ “Start” ยังคงสว่าง และหน้าจอดิจิตอลจะแสดงเป็น “--“ - Fig.12. เมื่อหม้อด้านในแห้ง หม้อหุงข้าวจะส่งเสียงเตือนหนึ่งครั้ง หน้าจอดิจิตอลจะแสดงเป็น “12” แสดงถึงการนับถอยหลัง 12 นาทีสำหรับการหุงเดือดแบบอัตโนมัติ หลังจากการนับถอยหลัง ไฟแสดงสถานะ “Keep Warm” จะสว่างขึ้นและหม้อหุงข้าวจะส่งเสียงเตือนหลายครั้ง และหน้าจอดิจิตอลจะแสดงเป็น “b” เปิดฝา ใช้ทัพพีคนข้าวเพื่อไม่ให้เกาะเป็นก้อน สามารถตักข้าวที่หุงสุกในทันทีหรืออุ่นไว้ในเวลาที่เหมาะสม รูปที่ 10 - Fig.10. คุณลักษณะของฟังก์ชันนี้ทำให้ระยะเวลาในการหุงสั้นลง และสะดวกสำหรับผู้ใช้ที่เร่งรีบ เหมาะสำหรับการหุงข้าวที่มีปริมาณปานกลาง หลังการใช้แต่ละครั้ง ทำความสะอาดถาดรองไอน้ำ คำแนะนำเพิ่มเติมเพื่อผลลัพธ์การหุงข้าวที่ดี • นำข้าวที่ตวงมาซาวโดยให้น้ำไหลผ่านตะแกรง (ยกเว้น ข้าวริซอตโต้ไม่ต้องซาวข้าว) จากนั้น นำข้าวใส่ในหม้อชั้นในตามด้วยปริมาณน้ำที่แนะนำ แน่ใจว่า ข้าวกระจายทั่วหม้อชั้นใน เติมเกลือเล็กน้อย ตามความชอบ น้ำอาจใช้น้ำต้มกระดูก ซึ่งอาจทำให้ข้าวมีสีน้ำตาลเล็กน้อย ไม่ควรเปิดฝาปิดระหว่างหุงข้าว เนื่องจากไอน้ำจะออกมาจากหม้อซึ่งมีผลต่อเวลาใน การหุงข้าวและรสชาติของข้าว • ข้าวสุก เมื่อไฟแสดงสถานะการอุ่นปรากฏ เปิดฝาคนข้าวในหม้อและปล่อยทิ้งไว้ใน หม้อหุงข้าวประมาณ 2-3 นาที เพื่อให้ได้ข้าวที่สวยเป็นเม็ดๆ • • • • การหุงพิถีพิถัน • ฟังก์ชัน “Expert” เป็นฟังก์ชันสำหรับการหุงข้าวเท่านั้น สามารถใช้การตั้งเวลาได้ โดยมีช่วงการตั้งเวลาระหว่าง 2 ถึง 15 ชั่วโมง • กดปุ่ม “Menu” ใต้สถานะรอจนกว่าไฟแสดงสถานะ “Expert” จะสว่างขึ้น หน้าจอดิจิตอลจะแสดงเป็น “--“ และไฟแสดงสถานะ “Start” จะกะพริบ - Fig.13. กดปุ่ม “Start” หม้อหุงข้าวจะป้อนรูปแบบการหุงแบบ “Expert” ไฟแสดงสถานะ “Start” ยังคงสว่าง และหน้าจอดิจิตอลจะแสดงเป็น “--“ - Fig.12. • เมื่อหม้อด้านในแห้ง หม้อหุงข้าวจะส่งเสียงเตือนหนึ่งครั้ง หน้าจอดิจิตอลจะแสดงเป็น “20” แสดงถึงการนับถอยหลัง 20 นาทีสำหรับการหุงเดือดแบบอัตโนมัติ 29 RICE COOKER MICROCOMPUTER_NC00112493_NC00021289 24/04/12 07:33 Page30 • หลังจากการนับถอยหลัง ไฟแสดงสถานะ “Keep Warm” จะสว่างขึ้นและหม้อหุงข้าวจะส่งเสียงเตือนหลายครั้ง และหน้าจอดิจิตอลจะแสดงเป็น “b” เปิดฝา ใช้ทัพพีคนข้าวเพื่อไม่ให้เกาะเป็นก้อน สามารถตักข้าวที่หุงสุกในทันทีหรืออุ่นไว้ในเวลาที่เหมาะสม - Fig.10. • ฟังก์ชันการหุงนี้ใช้เวลาในการหุงนานขึ้นเล็กน้อย แต่ผลลัพธ์ที่ได้ในที่สุดคือข้าวที่หุงสุกจะนุ่มและอร่อย เป็นฟังก์ชันที่ดีสำหรับข้าวที่หุงยาก โปรแกรมข้าวต้ม/โจ๊ก การทำข้าวต้ม/โจ๊ก • สามารถใช้การตั้งเวลาได้สำหรับฟังก์ชัน “Congee” โดยมีช่วงการตั้งเวลาระหว่าง 2 ถึง 15 ชั่วโมง • กดปุ่ม “Menu” ใต้สถานะรอจนกว่าไฟแสดงสถานะ “Congee” จะสว่างขึ้น หน้าจอดิจิตอลจะแสดงเป็น “--“ และไฟแสดงสถานะ “Start” จะกะพริบ - Fig.14. กดปุ่ม “Start” หม้อหุงข้าวจะป้อนรูปแบบการทำ “Congee” ไฟแสดงสถานะ “Start” ยังคงสว่าง และหน้าจอดิจิตอลจะแสดงเป็น “--“- Fig.12. • เมื่ออุณหภูมิของน้ำในหม้อถึงค่าที่ตั้งไว้ หน้าจอดิจิตอลจะแสดงเป็น “40” แสดงว่าหม้อหุงข้าวเริ่มนับถอยหลังจาก 40 นาที • เมื่อสิ้นสุดการนับถอยหลัง ไฟแสดงสถานะ “Keep Warm”จะสว่างขึ้น หม้อหุงข้าวจะส่งเสียงเตือนหลายครั้ง และหน้าจอดิจิตอลจะแสดงเป็น “b” แสดงว่าถึงเวลาเปิดฝาและตักข้าวได้ - Fig.10. • ฟังก์ชันนี้ใช้เวลาในการหุงนานขึ้นเล็กน้อย แต่ผลลัพธ์ที่ได้ในที่สุดคือโจ๊กที่มีรสชาติตามที่ต้องการ ฟังก์ชันการอุ่นร้อน • ไม่สามารถใช้การตั้งเวลาได้สำหรับฟังก์ชัน “Reheat” • กดปุม่ “Menu” ใต้สถานะรอจนกว่าไฟแสดงสถานะ “Reheat” จะสว่างขึ้น หน้าจอดิจิตอลจะแสดงเป็น “--“ และไฟแสดงสถานะ “Start” จะกะพริบ - Fig.15. กดปุ่ม “Start” หม้อหุงข้าวจะป้อนรูปแบบการ “Reheat” ไฟแสดงสถานะ “Start” ยังคงสว่าง และหน้าจอดิจิตอลจะแสดงเป็น “--“ - Fig.12. • หลังจากการอุ่นร้อน ไฟแสดงสถานะ “Keep Warm” จะสว่างขึ้น หม้อหุงข้าวจะส่งเสียงเตือนหลายครั้ง และหน้าจอดิจิตอลจะแสดงเป็น “b” แสดงว่าถึงเวลาเปิดฝาและตักข้าวได้ - Fig.10. โปรแกรมข้าวต้ม การทำข้าวต้ม • สามารถใช้การตั้งเวลาได้สำหรับฟังก์ชัน “Porridge” โดยมีช่วงการตั้งเวลาระหว่าง 2 ถึง 15 ชั่วโมง • กดปุ่ม “Menu” ใต้สถานะรอจนกว่าไฟแสดงสถานะ “Porridge” จะสว่างขึ้น หน้าจอดิจิตอลจะแสดงเป็น “--“ และไฟแสดงสถานะ “Start” จะกะพริบ - Fig.16. กดปุ่ม “Start” หม้อหุงข้าวจะป้อนรูปแบบการทำ “Porridge” ไฟแสดงสถานะ “Start” ยังคงสว่าง และหน้าจอดิจิตอลจะแสดงเป็น “--“ - Fig.12. 30 RICE COOKER MICROCOMPUTER_NC00112493_NC00021289 24/04/12 07:33 Page31 • เมื่ออุณหภูมิของน้ำในหม้อถึงค่าที่ตั้งไว้ หน้าจอดิจิตอลจะแสดงเป็น “20” EN แสดงว่าหม้อหุงข้าวเริ่มนับถอยหลังจาก 20 นาที • เมื่อสิ้นสุดการนับถอยหลัง ไฟแสดงสถานะ “Keep Warm”จะสว่างขึ้น หม้อหุงข้าวจะส่งเสียงเตือนหลายครั้ง และหน้าจอดิจิตอลจะแสดงเป็น “b” แสดงว่าถึงเวลาเปิดฝาและตักข้าวได้ - Fig.10. • ฟังก์ชันนี้ใช้เวลาในการหุงสั้นกว่า แต่ผลลัพธ์ที่ได้ในที่สุดคือข้าวต้มที่มีรสชาติตามที่ต้องการ โปรแกรมซุป ZH TH MS การทำซุป • สามารถใช้การตั้งเวลาได้สำหรับฟังก์ชัน “Soup” โดยมีช่วงการตั้งเวลาระหว่าง 4 ถึง 15 ชั่วโมง • กดปุ่ม “Menu” ใต้สถานะรอจนกว่าไฟแสดงสถานะ “Soup” จะสว่างขึ้น หน้าจอดิจิตอลจะแสดงเป็น “--“ และไฟแสดงสถานะ “Start” จะกะพริบ - Fig.17. กดปุ่ม “Start” หม้อหุงข้าวจะป้อนรูปแบบการทำ “Soup” ไฟแสดงสถานะ “Start” ยังคงสว่าง และหน้าจอดิจิตอลจะแสดงเป็น - Fig.12. • หลังจากการตุ๋นสองชั่วโมง หน้าจอดิจิตอลจะแสดงเป็น “60” แสดงว่าหม้อหุงข้าวเริ่มนับถอยหลังจาก 60 นาที • เมื่อสิ้นสุดการนับถอยหลัง ไฟแสดงสถานะ “Keep Warm”จะสว่างขึ้น หม้อหุงข้าวจะส่งเสียงเตือนหลายครั้ง และหน้าจอดิจิตอลจะแสดงเป็น “b” แสดงว่าถึงเวลาเปิดฝาและตักข้าวได้ - Fig.10. โปรแกรมนึ่ง (สำหรับผัก ปลา ฯลฯ) การตวงน้ำ • ปริมาณน้ำที่สามารถใส่ได้สูงสุดไม่ควรเกินระดับสูงสุดตามมาตรบอกระดับน้ำข้างในหม้อชั้นใน - Fig.7 หากใส่น้ำ เกินระดับสูงสุดน้ำอาจล้นหม้อระหว่างการใช้งาน • ระดับน้ำควรต่ำกว่าถาดนึ่งอาหาร • • • ใส่น้ำลงในหม้อชั้นใน อย่าให้เกินระดับสูงสุด วางถาดนึ่งอาหารในหม้อชั้นใน - Fig.20. วางอาหารในถาดนึ่งอาหาร การเตรียม การนึ่ง • สามารถใช้การตั้งเวลาได้สำหรับฟังก์ชัน “Steam” โดยมีช่วงการตั้งเวลาระหว่าง 2 ถึง 15 ชั่วโมง • กดปุ่ม “Menu” ใต้สถานะรอจนกว่าไฟแสดงสถานะ Steam” จะสว่างขึ้น หน้าจอดิจิตอลจะแสดงเป็น “--“ และไฟแสดงสถานะ “Start” จะกะพริบ - Fig.18. กดปุ่ม “Start” หม้อหุงข้าวจะป้อนรูปแบบการ “Steam” ไฟแสดงสถานะ “Start” ยังคงสว่าง และหน้าจอดิจิตอลจะแสดงเป็น - Fig.12. 31 RICE COOKER MICROCOMPUTER_NC00112493_NC00021289 24/04/12 07:33 Page32 • เมื่อสิ้นสุดการนับถอยหลัง ไฟแสดงสถานะ “Keep Warm”จะสว่างขึ้น หม้อหุงข้าวจะส่งเสียงเตือนหลายครั้ง และหน้าจอดิจิตอลจะแสดงเป็น “b” แสดงว่าถึงเวลาเปิดฝาและตักข้าวได้ - Fig.10. โปรแกรมเค้ก • กดปุ่ม การทำเค้ก “Menu” ใต้สถานะรอจนกว่าไฟแสดงสถานะ “Cake” จะสว่างขึ้น หน้าจอดิจิตอลจะแสดงเป็น “--“ และไฟแสดงสถานะ “Start” จะกะพริบ - Fig.19. กดปุ่ม “Start” หม้อหุงข้าวจะป้อนรูปแบบการทำ “Cake” ไฟแสดงสถานะ “Start” ยังคงสว่าง และหน้าจอดิจิตอลจะแสดงเป็น - Fig.12. • หลังจากการทำ “Cake” ไฟแสดงสถานะ “Keep Warm” จะสว่างและหม้อหุงข้าวจะส่งเสียงเตือนหลายครั้ง และหน้าจอดิจิตอลจะแสดงเป็น “b” หม้อหุงข้าวจะป้อนสถานะ “Keep Warm” - Fig.10. ฟังก์ชั่นการอุ่นอัตโนมัติ ไม่สามารถใช้การตัง้ เวลาได้สำหรับฟังก์ชนั “Keep Warm/Cancel” กดปุม่ “Keep Warm/Cancel” ใต้สถานะรอจนกว่าไฟแสดงสถานะ “Keep Warm/Cancel” จะสว่างขึน้ และหน้าจอดิจติ อลจะแสดงเป็น “b” หม้อหุงข้าวจะป้อนสถานะ “Keep Warm” รูปที่ 10 - Fig.10. • กดปุม่ “Keep Warm/Cancel” ใต้สถานะการตัง้ ฟังก์ชนั หรือรูปแบบการทำงานเพือ่ ยกเลิกการตัง้ ค่าทัง้ หมด และกลับไปยังสถานะรอ • • โปรดระวัง ไอน้ำที่ออกมาจากหม้อร้อนมาก ห้ามจับหม้อชั้นในด้วยมือเปล่า ควรใส่ถุงมือก่อนจับ หม้อชั้นในทุกครั้งหลังจาก ประกอบอาหารเสร็จ • • • • เครื่องทำงานเสร็จ เปิดฝาปิด ตักอาหารโดยใช้ทัพพีพลาสติกซึ่งมาพร้อมกับตัวเครื่อง และปิดฝาปิด อาหารที่เหลืออยู่ในหม้อชั้นในจะยังคงอุ่น อย่าลืมกดปุ่ม “ยกเลิก” หลังจากการใช้ฟังก์ชั่นการอุ่น การทำความสะอาดและบำรุงรักษา ถาดรองไอน้ำ • ถาดรองไอน้ำควรเทน้ำทิ้งและทำความสะอาดหลังการใช้งานแต่ละครั้ง • ถอดถาดรองไอน้ำออก • ใส่กลับเข้าที่เดิม โดยนำไปใส่ที่ช่องด้านข้างตัวเครื่องแล้วดันให้แน่น 32 อย่าใช้ฟังก์ชั่นเก็บไว้ในที่อุ่นสำหรับอาหารเย็น RICE COOKER MICROCOMPUTER_NC00112493_NC00021289 24/04/12 07:33 Page33 หม้อชั้นใน ถาดรองไอน้ำ ฝาระบายไอน้ำ ไมโคร-เพรสเชอร์ วาล์ว และถาดนึ่งอาหาร • เมื่อทำความสะอาดฝาระบายไอน้ำ ไมโคร-เพรสเชอร์ วาล์ว ให้ถอดออกจากฝาปิด • • • • EN ZH TH และเปิดโดยหมุนไปที่ตำแหน่ง “เปิด” - Fig.21 MS หลังจากทำความสะอาดฝาระบายไอน้ำเสร็จ เช็ดให้แห้ง และประกอบฝาระบายไอน้ำโดยให้ สัญลักษณ์สามเหลี่ยมของทั้งสองชิ้นส่วนตรงกัน จากนั้นหมุนไปที่ตำแหน่ง “ปิด” - Fig.21. จนกระทั่ง ได้ยินเสียง “คะ” ใส่ฝาระบายไอน้ำกลับเข้าที่เดิม ใช้น้ำร้อน น้ำยาล้างจานและฟองน้ำ ทำความสะอาดหม้อชั้นใน ถาดรองไอน้ำ – Fig.22 ฝาระบายไอน้ำ ไมโคร-เพรสเชอร์ วาล์ว – Fig.23 ทัพพีและถ้วยตวง ไม่แนะนำให้ใช้แผ่นขัดผิวหยาบในการทำความสะอาด หากมีอาหารติดที่ก้นหม้อชั้นใน ให้แช่หม้อในน้ำสักพักก่อนล้างทำความสะอาด เช็ดหม้อชั้นในให้แห้งด้วยความระมัดระวัง ห้ามจุ่มเครื่องลงในน้ำ หรือเทน้ำใส่เครื่อง ยกเว้นหม้อชั้นในเท่านั้น การดูแลผิวเคลือบสารกันติดของหม้อชั้นใน • ไม่ควรหั่นอาหารในหม้อชั้นใน เพื่อรักษาคุณภาพของสารเคลือบเซรามิก ของหม้อชั้นในให้ยาวนาน • ใช้ทัพพีพลาสติกหรือไม้ ไม่ควรใช้ทัพพีโลหะตักอาหาร เนื่องจากอาจทำ ให้ผิวเคลือบได้รับความเสียหาย • หลีกเลี่ยงความเสี่ยงของกรดกัดผิวเคลือบ ไม่ควรใช้น้ำส้มสายชูเทลงในหม้อ • สีของผิวหม้อชั้นในอาจเปลี่ยนได้ หลังจากใช้ครั้งแรกหรือใช้ไปนานวัน การเปลี่ยนสีเนื่องจากปฏิกิริยาของไอน้ำและน้ำ ไม่มีผลต่อหม้อหุงข้าวและ ไม่เป็นอันตราย ปลอดภัยสำหรับการใช้งาน การทำความสะอาดและบำรุงรักษาสำหรับชิ้นส่วนอื่นๆ ของเครื่อง • ถอดปลั๊กไฟก่อนทำความสะอาด • ทำความสะอาดด้านนอกของหม้อหุงข้าว ข้างในฝาปิด - Fig.24. และสายไฟด้วยผ้าเปียก หมาด ๆ และเช็ดให้แห้ง ไม่ควรขัดถูเครื่อง • ห้ามใช้น้ำทำความสะอาดภายในตัวเครื่อง เนื่องจากเซนเซอร์ความร้อนอาจชำรุด 33 RICE COOKER MICROCOMPUTER_NC00112493_NC00021289 24/04/12 07:33 Page34 ตารางแก้ไขปัญหาขัดข้อง คำอธิบายการทำงานผิดปกติ สาเหตุ ไม่ได้เสียบปลั๊กหม้อหุงข้าว ตรวจสอบว่าปลั๊กหลักต่อเข้ากับตัวผลิต ภัณฑ์เป็นอย่างดี หลอดไฟไม่ติดแต่ตัวทำความร้อน ทำงาน ปัญหาการเชื่อมต่อของหลอดไฟแสดง สถานะหรือหลอดไฟแสดงสถานะเสีย ส่งซ่อมที่ศูนย์บริการแต่งตั้ง ไฟแสดงสถานะขณะประกอบอาหารไม่ ปุ่มประกอบอาหารไม่อยู่ในสถานะประ ติด ไฟแสดงการอุ่นอาหารติด กอบอาหาร เลื่อนปุ่มประกอบอาหารให้อยู่ใน ตำแหน่งที่ต่ำกว่า (ประกอบอาหาร) ฝาปิดไม่สนิท เปิดและปิดฝาใหม่ วาล์วไมโครเพรสเซอร์อยู่ในตำแหน่งที่ ไม่ถูกต้องหรือไม่สมบูรณ์ หยุดประกอบอาหาร (ถอดปลั๊ก) และตรวจสอบวาล์วให้เรียบร้อย (2 ส่วนล็อคเข้าด้วยกัน) และอยู่ในตำแหน่งที่ถูกต้อง ฝาหรือวงแหวนวาล์วไมโครเพรสเซอร์ เสีย ส่งซ่อมที่ศูนย์บริการแต่งตั้ง ข้าวดิบ หรือสุกเกินไป น้ำน้อยหรือมากเกินไปเมื่อเทียบกับ ปริมาณข้าว ดูเรื่องปริมาณน้ำจาก คู่มือ ข้าวดิบ หรือสุกเกินไป เคี่ยวไม่เพียงพอ ตุ๋นตามที่กำหนดในส่วนของการ ประกอบอาหารใน คู่มือ ไอน้ำรัว่ ออกมาระหว่างการใช้งาน การอุ่นโดยอัตโนมัติไม่ทำงาน (ผลิตภัณฑ์อยู่ในสถานะประกอบ อาหาร หรือตัวทำความร้อนไม่ทำงาน) น้ำรั่วบนโต๊ะ ส่งซ่อมที่ศูนย์บริการแต่งตั้ง ตัวเก็บหยดน้ำสูญหายหรือล้น หมายเหตุ:หากหม้อชั้นในผิดรูป ให้เลิกใช้โดยเด็ดขาดและส่งซ่อมที่ศูนย์บริการแต่งตั้ง 34 การแก้ปัญหา หลอดไฟไม่ติดและตัวทำความร้อนไม่ ทำงาน เทน้ำออกจากตัวเก็บหยดน้ำเมื่อใช้เสร็จ ทุกครั้ง และแน่ใจได้ว่าตัวเก็บหยดน้ำอยู่ใน ตำแหน่งที่ถูกต้อง RICE COOKER MICROCOMPUTER_NC00112493_NC00021289 24/04/12 07:33 Page35 Perlindungan penting Arahan keselamatan EN ZH • Baca dan ikut arahan penggunaan. Simpan pada tempat yang selamat. • Peralatan ini bukan untuk dikendalikan dengan menggunakan penentu masa luar atau sistem kawalan jauh berasingan. Untuk keselamatan anda, peralatan ini mematuhi peraturan keselamatan dan arahan yang berkuatkuasa semasa ia dikeluarkan (Arahan voltan-rendah, Keserasian Elektromagnet, Peraturan Bahan berkenaan Makanan, Persekitaran…). • Periksa bahawa voltan bekalan kuasa sepadan dengan yang ditunjukkan pada peralatan (arus ulang-alik). • Memandangkan terdapat pelbagai standard yang berkuatkuasa, jika peralatan ini digunakan di negara lain selain daripada negara di mana ianya dibeli, dapatkan pemeriksaan daripada pusat servis yang bertauliah. • Jangan letak peralatan ini berdekatan dengan tempat yang panas atau dalam ketuhar yang panas, kerana kerosakan teruk boleh berlaku. • Peralatan ini direka untuk kegunaan domestik saja. Sekiranya digunakan secara profesional, secara tidak sesuai atau gagal mematuhi arahan, pengilang tidak akan bertanggungjawab dan jaminan tidak akan terpakai. • Ianya tidak bertujuan untuk digunakan bagi penggunaan berikut, dan jaminan tidak terpakai untuk: - staf bahagian dapur di kedai, pejabat dan persekitaran kerja yang lain; - rumah ladang; - oleh pelanggan hotel, motel dan jenis perkitaran kediaman yang lain; - jenis persekitaran katil dan sarapan. TH MS Menyambung kepada bekalan kuasa • Jangan gunakan peralatan ini jika : - peralatan atau kordnya telah rosak. - peralatan telah jatuh atau menunjukkan kerosakan nyata atau tidak berfungsi dengan betul. • Dalam kes ini, peralatan mesti dihantar ke pusat servis yang bertauliah yang terdekat dengan anda untuk mengelakkan sebarang kemungkinan bahaya. Jangan leraikan peralatan ini sendiri. • Jangan tinggalkan kord tergantung. • Sentiasa pasang peralatan di soket bumi. • Jangan menggunakan penyambung soket. Jika anda perlu menggunakan penyambung soket, hanya gunakan penyambung soket yang berkeadaan baik, mempunyai palam bumi dan sesuai dengan kuasa peralatan. • Jangan mencabut palam peralatan dengan menarik kord. • Sentiasa cabut palam peralatan : - sebaik sahaja selesai menggunakan, - apabila memindahkannya, - sebelum membersihkannya atau menyenggaranya, - jika ia gagal berfungsi dengan betul. Penggunaan • Guna permukaan kerja yang rata, stabil dan tahan-haba yang jauh dari apa-apa percikan air. • Jangan tinggalkan peralatan yang masih digunakan tanpa pengawasan. Jauhi daripada kanakkanak. 35 RICE COOKER MICROCOMPUTER_NC00112493_NC00021289 24/04/12 07:33 Page36 • Peralatan ini bukan untuk digunakan oleh orang (termasuk kanak-kanak) yang kurang keupayaan fizikal, deria atau mental, atau kurang pengalaman dan pengetahuan, kecuali mereka telah diberikan pengawasan atau arahan mengenai penggunaan peralatan oleh orang yang bertanggungjawab ke atas keselamatan mereka. • Kanak-kanak hendaklah diawasi untuk memastikan yang mereka tidak bermain dengan peralatan. • Lecuran boleh berlaku jika permukaan peralatan yang panas, air panas, wap atau makanan panas disentuh. • Jangan cuba untuk mengendalikan peralatan apabila mangkuknya kosong atau tanpa mangkuk. • Fungsi/tombol memasak perlu dibiarkan beroperasi sendiri. Jangan halang atau ganggu fungsinya daripada bertukar secara automatik kepada fungsi kekal hangat. • Jangan alihkan mangkuk semasa peralatan sedang digunakan. • Jangan sentuh tutup bahagian dalam dan luar sesudah selesai memasak. Kerana ia akan mengeluarkan suhu yang panas sepanjang fungsi memasak. • Jangan alihkan produk ketika tutup masih terbuka. • Jangan letakkan peralatan secara terus di atas permukaan yang panas, atau apa-apa sumber haba atau api yang lain, kerana ia akan menyebabkan kegagalan fungsi atau bahaya. • Mangkuk dan plat pemanas hendaklah bersentuhan secara terus. Sebarang objek atau makanan yang dimasukkan di antara kedua-dua bahagian ini akan dikendalikan dengan betul. • Jangan masukkan apa-apa makanan atau air ke dalam peralatan sehingga mangkuk diletakkan di kedudukan yang betul. • Patuhi tahap yang ditunjukkan dalam resipi. • Semasa memasak, peralatan akan mengeluarkan haba dan wap. Jauhkan wajah dan tangan anda. Jangan dekatkan wajah dan tangan dengan saluran keluar wap. Jangan halang saluran keluar wap. • Jangan rendam badan peralatan dalam air ataupun mencurahkan air ke dalamnya. Air hanya boleh dimasukkan ke dalam mangkuk. • Jika mana-mana bahagian peralatan anda terbakar, jangan padamkannya dengan air. Untuk memadamkan api, gunakan tuala kecil yang basah. • Sebarang penukaran peralatan ganti hanya harus dilakukan oleh pusat servis dengan menggunakan peralatan ganti yang asli. • Jika peralatan anda dilengkapi dengan kord kuasa yang boleh ditanggalkan: jika kord kuasa rosak, ia mesti digantikan dengan kord khas atau unit yang boleh didapati dari pusat servis Tefal yang bertauliah. • Jika peralatan anda dilengkapi dengan kord kuasa yang kekal: jika kord bekalan kuasa rosak, ia mesti digantikan oleh pusat servis Tefal yang bertauliah atau orang yang berkelayakan untuk mengelakkan sebarang bahaya. Melindungi alam sekitar • Peralatan anda telah direka untuk tahan selama beberapa tahun. Walau bagaimanapun, apabila anda membuat keputusan untuk menukarnya, fikirkan bagaimana anda boleh menyumbang kepada perlindungan alam sekitar. • Sebelum membuang peralatan anda, anda harus mengeluarkan bateri daripada penentu masa dan lupuskannya di pusat pengumpulan sampah sivik tempatan (mengikut model). Perlindungan alam sekitar terlebih dulu ! i Peralatan anda mengandungi bahan berharga yang boleh didapati semuka atau dikitar semula. ‹ Tinggalkannya di tempat pengumpulan sampah sivik tempatan. 36 RICE COOKER MICROCOMPUTER_NC00112493_NC00021289 24/04/12 07:33 Page37 Keterangan 1. 2. 3. 4. 5. 6. 7. 8. 9. 10. 11. 12. 13. EN Bakul kukusan Penanda air dan nasi Mangkuk seramik boleh ditanggalkan Cawan penyukat Pemegang senduk Senduk Wayar kuasa Butang penutup Pemegang penutup Injap tekanan mikro Penutup Pengumpul wap Kotak kawalan a. Paparan masa penamat dan keadaan kekal panas 14. 15. b. Lampu penunjuk memasak Ringkas c. Lampu penunjuk memasak pakar d. Lampu penunjuk memasak Bubur e. Lampu penunjuk panas semula f. Lampu penunjuk memasak bubur g. Lampu penunjuk memasak Sup h. Lampu penunjuk mengukus i. Lampu penunjuk memasak kek j. Kekunci “KEKAL PANAS/BATAL” k. butang “MENU” l. butang “START” m. Kekunci “PRESET” Plat panas Sensor ZH TH MS Sebelum penggunaan kali pertama Keluarkan peralatan • Alihkan peralatan daripada bungkusan dan keluarkan kesemua aksesori dan dokumen. • Buka penutup dengan menekan butang pembuka yang terletak di atas pemegang – Fig.1. • Pasang pemegang senduk: masukkan cangkuk plastik pemegang ke dalam lubang di bawah gegelang produk dan tolak ke bawah – Fig.2. Baca arahan dan ikut kaedah memasang dengan berhati-hati. Cuci peralatan • Alihkan mangkuk seramik dan injap tekanan mikro. • Cuci mangkuk dan injap tekanan mikro dengan span dan cecair pencuci. Lap bahagian luar peralatan dan bahagian logam penutup dengan kain lembap. • Keringkan dengan berhati-hati. • Pastikan injap tekanan mikro berada pada kedudukan yang betul – Fig.3. Menggunakan periuk nasi anda Untuk kesemua 8 fungsi • Lap bahagian luar mangkuk (terutama bahagian bawah) dengan berhati-hati. Pastikan tidak ada bendasing atau cecair di bawah mangkuk dan di atas plat panas – Fig.4. • Letakkan mangkuk ke dalam peralatan – Fig.5, pastikan ia diletakkan pada kedudukan yang betul. • Pusingkan sedikit mangkuk ke kedua-dua belah arah untuk memastikan bahagian bawah mangkuk bersentuhan dengan plat panas. Jangan sesekali meletakkan tangan di atas corong wap ketika memasak untuk mengelakkan bahaya melecur. Sekiranya anda hendak menukar menu yang tersalah pilih, tekan 37 RICE COOKER MICROCOMPUTER_NC00112493_NC00021289 24/04/12 07:33 Page38 • Periksa sama ada pengumpul wap diletakkan dengan betul, jika tidak sila tekan dengan kemas ke dalam alurnya – Fig.6. • Tutup dan kunci penutup. • Pasangkan plag peralatan. • Jangan buka suis peralatan sehinggalah kesemua langkah di atas telah dilengkapkan. • Jangan sentuh plat panas semasa peralatan sedang digunakan. kekunci “BATAL” dan pilih menu yang dikehendaki. Jangan menggunakan pemegang penutup untuk mengangkut produk sewaktu ianya penuh. Pakai mangkuk nasi yang disediakan sahaja. Jangan masukkan air atau bahan makanan ke dalam periuk nasi tanpa mangkuk. Memasak Nasi Menyukat bahan-bahan – Kapasiti mangkuk yang maksimum • Penanda di dalam mangkuk adalah dalam ukuran liter dan cawan untuk mengukur sukatan air semasa memasak nasi – Fig.7. • Cawan plastik yang disertakan adalah untuk menyukat beras dan jadual di bawah menyatakan kuantiti beras yang diperlukan untuk jumlah hidangan. 1 paras sukatan beras mempunyai berat lebih kurang 150g. • Jadual di bawah memberi panduan untuk memasak pelbagai jenis beras. Untuk hasil yang terbaik, kami menyarankan penggunaan beras biasa berbanding jenis beras ‘senang masak’ yang biasanya lebih lembik dan mungkin melekat pada dasar mangkuk. Sekiranya menggunakan jenis beras yang lain seperti beras perang atau beras liar, kuantiti air perlu diubahsuai seperti jadual di bawah. • Untuk memasak 1 cawan nasi putih (untuk 2 hidangan kecil atau 1 hidangan besar), gunakan 1 cawan beras putih dan tambah 1 ½ cawan air. Bagi sesetengah jenis beras, adalah normal sekiranya sedikit nasi melekat pada dasar mangkuk semasa memasak 1 cawan nasi. Untuk memasak nasi putih dalam kuantiti yang lain, rujuk kepada panduan memasak di bawah. • Sukatan maksimum air+beras tidak boleh melebihi tanda 5,5 atau 10 cawan di dalam mangkuk – Fig.7. Bergantung kepada jenis beras, kuantiti air perlu diubahsuaikan. Lihat jadual di bawah. • Cuci beras sepenuhnya sebelum memasak. PANDUAN MEMASAK UNTUK BERAS PUTIH 38 Sukatan beras putih (cawan) Berat beras putih Paras air dalam mangkuk (+ beras) Hidangan Anggaran masa memasak* 2 4 6 8 10 300 g 600 g 900 g 1200 g 1500 g Paras 2 cawan Paras 4 cawan Paras 6 cawan Paras 8 cawan Paras 10 cawan 3-4 hidangan 5-6 hidangan. 8-10 hidangan 11 hidangan 13 hidangan 38 min 42 min 46 min 50 min 54 min RICE COOKER MICROCOMPUTER_NC00112493_NC00021289 24/04/12 07:33 Page39 • Cuci beras sepenuhnya sebelum memasak kecuali beras risotto. EN PANDUAN MEMASAK UNTUK JENIS BERAS YANG LAIN ZH Jenis beras Sukatan beras (cawan) Berat beras Paras air dalam mangkuk (+ beras) Hidangan Anggaran masa memasak* Memasak nasi Beras Italian (lebih melekat) 4 600 g Tanda 4 cawan 5-6 hidangan 40 min Beras Gandum 4 600 g Tanda 4.5 cawan 5-6 hidangan 41 min Beras Risotto 4 600 g Tanda 4 cawan 4-5 hidangan 41 min Beras Pulut 4 620 g Tanda 4 cawan 5-6 hidangan 38 min Beras Merah 4 570 g Tanda 4.5 cawan 5-6 hidangan. 51 min Beras Jepun 4 580 g Tanda 4 cawan 5-6 hidangan 32 min Beras Wangi 4 640 g Tanda 4 cawan 5-6 hidangan 42 min TH MS * Periuk nasi akan menentukan masa memasak secara automatik bergantung kepada kuantiti air dan beras di dalam mangkuk. Memasak dengan permulaan boleh tangguh - fungsi "Praset" • Adalah tidak mustahil untuk menangguh masa untuk mula memasak. • Tekan kekunci "Menu" sehingga lampu penunjuk fungsi yang dikehendaki menyala; kemudian tekan kekunci "Praset ", dan skrin digital akan memaparkan masa praset minimum bagi fungsi yang dipilih (masa praset akan berkelip, menunjukkan masa praset masih belum dipilih) – Fig.8. Tekan untuk mengeset masa praset yang dikehendaki dan tekan kekunci "Mula" (masa praset akan merangkumi masa memasak, i.e. ia akan tamat memasak apabila masa praset tamat) – Fig.9. • Apabila memasak lampu penunjuk "Kekal Panas" akan menyala dan berbunyi beberapa kali dan skrin digital akan memaparkan "b", menunjukkan yang nasi sudah masak dan boleh dihidangkan – Fig.10. • Masa praset maksimum ialah 15 jam. Selepas 15 jam, ia akan kembali ke masa lalai praset minimum. Menangguh memasak adalah untuk modmod berikut: Segera, Pakar, Bubur, Sup dan Kukus. 39 RICE COOKER MICROCOMPUTER_NC00112493_NC00021289 24/04/12 07:33 Page40 Masak segera Periuk nasi akan menentukan masa memasak bergantung kepada kuantiti air dan bahan-bahan yang dimasukkan ke dalam mangkuk (sila rujuk jadual memasak di atas untuk panduan masa memasak.) Masa memasak yang diberikan dalam jadual hanyalah anggaran dan sebagai panduan sahaja. • Letakkan peralatan di atas permukaan yang rata, stabil, tahan panas dan jauh daripada percikan air dan sumber haba. • Tuangkan kuantiti beras yang dikehendaki ke dalam mangkuk dengan menggunakan cawan penyukat yang disediakan. Kemudian isikan air sejuk sehingga ke tanda “CAWAN” di dalam mangkuk tersebut. (Sila rujuk kepada panduan memasak di atas) – Fig.7. • Tutup penutup. Nota: Sentiasa masukkan beras terlebih dahulu untuk mengelakkan air yang berlebihan. • Fungsi "Segera" hanya untuk memasak nasi sahaja; praset masa tersedia, dengan masa boleh diprasetkan di antara 2 hingga 15 jam. • Tekan kekunci "Menu" di bawah status tunggu sedia sehingga lampu penunjuk "Segera" menyala, skrin digital akan memaparkan "--" dan lampu penunjuk "Mula" akan berkelip – Fig.11. Tekan kekunci "Mula", periuk akan memasukkan model memasak "Segera", lampu penunjuk "Mula" akan kekal menyala dan skrin digital akan memaparkan "--" – Fig.12. • Apabila bekas dalamnya kering, periuk akan berbunyi sekali, skrin digital akan memaparkan "12", menunjukkan pengiraan detik 12 minit untuk mereneh secara automatik. • Selepas pengiraan detik, lampu penunjuk "Kekal Panas" akan menyala dan periuk akan berbunyi untuk beberapa kali dan skrin digital akan memaparkan "b". Buka penutup; kacau nasi dengan senduk untuk mengelakkan berketul. Nasi yang siap dimasak boleh dihidangkan sama ada serta merta atau dikekalkan panas untuk tempoh yang sewajarnya – Fig.10. • Fungsi ini menonjolkan masa memasak yang pendek dan sesuai untuk pengguna yang sentiasa tergesa-gesa. Ia sesuai untuk memasak jumlah nasi yang sederhana. • Setiap kali selepas penggunaan, kosongkan dan bersihkan pengumpul wap. Saranan untuk mendapatkan hasil terbaik apabila memasak nasi • Sukat nasi dan dengan menggunakan penapis, cuci dengan sempurna di bawah air yang mengalir untuk satu jangkamasa (kecuali beras risotto yang tidak perlu dibilas). Kemudian masukkan beras ke dalam mangkuk bersamasama dengan kuantiti air yang mencukupi. • Pastikan beras diratakan sepenuhnya di atas permukaan mangkuk untuk masakan yang sekata. • Tambah garam mengikut rasa. 40 RICE COOKER MICROCOMPUTER_NC00112493_NC00021289 24/04/12 07:33 Page41 • Air boleh diganti dengan stok. Jika menggunakan stok, berkemungkinan nasi di bahagian bawah mangkuk akan sedikit perang. • Jangan buka penutup semasa memasak kerana wap akan keluar dan akan mengganggu masa memasak dan rasa masakan. • Setelah selesai memasak, apabila lampu penunjuk “KEKAL PANAS” menyala, kacau nasi dan biarkan di dalam periuk untuk beberapa minit lagi untuk memperolehi biji-biji nasi yang sempurna. EN ZH TH MS Memasak Pakar • Fungsi "Pakar" adalah untuk memasak nasi saja; praset masa tersedia, dengan masa praset di antara 2 hingga 15 jam. • Tekan kekunci "Menu" di bawah status tunggu sedia sehingga lampu penunjuk "Pakar" menyala, skrin digital akan memaparkan "--" dan lampu penunjuk "Mula" akan berkelip – Fig.13. Tekan kekunci "Mula", periuk akan memasukkan model memasak "Pakar", lampu penunjuk "Mula" akan kekal menyala dan skrin digital akan memaparkan "--" – Fig.12. • Apabila bekas dalamnya kering, periuk akan berbunyi sekali, skrin digital akan memaparkan "20", menunjukkan pengiraan detik 10 minit untuk mereneh secara otomatik. • Selepas pengiraan detik, lampu penunjuk "Kekal Panas" akan menyala dan periuk akan berbunyi untuk beberapa kali dan skrin digital akan memaparkan "b". Buka penutup; kacau nasi dengan senduk untuk mengelakkan berketul. Nasi yang siap dimasak boleh dihidangkan sama ada serta merta atau dikekalkan panas untuk tempoh yang sewajarnya – Fig.10. • Fungsi memasak ini mengambil masa memasak yang lebih lama sedikit tetapi hasilnya nasi yang masak menjadi gebu dan lazat, ianya sesuai untuk jenis beras yang lembut dan susah dimasak. Memasak bubur Untuk memasak bubur • Praset masa tersedia untuk fungsi "Bubur", dengan masa praset di antara 2 hingga 15 jam. • Tekan kekunci "Menu" di bawah status tunggu sedia sehingga lampu penunjuk "Bubur" menyala, skrin digital akan memaparkan "--" dan lampu penunjuk "Mula" akan berkelip – Fig.14. Tekan kekunci "Mula", periuk akan memasukkan model memasak "Bubur", lampu penunjuk "Mula" akan kekal menyala dan skrin digital akan memaparkan "--" – Fig.12. • Apabila suhu air dalam periuk mencapai nilai yang disetkan, skrin digital akan memaparkan "24", menunjukkan periuk memulakan pengiraan detik dari 40 minit. 41 RICE COOKER MICROCOMPUTER_NC00112493_NC00021289 24/04/12 07:33 Page42 • Selepas pengiraan detik, lampu penunjuk "Kekal Panas" akan menyala dan periuk akan berbunyi untuk beberapa kali dan skrin digital akan memaparkan "b", menunjukkan masanya telah tiba untuk membuka periuk dan menghidangkan nasi – Fig.10. • Fungsi memasak ini mengambil masa memasak yang lebih lama sedikit tetapi hasilnya adalah bubur lazat yang diinginkan. Fungsi Panas Semula • Praset masa tidak tersedia untuk Fungsi "Panas Semula" • Tekan kekunci "Menu" di bawah status tunggu sedia sehingga lampu penunjuk "Panas Semula" menyala, skrin digital akan memaparkan "--" dan lampu penunjuk "Mula" akan berkelip – Fig.15. Tekan kekunci "Mula", periuk akan memasukkan model memasak "Panas Semula", lampu penunjuk "Mula" akan kekal menyala dan skrin digital akan memaparkan "--" – Fig.12. • Selepas memanas semula, lampu penunjuk "Panas Semula"akan menyala, periuk akan berbunyi beberapa kali dan skrin digital akan memaparkan "b", menunjukkan masanya telah tiba untuk membuka periuk dan menghidangkan nasi – Fig.10. Memasak Bubur Untuk memasak bubur • • • • • 42 Praset masa tersedia untuk fungsi "Bubur", dengan masa praset di antara 2 hingga 15 jam. Tekan kekunci "Menu" di bawah status tunggu sedia sehingga lampu penunjuk "Bubur" menyala, skrin digital akan memaparkan "--" dan lampu penunjuk "Mula" akan berkelip – Fig.16. Tekan kekunci "Mula", periuk akan memasukkan model memasak "Bubur", lampu penunjuk "Mula" akan kekal menyala dan skrin digital akan memaparkan "--" – Fig.12. Apabila suhu air dalam periuk mencapai nilai yang disetkan, skrin digital akan memaparkan "24", menunjukkan periuk memulakan pengiraan detik dari 40 minit. Selepas pengiraan detik, lampu penunjuk "Kekal Panas" akan menyala dan periuk akan berbunyi untuk beberapa kali dan skrin digital akan memaparkan "b", menunjukkan masanya telah tiba untuk membuka periuk dan menghidangkan nasi – Fig.10. Fungsi memasak ini mengambil masa memasak yang lebih pendek tetapi hasilnya adalah bubur lazat yang diinginkan. RICE COOKER MICROCOMPUTER_NC00112493_NC00021289 24/04/12 07:33 Page43 Memasak Sup EN Untuk memasak sup ZH • Praset masa tersedia untuk fungsi "Sup", dengan masa praset di antara 4 hingga 15 jam. • Tekan kekunci "Menu" di bawah status tunggu sedia sehingga lampu penunjuk "Sup" menyala, skrin digital akan memaparkan "3" dan lampu penunjuk "Mula" akan berkelip – Fig.17. Tekan kekunci "Mula", periuk akan memasukkan model memasak "Sup" 3 jam, lampu penunjuk "Mula" akan kekal menyala dan skrin digital akan memaparkan "--" – Fig.12. • Selepas merendidih selama dua jam, skrin digital akan memaparkan "60"menunjukkan periuk memulakan pengiraan detik dari 60 minit. • Selepas pengiraan detik, lampu penunjuk "Kekal Panas" akan menyala dan periuk akan berbunyi untuk beberapa kali dan skrin digital akan memaparkan "b", menunjukkan masanya telah tiba untuk membuka periuk dan menghidangkan nasi – Fig.10. TH MS Mengukus (untuk sayuran, ikan dan sebagainya) Menyukat bahan-bahan • Kuantiti air yang maksimum di dalam mangkuk tidak boleh melebihi paras maksimum “CAWAN” yang ditanda pada mangkuk – Fig.7. Melebihi paras ini mungkin mengakibatkan limpahan semasa penggunaan. • Paras air sepatutnya lebih rendah daripada bakul kukusan. Penyediaan • Masukkan air ke dalam mangkuk tetapi jangan melebihi paras maksimum “CAWAN”. • Letakkan bakul kukusan ke dalam mangkuk – Fig.20. • Masukkan bahan-bahan ke dalam bakul kukusan. Untuk mengukus • Praset masa tersedia untuk fungsi "Kukus", dengan masa praset di antara 4 hingga 15 jam. • Tekan kekunci "Menu" di bawah status tunggu sedia sehingga lampu penunjuk "Kukus" menyala, skrin digital akan memaparkan "1" dan lampu penunjuk "Mula" akan berkelip – Fig.18. Tekan kekunci "Mula", periuk akan memasukkan model memasak "Kukus" 1 jam, lampu penunjuk "Mula" akan kekal menyala dan skrin digital akan memaparkan "--" – Fig.12. • Selepas mengukus selama satu jam, lampu penunjuk "Panas Semula" akan menyala, periuk akan berbunyi beberapa kali dan skrin digital akan memaparkan "b", menunjukkan masanya telah tiba untuk membuka periuk dan menghidangkan nasi – Fig.10. 43 RICE COOKER MICROCOMPUTER_NC00112493_NC00021289 24/04/12 07:33 Page44 Memasak Kek Untuk memasak kek • Praset masa tidak tersedia untuk Fungsi "Panas Semula". • Tekan kekunci "Menu" di bawah status tunggu sedia sehingga lampu penunjuk "kek" menyala, skrin digital akan memaparkan "--" dan lampu penunjuk "Mula" akan berkelip – Fig.19. Tekan kekunci "Mula", periuk akan memasukkan model memasak "Kek", lampu penunjuk "Mula" akan kekal menyala dan skrin digital akan memaparkan "--" – Fig.12. • Selepas memasak "Kek", lampu penunjuk "Panas Semula"akan menyala dan berbunyi beberapa kali dan skrin digital akan memaparkan "b", periuk akan berada di status "Kekal Panas" – Fig.10. Fungsi kekal panas otomatik • Praset masa tidak tersedia untuk Fungsi "Panas Semula/Batal". • Tekan kekunci "Kekal Panas/Batal" di bawah status tunggu sedia sehingga lampu penunjuk "Kekal Panas/Batal" menyala dan skrin digital akan memaparkan "b", menunjukkan periuk berada di status kekal panas – Fig.10. • Tekan kekunci "Kekal Panas/Batal" di bawah status fungsi mengeset atau model tugas untuk membatalkan semua seting dan kembali ke status tunggu sedia. Jangan gunakan fungsi kekal hangat pada makanan sejuk. Setelah selesai memasak Wap yang keluar adalah sangat panas. Jangan keluarkan mangkuk selepas memasak tanpa memakai sarung tangan ketuhar. • Buka penutup. • Hidangkan makanan dengan menggunakan senduk plastik yang dibekalkan bersama-sama dengan peralatan dan tutup penutup. • Baki makanan yang berada di dalam mangkuk akan kekal panas untuk hidangan kedua. • Jangan lupa untuk menekan kekunci “BATAL”selepas kekal panas. Mencuci dan menyelenggara Pengumpul wap • Pengumpul wap perlu dikosongkan dan dicuci selepas setiap penggunaan. • Untuk membuka pengumpul, tekan kedua-dua belah penutup plastik dan keluarkannya. • Untuk memasang kembali penutup plastik, tekan dengan ketat ke dalam alur. 44 RICE COOKER MICROCOMPUTER_NC00112493_NC00021289 24/04/12 07:33 Page45 Mangkuk, bakul kukusan, pengumpul wap dan injap tekanan mikro • Apabila mencuci injap tekanan mikro, sila alihkan daripada penutup dan buka dengan memutarnya ke arah “buka” – Fig.21. Selepas mencuci, sila keringkannya dan cantumkan kedua-dua segitiga bersama – Fig.21, dan putarkan ke arah “tutup” sehingga bunyi “ka” kedengaran kemudian letakkan ia kembali ke dalam penutup periuk nasi. • Gunakan air panas, cecair pencuci dan span untuk mencuci mangkuk, pengumpul wap – Fig.22, injap tekanan mikro – Fig.23, senduk dan cawan. Serbuk penyental dan span keluli tidak disarankan. • Sekiranya makanan terlekat di dasar, rendamkan mangkuk seketika sebelum mencuci. • Keringkan mangkuk dengan berhati-hati. • Jangan rendam peralatan di dalam air atau tuangkan air ke atasnya, hanya ke dalam mangkuk. EN ZH TH MS Menjaga mangkuk seramik • Untuk mengekalkan kualiti saduran seramik mangkuk selama yang mungkin, adalah disarankan agar tidak memotong makanan di dalamnya. • Apabila meletakkan mangkuk ke dalam mesin, berhati-hati supaya tidak merosakkan lapisan tidak lekat. • Setelah dicuci beberapa kali di dalam mesin pencuci pinggan, untuk menjadikan permukaan kelihatan baru semula, adalah disarankan untuk mengelap keseluruhan permukaan dalam mangkuk dengan sedikit minyak sayuran yang disapu ke atas tuala kertas. • Pastikan anda meletakkan kembali mangkuk ke dalam periuk nasi. Mencuci dan menjaga bahagian-bahagian lain peralatan • Tanggalkan plag peralatan sebelum mencuci. • Cuci bahagian luar periuk nasi, bahagian dalam penutup – Fig.24 dan wayar dengan kain lembap dan keringkan. Jangan gunakan produk yang kesat. • Jangan gunakan air untuk mencuci bahagian dalam peralatan kerana ia mungkin mengakibatkan kerosakan kepada sensor haba. 45 RICE COOKER MICROCOMPUTER_NC00112493_NC00021289 24/04/12 07:33 Page46 JADUAL PENYELESAI MASALAH Penerangan Kerosakan Penyebab Penyelesaian Mana-mana lampu penunjuk tidak menyala dan tidak memanas. Periuk nasi tidak dicucuh pada palam. Pastikan palam utama bersambung dengan betul ke badan produk. Mana-mana lampu penunjuk tidak menyala dan memanas. Masalah penyambungan lampu penunjuk atau lampu penunjuk rosak. Hantar kepada pusat servis yang bertauliah untuk dibaiki. Lampu penunjuk memasak tidak menyala, lampu kekal panas menyala. Butang memasak tidak dalam kedudukan memasak. Letakkan butang memasak di kedudukan rendah (memasak). Penutup tidak ditutup dengan betul. Buka dan tutup semula penutup. Injap tekanan mikro tidak diletakkan dengan betul atau tidak lengkap. Berhenti memasak (cabut palam produk) dan periksa sama ada injapnya lengkap (2 bahagian dilekat bersama) dan diletakkan dengan betul. Penutup atau gasket injap tekanan mikro rosak. Hantar kepada pusat servis yang bertauliah untuk dibaiki. Nasi tidak masak atau hangit. Air yang terlampau banyak atau tidak mencukupi berbanding kuantiti beras. Rujuk kepada IFU untuk kuantiti air. Nasi tidak masak atau hangit. Tidak direneh secukupnya. Reneh seperti yang dikehendaki dalam peranggan memasak IFU. Wap bocor semasa penggunaan. Kekal panas secara automatik gagal berfungsi (produk kekal dalam kedudukan memasak, atau tiada pemanasan). Air bocor pada meja. Hantar kepada pusat servis yang bertauliah untuk dibaiki. Pengumpul embun hilang atau pengumpul embun melimpah. Kosongkan pengumpul embun untuk setiap penggunaan. Pastikan kedudukan pengumpul embun yang betul. Catatan : jika bekas dalam cacat bentuk, berhenti menggunakannya dan hantar kepada pusat servis yang bertauliah untuk dibaiki. 46 RICE COOKER MICROCOMPUTER_NC00112493_NC00021289 24/04/12 07:33 Page47 RICE COOKER MICROCOMPUTER_NC00112493_NC00021289 24/04/12 07:33 Page48 INTERNATIONAL GUARANTEE : COUNTRY LIST ✆ ﺍﻝﺝﺯﺍﺉﺭ ALGERIA CIJA 9 rue Puvis de Chavannes Saint Euquene Oran 1 an 1 year (0)41 28 18 53 ARGENTINA GROUPE SEB ARGENTINA S.A. Billinghurst 1833 3° C1425DTK Capital Federal Buenos Aires 2 años 2 years 0800-122-2732 Њ ϻЏϻЗЙϻА ARMENIA НϼЂmϽчпщссШЗϿϼ} ЎпфжхШІЬнвнЪчШЫмШндкпщйв ̧овн 2цШчв 2 years (010) 55-76-07 AUSTRALIA GROUPE SEB AUSTRALIA PO Box 7535, Silverwater NSW 2128 1 year 02 97487944 ÖSTERREICH AUSTRIA SEB ÖSTERREICH HmbH Campus 21 - Businesspark Wien Süd Liebermannstr. A02 702 2345 Brunn am Gebirge 2 Jahre 2 years 01 866 70 299 00 BELGIQUE BELGIE BELGIUM GROUPE SEB BELGIUM SA NV 25 avenue de l’Espérance - ZI 6220 Fleurus 2 ans 2 years 070 23 31 59 БЕЛАРУСЬ BELARUS ЗАО «Группа СЕБ-Восток», 125171, Москва, Ленинградское шоссе, д. 16А, стр. 3 2 года 2 years 017 2239290 BOSNA I HERCEGOVINA SEB Développement Predstavništvo u BiH Vrazova 8/II 71000 Sarajevo 2 godine 2 years Info-linija za potrošače 033 551 220 BRASIL BRAZIL SEB DO BRASIL PRODUTOS DOMÉSTICOS LTDA Avenida Arno, 146 Mooca 03108-900 São Paulo SP 1 ano 1 year 0800-119933 БЪЛГАРИЯ BULGARIA ГРУП СЕБ БЪЛГАРИЯ ЕООД Ул. Борово 52 Г, ет. 1, офис 1, 1680 София 2 години 2 years 0700 10 330 CANADA GROUPE SEB CANADA 345 Passmore Avenue Toronto, ON M1V 3N8 1 an 1 year 800-418-3325 CHILE GROUPE SEB CHILE Comercial Ltda Av. Providencia, 2331, piso 5, oficina 501 Santiago 2 años 2 years 12300 209207 COLOMBIA GROUPE SEB COLOMBIA Apartado Aereo 172, Kilometro 1 Via Zipaquira Cajica Cundinamarca 2 años 2 years 18000919288 RICE COOKER MICROCOMPUTER_NC00112493_NC00021289 24/04/12 07:33 Page49 HRVATSKA CROATIA SEB Developpement S.A.S. Vodnjanska 26 10000 Zagreb 2 godine 2 years 01 30 15 294 ČESKÁ REPUBLIK CZECH REPUBLIC GROUPE SEB ČR spol. s r .o. Jankovcova 1569/2c 170 00 Praha 7 2 roky 2 years 731 010 111 DANMARK DENMARK GROUPE SEB NORDIC AS Tempovej 27 2750 Ballerup 2 år 2 years 44 663 155 DEUTSCHLAND GERMANY GROUPE SEB DEUTSCHLAND GmbH / KRUPS GmbH Herrnrainweg 5 63067 Offenbach 2 Jahre 2 years 0212 387 400 EESTI ESTONIA GROUPE SEB POLSKA Sp. z o.o. ul. Bukowińska 22b 02-703 Warszawa 2 aastat 2 years 5 800 3777 SUOMI FINLAND Groupe SEB Finland Kutojantie 7 02630 Espoo 2 Vuotta 2 years 09 622 94 20 FRANCE Incluant uniquement Guadeloupe, Martinique, Réunion, Saint-Martin GROUPE SEB FRANCE Service Consommateur Moulinex BP 15 69131 ECULLY CEDEX 1 an 1 year 09 74 50 47 74 ΕΛΛΑΔΑ GREECE SEB GROUPE ΕΛΛΑΔΟΣ Α.Ε. Οδός Καβαλιεράτου 7 Τ.Κ. 145 64 Ν. Κηφισιά 2 χρόνια 2 years 2106371251 SEB ASIA Ltd. Room 903, 9/F, South Block, Skyway House 3 Sham Mong Road, Tai Kok Tsui, Kowloon Hong-Kong 1 year 852 8130 8998 MAGYARORSZÁG HUNGARY GROUPE SEB CENTRAL-EUROPE Kft. Távíró köz 4 2040 Budaörs 2 év 2 years 06 1 801 8434 INDONESIA GROUPE SEB INDONESIA (Representative office) Sudirman Plaza, Plaza Marein 8th Floor JL Jendral Sudirman Kav 76-78, Jakarta 12910, Indonesia 1 year +62 21 5793 6881 ITALIA ITALY GROUPE SEB ITALIA S.p.A. Via Montefeltro, 4 20156 Milano 2 anni 2 years 199207354 JAPAN GROUPE SEB JAPAN Co. Ltd. 1F Takanawa Muse Building, 3-14-13, Higashi Gotanda, Shinagawa-Ku, Tokyo 141-0022 1 year 0570-077772 ҚАЗАҚСТАН KAZAKHSTAN ЖАҚ «Группа СЕБ- Восток» 125171, Мәскеу, Ленинградское шоссесі,16А, 3 үйі 2 жыл 2 years 727 378 39 39 ዽ࿌ KOREA ၉૯സໞ๐ᇬ൘ྤ ါགྷႶചૐ൚ ൚๚ಉᆲ ! 1 year 1588-1588 HONG KONG RICE COOKER MICROCOMPUTER_NC00112493_NC00021289 24/04/12 07:33 Page50 LATVJA LATVIA GROUPE SEB POLSKA Sp. z o.o. ul. Bukowińska 22b 02-703 Warszawa 2 gadi 2 years 6 716 2007 LIETUVA LITHUANIA GROUPE SEB POLSKA Sp. z o.o. ul. Bukowińska 22b 02-703 Warszawa 2 metai 2 years 6 470 8888 LUXEMBOURG GROUPE SEB BELGIUM SA NV 25 avenue de l’Espérance - ZI 6220 Fleurus 2 ans 2 years 0032 70 23 31 59 MACEDONIA Groupe SEB Bulgaria EOOD Office 1, floor 1, 52G Borovo St., 1680 Sofia - Bulgaria ГРУП СЕБ БЪЛГАРИЯ ДООЕЛ Ул. Борово 52 Г, сп. 1, офис 1, 1680 София, България 2 години 2 years (0)2 2050 022 MALAYSIA Unit No.402-403, Level 4, Uptown 2, No.2, Jalan SS21/37, Damansara Uptown, 47400 Petaling Jaya, Selangor D.E., Malaysia. 1 year (603) 7710 8000 MEXICO Groupe.S.E.B. México, S.A. DE C.V. Goldsmith 38 Desp. 401, Col. Polanco Delegación Miguel Hildalgo 11 560 México D.F. 1 año 1 year (01800) 112 8325 MOLDOVA ТОВ «Груп СЕБ Україна» 02121, Харківське шосе, 201-203, 3 поверх, Київ, Україна 2 ani 2 years (22) 929249 NEDERLAND The Netherlands GROUPE SEB NEDERLAND BV Generatorstraat 6 3903 LJ Veenendaal 2 jaar 2 years 0318 58 24 24 NEW ZEALAND GROUPE SEB NEW ZEALAND Unit E, Building 3, 195 Main Highway, Ellerslie, Auckland 1 year 0800 700 711 NORGE NORWAY GROUPE SEB NORDIC AS Tempovej 27 2750 Ballerup DANMARK 2 år 2 years 815 09 567 PERU Groupe SEB Perú Av. Camino Real N° 111 of. 805 B San Isidro - Lima – Perú 1 año 1 year 441 4455 POLSKA POLAND GROUPE SEB POLSKA Sp. z o.o. ul. Bukowińska 22b 02-703 Warszawa 2 lata 2 years PORTUGAL GROUPE SEB IBÉRICA SA Urb. da Matinha Rua Projectada à Rua 3 Bloco1 - 3° B/D 1950 - 327 Lisboa 2 anos 2 years 808 284 735 REPUBLIC OF IRELAND GROUPE SEB IRELAND Unit B3 Aerodrome Business Park, College Road, Rathcoole, Co. Dublin 1 year 01 677 4003 ROMÂNIA ROMANIA GROUPE SEB ROMÂNIA Str. Daniel Constantin nr. 8 010632 București 2 ani 2 years 0 21 316 87 84 РОССИЯ RUSSIA ЗАО «Группа СЕБ-Восток», 125171, Москва, Ленинградское шоссе, д. 16А, стр. 3 2 года 2 years 495 213 32 30 0801 300 423 koszt jak za połączenie lokalne RICE COOKER MICROCOMPUTER_NC00112493_NC00021289 24/04/12 07:33 Page51 SRBIJA SERBIA SEB Developpement Đorđa Stanojevića 11b 11070 Novi Beograd 2 godine 2 years 060 0 732 000 SINGAPORE GROUPE SEB SINGAPORE Pty Ltd. 59 Jalan Pemipin, #04-01/02 L&Y Building Singapore 577218 1 year 65 6550 8900 SLOVENSKO SLOVAKIA GROUPE SEB Slovensko, spol. s r.o. Rybničná 40 831 06 Bratislava 2 roky 2 years 233 595 224 SLOVENIJA SLOVENIA SEB d.o.o Gregorčičeva ulica 6 2000 MARIBOR 2 leti 2 years 02 234 94 90 ESPAÑA SPAIN GROUPE SEB IBÉRICA S.A. C/ Almogàvers, 119-123, Complejo Ecourban 08018 Barcelona 2 años 2 years 902 31 24 00 SVERIGE SWEDEN TEFAL SVERIGE SUBSIDIARY OF GROUP SEB NORDIC Truckvägen 14 A, 194 52 Upplands Väsby 2 år 2 years 08 594 213 30 SUISSE CHWEIZ SWITZERLAND GROUPE SEB SCHWEIZ GmbH Thurgauerstrasse 105 8152 Glattbrugg 2 ans 2 Jarhre 2 years 044 837 18 40 TAIWAN SEB ASIA Ltd. Taipei International Building, Suite B2, 6F-1, No. 216, Tun Hwa South Road, Sec. 2 Da-an District Taipei 106, R.O.C. 1 year 886-2-27333716 THAILAND GROUPE SEB THAILAND 2034/66 Italthai Tower, 14th Floor, n° 14-02, New Phetchburi Road, Bangkapi, Huaykwang, Bangkok, 10320 2 years 662 351 8911 TÜRKIYE TURKEY GROUPE SEB ISTANBUL AS Beybi Giz Plaza Dereboyu Cad. Meydan Sok. No: 28 K.12 Maslak 2 YIL 2 years 216 444 40 50 U.S.A. GROUPE SEB USA 2121 Eden Road Millville, NJ 08332 1 year 800-395-8325 Україна UKRAINE ТОВ «Груп СЕБ Україна» 02121, Харківське шосе, 201-203, 3 поверх, Київ, Україна 2 роки 2 years 044 492 06 59 UNITED KINGDOM GROUPE SEB UK LTD Riverside House Riverside Walk Windsor Berkshire, SL4 1NA 1 year 0845 602 1454 VENEZUELA GROUPE SEB VENEZUELA Av Eugenio Mendoza, Centro Letonia, Torre ING Bank, Piso 15, Ofc 155 Urb. La Castellana, Caracas 2 años 2 years 0800-7268724 VIETNAM GROUPE SEB VIETNAM (Representative office) 127-129 Nguyen Hue Street District 1, Ho Chi Minh City, Vietnam 1 year +84-8 3821 6395