1
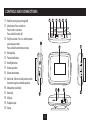
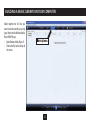
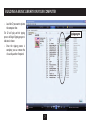
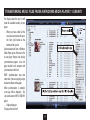
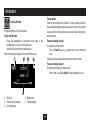
MP-329
Owner’s
Handbook
MP3 Player with FM radio
IMPORTANT SAFETY INFORMATION
IMPORTANT SAFETY INFORMATION
• Read these instructions.
• Keep these instructions.
• Heed all warnings.
• Follow all instructions.
• Do not use this apparatus near water.
• Clean only with a slightly damp cloth.
• Do not block any ventilation openings.
• Install in accordance with the manufacturer’s instructions.
• Do not install or operate near any heat sources such as radiators,
stoves, or other apparatus that produce heat.
• Do not expose the unit to rain or moisture.
• Never listen to music through headphones when driving a car or
cycling. It is not only dangerous, it is illegal.
• To avoid possible damage to your hearing, do not listen to music
at high levels through headphones.
• Never disconnect the player from the PC without following the
correct procedure.
• After use, always disconnect the earphones and store the
earphones and the player safely.
WARNING: This product contains an integral battery. There is a risk of
fire and burns if the player is handled improperly. Do not disassemble,
crush, puncture or dispose of in fire or water. Do not attempt to open
the player case or service the battery pack. Use a qualified service
technician to replace the battery and replace only with a battery
designated for this product. Dispose of the product with the battery
intact in accordance with recycling regulations in your area.
1
INDEX
INTRODUCTION
UNPACKING
Carefully unpack the unit. If it is damaged, please return it to
your nearest Tesco store for replacement. Remember to take your
purchase receipt with you.
Retain the User Handbook. If you pass the unit on to a third party
make sure you pass on the handbook.
We suggest you retain the packaging. If you dispose of it, do so
having regard to any recycling regulations in your area.
Important safety information.................................................. 1
Introduction & unpacking........................................................ 2
Controls & connections............................................................. 3
Battery & charging................................................................... 4
Getting started......................................................................... 5
Building a music library on your computer............................... 6
Transferring music to your player............................................. 8
Operation............................................................................... 12
Playing music......................................................................... 13
Voice recordings..................................................................... 17
FM radio................................................................................. 19
File & folder navigation.......................................................... 22
Settings.................................................................................. 24
Troubleshooting..................................................................... 27
Specifications......................................................................... 27
Warranty................................................................................ 27
CONTENTS
The carton should contain:
• The MP-329 MP3 player
• Headphones
• USB cable
• Operating Manual
If any items are missing or damaged, contact your nearest TESCO
store for a replacement. Have your receipt ready when you call.
Retain the packaging. If you dispose of it, do so having regard to
any recycling regulations in your area.
Microsoft, Windows, XP, Vista and Windows Media Player are
trademarks of the Microsoft group of companies.
2
CONTROLS AND CONNECTIONS
a Hook for carrying strap (not supplied).
b Select button. Press to switch on.
Press to enter a sub-menu.
Press and hold to switch off.
c Play/Pause button. Press to switch between
play and pause modes.
Press and hold to enter the main menu.
d Belt/lapel clip.
e Previous/Left button.
f Next/Right button.
g Volume up button.
h Volume down button.
i Hold slider. Slide to the lock position to lock
the controls against accidental operation.
p Microphone (inside hole).
q Reset hole.
r USB jack.
s Headphone jack.
t Display.
3
BATTERY AND CHARGING
BATTERY CARE
To preserve the life of the battery, the following recommendations are
made • Fully charge the battery before first use.
• Charge the battery immediately if the ‘Low battery’ message is
displayed.
• Do not overcharge the battery. Unplug the player from the
computer when the battery level indication reads fully charged.
• Do not allow the battery to over-discharge. To avoid overdischarge, fully charge the player every 3 months.
POWER SUPPLY
The player is powered by an internal rechargeable battery.
Battery cautions
The battery is not replaceable. Do not attempt to open the player to
replace the battery.
As the unit contains a battery, do not throw it into water, the general
rubbish or in a fire.
RECHARGING THE BATTERY
The battery is automatically recharged when the player is connected
to the USB port of a computer.
A full charge will take approximately two and a half hours. Once
plugged into the computer for charging the player should be left
charging for the recommended time period.
A battery level indicator is provided to monitor the charge condition
of the battery.
4
GETTING STARTED
How does the player work?
A library of music files is created on a personal computer. These files
are generally copied to the computer from music CDs (ripped). You
can then select music within the library that you want to listen to on
your personal MP3 player. Each time your MP3 player is connected, the
player will check the computer library and add new tracks that you
have marked to synchronise with the player.
What software will be required on my computer?
For easy communication with your player, Windows Media Player,
version 11 (WMP11) or later is recommended to manage your music
files.
Windows Media Player software is supplied free of charge with
Microsoft Windows, but depending on the age of your computer, the
version installed may not be version 11.
To check the version of Windows Media Player:
• Open Windows Media Player (click Start>All programs>Windows
Media Player)
• Once Windows Media Player is open, click Help>About Windows
Media Player.
The version is shown on this screen. Version 11 or later is recommended,
although earlier versions will function.
If you need to upgrade to a newer version of Windows Media Player,
visit www.microsoft.com and download the latest version.
Does the computer need to be a particular specification?
Your computer should meet a minimum specification of • Processor minimum of Pentium 200MHz.
• Operating system Microsoft Windows XP, Vista or later.
• 120MB or more of available hard disk space.
• A free USB port.
iTunes:
The iTunes Media Player is not recommended for managing the music
files on your player.
5
BUILDING A MUSIC LIBRARY ON YOUR COMPUTER
Collect together the CDs that you
want to include in your library and rip
(copy) them into the Windows Media
Player (WMP) library.
• Open Windows Media Player 11.
• Click on the ‘Rip’ tab at the top of
the screen.
6
BUILDING A MUSIC LIBRARY ON YOUR COMPUTER
• Load the CD you want to rip into
the computer drive.
The CD will play and the ripping
process will begin. Ripping progrees is
indicated as shown.
• Once the ripping process is
complete, you can remove the
disc and rip another if required.
7
TRANSFERRING MUSIC FILES FROM A WINDOWS MEDIA PLAYER 11 LIBRARY
Copying music to your player
• Switch on your computer.
• Open Windows Media Player 11.
• Lift the cover over the USB jack and
connect the USB cable (supplied).
• Connect the other end of the
cable to a convenient USB port
on your computer.
The display on the player will light and
show the synchronisation symbols.
After a short delay, a window will open
on the right of the Windows Media
Player display titled ‘Sync List’.
• In the main library, click on the
albums or tracks you want to
transfer and drag them across to
the sync list.
NOTE: You can drag individual tracks
from the track list or click on the
album symbol to select the entire
album.
8
TRANSFERRING MUSIC FILES FROM A WINDOWS MEDIA PLAYER 11 LIBRARY
The display above the sync list will
show the available memory in your
player.
• When you have added all the
music you want to transfer, press
the ‘Start Sync’ button at the
bottom of the sync list.
Synchronisation will start as Windows
Media Player copies all the music files
to your player. Progress bars display
synchronisation progress. Leave the
player docked to the computer until
synchronisation is finished.
NOTE: Synchronisation may take
some time if you are copying a large
number of albums to the player.
When synchronisation is complete,
a message will be displayed - ‘You
can now disconnect MP329 USB MP3
player’.
• Unplug the player.
The player will switch off.
9
USING WINDOWS EXPLORER TO TRANSFER MUSIC FILES
Copying music to your player using Windows Explorer
For users familiar with computer file transfer, Windows Explorer can be
used as an alternative to Windows Media Player 11 to transfer music
files to your player.
• Switch on the computer.
• Navigate to ‘My Computer’ (Click Start>My Computer).
• Lift the cover over the USB jack and connect the USB cable (supplied).
• Connect the other end of the cable to a convenient USB port on your
computer.
• Browse to the list of drives on your computer.
• After a short delay, the player will appear as a ‘Removable Disk’.
To make it easier to identify the player you may want to rename the disk
for easy recognition. The computer will recognise the player by its new
name whenever you connect it.
• Double click to open this drive and you will see a MUSIC folder (for
uploading music) and a RECORD folder (for recordings).
• Open a second window of ‘My Computer’.
• Browse to your music files and drag the album folders or music files
onto the MUSIC folder to upload them.
NOTE: If your files are stored in folders you can copy the complete folder
into the MUSIC folder. Ensure that only MP3 or WMA music files are in
the folders before transferring them.
10
USING WINDOWS EXPLORER TO TRANSFER MUSIC FILES
Disconnecting the player
• Locate the ‘Safely Remove Hardware’ icon on the taskbar at the
bottom right of the screen.
• Another screen opens. Click OK.
• Double click the icon.
• In the box that opens, click Stop.
• When you see the ‘Safe To Remove Hardware’ notice, you can
remove the player.
11
OPERATION
PLAYER MODES
SWITCHING THE PLAYER ON AND OFF
Main menu modes:
Switching the player on
• Press and hold the
button.
• Select this mode to play music.
• Select this mode to make a recording.
The display lights. After a short delay a welcome message ‘Technika’ is
shown on the display, then the main menu.
• Select this mode to play a recording.
Switching the player off
• Press and hold the button for 3 seconds.
A farewell message is shown on the display (Bye Bye!). After a short
delay the display will switch off.
• Select this mode to play FM radio.
• Select this mode to change settings.
Selecting a mode from the main menu
When the player is switched on the main menu will be automatically
displayed.
• From the main menu press the or button to scroll through
the available modes.
• Press the /, button to select a menu option.
NOTE: You can return to the main menu at any time by pressing and
holding the /, button.
12
PLAYING MUSIC
Play
• To start playing music, press the /, button.
When playing, the Repeat Mode is displayed.
Pause
• To toggle between play and pause, press the /, button.
When paused, a folder symbol is displayed in place of the repeat
symbol.
Track skip
• To select the next or previous track, press the or button.
Fast Search
• To fast search forward or backward through a track, press and
hold the or button.
Volume control:
• To increase or decrease the volume while playing, press the +
or - button.
When adjusting the volume, the volume bargraph is displayed alongside
the volume level on a scale of 0 (minimum) to 30 (maximum).
Navigating by album:
Advanced users may prefer to select music by folder/album. For more
information about folder navigation, refer to the section ‘Album
Navigation By Folder’.
Playing music:
• Select the ‘MUSIC’ mode from the main menu.
After a short delay the display will show the Music Status screen with
track number etc.
1.
2.
3.
4.
5.
Sample rate
Repeat mode
EQ setting
Track elapsed time
Battery level
6. Track total time
7. Track name/ID3 tag
8. Track number playing
9. Total number of tracks
10. Encoding (MP3/WMA)
13
ADVANCED MUSIC MENU
Repeat/random mode:
Your player includes 4 special functions that may be selected from the
Advanced Menu when music is playing. These are • Repeat mode
• Equaliser
• Tempo rate
• Favourites
• Exit
There are 5 repeat/random mode options.
• To change the repeat/random mode, select the Repeat option
from the Advanced Menu.
• Press the or button to scroll through the available options.
•
•
•
•
•
To open the Advanced Menu:
• Check that music is playing (not paused).
• Press the button.
The display will now show the Advanced Menu.
• Press the or button to change between menu options.
• Press the /, button to select a menu option.
Normal (Repeat off)
Repeat One (Repeat the current track)
Repeat All (Repeat all tracks)
Random (play all tracks in a random order)
Intro (play the first 10 seconds of each track)
• When you have highlighted the option you want, press the /,
button to select it.
The player will exit repeat setting and return to play the track. The
display will show the repeat mode that has been set.
14
ADVANCED MUSIC MENU
Equaliser:
There are 6 equaliser mode options that will change the sound
response of your player.
• To change the equaliser setting, select the Equaliser option from
the Advanced Menu.
• Press the or button to scroll through the available options.
• Normal (No equalisation)
• Rock
• Pop
• Classic
• Soft
• Jazz
As you change the setting you will hear the sound change.
• When you have highlighted the option you want, press the /,
button
The player will exit equaliser setting and return to play the track.
Tempo rate:
Changing the Tempo rate will change the ‘speed’ of the music. By
setting a higher tempo, the music will play faster. A lower tempo will
slow down the music.
• To change the Tempo rate setting, select the Tempo rate option
from the Advanced Menu.
• Press the
or
button to change the setting from 0 (no
change in tempo) to a minimum of -8 (very slow) or a maximum
of +8 (very fast).
15
ADVANCED MUSIC MENU
Favourites playlist:
When you hear a track you like, you can save it as a favourite in your
playlist. When you have a collection of favourites saved you can choose
to play the complete playlist of your favourites.
Exiting Favourite play:
• Press and hold the /, button at any time to return to the main
menu. You can select another function, or re-select MUSIC mode
to re-start normal music play.
Saving your favourites:
• To add the track that is playing to your Favourites playlist, open
the Advanced Menu and select the Favourites option.
• Press the or button to scroll to the ‘Add’ option.
• Press the /, button.
This track will be added to your Favourites playlist.
• Continue to add tracks and build up your favourites playlist.
Deleting your favourites:
There is also a delete option to remove tracks from your Favourites
playlist.
• To delete a track, open the Advanced Menu and select the
Favourites option.
• Press the or button to scroll to the ‘Delete’ option.
• Press the /, button.
Your Favourites playlist will be displayed
• Press the or button to scroll through the playlist and find
the track you want to delete.
• Press the /, button to confirm deletion from the playlist.
NOTE: A track deleted in this way from the Favourites playlist will
remain in the main library.
Viewing and Playing your favourites:
You can also view your Favourites playlist.
• To view your Favourites playlist, open the Advanced Menu and
select the Favourites option.
• Press the or button to scroll to the ‘View’ option.
• Press the /, button.
• Press the or button to scroll through your saved favourites.
• Press the /, button to play a track from your favourites.
Play will continue to the end of your favourites list.
16
MAKING VOICE RECORDINGS
• Press /, to start recording. Speak into the microphone,
positioned behind the ‘reset’ hole.
The recording elapsed time display will begin to count.
Making a voice recording:
Your player includes a microphone and recording capability. You can
use the recording function to make a recording, then play it back.
To pause a recording:
• Press the /, button to toggle between record and pause modes.
The record time display will flash when a recording is paused.
To record a voice:
• Select the ‘RECORD’ mode from the main menu.
After a short delay, the display will show the Recording Status screen.
1.
2.
3.
4.
Recording format
Recording elapsed time
Battery level
Recording time available
5.
6.
7.
8.
To save the recording:
• Whilst a recording is in progress or paused, press and hold the
/, button.
The recording will be saved with a file name in the format REC*** where
*** is the number of the recording stored on the player (starting 001).
Your player can record in four different formats. The format set for your
recording is indicated on the display.
To change the recording format:
• Before starting a recording, press the button.
The Recording Settings menu will open.
• Press the or button to scroll to the ‘REC type’ option.
• Press the /, button to select this option.
• Press the or button to scroll through the available formats.
• Press the /, button to select the highlighted format and return
to the Recording Status screen.
Recording file name
Recording number
Number of recordings already stored
Recording sample rate
17
PLAYING VOICE RECORDINGS
To play a voice recording:
• Press the or button to choose the voice recording you want
to play from the list of those available.
• Press the /, button to play the recording.
Playback control:
The same playback control functions are available (play/pause/track
skip/search) for playing voice recordings as playing music. Refer to the
section ‘Playing Music’ for more details of these functions.
Advanced Menu for Voice Recordings
An advanced menu is provided when playing voice recordings with
the option of selecting a Repeat mode or exiting the menu.
• To select Advanced Menu options and change the Repeat mode,
follow the instructions in the section ‘Advanced Music Menu’.
Playing a voice recording:
Voice recordings are stored in a different folder, separately from music
files. A separate function is provided from the Main menu to play voice
recordings.
• Select the ‘VOICE’ mode from the main menu.
After a short delay, the display will show the Voice Playback menu.
1.
2.
3.
4.
5.
Voice mode
EQ setting
Repeat mode
Track elapsed time
Battery level
6.
7.
8.
9.
Track total time
Recording file name
Recording number
Number of recordings stored
18
FM RADIO
Tuning modes:
There are two tuning modes available - Frequency tuning (search or
manual) where the player may be tuned across the band to search for
stations and Preset tuning where you can select stations from presets
you have stored.
Playing FM radio:
Your player includes an FM radio receiver.
To play the FM radio:
• Ensure that headphones are connected to the player as the
headphone wire is used as an FM radio aerial.
• Select the ‘Radio’ mode from the Main menu.
After a short delay, the display will show the FM radio menu.
Frequency tuning (search):
To search the band for stations• Press and hold the or button to scan up or down the
band.
Scanning will stop automatically when the next station is found.
Frequency tuning (preset):
To step through the presets (when saved) • Press the or button briefly to step through the presets.
1. FM mode
2. Channel (preset) number
3. Tuning frequency
4. Battery level
5. Tuning bargraph
19
FM RADIO ADVANCED MENU
FM radio Advanced Menu:
There are 5 additional functions available from the FM radio Advanced
menu • Save (to save a favourite station as a preset)
• Record (to record the current station)
• Delete (to delete a station from the favourites)
• Delete all (to delete all favourite stations)
• Auto search (to scan the band and save stations found as presets)
• Exit menu
Saving a favourite station (preset):
• Tune to the station you want to save.
• Open the FM radio Advanced Menu.
• Select the ‘Save’ option from the Menu.
• Press the or button to select Yes or No.
• Press the /, button to confirm and save the station.
The station will be saved in the next available preset number.
Tuning to a favourite station (preset):
To step through the presets (when saved) • Press the or button briefly to step through the presets.
To open the FM radio Advanced Menu:
• Check that FM radio is playing.
• Press the button.
The display will now show the Advanced Menu.
• Press the or button to change between menu options.
• Press the /, button to select a menu option.
20
FM RADIO ADVANCED MENU
Deleting a preset station from your favourites:
• Select the preset station you want to delete.
• When the station is playing and the preset number is displayed,
open the FM radio Advanced Menu.
• Select the ‘Delete’ option from the Menu.
• Press the or button to select Yes or No.
• Press the /, button to confirm.
The preset station will be deleted and higher preset numbers will shuffle
down so that there are no empty preset numbers.
Auto Searching for stations:
You can scan the band for all local FM stations and store all stations
as favourites.
NOTE: Auto Search will erase all previously saved favourite presets.
• Select FM mode.
• Open the FM radio Advanced Menu.
• Select the ’Auto Search’ option from the menu.
The player will scan the band, stopping at each station found and save
the stations as preset favourites.
Deleting all preset stations from your favourites:
• Select FM mode.
• Open the FM radio Advanced Menu.
• Select the ‘Delete All’ option from the Menu.
• Press the or button to select Yes or No.
• Press the /, button to confirm and delete all preset stations.
All preset stations will be deleted.
21
MUSIC FILE AND FOLDER NAVIGATION
You can navigate the folders stored on your player. This enables you to
change to another folder on your player and select a different album
(if your tracks are stored by album). A typical folder layout (tree) is
shown on the right.
To change to another folder while playing music:
• Whilst playing music, press the /, button.
The music pauses and a ‘Folder’ symbol appears in place of the Repeat
symbol.
• Press the button.
The folder display appears.
• Press the /, button to select the ‘Local Folder’ option.
• Press the or button to browse up or down the folder tree.
• To open a folder, press the /, button. To move up the folder tree
one level, browse to the ‘\’ symbol and press /,.
Playing an album from the folder list:
• Locate the album you want by browsing the folder list.
• Press /, to open the album folder.
• Press or button to the track you want to play.
• Press /, to select the track and return to the music playback
screen (paused).
• Press /, again to start play.
22
DELETING MUSIC FILES
MANAGING VOICE FILES
To delete the file that is playing, or all files in the folder
playing:
• Press the /, button to pause playback.
• Press the button to open the Folder menu.
• Scroll to the ‘Delete file’ or ‘Delete All’ option (Delete All will delete
all files in the album/folder).
• Press the /, button to confirm your choice.
Your action must be confirmed before deletion.
• Press the or button to scroll to ‘YES’ if you want to go ahead
and delete the file/folder.
NOTE: Whilst it is possible to delete files through the player menus,
this operation is easier when the player is docked to a computer, using
Windows Media Player 11 or Windows Explorer to manage your music
files.
When playing voice files you can also navigate your voice files and
folders.
Voice files may also be deleted.
To manage your voice files, select ‘Voice’ mode from the main menu
and follow the instructions in the previous sections ‘Music File
Navigation’ and ‘Deleting Music Files’ to navigate or delete your files.
23
SETTINGS MENU
Backlight:
The backlight setting enables you to change the time that the display
backlight stays on after you have operated a button.
• Press the or button to scroll to the ‘Backlight’ option in the
‘Settings’ menu.
• Press the /, button to select this option.
You will see a time delay figure and a bargaph.
• Press the
or
button to change the time delay to your
preference in a range from 0 seconds to 30 seconds.
• Press the /, button to save your preference.
You will return to the Settings menu.
NOTE: You may want to set a longer time for convenience of operation,
or a shorter time to extend battery life.
Settings menu:
There are a number of configurable settings within your player that
can be set up through the Settings Menu.
To open the Settings menu:
• Select the ‘Settings’ mode from the Main menu.
Press the or button to scroll through the 6 options • Backlight
• Language
• Power Off
• Firmware version
• Default settings
• Exit
• To select a setting, press the /, button.
Language:
The language setting will change the display language for all menus.
• Press the or button to scroll to the ‘Language’ option in the
‘Settings’ menu.
• Press the /, button to select this option.
You will see the language options that are available.
• Press the or button to change the display language setting.
• Press the /, button to save your preference.
You will return to the Settings menu.
To exit from the Settings Menu at any time:
• Press the or button to scroll to the ‘Exit’ option.
• Press the /, button.
The Main menu will be displayed.
24
SETTINGS MENU
Power off:
There are two Power Off options available • Off Time - the unit will power off after a set delay if the player is
not playing or being operated.
• Sleep time - the unit will power off after a set delay after the
player has finished playing.
To set Sleep Time:
• Press the or button to scroll to the ‘Power Off’ option in the
‘Settings’ menu.
• The two sub-options of ‘Off Time’ and ‘Sleep Time’ will be
displayed.
• Press the or button to select the ‘Sleep Time’ sub-option
you want to change.
• Press the /, button to select this option.
You will see a time delay figure and a bargaph.
• Press the
or
button to change the time delay to your
preference in a range from 0 minutes to 120 minutes.
• Press the /, button to save your preference.
You will return to the Settings menu.
To set Off Time:
• Press the or button to scroll to the ‘Power Off’ option in the
‘Settings’ menu.
• The two sub-options of ‘Off Time’ and ‘Sleep Time’ will be
displayed.
• Press the or button to select the ‘Off Time’ sub-option you
want to change.
• Press the /, button to select this option.
You will see a time delay figure and a bargaph.
• Press the
or
button to change the time delay to your
preference in a range from 0 seconds to 60 seconds.
• Press the /, button to save your preference.
You will return to the Settings menu.
25
SETTINGS MENU
HOLD SWITCH
Firmware version:
This option will display the version of the firmware installed in your
player. This information may be helpful if you have a reason to contact
a service agent concerning your player.
The Hold Slider enables you to lock the controls against accidental
adjustment.
Slide to the ‘lock’ position to disable all controls.
Slide to the ‘unlock’ position to re-enable the controls.
To display the firmware version:
• Press the or button to scroll to the ‘Firmware’ option in the
‘Settings’ menu.
• Press the /, button to select this option.
The firmware version and rest capacity of your player will be displayed.
Default settings:
This option will return your player settings for Backlight, Language,
and Power Off to the default ‘factory original’ settings.
To return the settings to default:
• Press the or button to scroll to the ‘Default’ option in the
‘Settings’ menu.
• Press the /, button to select this option.
The settings will be returned to default.
26
TROUBLESHOOTING
SPECIFICATIONS
No power:
The battery may be flat. Re-charge the battery and try again.
Power source:.......................... Internal rechargeable battery
Compatible audio formats:...... MP3, WMA, WAV
MP3 bit rate:........................... 32kbps - 320kbps
WMA bit rate:.......................... 8kbps - 320kbps
Recording format:................... WAV
Weight.................................... 30g
No sound, but the track is playing:
The volume may be turned down.
Check that the music format of this track is supported.
Unable to make a recording:
There may not be enough power in the battery. Re-charge the battery
and try again.
There may not be enough memory left.
WARRANTY
Your Tesco appliance is covered by a warranty for 12 months from the
date of purchase. If a fault develops during this period, please contact
the TESCO electrical help line on 0845 456 6767. Please have your
original purchase receipt with you when you call. This warranty in no
way affects your consumer rights.
The buttons are not working or display does not switch off:
The player may need re-initialising. Gently insert a metal pin (the end
of a paper clip is recommended) into the Reset hole in the side of the
player. You will feel a small click and the player will reset.
Poor FM reception:
The FM signal strength may be low. Try re-positioning the player and
headphone wire (the headphone wire is the aerial).
You may be using the FM radio close to a computer or other electronic
devices that are interfering with reception. Try moving to another
location.
UK: Waste electrical products/batteries should not be
disposed of with household waste. Separate disposal
facilities exist, for your nearest facilities see www.recyclemore.co.uk or in-store for details.
ROI: Produced after 13th August 2005. Waste electrical
products/batteries should not be disposed of with household
waste. Please recycle where facilities exist. Check with your
Local Authority or retailer for recycling advice.
27
Tesco Stores Ltd,
Delamare Road, Cheshunt, Herts, EN8 9SL
Technika Helpline: 0845 456 6767 (Calls cost up to 4p per minute from a BT landline, other providers may vary)
MP329 V0.2


![96-DVB2601 manual del usuario [es]](http://vs1.manualzilla.com/store/data/006303438_1-0ca90d2bec51e7dee6443a3e160a810e-150x150.png)