1
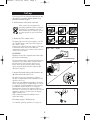
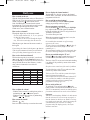
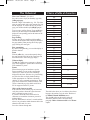
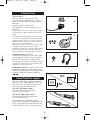
15/01/03 12:26
Page 1
The mains plug must be easily accessible.
About this manual
In the following cases, we recommend that you pull
out the mains connector:
1. During a thunderstorm. In such a case, it is
advisable that you also disconnect the TV set from
the aerial socket.
2. When odour or smoke emanates from the set.
Never attempt to open your TV set yourself.
Further information:
The TV set shielding is sufficient to prevent Xradiation to the exterior.
Any operation performed by a non skilled person,
change of high voltage or replacement of the picture
tube by a model not complying with the manufacturer
specification are likely to cause considerable increase
in X-radiation.
A TV set modified in such a way no longer complies
with the manufacturersÕ specification and must not be
used.
This manual is common to several TV models.
Therefore, the model you bought may not support
some of the functions or settings described
hereinafter.
About the On/Off switch
The position of the ON/OFF switch A, differs
depending on the model. It may be located on the
front or on the right-hand side of your set (see the
drawing inside the cover page of your manual).
For your safety
To ensure your own safety and safe operation of
the equipment, observe the following instructions
thoroughly.
About cleaning
TV sets require sufficient ventilation to prevent their
components from overheating, which will cause
failure. Do not block the ventilation openings at the
rear. If you place your TV set in a special piece of
furniture, make sure there is enough space for
unhindered air circulation. Do not place the TV set in
the close vicinity of a heater.
The TV set has been designed for use in dry rooms.
Should you use it, in exceptional circumstances in the
open air (example: on the balcony, in the veranda or
tent), you must absolutely protect it against moisture
(dew, rain, splash water). Before switching on a cold
TV set in a warm room, you should wait until any
condensation in the screen has dried by itself.
Maximum ambient temperature: 35¡.
Maximum humidity: 85%.
In the evening, after TV programmes or in case of a
long absence, it is recommended to turn of the
apparatus at the main switch. Even when the On/Off
switch is in the ÒOffÓ position and even though it
does not consume any current, the television is not
completely separated from the mains supply. In order
to completely disconnect, it is necessary to unplug
the mains plug.
The screen is to be cleaned with liquid glass cleaners.
¥ Never use abrasive products.
¥ Clean the cabinet with a soft cloth soaked with
neutral cleaner. Do not use solvents, such as white
spirit or alcohol-based cleaning products since they
may damage your television.
¥ At regular intervals, clean the ventilation grids at
the rear of the TV set.
About degaussing
The terrestrial magnetic field may have an influence
on your TV set. This influence is revealed by the
coloured spots, which appear on the screen.
Should this be the case:
¥ Turn the equipment off by means of the On/Offswitch.
¥ Wait about one hour before switching the set on
again.
This procedure performs automatic degaussing of the
screen. Should there still be coloured spots on the
screen, repeat the operation.
1
EN
tx807en2
tx807en2
15/01/03 12:26
Page 2
Set-up
To set up your TV set, follow the instructions on this
page before you continue with the channel set-up
procedure described on page 5.
1. Put the batteries in the remote control unit.
Batteries (LR 06-AA or LR 03-AAA) insertion differs
according to the type of your remote control.
Please respect the environment and
prevailing regulations. Before you dispose
of batteries or accumulators, ask your
dealer whether they are subject to special
recycling and if he accepts to take them
back.
1
2
3
1
2
3
1
2. Connect the TV to a mains socket.
The mains plug carries the power supply to your TV
set. It should only be connected to an AC supply at
220 - 240 V ~ 50 Hz.
It must not be connected to a DC supply *. If the plug
is detached from the cable, do not under any
circumstances connect it to a mains socket as there is
a danger of electrocution.
220 - 240 V ~ 50 Hz
2
UK SOCKET:
Equipment for the UK is supplied with a mains cable
fitted with a moulded plug.
Continental Europe
The plug contains safety components and must not be
replaced by a type sold in shops. It is fitted with a
fuse that protects your television. If your set no
longer works, the fuse may have blown. If it has,
replace it with an identical ASTA certified or BSI
(BS 1362) 5 amp fuse.
United Kingdom
3. Connect the outside aerial or cable network to the
g socket at the back of the TV set.
220 / 240 V~ 50Hz
The aerial socket is for connecting an external
antenna or equipment fitted with a modulator (VCR,
satellite receiver, etc.).
When connecting additional equipment to the aerial
socket, you must assign a channel number to it. To do
so, switch the external equipment on, then search for
its modulator channel on the TV set, assign the
channel number found to the equipment and store.
From now on, every time you want to use the external
equipment connected, you must select the channel
number assigned to it.
VCRÕs without an integrated modulator do not
require this setting.
2
5A
3
4. Continue on page 5, Channel set-up.
* For models operating on batteries, see page 10.
2
15/01/03 12:26
Page 3
Remote Controls:
Models 100 and 111
/ list
Model 100
Info
Model 111
text
Switching the TV set on standby.
menu
exit
EN
tx807en2
pr
pr
2
1
4
7
3
5
6
8
9
menu
Is for calling up the menu windows.
MENU
exit
For erasing the menu windows or
information from the screen.
EXIT
/
Volume control.
VOL+/-
av
Mute.
pr+/pr-
Programme change.
PR+/PR-
Directional keys Up/Down, Left/Right
for selection and validation key (OK).
Model 100
info
Personal Adjustments.
PRESETS
Timer.
ZZZ/LIST
Display of channel, stand-by time.
INFO
Selection of the sound type
(Sound 1, Sound 2, Sound 3)
in Dual, Nicam and AV.
GUIDE
Videotext keys.
TEXT
text
1
For channel selection and
number input in the menus.
0
To select one of the appliances
connected via the AV sockets.
av
Model 111
3
1
0
AV
tx807en2
15/01/03 12:26
Page 4
The set-up carried out through Frequency allows you
to find all the channels (even the non-standard ones).
Therefore, it is the recommended one if you are
connected to a cable network.
About the TV set
Prior to enjoying your TV set, youÕll have to set it up,
i.e. to find and store the channels, which may be
received in your area. The Automatic Channel Set-up
will look for all the channels and number them. Since
the channel numbers assigned to the programmes by
the Automatic Channel Set-up do not necessarily
correspond to the actual number of the channels
(example: Channel 4), you may change them upon
completion of Automatic Channel Set-up.
¥ Start the Automatic Channel Set-up by
pressing the OK key.
Wait a few minutes until the Channel Organisation
menu (ORG.) appears.
Channels Organisation
How to change the channel number?
To identify each channel, make use of your TV
magazine to find out the actual name of the current
programme/channel.
How to switch on the set?
With the On/Off-button fitted on the set. When the
red LED is lit, the TV set has previously been
switched on standby with the key B on the remote
control. To switch the TV set on again, type in a
channel number.
1. Use the key pr+ and pr- to select the channel
number you wish to change.
2. Press the new channel number (compulsorily 2
digits, for ex.: for Channel 2, enter 0, then 2) on the
remote control. You can also use the directional
Left/Right keys.
Automatic Channel Set-up
With the Automatic Channel Set-up
¥ When a VCR or satellite receiver is connected to the
aerial socket, you must switch on this equipment.
Should external equipment be connected to the TV set
via the SCART socket, it must be turned off.
The first time you switch your TV set on, the
automatic installation (AUTO INSTALL.) will
automatically appear. If it does not, you will find this
menu by pressing a number of times on the remote
control menu key:
- 3 times for the mono TV sets
- 4 times for the stereo TV sets.
3. Validate with key OK.
The corresponding programme is now stored under
the new channel number.
How to delete a channel number?
Delete any programme the picture quality of which
appears to be poor.
1. Select the channel with the key pr+ and pr-.
2. Press 00 on the remote control.
The first line (Standard) is selected.
3. Then validate with OK: The channel number is
now deleted.
Prior to leaving the menu, you should check whether
the programmes are stored in the order you prefer.
¥ Depending on the model of your TV set, youÕll
have to select from the options listed below the one
that fits with your country:
EURO : Western Europe, Tunisia, Morocco
FR
: France, Luxembourg
UK
: United Kingdom, Eire
DK
: Eastern Europe, Middle East, Africa,
French DOM-TOM
Once your channels are duly sorted, close the menu
through exit.
You may recall this menu by pressing the menu key:
- 4 times for the mono TV sets
- 5 times for the stereo TV sets.
Note: For channels diffusing teletext in Czech,
Slovak, Rumanian, Croat, Russian or Greek.
After having tuned in the channel, display the manual
channel set-up menu (see page 6).
- Select the Text line by pressing 5 times on the
Down button of the remote control.
- Select the number of the character table, using the
table on page 7.
- Memorise it with OK and then quit the menu with
Exit.
Select corresponding option by means of the
directional keys Left/Right.
¥ Select the Install. line with the directional
Up/Down keys.
This line allows you to select a set-up to be carried
out either through channels (CH/CC) or through
frequencies (MHz).
¥ Select the type of wished-for set-up through the
directional Left/Right keys.
4
15/01/03 12:26
Page 5
1: Western Europe
2: Eastern Europe, Russia
3: Greek
4: Arab
5: Ukrainian
6: Bielo-Russian
For more details, refer to the table on the next page.
Manual Channel Set-up
With the manual set-up
1. Display the menu by pressing a number of times
on the remote control menu key:
- twice for the mono TV sets.
- 3 times for the stereo TV sets.
10. Store the programme by pressing OK.
To find the next programme, re-start Channel Set-up
by means of the directional keys Left/Right.
The first line (Standard) is selected.
Depending on the model of your TV set, youÕll have
to select from the options listed below the one that
fits with your country:
EURO : Western Europe, Tunisia, Morocco
FR
: France, Luxembourg
UK
: United Kingdom, Eire
DK
: Eastern Europe, Middle East, Africa,
French DOM-TOM
Once the set-up achieved, close the menu through
exit.
Adjusting the Picture
Press the menu key once to display the menu.
Through the Up/Down keys, select the function you
want to adjust (Brightness, Colour, Contrast,
Sharpness, Tint). Adjust with the Left/Right keys.
Select corresponding option by means of the
directional keys Left/Right.
2 .Select the Mode line through the Up/Down
directional keys.
Adjustment of tone is only possible and necessary for
an NTSC image.
If you wish to preserve these adjustments as
preferential, press the red button to memorise them.
YouÕll then be able to recall them later on.
3. By means of the Left/Right directional keys, select
ANTENNA (reception through an aerial antenna) or
CABLE (reception through a cable network) for a
Channel set-up, or MHz for a Frequency set-up.
Close the menu through exit.
4. Select the CH or CC line through the Up/Down
directional keys.
Settings are stored until you proceed to another
change.
5. Start the set-up in a decreasing or increasing order
by means of the Left/Right directional keys.
When a channel is found, the pictures appear. If the
picture quality is poor, make use of the directional
keys Up/Down to select the line ->.<- and try to
improve picture quality with the directional keys
Left/Right.
Adjusting the Sound
(only on stereo models)
Press the menu key twice to display the menu.
Through the Up/Down keys, select the function you
want to adjust (Treble, Bass, Balance, Mode).
With the Left/Right keys, adjust the Treble or Bass
level, the balance between left and right paths and the
type of sound you want (Mono or Auto).
6. Select the Decod. line through the Up/Down
directional keys
If Auto has been selected, the TV set will automatically
adjust to the sound transmitted by the channel.
If you want to preserve these adjustments as
preferred settings, press the red key during 3 seconds
to store them.
YouÕll then be able to recall them later on.
7.If the station is encrypted and if you want to
connect a decoder to the AV socket, tick the box with
the Left/Right keys.
8. Then select the Pr line through the Up/Down
directional keys and enter the channel number
corresponding to the pictures. You may also use the
Left/Right keys.
Close the menu through exit.
Settings are stored until you proceed to another
change.
9. Select the Text line through the Up/Down keys
and choose the character set table to be used for
videotext:
5
EN
tx807en2
tx807en2
15/01/03 12:26
Page 6
How to display the channel number?
With the info key, display or remove the channel
number and, if you want it, the time left before timerprogrammed switch-off.
Daily use
How to switch on the set?
With the On/Off-button fitted on the set. When the red
LED is lit, the TV set has previously been switched on
standby with the key B on the remote control.
If the red LED flashes, it means that the control
keyboard of the TV is locked and can only be made
operational again through the remote control.
In both cases, enter a channel number.
How to recall the preferred settings?
Press on the red key to recall the sound and picture
settings you previously stored (see page 6).
How to programme a switch-off?
Press on the Green
key, then using the Left/Right
keys, adjust on the screen the wished-for duration
before the switching-off of the TV set (by intervals of
10 minutes up to 4 hours).
To exit the menu, press exit.
How to select a channel?
Through the digital keys of the remote control.
For the 2-digit channels (10, 11, 12, etc.) press on
key 0 of the remote control.
Ò --Ó appears on the screen. Through the digital
keys, enter the tens unit digit, then the unit one.
When the programmed remaining time is over, the
TV set will switch on standby
60 seconds before automatic cut-off, a message
appears on the screen.
To cancel, first press the Green key
and then, by
means of the directional key Left, reset the time
remaining on -:--.
The programmed switching-off is also deactivated when
the TV set is turned off through its own On/Off switch.
With the pr+ or pr- button of the remote control or
the keypad.
If you change the channel with the pr+ or pr- buttons
of the keypad, maintain the button pressed until the
next or preceding channel appears on the screen.
How to prevent kids using the TV set?
Hold key B on the remote control down for over 4
seconds until the red LED on the TV set flashes.
How to select the Sound channel?
This function may only be accessed if you selected
Auto on the
line of the Sound menu (see p. 6).
Press the blue key to successively select S1, S2 or S3
during NICAM, Stereo or Dual telecasts, or when
using a device connected to one of the AV
connections.
The keys of the TV set are now locked and switching
it on again will be possible by means of the remote
control only.
Keep the remote control out of the reach of children.
To unlock the keys of the TV set, make use of the
number keys on the remote control.
Sound received
S1
S2
S3
NICAM Stereo Stereo
Mono
X
NICAM Dual NICAM 1 NICAM 2 Mono
NICAM Mono NICAM
Mono
X
Stereo
Stereo
X
X
Dual
Dual 1
Dual 2
Mono
Mono
X
X
FM Mono
X
X
X
AVsound
Stereo
Channel L Channel R
The keys of the TV set will also remain locked after
timer-programmed switching-off.
The lock function will also be activated when the TV
set is switched on standby or switched off with its
On/Off switch before the time remaining until
programmed switching-off is over.
How to switch off the set?
To switch the TV set off, press the key B on the
remote control or use the On/Off switch on the TV set.
The TV set automatically switches to stand-by after a
few minutes without telecast on the selected channel.
X: Not available
How to adjust the volume?
- With the remote control, by making short pulses or
maintaining the
/
buttons pressed.
- With the keypad of the television, by maintaining
/
pressed.
buttons
Important:
The blue screen displaying SIGNAL = 0 either means
that the television set is not receiving any signal, or
that the channel on which you are tuned is receiving
two signals at the same time, which is preventing the
synchronisation of the television set. Change
programs and if the display persists, check your
antenna connection.
How to mute the sound?
With the (
) key.
Press once more on the key to reactivate the sound.
6
15/01/03 12:26
Page 7
Choice of table of characters
The Videotext
How to use Videotext? (If included)
Press the key text to display the Summary (page 100).
EN
NL
AF
DE
HR*
SL*
RO*
FR
IT
ES
PT
IS
SV
NO
FI
HU
TR
PL
ET
LT
RU
BG
SL
EL
AR
FA
UK
BE
CS
SK
HR
RO
Calling up a page
Enter the 3 digits of the number (e.g. 150, 170) of the
page you want to read. After a few moments, the page
will be displayed. To visualise the next or previous
page, press the directional keys Left/Right, pr+/pr-.
To access page scrolling, Games, Zoom and Display
functions, you must first press the menu button to
display the corresponding panel at the bottom of the
Fastext page.
Page Scrolling
You may stop the page scrolling with the red key.
This has the effect that STOP is displayed instead of
the page number. When pressing the red key again,
page scrolling will start again.
Prize competitions
By means of the green key, you can either display or
hide the solutions.
Zoom
With the yellow key, you can subsequently enlarge
the upper and the lower half of the screen page and
then switch back to full screen page display.
Videotext display
The blue key enables you to superpose a videotext
page on the standard TV picture and to switch back
to the standard TV picture
Fastext
When videotext pages are broadcast as per the
Fastext standard, you can use the corresponding
colour keys to select one out of the 4 headings
displayed in the footer. Selection of a given heading
may have the effect to display further headings.
Certain programmes use videotext to broadcast
subtitles, as well as constantly updated news. These
pages can be found in the videotext summary. Once
you have found the page, the subtitle and/or news
will be superposed on the TV picture.
Choice of the character set table
If the characters on the teletext page are inaccurate,
verify that you have chosen the correct character
table as indicated on pages 6 and 7.
If you have chosen the correct table and a few
characters are nevertheless inaccurate, proceed as
indicated below.
Press the Text button for at least 3 seconds and then
release it to go from the default character table to the
alternative table and vice-versa.
Leave the videotext through exit.
EN
tx807en2
1
2
3
4
5
6
1 / 2 + Alt
1 + Alt
The table below shows you, in relation to the teletext
language, the number to type in on the Text line of
the Manual Channel Installation menu.
The sign Alt points out the need for select the
Alternative character table as described in the
paragraph Choice of character table in the Teletext
chapter.
7
tx807en2
15/01/03 12:26
Page 8
Connections
The scart cable (1)
The scart cable allows you to connect a VCR or
camcorder (VHS, 8 mm,S-VHS or Hi-8), a Canal +
decoder, a video game machine or devices supplying a
RGB signal.
1
You may also connect a digital decoder
cable/earth/satellite, an analog satellite receiver or a
DVD player.
The type of connection shown on the opposite is highly
recommended, given that it provides improved picture
quality.
2
To operate the external equipment connected, you must
select its av socket by means of the av key. With certain
equipment, selection of proper av socket is performed
automatically. When connecting an S-Video equipment,
make sure you press the av key twice.
When you turn off the connected device, and if you have
not changed channel during viewing, the TV set
automatically returns to the previously watched channel.
If the TV set has been turned on by the VCR, it will
return to stand-by as soon as the VCR is switched off.
3
Audio/Video sockets (2) (If included)
The Audio/Video sockets allow you to connect a VHSor 8 mm-camcorder. To visualise the pictures from the
camcorder, select the proper socket with the av key.
Not to degrade the picture and sound quality, do not turn
on the devices connected to the scart socket and to the
Audio/Video socket at the same time.
The Headphone socket (3) (only available on specific models)
The headphone adapter allows you to connect a stereo
headphone or earphone plugs; the loudspeakers sound is
then muted. Volume may be adjusted through keys
.
/
DC
Mains/batteries supply
Some TV set models may be supplied through either
mains (220 - 240V ~ 50Hz) or battery 12V / 24V - CC.
To connect your TV set to either one of these power
sources, please proceed as indicated below:
AC
220 - 240V ~ 50 Hz Supply (Mains)
Connect the mains lead to the top socket
(move the socket cover down).
12V / 24V DC Supply (Direct current).
Connect the battery lead to the bottom socket
(move the socket cover up).
Use the supplied battery lead uniquely with this
apparatus. This is equipped with an 8A delayed-action
fuse. If your apparatus ceases to function, the fuse may
be blown. In this case, replace it with an identical one.
TX807 C/CS N2I /EN - BEI / RDG - Le 14 / 01 / 2003
8