1
TC Support Interactive
The TC Support Interactive website www.tcsupport.tc is designed as an online support
and information center. At the site you can find answers to specific questions regarding TC software and hardware. All known issues are stored in a database searchable by
product, category, keywords, or phrases. Under the section "My Stuff" you can login to
check the status of your questions, download materials such as product manuals, software updates and new presets.
This site has been specifically designed to meet the needs of our users. We constantly
update the database and you will find the site to be a huge resource of information.
Browse through Q&A's and discover new aspects of your TC product.
If you can't find an answer online, you have the option of submitting a question to our
technical support staff who will then reply to you by e-mail. The TC Support Team is
on constant alert to help you in any way they can.
Contact Details
Alternatively, you may contact the TC Electronic distributor in your area, or write to:
TC ELECTRONIC A/S
Customer Support
Sindalsvej 34
Risskov DK-8240
Denmark
ENGLISH
USA:
TC Electronic, Inc.
5706 Corsa Avenue, Suite 107
Westlake Village, CA 91362
www.tcelectronic.com
© BY TC ELECTRONIC A/S 2006. ALL PRODUCT AND COMPANY NAMES ARE
TRADEMARKS OF THEIR RESPECTIVE OWNERS. ALL SPECIFICATIONS SUBJECT
TO CHANGE WITHOUT NOTICE.ALL RIGHTS RESERVED.
TC ELECTRONIC IS A TC GROUP COMPANY.
TABLE OF CONTENTS
TABLE OF CONTENTS . . . . . . . . . . . . . . . . . . . . . . . . . . . . . . . . . . . . . . . . . . . . . . . .1
UNWRAP BACKGROUND . . . . . . . . . . . . . . . . . . . . . . . . . . . . . . . . . . . . . . . . . . . . . .2
INTRODUCTION . . . . . . . . . . . . . . . . . . . . . . . . . . . . . . . . . . . . . . . . . . . . . . . . . . . . .3
SYSTEM REQUIREMENTS . . . . . . . . . . . . . . . . . . . . . . . . . . . . . . . . . . . . . . . . . . . . .5
GLOBAL PLUG-IN CONTROLS & FOCUSFIELDS . . . . . . . . . . . . . . . . . . . . . . . . . . . . . . .6
MAIN PAGE . . . . . . . . . . . . . . . . . . . . . . . . . . . . . . . . . . . . . . . . . . . . . . . . . . . . . . .7
CENTER PAGE . . . . . . . . . . . . . . . . . . . . . . . . . . . . . . . . . . . . . . . . . . . . . . . . . . . . .8
SURROUND PAGE . . . . . . . . . . . . . . . . . . . . . . . . . . . . . . . . . . . . . . . . . . . . . . . . . .10
DELAY PAGE . . . . . . . . . . . . . . . . . . . . . . . . . . . . . . . . . . . . . . . . . . . . . . . . . . . . . .12
OUTPUT PAGE . . . . . . . . . . . . . . . . . . . . . . . . . . . . . . . . . . . . . . . . . . . . . . . . . . . .13
PRESET MANAGEMENT . . . . . . . . . . . . . . . . . . . . . . . . . . . . . . . . . . . . . . . . . . . . . .15
COMPARE SETTINGS WITH A/B MEM FUNCTION . . . . . . . . . . . . . . . . . . . . . . . . . . . .18
PARAMETER LOCK AT RECALL . . . . . . . . . . . . . . . . . . . . . . . . . . . . . . . . . . . . . . . . .19
ENGLISH
SETUP EXAMPLE . . . . . . . . . . . . . . . . . . . . . . . . . . . . . . . . . . . . . . . . . . . . . . . . . .20
UNWRAP -TDM / 1
UNWRAP BACKGROUND
From kitchen to cinema
Today's music has to be purposed for a number of different reproduction situations,
from a mono kitchen radio over a CD stereo system to a full size cinema.
Because no true down-mix or up-convert standard exist, control over this important
process can only be achieved by handling it at the mastering or mix studio; thus
producing one type of master for every major target reproduction situation.
Re-mixing for multichannel
If the source tapes are still at disposal and the budget is available, the only way to
take full advantage of the original material is by performing a re-mix. In a best case
scenario you will end up with different mixes each exposing full potential for the
format for which it was tailored.
Re-mixing can be an expensive and time-consuming process, but with experienced
engineers, the method should be chosen to fully exploit the possibilities of 5.1 and
beyond.
Up-conversion
Many reasons can exist for seeking a high quality up-conversion alternative to a remix, if...
• multitrack tapes never existed
• original source tapes are not in a suitable condition
• budget considerations prevents you from re-mixing
• a stereo soundtrack needs replaying using all the cinema channels
Finally there could be a more controversial reason with classic tracks: Maybe we don't
really want Strawberry Fields or The Boxer submitted to new balancing and Y2k
effects.
UnWrap
ENGLISH
For situations where up-conversion is indicated, TC now offers its renowned
production quality processor, UnWrap. Using a brute force DSP approach, UnWrap
preserves the qualities and resolution of the original mix way more than mediocre
processors found in current hi-fi equipment.
UnWrap is a double precision algorithm capable of running at any sample rate
between 44.1 and 96 kHz. Applications typically include mastering, film production
and broadcast conditioning.
Because up-conversion is not a one-size-fits-all process, UnWrap offers a palette of
options to be used for different types of program material, thereby giving as much
creative freedom as possible to the engineer performing this important task.
Basic conversion options
Some conversion options are of a profound nature, e.g. if the process is thought of as
purely additive, if the ability to collapse to stereo again is important, or if an LFE
channel should be derived or not.
2 / UNWRAP-TDM
Using the additive approach, UnWrap preserves the Left and Right channels bit
transparent all the way down to the LSB of a 24 bit input. If the original stereo-mix is
later requested, it can be obtained using only these two channels.
If subsequent down-mix capability using all the channels is essential, this option is
available too. In both cases, the LFE channel can be fully exploited, omitted or
anything in between, as can the Center.
Program related conversion options
It has been TC's goal to provide presets that can make any kind of program material
present itself better and more engaging in 5.1 than in stereo. From old to recent pop
and rock music, from unique classical recordings to highly ambient modern tracks,
from ultra dry to wet source material, UnWrap comes with settings to complement it
all.
Add to the default presets the capability to time-align all channels at sample
precision, widen or narrow the image, control the amount of Center and LFE channel
to be used, change filters and envelopes, and you begin to get an idea of the power
behind this new algorithm.
Introduction
UnWrap in use
UnWrap measures phase, delay and spectral differences between a pair of stereo
channels to create a 5.1 result. For different program material there will be different
optimum settings that best represent the qualities put into the original mix.
Please familiarize yourself with the controls and parameter-ranges on known material
before you attempt unwrapping new stuff.
Setting up
Try loading some of the UnWrap presets. You can A/B the process by pressing Bypass.
You may also experiment for stereo compatibility using the downmix levels on the DMIX page.
When all Delays are set at "0", all Outputs from UnWrap are aligned with sample
precision. The basic Delay through the algorithm in this case is 3.6 ms at 44.1 and
48kHz. Try offsetting the Delays in samples and ms, and note the shift in image.
Delays may be used...
- on the Surround channels to ensure that sounds appear to originate from the front
speakers
- on the Center channel to compensate for its position
- on the LFE channel to compensate for speaker position or to advance/delay it for
artistic reasons.
When the front channels are not assigned the same Delay, please note that a
subsequent stereo down-mix may not work so well. Use the downmix function
accessible via the Downmix page to compare processed and unprocessed material.
UNWRAP -TDM / 3
ENGLISH
Time alignment
Bit Transparency
When 0% L/R processing is selected, input trims and output levels are at 0dB, the
inputs are bit transparently cloned to the L Front and R Front outputs.
MAIN PAGE
Input trims are provided to carefully match the L/R balance. If working from analog
tape, adjust balance with a 1kHz calibration tone. If working from a digital master
with stereo levels at full scale, it may be necessary to adjust down Input levels a little
bit to avoid UnWrap overloads.
The L/R processing parameter determines how much the L and R front channels are
processed. At 0% UnWrap only adds sound to the 4 other channels preserving the
original L and R as they were. Somewhere between 60 and 70% the width of the
original mix is typically preserved even though a Center channel is added. Tip: A/B the
width soloing the three front channels and toggle by-pass.
UnWrap may derive an LFE signal from the Input. It is recommended to low-pass it
between 40 and 120Hz using a 2nd or 4th order filter.
CENTER PAGE
To better separate and optimize the Center Output, EQ and contour controls are
provided.
First set the Ref. Level control at the approximate reference level of the input signal.
For a typical level, set Ref. Level at -10 to -18dB. With a full scale digital input, ref.
level would be set high, typically 0 to -12dB. With a quiet or highly dynamic input,
set it between -15 and -25dB.
Then choose between the Contour Styles, and finally apply EQ to the center channel if
desired.
UnWrap's 48 bit EQ can work wonders on most signals and be used to selectively
suppress spectral ranges where the L/R width could otherwise get compromised, or to
boost selected frequencies to strengthen the center anchor function.
ENGLISH
SURROUND PAGE
To control the surround channels, decorrelation, EQ and contour controls are provided.
First set the Ref. Level control at the approximate reference level of the input signal.
For a typical level, set Ref. Level at -10 to -18dB. With a full scale digital input, Ref.
Level would be set high, typically 0 to -12dB. With a quiet or highly dynamic input,
set it between -15 and -25dB.
Then choose between the Contour Styles, and select a Decorrelation style
complementing your program material.
The different decorrelation styles should always be tried. They are highly subjective
and best evaluated with the Focus control set at "0". When a style is found, try
changing the Focus control to check if further optimization is possible. It may prove
convenient to solo the surround channels while doing so.
4 / UNWRAP -TDM
Now adjust the Decorrelation Tone and EQ parameters.
Tuning of the surround parameters is an iterative process and should include the delay
settings as well.
D-MIX PAGE
The downmix feature allows the user to check for stereo compatibility.
Four fields are used to tell how much audio to extract from Left/Right, Center, LFE
and sLeft/sRight surround channels.
What is LtRt?
An LTRT mix is usually used for a stereo optical, or for video. It is a two channel mix
that decodes into four channels in your venue. An LTRT mix is mixed in 4.0 (LCRS),
then folded down using a Dolby encoder producing two tracks (so that they can fit on
stereo optical or video). These tracks are then decoded back into 4.0 through a Dolby
ProLogic receiver. If a Dolby ProLogic decoder is not available, the mix will play back
in stereo.
TOOLTIPS
If you are just getting started with UnWrap and you want to know what all the
parameters do, press the question mark Icon to activate the tooltip function.When
activated, moving the mouse over the different parameters will display information
about the parameter functionality. Of course you can disable the tooltips, as soon as
you know your way around.
System requirements
Mac OS X (10.4 or higher) / Windows XP
Pro Tools TDM 7.2.1 software (or higher)
Pro Tools HD Accel Hardware
iLok USB key
iLok.com account and internet access required for product authorization
System must meet Digidesign’s system requirements for Pro Tools TDM systems!
ENGLISH
•
•
•
•
•
•
UNWRAP -TDM / 5
Global Plug-In Controls
KEYBOARD COMMANDS
The TDM versions of UNWRAP supports keyboard commands for certain functions.
The following key commands are available for all plug-in parameters:
Key Commands in Mac OS X:
Fine Adjust = Apple key + mouse movement
Reset To Default = Option + mouse click
Key Commands in Windows:
Fine Adjust = Ctrl + mouse movement
Reset To Default = Alt + Control + mouse click
AUTOMATION
Please be aware that automation of certain parameters, can cause audible artifacts.
In case you need to automate these parameters, you should take care that
changes only take place in parts where no audio is sent to the plug-in.
FOCUS FIELDS
You can place your own set of parameters in the 6 focus fields at the bottom
of the plug-in.
Making use of the focus fields can give you a better workflow, since you will not have
to switch pages all the time to find the parameters that you work with.
You can assign any parameter to the focus fields, and the focus fields are stored with
the session as well as when you save your presets.
ENGLISH
To change the assignment:
• Press the Assign button. The Assign button as well as one of the Focus Fields will
be highlighted.
• Select the Focus Field you wish to link a parameter to, by clicking on that field.
• Click on the parameter you wish to link to the selected Focus Field.
• To get an unassigned (empty) Focus Field, click again on the selected parameter.
• Once you have finished the assignments, click again on the Assign button to leave
the assign mode.
6 / UNWRAP -TDM
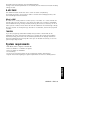
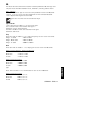
Main
INPUT TRIM
Left/right Input Trims
Range: -12dB to 0dB
Input level adjustment of the left/right channels.
L/R PROCESSING
L/R Processing
Parameter range: 0 - 100%
Determines the processing amount for the left and right front signals.
LFE PROCESSING
LFE Hi Cut Frequency
Range: 10 to 200Hz
Sets the Hi Cut frequency for the LFE channel.
LFE Hi Cut Slope
ENGLISH
Range: Off, 2nd, 4th
Sets the steepness of the LFE hi cut filter slope.
UNWRAP -TDM / 7
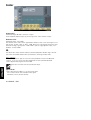
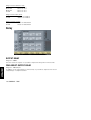
Center
Contour Style
Parameter range: Off and a selection of styles.
Select between different styles as processing for the center channel output.
Reference Level
Parameter range: -25 to 0dB
Set the Ref. Level control at the approximate reference level of the input signal. For a
typical level, set Ref. Level at -10 to -18dB. With a full scale digital Input, Ref. Level
would be set high, typically 0 to -12dB. With a quiet or highly dynamic input, set it
between -15 and -25dB.
EQ
The EQ for the center channel features four-band parametric EQ with high- and lowpass filters switchable between Notch, Parametric, Shelving and Cut filters.
Basic operation
• Select Freq, Gain or Type to access the same parameter for the four EQ bands.
• Select Lo or Hi to access the three parameters for the individual EQ band.
• Press Bypass EQ to bypass the entire EQ.
ENGLISH
Bypass does not affect the selected Contour Style.
Type Selector
• Press Type and use faders 1-4 to select filter types.
For Lo and Hi filters select between filter types:
Parametric, Notch, Shelve and Cut.
8 / UNWRAP -TDM
For Mid 1 and Mid 2 filters select between filter types:
Parametric and Notch.
Freq
Press Freq and use Faders
Range - Lo band
Range - Mid1 band
Range - Mid2 band
Range - Hi band
1 to 4 to adjust frequency for each of the four bands.
: 20Hz to 5kHz
: 20Hz to 20kHz
: 20Hz to 20kHz
: 500Hz to 20kHz
Gain
Press Gain and use Faders 1 - 4 to adjust gain for each of the four EQ bands.
Range for the Parametric, Shelve and Cut type:
Lo Gain
: -12dB to +12dB
Mid1 Gain
: -12dB to +12dB
Mid2 Gain
: -12dB to +12dB
Hi Gain
: -12dB to +12dB
Range for the Notch filter:
Lo Gain
: -100dB to 0dB
Mid1 Gain
: -100dB to 0dB
Mid2 Gain
: -100dB to 0dB
Hi Gain
: -100dB to 0dB
Type
Press and use Faders 1-4 to set BW value for each of the 4 EQ bands.
Range for the Notch filter:
Lo BW
: 0.02oct
Mid1 BW
: 0.02oct
Mid2 BW
: 0.02oct
Hi BW
: 0.02oct
to
to
to
to
1oct
1oct
1oct
1oct
Range for the Parametric filter:
Lo BW
: 0.1oct to 4oct
Mid1 BW
: 0.1oct to 4oct
Mid2 BW
: 0.1oct to 4oct
Hi BW
: 0.1oct to 4oct
ENGLISH
Range for the Shelve filter:
Lo BW
: 3dB/oct to 12dB/oct
Hi BW
: 3dB/oct to 12dB/oct
Range for the Cut filter:
Lo BW
: Bessel or Butterworth
Hi BW
: Bessel or Butterworth
UNWRAP -TDM / 9
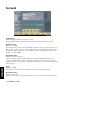
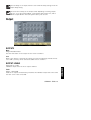
Surround
Contour Style
Parameter range: Off and a selection of styles.
Select between different styles as processing for the surround channels output.
Reference level
Range: -25 to 0dB
Set the Ref. Level control at the approximate reference level of the Input signal. For a
typical level, set Ref. Level at -10 to -18dB. With a full scale digital Input, Ref. Level
would be set high, typically 0 to -12dB. With a quiet or highly dynamic Input, set it
between -15 and -25dB.
Decorrelate Style
Range: A selection of styles
The decorrelating styles are highly subjective and best evaluated with the Focus
control set at "0". When a style is found, try changing the Focus control to check if
further optimization is possible. It may prove convenient to solo the surround channels
while doing so.
ENGLISH
Focus
Range: 0 - 100%
Set how much you want to decorrelate the sound in the surround outputs.
Decorrelate Tone
Range: +/- 40 steps.
Adjust the tone (color) of the decorrelated part of the sound on the surround outputs.
10 / UNWRAP -TDM
EQ
The EQ for the Surround channel features four-band parametric EQ with high- and
low-pass filters switchable between Notch, Parametric, Shelving and Cut filters.
Basic operation
• Select Freq, Gain or Type to access the same parameter for the four EQ bands.
• Select Lo or Hi to access the three parameters for the individual EQ band.
• Press Bypass EQ to bypass the entire EQ.
Bypass does not affect the selected Contour Style.
Type Selector
• Press Type and use faders 1-4 to select filter types.
For Lo and Hi filters select between filter types:
Parametric, Notch, Shelve and Cut.
For Mid 1 and Mid 2 filters select between filter types:
Parametric and Notch.
Freq
Press Freq and use Faders
Range - Lo band
Range - Mid1 band
Range - Mid2 band
Range - Hi band
1 to 4 to adjust frequency for each of the four bands.
: 20Hz to 5kHz
: 20Hz to 20kHz
: 20Hz to 20kHz
: 500Hz to 20kHz
Gain
Press Gain and use Faders 1 - 4 to adjust gain for each of the four EQ bands.
Range for the Parametric, Shelve and Cut type:
Lo Gain
: -12dB to +12dB
Mid1 Gain
: -12dB to +12dB
Mid2 Gain
: -12dB to +12dB
Hi Gain
: -12dB to +12dB
to
to
to
to
0dB
0dB
0dB
0dB
Press and use Faders 1-4 to set BW value for each of the 4 EQ bands.
Range for the Notch filter:
Lo BW
: 0.02oct
Mid1 BW
: 0.02oct
Mid2 BW
: 0.02oct
Hi BW
: 0.02oct
to
to
to
to
1oct
1oct
1oct
1oct
UNWRAP -TDM / 11
ENGLISH
Range for the Notch filter:
Lo Gain
: -100dB
Mid1 Gain
: -100dB
Mid2 Gain
: -100dB
Hi Gain
: -100dB
Type
Range for the Parametric filter:
Lo BW
: 0.1oct to 4oct
Mid1 BW
: 0.1oct to 4oct
Mid2 BW
: 0.1oct to 4oct
Hi BW
: 0.1oct to 4oct
Range for the Shelve filter:
Lo BW
: 3dB/oct to 12dB/oct
Hi BW
: 3dB/oct to 12dB/oct
Range for the Cut filter:
Lo BW
: Bessel or Butterworth
Hi BW
: Bessel or Butterworth
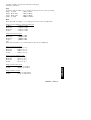
Delay
OUTPUT DELAY
Range: 0 - 200ms
For each of the six outputs it is possible to adjust the delay time in milliseconds.
ENGLISH
FINE ADJUST OUTPUT DELAY
Range: 0 - 100 samples
In addition to the output delay in milliseconds, it's possible to adjust each of the six
output delays in sample resolution.
12 / UNWRAP -TDM
The total delay on an output channel is the normal ms delay setting, PLUS the
sample delay setting.
The actual time a delay set in samples varies depending on running sample
rate. E.g. if you are running 48kHz, a 48 samples delay equals 1ms, and at
96kHz it equals 0.5ms. Also take system latency into account.
Output
OUTPUTS
Mute
Range: Muted/Unmuted
Sets the mute-status on the output for each of the 6 channels.
Solo
When a Solo button is selected, the outputs of all the five remaining channels will be
set to “Off”, but they can be selected as additional solo channels.
OUTPUT LEVELS
Fader
Range: -120 to 0dB
Fades all six outputs simultaneously. Preserves the individual output levels until either
the max. or min. value is reached.
UNWRAP -TDM / 13
ENGLISH
Range: Off to +12dB
Individual output levels for the six output channels.
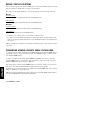
D-MIX
DOWNMIX LEVELS
The downmix feature allows you to check the UnWrap settings for stereo compatibility.
Downmix levels should match the settings for the external downmix device.
Presets are per default set to the following values that match the ATSC A/52 standard:
From
From
From
From
L/R
C
LSr/RSr
LFE
:
:
:
:
-3.0 dB
-6.0 dB
-6.0 dB
Off dB
It is important to check compatibility between:
- the unprocessed original stereo signal by pressing the Bypass key
- the signal unwrapped to 5.1
- the processed/unwrapped signal monitored as stereo using the downmix function
ENGLISH
Aim for matching results in all three listening situations. If you experience problems,
such as phase cancellation, these should be handled by adjusting the delay settings
on the delay page.
14 / UNWRAP -TDM
Preset Management
TC's comprehensive file based preset architecture makes archiving presets a simple
process. This allows you to organize your presets the way you find most comfortable
for your workflow, and to exchange presets with other users, no matter the platform or
application. Presets are saved as discrete files on your hard drive. Once a preset is
saved into the default location, it will automatically appear in the 'File' menu every
time you use the plug-in. The files can then be organized into sub-folders, where you
can delete, rearrange or create your own sub-folders to accommodate your needs.
NOTE: A folder will appear in the Preset File Menu if it contains at least one preset.
NEXT/PREVIOUS PRESETS
From the plug-in's Main page, you can directly jump from one preset to the next (or
previous) by clicking on the UP/DOWN arrows to the right of the preset name.
All presets available at the default plug-in preset location will be considered, so you
could in theory reach every preset this way. Direct access to specific presets is done
via the "File" button:
PRESET FILE MENU
Pressing the 'File' button will open the plug-in's File menu. The following options are
available from the File menu.
Loading a Preset
By selecting 'Load', you can navigate to any folder on the system that you have read
access to, including any shared folder. By default, these will be loaded from the
default location for UnWrap presets. Only presets located in the default file location
will appear in the UnWrap pop-up preset menu.
Naming a Preset
Saving a Preset
By selecting 'Save', you can save your preset to any folder on the system that you have
write access to, including any shared folder. By default, presets are saved to the
default location for the UnWrap presets.
UNWRAP -TDM / 15
ENGLISH
• Double click on the name field
• Type in the new name
• Press Enter
DEFAULT PRESET LOCATIONS
The following locations will describe where you can find the UnWrap presets. The presets are stored in a folder that is unique to each plug-in:
The plug-in’s own preset handling is storing the presets in the following locations:
Mac OS
Factory Presets:
/Library/Application Support/TC Electronic/UnWrap/Presets/
User Presets:
~/Library/Application Support/TC Electronic/UnWrap/Presets/
Windows
Factory Presets:
{System Drive}/Program Files/TC Electronic/UnWrap/Presets/
User Presets:
My Documents/TC Electronic/UnWrap/Presets/
• To delete a file, simply move it to the 'Trash' or 'Recycle bin'.
• To create a new sub-folder that appears in the plug-in menu, simply create a new
folder in the plug-in folder that resides in the PRESETS folder of the p default preset location.
NOTE: A folder will not appear in the Preset File Menu unless it has at least one preset inside.
CONVERTING UNWRAP PRESETS FROM SYSTEM 6000
In case you are the happy owner of the UNWRAP algorithm for System 6000, here is
something to get you in an even better mood: The UNWRAP plug-in is able to read
your System 6000 presets.
ENGLISH
In order to convert presets from System 6000 to UNWRAP, you need to store the
System 6000 presets in a preset file. The file extension has to be either ".syx" (for
example: MyPresets.syx) or .mid for a MIDI file.
The easiest way to export System 6000 presets is to use the "export to file" function
from the Icon Editor for Mac/Windows (requires version 3.5 or higher).
Alternatively, you can save a bank to a floppy disk (System 6000 only) or do a SysExDump to a MIDI file in your sequencer.
NOTE: For details regarding the export of presets from System 6000, please refer to
your System 6000 and Icon Editor documentation.
16 / UNWRAP -TDM
The generated SysEx/MIDI preset file needs to be placed in the default UNWRAP
Preset folder (at the root level; sub-folders are not considered). The file needs to have
either the extension ".syx" (for example: MyPresets.syx) or .mid for a MIDI file.
NOTE: In case you are running the Icon Editor on the same computer as the UNWRAP
plug-in, the UNWRAP will automatically search for preset files in the default locations
for and System 6000 files. You do not need to copy the files!
Once your preset file has been placed in the default UNWRAP Preset folder, it will
show up the next time you click the "File" button. At the top of the pop-up list you'll
find a section called "Convert", and the name of your preset file will be listed here.
ENGLISH
To convert your preset file to UNWRAP presets, simply select the name of the preset
file. The conversion will only take a few seconds and only needs to be done once.
When the conversion is done, all presets from your preset file will be available in a
sub-folder that has the same name as the preset file had. The presets will show up in
the same bank structure as on the System 6000, and presets that are not based on
the UNWRAP algorithm will not be converted.
The preset file will disappear from the Convert section of the file menu.
UNWRAP -TDM / 17
COMPARE SETTINGS WITH A/B MEM FUNCTION
With the A/B compare function you can easily compare different parameter settings
when you work with your music.
You have two buttons: the "Mem" and the "A/B" button.
When you start working with your preset, the A/B button is grayed out. This state indicates that the settings in both memory locations A and B are identical - so there is
actually nothing to compare.
As soon as you touch one of the parameters, the memory location "A" will get active,
and the "A"-part of the A/B button will light up. All parameter changes will be applied
to memory location "A". If you switch to memory location "B", you get back to your
starting point, and all further changes will now be applied to memory location "B".
Every time you press the A/B button, you will toggle between these two memory locations.
NOTE: The A/B memory locations are temporary settings only! Saving a preset (e.g. via
the File button or with your session) will only save the currently selected memory location. The setting of the other (hidden) memory location will not be saved!
ENGLISH
The "Mem" button will reset the A/B memory locations to the current setting.
18 / UNWRAP -TDM
PARAMETER LOCK AT PRESET RECALL
The parameter lock function allows you to lock the Dry Level, In Level and Out Level,
from changing when you change preset.
By using the parameter lock, you can easily browse through the extensive set of presets that comes with the UNWRAP, without having to change the Dry Level, In Level
or Out Level all the time.
To lock a parameter, simply click on the small lock in the parameter field. To unlock
it, click again.
ENGLISH
The parameter lock only affects parameter changes made with the mouse. The parameter lock does not affect automation data or preset changes initiated from the host
application. These changes will always pass.
UNWRAP -TDM / 19
SETUP EXAMPLE
This is an example of how to setup UnWrap on a stereo track in Pro Tools.
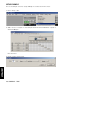
1. Go to: Setup - I/O
2. Add a set of 5.1 outputs. In the example below we have renamed the outputs to:
“Surround Output”.
Exit the menu.
ENGLISH
3. Create a stereo audio track.
20 / UNWRAP -TDM
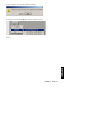
4. Click “Add” to the following common warning:
5. Now select the Surround Output that you created in step 2.
5. Select the “Surround Output” as the output of your track.
ENGLISH
That’s it.
UNWRAP -TDM / 21