1
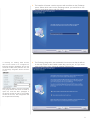
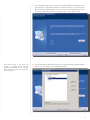
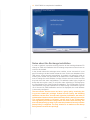
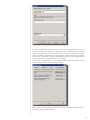
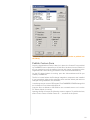
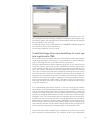
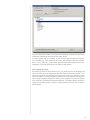
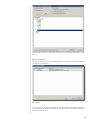
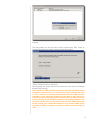
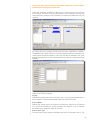
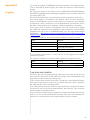
Installation and Usage
TANDBERG
Microsoft Exchange
Integration
TANDBERG offers an optional component to fully integrate the
TANDBERG Management Suite (TMS) with Microsoft Exchange and
Outlook. This integration gives the users the ability to schedule videoconferences, book meeting rooms and invite participants using their
Microsoft Outlook client.
The videoconferencing systems are registered as resources in Exchange, allowing end users to view their availability when making
the booking.
V 11.8
Functional overview
The integration requires a software component to be installed on the
Microsoft Exchange server.
Note that there is no need to update any of the Microsoft Outlook
clients.
In a front-end/back-end server scenario, the integration should be
installed on a back-end server.
D13562 Rev.12
Please see www.microsoft.com for more information about Microsoft
Exchange.
This document is not to be reproduced in whole
or in part without permission in writing from:
www.TANDBERG.com
Table of Contents
Server Requirements3
Supported Clients
3
TMS requirements
3
Limitations
3
Technical Description
Installation
4
6
Uninstallation 15
Upgrading16
Post installation setup
18
Making a booking using Outlook
Appendix A - Troubleshoot
Appendix B - Logging
33
38
39
Server Requirements
Server OS
Windows 2000 Server SP3 with Internet Explorer V5.5 or later
Windows 2003 Server with Internet Explorer V6.0 or later
Exchange Server
Microsoft Exchange 2000 with Microsoft Exchange service pack 3
Microsoft Exchange 2003 plain, service pack 1 or service pack 2
Exchange System Manager must be installed.
Supported Clients
Outlook
Microsoft Outlook 2000
Microsoft Outlook 2002
Microsoft Outlook 2003
Microsoft Outlook 2007
Microsoft Outlook Web Access
TMS requirements
Limitations
TMS
TMS V 9 for limited functionality, to get full functionality TMS V 11.7 or later is
required
Only one Exchange server can connect to TMS per Active Directory domain. If
there are multiple domains that are integrated with the same or different TMS
server(s) (in one forest), it is recommended to hide the resources between the
domains. TMS will not correctly build a call route if the resources in a single
meeting are split between the different domains.
All resource accounts representing Videoconference systems in one TMS Exchange Integration must have mailboxes on the same Exchange server. This
server cannot use Exchange Clustering, but the server can work as a link between a clustered Exchange solution and the TMS server. The Resources will
however be accessible to all users in the same Exchange organisation.
Different versions of a custom form in one Exchange Organization is not supported by Microsoft. However, the 8.0 Exchange Integration Component can
use the 9.0 version of the custom form and vice versa.
The group permisssions used on the calendars are not compatible with
the “Windows 2000 mixed” domain level. You need to raise the domain
level to “Windows 2000 Native” or higher. If you have to support NT4
servers and need “Windows 2000 mixed” domain functional level, you
have to apply your own set of permissions on the resource calendars by
logging on to each mailbox using Microsoft Outlook.
Technical Description
Both TMS and Exchange have their own database for booking information.
For Exchange the database contains resource availability based on free/busy
information for resource accounts. This information is stored in Exchange mailboxes and public folders.
TMS knows the resource availability based on its SQL Server database. That
means that there are two different systems that are separate, but must show
the same resource availability.
Two Exchange terms are important in the Exchange Integration; sinks and synchronization. A sink is a Microsoft concept in Exchange where the sink is a
‘hook’ which allows another process to be ran when calendar data is written.
This is used for intercepting meeting reservations in Exchange, making sure
that the meeting is validated and stored in TMS before the meeting is stored in
Exchange. A result from a sink is either true or false, so if true is returned the
meeting is booked in Exchange as well. If it is false, an e-mail is sent to the
requester describing why the meeting could not be booked on the TMS server,
and the meeting booking is aborted.
A synchronizer is used to ‘sync’ the data between the TMS server and Exchange. Meetings that are booked in TMS will be duplicated in the Exchange
database by the synchronizer. This syncronizer is run every 5 minutes, making
sure that meetings created in TMS are also copied to Exchange. In addition,
each time a meeting is booked in TMS, an e-mail is sent to the TMS-service
account. The TMS-Service mailbox has a sink installed that triggers the syncronizer when it receives e-mails.
Impacts on the Exchange server
In order for the Exchange Integration to function, the installer must make some
changes to the Exchange environment and server. The following changes are
made by the installer:
• Creates a Windows service for the synchronizer to run as – runs as
LocalSystem
• Creates a tms-service account in the current Windows domain
– Uses a strong password, can be changed via Configuration Tool
• Creates mailbox for the tms-service account and configures the required
settings and sinks
• Adds 6 role-restricted COM+ components. These run as tms-service
• Creates an address book in Exchange that will automatically list all TMS
integrated rooms
– Can be safely removed
• Creates a new local Windows user account named tmsconfuser on the TMS
Server (Normal Windows User privileges only)
– Alternatively the installer can use a pre-defined account on the TMS
server
– Assigns the tmsconfuser a special Exchange Integration Account
permission in TMS
• Creates some registry values, among others, an encrypted representation of
the password of the TMS server user
• Creates 2 Security Groups
– One for users who can book, and one for ‘admins’ who can access other
people’s bookings in resource calendars
Logging
TANDEBERG log files are available at the installation directory of the integra
tion. These log files include nearly all of the program activities, but the main
ones of interest are:
• Installation
• Account Creation
• Syncronizer Logs
• Calendar Sink
Microsoft log files can be accessed through Event View under Administrative Tools.
Installation
Before you start installing the TMS Exchange Integration component on the
Exchange server, make sure you are logged in as a user that has the following
permissions:
- Is a Domain Administrator for the local domain
- Is a Local Machine Administrator
- Is an Exchange Administrator
You will also need a set of user credentials that is
- Is an Site Administrator in TMS
- Is an Administrator of the Windows Server TMS runs on
Close all other applications running on the server.
Download the TMS Exchange Integration software package to the server (or
insert the CD ROM into your CD ROM drive), and start the installation program
(setup.exe) for the TMS Exchange Integration.
The installer will search for an already installed version of the TMS Exchange
Integration component. If one is present, the installer will start the uninstall
wizard. After the uninstallation, the setup needs to be launched again, to start
installation of the new version. See section Upgrading for further information
about upgrading.
The installation of the TMS Exchange component may require the installation of the additional Windows components (Windows component update). A list of the components will be shown and installed automatically.
A reboot of the server might be required after the installation.
Not Necessary if using previously created tmsconfuser account - you
just need the username/password of the existing account to be used
1. The TANDBERG installer will prepare the installation wizard.
At this stage a picture might display a list of
the components that need to be installed
before the installation of the TMS Exchange
Integration can continue. These components
will be automatically installed.
2.
A welcome window will appear on the screen. Press the ‘Next’ button.
3. Read and accept the License Agreement.
4. Select the destination folder where Setup will install the files. Click ‘Next’ to
accept the suggested path, or ‘Browse’ to change the path.
5. The installer will create a service account with a mailbox on the Exchange
server. Select which store on the Exchange server you would like to use
from the scroll-down menu, and click ‘Next’.
If choosing an existing TMS account,
this account needs to be configured for
Exchange booking capabilities. Go into the
Users tab of TMS, of the particular user, and
set ‘Exchange Integration Service Account’
to ‘Yes’.
6. The Exchange integration uses credentials from an account that is defined
in this step. Either let the installer create this user for you, or if you need
more control of the user, choose an existing TMS account.
Also make sure that the account is a member
of a group that has the ‘Book on behalf of’
option set, under the ‘Misc’ paragraph in
the Groups header in TMS. If the installer
creates the account, this configuration will
be completed automatically.
The Exchange server needs to be able to
reach port 80/HTTP or port 443/HTTPS on
the TMS server (in case of firewall issues).
7. Enter the IP-address or host name of the TMS server, and the user name
and password to an account that has at least local computer admin rights
on the TMS server and Site administrator rights in TMS. HTTPS can now
be used between the servers. If this is enabled a trusted root certificate
needs to installed on both servers.
Users in your organization that
should have access to booking of
videoconferences using Exchange/
Outlook should be granted access to
the first group, while admins should be
granted access to the second group.
8. The Exchange Integration will create 2 security groups in the domain. Press
the ‘Next’ button to accept the default values suggested by the installation
wizard. They will be created as domain local groups.
10
9. The next page allows you to put all the TMS-Exchange integration users
and groups in a separate container in Active Directory. If you want to put
them under an Organizational Unit (or create a new Organizational Unit),
click on the ‘Browse AD’ button. Otherwise click on the ‘Next’ button.
Post-install moving of the users and
groups to a different Active Directory
Container/organizational unit through
“Active Directory Users and Computers”
is not supported.
10. If you clicked on the ‘Browse AD’ button you can specify which Organizational
Unit to use, or create a new Organizational Unit.
11
11. Confirm the settings defined in the installation process and select ‘Next’ to
start copying files.
12. The installer will now start to copy files and perform necessary operations.
12
13. Click FINISH to complete the installation.
Notes about the Exchange installation
In order to perform, supervise and synchronize all the bookings between Exchange an TMS, the installation of the Exchange component causes 2 user-accounts to be created.
In the domain where the exchange server resides, a user ‘tms-service’ is created if choosing to let the installer create the user. On the user database of the
TMS server, a user account ‘tmsconfuser’ is created, or if opting for using an
existing user, the AD user specified will be added to the TMS database. If you
want to change the email address of either of these accounts, make sure that
they both have the same mail address. This address needs to be a legal address that can receive e-mail. To verify this, make a booking in TMS and open
the Configuration Tool of the Exchange Integration. The Configuration Tool will
report the time of the last notification of a TMS booking in the bottom right corner. If the text ‘No TMS Notification received’ is displayed, the e-mail address
is incorrectly configured.
The tms-service account must not have a group policy restricting the
“Log on as a batch job” privilege. If there is such a policy, the following
behaviour can be seen: It works well right after installation, but after an
undetermined amount of time (based on Group Policy timings) errors like
“The configured identity is incorrect” can be seen in the configuration
tool logs when you start the configuration tool, and in the Event Log. The
error will temporarily go away if you reset the password, but only until the
Group Policy is reapplied. The only solution is to make sure the Group
Policy doesn’t remove this privilege.
13
Permissions needed by the Exchange integration
This section describes the permissions needed by the accounts that are required for the Exchange integration. The information explains the permissions
required for each account, to give an administrator an overview of the security
model of the integration.
TMS-service
This user is created as a local administrator on the Exchange server because
it needs permissions such as:
• Log on as a Batch job
• Log on as a service
• Write permissions to the TANDBERG Key in the registry
• Read permissions from the TANDBERG Key in the registry
• Write permissions to log files
• Read permissions to log files and the integration components’
• Activate permissions to the TANDBERG COM+ package
TMSConfUser
• Must have access to login to TMS
• Needs to be a member that has ‘Book on behalf of’ permissions in TMS
• Must have ‘Exchange Integration Service Account’ set to Yes
VC mailboxes
• Normal mailbox users
Video Conference Users
• Gives users of this group read/book permission to change and delete their
own meetings.
Video Conference Admins
• Gives users of this group permission to change and delete all meetings.
14
Uninstallation
Run ‘setup.exe’ again to uninstall the TMS Exchange Integration component
from the Exchange Server or use ‘Add/Remove programs’ from the Control
Panel of the server.
If you tick of the checkbox before you click the ‘Next’ button, the uninstallation
script will also remove the security groups, the service user and all resource
accounts with mailboxes on the server. If you leave it unchecked only the integration program will be uninstalled, and the resources will be hidden from the
address books until you reinstall the TMS Exchange Integration.
15
Upgrading
Upgrading from a previous version of the TANDBERG Exchange Integration
should be considered done during non-office hours, as the integration will not
be able to detect changes from the Outlook clients when it’s not running.
The upgrade will ask for a reboot, but this is not required. The impact of opting to not reboot, is that one file will be marked for deleteion when the server
reboots. Other than that, not rebooting will not impact the functionality of the
product.
If upgrade during non-office hours in not an option, it should be pondered to
shut down the mailboxes representing the systems, to alert users that changes
are not possible during the update.
To upgrade start the setup-file as normal. The setup will then start to uninstall
the current version of the integration. During the un-installation, the option to
keep the existing settings and mailboxes are presented.
To keep the existing settings, leave the checkbox unchecked. This keeps your
settings and configurations. After the un-installation is finished, the following
screen is shown.
16
To install the new version, start the setup file again. If opting to keep the settings, you will notice that some of the screens shown in the installer when first
installing the product will not be shown, as the information is already present
from the previous installation.
When the installation is finished, make sure to launch the TANDBERG Microsoft Integration Configuration tool, and start the Syncronizer by clicking the ‘Start Synchronizer’ button.
17
Post installation setup
Once the TMS Exchange Integration component is installed on the Exchange
server, three important steps need to be done in order to make the installation
complete.
1. Publish the provided Videoconference form.
2. Create Exchange User representations for each system registered in TMS
3. Start Synchronizer to import
videoconference systems
existing TMS
booking
entries
for
Publish the provided Videoconference Form
A custom appointment form that adds support for videoconference meetings is
provided as part of the release from TANDBERG. It is recommended to place
this form under Organizational Forms Library in order to be made available
for all the Exchange end-users in your network. If an Organizational Forms
Library already exists on your Exchange server, this one can be used (make
sure permissions are set as described in the following chapter). If not, one has
to be created before importing the custom form. Please see www.microsoft.
com/exchange for more information about Microsoft Exchange.
Creating Organization Forms Library
Be sure you are logged in with full Exchange administrator rights. Go to ‘Administrative Groups’ and then select the group containing the Exchange Server
on which you just installed the Exchange Integration component. Normally this
would be ‘Administrative Groups/First Administrative Group’.
Select ‘Folders’ followed by ‘Public Folder’. Right-click on ‘Public Folder’ and
select ‘View System Folders’.
‘Folders’ may reside on root level if the Exchange System Manger is not
configured to show administrative groups.
While viewing the System Folders, right-click on ‘EFORMS Registry’ and select
‘New->Organizational Form’
A property page for the new Organizational Form library will be displayed. Fill in
a suitable name and (optional) description of the Organizational Forms Library.
Choose ‘English (USA) as E-forms language. If a Forms Library has already
been created with E-forms language ‘English (USA)’, the form must be published in this library.
18
Press ‘OK’ to save Organizational Forms Library.
In order to publish the Videoconference form in the Organizational Forms Library, an Outlook user needs to be granted “owner” permissions to the Organizational Forms Library. It is recommended only to give one single end user the
‘owner’ permission (preferably an administrator) , and use this user for publishing the form. Users who shall have availability to the form need ‘Read’ permissions granted to the Organizational Forms Library.
This is done by right-clicking on the created folder, select ‘Properties’. In the
pop-up window, select the ‘Permissions’ page.
Click on the ‘Client Permission’ button to change and review permissions for
the Organizational Forms Library.
19
Note that the permission level must be ‘owner’ in order to publish into
the library.
Publish Custom Form
Once the Organizational Forms Library is in place, the Custom Form provided
by TANDBERG can be placed here. As this has to be done from an Outlook client, you need to log on to the mailbox of a user with “owner” permissions to the
Organizational Forms Library (permission levels set as described above).
On the PC where Outlook is running, open the videoconference.oft file provided by TANDBERG.
The file is located where the Exchange Integration component was installed.
If you have admin rights to the exchange server and the default path was not
changed during installation, this would be:
\\<exchange server name>\C$\Program Files\TANDBERG\TMSExchange\Video Conference Form\ videoconference.oft
Copy the file to a diskette or CD-ROM or use a network store to run it on the
PC where Outlook is running.
Opening this file will cause the following screen to appear. To publish the form,
select ‘Tools->Forms->Publish Forms as ...’, as shown in the picture.
20
A screen for publishing the form will then pop up.
It is important that the fields are filled in exactly as described below (case sensitive).
Look in: select Organizational Forms Library
Display name: enter ‘Meeting’
Form name: enter ‘VideoConference’
‘Form Name’ is case sensitive and must be entered exactly as described
above.
Press ‘Publish’ when done.
You have now completed step 1 (out of 3) of the post installation process.
Problems with Outlook 2003 SP2 and SP3
In some cases, Outlook 2003 with SP2 installed will not show the form. This is
described in knowledge base article 907985 (http://support.microsoft.com/default.aspx?scid=kb;en-us;907985).
To publish the form, choose File -> New.. -> Choose Form.. from the File menu
of Outlook. Select ‘User Templates in File System’ from the Look In: dropdown
box.
21
Click ‘Browse’ and browse to the network path of the Exchange Server. The
file is located where the Exchange Integration component was installed. If you
have admin rights to the exchange server and the default path was not changed
during installation, this would be:
\\<exchange server name>\C$\Program Files\TANDBERG\TMSExchange\Video Conference Form\ videoconference.oft
You can then publish the form as normal.
Create Exchange User representations for each system registered in TMS
Each videoconferencing system that is to be bookable from Exchange/Outlook
needs a representation in Exchange. This representation is done by adding a
‘User’ in Exchange for each of the videoconferencing systems.
The user representation for these systems must be set up in a particular manner, and in order to simplify this process, TANDBERG provides a tool to assist
in the creation of these users. Running the Integration tool requires the user
have both Domain Administrator and Exchange Administrator permissions.
This is due to requirements that when configuring Exchange accounts to work
with TMS, both Active Directory and mailbox properties must be modified. The
Integration Tool automates the process of creating new Exchange accounts to
represent TMS systems as well as updating an existing Exchange resource
account be associated to a TMS system. The latter is useful if you have previously been scheduling the room or system through Exchange but without tying
it into TMS scheduling.
If for organizational permissions reasons, a user can not have both Domain
Administrator and Exchange Administrator permissions, TANDBERG can provide an alternate method which allows a Domain Administrator to create and
configure or modify existing AD users and mailboxes before using the Integration Tool. An Exchange Administrator must still complete the process using the
Integration Tool. The recommended way is to automate the process using the
Integration tool by running the tool with a user with both Domain and Exchange
Administrator permissions. Please contact TANDBERG Technical Support for
details on how to have a Domain Administrator setup accounts using an alternate method if required. Domain and Exchange Administrator permissions will
still be required to access all functionality shown in the Integration Tool.
The account and mailbox created by the Integration Tool should not be modified in anyway by the administrator. The exception to this is the administrator
22
may modify the Display Name of the account.
The configuration tool can be found on the Exchange server on which the
TANDBERG Exchange Integration component was installed. Click ‘Start’ menu,
‘Programs’ -> ‘TANDBERG’ -> ‘TANDBERG Microsoft Exchange Integration
Configuration’.
Make sure you are logged in with a user that has both Domain Administrator
and Exchange Administrator rights on this Exchange Server to properly run the
Integration Tool.
If the TANDBERG Microsoft Exchange Integration Configuration is returning errors when starting it right after installation, it should be shut down
and you should wait for at least one hour before starting it up again. This
might be necessary for the changes in the Active Directory and Exchange
to propagate in the network.
The user accounts created in Exchange representing the videoconferencing systems do not require any licenses from Exchange. Exchange
licenses are tied up against the number of Outlook installations accessing the Exchange server. So, accessing lots of different user-accounts
through your Outlook client still only uses 1 license.
The tool will automatically fetch information about all videoconference systems
from TMS and present them on the left hand side of the screen. Accounts identified by the Integration Tool as already integrated with TMS will be listed in the
right hand column.
When a system is imported into Exchange, it might take several hours
before the account is propagated, and available for booking through the
Active Director or Exchange resource forest.
Highlight each of the TMS systems from the left hand column that you wish to
integrate with Exchange and click the ‘Add to Exchange’ button.
23
A window will pop up for account configuration. You can decide for each system
if you want the tool to create the accounts for you, or if you want to associate
the systems with an existing account.
Let tool create accounts
By selecting the ‘Create an AD account for This System’, the tool will auto
create the needed account and mailbox for the system with all the required
permissions and properties.. The tool will then ask you the default password to
use for this account. This is only asked once, as all auto created accounts will
get the same password.
24
In the AD browser, select the OU where you want the account to be created. If
accounts should be created for all systems selected in the same OU, press the
‘Create the Remaining accounts in this folder’ button.
For each system that you ‘Enable’, a user account with the name tms-’system
id’ is created (e.g. from the previous picture, the following users are created:
tms-6, tms-7, tms-8 etc.). The number listed in front of the system name in the
Integration Tool is the System ID from TMS for that system.
Use existing accounts
By selecting ‘Use an existing AD account’, you need to specify an existing mailbox account that will be associated with the Videoconferencing system. This
option is used when you already have a resource account you previously have
been scheduling in Exchange that represents the TMS system and have not
been using TMS Scheduling. This allows you to migrate from your Exchangeonly model to a Exchange+TMS implementation. This setting is also used if are
using the alternate account creation method because you are not a Domain
Administrator.
25
Use the AD browser to select the account you to be associated with the system.
Review selections
After accounts have been created/specified for all systems selected, a window
will display your choices.
If the information is correct, press OK, or if alterations are needed press the
Edit button.
If one or more of the systems imported were associated with existing accounts,
you are asked if existing bookings for this account in Exchange should be
booked in TMS as well.
26
Click Yes to update TMS with the calendar information from the associated
systems.
The configuration tool will now start to import systems from TMS, create accounts and mailboxes if needed, and set up the associations.
Please note that this process can take several minutes depending on the
number of systems you are importing.
After importing, the system will then be moved over to the column ‘Exchange
enabled TMS Systems’.
The message ‘No TMS notifications received’ indicates that the Exchange
Integration component has not received any events from the TMS server. This is normal if no bookings have been performed in TMS since the
installation of the Exchange component completed. If this message is
still present after usage of TMS, this indicates that the TMS server can
not send e-mails to the TMS-Service User in the Exchange domain. This
will cause a delay in the synchronization process from TMS to Exchange.
Please contact your e-mail administrator to verify that the SMTP server
specified in TMS is configured to deliver e-mails to the Exchange domain.
27
Advanced Configuration
The ‘Advanced’ Button allows you to change the password for the tms-service
account created in Active Directory. You can also change the log path, define email options for outgoing e-mails, rebuild the TMS server connection and select
options for Asynchronous meeting requests.
Change password for tms-service
Used to set a new password for the tms-service account, used by the syncronizer. This account is created during installation. This must be changed here
and not through AD Users and Computers so that the Integration stored settings are updated as well as Active Directory.
Change log path
Defines the log path of the integration. Please note that the tms-service account needs to have write privileges to this directory.
Asynchronous meeting request
This controls the behaviour when booking the accounts in Exchange that are
integrated with TMS as ‘Required’ or ‘Optional attendees’ in meeting invites.
When set to ‘Always Decline Asynchronous Requests’ (the default) meeting requests are only processed if the account is booked as a ‘resource’ for the meeting. In this mode, the meeting organizer is told immediately if the resources
can be booked before the meeting is allowed to be saved and invites are sent
to other participants. If the accounts can not be booked, no meeting is saved,
and no invites are sent. Invites that put the account as a ‘Required’ or ‘Optional
Attendee’ are rejected and no invites are sent.
When set to ‘Always process asynchronous requests’, meetings will be processed even if the account is in the ‘Required’ or ‘Optional Attendee’ fields, but
the meeting will be saved and invites sent by the meeting organizer before the
meeting can be verified to be scheduled by TMS. This allows organizers to use
any of the invite fields when setting up a meeting, but allows the meeting to be
saved and invitations sent to participants even if the meeting is not successfully
booked by TMS (due to availability, resource conflicts, etc.).
It is strongly encouraged to retain the default setting of ‘Always Decline
Asynchronous Requests’ because sending invites and saving meetings
before the meeting is validated leads to end user confusion and complex28
ity when multiple updates are sent or they may not realize the meeting
was not successfully booked. However if support for Microsoft Outlook
Web Access is needed, this needs to be enabled, since Web Access does
not support calendar sinks.
Rebuild TMS server connection
This is used to re-configure the TMS connection. This might be needed if the
TMS server has changed IP-address, or if you want to use another user account in TMS to book the meetings.
Change ‘FROM’ address for outgoing e-mails
Some mail servers require that the outgoing e-mail addresses are valid e-mail
accounts to send the mail. Use this to configure the display name and e-mail
account that is used as a sender when sending e-mails to the booker if something goes wrong with the booking,
Advanced Usage
By selecting a system exported to Exchange, and right click on the mouse, a
popup window will appear to control that mailbox/system. This menu provides
many diagnostic tools used to detect or repair possible problems with a system.
Enable Autobooking
When creating the user accounts representing the video conference systems,
the Exchange Integration Configuration tool will try to set all the accounts to
automatically accept meeting requests. This is required in order to be able to
book them as resources.
However, in some Exchange environments the tool may not be able to set
this parameter (for many reasons). If this should happen, an indication in the
response message received after clicking the ‘Add to Exchange’ button will be
given for the account in question. You can then try to choose this option to enable the autobooking feature.
If this does not work, you need to manually set this parameter for each account
by logging into the mailboxes through Outlook. To do this, you need to log
29
on as each user representing the different videoconferencing system, using
user names and passwords created by the above-mentioned tool. See section
‘Manually set accounts to accept meeting requests’ for instructions on how to
do this.
Configure Calendar Rights and Sinks
This option re-registers the calendar sinks, making sure that the sinks run properly.
Reconfigure Accounts from TMS
This fetches updated data from TMS for the selected accounts. This is particularly useful when systems change name or numbers in TMS. If this happens,
selecting this option will update the account information in Exchange with the
recent data. Please note that it will take some time before the new account
data in Outlook is updated.
Unhide/Hide from Exchange Address List
This option lets you hide/unhide the accounts (systems) from the Exchange address list. E.g. if you need to make the accounts unavailable from booking for a
period of time from Exchange, but still want to keep the bookings from TMS up
to date with the Exchange bookings when the systems are un-hided again.
Remove
Does the same as the ‘Remove from Exchange’ button; removes the account
from Exchange.
Enable/Disable sinks
Enables/disables the sinks used to notify TMS about a booking in Exchange.
When disabling the sinks, no check or booking is done on the TMS server, and
the booking will only be done in Exchange.
Test sinks
This tests if the sinks calling the booking facilities in TMS works. This is done
by doing a booking in the past, and verifies the TMS replies with an exception
informing that the bookings can not be done in the past. Use this to verify that
sinks are up and running.
Book all meetings in TMS
By selecting this option, all meetings in the calendar of the particular system
are checked against TMS. If one or more meetings are not booked in TMS,
the tool will book them in TMS. This function is typically used when an already
existing resource in Exchange is updated with video support. This requires
meetings in Exchange to be copied to TMS as well, so TMS will be updated
with correct availability information.
Manually set accounts to accept meeting requests
If the Integration Tool is not able to enable Auto-Booking for an account,
you will receive a message stating so when enabling the system. In these
cases, you must manually enable auto-booking. Follow the instructions
in this section to enable auto-booking for each system that was not enabled automatically. If no systems failed to enable auto-booking, you can
skip this section.
It is recommended to add a new profile and set ‘Logon Network Security’ to
‘None’ when logging on as another user. Setting ‘Logon Network Security’ to
30
‘None’ implies that Outlook will not use your NT logon information when Outlook is opened, but will prompt you for username and password. This way, you
only need to restart Outlook to change to a different user instead of logging
completely off your PC. These steps may vary in other Microsoft Outlook versions. To change Network Logon Security in Outlook 2003, right click on your
Outlook icon and select ‘Properties’.Click on the ‘Show Profiles’ button and
select the Exchange profile you are using. Click on ‘Properties’ for this profile
and then select ‘Properties’ again for the Microsoft Exchange Server. Under
the ‘Advanced’ folder, you will find a field called ‘Logon Network Security’. Set
this parameter to ‘NTLM/Kerberos’ (which is called ‘None’ in Outlook 2000) and
click ‘OK’ on all the pop-up windows.
In Outlook, select ‘Tools’ -> ‘Options’.
Under ‘Preferences’ select the ‘Calendar Options’ button.
Select the ‘Resource Scheduling’ button.
31
Tick off the ‘Automatically accept meeting request and process cancellations’
and press ‘OK’. If you are asked about setting default permissions when clicking “OK” then do so! Even if you want to change the permissions later.
Customize Calendar permissions
If you would like to customize the calendar permissions, you can right-click on
the calendar folder icon in the “Folder List” pane and click “Properties”.
In the “Calendar Properties” page that pops up, switch to the “Permissions” tab
page. Authors can book and edit/delete their own bookings, Editors can book
and edit/delete all bookings.
You have now completed the second step (out of 3) of the post installation
process.
Import existing TMS booking entries for videoconference systems
In the previously mentioned tool, TANDBERG has included a feature to import
existing bookings in TMS into the calendar representations of the videoconferencing systems in Exchange.
It is therefore recommended that you ‘Enable’ all your TMS systems in Exchange before doing this operation. When later adding new systems to TMS,
it is recommended to enable them in Exchange before you start using them
from TMS.
The operation is simply done by pressing the ‘Reactivate Synchronizer’ button
on the Exchange Integration Configuration tool.
Enable users for booking of videoconference systems
To be able to book videoconference systems as resources, users must be
members of either the Video Conference Users or the Video Conference Admins groups, created in part 8 of the Installation chapter . Users that are not
members of either group will not see the video conference systems in their
address book, and will not be able to book them by manually typing the names
of the systems wither.
These are default names, and can be changed during installation
32
Making a booking using Activating the VideoConference Form
Before an end-user can customize the bookings using the videoconferencing
Outlook
form, each user must have the new Videoconference form activated on their
Outlook client. If the custom form is not to be used, the form does not need to
be activated.
You can change the default form in Outlook by making changes to the Microsoft
Windows Registry. The registry settings specify which forms are substituted for
the default Outlook forms. An Exchange administrator can change this registry
entry for all users using login scripts. For additional information please refer to
‘HOW TO CHANGE THE DEFAULT OUTLOOK FORMS’ at Outlook Exchange.
(See http://www.outlookexchange.com/articles/Santhosh/outlookforms.asp)
The form can also be activated manually by each individual user from their
Outlook client:
Right-click the Calendar icon on the user’s Outlook, and select ‘Properties’.
Under the ‘General’ page select ‘Forms..’ from the scroll down menu next to
‘When posting to this folder, use:’.
In the pop-up window, select ‘Organizational Forms Library’ from the scroll
down menu at the top (under ‘Look in’), and double click on the posted form
called ‘Meeting’ (if you used the naming convention proposed in the installation
guide).
33
Booking meetings with Videoconferencing rooms
Booking your videoconference meeting can now be done in the same way as
an ordinary meeting room/resource booking in Outlook. When adding videoconferece systems to the meeting, these can be found in the ‘VideoConference Rooms ’ address book. It is recommended to add each videoconference
system as Resource to the meeting. Select all the videoconference systems
and users you want to participate in your meeting.
By adding videoconference rooms as ‘Resource’, Outlook will try to book
the meeting directly in the calendar of the videoconference system before the meeting invitation is sent to the meeting participants. By adding
34
them in the same way as regular participants (‘Required’), you will get the
confirm/reject message per email later.
Under the ‘Attendee Availability’ folder of your meeting request you will see
the free/busy overview of all the participants in your meeting, including the
videoconference systems. This will assist you locating a suitable time for your
meeting.
Once you add a videoconference system as a resource in your meeting, you
will notice that your meeting request now has been expanded to include a
‘TANDBERG’ tab. Under this tab, you will be presented with more detailed information about the videoconference. Here you will also be allowed to set some
additional parameters for your videoconference as well as inviting external participants.
The following parameters and functions are available from the TANDBERG
folder of you meeting request:
Quality
Defines the quality of the videoconference call, i.e. the requested bandwidth. If
set to ‘Default’, the default bandwidth defined in TMS will be used.
Picture Mode
Defines the screen layout for multipoint conferences. Options are ‘Enhanced
CP’, ‘Continuous Presence’, ‘Voice Switched’ and ‘Default’. If set to ‘Default’,
the default value defined in TMS will be used.
Reservation Type
The reservation type parameter indicates what kind of reservation this is. The
35
default value is configured in TMS. Setting this parameter to ‘Automatic call
launch’ will cause the video conference to be set up automatically when the
meeting is due. Setting launch type to ‘Manual Call launch’ requires an end
user to confirm the call setup from each of the endpoints before the call is initiated.
Billing code
This field allows you to enter the billing code which shall be used for the booking. If a billing code is set, meeting participants need to enter this code before
joining the meeting.
Password
This field allows you to assign a password to the conference. Participants calling in to the conference will have to enter this password to be able to join the
conference.
Include Web Conference
This enables a web or data conference to be booked with the meeting. If set
to ‘Yes’, the meeting will only be booked if a web conference reservation be included. If set to ‘If possible’ the meeting will try to include a web conference, but
will be booked even if a web conference reservation could not be done. Including a web conference gives a link in the invitation e-mail, where the participants
can share desktop screens in addition to the video conference.
Secure Conference
Enables secure conferences by encrypting the videoconference call.
Restrict ISDN
Allows you to specify if the conference should call restrict (56kbps) or not.
Display Option to Extend Meeting
Allows you to specify if the conference master should be presented with the
option to extend the meeting using the quick keys on his remote control.
Add External
By pressing the ‘Add External’ button, a pop-up window will allow you to add
external dial-in or dial-out participants.
For Dial-Out participants, i.e. participant that will be dialled up by TMS, enter
the phone number they are reachable at and specify what kind of equipment
that shall be used. Options here are ‘Video ISDN’, ‘Video IP’ , ‘Telephone’, ‘IP
Telephone’,’ 3G’ or ‘SIP’. Press the ‘Add’ button when done entering information about a participant.
For Dial-In participants, select the ‘Dial-In’ folder in the pop-up window and enter a reference name for the participant. Also select the kind of equipment that
will be used when calling in. Options are the same as for Dial-Out. Press the
‘Add’ button when done entering information about a participant. Resources will
be set aside for these participants to dial into the videoconference.
You can also delete selected dial-in or dial-out participants by selecting them
and pressing the ‘Delete Selection’ button.
Notes
The Notes field is a message area where you can insert additional comments
on the video booking. This information will be stored along with the meeting
booking on the TMS server. If the booked videosystems are linked up with a
contact person who receives emails when a system is booked, the person will
also get this message.
Send Exchange meeting invitation
When you are done entering all the needed information into your meeting request, press the ‘Send’ button on the meeting invitation. Exchange will now
contact the TMS server and try to book the requested videoconference system
at the given time. If the booking is successful, a pop-up window will be dis36
played.
When the meeting is successfully booked, the meeting will be saved into your
calendar and invites will be sent to the meeting participants. Additionally the
meeting organizer will receive an email detailing the connection details for the
scheduled meeting.
If the meeting is not able to be booked, the meeting will not be saved, no invites
will be sent, and the meeting organizer will receive an email detailing why the
meeting could not be booked. The meeting organizer can make changes to the
meeting and try to book the meeting again by clicking the ‘send’ button after
making changes.
If Asynchronous Requests are enabled by the administrator, the meeting
will proceed as if it were successfully booked, but you may still get a rejection email afterwards when the meeting is actually processed.
Changing or editing an existing meeting
Meetings booked using MS Exchange can easily be changed later. Using your
Outlook calendar, you can open up the meeting representation in your calendar
and do whatever changes you want to the meeting, for example adding or removing participants, changing the time/date etc. When done with your changes,
simply press the ‘Send Update’ button to update the calendar entries of all the
participants in Exchange and update the videoconference booking in TMS.
The meeting can also be changed from TMS Scheduler or TMS Booking. If you
log in to TMS and select ‘My Meetings’ under the ‘Booking’ folder, you will see a
representation of your meeting booked from Exchange. You can edit this meeting like any other of your meeting in TMS. Any changes to it will be correlated
into the Exchange representation of this meeting and all the systems involved.
This way, TMS and Exchange will remain in synchronization all the time.
For more information about booking meetings using Exchange, please refer to
www.microsoft.com.
It may take a couple of minutes before Exchange is updated with changes
done to meetings from TMS. The other way round happens immediately.
37
Appendix A
Slow update of meetings from TMS to Exchange
Troubleshoot
If meetings are slow to be updated, make sure that there is no firewall that
blocks e-mail from the TMS server to the Exchange server. When a meeting is
booked in TMS, and e-mail is sent to the TMS-service account of the Exchange
Integration, trigging the synchronizer to start. If a firewall blocks this mail, the
meeting will only be imported by the synchronizer in to Exchange/Outlook when
the synchronizer is ran because the 5 minute interval.
If a firewall is not blocking the e-mail, check anti virus software running. In some
cases anti virus software will block e-mail sent to the TMS-service account.
To verify that the mail is received by the TMS-service account, check the mail
store of that account when a booking is being made. If no mail is received, the
synchronizer will not be triggered.
Error messages of bookings in the past from TMS
When making a booking on the Exchange server where the dateformat on the
Exchange server is different than the UTC format, you might get some strange
booking errors like “You can not book a conference in the past” when trying to
book a meeting in Outlook.
If this happens, verify that the registry key HKEY_USERS\.Default\Control
Panel\International\sShortDate is set to the dateformat DD/MM/YYYY format.
From TMS 11.8 and upwards TMS should give a better error message in such
a case.
38
Appendix B
To control the logging of TANDBERG Exchange Integration, the registry is used.
This is used both to disable logging, and control the amount of events that are
logged.
Logging
All values are stored in the ‘HKEY_LOCAL_MACHINE\SOFTWARE\Tandberg\
TANDBERG Management Suite Exchange Integration’ hive. All values in this hive
are strings (REG_SZ).
To specify the log directory, set the destination path in the string ‘Log directory’.
The actual logging is controlled by two different values for each component.
LogLevel and LogMode. Add the values LogLevel <component> and LogMode
<component>, where <component > can be CalendarSink, Synchronizer, ConferenceAPI, ConfigureResources, SetupApp, TMSExchangeSetup or InboxSink.
The Loglevel value is used for controlling the amount of events that are logged
for a particular component, and LogMode is used to determine if the Exchange
Integration will log to file or OutputDebugString. Use the freely downloadable
DebugView
(http://www.microsoft.com/technet/sysinternals/Miscellaneous/DebugView.mspx) from Sysinternals to view output to OutputDebugstring.
To control the LogLevel, the following data is valid for the LogLevel values:
Value
Meaning
-2
Off
-1
Errors only
0
Errors and Info (Default)
1023
Full log for debugging
E.g. LogLevel ConferenceAPI = “1023” will turn on full logging for the ConferenceAPI component.
To control the LogMode, the following data is valid for the LogMode values:
Value
Meaning
1
Log to file (Default)
2
Log to OutputDebugstring
Log size and rotation
To prevent the logs from getting too big, taking up too much disc space, the user
can control the maximum size and rotation of the logs. This is done globally, so all
logs share the same rotation and sizing rules.
The ‘Log Size’ value is used to control size. The log size is a string where the maximum size of log files is set in bytes. E.g ‘Log Size’ data can be set to ‘10485760’
for 10MB log files. This is the default value.
The rotating works as follows. When the log of a particular component increases
over the max size, the log will be renamed with a .bak extension. Then a new log
will be created with the same name.
E.g. the ConferenceAPI.log will be renamed to ConferenceAPI.bak when the size
limit is met. If a ConferenceAPI.bak file already exists, this will be deleted first.
After this, a new log with the name ConferenceAPI.log will be created.
39