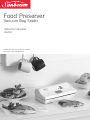
1
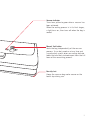
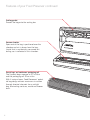
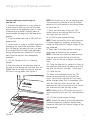
Food Preserver
Vacuum Bag Sealer
Instruction Booklet
VS5200
Please read these instructions carefully
and retain for future reference.
Contents
Sunbeam’s Safety Precautions
2
Introduction
3
Features of your Food Preserver
4
Using your Food Preserver
8
Vacuum Packing Explained
11
The Food Preserver System explained
12
Handy Hints
14
Guide to food preservation times with
Sunbeam Food Preserver™
15
Care and Cleaning
16
Troubleshooting
17
Important instructions – retain for
future use.
Sunbeam’s Safety Precautions
•
•
•
•
•
•
•
•
SAFETY PRECAUTIONS FOR YOUR
SUNBEAM FOOD PRESERVER, VACUUM BAG
SEALER.
• Always operate on a flat surface.
• Do not operate continuously for more than 2
minutes at a time.
Sunbeam are very safety conscious when
designing and manufacturing consumer
products, but it is essential that the product
user also exercise care when using an
electrical appliance. Listed below are
precautions which are essential for the safe
use of an electrical appliance:
Read carefully and save all the instructions
provided with an appliance.
Always turn the power off at the power outlet
before you insert or remove a plug. Remove
by grasping the plug – do not pull the cord.
Turn the power off and remove the plug
when the appliance is not in use or before
cleaning.
Do not use your appliance with an extension
cord unless this cord has been checked and
tested by a qualified technician or service
person.
Always use your appliance from a power
outlet of the voltage (A.C. only) marked on
the appliance.
Close supervision is necessary when your
appliance is being used near children or by
infirm persons.
Never leave an appliance unattended while
in use.
Young children should be supervised to
ensure that they do not play with the
appliance.
• Do not use an appliance for any purpose
other than its intended use.
• Do not place appliance on or near a hot gas
flame, electric element or on a heated oven.
Do not place on top of any other appliance.
• Do not let the power cord of an appliance
hang over the edge of a table or bench or
touch any hot surface.
• For safety reasons and to avoid maintenance
by unskilled persons, some appliances are
‘sealed’ using tamperproof screws. Such
appliances should always be returned to the
nearest Sunbeam Appointed Service Centre
for adjustment or repair if required.
• Do not operate any electrical appliance with
a damaged cord or after the appliance has
been dropped or damaged in any manner. If
damage is suspected, return the appliance
to the nearest Sunbeam appointed Service
Centre for examination, repair or adjustment.
• For additional protection, Sunbeam
recommend the use of a residual current
device (RCD) with a tripping current not
exceeding 30mA in the electrical circuit
supplying power to your appliances.
• Do not immerse the appliance in water or
any other liquid unless recommended.
If you have any concerns regarding the performance and use of your appliance,
please visit www.sunbeam.com.au or contact the Sunbeam Consumer Service Line.
Ensure the above safety precautions are understood.
2
Introduction
Congratulations on your purchase of the
Sunbeam Food Preserver™.
Vacuum packing will revolutionise the way
in which you buy and keep food. By keeping
food under vacuum (i.e. without air), the
shelf-life of fresh foods can be greatly
extended if properly handled, whether it is
kept in the pantry, refrigerator or freezer.
The three basic elements which may cause
food to spoil are oxygen (air), temperature
and time. Minimising any or all of these
elements will extend the useful life of foods.
Vacuum packing can help keep your food
fresher and more flavoursome for longer. This
process minimises the oxygen component
which is a main contributor to foods that are
stale, have perished or show signs of freezer
burns.
Now you can pack fresh food bought from the
market, or food picked from your vegetable
garden, in handy portions for future use,
even in large quantities. Food bought
already vacuum-packed can be repackaged
and vacuum sealed into more convenient
portions, retaining its flavour and freshness
once opened, without problems of moisture
and mould. Meat, fish and vegetables can
be frozen without the risk of frost burns and
will keep their freshness and quality. Foods
like coffee, rice, flour and nuts will last much
longer if they are vacuum packed. Fresh or
perishable foods must in any case be frozen
or kept in the fridge.
Always keep your Food Preserver bags or rolls
handy and you will quickly appreciate the
many advantages and ease of use that Food
Preserver offers when it comes to preserving
the quality of food.
Consult the “Guide to food preservation times
with Sunbeam Food Preserver™” table to see
how vacuum packing can extend the life of
food without in any way altering or impairing
its taste, smell, appearance, hygiene and
nutritional value.
3
Features of your Food Preserver
ON button
Starts the vacuum packing cycle.
Hose port
Accessory hose is connected here, for
use with containers and jars. Contact the
Sunbeam Consumer Line on 1800 025 059
to confirm availability.
Lid
The vacuum pump is turned on by pressing
the ON button located on the lid and holding
it down firmly until a vacuum is achieved.
Accessory hose
Connects to the hose port and is used in
conjunction with containers and jars which
are not sold with this appliance at this time.
Contact the Sunbeam Consumer Line on
1800 025 059 to confirm availability.
4
Vacuum indicator
Turns from yellow to green when a vacuum has
been achieved.
When the sealing process is in its final stages,
a light turns on, then turns off when the bag is
sealed.
Manual Seal button
Seals the bag independently of the vacuum
process. It can be turned on at any time and
is particularly useful when vacuuming delicate
foods that are likely to break apart from the full
force of the vacuuming process.
Non-slip feet
Keeps the vacuum bag sealer secure on the
bench top during use.
5
Features of your Food Preserver continued
Sealing gasket
Presses the bag onto the sealing bar.
Vacuum chamber
Open end of the bag is positioned over the
chamber and air is drawn from the bag.
Liquid that is accidentally vacuumed out
during use is collected in this chamber.
Precut bags and continuous packaging roll
The 5 precut bags measure at 20 x 30cm
and the packaging roll 20cm x 6m.
With 4 unique layers, Food Preservers’ patent
rib bag design ensures maximum air suction
through directed channels for an airtight
bag, eliminating moisture, mould and freezer
burn.
6
Airtight gaskets
Guarantees that a vacuum will be maintained
in the chamber, therefore allowing air to be
removed from bags.
Sealing bar
It contains a non-stick coated heating plate
that seals the bag and prevents it from
sticking to the bar.
7
Using your Food Preserver
Vacuum packing using Food Preserver
pre-cut bags
1. Position the appliance in a dry place on
a level surface, making sure that the work
area in front of the appliance itself is clear
of obstacles and there is enough room to
accommodate the bags with the food to be
packed.
7. Close the lid.
2. Plug the power cord into a 230-240 volt
power outlet.
NOTE: Releasing the ‘ON’ button during this
vacuum packing cycle will turn the appliance
off.
3. Check that the bag you are going to
use is at least 8 cm longer than the food
to be packaged, taking into account an
additional 2 cm for each time the bag will be
subsequently resealed.
4. Lift the lid open until it is standing
upright.
5. Place the food in the bag without creasing
it excessively or stretching the surfaces.
NOTE: Eliminate any liquids or food residues
from the area inside the bag that will be
sealed. This will ensure a perfect seal every
time.
6. Place the bag and its contents in front of
the appliance and place the open end of the
bag over the vacuum chamber. See Figure 1.
Figure 1
8
8. Press and hold down firmly the ‘ON’
button to complete the vacuum packing
cycle. The vacuum indicator will turn from
yellow to green when this is completed. Wait
until the seal light turns on and off. The
appliance will not only vacuum out all the air
but automatically seal the bag as well.
9. Lift the lid and remove the bag.
NOTE: Check the quality of the seal obtained.
It should appear as a regular, wrinkle-free,
horizontal strip with the internal ridges of the
bag flattened.
Using your Food Preserver continued
Vacuum packing by using the bag cut
from the roll
1. Position the appliance in a dry place on
a level surface, making sure that the work
area in front of the appliance itself is clear
of obstacles and there is enough room to
accommodate the bags with the food to be
packed.
2. Plug the power cord into a 230-240 volt
power outlet.
3. Unroll and cut a bag of suitable length for
packaging the food to be preserved. Check
that the bag you are going to use is at least
8 cm longer than the food to be packaged,
taking into account an additional 2 cm for
each time the bag will be subsequently
resealed.
NOTE: Be careful not to let the bag hang over
into the vacuum chamber or on the airtight
gasket as this will prevent a seal being made.
6. Close the lid.
7. Press and hold down firmly the ‘ON’
button to carry out sealing. Wait until the
seal light turns on and off.
8. Lift the lid and remove the bag.
NOTE: Check the quality of the seal obtained.
It should appear as a regular, wrinkle-free,
horizontal strip with the internal ridges of the
bag flattened.
9. Place food in the bag without creasing it
excessively or stretching the surfaces.
4. Lift the lid open until it is standing
upright.
NOTE: Eliminate any liquids or food residues
from the area inside the bag that will be
sealed. This will ensure a perfect seal every
time.
5. Position either of the two open ends of
the bag on the sealing bar, ensuring that the
ribbed side of the bag is facing up and the
flat side is facing down. See Figure 2.
11. Close the lid.
10. Place the bag and its contents in front of
the appliance and place the open end of the
bag over the vacuum chamber. See Figure 1.
12. Press and hold down firmly the ‘ON’
button to complete the vacuum packing
cycle. The vacuum indicator will turn from
yellow to green when this is completed. Wait
until the seal light turns on and off. The
appliance will not only vacuum out all the air
but automatically seal the bag as well.
NOTE: Releasing the ‘ON’ button during this
vacuum packing cycle will turn the appliance
off.
13. Lift the lid and remove the bag.
NOTE: Check the quality of the seal obtained.
It should appear as a regular, wrinkle-free,
horizontal strip with the internal ridges of the
bag flattened.
Figure 2
9
Using your Food Preserver continued
How to use the Manual Seal button
The Manual Seal button prevents delicate,
fragile foods from being crushed by the
vacuum process, such as biscuits and
berries.
1. Place the food in the bag without creasing
it excessively or stretching the surfaces.
NOTE: Eliminate any liquids or food residues
from the area inside the bag that will be
sealed. This will ensure a perfect seal every
time.
2. Place the bag and its contents in front of
the appliance and place the open end of the
bag over the vacuum chamber. See Figure 1.
3. Close the lid.
4. Press and hold down firmly the ‘ON’
button to commence the vacuum packing
cycle. By keeping watch of the bag whilst air
is being extracted, you will be able to decide
when the vacuum cycle should be overridden
so as to prevent delicate foods being
crushed. Continue pressing the ‘ON’ button
and now press the ‘Manual Seal’ button at
the same time. See Figure 3.
Figure 3
Pressing the Manual Seal button causes
the sealing light to turn on and the sealing
process starts immediately. Wait until the
seal light turns off.
10
5. Lift the lid and remove the bag.
NOTE: Check the quality of the seal obtained.
It should appear as a regular, wrinkle-free,
horizontal strip with the internal ridges of the
bag flattened.
Heading
Vacuum Packing Explained
The deterioration of food is caused by
chemical reactions that occur in food which
is exposed to air, temperature, moisture,
the action of enzymes, the growth of microorganisms or contamination by insects.
Vacuum packing reduces the absolute
pressure of the air inside the bag by removing
the oxygen. The oxygen in the air causes food
to deteriorate through a process of oxidation,
which causes the loss of nutritional values,
flavour and all the food’s qualities. Air also
promotes the growth of most micro-organisms
and when freezing causes the frost burns
which occur on frozen food.
Vacuum packing extends the shelf life of
many fresh foods, by reducing oxidation
and preventing the proliferation of microbes
(bacteria and mould). However, many
fresh foods contain sufficient moisture to
encourage the growth of micro-organisms
that can grow with or without air. To prevent
the deterioration of such foods, they must be
preserved at low temperatures.
Micro-organisms like mould, yeast and
bacteria are present everywhere, but they can
cause problems only in certain conditions.
Refrigeration slows the growth of yeast and
freezing blocks it completely.
Clostridium Botulinum is a dangerous type of
bacteria which can develop in environments
which do not contain acids, are without
oxygen and are exposed to temperatures in
excess of 4°C for long periods of time.
Foods vulnerable to attack by Clostridium
Botulinum are those with low acidity (like
red meat, poultry, fish, seafood, olives in
brine, eggs, mushrooms and vegetables)
and medium acidity foods like virtually all
vegetables and many fruits (ripe tomatoes,
onions, red pepper, figs and cucumbers).
To prevent contamination by this bacteria,
it is essential to observe the basic rules
of hygiene and to prevent its harmful
proliferation in preserved foods, they must
be refrigerated for only short periods and/or
frozen for long-life preservation. However,
such foods must be cooked and eaten
immediately after defrosting and heating.
Important: You must consume immediately any
food which has been heated while still sealed
in Food Preserver bags. Leaving the food to
cool slowly at room temperature in the sealed
vacuum bag may cause several harmful microorganisms to multiply, in just a few hours, to
values that are health-threatening.
Insect larvae are frequently found in many
low water content or dried foods found in the
pantry which have not been vacuum packed
and they can develop during storage and
thus contaminate the food. Some products
like flour and grain might contain larvae, but
using Food Preserver vacuum packing will
stop them developing into insects.
11
The
Heading
Food Preserver System
explained
becomes solid, vacuum pack it and replace
in your freezer. To vacuum pack vegetables,
peel them and then blanche them briefly
in boiling water or a microwave oven until
they are warm but still firm. Refresh in
iced water to stop the cooking process and
drain thorougly. Then vacuum pack them in
convenient portions.
By placing a bag inside the vacuum chamber,
air is quickly drawn and expelled via the
air release valve on the piston pump and
bag sealed using a non-stick coated heating
plate.
HOW TO PRESERVE FOOD IN FOOD PRESERVER
BAGS
Vacuum packing for the freezer
First of all, use the freshest possible food.
The Food Preserver system will allow you to
retain all the freshness of the food only if
it is properly preserved. Some foods have a
soft consistency which could be damaged
by vacuum packing the product when fresh.
To prepare delicate foods like fish, berries,
bread, etc, it is advisable to pre-freeze them
first. In the first twenty-four hours there is
no risk of freezer burns, so you can vacuum
pack the products frozen the previous day in
Food Preserver bags, and then keep them in
the freezer for long periods so as to preserve
all the nutritional values and flavour of the
product you have packed.
When vacuum packing soups, stews or
other liquid food, pre-freeze it in a pan or
temperature resistant dish. When the food
12
If the food is not pre-frozen, leave an extra
5 cm in the length to the bag, to allow for
expansion due to freezing. With regard to
meat and fish, it is advisable to place the
food on a paper towel and vacuum pack it
with the towel in the bag. This will absorb
any moisture in the food.
To preserve food like focaccia, crêpes and
small hamburger patties, stack them on top
of each other, placing greaseproof paper or
film between each piece. This will make it
easier to remove some of the food, re-vacuum
seal the rest and replace it immediately in
the freezer.
Vacuum packing for the fridge
For busy households, food can be prepared
in advance, then vacuum packed and kept in
the fridge for use at different times, ready to
be heated as and when necessary.
Vacuum packing for the pantry
Even foods that can keep at room
temperature (for example, coffee, flour,
pasta, sugar, etc.) can benefit from vacuum
packing. If these food items are to remain
unused for several days, it is advisable to
protect them by vacuum packing. They will
keep better and moisture, mould and insects
will not attack and ruin them.
The Food Preserver System explained continued
Heading
DEFROSTING FOODS IN FOOD PRESERVER BAGS
HEATING FOODS IN THE FOOD PRESERVER BAGS
Refrigerator
Defrosting in the refrigerator is considered
the best way to defrost whether it is raw
meats or frozen meals. Place Food Preserver
bags on the lowest shelf in the refrigerator to
defrost overnight. Do not re-freeze.
Liquid foods such as soups and sauces can
be placed still frozen into a saucepan of
boiling water until defrosted. The Food
Preserver Bag and its filling will be hot so
take caution when opening the bag.
Microwave
Cut Food Preserver Bag on one corner and
place onto a microwave safe plate. Use the
defrost setting on your microwave to defrost
slowly. Defrosting on a high heat will start
to cook the food on the outside before it
has fully defrosted. When defrosting in the
microwave, foods must then be cooked or
heated immediately. Do not re-freeze.
Room temperature
This method is only suitable for foods such
as breads or nuts. Cut Food Preserver Bag
on one corner and leave at room temperature
until thawed.
Note: Thawed raw foods such as meats or
chicken, can only be vacuum sealed and
re-frozen once cooked and allowed to cool
thoroughly first.
Precooked meals such as meat or rice dishes
should be thawed as recommended above,
removed from the bag and transferred to a
saucepan for reheating. Alternatively, one
corner of the Food Preserver Bag should be
cut if being placed in the microwave. Ensure
the bag is placed onto a microwave safe plate
and heat on high until hot.
Repackaging pre-packed food
Many foods, like cheese and meat, are sold
prepacked in factory-prepared vacuum bags.
To retain the flavour and freshness of these
foods, repackage them in Food Preserver bags
after the factory package has been opened.
Note: Pre-packed foods must always be
consumed by the useby date shown on the
original package.
13
Handy Hints
• The original quality of the food must be
of the very highest quality, in terms of
freshness and environmental hygiene, when
you decide to vacuum pack it.
There are in fact no preservation methods
which will transform a poor product into a
good one.
• Do not vacuum seal hot food. Allow to cool
sufficiently, then vacuum seal.
• Vacuum packing red meat may cause
discolouration, however this is a normal
process and the colour will return to the
meat once the seal is broken.
• If any unpleasant odours permeate from
a vacuum bag once opened, contents
should be allowed to rest for 5 minutes and
then rechecked. If strong odours persist,
it is recommended that the contents be
discarded.
• Once perishable food has been vacuumed
packed, place it in the refrigerator or freeze
it immediately, maintaining a constant
fridge or freezer temperature. Do not leave
the food at room temperature.
• After opening tinned food or food that has
been factory vacuum packed, it can be
vacuum packed again.
• Do not defrost food in boiling water or using
other heat sources, unless the food in
question is liquid (soups, sauces etc.).
14
• Vacuum packing will not extend the life of
fruit and vegetables including bananas,
apples and potatoes unless they have been
peeled prior to vacuum packing.
• Soft foods and food with a delicate
structure (like fish, berries, etc.) must be
pre-frozen for one night before they can be
vacuum packed and placed in the freezer.
• For food with tapered ends or sharp edges,
like bones and spaghetti, pad the edges
with paper towels to prevent perforating the
bag.
• Prior to vacuum sealing, write the date with
a permanent marker on bags and rolls, to
ensure that the bag contents are consumed
within the correct time frames.
• Fragile and delicate foods like crackers
or biscuits should be preserved using the
“Manual Seal’ function.
• There are many non-food products which
can be vacuum packed, such as camping
equipment including matches, first aid
kits and clean, dry clothes. Silverware and
collections can also be vacuum packed to
protect the items against oxidation, etc.
• To ensure correct and safe vacuum packing,
use only original Food Preserver bags and
rolls.
Guide to food preservation times
with Sunbeam Food Preserver™
Refrigerated foods ( 5± 2ºC)
TRADITIONAL
STORAGE TIMES
STORAGE TIMES WITH
FOOD PRESERVER
Red meat
White meat
Whole fish
Game
Sliced cured meats
Soft cheese
Hard and semi-hard cheese
Vegetables
Fruit
3-4 days
2-3 days
1-3 days
2-3 days
4-6 days
5-7 days
15-20 days
1-3 days
5-7 days
8-9 days
6-9 days
4-5 days
5-7 days
20-25 days
14-20 days
25-60 days
7-10 days
14-20 days
2-3 days
2-3 days
3-5 days
8-10 days
6-8 days
10-15 days
4-6 months
3-4 months
8-10 months
15-20 months
10-12 months
18-24 months
1-2 days
4-6 months
5-6 months
5-6 months
4-5 months
3-4 months
1-2 months
5-6 months
2-3 months
6-8 days
12 months
12 months
12 months
12 months
12 months
12 months
12 months
12 months
Cooked and Refrigerated foods (5 ± 2ºC)
Purees and vegetable soups
Pasta and risotto
Boiled and roast meats
Frozen foods (-18 ± 2ºC)
Meat
Fish
Vegetables
Food at ambient temperature (25 ± 2ºC)
Bread
Packed biscuits
Pasta
Rice
Flour
Dry fruit
Freeze-dried products
Powder tea
Ground coffee
Storage times with Sunbeam Food Preserver™ are indicative values that depend on the integrity of the package
and the original quality of the food.
IMPORTANT: Keep perishable foods in the freezer or refrigerator. Vacuum packing extends the life of food, but does
not turn it into a “preserve”, i.e. a stable product at ambient temperature.
NOTE 1: These food preserving performance claims are the product of collaboration between the Flaem Nuova
Research and Development Division and Prof. Luciano Piergiovanni, Chair of “Agri-food product conditioning and
distribution technologies” at Milan University, Italy.
NOTE 2: The average temperature for household freezers is -18ºC. If the temperature of frozen foods is allowed to
rise much above -18ºC, the shelf life of foods will be shortened. In this instance, frozen foods do not become unsafe
to eat, however changes will affect the sensory and nutritional properties of the food rather than its safety.
15
Care and Cleaning
• Always turn the power off and remove the
plug from the power outlet after use and
before cleaning.
• Both before and after use, clean the
exposed surfaces of the Food Preserver
using a non-abrasive sponge moistened
with a gentle dishwashing detergent.
• Any liquid which is accidentally vacuumed
into the Vacuum Chamber during use
should be soaked up and removed using a
non-abrasive sponge.
• Airtight and Sealing Gaskets may be
cleaned by dusting with a dry cloth to
remove dirt particles. If excessively dirty,
both the Airtight and Sealing Gaskets
may be removed and washed using a nonabrasive sponge moistened with a gentle
dishwashing detergent and rinsed well.
Gaskets should be dried thoroughly with a
cloth or paper towel.
NOTE: Do not stretch the gaskets as this will
prevent reinsertion back into the unit.
• Never immerse unit in water.
16
Heading
Troubleshooting
PROBLEM
POSSIBLE CAUSE
WHAT TO DO
The vacuum cycle will
not start.
There is a lack of pressure
being applied to the lid in
the closed position.
In case the unit does not
start when pressing the 'ON'
button, press simultaneously
the right hand corner of the
lid marked with the word
'PUSH', until the unit starts
functioning.
The Food Preserver does not
perform the first seal on the
bag cut from the roll.
Bag has been incorrectly
positioned.
Make sure the bag cut from
the roll is properly
positioned. See "Using your
Food Preserver" page 8.
Food Preserver does not
create a complete vacuum
in the bags.
Open end of bag is not fully
over the vacuum chamber.
To seal the bag properly, you
must make sure that the
open end remains completely
over the Vacuum Chamber.
Gaskets are dirty.
Make sure that the Sealing
Bar, the Sealing Gaskets
and Airtight Gaskets are free
of impurities, following
cleaning instructions on
page 16.
The Food Preserver bag might
have a hole in it.
Check bag.
Sealed portion of Food
Preserver bag has melted.
The Sealing Bar has
overheated.
Raise the Lid and allow the
Sealing Bar to cool down for
15 minutes and try again.
The Food Preserver bag does
not maintain a vacuum after
being sealed.
Leaks along the seam may be
caused by creases, crumbs,
grease or liquids.
Reopen the bag, clean the
upper inside part of the bag
and remove any foreign
material from the Sealing
Bar before resealing.
Check that the bag has no
holes in it which have
caused air to leak out. Use
paper towels to protect any
sharp edges on the contents
of the bag.
17
‘Sunbeam’, is a registered trademark of Sunbeam
Corporation.
'Food Preserver' is a trademark of Sunbeam Corporation.
Made in Italy. Due to minor changes in design or otherwise,
the product may differ from the one shown
in this leaflet. Backed by Sunbeam‘s 12 Month
Replacement Guarantee and National Service Network.
© Copyright. SUNBEAM CORPORATION LIMITED 2004.
(INCORPORATED IN N.S.W.) A.C.N. 000 006 771
Sunbeam Corporation is a division of GUD Holdings Ltd.
For more information or advice on this or any other
Sunbeam appliance, visit www.sunbeam.com.au or
contact the Sunbeam Consumer Service Line.
Australia 1800 025 059
New Zealand 0800 786 232.
Consumer Hotline
Australia
1800 025 059
New Zealand
0800 786 232
www.sunbeam.com.au
is a registered Trademark of Sunbeam
Corporation Limited. ACN 000 006 771.
© Sunbeam Corporation Limited 2004.