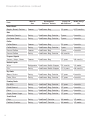
1
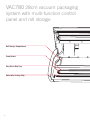
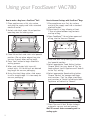
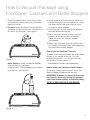
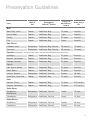
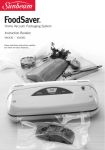
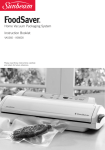
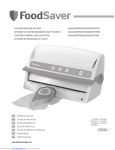
®
Home Vacuum Packaging System
Instruction Booklet
VAC780 - VS7800 Please read these instructions carefully
and retain for future reference.
Contents
Important Safeguards
4
Important Tips
5
Features of your FoodSaver® VAC780
Using your FoodSaver® VAC780
6
10
How to Vacuum Package using FoodSaver®
Canisters and Bottle Stoppers
13
Storage and Cleaning Instructions
14
Vacuum Packaging Non-Food Items
15
Food Preparation and Storage Guide
16
Guidelines for Vacuum Packaging
17
Preservation Guidelines
19
Troubleshooting
21
Important instructions – retain for
future use.
Sunbeam’sSafeguards
Important
Safety Precautions
Read the Instructions Carefully.
For your own safety, always follow these basic precautions when using the FoodSaver® appliance:
Sunbeam is very safety conscious when
designing and manufacturing consumer products,
but it is essential that the product user also
exercise care when using an electrical appliance.
Listed below are precautions which are essential
for the safe use of an electrical appliance:
• Read carefully and save all the instructions
provided with an appliance.
• Always turn the power off at the power outlet
before you insert or remove a plug. Remove
by grasping the plug - do not pull on the cord.
• Turn the power off and remove the plug
when the appliance is not in use and
before cleaning.
• Do not use your appliance with an extension
cord unless this cord has been checked
and tested by a qualified technician or
service person.
• Always use your appliance from a power
outlet of the voltage (A.C. only) marked
on the appliance.
• This appliance is not intended for use by
persons (including children) with reduced
physical, sensory or mental capabilities, or
lack of experience and knowledge, unless they
have been given supervision or instruction
concerning use of the appliance by a person
responsible for their safety.
• Children should be supervised to ensure that
they do not play with the appliance.
• The temperature of accessible surfaces may be
high when the appliance is operating.
• Never leave an appliance unattended while
in use.
• Do not use an appliance for any purpose
other than its intended use.
• Do not place an appliance on or near a hot gas
flame, electric element or on a heated oven.
• Do not place on top of any other appliance.
• Do not let the power cord of an appliance hang
over the edge of a table or bench top or touch
any hot surface.
• Do not operate any electrical appliance with
a damaged cord or after the appliance has
been damaged in any manner. If damage is
suspected, return the appliance to the nearest
Sunbeam Appointed Service Centre
for examination, repair or adjustment.
• For additional protection, Sunbeam
recommend the use of a residual current
device (RCD) with a tripping current not
exceeding 30mA in the electrical circuit
supplying power to your appliances.
• Do not immerse the appliance in water
or any other liquid unless recommended.
• Appliances are not intended to be operated
by means of an external timer or separate
remote control system.
• This appliance is intended to be used in
household and similar applications such
as: staff kitchen areas in shops, offices and
other working environments; farm houses; by
clients in hotels, motels and other residential
type environments; bed and breakfast type
environments.
If you have any concerns regarding the performance and use of your appliance,
please visit www.sunbeam.com.au or contact the Sunbeam Consumer Service Line.
Ensure the above safety precautions are understood.
4
Important Tips
When Vacuum Packaging:
1.Vacuum packaging is NOT a substitute for
refrigeration.
2.Use ONLY bags, rolls and canisters
manufactured by Sunbeam Products Inc.
3.Do not allow the Vacuum Channel to fill up
with liquids. This will render the machine
unusable. To prevent it, avoid overfilling the
bags and freeze liquids first.
4.You can prevent liquids from being
drawn into the appliance by placing a
folded paper towel at the top of the bag,
but below the seal area, before vacuum
packaging.
5.Do not attempt to create your own side
seals for a FoodSaver® Bag. These bags
are manufactured with special side seams
which are sealed all the way to the outer
edge. Creating your own side seams can
actually leave air channels exposed which
will cause leakage and prevent a vacuum
from being formed.
6.Always make sure you leave at least
2.5cm of extra bag material for each
time you plan to reuse the bag. To avoid
possible illness, do not reuse bags after
storing meats, fish or greasy foods.
7. If you are not sure whether you have
achieved a complete seal, simply seal the
bag again about 1cm above the first seal.
8. Bulky items sometimes make it difficult
to achieve a smooth sealing surface.
Gently stretch the bag flat along the
Sealing Strip before closing the lid.
9. When packaging products with sharp
edges (dry spaghetti, silverware, etc.),
protect the bag from punctures by
wrapping the products in a cushioning
material, such as paper towels, styrofoam,
tissue, etc. Products can also be vacuum
packaged in canisters to avoid any
possibility of puncturing a bag.
10.Avoid drawing powdery or fine-grained
products such as, flour, sugar and coffee
grinds into the appliance. This will inhibit
the vacuuming and sealing process and
may clog the unit, preventing it from
drawing a good vacuum. To prevent this
from occurring, avoid overfilling the bags.
11.If using the FoodSaver® appliance to
re-seal packets, ensure that these have
been previously commercially heat sealed.
Do not use the sealing strip to re-seal
conventional plastic wrap, sandwich bags
and plastic bags as they may melt over
the sealing strip.
5
VAC780 28cm vacuum packaging
system with multi-function control
panel and roll storage
Accessory Port
Attach accessory hose here and use to
vacuum package with FoodSaver® Canisters
and bottle stoppers.
Speed Setting
Select speed to optimise the vacuum.
'Gentle' for delicate foods; 'Normal' for all
average-sized bags, canisters and bottles;
'Fast' for larger-sized bags & canisters.
Adjustable Food Setting
Select food type to optimise the seal.
'Dry' (normal seal time) for food without
liquid; 'Moist' (longer seal time) for
juicy foods.
Progress Indicator Lights
Signal progression of the vacuum and sealing
process. All three lights shut off when the
full process is complete.
6
Vacuum & Seal Button
This button has two uses:
1.Press to vacuum package and seal with
a single touch. Shuts off automatically.
2.Press to cancel process at any time.
Canister Vacuum Button
Press to achieve best vacuum results for
canisters and bottle stoppers.
Seal Button
This button has four uses:
1.Press to immediately stop the vacuum
process and begin sealing the bag.
2.Press to create a seal when making bags
from a FoodSaver® Roll.
3.Press to create a seal on foil-based chip
and cereal packets.
4.Press during Pulse mode to seal bag.
Pulse Button
Press to remove air-as much or as little as
required - then press seal to complete.
7
VAC780 28cm vacuum packaging
system with multi-function control
panel and roll storage
Roll Storage Compartment
Foam Gasket
Easy Clean Drip Tray
Extra-wide Sealing Strip
8
Pen Storage
Bag & Roll Cutter
Vacuum channel
Easy-lock latch
9
Using your FoodSaver VAC780
®
How to make a Bag from a FoodSaver® Roll
1.Place appliance on a flat, dry surface
and plug the supply cord into a standard
electrical outlet.
2.Unlock side latch, open lid and position
open bag over the sealing strip.
3.Close lid and lock side latch into 'operate'
position. (Do not place edge of bag into
vacuum channel when sealing bags).
4.Press 'Seal' button to begin automatic
sealing process.
5.When seal indicator light turns off,
unlock latch, lift lid and pull out desired
bag length for vacuum packaging.
6.Using the inbuilt bag cutter, slide across
to cut a straight edge. It is now ready for
vacuum packaging.
How to Vacuum Package with FoodSaver® Bags
1.Place appliance on a flat, dry surface
and plug the supply cord into a standard
electrical outlet.
2.Place item(s) in bag, allowing at least
7.5cm of space between bag contents
and top of bag.
3.Open FoodSaver® lid and place open end
of bag into the Vacuum Channel.
4.Close and lock lid by locking side lock into
the 'operate' position.
5.Select appropriate 'Food Setting' button.
Choose 'Moist' for juicy foods or 'Dry' for
foods without liquid. Appliance will default
to the 'Dry' setting.
6.Select appropriate Speed setting button.
Choose 'Normal' for average-sized bags
and canisters; 'Fast' for larger sized bags
and canisters or 'Gentle' for delicate foods.
Appliance will default to 'Normal'.
Press
Slide
7.Press 'Vacuum & Seal' Button to begin
automatic vacuum and seal process.
Wait 20 seconds before vacuuming and / or
sealing again.
10
Using your FoodSaver® VAC780 continued
Tips on using the Pulse feature
Use the pulse feature to manually control the
vacuum process and avoid crushing delicate
items.
1.Place items in bag allowing 7.5cm of space between bag contents and top of
bag.
2.Open appliance lid and place open end of
bag into the vacuum channel. Close lid and
lock into 'operate' position.
3.Select and press appropriate food setting
- Moist or Dry.
4. Select and press appropriate speed setting
- Fast, Normal or Gentle.
5.Push and hold the Pulse Button. The
vacuum pump will run when the Pulse
Button is held down. Release 'Pulse'
button to stop the vacuum process. Repeat
pushing the 'Pulse' button until desired
amount of air has been removed.
Note: If the vacuum pump stops engaging
after several pushes of the Pulse Button,
it means the maximum vacuum has been
reached. DO NOT continue to push the Pulse
Button.
Tips on Sealing a Bag
Make sure you've locked the appliance lid.
When making a bag from a roll, place bag
material on Sealing Strip, close lid and
ensure latch is locked in the 'operate'
position.
Prevent moisture or liquid from being pulled
into the Vacuum Channel or trapped in the seal.
Either pre-freeze moist food such as raw
meat for 1-2 hours before vacuum packaging,
or place a folded paper towel between food
and end of bag to absorb excess liquids.
Just be sure to leave at least 7.5cm between
food and end of bag so that bag seals
properly with paper towel inside.
Make sure you give appliance time to cool
down. Wait at least 20 seconds between
seals. Under very heavy usage, appliance will
not operate to prevent overheating. If it does,
unplug appliance, wait 20 minutes to allow
appliance to cool off.
6.Press the Seal Button to seal the bag and
end the pulse mode.
7.When the progress Lights turn off, unlock
the latch, lift lid and remove bag.
11
Using your FoodSaver® VAC780 continued
Tips on Removing Air from a Bag
Make sure you've locked the appliance
lid. When vacuuming and sealing a bag
or canister, ensure latch is locked in the
'operate' position.
Check for wrinkles in the bag along the Sealing
Strip. Wrinkles in seal may cause leakage and
allow air to come back into bag. Check for
wrinkles in bag along Sealing Strip before
closing lid and vacuum packaging. If you
find wrinkles after sealing bag, simply cut
bag open and vacuum package again.
If motor runs for more than 30 seconds without
stopping, consider the following: You may
need to adjust bag and try again. If you are
making the initial seal on a piece of bag
material with two open ends, make sure bag
is placed on Sealing Strip. If you are vacuum
packaging with a bag, make sure open end is
placed over the Vacuum Channel and make
sure Accessory Hose is not attached.
12
How to Vacuum Package using
FoodSaver Canisters and Bottle Stoppers
®
1.Place the appliance on a flat, dry surface
and plug the supply cord into a standard
electrical outlet.
2.Canisters: place the item(s) to be vacuum
packaged inside the canister. Place the lid
on top of the canister*. See figure 1.
3.Insert one end of the Accessory Hose into
the Accessory Port on the appliance. Insert
the other end of the hose into the lid of
canister or bottle stopper.
4.Lock the latch on the side to the 'operate'
position before vacuuming.
5.Press 'Canister' Button to begin vacuum
process for either canisters or bottles,
motor will run until vacuum process
is complete.
6.When light indicator turns off, gently twist
and remove Accessory Hose from appliance
and canister or bottle stopper.
How to Open the FoodSaver® Canister
Figure 1
Bottle Stoppers: insert the Bottle Stopper
into the neck of the bottle.
Leave at least 2.5cm between the contents
and the rim. See figure 2.
To open, press and hold down the grey rubber
button in the center of the lid. This will
release the vacuum – a hissing sound can
be heard as the air rushes in.
* FoodSaver® Canisters sold separately.
How to Remove the FoodSaver® Bottle Stopper
To remove, simply twist and pull up on the
Bottle Stopper to release the vacuum.
IMPORTANT: Remember to remove the Accessory
Hose from the Accessory Port on the appliance
before you vacuum package in FoodSaver® Bags.
DO NOT STORE CANISTER IN THE FREEZER.
Figure 2
13
Storage and Cleaning Instructions
FoodSaver® Bags
FoodSaver® Storage
To utilise the unique vertical storage:
1.Close the lid.
2.Turn the latch halfway to secure for storage
(the halfway position locks the appliance
lid for storage without compressing the
foam gasket and creating unnecessary wear
and tear).
3.Push and hold 'Push' Button on the right
side of appliance.
4.Lift the front of the appliance until its in
the upright position and it clicks.
5.Let go of 'Push' Button
6.When ready to use again, press 'Push'
button and lower front of appliance.
IMPORTANT: Do not reuse bags after storing
meats, fish or greasy foods.
1.Wash bags in warm water using a mild
dishwashing soap.
2.Bags can be washed in the dishwasher by
carefully turning the bags inside out and
spreading them over the top rack of the
dishwasher so that all surfaces are exposed
to the washing water.
3.Allow bags to dry thoroughly before
reusing. To avoid possible illness, do not
reuse bags after storing raw meats, fish or
greasy foods. Do not reuse bags that have
been microwaved or simmered.
FoodSaver® Accessories
OPEN
N
STORE
PE
OPERATE
O
ST
O
RE
O
PE
RA
TE
OPEN
SE
RELEASE
RELEASE
EA
EL
R
STORE
OPERATE
The FoodSaver® Appliance
1.Always unplug the appliance before
cleaning.
2.Clean using a mild dishwashing soap and
a warm, damp cloth. Do not immerse the
appliance in water. Dry thoroughly before
using.
3.Do not use abrasive products or materials
to clean any of the appliance components.
Drip Tray
Wipe out with clean cloth to clean tray.
14
1.All FoodSaver® accessories should be
washed in warm water using a mild
dishwashing soap. Dry thoroughly before
using.
2.All FoodSaver® Canister bases (but not the
lids) may be washed in the dishwasher.
FoodSaver® Canister lids (white) are NOT
dishwasher safe.*
3.The FoodSaver® Canister base (clear) can
be cleaned in the dishwasher but only in
the top shelf. Items washed in bottom
shelves can distort due to the heat from
the dishwasher element.*
IMPORTANT: All plastic components
deteriorate through the prolonged use of a
dishwasher for cleaning. Hand washing of
plastic components in warm soapy water is
always recommended.
* FoodSaver® Canisters sold separately.
Vacuum Packaging Non-Food
Items
Your FoodSaver® appliance also protects
non-food items from oxidation, corrosion
and moisture.
Just follow the directions for vacuum
packaging using the FoodSaver® Bags,
Canisters and Accessories.
• Camping and hiking gear stays dry and
compact. Vacuum packaging your clothes
and equipment will help save space in your
bag. Vacuum package matches, maps and
anything you want to stay dry.
• For picnics, fill a FoodSaver® Bag with ice
and seal. When it melts, you’ll have fresh
water for drinking or you can put it back
in the freezer as a reusable ice pack.
• Vacuum package your food and equipment
for a boating or sailing outing. Food will
stay dry in the cooler/esky. Batteries and
film won’t get damaged by water, and you’ll
appreciate having a dry change of clothes.
• Vacuum package first aid kits and
emergency kits for your house, your boat
and your car. Items will all be in one
package and will stay dry and without
dirt and mold. Include flares, batteries,
flashlight, candles and matches.
• To vacuum package silver, wrap fork prongs
in soft cushioning material, such as a
paper towel, to avoid puncturing bag.
• For painting, vacuum package your wet
paint brush between coats rather than
washing out. Particularly useful for
oil based paints that require mineral
turpentine to clean up.
15
Food Preparation and Storage
Guide
Guidelines for Vacuum Packaging Food
Vacuum packaging is not a substitute for
canning nor can it reverse deteriorating
quality; it can only slow down changes in
quality. It is impossible to predict how long
a specific food will have top-quality flavour,
appearance and texture, because it depends
on the age and condition of the food on the
day it was vacuum packaged. Foods that are
extremely fresh will last longer than foods
that are already deteriorating.
Vacuum packaging extends the life of foods
by removing nearly all the air in a sealed
container, thereby reducing oxidation which
affects nutritional value, flavour and overall
quality. However, most foods contain enough
water to support micro-organisms which
can grow with or without air. While microorganisms are present everywhere, only
certain ones cause problems, and only under
certain conditions:
•M
ould: Easy to identify because of its
characteristic fuzz. Moulds are virtually
eliminated by vacuum packaging because
they cannot grow in a low oxygen
environment.
•Y
east: Results in fermentation, which can
frequently be identified by smell or taste.
Yeast requires water, sugar and a moderate
temperature to grow, and can grow with or
without air. Refrigeration slows the growth
of yeast, and freezing stops it completely.
16
•B
acteria: Frequently results in discoloration,
soft or slimy texture, and/or an unpleasant
odor. 'Clostridium botulinum' (the organism
that causes Botulism) can grow without
air under the right conditions, cannot be
detected by smell or taste, and although
extremely rare, can be very dangerous.
The combination of vacuum packaging and
freezing will extend food freshness and reduce
the growth of bacteria in perishable foods.
Maintaining low temperatures is a critical
factor in preserving foods safely. Growth of
micro-organisms is significantly reduced at
temperatures of 4°C or below. Freezing at
-17°C does not kill micro-organisms, but
it stops them from growing. For long term
storage, always freeze “perishable” foods
that have been vacuum packaged.
Thawing and Heating Vacuum Packaged Foods
Always thaw foods in either the Refrigerator
or microwave – do not leave “perishable”
foods at room temperature to thaw.
To microwave in a FoodSaver® Bag, cut a
corner of the bag and place on a microwavesafe dish. You can always reheat foods in
FoodSaver® Bags by placing them in water
at a low simmer below 75°C.
NOTE: Vacuum packaging is NOT a substitute
for refrigeration or freezing. Any “perishable”
foods that require refrigeration prior to vacuum
packaging still must be refrigerated or frozen
after vacuum packaging.
Guidelines for Vacuum Packaging
Preparation Guidelines for Meat and Fish
For best results, pre-freeze meat and fish
for 1-2 hours before vacuum packaging in a
FoodSaver® Bag. This helps retain the juice
and shape and guarantees a better seal.
If it's not possible to pre-freeze, place a
folded paper towel between meat or fish and
top of bag but below seal area. Leave paper
towel in bag to absorb excess moisture and
juices during vacuum packaging process.
Note: Beef may appear darker after vacuum
packaging due to the removal of oxygen.
This is not an indication of spoilage.
Preparation Guidelines for Hard Cheeses
To keep cheese fresh, vacuum package it
after each use. Make your FoodSaver® Bag
extra long, allowing 2.5cm of bag material
for each time you plan to open and reseal
in addition to the 7.5cm room you normally
leave between contents and seal. Simply cut
sealed edge and remove cheese. When you're
ready to repackage the cheese, just drop it in
bag and reseal.
Preparation Guidelines for Vegetables
Vegetables need to be blanched before
vacuum packaging. This process stops the
enzyme action that could lead to loss of
flavour, colour and texture.
To blanch vegetables, place them in boiling
water for 1 to 2 minutes. After blanching,
immerse vegetables in iced cold water to stop
the cooking process. Finally, dry vegetables
on a towel before vacuum packaging.
When freezing vegetables, it is best to
pre-freeze them for 1-2 hours or until solidly
frozen. To freeze vegetables in individual
servings, first place on a baking sheet and
spread them out so they are not touching.
This prevents them from freezing together
in a block. Once they are frozen, remove from
baking sheet and vacuum package vegetables
in a FoodSaver® Bag. After they have been
vacuum packaged, return them to the freezer.
Note: Cruciferous vegetables (broccoli,
Brussels sprouts, cabbage, cauliflower, kale,
turnips) naturally emit gases during storage.
Therefore, after blanching, they must be
stored in freezer only.
Important: Mushrooms and garlic should never
be vacuum packaged.
Preparation Guidelines for Leafy Vegetables
For best results, use a canister to store leafy
vegetables. First wash the vegetables and
then dry with a towel or salad spinner.
After they are dried, put them in a canister
and vacuum package. Store in refrigerator.
Preparation Guidelines for Fruits
When freezing soft fruits or berries, it is best
to pre-freeze them for 1-2 hours or until
solidly frozen. To freeze fruit in individual
servings, first place on a baking sheet and
spread them out so they are not touching.
This prevents them from freezing together
in a block. Once they are frozen, remove
from baking sheet and vacuum package fruit
in a FoodSaver® Bag. After they have been
vacuum packaged, return them to the freezer.
You can vacuum package portions for
baking, or in your favourite combinations
for easy fruit salad all year round. If storing
in the refrigerator, we recommend using a
FoodSaver® Canister.
17
Guidelines for Vacuum Packaging continued
Preparation Guidelines for Baked Goods
Preparation Guidelines for Marinating
To vacuum package soft or airy baked goods,
we recommend using a FoodSaver® Canister
so they will hold their shape. If using a bag,
pre-freeze for 1-2 hours or until solidly
frozen. To save time, make cookie dough, pie
shells, whole pies, or mix dry ingredients in
advance and vacuum package for later use.
Vacuum sealing opens the pores in foods
such as meats, poultry and seafood absorbing
marinades much faster than traditional
marinating methods. Marinating can occur
in either FoodSaver® Bags or Canisters.
Preparation Guidelines for Coffee and Powdery
foods
To prevent food particles from being drawn
into vacuum pump, place a coffee filter or
paper towel at top of bag or canister before
vacuum packaging. You can also place the
food in its original bag inside a FoodSaver®
Bag.
Preparation Guidelines for Liquids
Before you vacuum package liquids such as
soup stock, pre-freeze in a casserole dish,
loaf pan or ice cube tray until solid. Remove
frozen liquid from pan and vacuum package
in a FoodSaver® Bag. You can stack these
"frozen bricks" in your freezer. When you're
ready to use, just cut corner of bag and place
in a dish in microwave or drop into water at
a low simmer below 75˚C.
To vacuum package non-carbonated
bottled liquids, you can use a FoodSaver®
Bottle Stopper with the original container.
Remember to leave at least 2.5cm of room
between contents and bottom of Bottle
Stopper. You can re-seal bottles after each
use.
Preparation Guidelines for Snack Foods
Your snack foods will maintain their freshness
longer when you vacuum package them.
For best results, use a FoodSaver® Canister
for crushable items like crackers.
18
Do not overfill bags with marinating liquid.
This ensures that liquid does not enter the
vacuum channel.
Note: Marinating times will vary depending
on the type of marinade being used. Do not
marinate for more than 5-10 minutes if the
marinade contains acidic ingredients, such
as lemon juice and vinegar.
Re-sealing Chip packets, etc
Whilst we recommend only using FoodSaver®
Bags and Rolls to vacuum package items,
you can also utilise the sealing strip to
re-seal pockets that have already undergone
a commercial quality seal.
The heat sealing strip allows half consumed
packets of chips, crackers and cereals to be
resealed by placing on heating sealing strip.
Ensure that the bag does not reach into the
vacuum channel, as it will crush delicate
items. Only re-seal packets.
NOTE: Do not use the sealing strip to seal
conventional plastic wrap, sandwich bags
and plastic bags as the bags may melt over
the sealing strip.
Preservation Guidelines
Foods
Where to
Store
Recommended
FoodSaver® Products
Storage Life
with FoodSaver®
Products
Normal Storage
Life
Meat
Beef, Pork, Lamb
Freezer
FoodSaver® Bag
2-3 years
6 months
Ground Meat
Freezer
FoodSaver Bag
1 year
4 months
Poultry
Freezer
FoodSaver® Bag
2-3 years
6 months
Fish
Freezer
FoodSaver Bag
2 years
6 months
®
®
Hard Cheeses
Cheddar, Swiss
Refrigerator FoodSaver® Bag, Canister
4-8 months
1-2 weeks
Parmesan
Refrigerator FoodSaver® Bag, Canister
4-8 months
1-2 weeks
Vegetables (Vegetables, excluding leafy types, must be blanched before vacuum sealing.)
Asparagus
Freezer
FoodSaver® Bag
2-3 years
8 months
Broccoli, Cauliflower
Freezer
FoodSaver Bag
2-3 years
8 months
Cabbage, Brussels
Sprouts
Freezer
FoodSaver® Bag
2-3 years
8 months
Corn (cob or kernel)
Freezer
FoodSaver® Bag
2-3 years
8 months
Green Beans
Freezer
FoodSaver Bag
2-3 years
8 months
Lettuce, Spinach
Refrigerator FoodSaver Canister
2 weeks
3-6 days
Snow Peas, Snap Peas
Freezer
FoodSaver® Bag
2-3 years
8 months
Apricots, Plums
Freezer
FoodSaver® Bag
1-3 years
6-12 months
Peaches, Nectarines
Freezer
FoodSaver Bag
1-3 years
6-12 months
®
®
®
Fruits
®
Softer Berries
Raspberries,
Blackberries
Refrigerator FoodSaver® Canister
1 week
1-3 days
Strawberries
Refrigerator FoodSaver® Canister
1 week
1-3 days
Blueberries
Refrigerator FoodSaver® Canister
2 weeks
3-6 days
Cranberries
Refrigerator FoodSaver Canister
2 weeks
3-6 days
Harder Berries
®
19
Preservation Guidelines continued
Foods
Where to
Store
Recommended
FoodSaver® Products
Storage Life
with FoodSaver®
Normal Storage
Life
Baked Goods
Freezer
FoodSaver® Bag
1-3 years
6-12 months
Almonds, Peanuts
Pantry
FoodSaver® Bag, Canister
2 years
6 months
Sunflower Seeds
Pantry
FoodSaver Bag, Canister
2 years
6 months
Coffee Beans
Freezer
FoodSaver® Bag
2-3 years
6 months
Coffee Beans
Pantry
FoodSaver Bag, Canister
1 year
3 months
Ground Coffee
Freezer
FoodSaver Bag
2 years
6 months
Ground Coffee
Pantry
FoodSaver Bag, Canister
5-6 months
Freezer
FoodSaver® Bag
1-2 years
Bagels, Bread, Pastries
Nuts
®
Coffee
®
®
®
Prepared Liquids
Sauces, Soups, Stews
3-6 months
Bottled Liquids
Wine
Refrigerator FoodSaver® Bottle Stopper 2-4 months
Oils
Pantry
FoodSaver Bottle Stopper 1-1½ years
5-6 months
Beans, Grains
Pantry
FoodSaver® Bag, Canister
1-2 years
6 months
Pasta, Rice
Pantry
FoodSaver® Bag, Canister
1-2 years
6 months
Dry Milk
Pantry
FoodSaver® Bag, Canister
1-2 years
6 months
Dried Coconut
Pantry
FoodSaver Bag, Canister
1-2 years
6 months
Flour
Pantry
FoodSaver® Bag, Canister
1-2 years
6 months
Sugar, Brown Sugar
Pantry
FoodSaver Bag, Canister
1-2 years
6 months
Chips
Pantry
FoodSaver® Canister
3-6 weeks
1-2 weeks
Cookies, Crackers
Pantry
FoodSaver® Canister
3-6 weeks
1-2 weeks
®
1-3 weeks
Dry Foods
Powdery Foods
®
®
Snack Foods
20
Troubleshooting
Nothing happens when the on button is pressed:
• Check to see that the appliance is plugged
in. Test electrical outlet by plugging in
another appliance.
• The appliance will shut off automatically
if overheated. Allow to cool down for 20
minutes and try again.
• Check supply cord and plug for damage.
If damaged, do not use the appliance.
Air is not removed from the bag:
• To seal properly, open end of bag should
be resting entirely inside Vacuum Channel
area.
• Check sealing strip and gasket beneath the
lid for debris. Wipe off and then smooth
back into place.
• Bag may have a leak. To test, seal the bag
with some air in it, submerge in water, and
apply pressure. Bubbles indicate a leak.
Reseal or use another bag.
• Open bag and dry/wipe at top end of bag.
Ensure no food particles are in/around top
of bag.
Air was removed from the bag, but has come
back into the bag:
• Leaks along the seal can be caused by
wrinkles, crumbs, grease or liquids. Reopen
bag, wipe the top inside of the bag and
smooth it out along the sealing strip before
resealing.
• The release of natural gases or
fermentation from foods, (such as fresh
fruits and vegetables) may have occurred.
Most vegetables require blanching prior
to vacuum packing. See page 17 for more
details. Open bag, if you think food has
begun to spoil, discard food. Lack of
refrigeration or fluctuating temperatures in
the Refrigerator can cause food to spoil.
• Check the bag for a puncture or hole,
which may have released the vacuum.
Cushion sharp edges in the contents of
the bag with paper towels.
The Bag Melts:
• Should sealing strip overheat and melt
the bag, it may be necessary to lift the lid
and allow sealing strip to cool for a few
minutes.
• Built-in safety shut-off may shut the
appliance off if it becomes overheated.
Allow the unit to cool down for 20 minutes
and try again.
The FoodSaver® Storage Life with FoodSaver®
Canister will not vacuum:
• Make sure the rubber gasket on the
canister lid is free from food materials,
crumbs, coffee grinds, etc.
• Make sure the rim of the canister does not
have any cracks or scratches. Any gaps can
prevent a vacuum from forming.
• Make sure you aren’t filling the canister
too full prior to vacuum packaging. Always
leave at least 7.5cm between the contents
and the lid.
The FoodSaver® Storage Life with FoodSaver®
Bottle Stopper will not vacuum:
• Make sure the Bottle Stopper is fitting
snugly inside the bottle. If it is loose, air
may leak in and prevent a vacuum from
forming.
• Make sure the neck of the bottle and tip
of the Accessory Hose are free from food
materials, crumbs, etc. Any gaps created
by food etc, will prevent a vacuum from
forming:
Note: For all accessories, make sure the
Accessory Hose is completely inserted into
appliance and lid of accessory. Twist grey tab
on Accessory Hose while inserting to ensure
a tight fit.
21
Notes
12 Month Replacement Guarantee
In the unlikely event that this appliance develops any malfunction
within 12 months of purchase (3 months commercial use) due to
faulty materials or manufacture, we will replace it for you
free of charge.
Should you experience any difficulties with
your appliance, please phone our customer
service line for advice on 1300 881 861 in
Australia, or 0800 786 232 in New Zealand.
Alternatively, you can send a written claim
to Sunbeam at the address listed below.
On receipt of your claim, Sunbeam will
seek to resolve your difficulties or, if the
appliance is defective, advise you on how
to obtain a replacement or refund.
Your Sunbeam 12 Month Replacement
Guarantee naturally does not cover misuse
or negligent handling and normal wear and
tear.
Similarly your 12 Month Replacement
Guarantee does not cover freight or any other
costs incurred in making a claim. Please
retain your receipt as proof of purchase.
The benefits given to you by this guarantee
are in addition to your other rights and
remedies under any laws which relate to the
appliance.
Our goods come with guarantees that cannot
be excluded under the Australian Consumer
Law and under the New Zealand Consumer
Guarantees Act.
In Australia you are entitled to a
replacement or refund for a major failure and
for compensation for any other reasonably
foreseeable loss or damage. You are also
entitled to have the goods repaired or
replaced if the goods fail to be of acceptable
quality and the failure does not amount to
a major failure.
Should your appliance require repair or
service after the guarantee period, contact
your nearest Sunbeam service centre.
For a complete list of Sunbeam’s authorised
service centres visit our website or call:
Australia
www.sunbeam.com.au
1300 881 861
Units 5 & 6, 13 Lord Street
Botany NSW 2019 Australia
New Zealand
www.sunbeam.co.nz
0800 786 232
26 Vestey Drive, Mt Wellington
Auckland, New Zealand
Need help with your appliance?
Contact our customer service team or visit
our website for information and tips on
getting the most from your appliance.
In Australia
Visit www.sunbeam.com.au
Or call 1300 881 861
In New Zealand
Visit www.sunbeam.co.nz
Or call 0800 786 232
Distributed by:
Sunbeam Corporation Limited
ABN 45 000 006 771
Sunbeam Corporation is a division of GUD Holdings Ltd.
is a registered trademark.
www.sunbeam.com.au
Units 5 & 6, 13 Lord St Botany
NSW 2019 Australia
Unit 3, Building D, 26 Vestey Drive
Mt Wellington, Auckland New Zealand
© 2011 Sunbeam Products Inc. doing business as Jarden
Consumer Solutions. All rights reserved.
Foodsaver® is a registered trademark of Sunbeam Products,
Inc. Some images and text are copywrited.
Made in China.
Due to minor changes in design or otherwise, the product may
differ from the one shown in this leaflet.
7/11