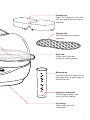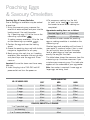
1
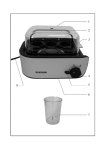
Poach & Boil™
Instruction Booklet
EC1300
Please read these instructions carefully
and retain for future reference.
Contents
Sunbeam’s Safety Precautions
3
Features of your Sunbeam Poach & Boil
4
Boiling Eggs
6
Poaching Eggs & Savoury Omelettes
7
Using the Steaming Rack
8
Care and Cleaning
8
Egg Tips
9
Recipes
10
Important instructions – retain for
future use.
Sunbeam’s Safety Precautions
SAFETY PRECAUTIONS FOR YOUR
SUNBEAM EGG COOKER.
• Ensure the steam vent faces away from you at
all times.
• Avoid injuries from the egg piercer.
•
•
•
•
•
•
•
•
•
Sunbeam is very safety conscious when
designing and manufacturing consumer products,
but it is essential that the product user also
exercise care when using an electrical appliance.
Listed below are precautions which are essential
for the safe use of an electrical appliance:
Read carefully and save all the instructions
provided with an appliance.
Always turn the power off at the power outlet
before you insert or remove a plug. Remove
by grasping the plug - do not pull on the cord.
Turn the power off and remove the plug
when the appliance is not in use and
before cleaning.
Do not use your appliance with an extension
cord unless this cord has been checked
and tested by a qualified technician or
service person.
Always use your appliance from a power
outlet of the voltage (A.C. only) marked
on the appliance.
This appliance is not intended for use by
persons (including children) with reduced
physical, sensory or mental capabilities, or
lack of experience and knowledge, unless they
have been given supervision or instruction
concerning use of the appliance by a person
responsible for their safety.
Children should be supervised to ensure that
they do not play with the appliance.
The temperature of accessible surfaces may be
high when the appliance is operating.
Never leave an appliance unattended while
in use.
• Use your egg cooker on a flat, level surface.
• To prevent damage to the appliance, do
not use concentrated cleaning agents when
cleaning, use a soft cloth and mild detergent.
• Do not use an appliance for any purpose
other than its intended use.
• Do not place an appliance on or near a hot gas
flame, electric element or on a heated oven.
• Do not place on top of any other appliance.
• Do not let the power cord of an appliance hang
over the edge of a table or bench top or touch
any hot surface.
• Do not operate any electrical appliance with
a damaged cord or after the appliance has
been damaged in any manner. If damage is
suspected, return the appliance to the nearest
Sunbeam Appointed Service Centre
for examination, repair or adjustment.
• For additional protection, Sunbeam
recommend the use of a residual current
device (RCD) with a tripping current not
exceeding 30mA in the electrical circuit
supplying power to your appliances.
• Do not immerse the appliance in water
or any other liquid unless recommended.
• Appliances are not intended to be operated
by means of an external timer or separate
remote control system.
• This appliance is intended to be used in
household and similar applications such
as: staff kitchen areas in shops, offices and
other working environments; farm houses; by
clients in hotels, motels and other residential
type environments; bed and breakfast type
environments.
If you have any concerns regarding the performance and use of your appliance,
please visit www.sunbeam.com.au or contact the Sunbeam Consumer Service Line.
Ensure the above safety precautions are understood.
3
Features of your Sunbeam
Poach & Boil™
Cover
Fits neatly over eggs during cooking.
Egg rack
Boil 1 to 6 eggs at one time, to your
desired firmness.
Non-stick heating vessel
Provides an easy to clean surface.
On light
Indicates the unit is operating.
Operating dial
The settings are: off
cook – cooks without ready buzzer
sounding.
cook – cooks with ready buzzer
sounding
Ready buzzer – Buzzer sounds to
indicate eggs are ready.
4
Poaching trays
Poach 1 or 2 eggs at a time. Also
ideal for cooking plain or savoury
omelettes.
Steaming rack
Ideal for steaming a variety of
vegetables.
Steam vent
Allows steam to escape
during the cooking process.
Measuring cup
Accurate amounts of water can be
measured to boil or poach eggs to
desired firmness.
Egg piercer (underneath)
Piercing eggs prevents them
cracking during cooking.
Cord storage
Stores cord neatly and
conveniently.
5
Boiling Eggs
Before the first use
Wipe over the heating vessel with a damp
cloth. Wash the plastic parts in warm soapy
water, rinse and dry.
the measuring cup. To do this, simply
place the large end of the egg against the
egg piercer and press the piercer into the
egg.
Boiling Eggs
Important: Avoid injuries from the egg piercer.
Up to 6 eggs can be cooked at one time.
3. Position the egg rack over the heating
vessel and place the eggs in the egg rack
with the large ends facing down.
1. Using the measuring cup, measure the
amount of water required and pour into the
heating vessel. Use cold tap water.
g. For 2 soft eggs, refer to the section
E
on the measuring cup and fill
marked
the cup to the line marked 2. For 3 hard
boiled eggs, refer to the section marked on the measuring cup and fill to the
line marked 3. See figure 1.
4. Place the cover over the eggs.
Important: Ensure the steam vent faces away
from you.
5. Insert the plug into a 230–240 volt AC
power outlet and turn the power on.
6. To commence cooking, turn the dial
’ if you wish
to ‘cook’, or to ‘cook
the buzzer to sound when cooking has
completed.
Approximate cooking times are as follows:
Soft
7 minutes
Medium
10 minutes
Hard
12 minutes
These cooking times are a guideline only.
Times will vary depending on the number of
eggs cooked, the size and the temperature of
eggs being used.
Figure 1
2. Eggs have an air pocket in the large end
of the shell and they can crack during
cooking as the air expands from the heat.
Thus piercing eggs prevents them from
cracking during cooking.
Pierce the large end of the egg using the
egg piercer which is on the underside of
6
The measures on the measuring cup are
based on eggs used at room temperature.
Standard (59g) eggs have been used.
Note: You may need to add more water for
refrigerated or larger eggs.
Also eggs will be firmer if more water is used
and softer if less is used. You will quickly
learn to adjust the water level to boil eggs
just the way you want.
Poaching Eggs
& Savoury Omelettes
Poaching Eggs & Savoury Omelettes
One or two eggs or omelettes may be cooked
at one time.
1. Using the measuring cup, measure the
amount of water required and pour into the
heating vessel. Use cold tap water.
Eg. If poaching eggs, fill to the line on the
measuring cup marked
.
If making savoury omelettes, fill to the line
on the measuring cup marked
.
2. Position the egg rack over the heating
vessel.
3. Grease the poaching trays well with butter,
margarine, vegetable oil or oil spray.
4. Break an egg into each tray, or if cooking
omelettes, pour omelette mixture into trays
and place trays onto the egg rack. Place
cover on.
Important: Ensure the steam vent faces away
from you.
5. Insert the plug into a 230–240 volt AC
power outlet and turn the power on.
NO. OF BOILED EGGS
6. To commence cooking turn the dial
to ‘cook’, or to ‘cook
’ if you wish
the buzzer to sound when cooking has
completed.
Approximate cooking times are as follows:
Poached Eggs 1 or 2
4 minutes
Omelette
10 minutes
The volume of water needed for poaching
eggs or cooking omelettes is marked on the
measuring cup.
Poached eggs and omelettes will be firmer if
more water is used and softer if less is used.
You will quickly learn to adjust the water
level to poach eggs or have your omelettes
exactly the way you like them.
The table below shows the measures from the
measuring cup. Use these measures if you
misplace your measuring cup. This table also
appears on the underside of your egg cooker.
Note: Less water is required if more eggs or
larger eggs are being used.
WATER QUANTITIES
SOFT
MED.
HARD
1 egg
53ml
83ml
110ml
2 eggs
47ml
78ml
100ml
3 eggs
43ml
72ml
93ml
4 eggs
39ml
66ml
87ml
5 eggs
34ml
57ml
80ml
6 eggs
30ml
51ml
75ml
POACHED, OMELETTE or STEAMING
1 or 2 poached eggs
or steaming
35ml
1 or 2 savoury omelettes
63ml
7
Using the Steaming Rack
The steaming rack can be used for steaming
vegetables such as asparagus, corn and
carrots or used to steam Asian dumplings and
gow gees.
1. Using the measuring cup, measure the
amount of water required and pour into the
heating vessel. Use cold tap water.
2. Position the egg rack over the heating
vessel.
3. Place the steam rack onto the egg rack.
4. Place the desired foods onto the steam
rack. Place cover on.
Important: Ensure the steam vent faces away
from you.
5. Insert the plug into a 230-240 volt AC
power outlet and turn the power on.
6. To commence turn the dial to 'cook' or to
'cook
' if you wish the buzzer to sound
when cooking has completed.
Suggested Foods and Preparation
For steamed asparagus, a maximum of one
bunch is recommended. Trim ends to fit.
Use setting as a guide – depending on
the thickness of the asparagus; more or less
water should be used.
For steaming Asian dumplings and gow gees,
fill steaming tray but do not stack. Use the setting – depending on the thickness of
the food; more or less water should be used.
For steamed corn cut into cobbettes. Use the setting as a guide.
For other vegetables, cut into even size
chunks, the harder the vegetable the smaller
the pieces should be. Use the setting
as a guide.
Note: If the appliance completes the cooking
cycle but the food is not cooked to taste,
simply add a little more cold water and
restart the cooking process.
Care and Cleaning
After each use
Turn the power off and unplug from the
power outlet.
To clean the plastic parts
Wash the cover, egg rack, poaching trays and
steaming rack in warm soapy water, rinse and
dry thoroughly.
Note: Do not clean any parts in a dishwasher
as the high temperatures reached may distort
the plastic.
To clean the heating vessel
Wipe over with a damp cloth. Do not use
8
harsh abrasives as these will scratch the nonstick surface.
After cleaning the heating vessel, rub a small
amount of vegetable or cooking oil into the
non-stick surface. This allows easier removal
of mineral deposits that exist normally in
water.
Important: Do not immerse the unit in water
or any other liquid.
Care is required when handling the egg
piercer on the measuring cup.
Egg Tips
Eggs are nature’s contribution to ‘fast food’.
Conveniently packaged, simple to use and
inexpensive.
They are an extremely nutrient-dense food,
providing vitamins, minerals, protein and
fats, with the standard size egg containing
only 300KJ.
A nutritious, balanced meal can be made
in under 10 minutes by serving a boiled or
poached egg with toast and orange juice.
Dressed up or served plainly, an egg always
tastes and looks great.
• When purchasing, avoid cracked or broken
eggs and check the ‘best by’ date on the
carton.
• Store eggs in the refrigerator with the
pointed side down in their carton. This
reduces the risk of damage, slows down
moisture loss and prevents eggs from
absorbing odours from strong smelling
foods.
• If a recipe specifies using eggs at room
temperature, simply remove them from the
refrigerator 30 minutes before using.
• T
o test for freshness, place an egg in a
bowl of cool water. If it sinks, it is fresh
– if it floats, throw it out.
• Piercing the large end of the egg with
the egg piercer on the underside of the
measuring cup prevents it from cracking
during cooking, with the added bonus of
making it easier to peel.
• Chill hard boiled eggs in cold water
immediately after cooking to prevent blue
discolouration around the yolk.
• Hard boiled eggs are much easier to slice
if they are cold. If you don’t have an egg
slicer, use a sharp, thin-bladed knife,
dipping into cold water every few slices.
• Refrigerated as soon as they cool, boiled
eggs will keep for up to 1 week.
9
Recipes
Porcini Mushroom Omelette
6g dry porcini mushrooms
2 eggs, beaten
2 tablespoons thickened cream
2 tablespoons chopped red onion
1. Place porcini mushrooms into a small
bowl, pour over boiling water to just cover.
Allow to hydrate for 5 minutes; drain and
chop finely.
2. Combine all ingredients and mix well.
3. Pour evenly into the two, well greased
poaching trays.
4. Cook as directed for savoury omelettes
Parmesan Omelette
2 eggs, beaten
2 tablespoons grated parmesan cheese
2 tablespoons cream, milk or water
2 tablespoons chopped red onion
Egg White Omelette
2 rashers short cut bacon, fat trimmed &
chopped
3 medium button mushrooms, sliced
2 egg whites
2 tablespoons grated low fat cheddar
1 tablespoon chopped chives
1. Heat a non-stick frying pan over medium
heat; add bacon and cook 1-2 minutes or
until golden & crispy.
2. Add sliced mushrooms and cook 1-2
minutes or until softened. Remove from
heat and cool slightly.
3. Beat egg whites until soft peaks form; fold
through cheddar and chives.
4. Pour evenly into the two, well greased
poaching trays.
5. Cook as directed for poaching.
1. Combine all ingredients and mix well.
6. Allow omelette to stand for 1 minute
before removing lid.
2. Pour evenly into the two, well greased
poaching trays.
7. Serve omelette topped with mushroom and
bacon.
3. Cook as directed for savoury omelettes.
10
Recipes continued
Eggs Benedict
3 egg yolks
1 tablespoon lemon juice
1 tablespoon water
125g butter, melted
Salt & pepper
4 eggs
2 English muffins, toasted
4 slices ham or bacon, grilled
1. Place egg yolks, lemon juice and water
in a heatproof bowl over a saucepan of
simmering water.
2. Whisk mixture until it thickens and is well
combined.
3. Gradually add melted butter; whisking
continuously until sauce is smooth and
thick. Do not allow sauce to boil or it will
separate.
Eggs Florentine
20g butter
1 clove garlic, chopped
150g baby spinach leaves
Squeeze of lemon juice
4 eggs
4 thick slices sourdough, toasted
Salt & pepper
1. Heat butter in a large frying pan over
medium heat, add garlic and cook 1
minute.
2. Add spinach and cook until just wilted;
add lemon juice.
3. Poach eggs according to directions.
4. Top toasted sourdough with wilted spinach
and poached egg; season with salt and
pepper.
4. Remove from heat and season to taste.
5. Poach eggs according to directions.
6. Top toasted muffin with grilled ham/bacon
and poached egg.
7. Drizzle over warm hollandaise sauce.
11
Heading
Recipes continued
Tuna Nicoise Salad
100g baby salad leaves
200g baby green beans, blanched
2 ripe medium tomatoes cut into wedges
3 medium Desiree potatoes, boiled & cut
into thick chunks
2 tablespoons olive oil
2 tablespoons lemon juice
1 x 185g can Tuna Slices in Olive Oil
4 hardboiled eggs, quartered
½ cup pitted Kalamata olives
4 anchovies split lengthwise (optional)
Salt and pepper
1. Scatter salad leaves over a large serving
platter.
2. Combine beans, tomatoes and potatoes in
a mixing bowl. Whisk together olive oil and
lemon juice and pour half the dressing
over vegetables; toss until evenly coated.
3. Spoon onto serving platter and top with
tuna slices, eggs, olives and anchovies.
4. Drizzle over remaining dressing and
season with salt & pepper.
Caesar Salad
4 rashers bacon, chopped (optional)
2 eggs
1 small onion, chopped
¼ cup chopped fresh herbs, (parsley, basil,
chives)
1 tablespoon Dijon mustard
3 anchovies chopped (optional)
100mls olive oil
1 tablespoon lemon juice
Salt & pepper
1 large Cos lettuce, roughly chopped
75g croutons
50g shaved parmesan
1. Heat a frying pan over medium heat,
add bacon and cook 2-3 minutes or until
bacon is golden and crispy. Remove and
set aside.
2. Cook eggs according to directions to a
soft boiled stage; remove and plunge into
chilled water to arrest cooking.
3. Combine runny eggs, onion, herbs,
mustard and anchovies in a food processor
and process until mixed. With motor still
running, slowly drizzle in olive oil. Mixture
will thicken.
4. Stir in lemon juice and season to taste.
5. Mix together lettuce and half the croutons,
parmesan and dressing. Place onto a
serving platter.
6. Top with remaining croutons and parmesan
and drizzle over remaining dressing.
12
Notes
Notes
14
12 Month Replacement Guarantee
In the unlikely event that this appliance develops any malfunction
within 12 months of purchase (3 months commercial use) due to
faulty materials or manufacture, we will replace it for you
free of charge.
Should you experience any difficulties with
your appliance, please phone our customer
service line for advice on 1300 881 861 in
Australia, or 0800 786 232 in New Zealand.
Alternatively, you can send a written claim
to Sunbeam at the address listed below.
On receipt of your claim, Sunbeam will
seek to resolve your difficulties or, if the
appliance is defective, advise you on how
to obtain a replacement or refund.
Your Sunbeam 12 Month Replacement
Guarantee naturally does not cover misuse
or negligent handling and normal wear and
tear.
Similarly your 12 Month Replacement
Guarantee does not cover freight or any other
costs incurred in making a claim. Please
retain your receipt as proof of purchase.
The benefits given to you by this guarantee
are in addition to your other rights and
remedies under any laws which relate to the
appliance.
Our goods come with guarantees that cannot
be excluded under the Australian Consumer
Law and under the New Zealand Consumer
Guarantees Act.
In Australia you are entitled to a
replacement or refund for a major failure and
for compensation for any other reasonably
foreseeable loss or damage. You are also
entitled to have the goods repaired or
replaced if the goods fail to be of acceptable
quality and the failure does not amount to
a major failure.
Should your appliance require repair or
service after the guarantee period, contact
your nearest Sunbeam service centre.
For a complete list of Sunbeam’s authorised
service centres visit our website or call:
Australia
www.sunbeam.com.au
1300 881 861
Units 5 & 6, 13 Lord Street
Botany NSW 2019 Australia
New Zealand
www.sunbeam.co.nz
0800 786 232
26 Vestey Drive, Mt Wellington
Auckland, New Zealand
Need help with your appliance?
Contact our customer service team or visit
our website for information and tips on
getting the most from your appliance.
In Australia
Visit www.sunbeam.com.au
Or call 1300 881 861
In New Zealand
Visit www.sunbeam.co.nz
Or call 0800 786 232
is a registered trademark.
‘Poach & Boil’ is a trademark of Sunbeam Corporation.
Made in China.
Due to minor changes in design or otherwise,
the product may differ from the one shown in this leaflet.
© Copyright. Sunbeam Corporation Limited 2011.
ABN 45 000 006 771
Units 5 & 6, 13 Lord Street
Botany NSW 2019 Australia
Unit 3, Building D
26 Vestey Drive
Mt Wellington Auckland
New Zealand
Sunbeam Corporation is a division of GUD Holdings Ltd.
8/11