1
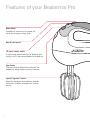
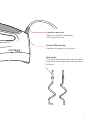
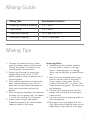
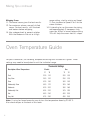
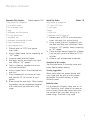
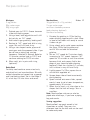
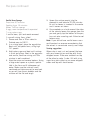
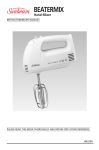
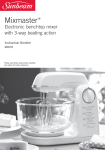
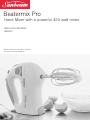
Beatermix Pro
Hand Mixer with a powerful 320 watt motor
Instruction Booklet
JM5900
Please read these instructions carefully
and retain for future reference.
Contents
Sunbeam’s Safety Precautions
Features of your Beatermix Pro
Using your Beatermix Pro
Mixing Guide
Mixing Tips
Oven Temperature Guide
Care and Cleaning
Recipes
Icing, Fillings, Frostings and Creams
1
2
4
5
5
6
7
8
14
Important instructions – retain for
future use.
Sunbeam’s Safety Precautions
SAFETY PRECAUTIONS FOR YOUR
SUNBEAM BEATERMIX PRO.
• Never eject beaters or dough hooks when the
appliance is in operation.
•
•
•
•
•
•
•
•
Sunbeam are very safety conscious when
designing and manufacturing consumer products,
but it is essential that the product user also
exercise care when using an electrical appliance.
Listed below are precautions which are essential
for the safe use of an electrical appliance:
Read carefully and save all the instructions
provided with an appliance.
Always turn the power off at the power outlet
before you insert or remove a plug. Remove
by grasping the plug - do not pull on the cord.
Turn the power off and remove the plug
when the appliance is not in use and
before cleaning.
Do not use your appliance with an extension
cord unless this cord has been checked
and tested by a qualified technician or
service person.
Always use your appliance from a power
outlet of the voltage (A.C. only) marked
on the appliance.
Close supervision is necessary when your
appliance is being used near children or
infirm persons.
Never leave an appliance unattended while
in use.
Young children should be supervised to ensure
that they do not play with the appliance.
• Ensure fingers are kept well away from moving
beaters and dough hooks.
• When mixing extremely heavy loads the
appliance should not be operated for more
than 1 minute. This does not apply to any of
the recipes detailed in this booklet.
• Do not use an appliance for any purpose
other than its intended use.
• Do not place an appliance on or near a hot gas
flame, electric element or on a heated oven.
Do not place on top of any other appliance.
• Do not let the power cord of an appliance hang
over the edge of a table or bench top or touch
any hot surface.
• For safety reasons and to avoid maintenance
by unskilled persons, some appliances are
‘sealed’ using tamperproof screws. Such
appliances should always be returned to the
nearest Sunbeam Appointed Service Centre
for adjustment or repair if required.
• Do not operate any electrical appliance with a
damaged cord or after the appliance has been
dropped or damaged in any manner. If damage
is suspected, return the appliance to the
nearest Sunbeam Appointed Service Centre
for examination, repair or adjustment.
• For additional protection, Sunbeam
recommend the use of a residual current
device (RCD) with a tripping current not
exceeding 30mA in the electrical circuit
supplying power to your appliances.
• Do not immerse the appliance in water
or any other liquid unless recommended.
If you have any concerns regarding the performance and use of your appliance,
please visit www.sunbeam.com.au or contact the Sunbeam Consumer Service Line.
Ensure the above safety precautions are understood.
1
Features of your Beatermix Pro
Boost button
Provides an extra burst of power for
those extra tough mixing tasks.
High & Low speeds
10 speed control switch
5 high-range speed settings for beating and
mixing, and 5 low range speeds for kneading.
Eject button
The eject button effortlessly releases the
beaters or dough hooks for easy cleaning.
Special ‘V-groove’ beaters
Specially designed steel beaters provide
maximum aeration and optimum mixing
results.
2
5 position swivel cord
Rotates to allow for comfortable
left or right hand use.
Powerful 320 watt motor
Handles the toughest mixing tasks.
Dough hooks
The strong steel dough hooks take the hard
work out of kneading dough and other heavy
mixtures.
3
Using your Beatermix Pro
Before using your Beatermix Pro
Before fitting the beaters or dough hooks, be
sure the power cord is unplugged from the
power outlet and the speed control switch is
in the ‘0’ OFF position.
1. Select the desired attachments,
depending on the mixing task to be
performed: beaters for mixing and
beating, or dough hooks for kneading.
Inserting the beaters
2a. Beaters can be inserted into either
socket, as the beaters are identical.
Inserting the dough hooks
2b. To insert the dough hooks, place the
dough hook with the small washer into
the left socket. Place the other dough
hook into the right socket.
Note: Ensure both beaters and dough
hooks are fully inserted into the correct
sockets or your mixing results may be
affected.
Using your Beatermix Pro
1. With the speed control switch in the ‘O’
OFF position, plug the power cord into a
230-240V AC power outlet.
2. Place the beaters or dough hooks into the
ingredients to be mixed and using the
speed control switch select the desired
mixing speed.
Select the Low range setting for kneading
dough and thicker mixtures, folding, or
when using the dough hooks. Select the
High range setting for mixing, beating,
and whipping.
4
Clearly marked instructions for correct mixing
speeds for each type of mixture are shown in
the mixing guide on page 5.
Tip: Always start mixing at slow speeds and
increase the speed gradually to prevent
ingredients splashing out of the mixing
bowl.
When adding dry ingredients use the
lowest speed to prevent the ‘snow storm’
effect.
3. Once you have finished mixing, turn the
speed switch to the ‘0’ OFF position and
unplug the cord from the from the power
outlet. Remove the beaters/dough hooks
from the mixture and press the eject
button firmly to release.
4. To remove the beaters/dough hooks, place
fingers loosely around the spindles and
press the eject button located at the front
of the head of the Beatermix Pro.
Note: Never eject the beaters or dough
hooks when the Beatermix Pro is in
operation.
Mixing Guide
Mixing Task
Recommended Speed(s)
Kneading, Folding & Blending
‘LO’ 1 and 2
Light Mixing
‘LO’ 3 and 4
Creaming & Beating
‘HI’ 2 and 3 or ‘LO’ 5
Whipping & Aerating
‘HI’ 4, 5 and Boost
Mixing Tips
1. For even and thorough mixing, slowly
guide the beaters around the sides and
through the centre of the bowl in the
same direction. Do not overmix.
2. Always stop the mixer by moving the
speed control switch to the ‘0’ OFF
position before raising the beaters out of
the mixing bowl.
3. When adding ingredients or scraping the
bowl, stop the mixer and rest it on it’s
base with the bowl below the beaters to
catch any mixture draining from the
beaters.
4. When folding dry ingredients into delicate
mixtures such as sponge cake, use Speed
1 on the ‘Low’ setting. Do not overmix.
5. Always start mixing at slow speeds.
Gradually increase to the recommended
speed as stated in the recipe.
Beating Egg Whites
6. Separate the yolk and white carefully
ensuring there is no yolk in the egg
white. If some egg yolk is in the egg
white, use the egg shell to scoop the yolk
out.
7. Best results are achieved when using a
glass or stainless steel mixing bowl. If
using a plastic mixing bowl, rub the
inside of the bowl with 1/2 a lemon. (This
helps remove any grease). Then wash and
dry thoroughly.
8. For best result always ensure that the
beaters and mixing bowl are thoroughly
clean and dry.
9. For maximum volume, beat egg whites at
room temperature.
10. Beat egg whites using Speed 5 on the
High range setting. Beating time can vary
depending on the freshness of the eggs.
5
Mixing Tips continued
range setting, start by mixing on Speed
2, than increase to Speed 4 or 5 as the
cream thickens.
14.If intending to use the cream for piping,
add approximately 2 teaspoons icing
sugar per 300ml of cream before mixing.
This will help the cream hold it’s shape.
Whipping Cream
11. Thickened cream gives the best results.
12. For maximum volume use well chilled
cream. For best results, chill the bowl
and beaters before whipping.
13. Use a deeper bowl to prevent splatter.
With the Beatermix Pro set to a High
Oven Temperature Guide
For your information, the following temperature settings are included as a guide. These
settings may need to be adjusted to suit the individual range.
Thermostat Settings
Description of Oven Temperatures
Electric
°F
°C
Gas
°F
°C
Cool
200 110
200 100
Very Slow
250 120
250 120
Slow
300 150
300 150
Moderately Slow
350 170
325 160
Moderate
400 200
350 180
Moderately Hot
425 220
375 190
Hot
450 230
400 200
Very Hot
475 250
450 230
Note: If using fan forced ovens be sure to turn the temperature down by 20-30°C.
Also check recipes at the back of this book.
6
Care and Cleaning
Before cleaning your Sunbeam Beatermix
Pro, ensure that the power is turned off at
the power outlet, then remove the plug.
Wipe over the outside area of the Beatermix
Pro with a dampened cloth and polish with a
soft dry cloth. Wipe any excess food particles
from the power cord.
Do not immerse the motor housing in water
or any other liquid. Do not harsh detergents
or abrasive cleaners to clean the motor
housing as these will scratch and damage the
surface.
Wash the beaters and dough hooks in warm
soapy water with a cloth or sponge. Rinse
and dry thoroughly. Do not use scouring
pads or abrasive cleaners. The beaters and
dough hooks can also be placed in a
dishwasher.
Note: Never wind the power cord around the
motor after use as the warmth of the motor
may cause damage to the power cord.
7
Recipes
Fluffy Pikelets
Makes approx 12
11/2 cups S.R. flour
pinch salt
1 teaspoon bicarbonate of soda
2 tablespoons sugar
1 egg
11/4 cups milk
4-5 drops vanilla extract
40g butter or margarine
1. Sift flour, salt and soda into a bowl. Add
sugar, egg and milk. Beat on “LO” speed
until mixed.
2. Increase to “HI” speeds and beat for 1-2
minutes until smooth.
3. Fold in melted butter. Place spoonfuls
onto a hot Sunbeam Frypan and cook
until bubbled, turn to brown.
Note: Suitable to freeze and reheat.
Serving suggestions:
Serve pikelets hot or cold.
Serve with whipped cream and jam for a
sweet treat.
For a savoury treat, top with vegemite &
butter or ham & cheese.
Add freshly chopped herbs to the batter and
serve cooked pikelets with cream cheese,
smoked salmon and caviar.
8
Sweet Crepes
11/2 cups plain flour
pinch salt
2 eggs
11/4 cups milk
1 tablespoon oil
1. Combine all ingredients together in a
bowl. Beat on “LO” speeds for 2 minutes
until smooth.
2. Allow to stand for 1 hour.
3. Grease heated Skillet or Frypan. Pour
about 1/3 cup of batter into the pan to
make each crepe.
4. Cook quickly until lightly brown. Toss and
brown other side. Sprinkle with lemon
juice and sugar. Roll and serve hot.
Serving suggestion:
After crepe is cooked spread with nutella and
roll up. Serve warm or serve cold (this one is
great with the kiddies and big kids alike!).
Recipes continued
Chocolate Chip Cookies
Makes approx 100
125g butter or margarine
3
/4 cup white sugar
2/3 cup brown sugar
2 eggs
1 teaspoon vanilla essence
21/4 cups plain flour
1 teaspoon salt
1 teaspoon bicarbonate of soda
2 cups chocolate chips
1 cup chopped nuts
1. Preheat oven to 170°C and grease
oven slides.
2. Using a bowl, break up the shortening on
“LO” speed.
3. Increase speed and add sugars.
4. Add eggs, vanilla and cream until light
and fluffy on “HI” speeds.
5. Fold in sifted dry ingredients and mix
until well combined.
6. Using a spoon fold in the chocolate bits
and nuts.
7. Place teaspoonfuls of mixture on trays
and bake for 12-15 minutes or until
golden.
8. Allow to cool on wire racks. When cooled,
the cookies can be sandwiched together
with nutella and sprinkled with icing
sugar.
Quick Cup Cakes
Makes 12
60g butter or margarine
11/4 cups S.R. flour
1
/2 cup sugar
2 eggs
1
/4 cup milk
1 teaspoon vanilla essence
1. Preheat oven to 220°C and place patty
cases into patty tins and set aside.
2. Using a bowl, place all ingredients into
the bowl and beat until combined. Start
mixing on “LO” speeds, slowly increasing
to “HI” speed.
3. Place rounded dessert spoonfuls of batter
into the patty cases and bake for 12-15
minutes.
4. Allow to cool and decorate as desired.
Variations to this recipe:
Top the cake batter in the patty cases with
frozen berries before baking.
Serving suggestion:
When patty cakes are cooked drizzle with
icing sugar and top with a small eatable
decoration like marshmallows, or make
Butterfly cakes.
Butterfly cakes
Cut the tops off the patty cakes and cut inhalf. Top with a small spoonful of cream or
thick custard. Place cake halves back into
the centre of the cup cakes facing up to
create wings. Dust with icing sugar.
9
Recipes continued
Meringues
2 egg whites
90g caster sugar
90g icing sugar
1. Preheat oven to 120°C. Grease two oven
slides with baking paper.
2. Using a bowl, beat egg whites until stiff
but not dry, on “HI” speed.
3. Add castor sugar gradually, beating well.
4. Reduce to “LO” speed and fold in icing
sugar. Mix until stiff and shiny.
5. Using a star shaped nozzle, pipe small
meringues onto the prepared slide. If you
do not have a piping bag use two
teaspoons. Decorate if desired. Bake for
10 minutes, reduce heat to 100°C and
continue cooking for 20-25 minutes.
6. When cold, join in pairs with icing
(optional).
Rocky Road
For rocky road combine some mixed nuts,
and dried fruit and marshmallows. Mix with
melted chocolate and spread into a greased
and lined baking sheet. Set in the fridge if
it’s a hot day. Cut into slices and serve.
Marshmallows
30g gelatine (3 x 10g sachets)
2 cups castor sugar
vanilla or strawberry essence
food colouring (optional)
Cornflour for coating
Makes 12
1. Dissolve the gelatine in 125ml boiling
water whisking together with a fork. Keep
in bowl of hot water until ready to use so
it does not gel.
2. Using a bowl and a metal spoon combine
the sugar, 250ml boiling water and
vanilla. Stir and add the dissolved
gelatine.
3. Mix on “LO” speed for 2 minutes slowly
increasing to “HI” speed. Leave on “HI”
speed for 10 minutes or until the mixture
becomes thick and creamy. Add a few
drops of your favourite food colouring
(optional). Beat for a further 5-7 minutes,
until mixture is very stiff and fluffy.
4. Lightly grease 2 x 22cm square tins or
similar with vegetable oil.
5. Scrape down sides of bowl occasionally
during beating.
6. Spoon mixture onto oven slides, spread
evenly. Leave to set at room temperature,
approximately 30 minutes.
7. When firm to touch, cut into cubes or fun
shapes that the kids will enjoy. Toss in
cornflour.
Note: Marshmallow mixture can also be
piped onto oiled trays, if you have a piping
bag and nozzle.
Serving suggestion:
Marshmallow’s are great served in hot
chocolates or coffee. They are a fun
afternoon treat for the kids and can be used
to make rocky road.
10
Recipes continued
Foundation Butter Cake
125g butter or margarine
4 drops vanilla extract
3
/4 cup castor sugar
2 eggs
2 cups S.R. flour
1 cup milk
1. Preheat oven to 180°C and grease a
20cm round cake tin or similar.
2. Using a bowl, break up shortening on
‘LO’ speed 1, add vanilla and sugar, and
cream on speed 3 until light and creamy.
Approximately 2 minutes.
3. Add eggs one at a time beating well
between each addition.
4. Reduce to speed 1 and mix in sifted flour
and liquid alternately. Be careful not to
use high speeds as flour will go
everywhere! Mix for 3-4 minutes until
cake batter is rich, smooth, thick and
creamy.
5. Scrape batter into prepared tin. Bake for
30-35 minutes until golden brown.
Variations to this recipe:
Lemon or Orange Cake
Add the rind of one lemon or orange into the
cake batter, and or with the addition of
butter and sugar and fold 2 tablespoons of
poppy seeds into the cake batter makes an
interesting and tasty cake.
Coffee Crumble
Mix in 2 tablespoons of instant coffee
powder into the cake batter. On top of the
cake batter sprinkle with a mixture of 1
tablespoon butter, 2 tablespoons plain flour,
2 tablespoons sugar, 1/2 teaspoon of
cinnamon and 2 tablespoons of instant
coffee.
Chocolate Cake
60g unsweetened chocolate - melted and
combine with milk from the recipe above and
mix well into the cake batter before baking.
Marble Cake
Divide batter into 3, leave one plain, add
pink food colour to second portion and 2
tablespoons of cocoa, 1/8 teaspoon
bicarbonate of soda and 1 tablespoon milk to
the remaining cake batter. Drop spoonfuls of
alternate colours into a 20cm ring tin, or
place each coloured cake mixture into 3
separate tins and bake. Then cut into 2cm
thick fingers and sandwich together with the
fluffy frosting (recipe in icing section, page
19). As sandwiching fingers together create a
3x3 finger cake, decorate with extra frosting.
Berry Cake
Add 2 cups of fresh, frozen or canned mixed
berries to the top of the cake batter in tins
before baking. Make sure that berries are
well drained if canned.
11
Recipes continued
Vanilla Bean Sponge
Prep time: 30 minutes
Cooking time: 15 minutes
Makes 1x20cm sponge
3 eggs, room temperature & separated
3
/4 cup caster sugar
1 vanilla bean, split and seeds removed
1 cup self raising flour, sifted
1. Grease and flour a 20cm cake tin.
Preheat oven to 180°C.
2. In a mixing bowl, place the egg whites.
Beat until soft peaks form, using high
‘HI’ speeds.
3. Add caster sugar and beat until mixture
is thick and glossy. Beat in the egg yolks
and vanilla, continue mixing until the
mixture is well combined.
4. Stop the mixer and remove beaters. Using
a large metal spoon or a plastic spatula
fold in the flour and 3 tablespoons of
water. Make sure the mixture is well
combined and take care not to over beat
as you will lose the air bubbles and the
mixture will be flat and tough.
12
5. Spoon the mixture evenly into the
greased tin and bake for 20-25 minutes
or until a skewer is inserted in the centre
and it comes out clean.
6. Once cooked run a knife around the sides
of the cake to loosen the sponge from the
pan and gently tap the bottom of the pan,
turn out onto a cooling rack. Allow to cool
before using.
Note: If you do not have vanilla beans use a
vanilla extract or essence remembering that
the extract is concentrate so only use a drop.
Serving suggestion:
When cake is cool, cut and spread the base
with your favourite jam and top with firmly
whipped cream. Place one sandwich on top
of the other to make 1 cake. Sift with icing
sugar for a plain effort or use more whipped
cream and top with fresh berries.
Recipes continued
Pavlova
4 egg whites
1 cup castor sugar
2 teaspoons vinegar
3 teaspoons cornflour
1
/2 teaspoon vanilla extract
1. Preheat oven to 120°C. Grease and flour
20cm round tray.
2. Using a clean, dry bowl whip the egg
whites until stiff on “HI” speeds.
3. Gradually add the sugar, a teaspoon at a
time to start. Beat well between each
addition. As mixture thickens add the
sugar more quickly. This should take
approximately 5-8 minutes mixing time.
4. Reduce speed to 1 and fold through
vinegar, cornflour and vanilla. Continue
mixing until mixture is stiff and glossy,
approximately 2-3 minutes.
5. Spread half pavlova onto a prepared tray.
Pipe the remaining mixture to form a
border.
6. Bake for 11/4 - 11/2 hours. If able, turn
oven off and allow to cool in oven
overnight or for a few hours.
Serving suggestion:
Decorate as desired. Fresh cream and lots of
fresh berries is my favourite. Sprinkled with
icing sugar to finish off.
13
Icing, Filling, Frostings and Creams
Fluffy Butter Frosting
1
/3 cup butter or margarine
4 cups pure icing sugar
pinch salt
3-4 tablespoons milk
11/2 teaspoon vanilla
1. Place all ingredients into a bowl and on
‘LO’ speed, mix until all ingredients are
well combined, creamy, light and fluffy in
texture.
Glaze Icing
3 tablespoons sugar
1
/4 cup water
1 teaspoon gelatine
1. Place all ingredients into a small
saucepan. Stir over medium heat until
sugar has dissolved, approximately 2
minutes.
2. Brush warm on top of baked sweet goods.
14
Royal Icing for Fruit Cakes
1 egg white
11/4 - 11/2 cups sifted pure icing sugar
1 teaspoon liquid glucose
2 teaspoons lemon juice
Extra icing sugar for kneading, approximately
1x500g box
1. Using a small bowl, beat the egg white on
‘HI” speeds.
2. Add icing sugar gradually on ‘LO’ speeds.
3. Mix glucose evenly through on ‘LO’
speeds.
4. Beat on medium speeds until smooth.
Add lemon juice.
5. Turn out icing onto a well dusted surface
of icing sugar, knead with icing sugar
until icing is firm, smooth, stiff and very
white.
Note: If icing is not being used immediately,
cover with a damp cloth or plastic wrap.
‘Sunbeam’ & ‘Beatermix Pro’ are registered
trademarks of Sunbeam Corporation.
Made in China. Designed in Australia.
Due to minor changes in design or otherwise,
the product may differ from the one shown
in this leaflet. Backed by Sunbeam‘s 12 Month
Replacement Guarantee and National Service Network.
© Copyright. SUNBEAM CORPORATION LIMITED 2003.
(INCORPORATED IN N.S.W.) A.C.N. 000 006 771
Sunbeam Corporation is a division of GUD Holdings Ltd.
For more information or advice on this or any other
Sunbeam appliance, visit www.sunbeam.com.au or
contact the Sunbeam Consumer Service Line.
Australia 1800 025 059
New Zealand (09) 912 0747.
Consumer Hotline
Australia
1800 025 059
New Zealand
(09) 912 0747
www.sunbeam.com.au
is a registered Trademark of Sunbeam
Corporation Limited. ACN 000 006 771.
© Sunbeam Corporation Limited 2003.