1
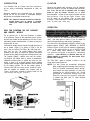
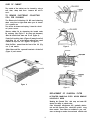
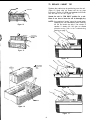
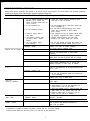
Y
w
MODEL 2571
OWNER’S
MANUAL
900 AIR CLEANER
AND IONIZER
OPERATING
INSTRUCTIONS
CAUTION:
READ AND
SAVE THESE
INSTRUCTIONS.
-
Any questions or comments?
Call I-800-526-2832
Mon.-Fri. 8 a.m. - 4 p.m. Centrai Time
INTRODUCTION
LOCATION
Your Sunbeam 900 Air Cleaner has been designed to
let you enjoy a refreshing experience in clean air
living.
Remove the plastic bag covering your air cleaner.
Select the location for your air cleaner with electrical
outlet nearby. Do not use an extension cord to supply
power to your air cleaner. Remember, the air cleaner
must be placed SO that air can freely circulate into the
front grill and out of the top grill. (Figure 1) Never place
your air cleaner on soft surfaces (such as beds, sofas
or carpet), near computers or next to sources of heat
(such as stove tops, ovens, etc.).
Airborne particles are removed from air passing
through the unit by the process of electrostatic precipitation and an activated charcoal filter.
NOTE: This owner’s manual should be read thoroughly before your air cleaner is operated.
Retain your owner’s manual for future reference.
OPERATION
HOW THE SUNBEAM 900 AIR CLEANER
AND IONIZER WORKS
The air around you is filled with thousands of particles
of air pollution. Some of the pollutants (dust, smoke
and lint) are visible to the naked eye, but most of the
pollutants (pollen and bacteria, to name a few) are
microscopic in size.
Polluted air enters the air cleaner through the front of
the air cleaner. (Figure 1) As shown in Figure 2, the fan
pulls in dirty air and the Pre-Filter (#l) traps large particles (hair, lint, etc.). The smaller particles (dust, smoke,
pollen) in the dirty air receive a positive electrical
charge as they pass through the ionizing section. (#2)
The positively charged
particles then enter the collecting section (#3) which uses a series of alternately
charged aluminum plates to attract and retain the particles. It works Ii ke a powerful magnet and the particles
remain there through natural adhesion until removed
by the washing process. The air then passes through a
charcoal filter (#4) that helps remove household odors.
Next, the negative ion generator (#5) freshens stale air.
Finally, electronically cleaned air passes back into the
room through the top grill. (Figure 1)
_“.
-.
“_-I-._
Plug the cord into any standard household electrical
outlet. (See data label on bottom of your air cleaner for
electrical specifications and power consumption.)
Turn the unit on by sliding the ON/OFF switch to the
desired speed. (DAILY USE, MEDIUM or SUPER
CLEAN, Figure 3) Until your air cleaner is adequately
broken in, the speed should be set on SUPER CLEAN
for 1 minute initially before switching to desired speed.
Your electronic air cleaner is designed for continuous
operation -- peak efficiency is obtained when the air
cleaner remains on constantly. For best results, Select
“DAILY USE” setting.
The “FAN ONLY” speed is provided to assist in the dry
cycle after cleaning the cell.
NOTE: You may notice an occasional, infrequent
Sharp snapping sound coming from your unit.
This is a normal occurrence called “arcing”
and results as large particles of dust are
collected in the ionizing-collecting cell. Should
prolonged or continuous arcing occur, the
Electronic Collecting Cell should be thoroughly cleaned and dried. (See “TO Clean Electronic
Collecting Cell”.)
Figure 1
k
Figure 2
Figure 3
CARE OF CABINET
The outside of the cabinet can be cleaned by using a
soft, clean, damp cloth. Never immerse the unit in
water.
TO REMOVE ELECTRONIC COLLECTING
CELL FOR CLEANING
The Electronic Collecting Cell Will need cleaning
about every four to eight weeks when your air cleaner
is in constant use.
Turn off the air cleaner and unplug it trom the electrical power source.
Figure 5
Remove cabinet lid by depressing tab located under
lid overhang. (See Figure 11 for exact tab placement)
Slide lid forward from base and lift off. (Figure 4)
Push Cell Locking Latch (Figure 5) away from Cell
while lifting Cell out of the cabinet using the two small
handles on top of the Cell. (Figure 5 & Figure 6)
Slide Pre-Filter upward from the front of the Cell (Figure 7) and remove.
Figure 8
Slide Charcoal Filter upward from back of the Cell
(Figure 6) and remove.
Figure 7
Figure 4
Figure 5
REPLACEMENT OF CHARCOAL FILTER
ACTIVATED CHARCOAL FILTER
HOUSEHOLD ODORS
HELPS REMOVE
Washing the Charcoal Filter with soap and water Will
destroy its ability to adsorb odor.
Odor adsorption effectiveness Will gradually deteriorate and the Charcoal Filter should be replaced every
three months. These filters are available in your retail
store or through a reorder form enclosed with this unit.
2
TO CLEAN ELECTRONIC COLLECTING CELL
NOTE: When handling the collecting cell, care should
be taken to avoid damaging wires and metal
plates. Do not wash Charcoal Filter. Do not
wash Electronic Collecting Cell in dishwasher.
Shake as much water out of the cell as possible.
Replace Cell in the unit as described below and operate unit in “FAN ONLY” position for a minimum of one
hour to insure cell is thoroughly dry.
Slide out Pre-Filter located on front of the Cell. Rinse
thoroughly with clean warm water. Set aside to dry.
TO CLEAN NEGATIVE
ION GENERATOR NEEDLE
Use dishwashing detergent and the hottest water
available to make a good soaking solution.
Make sure the air cleaner is turned off and unplugged
from the electric power source for approximately 1
minute before cleaning needle.
NOTE: If the Cell is extremely dirty, spray the cell with
a household cleaning agent such as 409, Fantastik or Lysol. Let the cell soak five (5) minutes
before proceeding to washing instructions.
The negative ion generator needle is located in the
right rear of the air cleaner (Figure 11) and should be
cleaned at least every 60 days.
Completely immerse the Cell and soak for 20 to 30
minutes.
.
After the Cell has soaked sufficiently, it should be
shaken vigorously in water until clean. (Figure 9)
Simply use cotton swab dipped in alcohol and wipe off
the dirt from the needle. Using a dry cotton swab, make
sure the needle is dry.
Thoroughly rinse both sides of the cell. If a sprayer is
available, spray with water. (Figure 10) Check to make
sure the cell plates are clean. Carefully wipe with a
Q-tip and alcohol along the ionizing wires.
Repeat the above last 3 paragraphs if necessary.
Figure 9
Figure 11
TO REPLACE ELECTRONIC
CELL AFTER CLEANING
COLLECTING
NOTE: Use directions on top of Cell for proper placement of the filters into the Cell and for replacing
the Cell into the unit. Unit will not operate
properly if the Cell is not replaced correctly.
Slide the Pre-Filter in the slots provided in the front of
the Cell. (Figure 12)
Slide the Charcoal Filter in the slots provided in the
back of the Cell. (Figure 13)
Figure 10
Using the cell handles (Figure 14), align the Cell with
the ribs (Figure 14) on the inside cabinet wall. Gently
slide Cell into place.
3
TO REPLACE CABINET TOP
s/
_
Replace the cabinet top by positioning over the unit.
(Figure 15) Gently slide top forward until the top drops
into place. (Figure 16) Slide top backward until flush
with the back of the unit. (Figure 17)
PRE-FILTER
Operate the unit in “FAN ONLY” position for a minimum of one hour to insure the cell is thoroughly dry.
NOTE: An occasional “arcing” sound is normal when
operating the unit immediately after cleaning
the Cell and should stop after a few minutes of
operation. If cleaning the Cell does not alleviate
excessive arcing, refer to the Troubleshooting
Section on page 5.
Figure 12
Figure 13
Figure 15
\\\\
/ ELECTRONIC
COLLECTING
Figure 16
CONTACTS
Figure 14
Figure 17
4
TROUBLESHOOTING CHECKLIST
Many times service problems that appear to be major can be solved easily. The chart below lists potential problems
and how to correct them. Remember, check the simple things first.
CONDITION
WHAT TO. CHECK
WHAT TO DO
Unit arcs, sparks or pops
Electronic Collecting Cell
1. Is Cell cleaned thoroughly? Heavy
deposits of tar & nicotine may
require a stronger cleaner such as
409 or Fantastik.
2. Is Cell completely dry?
3. Is Cell positioned properly?
Machine will not operate
6. Be sure wall contacts are slightly bent upward and
Cell is positioned against contacts. (Ref. Fig. 14)
Reposition needle towards back wall of unit by
pressing front center of needle backwards.
Plug power cord into electrical outlet.
Check for power to the electrical outlet. Plug a table
lamp into the electrical outlet to ensure power
availability.
Cabinet Top must be replaced properly to activate
safety switch. Unit will not operate with top removed.
Turn Slide Switch to desired speed.
If blower wheel will not rotate, return unit to Appliance
Service Station, Hattiesburg, MS, for service. See
Warranty Information on back cover for address.
Move unit to a different location away from TV or
radio. Do not operate unit on the same electrical outlet
as TV or radio.
Speed Selection Switch
Blower Wheel
Electrical
Outlet
Electronic Collecting Cell
1. Clean Cell if dirty.
2. Be sure Cell is positioned against wall contacts and
not in backwards.
Reposition needle towards back wall of unit by
pressing front center of needle back.
Operate unit in any position except “OFF” and
“FAN ONLY”.
1. Operate unit continuously, not occasionally.
2. Check location of unit. Be sure that intake and
exhaust areas of unit are not blocked.
1. Clean Cell; Operate unit for 1 week and clean Cell
again. Notice the “dirt” washed away from Cell.
2. Check for broken wires. If more than 1 wire is
broken, cell will need to be replaced.
Negative ton Generator Needle
Unit is not
removing pollutants
Speed Selection Switch
Unit
Electronic Collecting Cell
No longer notice
“fresh smell”
Machine still does not
operate properly
2. Dry Cell; Operate unit on “FAN ONLY” speed until
Cell is completely dry.
3. Be sure Cell is positioned properly, not in backwards, and is completely in place (making
good contact).
4. One complete wire may be removed without affecting operation. Straighten bent plates if possible.
5. Remove electrical contacts from Cell, clean
thoroughly and replace. Clean wall contacts.
4. Check for broken wires or
bent plates
5. Are electrical contacts clean
deposit
and free of mineral
buildup?
6. Are wall contacts slightly
bent upwards?
Negative Ion
Generator Needle
Power Cord
Electrical Outlet
Cabinet Top
Interference with radio
and TV
1. Clean Cell; consult cleaning instructions. Clean
wires with a Q-tip and alcohol.
Negative Ion
Generator Needle
Charcoal
After-Filter
Recheck the above points.
Clean Negative Ion Generator Needle per
cleanina instructions.
Replace Charcoal Filter.
Return unit to Appliance Service Station, Purvis,
MS, for service. See Warranty Information on
back cover for address.
NOTES:
1. Discoloration of aluminum collector cell plates is normal with use, even after cleaning.
2. Blowing smoke directly into the front grill is not a good test for unit performance.
5
TOP
TRONIC COLLECTING
FILTER
PRE-FILTER
02
REPLACEMENT PARTS
1
,
Key Number
Part Number
1
2
3
4
344950-001
342480-001
442415-001
6571
Description
Cabinet Top
Pre-Filter
Electronic Collecting’cell
Charcoal Filter (Set of 2)
To order Replacement Parts, write to Appliance Service Center, P.O. Box 70,6892
MS, 39475.
6
Purvis,
s
e”
MODEL 2571
900 AIR CLEANER
AND IONIZER
OWNER’S
MANUAL
LIMITED ONE YEAR WARRANTY STATEMENT
This product is warranted for one year from the date of purchase
against electrical and mechanical defects in material and workmanship. If the unit fails to operate during this period, return it, prepaid, to
Appliance Service Station, 117 Central Industrial Row,Purvis,Mississippi, 39475, for repair or replacement without charge at the manufacturer’s option. This warranty gives you specific legal rights, and
you may also have other rights which vary from state to state.
Warrantor: Sunbeam-Oster Household Products
Made in America
Pan NO. 61801 (144958-001)
@Sunbeam-Oster Household Products, Distributed
by Sunbeam-Oster Household Products, Schaumburg. IL 60173
Committed To Our Environment . . . Printed on Recycled Paper
(:)
Printed in USA