1
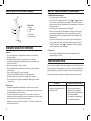
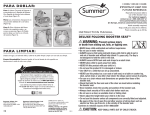
NOTES ON TEMPERATURE
Product
One Second Ear Thermometer
Battery Type
2xAAA 1.5V
Accuracy
.36°F(0.2°C)
Measuring Range
89.6°F-109.22°F(32°C-42.9°C)
Display Resolution
0.1°
Operating Ambient Temperature Range
41°F-104°F(5°C-40°C)
Relative Operating Humidity
15 to 95%RH
Storage Environment
-13°F-131°F(-25°C to 55°C)
Relative Storage Humidity
30 to 95%RH
The ear thermometer meets American Society for Testing and
Materials accuracy standards (ASTM) with requirements specified in
ASTM stands E 1965-98 ,as it pertains to infrared thermometers and
when used under normal operating conditions.
03170
Please read the following instructions
and warnings carefully.
Keep this instruction manual
for future reference.
Requires 2 AAA batteries (included).
For Technical Support
Call 1-800-268-6237
or E-Mail at
[email protected]
For use with children from birth and up.
INSTRUCTION MANUAL
ONE SECOND EAR THERMOMETER
Thank you for purchasing the One Second Ear Thermometer. Before
you start using your new Ear Thermometer, please read this operation
manual thoroughly for the correct methods of usage especially section
on Safety.
This manual should be kept on hand for easy future reference.
We at Summer Infant stand behind all of our products. If you are not
completely satisfied or have any questions, please contact our
Customer Service Department at 1-800-268-6237 or e-mail us at
[email protected].
WARNING:
• Use of this thermometer is not intended as a
substitute for consultation with your physician.
• The thermometer is not waterproof!
NEVER immerse into liquids.
6 Blackstone Valley Place, Suite 206
Lincoln, RI 02865 USA 1-800-268-6237
www.summerinfant.com
© 2005 Summer Infant, Inc.
Summer Infant Europe, LTD.
20 Sparrows Herne
Bushey, Hertfordshire
WD23 1FX UK 44 (0)20 8420 4429
Colors and styles may vary.
12
MADE IN CHINA
Summer Infant, Inc.
7/05
CAUTION:
THIS PRODUCT IS NOT A TOY. ADULT SUPERVISION IS
REQUIRED. STORE AWAY FROM CHILD’S REACH.
PRODUCT CARE AND STORAGE
CONTENTS
Safety
Notes on Temperature
Parts and Accessories Index
Features and Effectiveness
Preparation Before Use
Use of Your Product
Troubleshooting
Product Care and Storage
Specifications
Page
Page
Page
Page
Page
Page
Page
Page
Page
2
3
4
4
5
7
8
9
10
SAFETY
Safety Precautions During Use
• Do not drop, step on or subject the ear thermometer to any
shock or vibration.
• Do not submerge this product in water or any other liquid.
• Do not use excessive force to insert the probe into the ear. Use of
excessive force may injure the ear canal or the eardrum.
• Do not use a portable phone near the thermometer when you are
taking the temperature as it will cause the thermometer
to malfunction.
Caution
• Do not disassemble or repair or remodel the ear scan.
• Do not discard batteries into the fire.
When the Product Should Not be Used
• This thermometer is designed to take your body temperature
through the ear canal only. Do not use it for any other purpose.
• Do not use the product on people suffering from ear diseases.
• Do not use the product while the ear canal is wet (e.g. after a swim
or a bath).
• This product is not waterproof. Therefore, keep the product dry at
all times.
• Do not operate the device outside the specified ambient
temperature range 41°F-104°F(5°C to 40°C) and humidity range
(15-95%RH)
• Do not store the ear thermometer outside the specified ambient
temperature range -13°F-131°F(-25°C to 55°C) and humidity range
(15-95%RH).
2
1. General
• Clean off dirt in the main body with a clean, soft and dry cloth.
• Do not clean the main body with water nor a cleaner containing
abrasive agents, thinner or benzene.
• Before and after each use, clean the thermometer.
2. Batteries
• If the low battery indicator flashes during use, replace with new
batteries, refer to page 5 under preparation before use point 2 on
the procedure for replacement of new batteries.
• Remove the batteries if you will not be the product for a long
period of time.
3. Probe
• Clean the probes surface with a cotton swab slightly moistened
with alcohol and immediately dry it with a clean cotton swab. After
cleaning, allow at least 5 minutes to dry before using it again.
• Do not clean the probe with a paper towel or paper as it contains
glass fiber, which may damage the lens at the tip of the probe.
• After cleaning , dry the probe thoroughly before store it.
• To assure a high level of accuracy, it is very important to keep the
probe clean, dry and unchanged. Fingerprints, earwax. dust and
other soiling compounds reduces the transparency of the window
and results in lower temperature reading.
• Avoid touching the probe except when cleaning is required.
• As the probe is the most sensitive and delicate part of the
thermometer, it is extremely important to ensure that a probe cover
is always on the probe to protect it from dirt and damage.
4. Storage
• Do not store the ear thermometer under direct sunlight or in
places where temperature and humidity are very high or very
low, in dusty or wet places, or where the product be affected by
a vibrating shock.
BATTERY WARNING:
Keep battery out of child’s reach. Swallowing battery could
be fatal. Battery should not be charged or placed in extreme
heat as it may rupture. Used batteries should be disposed
of properly.
11
TROUBLESHOOTING (continued)
Conditions
•
sign is displayed
Possible cause and solution
• Low battery signal. Replace
with new battery.
• Measurement cannot be made • Tip of probe may be dirty or
damaged. Clean the probe.
or abnormal value is
• Excessive earwax in the ear
displayed.
canal. Clean the ear canals
with a cotton swab.
• Probe may be insterted
incorrectly. Insert the
probe correctly.
Follow inserting the probe into
the ear canal under “use of
your product” page 8.
If the problem still persists,
send to service center
for repair.
•
is displayed
• There may be a short circuit.
Please contact service center.
• The ambient temperature has
exceeded the specific range
of 41°F-104°F(5°C-40°C).
• Measurement will not start
after pressing the button.
• Measurement is made when
the “
“ is not displayed.
Measure again after the sign
is displayed.
• Measured result is “Hi” or “Lo”
• ”Hi” is displayed when the
body temperature is more
than 107.6°F(42°C).
• ”Lo” is displayed when the
body temperature is less
than 95°F(35°C).
10
NOTES ON TEMPERATURE
Why Measure in the Ear?
Clinical studies have shown that the ear is an excellent site for taking
body temperature because the temperature taken in the ear reflects
the body’s core temperature. Body temperature is regulated by the
hypothalamus, which shares the same blood supply as the tympanic
membrane. Changes in core body temperature are usually seen sooner
in the tympanic membrane than in other places, such as rectum, mouth
or under the arm.
Advantages of taking temperature in the ear versus traditional
sites:
• Axillary temperature readings only reflect skin temperature,
which may not indicate the internal body temperature.
• Rectal temperature often lag significantly behind internal
body temperature changes, especially at times of rapidly
changing temperatures.
• Oral temperature is often influenced by eating, drinking, breathing
through the mouth, or the inability of the person to close his/her
mouth completely.
Normal body temperature
Normal temperature refers to the body temperature of a healthy
person. It differs among individuals and is affected by environmental conditions such as time of day, atmospheric temperature, activity
before measurement, site of measurement e.g. ear, mouth, or armpit.
We recommend that you determine your normal body temperature by
measuring several times under the same conditions.
How Does the Ear Thermometer Work?
The Ear Thermometer measures the infra heat generated by the
eardrum and surrounding tissues. Clinical research has shown that
the ear is an ideal site for taking body temperature since the eardrum
shares blood vessels with the hypothalamus; the part of the brain
that controls body temperature. To help ensure accuracy, the
Ear Thermometer takes 6 measurements within one second and
displays the average temperature.
Measuring difference for ear themometer (for reference only)
According to the explanation of ASTM-E1965,
there might be some differences in reading
results if the measuring position is different.
The following drawing is taken from
ASTM-E1965 for your reference (Fig.1).
3
PARTS AND ACCESORIES INDEX
(1)
(2)
(3)
(4)
Main Body
1. Probe
2. Start Button
3. LCD
4. O/I Button
5. Battery Cover
(5)
FEATURES AND EFFECTIVENESS
Features
• The ear thermometer is simple and convenient to use with one
button operation.
• Loading of a probe cover is not required before taking a
measurement, making the thermometer more user-friendly and
more cost-effective.
• Measures temperature in one second.
• Unique and slim design, following the contour of human’s palm for
easy handling.
• Comes with a large LCD for easy reading.
• Operated by two AAA batteries for easy replacement.
• Auto-off function helps you to save energy in the batteries.
• The ear thermometer is light and compact, allowing you to take
it everywhere.
Effectiveness
• Compared to traditional thermometers, which require several
minutes to take the temperature, the ear thermometer takes only one
second to display the measurement.
• It is safer to take the temperature in the ear, as there is no risk of
infection caused by contact with mucous membrane in the oral cavity
or the rectum as in conventional measurement.
• Operating environment from 41°F-104°F(5°C-40°C) makes it easy for you
to take a measurement.
4
USE OF YOUR PRODUCT (continued)
3. Starting the measurement
• Press and release the O/I button.
” is displayed and a
• Ensure that the “ready to measure” sign “
beep sound is heard before measurement. If the START button is
pressed before the sign is displayed, the thermometer will not start
the measurement.
• It will beep once and measurement will begin.
• After one second, the ear thermometer will give out a beeping
sound to signal completion of measurement. Remove the ear
thermometer from the ear canal and check the reading on the
display panel.
• If you want to repeat the measurement, start measuring after it
beeps (about 10 seconds after the last measurement) and the
” is displayed. You can repeat the
“ready to measure” sign “
process again from step 3 onwards.
4. Power off
• Power will be automatically turned if the thermometer is left
unattended for 1 minute.
TROUBLESHOOTING
If you encounter problems with the operation of your Ear Thermometer,
please check the following points to see if they can be rectified. If the
problem still persists, please contact the service center for servicing.
Do not disassemble or attempt to repair the thermometer yourself.
Conditions
• Nothing is displayed after O/I
button pressed
Possible cause and solution
• Battery may be worn out.
• Replace with new battery.
• Battery may not be placed in
the correct polarities.
• Place batteries according to
the polarities indicated
9
USE OF YOUR PRODUCT (continued)
PREPARATION BEFORE USE
2. Inserting the probe into the ear canal
1. General
• Ensure that your ear is clean. If your ear is clogged with excessive
earwax measurement may be inaccurate.
• Sudden change of ambient temperature may influence the
measurement accuracy. For accurate measurement, try to store
the ear thermometer in the same room where you usually take
your temperature.
• For accurate measurement, take the temperature while you relax.
Your temperature may increase after exercise or a bath.
• The right ear reading may differ from the left ear. Therefore, always
take the temperature using the same ear.
• External factors may influence ear temperatures, including when an
individual has:
-been lying on one ear or the other
-had their ear covered
-been exposed to very hot or very cold temperatures
-has just finished swimming or bathing
-has been wearing hearing aids or ear plugs
Should any of the above mentioned situations occurs, wait for
20 minutes prior to taking the temperature.
Gently Pull Outer Ear.
Straighten Ear Canal
Less than 1 Year
1 Year and older
Fully Insert Thermometer Probe
Gently into Ear
For children aged 1 year or above and for adults:
• Pull the ear slightly backwards and insert the probe along the ear
canal in a straight direction.
• Insert the probe until the body of the probe fully seals the ear canal
and hold it there until measurement is completed.
For an infant less than 1 year old:
• Pull the ear diagonally behind to make the ear canal straight.
• Apply the tip of the probe straight against the ear canal. Hold in
this position until measurement is completed.
2. Inserting batteries
• Your Ear Thermometer requires two AAA batteries. To insert,
remove the battery cover by sliding it away from the probe as
shown in fig.3.
For measuring your own temperature:
•
8
Hold the main body of the thermometer and insert the probe along
your own ear canal. Push the probe naturally against the ear canal
and insert it further.
After confirming that the probe and the ear canal are in close
contact, start the measurement.
5
PREPARATION BEFORE USE (continued)
PREPARATION BEFORE USE (continued)
•
In the following situations, it is recommended that you take the
temperature three times in the same ear. If the temperature happens
to differ, use the highest reading. Be aware that slight variations
.36°F-.54°F (0.2-0.3°C) can occur if consecutive measurements are taken.
• Infants 3 months and below
• Children under 3 years who have a condition such as a
compromised immune system and for whom the presence
or absence of fever is critical.
• When you are first learning to use the ear thermometer until
you are comfortable with the technique and are obtaining
consistent readings.
Place the battery in the battery compartment, making sure that
it is positioned correctly according to the polarities indicated on the
thermometer.(Fig.4)
Caution
For individuals who have hair in their ears, please note that the
measured temperature may be lower than the actual temperature.
•
Replace the battery cover by sliding it into place.(Fig.5)
USE OF YOUR PRODUCT
1. Power on
• Press the’O/I’ button.
• The thermometer will show the following display
3. Correct Holding Posture
• Hold the main body as shown in fig.6 so that you can press the
button with your index finger.
6
•
The last memory reading will be displayed.
•
There will be a display for an automatic function test as
indicated below
•
After the completion of the automatic function test, a beep
sound will indicate the thermometer is ready for measuring
the temperature
Caution
If no further operation is activated, the display goes off automatically
1 minute after activation, or after measuring the temperature.
7
PREPARATION BEFORE USE (continued)
PREPARATION BEFORE USE (continued)
•
In the following situations, it is recommended that you take the
temperature three times in the same ear. If the temperature happens
to differ, use the highest reading. Be aware that slight variations
.36°F-.54°F (0.2-0.3°C) can occur if consecutive measurements are taken.
• Infants 3 months and below
• Children under 3 years who have a condition such as a
compromised immune system and for whom the presence
or absence of fever is critical.
• When you are first learning to use the ear thermometer until
you are comfortable with the technique and are obtaining
consistent readings.
Place the battery in the battery compartment, making sure that
it is positioned correctly according to the polarities indicated on the
thermometer.(Fig.4)
Caution
For individuals who have hair in their ears, please note that the
measured temperature may be lower than the actual temperature.
•
Replace the battery cover by sliding it into place.(Fig.5)
USE OF YOUR PRODUCT
1. Power on
• Press the’O/I’ button.
• The thermometer will show the following display
3. Correct Holding Posture
• Hold the main body as shown in fig.6 so that you can press the
button with your index finger.
6
•
The last memory reading will be displayed.
•
There will be a display for an automatic function test as
indicated below
•
After the completion of the automatic function test, a beep
sound will indicate the thermometer is ready for measuring
the temperature
Caution
If no further operation is activated, the display goes off automatically
1 minute after activation, or after measuring the temperature.
7
USE OF YOUR PRODUCT (continued)
PREPARATION BEFORE USE
2. Inserting the probe into the ear canal
1. General
• Ensure that your ear is clean. If your ear is clogged with excessive
earwax measurement may be inaccurate.
• Sudden change of ambient temperature may influence the
measurement accuracy. For accurate measurement, try to store
the ear thermometer in the same room where you usually take
your temperature.
• For accurate measurement, take the temperature while you relax.
Your temperature may increase after exercise or a bath.
• The right ear reading may differ from the left ear. Therefore, always
take the temperature using the same ear.
• External factors may influence ear temperatures, including when an
individual has:
-been lying on one ear or the other
-had their ear covered
-been exposed to very hot or very cold temperatures
-has just finished swimming or bathing
-has been wearing hearing aids or ear plugs
Should any of the above mentioned situations occurs, wait for
20 minutes prior to taking the temperature.
Gently Pull Outer Ear.
Straighten Ear Canal
Less than 1 Year
1 Year and older
Fully Insert Thermometer Probe
Gently into Ear
For children aged 1 year or above and for adults:
• Pull the ear slightly backwards and insert the probe along the ear
canal in a straight direction.
• Insert the probe until the body of the probe fully seals the ear canal
and hold it there until measurement is completed.
For an infant less than 1 year old:
• Pull the ear diagonally behind to make the ear canal straight.
• Apply the tip of the probe straight against the ear canal. Hold in
this position until measurement is completed.
2. Inserting batteries
• Your Ear Thermometer requires two AAA batteries. To insert,
remove the battery cover by sliding it away from the probe as
shown in fig.3.
For measuring your own temperature:
•
8
Hold the main body of the thermometer and insert the probe along
your own ear canal. Push the probe naturally against the ear canal
and insert it further.
After confirming that the probe and the ear canal are in close
contact, start the measurement.
5
PARTS AND ACCESORIES INDEX
(1)
(2)
(3)
(4)
Main Body
1. Probe
2. Start Button
3. LCD
4. O/I Button
5. Battery Cover
(5)
FEATURES AND EFFECTIVENESS
Features
• The ear thermometer is simple and convenient to use with one
button operation.
• Loading of a probe cover is not required before taking a
measurement, making the thermometer more user-friendly and
more cost-effective.
• Measures temperature in one second.
• Unique and slim design, following the contour of human’s palm for
easy handling.
• Comes with a large LCD for easy reading.
• Operated by two AAA batteries for easy replacement.
• Auto-off function helps you to save energy in the batteries.
• The ear thermometer is light and compact, allowing you to take
it everywhere.
Effectiveness
• Compared to traditional thermometers, which require several
minutes to take the temperature, the ear thermometer takes only one
second to display the measurement.
• It is safer to take the temperature in the ear, as there is no risk of
infection caused by contact with mucous membrane in the oral cavity
or the rectum as in conventional measurement.
• Operating environment from 41°F-104°F(5°C-40°C) makes it easy for you
to take a measurement.
4
USE OF YOUR PRODUCT (continued)
3. Starting the measurement
• Press and release the O/I button.
” is displayed and a
• Ensure that the “ready to measure” sign “
beep sound is heard before measurement. If the START button is
pressed before the sign is displayed, the thermometer will not start
the measurement.
• It will beep once and measurement will begin.
• After one second, the ear thermometer will give out a beeping
sound to signal completion of measurement. Remove the ear
thermometer from the ear canal and check the reading on the
display panel.
• If you want to repeat the measurement, start measuring after it
beeps (about 10 seconds after the last measurement) and the
” is displayed. You can repeat the
“ready to measure” sign “
process again from step 3 onwards.
4. Power off
• Power will be automatically turned if the thermometer is left
unattended for 1 minute.
TROUBLESHOOTING
If you encounter problems with the operation of your Ear Thermometer,
please check the following points to see if they can be rectified. If the
problem still persists, please contact the service center for servicing.
Do not disassemble or attempt to repair the thermometer yourself.
Conditions
• Nothing is displayed after O/I
button pressed
Possible cause and solution
• Battery may be worn out.
• Replace with new battery.
• Battery may not be placed in
the correct polarities.
• Place batteries according to
the polarities indicated
9
TROUBLESHOOTING (continued)
Conditions
•
sign is displayed
Possible cause and solution
• Low battery signal. Replace
with new battery.
• Measurement cannot be made • Tip of probe may be dirty or
damaged. Clean the probe.
or abnormal value is
• Excessive earwax in the ear
displayed.
canal. Clean the ear canals
with a cotton swab.
• Probe may be insterted
incorrectly. Insert the
probe correctly.
Follow inserting the probe into
the ear canal under “use of
your product” page 8.
If the problem still persists,
send to service center
for repair.
•
is displayed
• There may be a short circuit.
Please contact service center.
• The ambient temperature has
exceeded the specific range
of 41°F-104°F(5°C-40°C).
• Measurement will not start
after pressing the button.
• Measurement is made when
the “
“ is not displayed.
Measure again after the sign
is displayed.
• Measured result is “Hi” or “Lo”
• ”Hi” is displayed when the
body temperature is more
than 107.6°F(42°C).
• ”Lo” is displayed when the
body temperature is less
than 95°F(35°C).
10
NOTES ON TEMPERATURE
Why Measure in the Ear?
Clinical studies have shown that the ear is an excellent site for taking
body temperature because the temperature taken in the ear reflects
the body’s core temperature. Body temperature is regulated by the
hypothalamus, which shares the same blood supply as the tympanic
membrane. Changes in core body temperature are usually seen sooner
in the tympanic membrane than in other places, such as rectum, mouth
or under the arm.
Advantages of taking temperature in the ear versus traditional
sites:
• Axillary temperature readings only reflect skin temperature,
which may not indicate the internal body temperature.
• Rectal temperature often lag significantly behind internal
body temperature changes, especially at times of rapidly
changing temperatures.
• Oral temperature is often influenced by eating, drinking, breathing
through the mouth, or the inability of the person to close his/her
mouth completely.
Normal body temperature
Normal temperature refers to the body temperature of a healthy
person. It differs among individuals and is affected by environmental conditions such as time of day, atmospheric temperature, activity
before measurement, site of measurement e.g. ear, mouth, or armpit.
We recommend that you determine your normal body temperature by
measuring several times under the same conditions.
How Does the Ear Thermometer Work?
The Ear Thermometer measures the infra heat generated by the
eardrum and surrounding tissues. Clinical research has shown that
the ear is an ideal site for taking body temperature since the eardrum
shares blood vessels with the hypothalamus; the part of the brain
that controls body temperature. To help ensure accuracy, the
Ear Thermometer takes 6 measurements within one second and
displays the average temperature.
Measuring difference for ear themometer (for reference only)
According to the explanation of ASTM-E1965,
there might be some differences in reading
results if the measuring position is different.
The following drawing is taken from
ASTM-E1965 for your reference (Fig.1).
3
PRODUCT CARE AND STORAGE
CONTENTS
Safety
Notes on Temperature
Parts and Accessories Index
Features and Effectiveness
Preparation Before Use
Use of Your Product
Troubleshooting
Product Care and Storage
Specifications
Page
Page
Page
Page
Page
Page
Page
Page
Page
2
3
4
4
5
7
8
9
10
SAFETY
Safety Precautions During Use
• Do not drop, step on or subject the ear thermometer to any
shock or vibration.
• Do not submerge this product in water or any other liquid.
• Do not use excessive force to insert the probe into the ear. Use of
excessive force may injure the ear canal or the eardrum.
• Do not use a portable phone near the thermometer when you are
taking the temperature as it will cause the thermometer
to malfunction.
Caution
• Do not disassemble or repair or remodel the ear scan.
• Do not discard batteries into the fire.
When the Product Should Not be Used
• This thermometer is designed to take your body temperature
through the ear canal only. Do not use it for any other purpose.
• Do not use the product on people suffering from ear diseases.
• Do not use the product while the ear canal is wet (e.g. after a swim
or a bath).
• This product is not waterproof. Therefore, keep the product dry at
all times.
• Do not operate the device outside the specified ambient
temperature range 41°F-104°F(5°C to 40°C) and humidity range
(15-95%RH)
• Do not store the ear thermometer outside the specified ambient
temperature range -13°F-131°F(-25°C to 55°C) and humidity range
(15-95%RH).
2
1. General
• Clean off dirt in the main body with a clean, soft and dry cloth.
• Do not clean the main body with water nor a cleaner containing
abrasive agents, thinner or benzene.
• Before and after each use, clean the thermometer.
2. Batteries
• If the low battery indicator flashes during use, replace with new
batteries, refer to page 5 under preparation before use point 2 on
the procedure for replacement of new batteries.
• Remove the batteries if you will not be the product for a long
period of time.
3. Probe
• Clean the probes surface with a cotton swab slightly moistened
with alcohol and immediately dry it with a clean cotton swab. After
cleaning, allow at least 5 minutes to dry before using it again.
• Do not clean the probe with a paper towel or paper as it contains
glass fiber, which may damage the lens at the tip of the probe.
• After cleaning , dry the probe thoroughly before store it.
• To assure a high level of accuracy, it is very important to keep the
probe clean, dry and unchanged. Fingerprints, earwax. dust and
other soiling compounds reduces the transparency of the window
and results in lower temperature reading.
• Avoid touching the probe except when cleaning is required.
• As the probe is the most sensitive and delicate part of the
thermometer, it is extremely important to ensure that a probe cover
is always on the probe to protect it from dirt and damage.
4. Storage
• Do not store the ear thermometer under direct sunlight or in
places where temperature and humidity are very high or very
low, in dusty or wet places, or where the product be affected by
a vibrating shock.
BATTERY WARNING:
Keep battery out of child’s reach. Swallowing battery could
be fatal. Battery should not be charged or placed in extreme
heat as it may rupture. Used batteries should be disposed
of properly.
11
NOTES ON TEMPERATURE
Product
One Second Ear Thermometer
Battery Type
2xAAA 1.5V
Accuracy
.36°F(0.2°C)
Measuring Range
89.6°F-109.22°F(32°C-42.9°C)
Display Resolution
0.1°
Operating Ambient Temperature Range
41°F-104°F(5°C-40°C)
Relative Operating Humidity
15 to 95%RH
Storage Environment
-13°F-131°F(-25°C to 55°C)
Relative Storage Humidity
30 to 95%RH
The ear thermometer meets American Society for Testing and
Materials accuracy standards (ASTM) with requirements specified in
ASTM stands E 1965-98 ,as it pertains to infrared thermometers and
when used under normal operating conditions.
03170
Please read the following instructions
and warnings carefully.
Keep this instruction manual
for future reference.
Requires 2 AAA batteries (included).
For Technical Support
Call 1-800-268-6237
or E-Mail at
[email protected]
For use with children from birth and up.
INSTRUCTION MANUAL
ONE SECOND EAR THERMOMETER
Thank you for purchasing the One Second Ear Thermometer. Before
you start using your new Ear Thermometer, please read this operation
manual thoroughly for the correct methods of usage especially section
on Safety.
This manual should be kept on hand for easy future reference.
We at Summer Infant stand behind all of our products. If you are not
completely satisfied or have any questions, please contact our
Customer Service Department at 1-800-268-6237 or e-mail us at
[email protected].
WARNING:
• Use of this thermometer is not intended as a
substitute for consultation with your physician.
• The thermometer is not waterproof!
NEVER immerse into liquids.
6 Blackstone Valley Place, Suite 206
Lincoln, RI 02865 USA 1-800-268-6237
www.summerinfant.com
© 2005 Summer Infant, Inc.
Summer Infant Europe, LTD.
20 Sparrows Herne
Bushey, Hertfordshire
WD23 1FX UK 44 (0)20 8420 4429
Colors and styles may vary.
12
MADE IN CHINA
Summer Infant, Inc.
7/05
CAUTION:
THIS PRODUCT IS NOT A TOY. ADULT SUPERVISION IS
REQUIRED. STORE AWAY FROM CHILD’S REACH.