1
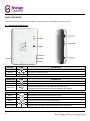
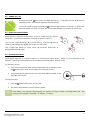
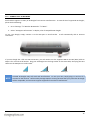
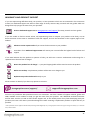
CAUTION RISK OF ELECTRIC SHOCK DO NOT OPEN TO REDUCE THE RISK OF ELECTRIC SHOCK, DO NOT REMOVE THE COVER. NO USER SERVICABLE PARTS INSIDE. REFER SERVICING TO QUALIFIED PERSONNEL. The lightning flash with arrowhead symbol, within an equilateral triangle, is intended to alert the user to the presence of noninsulated “dangerous voltage” within the product’s enclosure that may be of sufficient magnitude to constitute a risk of electric shock. The exclamation point within an equilateral triangle is intended to alert the user to the presence of important operating and maintenance (servicing) instructions in the literature accompanying the appliance. 2 WARNING: TO PREVENT FIRE OR SHOCK HAZARD, DO NOT EXPOSE THIS UNIT TO RAIN OR MOISTURE CAUTION: TO PREVENT ELECTRIC SHOCK, ENSURE THE PLUG IS FULLY INSERTED INTO A MAINS SOCKET IMPORTANT SAFEGUARD All lead-free products offered by the company comply with the requirements of the European law of the Restriction of Hazardous Substances (RoHS) directive, which means our manufacturing processes and products are strictly “lead-free” and without the hazardous substances cited in the directive. The crossed-out wheeled bin mark symbolizes that within the European Union the product must be collected separately at the product’s end-of-life. This applies to your product and any peripherals marked with this symbol. Do not dispose of these products as unsorted municipal waste. Contact your local dealer for procedures for recycling this equipment. DISCLAIMER We reserve the right to revise or remove any content in this manual at any time. We do not warrant or assume any legal liability or responsibility for the accuracy, completeness, or usefulness of this manual. The content of this manual is subject to change without notice. Screenshots are for illustration purposes only and may not be representative of the actual product. RECOMMENDATIONS AVOID DUSTY LOCATIONS: DO NOT EXPOSE TO MOISTURE: DO NOT DROP: DO NOT OPEN CHASSIS: Excessive build-up of dust may cause the unit to fail. Exposing the unit to water poses high risk of electric shock. Doing so could damage internal components. No user-serviceable parts inside. TRADEMARK ACKNOWLEDGEMENTS AndroidTM is a trademark of Google. Microsoft & Windows are registered trademarks of Microsoft Corporation. All applications copyright © their respective owners. WARRANTY AND TECHNICAL SUPPORT To help you make the most of this product you’ll find a host of information including full product manuals, FAQ, troubleshooting guides and a support service if you have specific questions, available at our support website: www.storageoptions.com/support. This product is also backed by a 12 month warranty in the unlikely event of something going wrong. More information and warranty registration is available at www.storageoptions.com/warranty. storageoptions.com/support/ [email protected] 3 TABLE OF CONTENTS QUICK START GUIDE 6 OVERVIEW 6 CONVENTIONS USED IN THIS MANUAL 7 PURPOSE OF THIS MANUAL 7 PACKAGE CONTENTS 7 BASIC OPERATION 6.1 – Buttons & Connections 6.2 – Power On / Off 6.3 – Using The Touch Screen 6.4 – Unlock The Screen 6.5 – Camera Shortcut 8 8 9 9 9 9 CHARGE THE BATTERY 10 HOME SCREEN 11 DISPLAY ORIENTATION 12 SETTINGS MENU 13 NETWORK CONNECTIVITY 11.1 – Connect To A Wireless Access Point 11.2 – Connect To A 3G Network 14 14 15 APPLICATIONS 12.1 – The Applications Menu 12.2 – Applications & Widgets 12.3 – Pre-Installed Applications 12.4 – Pre-Installed Widgets 12.5 – Pre-Loaded Applications 12.6 – SlideMe Marketplace 12.7 – Add More Applications 12.8 – Add A Shortcut To The Desktop 12.9 – Remove A Shortcut From The Desktop 12.10 – Uninstall Applications 16 16 17 17 17 18 18 18 19 19 19 4 TABLE OF CONTENTS (CONTINUED) WEB BROWSER 20 VIDEO PLAYBACK 21 7DIGITAL MUSIC SERVICE 22 WILD TANGENT GAMES SERVICE 23 DEFENX ANTI-VIRUS 24 SOCIAL NETWORKING 18.1 – Facebook 18.2 – Twitter 25 25 25 BUILT-IN CAMERA 26 MEMORY EXPANSION WITH MICRO SD CARD 27 CONNECT TO A COMPUTER 28 SYSTEM RESET 29 PRODUCT SPECIFICATION 30 WARRANTY AND PRODUCT SUPPORT 31 5 QUICK START GUIDE Please follow this quick start checklist to guide you through using your Storage Options Scroll Pocket: 1. Check the package contents. See section “Package Contents” (page 7) for more details. 2. Charge the battery. See section “Charge The Battery” (page 10) for more details. 3. Remove the protective film. Peel the protective film off the tablet’s screen. 4. Familiarise yourself with the physical buttons and connections, powering on, and touch screen control. See section “Basic Operation” (page 8) for more details. 5. Connect to a wireless network for web browsing. See section “Network Connectivity” (page 14) for more details. 6. Familiarise yourself with the included applications. See section “Applications” (page 16) for more details. OVERVIEW Scroll Pocket is a capacitive, touch screen mini tablet PC designed for use both at home and on the move. Running the intuitive Android 4.0 (Ice Cream Sandwich) operating system the Pocket is a tablet well equipped for internet browsing, social networking, games, videos and much more! Compact and stylish, the Scroll Pocket is the ideal travel companion. Light enough to put in a pocket or bag, the Scroll will keep you amused and connected wherever you travel. Fast and responsive with all the power of a larger tablet device, you’re sure to come to love using the Scroll Pocket. Use the built in multimedia centre to play the latest video and music content, enjoy a wide range of games wherever you are and stay connected with social networking applications. Scroll Pocket is a Complete Tablet, In Your Pocket. 6 Mini Android 4.0 tablet PC, fits easily in your pocket Full colour, capacitive touch screen Great for games, music, videos, web, eBooks and more Quick and simple to use 4GB of storage on board Micro SD card slot to add up to 32GB CONVENTIONS USED IN THIS MANUAL At various points in this manual you will see highlighted text. Please refer here for an explanation: NOTE TIP Important notes are highlighted in blue. Tips on best practice are highlighted in green. CAUTION Important cautions and warnings are highlighted in red. PURPOSE OF THIS MANUAL This manual is intended to give you a quick overview of the Scroll Pocket hardware and very basic functionality of the AndroidTM 4.0 operating system. It does not feature in-depth instructions for AndroidTM 4.0. The applications are provided “as-is” as a bonus for Storage Options customers. Please contact application developers directly for help and information on their software. For more detailed information and instructions on the AndroidTM 4.0 operating system, please visit: http://www.android.com/ Google is also an excellent resource for help with the AndroidTM operating system. http://www.google.co.uk/ PACKAGE CONTENTS Check the package contents against this checklist. If anything is missing or damaged, please do not use the system, and inform your supplier as soon as possible. Scroll Pocket Mains adapter USB cable On-The-Go (OTG) cable Earphones Instruction manual 7 BASIC OPERATION The Scroll Pocket has very few physical buttons. Most control is performed via the touch screen. 6.1 – BUTTONS & CONNECTIONS BUTTON ICON Power Hold to turn the tablet on or off Volume Decreases / increases volume Reset RESET CONNECTION ICON Earphones Micro SDHC ON-SCREEN Reverts all settings to factory defaults DESCRIPTION Connect earphones to this standard 3.5mm jack socket Insert a Micro SD card (up to 32GB) Connect peripheral devices (e.g. keyboard, USB flash drive) Recharge Scroll Pocket’s battery using the supplied mains adapter Mini USB ICON DESCRIPTION Return Moves back one step to the previous menu / page Home Returns immediately to the Android desktop Menu Displays a menu of recently opened applications Volume Context Menu 8 DESCRIPTION Decreases / increases volume Displays a menu of options (differs depending on the application) 6.2 – POWER ON / OFF Press and hold the button until the tablet switches on. It will boot into the AndroidTM 4.0 operating system. This will take approximately one minute. To turn the tablet off, press and hold the button for approximately 3 seconds. A “Power Off” menu will appear on screen. Choose “OK” to complete shutdown or “Cancel” to resume use. 6.3 – USING THE TOUCH SCREEN Scroll features a capacitive touch screen. To use it, simply touch any area on the screen – no pressure is required. Touch (A) an option to select it. You can also “touch and drag” (B) to move items or scroll through lists by touching and holding, then gliding your finger over the screen. Use a finger and thumb to “pinch zoom” (C) on-screen items such as photographs and web pages. 6.4 – UNLOCK THE SCREEN Scroll Pocket operates in a similar manner to a touch-screen mobile phone. When it is first powered on, the AndroidTM operating system will boot, then you will be presented with a “locked” screen. To unlock the screen: 1. If the screen is currently blank (Scroll is powered on but in standby), press the button (short press, do not hold). The screen will turn on. 2. Touch and drag the padlock icon over to the open padlock symbol on the right side of the screen. To lock the screen: 1. Press the button (short press, do not hold). 2. The screen will go blank to conserve battery power. TIP If the tablet is not used for approximately one minute, it will go to sleep to prolong battery life. This setting can be changed in “Settings” “Display” “Sleep”. 9 CHARGE THE BATTERY It is recommended to fully charge Scroll Pocket overnight before first use. This will help prolong the useful life of the built-in battery. To charge the battery: Insert the mains charger plug into the USB socket on Scroll Pocket. Connect the mains adapter to a UK 3-pin electrical socket. CAUTION Do not use any mains adapter other than the one supplied. Using an incompatible adapter could damage the tablet and poses the potential risk of fire. If Scroll Pocket is powered off, it will charge until the battery is full. If Scroll Pocket is powered on, the battery charge status will be indicated on screen by the battery meter: Battery is full 10 Battery is discharging Battery is charging HOME SCREEN The Home screen will look similar to the picture below. It is actually five screens, each of which can have a different layout of icons. To switch between screens, simply slide your finger left or right across the display. The status bar and navigation buttons are always visible, no matter which Home screen you are currently viewing. The Desktop can contain shortcuts to your most-used applications and widgets. Touch the Search icon to quickly search the World Wide Web using Google. The The status bar displays system information, such as current time, wireless connectivity and battery level. Touch to expand the status bar for more detailed information. The button moves back one step to the previous menu / page. The button returns immediately to the Android desktop. The button displays a menu of recently opened applications. The The button displays a menu of options (differs depending on the application). icon will launch the Applications menu. and buttons decrease and increase volume. 11 DISPLAY ORIENTATION Scroll Pocket features a built-in G-Sensor, which monitors the tablet’s current orientation and automatically adjusts the display to match. To re-orientate the display: NOTE Simply turn Scroll Pocket to portrait or landscape position, and the display will rotate to match. Some applications will lock screen orientation. Normal rotation functionality will resume once the application is closed. Automatic screen rotation can be switched off, which is useful if you would prefer to use Scroll Pocket exclusively in landscape mode. To switch off automatic rotation: 1. From the Home Screen, touch the icon (located at the top right) to open the Applications menu. 2. Touch the “Settings” icon. 3. Select “Display”. 4. Touch “Auto-rotate screen” to remove the tick from the checkbox. Scroll Pocket will be locked into landscape mode. To switch automatic rotation back on, repeat the above steps and ensure there is a tick in the checkbox in step 4. 12 SETTINGS MENU The Settings menu allows you to adjust Scroll Pocket’s system configuration. To change settings: 1. Touch the “Settings” menu icon on the Applications menu. The Settings menu will open. 2. Glide your finger up or down the left side of the screen to scroll through the list of available categories. 3. Touch a category title to view further options on the right side of the screen. ITEM ICON DESCRIPTION Wi-Fi Connect to / disconnect from wireless networks, view connection status, etc Data usage Enable / disable mobile data, view current usage, set mobile data limit, etc Sound Change volume, touch sounds, screen lock sounds, etc Display Change brightness, wallpaper, sleep settings, font size, etc Storage Manage NAND and Micro SD card, view available capacity, etc Battery See battery status and powered-on time Apps Manage applications, running services, etc Accounts & sync Switch synchronisation on / off, manage accounts, etc Location services Change approximate location detection, improve search results Security Change screen lock type, encryption, passwords, credential storage, etc Language & input Select language, add to the dictionary, edit on-screen keyboard settings, etc Backup & reset Backup & restore data, perform factory reset, etc Date & time Set date, time zone, time, clock format, etc Accessibility Set up large text, auto-rotate screen, speak passwords, etc Developer options Advanced functions for Android developers – debugging, HDCP check, etc About tablet Information about your AndroidTM device Some options will have a simple checkbox, while others will have a list of further settings to choose from. You should take time to become familiar with the options in these categories. For more detailed information, please visit http://www.android.com/. 13 NETWORK CONNECTIVITY The vast majority of applications support some kind of networking / Internet functionality. There are two ways to connect to the Internet using Scroll Pocket; either through your wireless router (access point) or by plugging in a 3G network dongle. 11.1 – CONNECT TO A WIRELESS ACCESS POINT Scroll Pocket features standard wireless B / G / N capabilities, meaning it can connect to any router which is compatible with the 802.11b/g/n standard. Check your router’s documentation to confirm compatibility. NOTE You will need your router’s wireless SSID and password to continue with these instructions. To enable wireless networking and connect to your router: 1. Go to “Settings” “Wireless & Networks” “Wi-Fi” and slide the Wi-Fi switch to the right to enable it. 2. After a few seconds, Wi-Fi will be enabled. Touch “Wi-Fi” and a list of available wireless network names (SSID) will appear. Locate your wireless network on the list and touch to select it. 3. You will be asked for the password. Type it in using the keyboard which automatically appears on screen. TIP If you do not know your wireless password, please refer to your router’s instruction manual, or contact your Internet Service Provider (ISP). 4. Touch the “Connect” option to complete setup of your wireless connection. NOTE Advanced users can touch “Show advanced options” to set up a proxy and / or manual IP configuration. An icon will be displayed in the status bar to show wireless connection status: Full signal Moderate signal Weak signal Once you are connected to a wireless network, you can select it on the list, to view connection details (e.g. signal strength, link speed and IP address). You can use the “Forget” option to disconnect from the network and remove the stored password. 14 11.2 – CONNECT TO A 3G NETWORK Scroll Pocket supports a variety of 3G dongles from various manufacturers. To view the list of supported 3G dongles, please do the following: 1. Go to “Settings” “Wireless & Networks” “More”. 2. Select “3G Support Information” to display a list of compatible 3G dongles. To use a 3G dongle, simply connect it to the USB port on Scroll Pocket. It will automatically dial its Internet connection. If your 3G dongle has a full-size USB connection, you will need to use the supplied USB On-The-Go (OTG) cable to adapt it for use with Scroll Pocket. Plug your 3G dongle into the large socket on the OTG cable, then plug the OTG cable into the USB port on Scroll Pocket. Full signal NOTE Moderate signal Weak signal Unlisted 3G dongles may still work with Scroll Pocket. To test your own, simply plug it in and see if it connects to the Internet. Unfortunately Storage Options cannot guarantee that your particular 3G dongle will be compatible, and we cannot support equipment from other manufacturers. 15 APPLICATIONS Scroll Pocket supports a wide variety of applications. A small selection is pre-installed on the tablet and available from the applications menu, but many more can be downloaded from various websites. 12.1 – THE APPLICATIONS MENU To open the Applications menu, touch the 16 icon at the top right of the Home screen. Use the selection menu to choose between viewing installed applications and widgets. If you have more applications than can fit onto one page, slide your finger to the right across the screen to change to the next page. The status bar displays system information, such as system time, wireless connectivity and battery level. Touch it to expand and display more detailed information. The button moves back one step to the previous menu / page. The button returns immediately to the Android desktop. The button displays a menu of recently opened applications. The The button displays a menu of options (differs depending on the application). and buttons decrease and increase volume. 12.2 – APPLICATIONS & WIDGETS Applications: Applications provide expanded functionality to Scroll Pocket. A selection of applications is pre-loaded onto your Scroll Pocket tablet, and more can be downloaded from various websites. Applications usually take over the full screen when in use. The status bar will remain visible so you can still use the and buttons. Widgets: Widgets give enhanced functionality to Scroll Pocket’s desktop by providing live updates such as news headlines, e-mail notifications, current time, and more. Some widgets are preinstalled, and others are installed along with their application counterparts. 12.3 – PRE-INSTALLED APPLICATIONS These applications are pre-installed on Scroll Pocket: Adobe Flash® Browser Downloads Music Calculator Email Scroll Apps Calendar Camera File Manager Scroll Help Gallery Search To access and launch the pre-installed applications, touch the Applications menu. Clock Hi-Q MP3 Recorder Settings YouTube icon on the Home screen to display the 12.4 – PRE-INSTALLED WIDGETS These widgets are pre-installed on Scroll Pocket: Analog clock: Bookmark: Bookmarks: Calendar: Email: Displays a real time graphical analogue clock on the desktop Displays a single web page bookmark on the desktop Displays multiple web page bookmarks on the desktop in a group Displays upcoming appointments in your calendar Shows real time updates to your e-mail inbox Please see http://www.android.com for more information about widgets. 17 12.5 – PRE-LOADED APPLICATIONS Scroll Pocket has several applications which are pre-loaded onto the internal memory. You will need to install them before you can use them. To install the preloaded applications: 1. From the applications menu, touch the “Scroll Apps” preloaded apps will appear on screen. icon. “Easy Installer” will load and a list of 2. Touch to place a tick in the check box next to each application you wish to install. 3. Touch the “Install selected apps” button at the bottom of the screen, then follow the onscreen instructions. These applications are pre-loaded on Scroll Pocket: 7digital Adobe Reader® Facebook Aldiko Quick System Info Pro Amazon KindleTM SlideMe Marketplace BBC News TuneIn Radio Defenx Anti-Virus Twitter Evernote WildTangent 12.6 – SLIDEME MARKETPLACE SlideMe Marketplace is pre-loaded onto Scroll Pocket. Once you have installed it using the method described above, you can launch the marketplace and browse available applications. For support and further information on SlideMe Marketplace, please visit http://slideme.org. NOTE Scroll Pocket does not support the official AndroidTM Market. 12.7 – ADD MORE APPLICATIONS There are thousands of applications available for AndroidTM from various websites. It is possible to download application (.apk) files on a computer, then transfer them to Scroll Pocket using the supplied USB cable. See section “Connect To A Computer” (page 28) for more details. Here are some recommended websites: 18 Opera Mobile Store Handango Freeware Lovers http://mobilestore.opera.com http://www.handango.com http://www.freewarelovers.com 12.8 – ADD A SHORTCUT TO THE DESKTOP You can add shortcuts onto the desktop for quick access to your favourite applications. Shortcuts can be placed anywhere on the desktop grid, so you can organise them in whichever manner you like. To place a shortcut on the desktop: 1. Open the Applications menu by touching the icon at the top right of the Home screen. 2. Touch and hold your favourite application’s icon. 3. The Applications menu will close and you will be returned to the desktop on the Home screen. A faint blue grid will appear which shows you where you can place the shortcut. 4. Drag the shortcut anywhere on the grid, then release it to place it in that position. TIP To place a widget on the desktop, you can follow the procedure above, but switch to Widgets on the selection menu after step 1. 12.9 – REMOVE A SHORTCUT FROM THE DESKTOP If you would like to remove an application shortcut from the desktop, you can do so. To remove a shortcut: 1. Touch and hold the shortcut icon you would like to remove. A message stating “X” will appear at the top of the screen. 2. Drag the icon over this message. Once it turns red, release the icon and the shortcut will be removed. TIP You can also use this method to remove widgets from the desktop. 12.10 – UNINSTALL APPLICATIONS To uninstall an application (i.e. completely remove it from your tablet), follow this procedure: 1. Open the Applications menu and touch the “Settings” icon. 2. Touch the “Apps” option on the left of the screen, then filter the list that appears by choosing “Downloaded”, “On SD Card”, “Running” or “All”. 3. Touch the application you would like to remove, choose “Uninstall” from the options that appear on screen, then touch the “OK” option to confirm. 19 WEB BROWSER Scroll Pocket has a built-in browser which can be used to browse the World Wide Web, in the same way you would use a browser on a desktop computer or laptop. To use the browser: 1. Touch the “Browser” icon on the Applications menu. The browser will open. 2. By default, the browser will automatically load Google. NOTE 20 Make sure you are connected to your wireless network before opening the browser. Use tabs to load multiple websites and switch between them. Use the address bar to go directly to a website if you know its address. Touch the button to open a list of options for bookmarks, page refresh, sharing a page, requesting the desktop version of a website, and other settings. The button moves back one step to the previous menu / page. The button returns immediately to the Android desktop. The button displays a menu of recently opened applications. VIDEO PLAYBACK Scroll Pocket is a powerful portable media player. The “Gallery” application can play video and display photos that are stored on either internal memory or a Micro SD card. To use the Gallery: 1. Touch the “Gallery” icon on the Applications menu. The Gallery application will open. 2. The Gallery will automatically find your media and arrange it in a thumbnails view. If you have multiple folders, it will show them first. Touch a folder to select it, then you will be shown the media files in that folder. 3. Touch the thumbnail to play the file. TIP To view more information about a file (such as duration, size and location), touch and hold its thumbnail, then touch the button and select “Details”. Video files will play back in full screen mode. For a few seconds during the start of playback, the user interface will be displayed: Use playback control buttons to play / pause or skip backwards / forwards between videos. Drag the progress indicator left or right to fast forward or rewind the video. The Sub Menu provides further options for subtitles, repeat play, aspect ratio etc. Touch the screen to reactivate the controls after they have disappeared from view. 21 7DIGITAL MUSIC SERVICE 7digital is a digital music content delivery and management application. With over 17 million tracks available in MP3 format from all major labels, 7digital has something for everyone. The 7digital application is pre-loaded on Scroll Pocket. See section “12.5 – Pre-Loaded Applications” (page 18) for instructions on how to install. To use 7digital: 1. On the Applications menu, touch the 7digital application to launch it. 2. You will be presented with the latest releases and you can swipe across the screen to see more. 3. When you try to purchase music, you will be asked to either create an account, or sign in to your existing account. You can also sign in from the options menu; touch the button then go to “Settings” “General” and choose “Sign In”. There are many functions available in 7digital. Refer to http://www.7digital.com for full information. To get started quickly, you should become familiar with these icons: Use the Touch to switch to your local music collection. This can include music purchased from 7digital and / or music stored on your tablet (e.g. on a Micro SD card). TIP function at the top of the screen to type a search term for your favourite artist. It is recommended to store your music collection in a folder called “Music” in the root of the card. Touch to switch back to the home screen where you can browse the latest releases. To change the default currency: 1. Touch the button at the top right of the screen, then choose “Settings”. 2. Scroll down the list until you find the “General” section, and touch “Country”. 3. Choose your preferred country from the list on screen. The currency displayed on the 7digital store will change to match. NOTE 22 For support and further information on the 7digital music service, please visit http://www.7digital.com. WILD TANGENT GAMES SERVICE WildTangent provides a gaming service for Scroll Pocket where users can trial, rent or own top games, based on WildCoins. WildCoins are a digital currency which can be purchased in packs or as a subscription. Users can also play for free in exchange for viewing an advert from a brand advertiser. The WildTangent Games application is pre-loaded on Scroll Pocket. See section “12.5 – Pre-Loaded Applications” (page 18) for instructions on how to install. To use WildTangent: 1. Open the WildTangent Games application from the Applications menu. 2. Sign into your account, or if you do not have one, select the “Create an account” option. Follow the on-screen instructions to create an account. 3. The main interface will launch and automatically show the latest games. Browse the featured games on this page, or touch the “Find Games” button to search for a specific type of game. 4. Touch a game’s icon to view details. The “My Games” tab shows all games currently installed on Scroll Pocket. Touch a game’s icon to launch it. Touch and hold a game icon to open a sub menu with the following options: Play to launch the game Uninstall to remove the game from Scroll Pocket Stop Renting if you wish to discontinue renting (if applicable) TIP Games installed via the WildTangent application will also be available to launch from Scroll Pocket’s own Applications menu. While in the WildTangent application, press the button to launch the context menu for further options. NOTE For support and further information on WildTangent, please visit http://www.wildtangent.com. 23 DEFENX ANTI-VIRUS Defenx AntiVirus is powerful and easy-to-use to protect your tablet from viruses, spyware and malicious applications that can make it unusable or lead to loss of data. A trial version of the Defenx Anti-Virus application is included with Scroll Pocket. The first time you run Defenx, it will ask you for a product key. This field will already be completed with a trial key which allows use of the software for 30 days. After this time, if you wish to continue using Defenx Anti-Virus, you will need to purchase a full licence. You must accept the licence agreement to use the software. Defenx Anti-Virus is simple to use. There are just three options on the main screen: OPTION NOTE DESCRIPTION Scan Scans the internal memory for viruses / spyware. Update Checks for updates to the anti-virus definition files. Scroll Pocket must be connected to the Internet for this to work. Quarantine Lists files that have been placed in quarantine by Defenx Anti-Virus. Defenx Anti-Virus will also automatically scan the contents of a MicroSD card when it is inserted. For more information and help with Defenx, please see http://www.defenx.com. 24 SOCIAL NETWORKING Scroll Pocket is capable of connecting to your favourite social networking systems. You can either do this via the built-in web browser (see section “Web Browser”, page 20) or via dedicated applications. To install these pre-loaded applications, please see section “12.5 – Pre-Loaded Applications” (page 18). 18.1 – FACEBOOK Facebook is the most popular social networking experience. Keep in touch with your friends, share photo albums and use instant messaging. The first time you use the Facebook application, you will be required to accept an “End-User License Agreement” to use it. Touch the “I agree” option to continue. If you already have a Facebook account: 1. Touch the “Email” field to display the on-screen keyboard and type your e-mail address. 2. Touch the “Next” option, then type in your password. 3. Touch the “Done” option, then choose “Login”. 4. Interact with your friends! If you do not have a Facebook account, touch the “Sign up” option at the bottom right of the screen. For more information and help with Facebook, please see http://www.facebook.com. 18.2 – TWITTER Twitter allows you to connect to the information that is most important to you. You can follow tweets from friends, celebrities, experts, news crews and more. The first time you use Twitter you can either search for interests, or sign in to your account to follow tweets. If you already have a Twitter account: 1. Touch the “Sign In” option, then the “Username or email” field to display the on-screen keyboard and type your e-mail address. 2. Touch the “Next” option, then type your password. 3. Touch the “Done” option, then choose “Sign In” at the bottom of the screen. 4. Interact with your friends! If you do not have a Twitter account, touch the “Sign Up” option at the top right of the screen. For more information and help with Twitter, please see http://www.twitter.com. 25 BUILT-IN CAMERA The Camera application lets you take photographs and record video clips using the built-in cameras. Launch the “Camera” Use the Viewport to align the scene you would like to capture. Slide the Zoom indicator along its track to zoom in or out. Touch Touch the Capture button to record. application from the Applications menu by touching the Camera icon: to change image settings. There are three camera modes: ICON CAPTURE BUTTON DESCRIPTION Still picture mode Video recording mode Panoramic still mode – capture very wide photographs 26 MEMORY EXPANSION WITH MICRO SD CARD Scroll Pocket features built-in flash memory, which can be expanded using a Micro SD card (not included). You may use any Micro SD or Micro SDHC card, up to 32GB capacity. The best way to use a Micro SD card is to treat it as media storage; transfer media files (videos, music and photos) from your computer to your Micro SD card in the usual manner, then insert it into Scroll Pocket as shown. To insert and use a Micro SD card: 1. Push the Micro SD card into the slot indicated in the diagram below, until it clicks and locks in place. 2. Scroll Pocket will automatically mount the Micro SD card for use. To eject a Micro SD card: Push the Micro SD card inwards slightly until it clicks, then release pressure. It will pop out from the socket. It is recommended to organise your Micro SD card by creating folders for different media types in the root: eBooks Music Pictures Videos Place your media files in the respective folders. This may help if you need to instruct an application where to look for media files. NOTE For third party applications you may need to point them to the Micro SD card to read your media files. Refer to the instructions specific to each application for directions on how to do this. 27 CONNECT TO A COMPUTER Scroll Pocket can be connected to a computer running Microsoft Windows for file transfer via USB cable. To connect to a computer: 1. Using the supplied USB cable, plug the mini USB connector into Scroll Pocket’s USB socket, and plug the fullsize USB plug into an available USB socket on your computer. 2. Windows may present you with a “New Hardware Wizard”. Please click the “Cancel” option to close this. 3. On Scroll Pocket, touch the status bar at the bottom of the screen. 4. Touch the “USB connected” option, then choose “Turn on USB storage”. Scroll will appear as mass storage on your computer and will be assigned the next available drive letter within “My Computer” or “Windows Explorer”. Drag and drop files from your computer’s storage drives onto Scroll Pocket, just like you would with any other external storage device. To disconnect from a computer: 1. Touch the “Turn off USB storage” button to un-mount the flash memory. 2. Disconnect the USB cable. NOTE 28 Failure to un-mount the flash memory could prevent AndroidTM applications from being able to access the memory, and cause erratic behaviour. Always un-mount before disconnecting the USB cable. SYSTEM RESET A system reset allows you to return the tablet back to factory default settings. CAUTION Resetting to factory defaults will erase all data from the tablet’s internal storage. You must do a back up of any important data before performing this procedure. To reset your tablet to factory defaults: 1. Touch the “Settings” 2. Scroll down to the “ menu icon on the Applications menu. The Settings menu will open. Backup & reset” menu item, and touch to select it. 3. Select “Factory data reset”. Android will warn you that you are about to erase everything on the tablet’s internal storage, including: Your Google account System and application data and settings Downloaded applications A note states “To clear music, pictures and other user data, the SD card needs to be erased”; this message is referring to the internal memory (virtual SD card) on your tablet. It does not mean an inserted Micro SD card! Selecting this option is not advisable as it will delete the pre-loaded Scroll Apps from the tablet, meaning you will not be able to reinstall them once the tablet has been reset. If you are sure you want to erase the internal memory (virtual SD card), please make a backup of the “Scroll Apps” folder (either to Micro SD card or your computer) first. 4. Select the “Reset tablet” option. Android will ask you if you are sure; touch the “Erase everything” button to confirm this. The tablet will shut down, perform the reset procedure, and then reboot. NOTE The reset procedure may take some time. Once the procedure is complete, the tablet will take longer to reboot than before. This is normal, and will only happen for the first boot after resetting the tablet. 29 PRODUCT SPECIFICATION Scroll Pocket Hardware Unit Size (mm): 114 (W) x 77 (H) x 14 (D) Unit Weight: 130 g CPU: Boxchip A13 1GHz RAM: 512 MB GPU: 2D / 3D graphics processor Built-in Storage: 4 GB Storage Expansion: Micro SD card, up to 32 GB Display: 4.3” capacitive multi-touch Resolution: 480 x 272 Battery Type: Rechargeable Battery Capacity: 1400mAh USB Port: 1x USB Speaker: Built-in Wireless Connectivity: 802.11b/g/n Software Operating System: AndroidTM 4.0 Web Browser: Pre-installed Video Support: AVI, H.264, MPEG2, MPEG4, MKV, MP4 Audio Support: MP3, AAC, AC3, WAV Photo Support: JPEG, BMP, GIF, PNG, TIFF 3D Gaming: OpenGL rendering 30 WARRANTY AND PRODUCT SUPPORT If you are experiencing difficulties with your product, or have questions which are not answered in this instruction manual, our dedicated support site offers a wide range of clearly written FAQs, manuals and user guides which are designed to help you get the most from your purchase. Visit our dedicated support site at storageoptions.com/support/ for FAQs, manuals and user guides If you are unable to find an answer online, still experiencing issues or suspect your product to be faulty, our UK based customer service team is available to offer full support, and can be contacted via the support pages of our website. Submit a service request online if you cannot find an answer to your problem A member of our UK based support team will review your case and offer the highest level of advice and support If our team believes that the product in question is faulty, we will issue a returns authorisation and arrange for a replacement to be sent free of charge.* Return the product free of charge* – a pre-paid shipping label will be issued to return the product Within 5 to 10 days a replacement product will be sent at no charge to you Replacement product delivered directly to you Please contact us directly if you have any queries or concerns: storageoptions.com/support/ [email protected] Our aim is to provide the best possible service to our customers. We have a wealth of support material, guides and FAQs available on our website to help you get the most from your product. Our dedicated UK based Customer Service team are also on hand to offer further support and, in the unlikely event of any fault developing with your purchase, we have a full returns procedure designed to make receiving a replacement product as quick and easy as possible. *Free replacement service applies to UK Mainland (excluding Scottish Highlands) only. Storage Options reserves the right to charge for delivery to, or collection from, other locations. 31 32