1
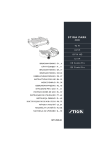
STIGA
COMPACT LINE
SNOW ELECTRIC
BRUKSANVISNING SV .... 4
KÄYTTÖOHJEET FI ..... 8
BRUGSANVISNING DA ..12
BRUKSANVISNING NO .16
GEBRAUCHSANWEISUNG DE ...20
INSTRUCTIONS FOR USE EN...24
MODE D’EMPLOI FR....28
ISTRUZIONI PER L´USO IT.....32
INSTRUKCJA OBS£UGI PL ....36
»HC“P”K÷»fl œOÀ‹«Œ¬¿“EÀfl RU...40
NÁVOD K POU®ITÍ CS ...45
HASZNÁLATI UTASÍTÁS HU ..49
NAVODILA ZA UPORABO SL ....54
8218-2218-71
1
2
1
2
4
3
5
B
6
A
4
3
4
1
C
5
2
6
7
8
9
3
EN
ENGLISH
•
1 SYMBOLS
The following symbols appear on the machine. They are
there to remind you of the care and attention required in use.
This is what the symbols mean:
Warning. If the regulations are not followed, there
is a risk of danger to life and machine breakdown.
Read the owner’s manual before operating the
machine.
Keep bystanders at a safe distance from the
machine.
Warning of hard objects flying off.
The power supply must be disconnected before
carrying out cleaning or maintenance. Shut off the
motor before unclogging the discharge shute.
The electric cable must be kept away from the auger
opening. Check that the connection cable is always
fault free. Only fault-free cables may be used.
Keep hands and feet away from rotating parts.
Risk of death and maiming. Avoid injury from the
rotating auger, keep hands, feet and clothing away.
Risk of fatal electric shocks
2 SAFETY INSTRUCTIONS
2.1 GENERAL
• Please read through these instructions carefully. Learn all
the controls and the correct use of the machine.
• Never allow children or anyone who is not familiar with
these instructions to use the snow thrower. Local
regulations may impose restrictions as regards the age of
the driver.
• Never use the machine if others, particularly children or
animals, are in the vicinity.
• Remember that the driver is responsible for accidents that
happen to other people or their property.
• Be careful not to trip or fall, especially when reversing
the machine.
• Never use the snow thrower under the influence of
alcohol or medication and if you are tired or ill.
2.2 PREPARATIONS
• Check the area to be cleared and remove any loose or
foreign objects.
• Disengage all controls before starting the engine.
• Never use the snow thrower unless properly dressed.
Wear footwear that improves your grip on a slippery
surface.
• Adjust the height of the auger housing to ensure it stays
above gravel paths.
• Check that the mains voltage corresponds with the snow
thrower’s rated voltage.
24
•
•
Never, under any circumstances, make adjustments while
the engine is running (unless otherwise specified in the
instructions).
Allow the snow thrower to adjust to the outdoor
temperature before using it.
Always use protective goggles or a visor during use,
maintenance and service.
2.3 OPERATION
• Keep hands and feet away from rotating parts. Always
avoid the discharge chute opening.
• Be careful when driving on or crossing gravel paths,
pavements and roads. Be aware of hidden dangers and
traffic.
• Never direct the discharge chute towards a public road or
traffic.
• If the snow thrower hits a foreign object, stop the engine,
disconnect and carefully inspect the machine for damage.
Repair the damage before using the machine again.
• If the machine starts vibrating abnormally, stop the
engine and look for the cause. Vibration is normally a
sign of something wrong.
• The snow thrower may only be connected to power sockets that are supplied with earth leakage circuit breakers.
The earth leakage circuit breaker must have a trip current
of max. 30 mA.
• Risk of tripping over the electric cable. Always be aware
of the whereabouts of the electric cable so that it does not
get in the way of your feet or anything else moving about
in the area.
• The snow thrower may only be connected with a cable
that is approved for outdoor use.
• The electric cable with which the snow thrower is connected must always be intact. It must never be used if it
displays signs of damage.
• The snow thrower must never be used if its plug, electric
cable or other electrical equipment is damaged.
• Repairs to the electrical equipment may only be carried
out by an authorised electrician.
• Never drive over the electric cable for the snow thrower
while working.
• If the electric cable for the snow thrower has been damaged while working, the following instructions must be
followed:
A. Stop the motor.
B. Leave the site in the opposite direction from the damaged
point on the cable.
C. Disconnect the cable from the power socket.
• Stop the motor and disconnect the power supply:
A. If the driver leaves the machine.
B. If the auger housing or discharge chute is blocked and
must be cleaned.
C. Before beginning repairs or adjustments.
• Stop the engine and disconnect the spark plug cable:
A. If the machine steers away from the driving position.
B. If the auger housing or discharge chute is blocked and
must be cleaned.
C. Before beginning repairs or adjustments.
EN
ENGLISH
•
•
•
•
•
•
•
•
•
•
•
•
•
•
•
•
•
•
Always make sure the rotating parts have stopped and all
the controls are disengaged before cleaning, repairing or
inspection.
Before leaving the machine unattended, disengage all the
controls, put it into neutral gear, stop the engine and
remove the ignition key.
Never run the engine indoors except when taking it in and
out of its place of storage. In this case ensure the door to
the storage place is open. Exhaust fumes are toxic.
Never drive across a slope. Move from the top down, and
from the bottom to the top. Be careful when changing
direction on a slope. Avoid steep slopes.
Never operate the machine with insufficient protection or
without the safety devices in place.
Existing safety devices must not be disconnected or
disengaged.
Do not alter the engine’s regulator setting and do not race
the engine. The possibility of personal injury increases
when the engine is run at high revs.
Never use the snow thrower near enclosures, cars,
windowpanes, slopes etc. without properly setting the
discharge chute deflector.
Always keep children away from areas to be cleared. Get
another adult to keep the children under supervision.
Do not overload the machine by driving it too fast.
Take care when reversing. Look behind you before and
during reversing to check for any obstacles.
Never point the discharge chute towards bystanders. Do
not allow anyone to stand in front of the machine.
Disengage the auger when the snow thrower is to be
transported or is not in use Do not drive too fast on
slippery surfaces when transporting.
Only use accessories that are approved by the machine’s
manufacturer.
Never drive the snow thrower in bad visibility or without
satisfactory lighting.
Always ensure you have a good balance and a tight grip
on the handle.
Never use the snow thrower on a roof.
Do not touch engine components because they are warm
during use. Risk of burn injuries.
2.4 MAINTENANCE AND STORAGE
• Tighten all nuts and screws so that the machine is in safe
working condition. Check the shear bolts regularly.
• Always use genuine spare parts. Non-genuine spare parts
can entail a risk of injury, even if they fit the machine.
• Never store the machine with petrol in the tank in
buildings where the fumes can come into contact with
open flames or sparks.
• Allow the engine to cool before putting the machine in
store.
• Before a long storage, check the instructions for
recommendations.
• Replace damaged warning and instruction stickers.
• Let the engine run a couple of minutes with the auger
connected after use. This prevents the auger from
freezing solid.
3 ASSEMBLY
3.1 UNPACKING
1. Open the packing and take out all parts.
2. Check that all parts are supplied. The parts are as follows:
• Lower part of the handle
• Upper part of the handle
• Start control
• Cable holder
• Six black knobs.
• Four long screws with square fittings.
• Two short screws with square fittings.
• Four screws with washers for the chute attachment.
• Chute attachment.
• Ratchet with springs for the chute.
• Chute.
• Two plane washers for the deflector.
• Deflector.
• Cable holders
• Two clamps for fixing of the cable.
• Two screws for the start control.
3. If anything is missing or damaged, take immediately
contact with the supplier.
3.2
HANDLE
3.2.1 Lower part of the handle
See fig. 2.
Assemble the lower part of the handle with two knobs and
two long screws with square fittings.
3.2.2 Upper part of the handle
See fig. 3.
Assemble the cable holder (4) to the upper part of the handle.
Assemble the upper part of the handle on the lower part of the
handle. Fix with two long screws with square fittings and two
knobs.
3.2.3 Start control
See fig. 4.
Assemble the start control (1) on the upper part of the handle.
Secure the cable to the handle with two clamps (C).
3.2.4 Chute
1. Assemble the ratchet with the two springs. See fig. 5.
2. Assemble the chute in the opening and against the
ratchet. See fig. 6.
3. Assemble the chute attachment with four screws and four
washers. See fig. 7.
4. Assemble the deflector with two short screws, two
washers and two knobs. See fig. 8.
25
EN
ENGLISH
4 CONTROLS
The snow thrower is fitted with the following controls and
devices.
See fig. 9-12.
Starting handle (1) – Starts and stops the electric motor.
Ignition lock (2) – Facilitates activation of the starting handle.
Connector (3) – For electrical connection.
Cable support (4) – For supporting the connection cable.
Deflector lock (5) – Locks the deflector in position.
Direction lever (6)– Changes the direction of the discharge
chute.
Discharge chute (A) – Ejects the snow.
Deflector (B) – Determines the distance the snow is thrown.
5 USING THE MACHINE
5.1 GENERAL
Never start the engine until all the above measures under
‘ASSEMBLY’ have been carried out.
Never use the snow thrower without first reading
and understanding the enclosed instructions and
all the warning and instruction stickers on the
snow thrower and in these instructions.
Always wear protective goggles or a visor during
use, maintenance and service.
5.2BEFORE STARTING
The connection cable and its plugs must be fault
free and approved for outdoor use.
The connection cable may only be connected to
power sockets equipped with an earth leakage circuit breaker with a trip current of max. 30 mA.
The connection cable must be suspended on the cable support. Otherwise there is a risk of damage
alongside the plug which is potentially life-threat-
ening.
Connect the snow thrower with the electric cable from the
property’s power socket.
Suspend the cable on the cable support (4) and connect to the
connector (3). See fig. 9.
5.3 START
Start the motor and the auger as described below.
See fig. 1.
1. Lean the snow thrower back slightly so that the auger is
raised a little above the ground.
2. Press in and hold the button (2) . Squeeze the handle (1).
3. Release the ignition lock, lower the auger towards the
ground and start to clear the snow.
5.4 STOP
Stop the motor and the auger by releasing the
starting handle (1). See fig. 1.
26
5.5 SNOW CLEARANCE
See fig. 1.
Never aim the snow at bystanders.
Always stop the engine before unclogging.
Always wear eye protection when operating the
snow thrower.
If the auger is blocked, never try to keep the motor
engaged for more than 20 seconds. Extensive engagement will damage the motor.
1. Start the motor as described above and check the ejection
distance and direction.
2. If necessary, stop the motor and adjust the deflector (B).
Upwards gives a longer throwing distance and downwards gives a shorter throwing distance. Lock the deflector in position using the knob (5).
3. If necessary, stop the motor and adjust the discharge
chute (A) with the lever (6) so that the snow is ejected in
the desired direction.
4. Stop working by releasing the starting handle (1).
5. Any unclogging can easily be carried out with a piece of
wood or similar after the engine has stopped.
The snow thrower is propelled automatically with the aid of
the auger. To facilitate propulsion, raise the handlebar a little.
Do not push the snow thrower.
5.5.1 Dry and normal snow
Snow up to 20 cm deep can be removed quickly and easily
by clearing at an even speed. Plan for downwind discharge of
the snow.
5.5.2 Wet, packed snow
Drive slowly forward. If the wet, packed snow blocks the discharge chute, back up and jab a little way into the snow a few
times to clear the deflector.
5.6
AFTER USE
The snow thrower must never be rinsed with water. Risk of damage to the electrical system and
risk of electric shocks.
1. Stop the motor.
2. Disconnect the electric cable from the snow thrower and
the property’s power socket.
3. Allow the snow thrower to cool for 30 minutes.
4. Clean the inside and outside of the snow thrower with a
suitable brush.
5. Check that there are no damaged or loose parts. Repair/
replace parts if necessary.
EN
ENGLISH
6 MAINTENANCE
The electrical connection must be disconnected
before carrying out maintenance work.
6.1 BEFORE USE
• Every time the snow thrower is to be used, check that the
electrical equipment is intact and free of faults. The snow
thrower must not be used if there are any faults or if anything is missing.
• Check that the auger rotates easily.
• Check that all screw joints are tightened. Tighten if necessary.
• Apply silicon spray to the auger. This prevents icing.
• Check that the starting handle cannot be activated without the ignition lock being moved to the left.
6.2 FAULT-TRACING
The faults described below can usually be rectified directly
by the user. If there is any doubt, contact an authorised agent.
The motor does not start:
• The electric cable is not connected or is defective.
• The fuse has blown. If a higher amp fuse needs to be installed, contact an authorised electrician.
The motor hums, but does not start:
• Auger or discharge chute blocked.
• The capacitor is defective. Contact your GGP agent.
The motor stops suddenly:
• Loose plugs.
• The overload protection has been tripped. Wait for 10
minutes, then attempt to start again.
The snow thrower vibrates:
• Loose parts.
• Defective auger.
• The motor is loose.
The snow thrower does not clear any snow:
• Auger or discharge chute blocked.
The drive belt is loose or defective.
8 PURCHASE TERMS
A full warranty is issued against manufacturing and material
defects. The user must carefully follow the instructions given
in the enclosed documentation.
The warranty does not cover damage due to:
- Neglect by users to acquaint themselves with
accompanying documentation
- Carelessness
- Incorrect and non-permitted use or assembly
- The use of non-genuine spare parts
- The use of accessories not supplied or approved by GGP
Neither does the warranty cover:
- Wear parts such as drive belts, augers, wheels
- Normal wear
- Engines. These are covered by the engine manufacturer’s
warranties, with separate terms and conditions.
The purchaser is covered by the national laws of each
country. The rights to which the purchaser is entitled with the
support of these laws are not restricted by this warranty.
7 STORAGE
When the snow thrower is to be stored for an extended period, such as during that part of the year when snow clearance
does not need to be carried out, the following measures must
be taken.
1. Clean the whole snow thrower thoroughly.
2. Inspect the snow thrower for damage. Repair if necessary.
3. Touch up any paint damage.
4. Rust-proof unpainted metal surfaces.
5. Store the snow thrower in a clean, dry place.
27
w w w. s t i g a . c o m
GGP Sweden AB · Box 1006 · SE-573 28 TRANÅS