1
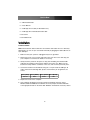
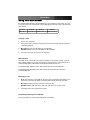
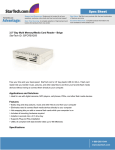
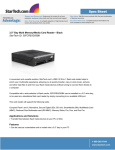
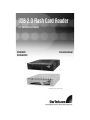
USB 2.0 Flash Card Reader
3.5” Multi-Flash Card Reader
35FCREAD20
35FCREAD20BK
Instruction Manual
Actual product may vary from photo
FCC Compliance Statement
This equipment has been tested and found to comply with the limits for a Class B digital
device, pursuant to part 15 of the FCC Rules. These limits are designed to provide
reasonable protection against harmful interference in a residential installation. This
equipment generates, uses and can radiate radio frequency energy and, if not installed
and used in accordance with the instructions, may cause harmful interference to radio
communications. However, there is no guarantee that interference will not occur in a
particular installation. If this equipment does cause harmful interference to radio or
television reception, which can be determined by turning the equipment off and on, the
user is encouraged to try to correct the interference by one or more of the following
measures:
• Reorient or relocate the receiving antenna.
• Increase the separation between the equipment and receiver.
• Connect the equipment into an outlet on a circuit different from that to which the
receiver is connected.
• Consult the dealer or an experienced radio/TV technician for help.
Use of Trademarks, Registered Trademarks, and
other Protected Names and Symbols
This manual may make reference to trademarks, registered trademarks, and other
protected names and/or symbols of third-party companies not related in any way to
StarTech.com. Where they occur these references are for illustrative purposes only and
do not represent an endorsement of a product or service by StarTech.com, or an
endorsement of the product(s) to which this manual applies by the third-party company in
question. Regardless of any direct acknowledgement elsewhere in the body of this
document, StarTech.com hereby acknowledges that all trademarks, registered
trademarks, service marks, and other protected names and/or symbols contained in this
manual and related documents are the property of their respective holders.
Instruction Manual
Table of Contents
Introduction . . . . . . . . . . . . . . . . . . . . . . . . . . . . . . . . . . . . . . . . . . . . . . . . . . . . .1
Features . . . . . . . . . . . . . . . . . . . . . . . . . . . . . . . . . . . . . . . . . . . . . . . . . . . . . . . .1
Before You Begin . . . . . . . . . . . . . . . . . . . . . . . . . . . . . . . . . . . . . . . . . . . . . . . . .1
System Requirements . . . . . . . . . . . . . . . . . . . . . . . . . . . . . . . . . . . . . . . . . . .1
Contents . . . . . . . . . . . . . . . . . . . . . . . . . . . . . . . . . . . . . . . . . . . . . . . . . . . . .2
Installation . . . . . . . . . . . . . . . . . . . . . . . . . . . . . . . . . . . . . . . . . . . . . . . . . . . . . .2
Panel Installation . . . . . . . . . . . . . . . . . . . . . . . . . . . . . . . . . . . . . . . . . . . . . . .2
Using Your Card Reader . . . . . . . . . . . . . . . . . . . . . . . . . . . . . . . . . . . . . . . . . . .3
Inserting a Card . . . . . . . . . . . . . . . . . . . . . . . . . . . . . . . . . . . . . . . . . . . . . . . .3
LED Indicators . . . . . . . . . . . . . . . . . . . . . . . . . . . . . . . . . . . . . . . . . . . . . . . . .3
Removing a Card . . . . . . . . . . . . . . . . . . . . . . . . . . . . . . . . . . . . . . . . . . . . . .3
Permanently removing the Card Reader . . . . . . . . . . . . . . . . . . . . . . . . . . . . .3
Troubleshooting . . . . . . . . . . . . . . . . . . . . . . . . . . . . . . . . . . . . . . . . . . . . . . . . .4
Technical Specifications . . . . . . . . . . . . . . . . . . . . . . . . . . . . . . . . . . . . . . . . . .5
Accessory Products from StarTech.com . . . . . . . . . . . . . . . . . . . . . . . . . . . . .6
Technical Support . . . . . . . . . . . . . . . . . . . . . . . . . . . . . . . . . . . . . . . . . . . . . . . .7
Warranty Information . . . . . . . . . . . . . . . . . . . . . . . . . . . . . . . . . . . . . . . . . . . . .7
i
Instruction Manual
Introduction
Thank you for purchasing a StarTech.com 3.5” Multi-Flash Card Reader. This panel
works with a wide variety of flash cards (see Features for detailed compatibility list) and
can be installed in an open 3.5” bay or used as a standalone. The card reader plugs into
any USB port and makes it easy to transfer files, images, and music between your
computer and your MP3 player, digital camera, cell phone, or PDA.
Features
• Supports the following types of flash cards: Compact Flash Type I, Compact Flash
Type II, MicroDrive, MultiMedia Card (MMC), Reduced Size Multimedia Card (RSMMC), Memory Stick, Memory Stick Pro, Memory Stick Duo, Memory Stick Pro Duo,
Secure Digital card (SD), Mini Secure Digital card (mini-SD), SmartMedia card (SM),
• Can be used as a standalone or a 3.5” front panel USB 2.0 multi card reader.
• Provides an activity and status LED for each of the four card slots.
• Compliant with USB 2.0 to support transfer rates of 480Mbps
• Powered by USB for use as a standalone card reader
• Supports drag and drop between cards
• Fits into any 3.5” drive bay
Before You Begin
To ensure a quick and easy installation, please read through this section carefully before
attempting to install the Flash Card Reader.
WARNING! Flash cards, like all computer equipment, can be severely damaged by static
electricity. Be sure that you are properly grounded before opening your computer case or
touching your card. StarTech.com recommends that you wear an anti-static strap when
installing any computer component. If an anti-static strap is unavailable, discharge
yourself of any static electricity build-up by touching a large grounded metal surface
(such as the computer case) for several seconds.
System Requirements
• Windows 98SE (or higher) with a Pentium-class (or compatible) processor, or Mac
OS X with a Power PC (or above).
• A CD drive
• An available USB port
1
Instruction Manual
Contents
• 1 x Multi-Card Reader
• 1 x User Manual
• 1 x USB Type A to B cable (for Standalone use)
• 1 x USB Type B to motherboard header cable
• Four Screws
• Four Rubber Pads
Installation
Panel Installation
Note: The instructions below outline how to install the card reader into a 3.5” drive bay.
Alternatively, you can use your card reader externally by plugging the USB cable into an
open USB port.
1. Make sure that your system is unplugged and you are grounded.
2. Remove the cover of your system and remove the cover from a 3.5” drive bay (see
your computer’s user manual for details, if necessary).
3. Gently insert the panel into the open 3.5” bay (after threading the attached USB
cable into the computer) until it is flush with the front of the case. Make sure the
bracket is lined up with the screwholes in the case, and screw the panel into place.
4. Connect the reader to the mainboard, using the 1 x 4 pin header to USB Type ‘B’
cable. Based on the following table, please ensure that the pin assignments are
correct:
Pin 1 (Red)
USB 5V
Pin 2 (White)
DATA-
Pin 3 (Green) Pin 4 (Black)
DATA+
GND
5. Replace the cover on the computer.
6. Your computer will display a message saying new hardware has been found.
Windows 98SE and 2000 users follow the on-screen prompts and direct Windows
to the appropriate folder on the driver disk. Windows will install the necessary drivers.
2
Instruction Manual
Using Your Card Reader
The following table illustrates the designation for each card port on the reader. Be sure
to use the correct slot as indicated, to avoid damaging your Flash Cards or the data that
they contain:
SLOT A
SLOT B
SLOT C
SLOT D
SMC/Others CF/MD/Others SD/MMC/Others MS/MSPro/Others
Inserting a Card
1.
Turn on your computer.
2.
Insert your memory card into the proper slot on the card reader, with the top of the
card facing upwards..
3.
Mac users: A new icon will appear on your desktop.
Windows users: A new icon will appear in “My Computer.”
4.
The card can now be accessed as an extra disk.
LED Indicators
The LEDs on the card reader are your best indication of the reader’s activity. The red
light indicates whether or not your card reader is receiving power. Each card slot has a
corresponding LED as indicated by the designated letters for each slot.
A solid green light, indicates that a card is detected in the corresponding slot.
A flashing green light indicates that data is being accessed from the card in the
corresponding slot.
Removing a Card
1.
Make sure that none of the LEDs on the front of the card reader are flashing. If you
remove the card when the LEDs are flashing, data may be lost from your card.
2.
Mac users: drag the memory card icon to the Trash bin.
Windows users: right-click on the drive icon and choose to eject the card.
3.
Physically remove the card from the reader.
Permanently removing the Card Reader
Use this procedure to permanently uninstall the card reader.
3
Instruction Manual
Windows users:
1.
Make sure there is no card reader connected to the USB port.
2.
Click on the “Uninstaller” icon in the taskbar.
3.
Click on “USB Storage Device - Change/Remove.”
4.
Remove all installed components and click Next.
5.
Choose to restart your computer and click Finish.
Mac users:
1.
If there is a memory card connected to the card reader, drag the memory card icon
into the Trash. Wait until the icon has disappeared.
2.
Disconnect the card reader.
Troubleshooting
The card reader is not detected:
The reader has not been properly connected or is not receiving enough power. Make
sure that the reader’s USB cable is firmly seated in the USB port. If you are connecting
the card reader to a hub, make sure that it is a powered hub.
The card doesn’t fit in the reader:
Make sure you are installing the card in the proper slot and that the card is facing the
right direction. Check with the card manufacturer’s instructions.
A drive letter is shown for the card, but it can’t be accessed:
The card has not been formatted or is formatted incorrectly. Follow the instructions
provided by the manufacturer of your digital media device (i.e. Your MP3 player, digital
camer, etc.) to format the card using your digital media device.
No icon appears when a card is inserted into the reader (Mac OS X)
The card may have been formatted in Windows’ FAT-32 format. Using a PC or digital
device, re-format the card using the OS X compatible FAT or FAT-16 format.
4
Instruction Manual
Technical Specifications
USB Ports
1 x 4 pin USB (Type A)
Standards
Data Transfer Rate
USB 2.0
USB 2.0 devices: Up to 480 Mbits/sec
USB 1.1 devices: Up to 12 Mbits/sec
Flash Cards: 700 Kbits/sec to 480 Mbits/Sec
SATA devices: 150 Mbits/sec
Firewire devices: 400 Mbits/sec
CF Slot: CF I, II, CF Ultra (high speed), IBM MicroDrive,
Magicstor MD.
Compatibility
SD Slot: Secure Digital Card, SD Ultra (high speed), Mini SD
(adapter needed), MMC, MMC 2.0, MMC 4.0, RS-MMC, T-flash
adapter needed.
SM Slot: Smart Media Card, SM-ROM.
MS Slot: Memory Stick, Magic Gate, MS Pro, MS Ultra II, MS
Select, MS Duo, MS Pro Duo, Magic Gate Duo, MS Duo Magic
Gate (These six require an adapter)
LED Indicators
System
Requirements
Power & Activity
An available 3.5” bay, Windows 98SE or higher, or Mac OS X
Instruction Manual
Accessory Products from StarTech.com
Contact your local StarTech.com dealer or visit www.startech.com for cables or other
accessories that will help you get the best performance out of your new product.
139466EXT6
6 ft. i.Link IEEE-1394 FireWire Extension Cable 6 to 6 pin M/F
1394_10
10 Ft IEEE-1394 Firewire Cable 6-6 M/M
139444EXT6
6 ft. IEEE-1394 FireWire Extension Cable 4 to 4 pin M/F
USBEXTAA_6
6 ft. Fully Rated USB Extension Cable A-A
USB2FAAEXT15
16 Foot (5 Meter) USB 2.0 Active Extension Cable
6
Instruction Manual
Technical Support
StarTech.com’s lifetime technical support is an integral part of our commitment to provide
industry-leading solutions. If you ever need help with your product, visit
www.startech.com/support and access our comprehensive selection of online tools,
documentation, and downloads.
Warranty Information
This product is backed by a one-year warranty. In addition, StarTech.com warrants its
products against defects in materials and workmanship for the periods noted, following
the initial date of purchase. During this period, the products may be returned for repair, or
replacement with equivalent products at our discretion. The warranty covers parts and
labor costs only. StarTech.com does not warrant its products from defects or damages
arising from misuse, abuse, alteration, or normal wear and tear.
Limitation of Liability
In no event shall the liability of StarTech.com Ltd. and StarTech.com USA LLP (or their
officers, directors, employees or agents) for any damages (whether direct or indirect,
special, punitive, incidental, consequential, or otherwise), loss of profits, loss of business,
or any pecuniary loss, arising out of or related to the use of the product exceed the
actual price paid for the product.
Some states do not allow the exclusion or limitation of incidental or consequential
damages. If such laws apply, the limitations or exclusions contained in this statement
may not apply to you.
7
About StarTech.com
StarTech.com is “The Professionals’ Source for Hard-to-Find Computer
Parts”. Since 1985, we have been providing IT professionals with the
quality products they need to complete their solutions. We offer an
unmatched selection of computer parts, cables, server management
solutions and A/V products and serve a worldwide market through our
locations in the United States, Canada, the United Kingdom and Taiwan.
Visit www.startech.com for complete information about all our products
and to access exclusive interactive tools such as the Parts Finder and the
KVM Reference Guide. StarTech.com makes it easy to complete almost
any IT solution. Find out for yourself why our products lead the industry in
performance, support, and value.
Revised: 3 March 2006 (Rev. B)