1
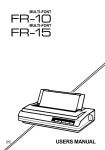
USERS MANUAL
LC-20
DOT MATRIX PRINTER
80820476
Trademark Acknowledgements
LC-20, NX-1OOO,
LC.1O, ND.10/15: StarMicronicsCo., Lid.
III, ProprhrterII, PC.DOS: InternationalBusiness Machines
IBM PC, PC-AT, PC-XT, Proprinter
Corp.
Microaoft BASIC, MS-DOS: Microsoft Corporation
LX.85Q FX86q Fx286e: seikO @sOn Corp.
NOTICE
● All rights reserved. Reproduction of aoy partof this manual in any form whatsoeverwithout
.
.
. %~~~~?~%~~%;~;~~;%
ckgewitiattim.
All effortshave been made to ensurethe accuracyof the contentsof this manrralat the time of
press, However, shotddany errorahe detected,STAR would greatlya~reciate being informed
of them.
● The above notwithstanding,STAR cartassumeno responsibilityfor any errorsin this manual.
●
@Copyright1990Star MicronicsCo., Ltd.
HOW TO USE THIS MANUAL
This manualis organizedintonine chapters.Tolearn how to makethe best
use of yourprinteryou areurgedto readthroughchapten 1through3. The
remainingchaptersmay be treated as a referenceguide for programming
operations, etc. It assumes a degree of knowledge of the operation of
computexx(forinstance,it assumesyouknowabouthexadecimalnumbers).
The chaptexxare as follows:
Chapter 1— Settingup the printer
This chapterexplainshow to getthe printerunpackedand setup. Readthis
chapterbefore you do anythingelse.
Chapter 2 — Controlpaneloperations
There are a number of controlson the front panel which performvarious
functionsrelatedto paperhandling,printmodes and font selection.
After gettingset up, read this chapterand try out the variousproceduresin
it to find out how the printerworks.
Chapter 3 — DIP switch settings
This chapterexplainshow to set the DIP switchesto make systemsettings
on the printer.
Chapter 4 — Printercontrolcommands
Thischapterexplainsthediffe~nt emulationsprovidedby yourprinter,and
the softwarecommandsused to drive it. This sectionis of use if you are
writingor modifiing progr~s to take advantageof the printer’sfeatures.
Chapter 5 — Downloadcharactem
This chapterexplainsthe proceduresto create your own characters.
Chapter6 — MS-DOSand yourprinter
Since the PC or PC-AT family of computemrunningunder MS-DOS is
curnmtlythe most popular configurationof microcomputer,we have includeda few hints and tips to help you use yourprinterwith such systems.
SincevirtuallyallPCsaresoldwitha MicrosoftBASICinterpreter,wehave
also included some hints, and a sample program in this language to
demonstratethe capabilitiesof the printer.
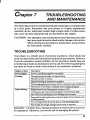
Chapter 7 — Troubleshootingand maintenance
Thissectiongivesa checklistofpointsto checkif yourprinterisnotworking
in the expectedway. It also includesdetailsof some routinemaintenance
operationsyoucan carryoutyourself.It is no~however,a completeservice
manual.Calla qualifiedserviceengineerif you areunsureof yourabilityto
carry out any maintenanceor servicingoperations.
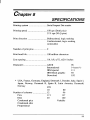
Chapter 8 — Specifications
This sectiongivesthe specificationsof your printer.
Chapter 9 — Charactersets
Thesechartsgivethe differentcharactersets available,and the differences
betweennationalcharactersets (as set up with the DIP switches).
FEATURES OF THE PRINTER
Thisprinteris aconvenient,monochromeprinterwithoutfiillsbutwitha full
complementof features, making it an excellent partner for a personal
computer.It supportsthe IBM/Epsonprintercommandsandcharactersets,
enablingit to printjust aboutanythingyourcomputercangenerate,bothtext
and graphics.Some of its main featuresare the following:
. ExtensivesoftwareSupport
Since it is compatiblewith the Epson and IBM printers,it works with any
softwarethat supportsthose printem.That includesmost word-processing
and graphicsprograms,spread-sheets,and integratedsoftwarepackages.
. Easy”operation
Clearlyunderstandableindicatordisplaysand beep tonesprovideimmediate feedback when you press the buttons on the control panel. The four
buttonscan operatein combinationsto performa surprisingvarietyof functions, includingmicro-alignment.
. Easy care and maintenance
The ribbon cartridgecan be replaced in seconds the print head in a few
minutes.
. Versatilepaperhandling
Singlesheets,fanfoldforms,andmulti-copyforms (up to triple-ply)are all
accepted,and you can use either tractoror frictionfeed. A specialfeature
enables you to keep fanfold forms parked in readinesswhile printing on
other paper.
●
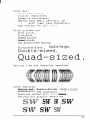
Large varietyof fonts and sizes
The printerhas one draft font and four NLQ fonts (Courier,Sanserif,and
Orator with small capitals or lower case), italics for all styles, plus condensedprint, bold print, double-sizedprint, and quadruple-sizedprint.
TABLE OF CONTENTS
Chapter 1 SETTING UP THE PRINTER
LocatingthePrinter
UnpackingandInspection
Checkthecartoncontents
Partsnameof theprinter
SettingUp
Mount the platen knob
Install the ribbon cartridge
Comection
Loading Single Sheets
Automatic loading
Manual loading
Loading and Parking Fanfold Forms
Loading the paper
Paper parking
Paper unparking
Adjusting the PrintingGap
Chapter 2 CONTROL PANEL OPERATIONS
ButtonsandIndicators
ONLINEbutton
PAPERFEEDbutton
PITCHbutton
FONTbutton
Power-UpFunctions
Shorttestmode
Longtestmode
Stayinpanelpitch
Stayinpanelfont
Stayinpanelpitchandfont
Hexadecimal
dump
SwitchCombination
Functions
Formfeed
PaperParking
Topof form
Forwardmicro-feed
Reversemicro-feed
Clearingthebuffer
1
1
2
2
3
4
4
4
7
8
8
10
11
11
14
14
15
17
17
18
19
19
20
21
21
22
22
22
22
23
25
25
26
26
26
27
27
Chapter 3 DIP SWITCH SETTINGS
Locationof theDIPSwitches
FunctionsoftheDIPSwitches
29
29
Chapter 4 PRINTER CONTROL COMMANDS
FontControlCommands
CharacterSetCommands
CharacterSizeandPitchCommands
VerticalPositionCommands
HorizontalPositionCommands
GraphicsCommands
DownloadCharacterCommands
OtherPrinterControlCommands
33
34
39
41
47
53
58
61
65
Chapter 5 DOWNLOAD CHARACTERS
DesigningYourOwnDraftCharacters
Definingtheattributedata
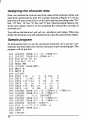
Assigningthechamcterdata
Sampleprogram
DefiningYourOwnNLQCharacters
69
69
70
72
72
74
Chapter 6 MS-DOS AND YOUR PRINTER
InstallingApplication
SoftwarewithYourPrinter
EmbeddingPrinterCommands
Programming
thePrinterwithDOSCommands
Programming
withBASIC
Howtheprogramworks
77
77
78
80
82
86
Chapter 7 TROUBLESHOOTING AND MAINTENANCE
Troubleshooting
Powersupply
Printing
Paperfeeding
Maintenance
ReplacingthePrintHead
89
89
90
90
92
95
95
30
.
Chapter 8 SPECIFICATIONS
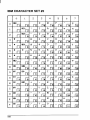
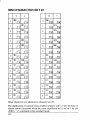
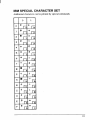
Chapter 9 CHARACTER SETS
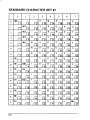
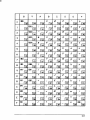
StandardCharacterSet
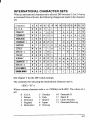
International
CharacterSets
IBMCharacterSet #2
IBMCharacterSet#1
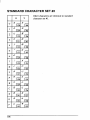
IBM Special Character Set
99
103
104
106
107
109
110
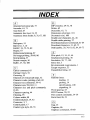
INDEX
113
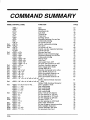
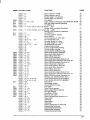
COMMAND SUMMARY
116
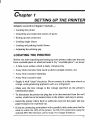
chapter 1
SETTING UP THE PRINTER
Subjects covered in Chapter 1 include —
●
Locatingthe printer
●
Unpackingand inspection(namesof parts)
✎
Settingup and connection
✎
Loadingsinglesheets
●
Loadingand parkingfanfoldforms
✘
Adjustingthe printinggap
LOCATING THE PRINTER
Beforeyou startunpackingand settingup yourprinter,make surethat you
have a suitableplaceon whichto locateit. By “a suitableplace”,we mean:
. A firm, level surfacewhichis fairly vibration-free
●
Away from excessiveheat (such as directsunlight,heaters,etc)
●
Away from excessivehumidity
●
Away from excessivedust
●
Supplyit with“clean”electricity.Do not connectit to the samecircuitas
a large,noise-producingappliancesuch as a refrigerator.
●
Make sure the line voltage is the voltage specified on the printer’s
identificationplate.
●
To discomect the printerthe plug has to be disconnectedfrom the wall
socket,whichhas to be locatedcloseto the printer,and easy to access.
●
Install the printer where them is sufficientroom for the paper and any
paperbeing fed in or printedout.
●
If youareconnectingyourprinterwithaparallelcable,makesurethatthe
cableis within2m {6-fi)of the printer.An RS-232connectionusing the
optionalSPC-8Kinterfacecan be made over longerdistances.
I
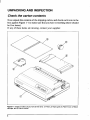
UNPACKING AND INSPECTION
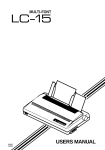
Checkthe cartoncontents
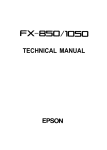
Nowunpackthe contentsof the shippingcarton,andcheckeachitemin the
box againstFigwe 1-1to makesurethat youhaveeverything(thereshould
be five items).
If any of these items are missing,contactyour supplier.
Figure 1-1.Check to make sure you have all five items: 1) Printer, 2) Paper guide, 3) Platen knob, 4) Ribbon
cartridge, and 5) User’s manual.
2
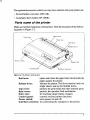
Theoptionalaccessorieswhichyoumayhaveorderedwithyourprinterare:
●
Serial-Parallelconverter(SPC-8K)
●
Automaticsheetfeeder (SF-1ODR)
Parts name of theprinter
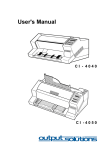
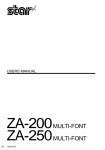
Makean externalinspectionof theprinter.Notethelocationsof thefollowing parts in Figure 1-2.
ver
Power s
knob
Control panil
Figut@1-2 The printer’s external parts
Bail lever:
opensandclosesthe paperbail whichholdsthe
paper againstthe platen.
Release lever:
releasesthe platen.Thislever must be back for
singlesheets,and up for fanfoldforms.
Top cover:
protectsthe printhead and other internalparts.
protectsthe sprocketfeed mechanism.
Rear cover:
for insertingsinglesheetsof paper.
Entry slot:
Control panel:
controlsvariousprinter functions.
Power switch:
turnspoweron and off.
Interface connector: for connectingthe computerto the printer.
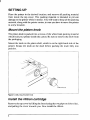
SETIWJG UP
Place the printer in the desiredlocation,and remove all packingmaterial
from inside the top cover. This packing material is intendedto prevent
damageto theprinterwhilein transit.You willwantto keep allthepacking
material,alongwiththeprintercarton,in caseyouhaveto movethe printer
to a new location.
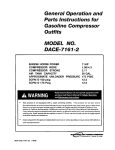
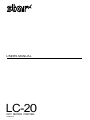
Mount theplaten knob
The platenknobis packedinto a recessof the whitefoampackingmaterial
whichheld yourprinterinsidethe carton.Be sureto removethe knob from
the packaging.
Mountthe knob on the platenshaft, whichis on the right-handside of the
printer. Rotate the knob on the shaft before pushing the knob fully into
position.
~
.
Platen
knob
Figure 1-3. Mounting the platen knob
lnsta// the ribboncartridge
Removethetopcoverby liftingthefront(usingthetwogripson eitherside),
andpullingthe covertowardsyou.Now installthe ribbon.
4
Figure 1-4. Removing the lop cover
1. Turn the tension knob counterclockwiseon the ribbon cartridge to
tightenthe ribbonif it is slack.
2. Guidethe ribbonbetweenthe printhead andthe platen,makingcertain
that the spindles on the cartridge holder fit into the sockets on the
cartridgeitself.
Figure 1-5. Installing the ribbon cartridge
I
3. Theribbon shouldpassbetweenthe printhead andtheprinthead shield
(see Figure 1-6).
I
I
Print head
\
Print head shield
‘ h~,.kribbo.
IIL
@J\
Figure 1-6. Pass the ribbon between the print head and print haad shield
To replacethe top cover, insert the tabs into the slots on the printer case.
Swingthe front edge down to closethe cover.
Leavethe top coverclosed duringnormaloperation.The cover keeps out
dustanddirtand reducestheprinter’soperatingsounds.Openthecoveronly
to changethe ribbonor make an adjustment.
6
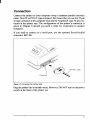
Connection
Connecttheprinter to your computerusing a standard parallel interface
cable.On a PC or PC/AT-typecomputer,thismeansthat youuse the 25-pin
D-typeconnectorat the computerend, andthe Amphenol-type36-pinconnector at the printer end. The configurationof the printer’s connectoris
given in Chapter 8 should you need a cable for connectionto another
computer.
If you need to connect to a serial port, use the optional Serial-Parallel
converter,SPC-8K.
\!j$”
&
’06’
I
,/
Connector
Interface cable
*
Figure 1-7. Connecting the interface cable
Plugtheprinterinto a suitableoutlet.However,DONOTturnon thepower
switch at the front of the printeryet.
7
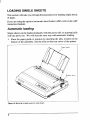
LOADING SINGLE SHEETS
Thissectionwilltake you throughtheproceduresfor loadingsinglesheets
of paper.
If youareusingthe optionalautomaticsheetfeeder(AN?),referto the ASF
instructionbooklet.
Automaticloading
Singlesheetscan be loadedmanuallywith the poweroff, or automatically
with the poweron. We will start the easy way with automaticloading.
1. Place the paper guide in positionby insertingthe tabs, locatedon the
bottomof the assembly,into the slotson the rear coverof the printer.
lever
Figure T-8. Mounting the paper guide for single sheets
8
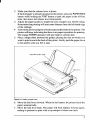
2. Make sure that the releaselever is down.
If fanfoldpaperis alreadymountedin theprinter,pressthe PAPER FEED
buttonwhileholdingthe FONTbuttonto park the paperin the off-line
state,then movethe releaseleverdownwards.
3. Adjustthe paper guidesto match the size of paper you will be using.
Rememberthatprintingwillstartsomedistancefromtheleft-handedge
of the carriage.
4. Turnonthepowerusingtheswitchlocatedatthefrontof theprinter.The
pnnterwill beep,indicatingthatthereisnopaperinpositionforpnnting.
The orange POWER indicatorwill also flash to confirmthis.
5. Place a singlesheetbetweenthe guides,placingthe side on whichyou
wantto printtowardsthebackoftheprinter.Gentlypushthepaperdown
in the guidesuntil you feel it stop.
I
Figure 7-9. Loading a single sheet
6. Movethe bail leverforward.Whenthe bailopens,the printerfeedsthe
paper automatically.
7. Move the bail lever back. The paper will feed slightlyforward again,
endingin positionto print with a top marginof aboutone inch.
9
I
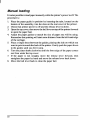
Manualloading
It isalsopossibletoloadpapermanuallywhiletheprinter’spowerisoff.The
procedureis:
1. Place the paper guide in positionby insertingthe tabs, locatedon the
bottomof the assembly,into the slotson the rear coverof the printer.
2. Checkthat printerpower is off and the releaselever is down.
3. Openthetopcover,thenmovethebailleverontopof theprinterfonvard
to open the paper bail.
4. Adjustthe paper guidesto match the size of paper you will be using.
Rememberthatprintingwillstartsomedistancefromtheleft-handedge
of the carriage.
5. Place a singlesheetbetweenthe guides,placingthe side on whichyou
wantto printtowardsthebackoftheprinter.Gentlypushthepaperdown
in the guidesuntil you feel it stop.
6. Turn the platenknobclockwiseuntilthe frontedgeof the papercomes
out from underthe top cover.
7. If the paper is not straight, move the release lever forward, then
straightenthe paper by hand and movethe releaselever back down.
Movethe
bail leverback to closethe paperbail.
8.
10
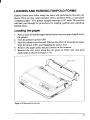
LOADING AND PARKING FANFOLD FORMS
Fanfold forms have holes along the sides and perforationsbetween the
sheets.They are also called sprocketforms, punchedforms, or just plain
“computerpaper”.This printeracceptsformsup to 10”wide.This section
will take you throughthe proceduresfor loading,parking and unparking
fanfoldforms.
Loadingthepaper
1. Placea stackof fanfoldpaperbehindandatleastonepage-lengthbelow
the printer.
2. Turn the printer’spower OFF.
3. Pushthe releaseleverforward.Thishastheeffectof releasingthe paper
from the platenroller,and engagingthe tractorfeed.
4. Removethe paper guideand put it asidefor the moment.
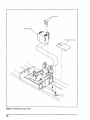
5. Remove the rear cover using the two grips on either side, and push
backwardsas shownin Figure 1-10.
Rear cover
I
Figure 1-10.Removing
therearcover
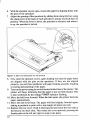
6. Withthe sprocketcoversopen,mountthe paperby aligningholes with
the pins on the sprockets.
7. Adjustthe spacingof the sprocketsby slidingthemalongthe bar, using
the clampleverat the backof each sprocketto releaseandlock themin
position.Whenthe lever is down,the sprocketis released,and when it
is up, the sprocketis locked.
I
Figuru 7-11. Mount the fanfold psper over the sprockets.
8. Now closethe sprocketcovers,againmakingsure that the paperholes
are aligned with the pins on the sprockets. If they are not aligned
properly,youwillhaveproblemswithpaperfeeding,possiblyresulting
in tearingandjammingof the paper.
9. Turnon thepowerusingtheswitchlocatedatthefrontoftheprinter.The
printerwill‘beep,indicatingthat ttiepaperis not yet fully loaded.This
is also confirmedby the orange POWERindicatorflashing.
10.Movethe bail leverforward.Whenthe bailopens,the printerfeedsthe
paper automatically.
11.Move the bail lever back. The paper will feed slightlyforward again,
endingin positionto print with a top marginof aboutone inch.
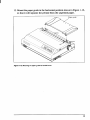
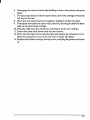
12.Replacethe rear cover.Hold it tiltedupward and insertthe four tabs at
the bottominto their slots.Then rotatethe coverupwards,pressingthe
thumbpads on the left and rightto snap it into place.
12
13.Mountthe paperguidein the horizontalpositionshownin Figure 1-12,
so that it will separatethe printedfrom the unprintedpaper.
F/gufo 1-12. Mountingthe paper guide for fanfold forms
13
Paperparking
Afterloadingfanfoldpaper,youdo nothaveto unloadit whenyou wantto
print on a singlesheet.The printerwill “park”it for you if you followthe
procedurebelow.
1. To beginpaper parking,start with power ON, fanfoldpaperloadedin
printingposition,and the releaselever up.
2. Press the ONLINEbuttonon the controlpanelto set the printeroff-line.
ONLINEindicatorwill turn off.
3. Tear off the printedform at the last perforation,leavingnot more than
abouthalf a page showingabovethe top cover.If necessary,press the
PAPER FEED buttonto feed paperforwarduntila perforationis located
just abovethe top cover, and tear there.
4. Press the FONT buttonand hold it down.
5. Whileholdingthe FONTbuttondown,pressthe PAPER FEED buttonon
the controlpanel.
The printerwill automaticallyfeed the fanfoldform backwarduntilthe
paperis completelyfree of the platen.
6. Movethe releaselever to the down position.
7. Mountthe paper guidein the uprightposition.
Now you can load single sheets either automaticallyor manually,as explainedpreviously.The fanfold paper remainsparked at the back of the
printer.
Paperunparking
Whenyou wantto resumeusingfanfoldpaper,theprocedureis as follows.
1.
2.
3.
4.
Removeall singlesheetsfrom the printer.
Mountthe paper guidein the horizontalposition.
Movethe releaselever to the up position.
WithPowerON,movethebailleverforward.Thepnnterwill automatically feed the parkedfanfoldpaperback into positionfor printing.
5. Movethe bail lever back to close the bail.Now you are readyto print.
14
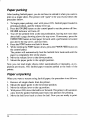
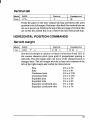
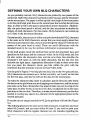
ADJUSTING THE PRINTING GAP
The distance between the print head and the platen can be adjusted to
accommodatedifferentpaperthicknesses.To makethisadjustment,remove
the top cover.The adjustmentleveris locatednearthe left sideof the paper
bail. Fullingthe adjustmentlever towardsyou widensthe gap; pushingit
away from you narrowsthe gap.
There are five positions, and you can feel the lever clicking into each
position.The secondpositionfromthe top is the onemost commonlyused
for single sheets of paper. Try differentpositionsuntil you get the best
printingresults.
FJgure 7-73. Adjusting for different thicknesses of paper
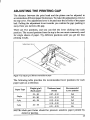
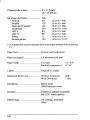
The followingtable provides the recommendedlever positions for each
papertypes as a reference.
PaperType
Weight(g/mz)
(Eachpaper)
Thickness
(mm)
(Total)
Recommended
Leverposition
52-82
0.07-0.10
2nd
Single
83-90
2-ply
40-58
3-ply
40-58
0.11-0.12
0.12-0.16
0.18-0.20
0.21-0.25
3rd
3rd
3rd
4th
NOTE: Multi-part forms should be pressure sensitive paper jointed by
dottedor pasting.
15
16
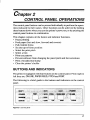
chapter2
CONTROL PANEL OPERATIONS
The controlpanelbuttonscan be pressedindividuallyto performtheoperationsindicatedby theirnames.Otherfunctionscan be achievedby holding
thesebuttonsdownwhenyouturntheprinter’spoweron,or by pressingthe
controlpanelbuttonsin combination.
This chapterexplainsall the buttonand indicatorfunctions.
● Pauseprinting
● Feed paper (fast and slow,forwardand reverse)
✎ Park fanfoldforms
✎ Set the top-of-formposition
● Selectthe print pitch
● Selecta font
✎ Print test patterns
✎ Preventsoftwarefrom changingthe panelpitch and font selections
✎ Print a hexadecimaldump
● Clearthe printer’sbuffer
BUTTONS AND INDICATORS
Theprinteris equippedwithfourbuttonson thecontrolpanel.Fromrightto
left they are, ONLINE,
PAPER FEED, PITCH and FONT.
followingis a brief guideto the buttonsand indicatorson the control
panel.
The
Figure 2-1. Control penel
17
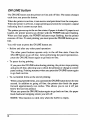
ON L/NE button
The ON LINE buttonsetstheprinteron-lineand off-line.The statuschanges
each time you press the button.
Whentheprinteris on-line,it can receiveandprintdatafromthe computer.
Whentheprinteris off-line,it stopsprintingandsendsthecomputera signal
indicatingthat it cannotacceptdata.
Theprinterpowersup in the on-linestatusif paperis loaded.If paperis not
loaded,the printer powersup off-linewith the POWER indicatorflashing.
When you load paper, the POWER indicatorstops flashing,but the printer
remainsoff-line.To startprintingyoumustpressthe ONLINEbuttongo online.
You will wantto press the ONLINEbuttonare:
●
Before and after any otherpaneloperation
The other panel buttons operate only in the off-line state. Press the
ONLINE buttonto go off-line.After performingthe paneloperation(s),
press the ONLINE buttonagainto go back on-line.
●
To pause duringprinting
If youpresstheONLINE buttonduringprinting,theprinterstopsprinting
andgoesoff-line,allowingyouto checktheprintoutor changea control
panelsetting.PrintingresumeswhenyoupresstheONLINEbuttonagain
to go back on-line.
●
To cut,fanfoldforms at the end of printing
Whenusingfanfoldforms,youcanholdtheONLINE buttondownforone
second. In additionto going off-line, the printer also feeds the paper
forward approximatelytwo inches. This allows you to cut it off just
belowthe last line printed.
Whenyou pressthe ONLINEbuttonagainto go back on-line,the paper
feedsbackwardstoppingwhere you left off.
NOTE: This functionis valid only when the buffer is empty.
18
PAPERFEED button
If you press this buttonwhile off-line,the paper will feed forward.If you
hold the buttondown,the printerwill performconsecutiveline feeds.
IfyoualsopresstheONLINEbuttonwhileyouareline-feeding,thepaperwill
feed automaticallyto the top of the next page.This is explainedlater.
If youpress thisbuttonwhileon-line,this willalternatelyselectand cancel
the Quiet mode. When in the Quiet mode, the printer will print slightly
slower,but at a reducednoiselevel.
PITCHbutton
Thisbuttonallowsyouto selecttheprintingpitch.Rememberthattheprinter
must be off-line for you to do this. Successivepresses of this button will
illuminate(and select)the followingoptionsin order:
Pitch
Pica
Indicator(s)
10CPI
Elite
12CPI
Condensedpica
10CPI, COND
12CPI, COND
10CPI, PROP
12CPI,
PROP
Condensed elite
Pica proportional
Elite proportional
19
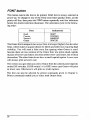
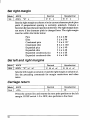
FONTbutton
This button selectsthe font to be printed.Draft font is always selectedat
power-up.To changeto one of the NLQ (near letterquality)fonts, set the
printeroff-line,then press the FONTbuttonrepeatedlyuntil the indicators
besidethe desiredselectionilluminate.The selectionscycle in the following order:
Font
Draft
Courier
Sanserif
Orator
Indicator(s)
DRAFT
COURIER
SANSERIF
ORATOR
TheOratorfontisuniqueintwoways.First,itislarger(higher)thantheother
fonts,whichmakesit a goodchoicefor labelsand othertext requiringhigh
visibility.You will need a little extra line spacing when Orator is used.
Second,there are two versionsof the Oratorfont:one prints smallcapitals
in placeof lower-caseletters;theotherprintslower-caseletters,butwithout
descenders.Theotherfontsdo nothavea small-capitalsoption.Lowercase
will alwaysprint as lower case.
Theversionyouget whenyouselectOratorfromthecontrolpaneldepends
on the DIP switches.If DIP switch 1-6is OFF,lower-caseOratorwillprint
as lower case. Otherwiseit will print as smallcapitals.
The font can also be selected by printer commandsgiven in Chapter4.
Printercommandsenableyou to selectboth Oratorfonts.
20
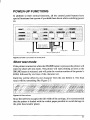
POWER-UP FUNCTIONS
In additionto their normal functions,all the control panel buttonshave
specialfunctionsthatoperateif youholdthemdownwhileswitchingpower
Il:,:;,:a,:,t[lTyj,g
J,,,,,
Stay in panel font
Stay in panel pitch
Eigum 2-2. Power-up functions of control panel
Short test mode
Iftheprinteris turnedon whiletheONLINEbuttonispressed,theprinterwill
enterthe short self-testmode.The printerwill start printingas soon as the
ONLINEbuttonis released,andwillprinttheversionnumberof theprinter’s
ROM, followedby six lines of the characterset.
Each line will be offset by one characterfrom the one before it. The final
result will be somethinglike Figure2-3.
‘-E!CIBCDEFGHI
JKLMNOFIJRSTUVWXYZ[ \ 1“- ‘abcdefghi
jk Imno
! #’#$%:<’ ( ) *+. -. /01234567!39:
: ,::=.,
! ,,~$~~~ ( ) x+, -. /0123456789
: : .:.=:>?QABcDEFGHIJKLMNOFQRSTUVW
xYZ[ 11“”’-‘abcde+ghi jk lmnOP
- %’ABcDEFGHIJKL
MNOF13RSTUVWXYZ t \ 1’””- ‘abcdefghi
Jk lmnoPcl
: ~.-:.
:
#$%&’ ( j a+, -. /0123456789:;
..=:~?@GBCDEFGH
IJ~:LMNoP~sTuvWxYz[ 11“’”-‘abCde@hi jk lmnOPqr
ABC
[\ 1’- ‘a bcdefghi
Jklmnopqrs
; ::=.,..ma
_ DEFGHI JKLMNOPQI+STUVWXYZ
$%&’( ) *+, -. /012345678?:
-.-Ia6BcDEF’6H1
J#:LMNOFQRSTUVWXYZ[\ l”- ‘a bcdefghi J k lmnOPqr-t
X&’ ( ) U+. -. /0123456789:
: .“-.
I-
C,#$%&’( ) X+. –. /O1234567S9:
Figure 2-3. Short self-test
Sincethe self-testoccupiesthefullwidthof the carriage,it is recommended
that the printeris loadedwiththe widestpaperpossibleto avoiddamageto
the print head and/orplaten.
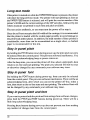
Long test mode
Iftheprinteristurnedon whilethe PAPERFEEDbuttonispressed,theprinter
will enterthe long self-testmode.The printerwill startprintingas soon as
the PAPERFEEDbuttonis released,andwillprintthe versionnumberof the
printer’sROMandthe currentsettingsof the DIPswitches,followedby the
wholecharacterset printedin each font and pitch available.
The test cyclesendlessly,so you mustturn the poweroff to stop it.
Sincethe self-testoccupiesthefill widthof thecarnage,it is recommended
thatthe printeris loadedwiththe widestpaperpossibleto avoiddamageto
the printhead and/orplaten.In addition,thetotalnumberof linesprintedis
considerable,more than can be accommodated
on a singlesheet, so fanfold
paper is recommendedfor this test.
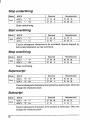
Stay in panel pitch
Byholdingthe PITCHbuttondownduringpower-up,theprintpitchcanonly
be selectedfromthecontrolpanel.Thispreventssoftwareinterference.You
will hear an acknowledgingbeep as power comeson.
Afterthebeeptone,youcan settheprinteroff-line,selecta printpitch,then
mtum to on-lineand startprinting.The pitchyou selectedwillnot be reset
or otherwisechangedby any commandsyour softwaremay issue.
Stay in panel font
By holdingthe FONTbutton duringpower-up,fonts can only be selected
fromthecontrolpanel.Thispreventssoftwareinterference.Therewillbean
acknowledgingbeep, after whichyou can set the printer off-line,select a
font,thenreturnto theon-linestateandstartprinting.The selectedfontwill
not be changedby any commandsyour softwaremay issue.
Stay in panel pitch and font
If youwantto protectboththepitchandfontsettingsfromsoftwarechanges,
press both the PITCHand FONT buttonsduringpower-up.There will be a
little long acknowledgingbeep.
Pressingthesebuttonsduringpower-updoesnot preventyou from making
any numberof changeslater from the controlpanel.
22
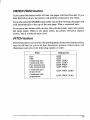
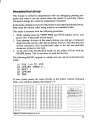
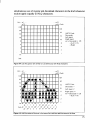
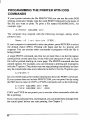
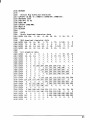
Hexadecimaldump
This feature is useful for programmed who are debuggingprinting programs and want to see the actual codes the printer is receiving.(Some
computerschangethe codesthe programmerintended.)
Inthismode,alldatareceivedwillbeprintedin ahexadecimaldumpformat,
ratherthan the controlcodesbeing actedon as commandcodes.
This modeis accessedwith the followingprocedu~:
1. While holding both the PAPERFEEDand PITCHbuttons down, turn
power ON. A beep tone will be heard.
2. Start printing.In place of the usual printoutyou will get a formatted
dumpshowingexactlywhatdatatheprinterreceives.Eachlinepresents
sixteen charactem their hexadecimalcodes to the left and printable
charactersprintedon the right.
3. At the end of the hexadecimaldump, set the printer off-line with the
ONLINEbutton.This is necessaryto printthe last line.
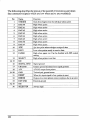
The followingBASICprogramis a simpletest you can run in hexadecimal
mode:
10 FOR 1=0 TO 255
20
30
40
50
LPRINT
CHR$( 1 ) ;
NEXT I
LPRINT
END
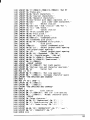
If your system passes the codes directly to the printer withoutchanging
them, you will get a printoutlike Figure2-4.
m [:)1(:]203 04
1 [] 11
’20 ~~
12
~~
31>
40
50
60
70
80
90
31
41
51
01
71
.91
9I
32
42
52
62
72
S2
72
M)
EI[:I
CCI
D(I
E()
F[l
(:]D
01 42
B 1 E12
Cl C2
DI D2
E 1 E2
F 1 F2
(:)(?
Figure 2-4.
1.3 14
p~ 24
33 34
4s 44
5.3 54
63 64
73 74
S3 84
93 94
05
15
25
35
45
55
.55
75
S5
95
06
16
26
3.5
46
36
66
76
86
96
07
17
27
37
47
57
67
77
87
97
As
B3
C.3
D3
E3
F3
65
B5
C5
D5
E’5
F5
A.5
Et6
C6
D6
E6
F6
Q7
E17
C.7
D7
E?
F7
A4
E14
C4
D4
E4
F4
0!3
113
~S
38
48
5S
68
78
8S
98
AS
E18
C@
DE!
ES
FB
09
19
29
39
49
59
69
7?
89
99
69
!39
C9
D9
E9
F9
[:IA
1A
ZQ
30
4A
3A
6A
76
8.4
9A
AA
13A
CO
DA
EA
FA
Oi3
113
~B
7B
4B
5i3
6!3
7B
8B
9S
(WI
!3EI
CB
DEI
EH
FEI
OC
IC
2C
3C
4C
5C
6C
7C
8C
9C
AC
BC
CC
DC
EC
FC
CID
ID
2D
.3D
4D
!5D
6D
7D
SD
9D
6D
EID
CD
DD
ED
FD
OE
IE
2E
3E
4E
5E
6E
7E
SE
9E
9E
BE
CE
DE
EE
FE
OF
IF
2F
3F
4F
5F
6F
7F
SF
9F
6F
RF
CF
DF
EF
FF
. . . . . . . . . . . . . . . .
. . . . . . . . . . . . . . . .
! “#$”/.&’ ( ) *+, -. /
(:11234 !36789 : ; <:=:$?
@9BCDEFGHI JKLMNO
PQRSTUVWXYZ
‘abc de+ghi j
pqt. stuvwxyz
. . . . . . . . . . .
. . . . . . . . . . .
. . . . . . . . . . .
. . . . . . . . . . .
. . . . . . . . . . .
. . . . . . . . . . .
. . . . . . . . . . .
. . . . . . . . . . .
. .
[ \ lok 1 mno
{ : 3 -’.
. . . . .
. . . . .
. . . . .
. . . . .
. . . . .
. . . . .
. . . . .
. . . . .
Sample hexadecimal dump
23
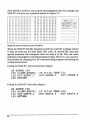
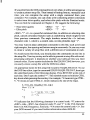
Most BASICS, however,arenotquitethatstraightfonvard.Forexample,the
IBM-PC will give you a printoutsimilarto Figure2-5.
............... .
................
! “ 4+$%!%’( ) x+, -. /
O 123456789:
: .::= ::.?
@ABCDEFGHIJF::LMNO
PQF:STLIVWXYZ [ \ 1‘“’‘ abcde+g h i j l:.1mno
pqh. 5tLlVW>:yZ : : ]+.
................
................
................
.............. ..
................
................
............... .
..... ...........
“.
Figure2-5. Sample hexadecimal dump with IBM-PC
When the IBM-PCBASICinterpretersendshex codeOD(carriagereturn)
it adds an extra hex OA(line feed). Hex code 1A (end-of-fde)also gets
special treatment:the interpreterdoes not send it at all. This can cause
problemswithgraphicsordownloadcharacterdata.However,youcansolve
this problemby changingline 20 in the precedingprogramand addingthe
codingshownbelow.
Codingfor IBM-PCwith monochromedisplay:
20 GOSUB 100
100 O==INP(&H3BD) : IF 0<128 THEN 100
: OUT &H3BE, 4
: OUT &H3BE,5
110 OUT &H3BC, I
1204 RETURN
Codingfor IBM-PCwith color adapter:
20 GOSUB 100
100 O=INP (&H379 ) : IF 0<128 THEN 100
: OUT &H37A, 4
: OUT &H37A, 5
110 OUT &H378, I
120 RETURN
ill
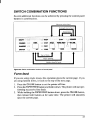
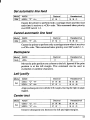
SWITCH COMBINATION FUNCTIONS
Severaladditiomdfunctionscan be achievedby pressingthe controlpanel
buttonsin combinations.
m
Reverse
mmu-teed
I
Figwe2-6. Switch combination functions of control panel
Form feed
If you are usingsinglesheets,this operationejectsthe currentpage.If you
are using fanfoldforms,it feedsto the top of the next page.
1. Press the ONLINE button to set the printeroff-line.
2. Pressthe PAPER FEED buttonandholditdown.Theprinterwillstartperformingsuccessiveline feeds.
3. Whileholdingthe PAPERFEEDbuttondown,pressthe ONLINEbutton,
then release both buttonsat the same time. The printer will smoothly
eject the currentpage.
Paper Parking
This procedurefeedsthe paper backward.It parks the fanfoldform at the
backoftheprintersothatyoucanswitchto signal-sheetfeeding(bymoving
the releaseleverto the down position).
Beforeparkingfanfoldforms,tear off all but the last page,leavingless (at
least three inchesless) than a full page showingabovethe top cover.
1. Press the ONLINEbuttonto set the printeroff-line.
2. Press the FONTbuttonand hold it down.
3. WhileholdingtheFONTbuttondown,
pressthePAPERFEEDbutton.The
paper will be fed out backward.
Topof form
Whenyoupowerontheprinter,thetop-of-formpositionis automaticallyset
to thecurrentposition.Ifthisisnotwhereyouwantthetop ofthepageto be,
you can changethe top-of-formpositionas follows:
1. Press the ONLINEbuttonto set the printeroff-line.
2. Move the paper to the desired top-of-formpmition by pressing the
PAPER FEED button,or by performinga forwardor reverse‘micro-feed.
3. Press and hold the FONTbutton.
4. While holding the FONT button down, press the PITCHbutton, then
releaseboth buttonsat the sametime.The printerwill beep to indicate
that the top-of-formpositionhas been set.
Forwardmicro-feed
For finealignment,youcanfeedthepaperforwardin very smallincrements
as follows:
1. Press the ONLINEbuttonto set the printeroff-line.
2. Press the ONLINE button again and hold it down.
3. Whileholdingthe ONLINE buttondown,pressthe PAPERFEEDbutton.
Thepaperwillstartadvancingin a seriesof smallsteps.Whenyouwant
to stop, releaseboth buttons.
26
Reversemicro-feed
You can also feed the paper in small incrementsin reverse,to return to a
higherpositionon the same page.
NOTE: Withfanfoldforms,do nottryto returnto apreviouspage.Theperforationmay catch insidethe printerand cause a jam.
‘1. Press the ONLINE buttonto set the printeroff-line.
2. Press the ONLINEbuttonagain and hold it down.
3. Whileholdingthe ON LINE button down, press the PITCHbutton.The
paperwill startmovingbackwardsin a seriesof smallsteps.Whenyou
wantto stop, releaseboth buttons.
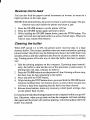
Clearingthe buffer
When DIP switch 1-2 is ON, the printer stores received data in a large
memorybuffer.Thiscreatesaproblemwhenyouwantto abandonaprinting
job andrestart:theprintermaybeholdingmoredatain its bufferthanit has
actuallyprinted,and this unprinteddatamust be clearedout beforerestarting. Turningpower off is one way to clear the buffer,but there is another
way:
1. Halt the printingprogramon the computer.If printing stops immediately,the bufferis clearandthe rest of this procedureis unnecessary.If
printingdoes not stop, continueas follows:
2. PresstheONLINEbuttontosettheprinteroff-line.Printingwinnow stop,
but there may be data remainingin the buffer.
3. Press and hold the FONTbutton.
4. Whileholdingthe FONTbutton
down,pressandholdthe ONLINE
button.
Continueholdingthesetwo buttonsdown.In aboutthree secondsyou
will hear a beep tone signalingthat the bufferhas been cleared.
5. Releasethese buttons,make any necessarycontrolpanel settings,then
set the printerback on-line.
It is essentialto halttheprintingprogramon thecomputerbeforeyougoofflke. Otherwise,when you go back on-linethe computerwill start sending
dataagainandtheprinterwillcontinueprinting,withmissingdatawherethe
buffer was cleared.
27
z?
chapter 3
DIP SWITCH SETTINGS
The bank of DIP (DualIn-linePackage)switchesinsidethe printeris used
for variousfunctions.
This chapterexplainswhere the DIP switchesare located,and how to use
them.
LOCATION OF THE DIP SWITCHES
Whenyou removethe printer’scover and look inside,you will see on the
greenboard at thebottomof the printertwogroupsof smallwhiteswitches
markedDSW1andDSW2.Thesearetheprinter’sDIPswitches.DSW1has
eightswitches,named 1-1to 1-8fromleftto right.DSW2hasfourswitches
named 2-1 to 2-4.
e
/
DIP Switch I
/
DIP Switch
OFF
2
mu
Figwv S7. DIPswitches
For all switches,the ONpositionis towardsthe back of the printerand the
OFFpositionis towardsthe front.To set a DIP switch,use a ballpointpen
or other smallimplementto movethe switchto the ON or OFF position.
The printer’spowershouldbe off whenyou set the DIP switches.Settings
madewhilepoweris on do not takeeffectuntilpoweris switchedoff, then
on again,becausethe printer~ads the DIP switchesonly at power-up.
29
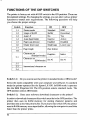
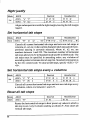
FUNCTIONS OF THE DIP SWITCHES
The printeris factory-setwith all DIP switchin the ONposition.These are
thestandardsettings.By changingthe settings,youcan altervariousprinter
fimctionsto match your requirements.The followingquestionswill help
you choosethe proper settings.
Switch
1-1
1-2
1-3
1-4
1-5
1-6
1-7
143
2-1
2-2
2-3
2-4
Switchl-l:
Function
ON
OFF
Printermode
UsageofRAM
AutoLF
Standard
Buffer
No
IBM
Download
Yes
Autosheetfeeder
Paper-outdetector
Oratorlowercase
Inactive
Enabled
Smatlcaps
Active
Disabled
Lowercase
Page length
(see
below)
Characterset
(Standardmode) ‘raphics
Characterset
(IBM mode) ‘et #2
Italics
Set#l
International
characterset
DoyouwanttousetheprinterinstandardmodeorIBMmode?
Selectthe modecompatiblewith your computerand software.In standard
modethe printeroperateslike theEpsonLX-850.In IBMmodeit operates
like the IBM Propnnter HI. The ON positionselects standardmode. The
OFFpositionselectsIBM mode.
Switch 1-2:
Does your softwaredownloadcharactersto the printer?
Inorderto downloadcharactemthisswitchmustbein the OFFposition.The
printer then uses its RAM memory for storing character patterns and
providesonlya one-lineprintbuffer.If youleavethisswitchON,theprinter
usesitsRAMmemoryasaninputbuffer,allowingthecomputerto senddata
fasterthan the printerprints.
30
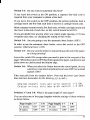
Switch 1-3: Do you want an automaticline feed?
If you leave this switch at the ON position, a separate line-feed code is
required from your computer to obtain a line feed.
If you move this switch to the OFF position,the printer performsboth a
carriagereturn and line feed each time it receivesa carriage-returncode.
Most computer systems send a line feed code, or both a carriage return and
line feed, at the end of each line, so this switch should be left ON.
If you get doubleline spacingwhen you expectsingle spacing,or if lines
overprinteach other,try changingthe settingof this switch.
Switch 1-4:
AR you going to use the automatic sheet feeder (ASF)?
In order to use the automaticsheet feeder, move this switch to the OFF
position.Otherwiseleave it ON.
Switch 1-5: Do youwanttheprinterto stopprintingattheen dofthepaper,
or to keep printing?
Leavethis switch ON except when you need to print to the veryendof the
paper.WhenthisswitchisOFFtheprinterignoresthepaper-outdetectorand
printsdown to (and beyond)the bottomedge.
Switch 1-6: Whenyou selectthe Oratorfonton the controlpanel,do you
wantlower-caseletterstoprintaslowercase(OFF)eras small
capitals(ON)?
Take your pick from the samplesbelow.Note that the lower-caseOrator
does not have descendersfor the lettersg, j, p, q, and y.
ORATOR
Orator
PRINTS
THIS
Prints
this way
WAY WITH
with
SWITCH
1-3
switch
1-3 OFF .
ON.
Switches
1-7 and 1-8: Whatis the pagelengthof yourpaper?
Youcan selectoneof fourpagelengtheswiththe settingsof theseswitches
as shownbelow.
Page length
1-7
1-8
Page length
1-7
1-8
11 inches
ON
ON
A4 size
ON
8 inches
OFF
ON
12 inches
OFF
OFF
OFF
31
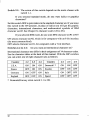
Switch 2-1: The actionof this switch dependson the mode chosen with
switch 1-1.
If you selected standard mode, do you want italics or graphics
characters?
Setthis switchOFFto printitalicsin the standardcharacterset. If youleave
this switch in the ON position,in place of italicsyou will get the graphic
characte~, internationalcharacters, and mathematicalsymbols of IBM
characterset #2. See Chapter9, charactercodes 128to 254.
If you selectedIBMmode,do youwantIBMcharacterset#l or#2?
ON selectscharacterset #2, whichis for computerswith an 8-bitinterface
(the most commonkind).
OFF selectscharacterset #1, for computerswith a 7-bit interface.
Switches 2-2 to 2-4:
Do you want an internationalcharacterset?
Internationalcharactersetsdifferin theirassignmentof 14charactercodes.
See the charactertables at the back of this manual.With the DIP switches
you can selectone of eight charactersets as follows:
2-2
2-3
2-4
Country
2-2
2-3
2-4
U.S.A.
ON
ON
ON
DenmarkI *
ON
ON
OFF
France
OFF ON ON
ON OFF ON
OFF OFF ON
Sweden
OFF ON OFF
ON OFF OFF
OFF OFF OFF
Country
Germany
England
Italy
SpainI
* Denmark/Norwaywhen switch2-1 is ON.
32
—
chapter 4
PRINTER CONTROL COMMANDS
The printer has two emulationmodes:Standardmode and IBM mode.
IiIstandardmode,the printeremulatesthe functionsof the EpsonLX-850.
In IBM mode, the printer emulates the IBM Propnnter III. Additional
commandcodes are includedas a supersetof these emulations.
Theemulationis changedbymeansof DIPswitch1-1.WhenON,theprinter
will be in standard mode, and when OFF, the printer will be in IBM
emulationmode (see Chapter3). It is not possibleto changethe emulation
modeby meansof softwarecontrolor the front controlpanel.
Thischapterdescribestheprinter’scontrolcommands.Somecommandsare
commontoboththestandardandIBMmodes.Inthedescriptionsofthecommands, all commandswill be categorizedby function.The name of each
commandis followedby a table like the one below:
Mode
std.
Decimal
ASCII
Hexadecimal
<ESC> “X” “l”
27120
49
IB
78 31
<ESC>
27120
1
IB
78 01
“X” <1>
Mode:
Indicatesthemodein whichthecommandis recognized.
Std. Standardmode (DIP switch 1-1on)
IBM IBM mode (DIP switch 1-1off)
Both Both standardand IBM modes
ASCII:
Indicates the ASCII coding of the command.
Controlcharactemare enclosedin pointedbrackets: For example,<1> means charactercode 1.
Decimal:
Givesthe commandin decimalcharactercodes.
Hexadecimal: Gives the command in hexadecimal character
codes.
Parametersfor whichvaluesmustbe suppliedare indicatedby italicletters
such as n.
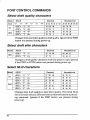
FONT CONTROL COMMANDS
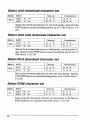
Select draft qualitycharacters
Mode ]
Decimal
ASCII
Both I “(”
‘T’
“F” “)”
.
.
.
<ESC> “X” “O”
std.
“x” <o>
<ESC>
“)”
.
.
IBM
“9” I 40407041
Hexadecimal
41 57 I 282846292939
1
27 ?20 48
16 78 30
27120
lB
0
78 00
<ESC>
“I”
“O”
27 73 48
16 49 30
<ESC>
“I”
<O>
27 73
16 49 CO
0
I
Changesfromnearletterqualitytodraftquality.Ignoredifthe FONT
button was pressedduringpower-up.
Select draft elite characters
IMode I
IBM
Decimal
ASCII
<ESC> “I” “l”
<ESC> “I” <1>
I1 27 73 49
27 73 1
Hexadecimal
I
1 16 49 31
16 49 01
I
Changesto draftqualitycharacterswithelitepitch(12cpi).Ignored
if the FONTor PITCHbuttonwas pressedduringpower-up.
Select NLQ characters
~ModeI
Decimal
ASCII
<ESC> “X” “l”
std.
<ESC> “X” <1>
<ESC> “I” “2”
<ESC> “I” <2>
IBM
<ESC>
“I”
<ESC>
‘T” <3>
“3”
2712049
27120 1
27 73 50
27 73 2
Hexadecimal
16 49 02
27 73 51
IB 49 33
27 73
16 49 03
3
1
16 78 31
16 78 01
16 49 32
Changesfrom draft qualityto “nearletter quality.The initialNLQ
fontis Counerunlessa differentfonthasbeenselectedby a preceding command. Ignored if the FONT button was pressed during
power-up.
34
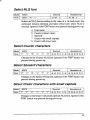
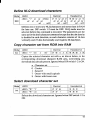
Select NLQ font
Decimal
Mode
ASCII
Both
<ESC> “k” n
27107
Hexadecimal
n
IB 6B
n
SelectsanNLQfontaccordingto thevalueof n. In draflmode,this
command remains dormant and takes effect later when NLQ is
selected.Ignoredif the FONTbuttonwas pressedduringpower-up.
n
O
1
7
8
Font name
Courier(initialvalue)
Sanserif
Oratorwith smallcapitals
Oratorwith lower case
Se!ectCouriercharacters
Mode
Both
Decimal
ASCII
“ ((“
“ “
“F”
“)”
“)”
I
Hexadecimal
“o” 4040 70 41 41 48 I 28 28 46 XI ~ 30
Changesto the CourierNLQ font. Ignoredif the FONTbuttonwas
pressedduringpower-up.
Select Sanserifcharacters
Mode
Both
Decimal
ASCII
“(”
“(”
“F’
“)”
“)”
“l”
4040
Hexadecimal
70414149 282846292931
Changesto the SanserifNLQ font.Ignoredif the FONTbuttonwas
pressed duringpower-up.
Select Oratorcharacterswithsmall capitals
Mode
Both
Decimal
ASCII
“(”
“(”
“F”
“)”
“)”
“7”
4040
70 41 41 55
Hexadecimal
28 2846 ~
~ 37
Changesto the OratorwithsmaIIcaptitalsNLQfont.Ignoredif the
FONTbutton
was pressed during power-up.
35
I
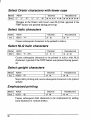
Select Oratorcharacterswith lower case
Mode
Both
ASCII
“ ((“
Decimal
“ “
“F’
‘S“
))
“ “
“8”
40 40 7041 41 56
Hexadecimal
28 2846 29 29 36
Changesto the Orator with lower case NLQ font. Ignored if the
FONTbuttonwas pressedduringpower-up.
Select italic characters
Mode
ASCII
Std.
<ESC>
Decimal
“4”
27 52
Hexadecimal
IB 34
Causessubsequentcharactersto be printedin italics.
Select NLQ italic characters
Mode
Ascli
IBM
<ESC> “I” <VT>
Decimal
27 73 11
Hexadecimal
IB
49
OB
Causes subsequentcharactersto be printed in italics with NLQ
charactem.Ignoredif the FONTbuttonwas pressedduringpowerUp.
Select uprightcharacters
Mode
ASCII
std. <ESC> “5”
Decimal
27 53
Hexadecimal
IB 35
Stopsitalicprintingandcausessubsequentcharactersto be printed
upright.
Emphasizedprinting
Mode
ASCII
Both
<ESC> “E”
Decimal
27 69
Hexadecimal
IB 45
Causes subsequentdraft charactersto be emphasizedby adding
extra thicknessto verticalstrokes.
36
Cancelemphasjzedprjntjng
Decimal
Mode
ASCII
Borh
<ESC> “F’
27 70
Hexadecimal
IB 46
CanWlsemphasizedprinting.
Double-strikeprinting
Decimal
Mode
ASCII
Both
-@3C> “G”
27 71
Hexadecimal
IB 47
Causessubsequentcharactersto be printedin double-strikemode
witha slightverticalpapermotionin between,causinga thickening
of horizontalstrokes.
For boldprint,use of double-strikeis ~commendedin NLQmode,
and combined use of emphasized and double-strikeis recommendedin draft mode.
Double-strikecannotbe used with superscriptsor subscripts.
Canceldouble-strikeprinting
Mode
ASCII
Both
@SC> “H”
Cancels
Decimal
27 72
Hexadecimal
IB 48
double-strikeprinting.
Start underlining
Mode
Both
ASCII
<ESC>“-” “l”
<ESC> “-” <1>
Decimal
27 4s 49
27 45 1
Hexadecimal
IB
2D
31
IB 2D 01
Causessubsequentcharactemto beunderlined.IBMblockgraphics
charactemand spaces skipped by horizontal tabulation are not
underlined.
Stop underlining
Mode
Both
ASCII
Decimal
Hexadecimal
<ESC> “-” “O”
27 45 48
IB 2D 30
<ESC>
27 45
IB 2D 02
“-”
<o>
0
Stopsunderlining.
Start overlining
Mode
IBM
Decimal
ASCII
<p.c>
,,-..
‘.~?>
27 95 49
<ESC> “– “ <1>
27 95 1
Hexadecimal
IB 5F 31
IB 5F 01
Causessubsequentcharactersto be overlined.Spaces skippedby
horizontaltabulationare not overlined.
Stop overlining
Mode
LBM
ASCII
<~sc>
Decimal
,, – .! “0..
<ESC> “ - “ <O>
Hexadecimal
?7 95 4a
IB 5F 30
27 95
IB 5F W
0
Stops overlining.
Superscript
Decimal
Mode
ASCII
Both
<ESC> “S” “O”
<ESC> “S” <O>
27 33 4a
27 83 0
Hexadecimal
IB 53 30
IB 53 00
Causessubsequentcharactemtobeprintedassuperscripts.Doesnot
changethe characterpitch.
Subscript
Mode
Both
Decimal
ASCII
Hexadecimal
<ESC>
“S” “l”
27 B3 49
IB 53 31
<ESC>
“s” <1>
27 S3
IB 53 01
1
Causessubsequentcharactersto be printedas subscripts.Doesnot
changethe characterpitch.
Cancelsuperscriptor subscript
Mode
ASCII
Both ! CEsc>
Hexadecimal
Decimal
‘“r”
27 64
iB
54
Stops printing superscriptsor subscripts and Eturns to normal
printing.
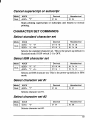
CHARACTER SET COMMANDS
Selectstandardcharacterset
Mode
Both -
ASCII
Decimal
CEsc>
“t”
“o”
27116
CEsc>
“t”
<o>
27116 0
4S
Hexadecimal
IB
74 30
IB 74 00
Selectsthe standardcharacterset. This is the power-updefault in
Standardmodeif DIP switch2-1 is OFF.
Select IBM characterset
Mode
ASCII
Both
<ESC> “t” “l”
“t”<1>
<ESC>
Decimal
Hexadecimal
27116 49
IB
74 31
27116
IB
74 01
1
Selectsan IBM character set. This is the power-up default in IBM
mode.
Select characterset #1
Mode
ASCII
Both <ESC>“7”
Decimal
27 65
Hexadecimal
IB 37
Selectscharacterset #1.
Select characterset #2
Mode
ASCII
Both
<ESC> “6”
Selectscharacterset #2.
Decimal
27 54
Hexadecimal
IB 36
I
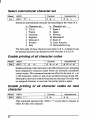
Selectinternationalcharacterset
Mode
std.
Decimal
ASCII
&SC>
“R” n
27
02
n
Hexadecimal
IB 52
n
Selectsan internationalcharacterset accordingto the valueof n.
n Characterset
n Characterset
7 Spain I
O U.S.A
8 Japan
1 France
9 Norway
2 Germany
10 DenmarkII
3 England
11 Spain II
4 DenmarkI
12 Latin America
5 Sweden
13 Denmark/Norway
6 Italy
The first eightof thesecharactersets (fromU.S.A.to SpainI) can
be selectedas power-updefaultsby DIP switches2-2 to 2-4.
Enableprinting of all charactercodes
Decimal
Mode
ASCII
IBM
<ESC> ‘Y”
nl
d
27 92 nl n2
Hexadecimal
IB SC nl n2
Enablesprintingof allcharactersintheIBMcharacterset,including
those assignedto charactercodes which are normallyconsidered
controlcodes.Thiscommandremainsin effectforthe nextnl + n2
x256 characters,wherenl and ti are numbersbetweenOand255.
Duringthisintervalnocontrolfimctionsareexecuted.If acodewith
no assignedcharacteris received,the printerprints a space.
Enable printing of all character codes on next
character
Mode
ASCII
IBM
CEsc>
Decimal
“‘ “
27 94
Hexadecimal
IB 5E
This commandoperateslike <ESG ‘1” exceptthat it remainsin
effect for only one character.
40
I
Select slash zero
Mode
std.
ASCII
<ESC> “ - “ “l”
<ESC> “ - “ <1>
Decimal
27126 49
27126 1
Hexadecimal
IB 7E 31
IB 7E 01
Causes subsequentzero charactersto be overprintedwith a slash
(0
Select normalzero
Mode
std.
ASCII
<ESC> “ - “ “O”
<ESC> “ - “ <O>
Decimal
27126 48
27126 0
Hexadecimal
IB 7E 30
IB 7E 00
Causes subsequentzero characters to be printed normally (0),
withouta slash.
CHARACTER SIZE AND PITCH COMMANDS
Pica pitch
Mode
std.
IBM
ASCII
<ESC> “P”
<DC2>
Decimal
27 80
18
Hexadecimal
IB 60
12
Changesfromeliteto picapitch (10cpi) or fromcondensedeliteto
condensedpica (17 cpi). Ignoredif the PITCHbutton was pressed
during power-up.
Elitepitch
Mode
std.
IBM
ASCII
<ESC> “M”
<ESC> “:”
Decimal
27 77
27 58
Hexadecimal
16 4D
IB 3A
Changesfrompicato elitepitch(12 cpi)or fromcondensedpicato
condensedelite (20 cpi). Ignoredif the PITCHbutton was pressed
duringpower-up.
41
Condensedprinting
Mode
Both
ASCII
<Sb
<ESC> <Sb
Decimal
15
27 15
Hexadecimal
OF
IB OF
Changes from pica to condensedpica (17 cpi) or from elite to
condensedelite (20 cpi). Ignoredif the PITCHbuttonwas pressed
duringpower-up.
Cancelcondensedprinting
Mode
ASCII
Both
<DC2>
Decimal
18
Hexadecimal
12
In Standardmode,changesfrom condensedpicato normalpicaor
fromcondensedeliteto normalelite.In IBMmode,alwayschanges
to normal pica. Ignored if the PITCHbutton was pressed during
power-up.
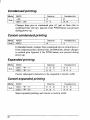
Expandedprinting
Mode
Both
ASCII
<ESC> “W” “l”
<ESC> “W” <1>
Decimal
27 87 49
27 87 1
Hexadecimal
IB 57 31
IB 57 01
Causessubsequentcharactersto be expandedto doublewidth.
Cancelexpandedprinting
Mode
ASCII
<ESC> “W” “O”
Both <ESC> “W” <O>
Decimal
27 87 48
27 87 0
Hexadecimal
IB 57 30
IB 57 00
Stopsexpandedprintingand returnsto normalwidth.
42
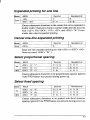
Expandedprinting for one /ine
rMode ASCII
Decimal
Both
<so>
14
27 14
<ESC> <SO>
Hexadecimal
OE
IB OE
Causessubsequentcharactersin the currentline to be expandedto
doublewidth.Charactemreturnto normalwidthafterthe nextline
feed (<LF>).The <DC4>,cVT>, d%-, and cESC> “W” Ocommands also cancelexpandedprinting.
Cancelone-lineexpandedprinting
IMode 1]
ASCII
Decimal
Both I <X4>
20
Hexadecimal
14
Stops one-lineexpandedprintingset with cSO> or <ESC>-+0>.
Does not cancel<ESC>‘W” 1.
Selectproportionalspacing
Mode
std.
IBM
Decimal
ASCII
<ESC> “p” “l”
<ESC> “p” <1>
<ESC> “P” <1>
27112 49
27112 1
27 H) 1
Hexadecimal
16 70 31
IB 70 01
16 .50 01
Causessubsequentcharactersto be proportionallyspaced.Ignored
if the PITCHbutton was pressedduringpower-up.
Select fixed spacing
Mode
Std.
IBM
ASCII
Decimal
<ESC> “p” “O”
<ESC>
“p” <o>
<ESC> “P”
<0>
27112 48
27112 0
27 80 0
Hexadecimal
16 70 30
IB 70 00
IB 50 00
Causes subsequentcharactersto be printed with fixed character
spacing.Ignoredif the PITCHbuttonwaspressedduringpower-up.
43
I
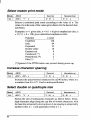
Selectmasterprint mode
Mode
std.
ASCII
<ESC>
Decimal
“!”
n
27 33
n
Hexadecimal
IB 21
n
Selects a combinedprint mode accordingto the value of n. The
valueof n is the sumof thevaluesgivenbelowfor the desiredcharacteristics.
Examples:n = 1 giveselite;n = 9 (1 +8) givesemphasizedelite;n
= 137(1 + 8 + 128)givesunderlinedemphasizedelite.
Function
Underline
Italic
Expanded
Doublestrike
Emphasized
Condensed[*]
Proportional[*]
Elite [*]
n value
128
64
32
16
8
4
2
1
[*I Ignoredif the PITCHbutton was pressedduringpower-up.
Increasecharacterspacing
Mode
std.
ASCII
Decimal
<ESC> <SP> n
27 32
n
Hexadecimal
IB 2U n
Increasesthe spacebetweencharactersby rz/240inches,wheren is
a numberfrom Oto 127.Used in microjustification.
Select doubleor quadruplesize
Mode
std.
ASCII
<ESC>
Decimal
“h”
n
27 104 n
Hexadecimal
IB 6$
n
Selectsthe size of subsequentcharactersas shown below. Extrahigh charactersalignalongthe cap-lineof normalcharacters,with
thebaselinetemporarilymovingdown.Linespacingis temporarily
doubledwhen n = 1 and quadrupledwhen n =2.
n
O
1
2
Effect
Normal size
Double-high,double-wide
Quadruple-high,quadruple-wide
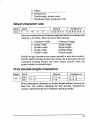
Select charactersize
Mode
Both
Decimal
ASCII
“ ((“
““
“S”
“ )“
“)”
n
40 40 E3 41 41 n
Hexadecimal
28 28 53 29 29 n
Selectsacombinationofcharacterheightandwidthaccordingto the
value of n, as below.Does not movethe base line.
n
O
1
2
3
Characterwidth
Singlewidth
Doublewidth
Singlewidth
Doublewidth
Characterheight
Singleheight
Singleheight
Doubleheight
Doubleheight
Double-heightcharactemare alwaysprinted at near letter quality.
Doubleheightprintingtemporarilycancelsthe super/subscriptand
condensed printing modes, but these modes resume when the
printerreturnsto normalheight.
Print double-heightcharacters
Mode
sid.
Decimal
ASCII
<ESC>
“W”
<ESC>
“W”
“l”
<1>
27119 49
27119 1
Hexadecimal
IB 77 31
IB 77 01
Prints subsequentcharactersat doubleheight withoutmovingthe
base line, and without changing the line spacing. Temporarily
cancelssuper/subscriptand condensedprintingmodes.
Returnto normalheight
Mode
std.
ASCII
Decimal
<ESC>
“W”
<ESC>
“W”
“O”
<O>
Hexadecimal
IB 77 w
16 77 00
27119 48
27119 0
Terminatesdouble-heightprintingandpxintssubsequentcharactem
at normalheight.Resumessuper/subscriptandcondensedprinting
if thesemodeswere in effect beforedoubleheightwas selected.
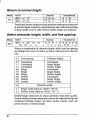
Select characterheight, width,and line spacing
Mode
IBM
ASCII
cESC>
Hexadecimal
Decimal
“[”
“@”
CO> CO>
<4>
n
<()>
m
27 91 64
OOnm
4
0
16 56 40 04 W
OOW
nm
Selectsa combinationof characterheight,width,and line spacing
accordingto thevalueof n andm,as below.Doesnotmovethebase
line.
—
n
o
1
2
16
17
;;
33
34
—
m
Line spacing
Unchanged
Unchanged
Unchanged
Single
Single
Single
Double
Double
Double
Characterheight
Unchanged
Singleheight
Doubleheight
Unchanged
Singleheight
Doubleheight
Unchanged
Singleheight
Doubleheight
Characterwidth
1 Singlewidth (sameas ~SC> “W” O)
2
— Doublewidth (sameas <ESG “W” 1)
Double-heightcharactemare alwaysprintedat near letter quality.
Doubleheightprintingtemporarilyc&cels the super/subscript~d
condensed printing modes, but these modes resume when the
printerreturnsto normalheight.
46
..,,
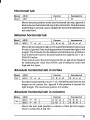
VERTICAL POSITION COMMANDS
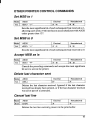
Set line spacingto 1/8inch
Mode
Both
Decimal
ASCII
<ESC> “0”
Hexadecimal
IB
27 48
30
Setsthe distancethe paper advancesor revemesin subsequentline
feedsto 1/8inch.
Set line spacingto 7Y72inch
Mode
ASCII
Both
<ESC>
Hexadecimal
Decimal
IB 31
27 49
“l”
Setsthe distancethe paper advancesor reversesin subsequentline
feedsto 7f72inch.
Set line spacingto 1/6inch
Mode
Hexadecimal
Decimal
ASCII
std. dzsc> “2”
IB 32
27 WI
Setsthe distancethe paper advancesor reversesin subsequentline
feeds to 1/6inch.
Set line spacingto ~/216 inch
Mode
Both
Decimal
ASCII
cESC>
“3”
n
27 51
n
Hexadecimal
IB 33
n
Setsthe distancethe paper advancesor reversesin subsequentline
feeds to n/216 inch, where n is between O and 255. If n= O, in
Standardmodethe line-feeddistanceis set to O,but in IBM mode
this commandis ignored.
I
Set line spacingto n/72 inch
Mode
Both
ASCII
<ESC>
Decimal
“A”
n
27 65
n
Hexadecimal
16 41 n
In Standardmode,sets the distancethe paperadvancesor reverses
in subsequentlinefeedsto n/72inch,wheren is betweenOand255.
.If n =0, the line spacingis set to O.
In IBMmodethis commanddoesthe sameexceptthat (1) the new
line spacing does not take effect until the next <ESC> “2”
command,and (2) if n = O,the cESC> “A” commandis ignored.
Execute<ESC> “A”
Mode
ASCII
IBM
<ESC>
Decimal
“2”
27 50
Hexadecimal
IB 32
Sets the line spacing to the value defined by the last preceding
cESC> “A” command.Sets the line spacingto 1/6inch if them is
no precedingcESC> “A” command.
Line feed
‘Mode
ASCII
Both
<LF>
Decimal
10
Hexadecimal
OA
Prints the currentline and feedsthe paper to the next line. See the
precedingcommandsfor the line spacing.
Reverseline feed
Mode
std.
IBM
ASCII
<ESC> <LF>
<ESC> “ 1“
Decimal
27 10
27 93
Hexadecimal
IB OA
IB 5D
Printsthe currentlineandfeedsthepaperinthe reversedirectionto
the preceding line. See the preceding commands for the line
spacing.Ignoredwhen frictionfeed is used.
48
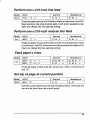
Performone n/216-imh line feed
Mode
Both ]
Decimal
ASCII
<!3SC>
“J” n
27 74
Hexadecimal
IB 4A
n
n
Feedsthepaperonceby n/216inches,wherenis between1and255.
Doesnotmovethe printpositionrightor left in the standardmode.
Does not changethe line-spacingsetting.
Performone n/216-inchreverseline feed
Mode
std.
Decimal
ASCII
<ESC>
“j”
n
27106
Hexadecimal
IB 6A n
n
Feedsthepaperonceby n/216inchesin thereversedirection,where
n isbetween-land255.Doesnotmovethepnntpositionrightorleft.
Doesnot changethe line-spacingsetting.
Feedpaper n lines
Mode
std.
<ESC>
<ESC>
Hexadecimal
Decimal
ASCII
“f” “l” n
“f” <1> n
27102
49
n
27102
1
n
IB 66 31
IB 66 01
n
n
Feedsthe papern linesfrom the currentline, wheren is betweenO
and 127.
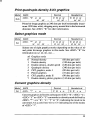
Set top of page at currentposition
Mode
ASCII
IBM
<ESC>
Decimal
“4”
27 52
Hexadecimal
IB 34
Setsthe currentpositionas the top-of-pageposition.Notethat this
can also be done from the controlpanel.
49
I
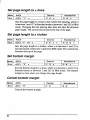
Setpage length ton lines
Mode
ASCII
Both
<ESC>
Decimal
“C”
n
27 67
Hexadecimal
IB 43
n
n
Sets the page lengthto n lines in the currentline spacing,where n
isbetween1and 127in Standardmodeorbetween 1and255inIBM
mode. Changingthe line spacinglater does not alter the physical
page length.The currentline becomesthe top of the page.
Set page length ton inches
Mode
Both
ASCII
Decimal
cESC> “C” cO> n
27 67
Hexadecimal
0
n
IB 43 00
n
Sets the page length to n inches,where n is between 1 and 32 in
Standardmodeor between1and 64 in IBMmode.The currentline
becomesthe top of the page.
Set bottommargin
Mode
ASCII
Both
<ESC>
Decimal
“N”
n
27 78
n
Hexadecimal
IB 4E n
Setsthe bottommarginto n lines,wheren is between 1 and 127in
Standardmode or between 1 and 255 in IBM mode. The bottom
marginis reset when you changethe page length.
Cancelbottommargin
Mode
Both
ASCII
<ESC> “O”
Cancelsthe bottommargin.
Decimal
27 79
Hexadecimal
IB 4F
I
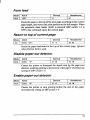
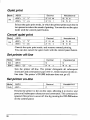
Form feed
Mode
ASCII
Both
<FF>
Decimal
12
Hexadecimal
Oc
Feedsthe paperto the top of thenextpage accordingto the current
pagelength,andmovesthe printpositionto the left margin.When
the automaticsheet feeder (ASF) is selected (DIP switch 14 is
OFF), this commandejectsthe currentpage.
Returnto top of currentpage
Mode
std.
ASCII
Decimal
<ESC> <FF>
27 12
Hexadecimal
IB OC
Feeds the paper backwardto the top of the currentpage. Ignored
when frictionfeed is used.
Disablepaper-outdetector
Mode
ASCII
Both
<ESC>
Decimal
“8”
27 5S
Hexadecimal
IB
38
Causes the printer to disregard the signal sent by the paper-out
detector,enablingprintingto thebottomofthepaper.Overridesthe
settingof DIP switch 1-5.
Enablepaper-outdetector
Mode
Both
ASCII
<ESC> “9”
Decimal
27 57
Hexadecimal
IB
39
Causes the printer to stop printing before the end of the paper.
Overridesthe settingof DIP switch 1-5.
51
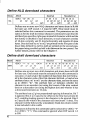
Set verticaltab stops
Mode
ASCII
Both
<ESC>
Decimal
“II”
nl
n2
...
<0>
Hexadecimal
2766 d n2 ... 0
IB 42 nl d
...00
Cancelsallcurrmt verticaltab stopsandsetsnewverticaltab stops
at lines nl, n2, etc., whered, w2,etc. are numbersbetween 1 and
255. A maximumof 16verticaltab stopscan be set.The tab stops
must be specifiedin ascendingorder any violationof ascending
orderterminatesthetabstoplist. Standardterminationis bythecb
controlcode.Theverticaltabstopsaresetin termsofthecurrentline
spacingand do not move if the line spacingis changedlater.
Set verticaltab stops everyn lines
Mode
std.
ASCII
Decimal
<ESC> “e” 4’1” n
<“ESC> “e” <1> n
Hexadecimal
27101 49 n
27101 1 n
IB 65 31 n
IB 65 01 n
Cancelsallcurrentverticaltab stopsand setsnewtab stopseveryn
lines. where n is between2 and 127.
Set verticaltab stops in channel
Mode
std.
ASCII
Decimal
<ESC> “b”
nO
nl
n2
...
<o>
Hexadecimal
27 96 nO nl
n2 ... 0
IB 62 nO nl
d ... 00
Cancelsall current verticaItab stops in channelnO,(where M is
betweenOand7) and setsnewverticaltab stopsin this channel.(A
channel is a set of vertical tab stops selectedby the <ESC> “~’
command.)See d3SC> “B” for parametemnl, n2, ... <0>.
Select vertica/tab channel
Mode
std.
ASCII
<ESC>
Decimal
“r’
nO
27 47 nil
Hexadecimal
IB 2F nO
Selectsa set of verticaltab stopsdesignatedby a channelnumber
(n(l)fromOto7.Thetabstopsineachchannelaresetby<ESC>’’b”.
I
Verticaltab
Mode
ASCII
Both
<VT>
Decimal
Hexadecimal
OB
11
Feeds the paper to the next verticaltab stop and moves the print
positiontotheleftmargin.Performsalinefeedifnoverticaltabsaxe
set, as at power-up.Feedsto the top of the nextpageif verticaltabs
are set but the currentline is at or belowthe last verticaltab stop.
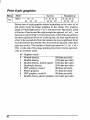
HORIZONTAL POSITION COMMANDS
Set left margin
Mode
std.
ASCII
<ESC>
Decimal
“l”
n
27108
n
Hexadecimal
IB 6C n
Setsthe left marginat columnn (wheren is betweenOand 255) in
the current character pitch (pica pitch if proportionalspacing is
selected).The left margin does not move if the characterpitch is
changedlater.The left marginmustbe at least two columnsto the
left of the rightmargin and withinthe limitsbelow:
Pica
Elite
Condensedpica
Condensedelite
Expandedpica
Expandedelite
Expandedcondensedpica
Expandedcondensedelite
53
Set right margin
Mode
std.
ASCII
<ESC>
Hexadecimal
Decimal
“Q”
n
27 81
IB 51
n
n
Setstherightmarginatcolumnn inthecurrentcharacterpitch(pica
pitch if proportionalspacing is currently selected). Column n
‘becomesthelastcharacterpositionintheline.The nghtmargindoes
not move if the characterpitch is changedlater. The rightmargin
must be withinthe limitsMow:
4< n <80
Pica
5 s n <96
Elite
7<
n <137
Condensedpica
8<
n <160
Condensedelite
2< n <40
Expandedpica
Expandedelite
3 s n 548
4< n <68
Expandedcondensedpica
4< n <80
Expandedcondensedelite
Set left and right margins
Mode
ASCII
IBM
<ESC>
Hexadecimal
Decimal
“X”
nl
d
27 38 nl
d
IB M nl n2
Setstheleftmarginatcolumnnl andtherightmarginat columnn2.
See the preceding commands for margin restrictions and other
notes.
Carriagereturn
Mode
ASCII
Both
<CR>
Decimal
13
Hexadecimal
OD
Prints the current line and returnsthe nextprint positionto the left
margin.If DIP switch 1-3is OFF, alsoperformsa line feed.
54
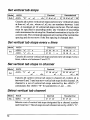
Set automaticline feed
Mode
IBM
ASCII
Decimal
CEsc>“’5”
cl>
27 63
Hexadecimal
1
IB 36 01
Causesthe printer to performboth a carriage~tum and line feed
each time it receivesa <CR> code. This commandtakes priority
over DIP switch 1-3.
Cancelautomaticline feed
Mode
ASCII
IBM
<ESC>
Decimal
“5”
cO>
27 53
Hexadecimal
0
IB
35 00
Causestheprinterto performonlya carriagereturnwhenit receives
a <C- code.This commandtakespriorityover DIP switch 1-3.
Backspace
Mode
ASCII
Both
CBs>
Hexadecimal
Decimal
8
06
Movesthe printpositiononecohunnto theletl. Ignoredif the print
position is at the left margin. This command can be used to
overstrikeor combinecharacters.
Leftjustify
Mode
std.
Decimal
ASCII
Hexadecimal
<ESC>
“a” “O”
27 97 46
<ESC>
“a”
27 97
<0>
0
IB 61 30
IB 61 CO
Alignssubsequenttextwiththeleftmargin,leavingtherightmargin
ragged.
Center text
Mode
std.
ASCII
Decimal
Hexadecimal
<ESC> “a” “1”
27 97 49
dzsc> “a”
27 97
cl>
1
IB 61 31
IB 61 01
Centerssubsequenttext betweenthe left and right margins.
55
Rightjustify
Mode
std.
ASCII
Decimal
cESC>
“a”
“2”
<ESC>
“a”
<2>
Hexadecimal
27 97 50
27 97 2
IB 61 32
IB 61 02
Alignssubsequenttextwiththenghtmargin,leavingtheleftmargin
‘ragged.
Set horizontaltab stops
Mode
ASCII
Both
cESC>
Decimal
“D”
nl
n2
... d>
Hexadecimal
27 66 nl n2 ... 0
IB 44 nl n2 ... 00
Cancelsall curnmthorizontaltab stops and sets new tab stops at
columnsnl, ti, etc.in the currentcharacterpitch(picapitchif proportional spacing is currently selected), where nl, n2, etc. are
numbensbetween 1 and 255. The maximumnumberof horizontal
tab stopsallowedis 32 in Standardmodeand64 in IBMmode.The
tab stops must be specifiedin ascendingorder; any violationof
ascendingorderterminatesthetab stoplist. Standardterminationis
by the cO>controlcode.To clearall tab stops,specify<ESC>“D”
<o>.
Set horizontaltab stopseveryn columns
Mode
std.
<ESC>
Hexadecimal
Decimal
ASCII
“e”
“O”
n
cESC> “e” <O> n
27101 46
27101 0
n
n
IB 65 30 n
IB 65 00 n
Cancelsallcurrenthorizontaltab stopsandsetsnewtab stopsevery
n columns,where n is between 1 and 127.
Resetall tab stops
Mode
ASCII
IBM
<ESC>
Decimal
“R”
27 82
Hexadecimal
IB 52
Resetsthe horizontaltab stopsto theirpower-upvaluesin which a
tab stop is set every 8 columnstartingat column9. Also clears all
verticaltab stops.
56
Horizontaltab
Mode
ASCII
Both
<H-f>
Hexadecimal
Decimal
09
9
Movesthe printpositionto the nexthorizontaltab stop. Ignoredif
thereisnonexthorizontaltabstopinthecurrentline.Notethatwhen
underliningis selected,spacesskippedby horizontaltabulationare
not underlined.
Relativehorizontaltab
Mode
std.
Decimal
ASCII
cESC>
‘A” nl
n2
Hexadecimal
27 92 nl d
IB 5C nl
n2
Movestheprintpositionrightorlefta specifieddistance(maximum
8 inches).Ignoredif theresultingpositionis beyondthe rightor left
margin.The formulasfor the distanceand directionare as follows:
If n2 is betweenOand 63,the printheadmovesrightby (nl + n2 x
256)/120inches.
If youwantto movetheprintheadto theleft,nl andn2 areobtained
by subtractingthe value from 65536,and dividingthe result into
high and low bytes.
Absolutehorizontaltab in inches
Mode
ASCII
std.
cESC>
Hexadecimal
Decimal
4’$”
nl
n2
27 36 nl n2
IB
24 nl n2
Setsthenextprintpositionto (nl + n2 x 256)/60inchesfromtheleft
margin on the currentline. Ignored if this positionis beyond the
rightmargin.The maximumpositionis 8 inches.
Absolutehorizontaltab in columns
Mode
std.
ASCII
Hexadecimal
Decimal
<ESC>
“f’
“O”
n
cESC>
“f’
cO>
n
27102 48
27102 0
n
n
IB
66 30
IB M 00
n
n
Moves the next print positionto column n fmm the left margin,
where n is betweenOand 127.
57
GRAPHICS COMMANDS
Print normal-density8-bitgraphics
Mode
Both
ASCII
cESC>
Decimal
“K”
nl
ml
Hexadecimal
27 75 nl n2
d
m2
...
ml
d
...
IB 4B n] d
ml d
...
bit-image graphics at 60 dots per inch horizontally.The
graphicimageis 8dotshighandnl + n2x 256dotswide.Maximum
widthis 8 inches(480 dots).ml, m2,... are the dot data, each a 1bytevaluefromOto 255representing8 verticaldots,withthemost
significantbit at the top and the least significantbit at the bottom.
The numberof data bytesmustbe nl + ti x 256. Dotsbeyondthe
rightmarginareignored.Attheendof bit-imageprintingtheprinter
returnsautomaticallyto charactermode.
Prints
Print double-density8-bitgraphics
Mode
Both
ASCII
<ESC>
Decimal
“L”
nl
n2
ml
m2
...
Hexadecimal
27 76 nl d
ml m2 ...
IB 4C nl n2
ml
d
...
Prints bit-imagegraphicsat 120dots per inch horizontally(maximum 960 dots wide).See <ESC>“K” for other information.
Printdouble-density,double-speed8-bitgraphics
Mode
Both
ASCII
CESC> “Y”
Decimal
nl
ml
Hexadecimal
27 B9 n] d
d
m2
...
ml
d
IB
...
59 nl n2
ml ?n2 . . .
Printsbit-imagegraphicsat 120dots per inch horizontally(maximum 960 dots wide), skippingevery seconddot in the horizontal
direction.See <ESC>“K” for other information.
Print quadruple-density8-bitgraphics
Mode
Both
ASCII
Decimal
<ESC> “Z”
nl
n2
ml
d
Hexadecimal
27 90 nl d
ml m2
...
...
IB 5A nl W?
ml m2 . . .
Printsbit-imagegraphicsat 240 dots per inch horizontally(maximum 1920dotswide),skippingevery seconddot in the horizontal
direction.See <ESC>“K” for otherinformation.
Selectgraphicsmode
Mode
ASCII
std.
<ESC>
Decimal
“*”
nO
n2
nl
ml
m2
Hexadecimal
27 42 d d
n2 ml d
...
IB 2A nO nl
...
d
ml
m2
...
Selectsone of eightgraphicsmodesdependingon the value of nO
and prints bit-imagegraphicsin this mode. See <ES~ “K” for
informationon nl, ti, ml, rn2,...
MI Graphicsmode
O Normal-density
(60 dots per inch)
1 Double-density
(120 dots per inch)
2 Double-density,double-speed (120 dots per inch)
(240 dots per inch)
3 Quadruple-density
4 CRTgraphics,mode I
(80 dots per inch)
5 Plottergraphics
(72 dots per inch)
6 CRTgraphics,mode II
(90 dots per inch)
7 Double-densityplottergraphics (144 dots per inch)
Convertgraphicsdensity
IMode ]
ASCII
I Std. I
<ESC> “?”
Decimal
n
m
I 27 M
n
Hexadecimal
m
I IB 3F
n m
Convertsgraphicsdefinedby subsequentcESC>“K”,<ESb “L”,
<ESC>”Y”or<ESC>“Z”commandsto a densitymodedefinedby
<ESC>“*”. n is “K”, “L“, “Y” or “Z”, indicatingthe mode to be
converted.mis a codefrom<0>to <7>indicatingoneof themodes
of <ESb “*”.
59
Print 9-pingraphics
Mode
std.
ASCII
Decimal
<ESC> “” “ nO
d
nl
ml
Hexadecimal
IB 5E nO nl
27 94 nO nl
d
...
n2 ml
d
...
n2 ml
d
...
Selectsone of eight graphicsmodesdependingon the valueof M
and prints 9-pin bit-image graphics in this mode. The graphics
imageis 9 dotshigh and nl + n2 x 256dotswide.Maximumwidth
is 8 inches.Dotsbeyondtherightmarginareignored.ml, m2,... are
bytepairsrepresenting9 verticaldotseach.In theleftmostposition,
the most significantbit of ml is the top dot;the least significantbit
of ml is the seconddot fromthe bottom;the most significantbit of
m2is thebottomdot;andtheotherbitsof m2areignored.Otherbyte
pairs are similar.The numberof databytesmust be 2 x (nl + n2 x
256).At the end of bit-imageprintingthe printerreturnsautomatically to charactermode.
rd
O
1
2
3
4
5
6
7
60
Graphicsmode
Normal-density
(60 dots per inch)
Double-density
(120 dots per inch)
Double-density,double-speed (120 dots per inch)
(240 dots per inch)
Quadruple-density
CRTgraphics,mode I
(80 dots per inch)
Plotter graphics
(72 dots per inch)
CRTgraphics,mode II
(90 dots per inch)
Double-densityplottergraphics (144 dots per inch)
DOWNLOAD CHARACTER COMMANDS
Define draft downloadcharacters
Mode
cESC>
. std.
d
Hexadecimal
Decimal
ASCII
“&”
27 30 0 d
n2 mO ml d
<O> n]
mO
ml
m2
d
. ..
mll
d
. . . mll
IB 26 W nl
d
mO ml m2
d
. . . mll
Definesone or morenew draftcharactersand storesthemin RAM
for lateruse. DIP switch 1-2must be OFF;otherwiseRAM is used
as an input buffer, not for downloadingcharacters,and this commandis ignored.Draftmodemustbe selectedbeforethiscommand
is executed.
nl is the charactercodeof the first characterdefinedand n2 is the
charactercodeof the last characterdefined.nl must be equalto or
lessthann2.Useofcharactercodes32(space)and 127(deletecode)
shouldbe avoidedif possible.
Eachcharacters definedby anattributebyte(mO)and 11databytes
(ml, nd, ..... roll).
Themost significantbit of the attributebyte is 1 if the characteris
an ascender(positionedentirelyabovethe baseline)or Oif it is a
descender(descendingbelowthe baseline).The attributebyte also
indicatesthe amountof whitespaceto theleft of the character(Oto
7 dots, specifiedby bits4 to 6), and the widthof the charactercell,
includingthis space(4 to 15dots,specifiedby bits Oto 3). The left
spaceandcellwidthattributesareusedonlyinproportionalspacing.
Eachdatabyteindicateseightverticaldots,withtheMSBbeingthe
top dot and the LSB the bottomdot.These correspondto pins 1to
8 or 2 to 9 of the printhead,dependingon whetherthe characteris
an ascenderor descender.
For furtherdetails,pleaserefer to the Chapter5.
61
DefineNLQ downloadcharacters
IMode/
std.
ASCII
d
I
Decimal
cESC> “&” <O> nl
rno ml
d
27 36
m2
...
d
m46
d
0 nl
ml
Hexadecimal
IB 26 LII nl
d
nd ... m46
d
mo ml d
ti
... m46
.Definesoneor morenewNLQcharactemand storesthemin RAM
for later use. DIP switch 1-2 must be OFF. NLQ mode must be
selectedbeforethis commandis executed.The parametersare the
same as for the draftdownloadcharactercommandexceptthat the
attributebytespecifiesrightspaceinsteadofcharacterwidthandthe
dot densityis doubledin each direction,so each characterconsists
of 16 dots verticallyand 23 dots horizontallyand requires46 data
bytes.Dotsdefinedby ml to m23areprintedon the firstpassof the
head. Dots definedby m24to m46areprintedon the secondpass,
the paperbeingscrolledup half a dot betweenthe two passes.For
furtherdetails,pleaserefer to the Chapter5.
Definedraft downloadcharacters
Mode
IBM
ASCII
<ESC> “=”
nl
n2 <DC4>
aO
al
a2 ml
d
. . . mll
Decimal
Hexadecimal
27 61 nl n2 20 IB 3D nl n2 14
aO al
d
a2 ml
. . . mll
aO al d ml
d . . . mll
Definesone or morenew draftcharactersand storesthemin RAM
for later use. Draft modemust be selectedbeforethis commandis
executed.nl and n2 givethe numberof databytesthat willfollow.
dOis the charactercodeof the firstcharacterdefined.al anda2 are
attributesbytes.ml to mll are the characterdata,and are the same
as in <ESC> “&”. The attributebyte al indicates whether the
characteris an ascender(not using the lowest of the nine vertical
dots)or a descender(not usingthe highestdot) and whetherit has
a downwardextensionto 12dots.
The attributebytea2 givesproportional-spacinginformation.Bit7
is ignored.Bits 4 to 6 specifythe offsetto the first byte printed(O
to 7), enablingleadingspacesin the characterto be ignored.BitsO
to 3 specifythewidthof the charactercell(maximum11dots).The
characterwillbe followedby a mandatoryblankdot columnwhich
is not includedin this width.
Charactersdefinedby thiscommandcan be selectedby -d3Sb “I”
4 or <ESC>“I” 5. This commandis ignoredwhenDIP switch 1-2
is ON.
62
DefineNLQ downloadcharacters
Mode
IBM
ASCII
Decimal
<ESC> “=”
nl
n2 dJAU
al
d
ml
aO
d
. . . m46
Hexadecimal
27 61 n] n2 21 IB 3D nl n2 15
aO al
d
d ml
. . . m46
aO al d
m2
ml
m46
Definesoneor morenewNLQcharactersand storesthemin RAM
for later use. DIP switch 1-2 must be OFF. NLQ mode must be
selectedbeforethis commandis executed.The parametemare the
sameas for thedraftcharactercommandexceptthatthe dotdensity
is doubledin each direction,so each characterconsistsof 16 dots
verticallyand 23 dotshorizontallyand requires46 data bytes.
Copy characterset from ROM into RAM
Mode
sid.
ASCII
Decimal
<ESC> “:”
<O>
n
<o>
27 56
Hexadecimal
0
n
O IB 3A 00
n 00
Copiesthe selectedcharacterset with n, as shown below, to the
correspondingdownload character RAM area, overwriting any
downloaddataalreadypresent.IgnoredwhenDIPswitch1-2is ON.
n
O
1
7
8
Characterset
Courier
Sanserif
Oratorwith smallcapitals
Oratorwith lower case
Select downloadcharacterset
Mode
std.
ASCII
<ESC> “Yo” “l”
<ESC> “%” <1>
Decimal
27 37 49
27 37 1
Hexadecimal
IB 25 31
IB 25 01
Selectsthe downloadcharacterset.IgnoredwhenDIPswitch 1-2is
ON.
63
Select draft downloadcharacterset
Mode
ASCII
IBM
Decimal
<ESC>
“I”
<ESC>
“I” <4>
“4”
Hexadecimal
27 73 52
27 73
4
IB 49 34
IB 49 04
Selectsthe downloadcharacterset anddraft quality.Ignoredif the
‘ FONTbuttonwas pressedduringpower-upor if DIP switch 1-2 is
ON.
Select draft elite downloadcharacterset
Mode
Decimal
ASCII
IBM
Hexadecimal
<ESC>
“I” “5”
27 73 53
<ESC>
“I”
27 73
<5>
5
IB 49 35
IB 49 05
Selectsthe downloadcharacterset,draftquality,andelitepitch(12
cpi). Ignoredif the FONTbuttonwas pressedduringpower-upor if
DIP switch 1-2is ON.
Select NLQ downloadcharacterset
Mode
ASCII
IBM
Decimal
<ESC>
“1”
“6”
<ESC>
“I” <6>
Hexadecimal
27 73 54
27 73
6
IB 49 36
IB 49 06
Selectsthe downloadcharacterset andnear letterquality.Ignored
if the FONTbuttonwaspressedduringpower-upor if DIPswitch 12 is ON.
Select ROM characterset
Jode
std.
I
ASCII
<ESC> “%” “O”
<ESC> Vo” <O>
Decimal
27 37 48
27 37 0
Hexadecimal
IB 25 30
IB 25 00
Stops using the downloadcharacterset and returnsto the built-in
ROM characterset. Ignoredwhen DIP switch 1-2is ON.
64
OTHER PRINTER CONTROL COMMANDS
Set MSB to 1
Mode
std.
ASCII
Decimal
<ESC> “>”
27 62
Hexadecimal
IB 3E
Setsthe mostsignificantbit of each subsequentbytereceivedto 1,
allowinguserswitha7-bitinterfaceto accesscharacterswithASCII
codes greaterthan 127.
Set MSB to O
Mode
std.
ASCII
Decimal
<ESC> “=”
Sets the
27 61
Hexadecimal
IB 3D
mostsignificantbit of each subsequentbytereceivedto O.
Accept MSB as is
Mode
std.
ASCII
<ESC>
Decimal
“#”
27 35
Hexadecimal
IB
23
Cancelsthe precedingcommandsand acceptsthe most significant
bit as it is sentto the printer.
Delete last charactersent
Mode
std.
ASCII
<DEb
Decimal
127
Hexadecimal
7F
Deletes the last character received.Ignored if the last character
receivedhas alreadybeen printed,or if the last characterreceived
was all or part of a command.
Cancellast line
Mode
ASCII
Both
<CAN>
Decimal
24
Hexadecimal
18
Deletesthe last line currentlypresentin the printbuffer.
65
Quietprint
Mode
Std.
Decimal
ASCII
<ESC>
<ESC>
“l”
“s” <1>
“S”
27115 49
27115 1
Hexadecimal
IB 73 31
IB 73 01
Selectsthe quietprintmode,in whichtheprinterprintseachlinein
two passesto reducethesoundofprinting.Youcanalsosetthequiet
mode with the controlpanelbutton.
Cancelquietprint
Mode
Std.
ASCII
Decimal
<ESC>
“S”
“O”
<ESC>
“s”
<o>
27115 48
27115 0
Hexadecimal
IB 73 30
IB 73 00
Cancelsthe quietprint mode, and resumesnormalprinting.
You can also cancelthe quietmode with the controlpanelbutton.
Set printer off-line
Mode
std.
IBM
ASCII
<DC3>
<ESC> “Q”
Hexadecimal
Decimal
19
<3>
27 81
3
13
IB 51 03
Sets the printer off-line. The printer disregards all subsequent
charactersandcommandsexcept<DC1>,whichreturnsitto theonline state.The printer’sONLINE indicatordoes not go off.
Setprinter on-line
Mode
ASCII
Both
<Del>
Decimal
17
Hexadecimal
11
Returnsthe printerto the on-linestate, allowingit to receiveand
processall subsequentcharactersandcommands.Thiscommandis
ignoredif theprinterwas setoff-linebypressingtheONLINEbutton
on the controlpanel.
66
Bell
Mode
Both
Decimal
ASCII
-+lEb
Hexadecimal
07
7
Soundsa brief beep tone from the printer’sbeeper.
Bidirectionalprinting
IModel
Both
I
ASCII
Decimal
27 85 48
27 85 0
<ESC> “U” “O”
<ESC> “U” <O>
\
Hexadecimal
I
IB 55 30
16 55 00
Causessubsequentprintingto be done in the normalbidirectional
mode, whichis faster than unidirectionalprinting.
Unidirectiona/printing
Mode
Both
Decimal
ASCII
<ESC>
“U”
27 85 49
27 85 1
“l”
<ESC> “u” cl>
Hexadecimal
IB 55 31
18 55 01
Causes subsequentprintingto be done unidirectionally,ensuring
maximumverticalalignmentprecision.
One-1ineunidirectionalprinting
Mode
ASCII
Std.
<ESC>
Decimal
27 60
“<”
Hexadecimal
IB 3C
Immediatelyreturnstheprintheadto theleftmargin,thenprintsthe
remainder of the line from left to right. Normal bidirectional
printingresumeson the next line.
Manual feed
Mode
Both
Decimal
ASCII
<ESC>
,,(,,
<EM> <O>
,,(,,
“o”
“ ))“
““
27 25 0
40 40 48 41 41
Hexadecimal
IB 19 00
28 28 30 29 29
Selects manual sheet feeding even when the optional automatic
sheet feeder is mounted.Ignored if DIP switch 1-4 is ON (ASF
inactive).
I
Auto feed
‘Mode
Both
ASCII
Decimal
<ESC> <EM> <4>
,,(,,
,,(,,
“4”
“ ))“
““
27 25 4
40 40 52 41 41
Hexadecimal
IB 19 04
28 28 34 29 29
Selectsthe automaticsheetfeeder.Ignoredif DIP switch 1-4is ON
(ASF inactive).
Ejectpaper fromASF
Mode
Both
ASCII
Decimal
<ESC> <EM> “R”
,,(,,
,,(,,
“R”
“ ))“
““
27 25 82
40 40 82 41 41
Hexadecimal
IB 19 52
28 28 52 29 28
Ejects the current page. Ignored if DIP switch 1-4 is ON (ASF
inactive).
Setprint startposition onASF
Mode
Both
ASCII
<ESC> <EM>
,,(,, ,,(,,
“T”
Decimal
‘T” n
“ ))“ “ “
n
27 25 84 n
40 40 84 41 41 n
Hexadecimal
IB 19 54 n
28 28 54 28 29 n
Skipsn/6inchesatthetop of thepage,wheren is between1and 15.
Ignoredif DIP switch 1-4is ON (ASF inactive).
Resetprinter
Mode
Both
ASCII
<ESC> ‘&I@”
Decimal
27 64
Hexadecimal
IB 40
Reinitializestheprinter.Clearstheprintbufferand returnssettings
to theirpower-upvalues.Doesnot clearthe inputbufferor change
ASF selections.
68
chapter 5
DOWNLOAD CHARACTERS
Withthisprinteryoucancreatenewcharactersandsymbols,downloadtheir
dotdata,andhavethemprintedin placeof selectedcharactersin the regular
characterset.Charactersthatcanbegeneratedin thiswayrangefromsimple
but useful symbols like the check mark through complex Chinese or
Japanesecharacters.
Regular characters are permanently stored in the printer’s ROM, but
charactersyou design are downloadedand storedin RAM for use.
DESIGNING YOUR OWN DRAFT CHARACTERS
Designingand printing your own charactershas two requirements:first,
designingthe shapeof the character,calculatingthe datanecessaryto make
the shape, and sendingthat data to the printer, and secondly,sendingthe
commandto printthe downloadedcharactersinsteadof the regularcharacters. There are a number of designconstraintsfor downloaddraft quality
characters:
●
●
The matrixor grid on whichyou designthe charactersis six boxeswide
by nine boxeshigh.
HorizontaUy,dotsmaybecenteredinabox, ormaystraddlealine, making
the actualcharactergrid 11dotswideby 9 dotshigh.Vertically,dotscan
only be centeredin a box. See Figure5-1.
I
Figure 5-1.Dotscanbe insideboxesor straddlethe verticallinesof the grid
69
I
●
The minimumwidthof a characteris five dots.
●
The user-definedcharactersmay use eightdots vertically.
w
●
Dots cannotoverlap— that is, youmay not have a dot insidea box next
to one that is on a line.
You may defineany positionin the ASCIItable.
PhotocopythegridinFigure5-2tohelpdesignyournewcharacters.Wewill
use a tiny-rep=sentationof a car-shapedsymbolfor our example.
ml m3 ti m7 m9 mll
m2 m4 m6 m8 m10
]~g
64
32
16
8
ASCII Code:
Descender:
Left space:
Last column:
mO= Descender x 128
+ (Left x 16)
+ Last
4
2
1
[
Flgutw5-2 Usethisgrid(orone similarto it) to defineyourowndraftcharacters
Definingthe attributedata
Beforeyoustartthedefinition,you willneedto decideexactlywherein the
mgularASCIIsetyouwanttoplaceyourcharacters.Atlerdownloading,you
access your new character by sending the code for the character you
replaced.
70
ml m3 nd m7 m9 mll
nl~ “,4 m6 n,8 ~,]()
128
64
ASCII Code:
32
Descender: 7
16
Left space: O
Last column: ?Z
m(l = Descender x
+ (bft X 16)
+ Last
8
4
2
]28
1
124
66
0
64
4
76
36
16
2
0
12
FigureS3. Addthe values of the dote in each column and write the sum of each column
at the bottom
Next you must choose whetherto make the car symbolan ascenderor a
descender.This determineshow the characteris seatedon the line:
Ascender:
Cl:;:::
Descender:
~.u~i’:
We decidedthatourcar symbolwillnotbe a “descender”,so a figure“l” is
writtennextto Descenderon thegrid.If yourcharacteris a descender,write
a “O”next to Descender.
Next, you must specify the left space and the last print column of the
character.
Being able to specifythe width of the characterallowsyou to specifythe
precise area insidethe grid that the characterwill occupy,so that narrow
charactemwill look attractivenext to wide ones.
Acceptablevaluesfor the left spaceare Oto 7, andthe lastprintcolumnare
from 4 to 11.
Our characterwill occupyfromcolumn 1to column 11,so the lefl spaceis
Oand the characterwidthdata is 11.
Assigningthe characterdata
Now,we calculatetheverticalnumericalvaluesof thecolumnsof dots,and
enterthemunderneaththe grid.For example,lookingat Figure5-3, we see
thatintheleft-mostcolumntherearefivedots,andtheyaresittinginthe“64”
box,“32’’box,“16”twx,“8”box,and“4”box.Thusitsverticalvalueis 124.
In the next column,there is no dot straddlingthe verticalline; its value is
nxorded as O.
You will see the lettersml, nd, m3,etc., are aboveyourvalues.Whenyou
definethe character,you will substituteyourvaluefor eachof theseletters.
Samp/eprogram
To demonstratehow to use the downloadcharacters,let’s use the “car”
characterandsomeotheruser-definedcharactersto printa smallgraph.This
programwill do just that:
200 LPRINT CHR$( 27) ; “A” ; CHR$( O) ;
210 LPRIN”r CHR$(60) ; CHR$( 62 ) ;
220 FOR N=60 TO 62
230 FOR M=O TO 11
240 READ MM
250 LPRINT CHR$(MM);
260 NEXT M
270 NEXT N
280 LPRINT
8, 241,
0
290 ;:);
139,
2,
5,
0,241,
8,
5,
2,
0
300
310 DATA 139, 124, 0, 66, 4, 64
320 DATA 36, 16, 2, 16, 12, ()
330 DATA 139, 46, 16, 2, 60, 0
340 DATA 48, 0, 48, 0, 48, 0
350 LPRINT CHR$(27) ; ‘(D:4JCHR$( 11 ) ; CHR$( O) ;
360 LPRINT CHR$( 27 ) j “h” j CHR$( 1 ) ;
370 LPRINT “ U . S . EXPORTS”
380 LPRINT CHR$( 27 ) j “h” 1CHR$( OJ ;
390 LPRINT CHR$(27) : “%” ; CHR$( 1 ) ;
400 LPRINT “AUTOS“ ; CHR$( 9 ) j
410 FOR I=. 4 TO 9.3 STEP .4
420 LPRINT CHR$(61) ;
430 NEXT I
440 LPRINT
72
450
460
470
480
490
500
510
520
530
540
550
560
570
580
590
600
610
620
630
640
650
660
670
680
690
L,PRINT “CHEMICALS” ;CHR$ (9) ;
FOR 1=.4 TO 5.7 STEP .4
LPRINT CHR$(60) ;
NEXT 1
LPRINT
LPRINT “GUNS” ;CHR$ (9) ;
FOR 1=.4 TO 1.4 STEP .4
LPRINT CHR$(62);
NEX’1”I
LPRINT
LPRINT CHR$(9) ;“+––”;
SCALE$=’’––+––”
FOR 1=2 TO 8 STEP 2
LPRINT SCALE$;
NEXT I
LPRINT “--+”
LPRINI” CHR$(9); ” “;
FOR 1=2 TO B STEp 2
LPRINT “ “;1;
NEXT I
LPRINI” CHR$(27) ;”%’’;CHR$(O)
LPRINT CHR$(27) ;“S’’;CHR$(O) ;
LPRINT CHR$(9); ’’MILLIONS OF DOLLARS”
LPRINT CHR$(27); ”T”
LPRINT CHR$(27) ;“@”
LLl EL E X’
+ ---
..-.”
-t
. ---+..
. .
-,+----,--
--+’ ---- .....+
73
I
DEFINING YOUR OWN NLQ CHARACTERS
As you probablynoticed,NLQ charactersare printedby two passesof the
printhead.Halfofthecharacters printedonthefirstpass,andtheremainder
onthesecondpass.Thepaperisrolledup halfa dotheightinbetweenpasses
to let the printhead print dotson the secondpass that overlapthe previous
dots,b onler to fill in the spacesand producedenserchamctem.Additionally,the print head speed is halved,and the dots are printed at doublethe
densityof draft characters.For this reason,NLQ charactemcan containup
to 23 dots in the horizontaldirection.
Fundamentally,the processto defineandprintdownloadedNLQcharacter
is the same as for draft characters,exceptthat you must supplyaboutfour
timesasmuchcharacterdata,andyoumustdesignthecharacterwiththetwo
passes of the print head in mind. There are small differenceswith the
standardmode in the way the attributeinformationis processedalso.
In the draft qualitymode the attributebyte carriesthe descenderdata, and
specifiesthe left spaceandthe characterwidth.In the NLQ mode,the first
bit also carries the descenderdata, and the next three bits describe the
character’sleft space as with the draft charactem,but the last four bits
describethe right space.Appropriateallocationof data in these sevenbits
lets you place the character where you like within the grid, with the
restrictionthat the charactermust be at least 9 dots wide.
Usethe gridin Figure5-4 to helpplotthedata.Dueto thetwo-passprocess,
NLQcharacterscan containup to 16dotsvertically.ml to m23arethedata
for the f~st pass, and m24 to m46are the data for the secondpass.
To makethe characterdataeasierto calculate,put the firstpass dotsinside
theboxesonthegridwhenyouaredesigningyourcharacters,andthesecond
pass dotson the lines.Rememberthat adjacentdotsmay not overlapon the
samepass;in otherwords,if onedotis in a box,its adjacentdoton the same
passmaynotbeon aline.Therefore,tomakesmoothcharactm, putthedots
neededto overlapany spacesin a characterin the appropriateplacesin the
secondpass grid.
If weplotourcar-shapedsymbolforNLQ,thegriddatawilllooklikeFigure
5-5.
Thedefiningprocessis thesameas fordraftcharacters,exceptthatyoumust
selectNLQ mode, and you must define46 data. If you wish to print your
NLQ characterswith the regularcharacterset, the remarks regardingthe
74
simultaneoususe of ~gular anddownloadcharactersin the draft character
sectionapplyequallyto NLQ characters.
(1s1) ml
,. ..m23
..m46 (2nd)
rr124.
]~8
128
64
64
32
32
16
16
8
8
4
ASCII Code:
Descender:
Left space:
Right space:
mO= Descender x 128
+ (Lef{ X 16)
+ Right
4
~
~
1
1
lst:
2nd:
I
I
Figure 5-4. Use this grid (or one similar to it) to define your own NLO characters
( lst)
m] ...,
..m23
(2nd)
128
128
64
64
3?
32
16
16
8
8
4
4
2
ASCI1 Code:
Descender: 1
Left space: O
Right space: O
mO= Descender x 128
+ (Lef[ x 16)
2
1
~St: 14
38
?6
2nd: 28
70
1
1
70 126 0 0 0
0 070382.?6
1
9980
6
6
M 74 M 124 0 64 32 76 0 0 0
32 64 0 0 0 12 12 74 74 74 72
igure 5-5. Add the values of the dots in the boxes first, and then add the value on the lines
I
75
MEMO
76
chapter 6
MS-DOS AND YOUR PRINTER
WhenusingyourprinterwithanIBMPC, PC-XT,orPC-ATor compatible,
youwillprobablybe usingPC-DOSor MS-DOSas anoperatingsystem.A
numberof softwaretricksmaybe usefulhere.This chapteris not,however,
a substitutefor the operatingsystemmanualssuppliedwith yourcomputer.
To learn how to print files, etc. it is best to read the relevantparts of these
manuals.
INSTALLING APPLICATION SOFTWARE WITH
YOUR PRINTER
Wheninstallingapplicationsoftware,you may find that yourprinteris not
specificallymentionedin the lists of printersgiven for installation.However, this should pose no problem. Read this section, and guidelines
providedwith your softwa~ on printerinstallation.
If youhaveyourprintersetup in standardmode,thenchooseanEpsonLX850 as yourprinterto be selected.
If thisis notmentioned,chooseoneof thefollowing(inorderof preference):
Star NX-1000/LC-10,Star ND-10/15,Epson FX86e,Epson FX286e.
If you have your printer setup with the DIP switchesto emulatean IBM
ProprinterIII, simplychoosethis from the list of printers availablein the
applicationsoftwarelist.
If the IBM ProprinterIII is not mentioned,use PmprinterII or Pmprinter.
Ifyoursoftwaxepackagedoesnotmentionprintersbyname,butasksinstead
what featuresyour printer is capableof, the most commonquestionsare:
“Can your printerperforma backspace?”and “Can it do a hardwareform
feed?”.You shouldanswer“Yes”to both these questions.
Other softwarepackagesmay well allow you to install specificfeatures.
Spreadsheetprogramswill often ask for the maximumnumberof columns
to be printed.This is givenbelow.
77
Pica
Elite
Condensedpica
Condensedelite
Proportional
CPI
10
12
17.1
20
Numberof columns
80
96
137
160
Variable
Sometimes the software installation will ask you for an initialization
sequenceto returnto the defaultsettings.The commandfor yourprinteris
<ESC>@.
MakesurethattheDIPswitchesaresetforthecorrectpnnteremulation,and
thatyouhave selectedthe appropriatecharactersetusingthe DIP switches.
If you arein doubtaboutthecofilgrationof yourapplicationsoftware,seek
expertadvice.Yoursoftwaresupplierwillprobablybe yourmostqualified
reference.
EMBEDDING PRINTER COMMANDS
Many word-processorsand other software lack commandsfor changing
font, or printing double-sizecharactem.Your printer thereforehas commandsthatcanbeembeddedindocumentsto controlthesefunctionswithout
softwarehelp.The commandsconsistof a capitalletterenclosedin double
parentheses,followedby a digit:
Font:
Size:
((F))O
((F))l
((F))7
((F))8
((F))9
((s))0
((s))1
((s))2
((s))3
Courier
Sanserif
Oratorwith smallcapitals
Oratorwith lower case
Draft
Standardsize
Doublewidth
Doubleheight
Doublewidth and height
If you want to print a title in double-sizeOrator with small capitals,then
changeto regular-sizefonts for othertext, you can use thesecommandsas
follows:
File as seen on computerscreen:
((F))7 ((S))3
Printer
commands
(( F))CI (( S))0
Font commands (( F))lcan
((Fl)8anywhere
((F) )9in
be (( F))7embeddecl
a document.
Printout:
PRINTER
COMMANDS
When youuse these commandsthere are severalpointsto note:
●
●
●
The font ((F)) commandis ignored if the FONT button was held down
when power was switchedon.
A line consistingof commandsaloneprints as a blankline.
The softwarewillnot knowthatthesearecommands,so youcannottrust
yoursoftwareto giveyou the correctline width.The printedline maybe
considerablyshorterthan thelineon the screen;the extraspacebeingthe
spacethat was occupiedby the commands.
Onewayto handlethelastproblemis to prepareyourdocumentwithoutthe
commands,then insertthem as a final step, withthe marginsreleased.The
find,replace,andcopyfunctionsof word-processingsoftwarecanbehelpful
here.
If youdo notusethesecommandsorthepanelcontrols,theprinterwillprint
standard-size,draft characters.
The printer supportsvarious commandsin additionto the above, such as
quadruple-sizeprinting.Mostoftheseothercommandsconsistof theescape
code followedby one or more lettersor numbers.
If yoursoftwareenablesyouto placethe escapecodein yourfiles,or if you
areableto definethisasauseroptionduringinstallation,youcanalsoembed
these escape sequences.
PROGRAMMING THE PRINTER WITH DOS
COMMANDS
If your system includesthe file PRINT.COMyou can use the main DOS
printingcommand.Simplytypethe wordPRINT followedby the name of
the file you want to print. To print a fde named README.DOC,for
example,type:
A >PRINT README .DOC
The computer may respond with the following message, asking which
printerto use:
Name of 1ist device [PRN] :
If yourcomputeris connectedto onlyoneprinter,pressRETURNto select
the default choice (HUN).Printing will begin and the A> prompt will
reappear.You can executeother commandsor programswhile the fde is
being printed.
A singlePRINTcommandcan print two or more files.List the file names
consecutivelyon the sameline,or use wild-cardcharactem(* and ?). Each
file will be printedstartingon a new page.The PRINT commandalso has
controloptions.For example,you can terminatea printingjob in progress
with then option.(Theprintermay not stopprintingimmediatelyas there
may be considerabledatastoredaheadin its buffer.)For then option,type:
A )F’RI
NT/’”lY
See your,DOSmanualfor furtherinformationaboutthe PRINTcommand.
If your systemdoes not includePRINT.COM,you can print filesby using
the PRN devicenamein COPYor TYPEcommandssuchas the following:
COPYandTYPE do not permityou to executeothercommandswhilethe
file is printing.
If youwanta particularfont,orprintpitch,youcanmakethesesettingsfrom
the controlpanel before you start printing.See Chapter2.
80
I youprintfromtheDOScommandlevelveryoften,itwillbe advantageous
to createa printersetupfde. Theninsteadof settingfontetc.manuallyeach
time, you can compIete the setup with a single command from your
computer.For example,you can createa file containingprintercommands
to selectnear letter quality,and selectelite pitch with the Standardmode.
You can find the commandsin Chapter4. We suggestthe following:
~ Near letter quality
Elite pitch
●
<ESC>
<ESC>
“!”
“l”
<1>
<ESC>“!” <1> is a powerfulcommandthat, in additionto selectingelite
pitch, cancelsunwantedfeatures such as underliningwhich might be left
from previous commands. The angle brackets around the cl> indicate
charactercode 1, which is a controlcode,not the printabledigit“l”.
You may want to place additionalcommandsin this file, such as left and
rightmargins,linespacingandbottommargincommands.Oryoumaywant
to create a variety of setupfdes with a differentset of commandsin each.
To avoidexcessline feeds,you shouIdpIacethe commandson one line in
thesetupfile.Youmayor maynotbe ableto generatea setupfilewithwordprocessing software;it dependson whetheryour softwarelets you enter
controlcodes.If yoursystemincIudesthe fileEDLIN.COM,however,you
can easilycreate a setupfile with the DOS line editor.
An appropriatenamefor this setupfile wouldbe NLQELITE.DAT.To use
theDOSlineeditor,typethecommandEDLINNLQELITE.DAT,thentype
the underlinedpactsof the followingdisplay.Press RETURNat the end of
eachline. Don’ttypethe symbol“A”.This symbolmeansto holdthe CTRL
keydownwhilepressingthenextkey:forexample,‘V meansto typeCTRLV.
whichindicatesthe end of the input.
A)EDLIN
NLQELITE
. DAT
..._————.—
——....-..—..
—.,New f i le
“’v[:“VA
*.X1X1
—......—.
.——_.—
*“C
—
‘V indicatesthat the followingcharacteris a controlcode. ‘V[ enters the
<ESC>code. <ESb has charactercode 27, and “[” is the 27th character
fromA inASCIIsequence.Similarly,‘VA entersthecontrolcode<1>.See
your DOS manualif you need furtherinformationaboutEDLIN.
81
You can now set up the printerby sendingit the file NLQELITE.DAT.To
avoidumecessary loggingof commands,switchhard-copyoutputoff (by
pressingClllL-PRTSC ifhardcopyis on).ToprintthefileREADME.DOC
in NLQ elite type, give the followingtwo commands:
A?COPY NLC?ELITE. PAT PRN
A )PRINT README .DOC
For greaterconvenienceyoucanmakeabatchfde thatwillsetup theprinter
and print any specifiedfile with a singlecommand.To createsuch a batch
file withthenameNLQPRINT.BAT,typein the firstfourlinesshownnext.
‘Z meansto pressthe CTRLand Z keys simultaneously.To use this file to
print README.DOC,type the fifth line.
A ?c@Pj’CON NI.QFT!INT
.BAT
COPY NLQELITE . DAT PRN
PRINT %1
.-L
A’?NLQpRINT RE7iDME.DOc
The first line aboveis a copy commandfrom the CONsolescreento a file
namedNLQPRINT.BAT.Thenexttwolinesarethecontentsofthisfile.The
%1 is a dummyparameter:whateverfile name you type afterNLQPRINT
will be substitutedfor 701and printed.
PROGRAMMING WITH BASIC
As an exampleof programmingthe printeron MicrosoftBASIC,we have
listed the program for the IBM-PC. This program runs in the printer’s
Standardmode, and the dowrdoadablecondition(DIP switch 1-1 ON and
DIP switch 1-2 OFF).
1000
1010
1020
1030
‘ Set control
E$=CHR$(27)
D$-E$+’’XO”
cedes
‘Escape cqde
‘Draft quality
N$=E$+’’x1°
‘Nearletterquality
1040C$=@+’’kO’’+N$
‘Courier
characters
1050S$=E$+’’kl’’+N$ ‘Sarserifcharacters
106001$-E$+’’k7’’+N$ ‘Orator
withsmal1 capital
107002$=E$+’’k8’’+N$ ‘Orator
with lowercase
1080H$=CHR$(9)
‘Horizontal
tab
1090P$=E$+”P”
‘Picapitch
1100 ‘ Startprinting
1110WIDTH“1.Fll
:“,255
82
1120LPRINTE$;’’D’’
;CHR$(3)
;CHR$(13);
CY+R$(O)
‘Set~
1130LPRINTC$;“Fontsare:”
1140LPRINTH$;D$;“Draftcharacters,
“
1150LPRI~ H$;C$;“Courier
characters,
”
1160LPRINTH$;S$;‘%nserifcharacters,
”
1170LPRINTH$;O1$;“Oratorwithsmal1 capitals,
or ‘(
,
with lowercasecharacters,
1180LPRINTH$;02$;
“
‘Selectitalics
1190LPRINTE$;“4”;
1200LPRINTH$;02$;
“and“;01$;
‘(italics
“;S$;
“for“;
1’210
I.F’RINT
C$;“all“;E$;
“fonts.
”
‘Cancelitalics
1220LPRINTE$;“5”
1230LPRINTC$;“Printpitchesare:”
1240LPRINI’
H$;P$;“Picapitch,
“
“M”; “Elitepitch,
”
1250LPRINTH$;E$;
1260I#RI~ H$;CHR$(15);‘Cordensed
pitch
1270LPRXNTP$;“Condensed
picapitch,
“
1280LPRINTH$;E$;“M”;“Cordemedelitepitch,”:
‘Picapitch
1290LPRI~ P$;
‘Cancel
cordemedprint
1300LPRINTCHR$(18)
‘Select
proportional
spacing
1310LPRINTH$;E$;
1320LPRINI’
“andproportional
spacirg,
”
‘
proportiomlspacirg
1330LPRI~ E.$;
1340LPRIW H$;E$;
“W1’’;
’’Expanded,
“;F$;
“WO”;
1350LPRI~ IZ$;
“w1”;
‘Touble-height,
“;E$;
“wO”
1360IFRINTH$;E$;
“h”;GIR$(l);
“Ibubl=ized,”
1370LPRItWH$;E$;“h”;CHR$
(2);
“Quad*ized.
”;
1380LPRI~ E$;“h’’;
CHR$(O)
1390LPRI~ :LPRINT:IYRINT
1400LPRI~ ~; “Q”;CTIR$
(47)‘Setrightumqin
1410LX’RINT
C$;“Varims lineami character
spacings:”
‘Centertext
1420IPRI~ E$;“al”
1430KM? 1=1‘ID7
1440LPRINTE$;“A”;CHR$
(I); ‘Set1inespacing
1450LPRIM E$;“ “;CHR$
(I); ‘Increase
character
space
C
14$0~~~
“THES
1470NEXTI
la FCR I-7ITI1 SIW –1
1490LPRINTF.$;
“A”;CHR$
(I);
1500LPRINTE$;“ “;c
HR$(I);
1510LPRI!W“lHESPACIN3SARE CHAN’3ED”
1520NEXT I
1530LPRI~ E$;“aO”
‘Lef,t
justify
1540LpRIm ~; “3”;CHR$(36)
; ‘Set1/6”1inespacing
1550LPRINTF$;“ “;CHR$
(0); ‘Normal
character
space
1560LPRINT:LPRINT
1570LPRIW C$;“Otherfeatures:”
1580LPRINTH$;E$;“E”;“I@hasized”
;E$;
“F”;”,“;
1590LPRINTE$;“G”;‘Tkmble-trike”
;E$;
“H”;”,“;
1600LPRINTE$;“-l”;
‘Thxierl
ining”
;E$;
“4”;“, “;
1610LPRINT
16~0~1~
H$;FJ$;
“SO”;
“SUPERSCRIPT”
;E$;
“T”;“ and “;
1630LPRI~ E$;“S1”;“5WESCR1PT”
;E$;
“T”
1640Gmu8 2110
83
1650 LPRI~ H$;C$;“Ibtnload
characters:
“;
1660LPRI~ D$;E$;“%1”; ‘Selectdownloadcharacter
1670l?3R1=1TO 5
1680LPRINTCHR$(60);
‘Printdownlmd character
1690NEXTI
1700LPRINTE$;“%0”;
‘Selectnormalcharacter
1710GCEuB2200
1720LPRIm C$;E$;“%1”: ‘Select
downloadcharacter
1730FQR 1=1‘lU5
1740LPRINTCHR$(60);
Printdownloadcharacter
1750NEXTI
‘Select
nomal character
1760LPRINTE$;“%0”
1770LPRI~ H$;C$;“Various
dot graphicdensities:
“
1780DIM 1.030$(4)
1790 RE31?3RE2390
1800 FUR ROW=l TO 4
1810 FOR COL=lTO 65
1820REAOIX
1830(ROW)
‘D30$(ROW)
+CHR$(t13)
1840NEXTCOL
1850NEXT~
1860LPRINrm; “A’’;
CHR$(8): ‘Set8/72”linespscing
1870FOR ROW=lTO 4
1880LPRINTH$;“ “:
1890RX? E=JOTO 4
1940
1900IF
dot graphicsmode
CHR.$(B)
; ‘Select
1910LPRI~ E$;“*’’;
;CHR$(0)
;KG0$(173W)
;
1920LPRI~ CHR$(65)
1930LPRI~ “ “;
1940NEXTB
1950LPRI~
1960mm
1970LPRINT
1980m mw==lm 4
“ “:
1990LPRIm I-l$;
2000FcR B-5 m 7
dot graphicsmode
2010LPRINTES:“*’’;
CHR$(B)
; ‘S
;
;
;
2020LPRI~ C
“
2030L
2040NEXTB
2050LPRI~
2060
‘Initialize
printer
2070EN!mm; “@”
2080m
2090
2100 ‘ ~INES
2110 ‘ Definedraftdownloadcharacter
;CHR$(60)
;CHR$(60)
;
2120LPRIm D$;E$;“&”;CHR$(0)
2130RE510RE2300
2140FOR M=O ~ 11
2150READMt4
;
2160LPRINTCHR$(MM)
2170NIXTM
84
2180
2190
2200 ‘ DefineNLQ downloadcharacter
“&’’;
CHR$(O);CHR$(60)
;CHR$(60)
;
2210LPRINTC$;E$;
2220RHmRE 2330
2230RX M=OTO 46
2240FmDMM
2250LPRI~ CHR$(MM);
2260NEXTM
2270
2280
2290 ‘ DATA
data
2300 ‘ Draftdownloadcharacter
2310DATA 139,124,0, 66, 4, 64, 36, 16, 2, 16, 12, 0
2320
2330 ‘ NI.Q
downloadcharacter
data
2M0 DATA 128,14, 16, 38> 1, 70, 1, 70, 0,126s O, 0
2350DATA 70, 0, 38, 0, 22> 9, 6. 9, 6, 8> 6, 0
2360DATA 28, 32. 14, 64, 14. 0, 14, 0>124, 0, 0, 12
2370DATA 64, 12, 32, 14, 16, 14, 0, 14, 0, 12, 0
2380
2390 ‘ Lbt graphicsdata
2400DATA O, 0, 0, 0, 1, 3, 7, 7, 7, 15/ 14, 14
2410DATA 14, 14, 14, 7, 7, 3, 3, 15, 15, 15> 0, 0
2420DATA O, 0, 6, 7, 7. 7, 7. 7. 7. 7, 7. 6
2430DATA 6. 0. 0, 7. 7, 7. 7. 7, 7. 7. 7s 7
2440DATA 7, 7. 0, 0, 7. 7> 7, 7. 7, 7. 7. 7
2450DATA 7, 7, 0, 0, 0
15, 7, 7
2460DATA 0, 0, 60,255,255,255,255,255,143,
0, 0
2470DATA 7, 7, 3, 3, 3,131,193,241,240,240,
31, 0
2480DATA O, 0, 0, 0,224,255,255>255,255,255,
1
2490DATA O, 0, 1, 3, 31,255,255,255,255,255,255>
O
2500DATA O, 0, 0, 1, 7, 31,255,252,240,192,128,
2510DATA O. 0, 0, 0, 0
192,224
2520DATA o, 31, 31. 3,129,128,192,192,192,192,
2530::~~~24>224.224.240,255r255t
255,255,255,127,
0, 0
15
0, 0, 0, 0, 0,192,255,255,255,255,255,
2540
0,240,255,255,255,255,255
2550DATA 15, 63,252,240,192,
0, 0, 0, 0. 0, 0
2560DATA 7, 15,127,252,240,192,
2570DATA 0, 0, 0, 0, 0
112,56, 56, 56, 56
2580DATA 0,248,248,240,224,224,112.
192,128,0, 0, 0
2590DATA 56,120,120>240,X0,224,224,
2600DATA 0. 0, 0> 0, 0, 0,128,248,248,248,248,240
2610DATA192. 0, 0, 0, 0. 0,240,248,248,248,248,240
2620DATA192, 0. 0, 0, 0, 0, 0, 0> 0, Or o> 0
2630DATA O. 0, 0, 0, 0
85
p
w
Thisprogrambeginsby assigninga numberof printercommandsto BASIC
stringvariables(lines 1000to 1090).Youcan findmostof thesecommands
near the beginningof chapter4.
The WIDTH“LPT1:“255 statementin line 1110meansintlniteline width.
It preventsthe IBM-PCfrom insertingunwantedcarriagereturnsand line
feeds in graphicsdata.
Actualprintingbeginsin line 1120.Usingthe preassignedcommands,the
programprints samplesof its differentfonts, includinga line showingall
stylesin italics,followedby samplesof the printpitches,then somedouble
and quadruple-sizedprinting.
Next comes the central attractionof the program: a line of text printed
fourteentimesin expandingandcontractingloopsto giveabarreleffect.The
workis doneby fourprintercommands:a commandsettingtherightmargin
(line 14@);a centeringcommand(line 1420);a commandto vary the line
spacing(lines 1440and 1490);and a commandto micro-adjustthe space
betweencharactm (lines 1450and 15W).
Nexttheprogramreturnstonormalspacingandgivesa demonstrationofthe
printer’swc)rd-processingabilities:bold printing,underlining,subscripts,
etc.
The row of automobilesin the nextprintedline is createdby dGwrdoading
two new characterpatterns,whichare printedin placeof the character“<”
(character60). Detailscan be fwnd in Chapter5.
The final part of the programuses dot graphicsto print some “SW” IGgm
withvariousdensities.Thedotpatternof thelogo wasoriginallylaid outon
graphpaper,then convertedto the datain lines 2400to 2630with the help
of a calculator.Each number~presents eightverticaIdots. (See “Graphics
cGmmands”in Chapter4 for details.)
The patternis printedin four rows,each row is eightdotshigh and 65 dots
wide.Lines 1800to 1850readthedotdataintoa stringarrayvariablenamed
LOGO$.Line 1860sets the line spacingtG8/72inch so that the rows will
connectvertically.The loop in lines 1870tG1960dGesthe printingin four
passesof the print head.
86
Fonts are:
;,l!.
..,.:<..,.;.(::/
”’”1;
::,/’”!(:{l.:::”!
”:.(::!’”
+:,
Courier
characters,
SanSet
-if
characters,
O
ORATOR
w
a
l
c
c
ITALICS fof-all ~’~:~:”;fc:.
Print
pitches
are:
Pica pitch,
Elite pitch,
Condensed
picap]tch,
Condensed
el]tepltch,
and proportional
spacing,
Double-height,
Ihub 1e–s ized,
Expdncled..
Q
Various
i
1i ne and
charac<er
spacings
.
:
Other features
:
~nder
1i n i nq,
Doubl e-strike,
—-....—
Emphasized,
SUPER=CR1~~ and ~uB~C=l r_.*
Down 1oacl characters
: ;:,~:ii~:~:$~
Various
dot graphic
dens it ies :
$8
c
7
TROUBLESHOOTING
AND MAINTENANCE
The followingsectionon troubleshootingandmaintenanceis intendedonly
as a brief guide. Remember that your printer is a highly sophisticated
electronicdevice,whichalso containshigh voltageinside.For that reason,
only carry out thoseoperationsthat ate describedin this chapter.
CAUTION: Anyattemptto carryoutoperationsotherthanthosedescribed
heremayresultin electricshockand/ordamageto theprinter.
Whencarryingoutanyrepairsor maintenance,alwaysfollow
the instructionscarefidly.
TROUBLESHOOTING
Yourprinter is a reliablepiece of precisionmachinery,which shouldnot
causeyouanytrouble,providedthatitisusedandtreatedsensibly.However,
if you do experiencea minorproblem,the few tips belowshouldhelp you
avoidhavingto makeanunnecessaryservicecall.Thefollowingtablegives
you ideason whereto look in this sectionif you experienceproblems:
Region of fault
Power supply
Description
Power is not being
supplied
tothe
printer
Printing
Theprinter
does
notprin~
orstops
printing
Theprint
isfaint
oruneven
missing in charactm or graphics
Dotsare
Paper feeding
Whileusing application software, fonts orcharactm cannotbeprinted
The printout is not what is expected when running a program
Single sheets do not feed properly (without ASF)
Continuous pap& does not feed properly with the tractor feed
The ASF is not operating or is not feeding paper properly
Paper park(switching between continuous paper and cut she&a) is not
working properly
Text is being printed all on one line, or with extra blank lines
Page length and margin settings are not what is expected.
Remember- it is betternotto attemptoperationsor ~pairs aboveyourlevel
of competence.Otherwise,you run the risk of damagingthe printer.
89
P
s
If the POWER indicatordoes not illuminate,checkthe following:
Check
1Is the power cable properly
1plugged into the eledrical
(outlet?.
1Is power being supplied to
1the outlet?
1 theprintervoltage correct?
Is
Possible remedy
Turn off the printer, make certain that the power cable
is securely connected, and then tumtheprinterback on.
Turn off the printer and unplug it- TV out another
appliance of theoutletto determineifelectricity is being
supplied to that outlet.
Check the bottom panel of yourprinterto verify that the
outletvoltage corresponds tothevokagerequiredby the
printer. If theydonotmatch, DONOTW to operate the
printer. Contact your supplier.
P
If yourprinterdoesnot print,or suddenlystopsprinting,checkthe following:
Check
Is the interface cable connected securely?
Is the O
indicator illuminated?
Is the
indicator
flashing?
Is the paper caught up internally?
Is the ribbon caught up
around the print head?
Is the software you are using
properly installed for your
printer?
Can the printer perform selftest operations?
9
Possible remedy
Check both ends of the cable - printer and computer to
make sure that the connector is firmly in position.
Ifit isno~ press the ONLINEbuttonto set the printer online.
If it is, the paper has run out. Load more paper.
Turn off the power, remove the jmedpaper,
replace,
tumonthe@nter, andcontinueprinting. hIalcesure that
the leading edge of the paper is smooth and uncreased.
Turnoff the power, remove thenbbon, retension it,
and
replace it. This problem occurs most frequently with a
worn ribbom so you may need to replace the ribbon.
Check the installation settings in your softwar% and reinstall if necessary.
Turn the printer off, and turn it on again, holding down
one of the buttons to perform a self-test. If these do not
work, contact your dealer.
If the print is faint,or uneven,checkthe following:
Check
Is the ribbon properly installed?
Is the ribbon worn out?
Possible remedy
Check and reinstall ifnecessaxy.
The ribbon has a long tife, but will eventually need replacing. Fit a new ribbon cartridge if necessary.
If dots are missingin the printing,checkthe following:
I Check
Are dots missing at random
in the printing?
I Possible remedv
The ribbon has become slack causing it to get caught
up. Stop printing, remove the ribbon cartridge, retension and replace it.
Isa line of dots missing conThe print head is darnaged. Stop printing, and contact
sistently
throughout
the” your supplier for a new print head
ptiting?
If your applicationsoftwarecannotprint the fonts or charactersselected,
checkthe following:
Check
Is your application software
properly installed?
Are fonts not being selected
properly?
Are characters other than
those
expected
being
primed?
Possible remedv
Check the software installation, andre-install the software if necessary.
Check the software installatio~ and insert the commands necessary for font changes into the software.
Eitheryou areusing the wrong International Character
Set (reset with DIP switches or software commands),
or you have the wrong character set selected (for
example if characters other than IBM block graphic
characters are being printed). Correct this with DIP
switches or the appropriate software sequences.
If the printoutis not whatis expected:
1 Check
Is the printer installed correctly?
I
I Possible remedv
Your software may think that it is driving a different
emulation to the one actually set. Check the DIP switch
settings to make sure you have the right emulation.
Usethe Hex Dump mode to analyze the output from the
computer to the printer. This witt enable you to determine that the right escape sequences, etc are being
mmsmitted.
91
P
f
If cut sheet paper (withoutthe ASF) is not feeding smoothly,check the
following:
Check
Is the papa release leva
pushedback(toti
~ position)?
Is the paper guide in plwe
and Veltical?
Are the left and right guidea
too close together?
Possible remedy
Set the release lever to the *
position.
The paper guide should be in place vertically for cut
sheets to feed smoothly.
If the left and right guides are too close together, the
p~willnot
feed smoothly. Move them a little further
apart to allow the paper to feed freely.
If it is, then deselect it.
Is the ASF selected with the
DIP switch settings?
You can only feed paper in this way wh~ the printer is
Are you hying to feed paper
off-line. Set the printer off-line and then feed paper.
using the front panel buttons
while the ON LINE indicator
i illuminsled?
Is the DSI There are limits to the thickness of paper thatcsnbe fed
. . too thick?
in this way. Try with thinner pa&r. -
If fanfold(continuous)paperisnot beingfedcorrectlyusingthetractorfeed,
checkthe following:
Check
Is the paper release lever
pushed to the ~ position?
Is the paper guide in the vertied position?
Are the holes on each side of
the paper aligned withregard
to each other in the sprocke~?
Possible remedy
Make sure the release lever is pushed to the ~ position
When using the &actor fd the paper guide should be
horizontal.
Ifthetwosidesof thepaperare out of alignmen~realign
them so that the sprocket holes match up.
Arethesprockets tooclosea
too far apart?
Are the sprockets locked in
position and the covers
closed?
Is the paper feeding freely
into the printer?
Misalignment of the sprockets, making the paper too
loose or too tight+will prevent a smooth paper feed.
Correct this if necessary.
92
The paper should not be too far horn the printer (less
than 1 meter/3 feet), and there should be no cables or
other obstacles obstructing its path. The paper should
also be feeding straight into the printer, and an angled
feed may cause jams and blockages.
I Check
Are you trying
tofeed paper
using the front panel buttons
while the ON LINE indicator
is illuminated?
I the paper toothick?
r
I Possible remedy
You can only feed paper in this way when the printer is
off-line. Set the printer off-line and then feed paper.
There are limits to the thickness of paper that can be fed
in this way (one top copy and two NCR copies). Try
using thinner paper.
If the ASF is not operatingor is not feeding paper correctly,check the
following:
Possible
remedy
Check
this
option.
Has theASF option
been Select
selected
with the DIP
switch?
lever
should
be settothesingle-sheet
Istherelease
lever
set
tothe Therelease
position.
~ position?
that
the
ASFispmperly
seated
ontheprinter.
Is the ASF correctly Makesure
mounted?
Stop printing, remove the j ammed sheet (you may have
up near the
Ispaper
caught
pint head?
Are the left and right guides
too close together?
Is there too much paper in the
paperfeedhopperorstacker?
Was the paper fanned before
being fed into the ASF?
Has the paper been used already or is it creased?
Are you trying to feed paper
using the front panel buttons
while the ON
indicator
is illuminated?
Is the paper too thick or too
thin?
to remove the ASF for this), and continue.
If the left and right guides are too close together, the
paper will not feed smoothly. Move them a Iittlefurther
aw to abv the paper to feed freely.
The ASF’S paper feed hopper and stacker can hold 50
sheets each. Make sure that there is no more paper than
this in either the hopper or stacker.
If this is not don% paper jams may occur. Remove the
stack of paper horn the ASF and fan it before reinserting.
Only new, uncreased paper should be used with the
ASF.
You can only feed paper in this way when the printer is
off-line. Set the printer off-line and then feed paper.
There are limits to the thickness ofpaperthat can be fed
in this way. Try using different paper.
If the paperpark facilitydoesnot appearto be workingcorrectly,checkthe
following:
Check
Isthepaper
release
lever
in
Possible
remedy
Thepaper
release
lever
mustbeset to the ~ position
the ~ position?
Has the fanfold paper been
properly parked?
after the fanfold paper has been parked.
Make sure that the
indicator comes on flashing
after the fanfold paper has been parked.
Ift is beingprinted all on one line, or with extra blanklines,
e check the
following:
Check
Is the text all on the same
be?
Is text being printed with
extra blank lines?
Possible remedy
Carriage returns are not being expanded to
<CR> + <LF>pairs. Check the DIPswitchsetting and
correct.
Two line feeds are being printed. Make your software
print just acarriageretumor (if this isnotpossible), set
the AUTO LF to OFF with the DIP switch setting.
If thepagelengthandmarginsarenotwhatis expected,checkthefollowing:
I Check
I Possible remedv
Istheprinting
starting
too Usethe
Micro
Feedfunction
toadjust
the
print
position
high
ortoolowonthe
page? relative
tothe
page.
Does the printer’s page
length notmatchthephysical
page length?
94
Use the DIP switch to setup the correct page length, or
use software commands to do it.
I
MAINTENANCE
Essentially,your printer is a robust piece of equipment, but shouId be
treatedwitha modicumofcarein orderto avoidmalfunctions.Forexample:
. Keepyourprinterin a “comfortable”environment.Roughlyspeaking,if
you arecomfortable,thenthe environmentis suitablefor yourprinter,too
(see Chapter1).
. Do not subjectthe printerto physicalshocksor excessivevibration.
. Avoidextremelydustyenvironments.Dust is the enemyof all precision
mechanicaldevices.
. To clean the exteriorof the printer, use a cloth barely dampenedwith
eitherwaterwith a littledetergentor a little alcohol,but do not allowany
liquidto fall insidethe printer.
●
Theinteriorof theprintermaybe cleanedwith a smallvacuumcleaneror
a compressed-airaerosol(sold for this purpose).When performingthis
operation, be sure not to bend or damage any cable connectionsor
electroniccomponents.
REPLACING THE PRINT HEAD
Thisisnotajob whichyouwillneedto doveryoften.Thepnnt headhasbeen
designedto last for about 100millioncharacters.In normaleverydayuse,
thistranslatesto yearsof life.However,if theprintqualityis faint,evenafter
youhavechangedtheribbonor youhaveadjustedthe gapbetweenthe print
head and the platen (see Chapter1),the print head will need replacement.
Only use a replacementprint head as recommendedby your supplier.
1. Turn OFF the printer,and unplugthe power cord.
2. Removethe top cover and ribboncartridge.
3. Iftheprinterhasbeenin opeiationimmediatelybeforethisoperation,the
print head will be hot. Allow time for the print head to cool before
attempingto work on it.
4. Move the print head carriage toward the right until you can see the
connectorcover. Removethe connectorcover and pull the cable free
from the connector.
5. Unscrewthe two screwsthat hold the print head in pIace and set them
aside.
95
(
S
Y
\\
\
F
R
6. Disengagethecablefromthetabsholdingitdown,thenremovethepnnt
head.
7. Foreasy instaUationofthenewpnnthead, movethecarriagetowardthe
left end of the rail.
8. Place the new printhead on its support,seatingit on the two pins.
9. ‘ITueadthenewcablethe samewayas theold, securingitunderthe three
tabs on the printhead carnage.
10.Plug the cable into the connector,insertingit as far as it will go.
11.Fasten the printhead down with the two screws.
12.Movethecarnagebacktowardtherightandreplacetheconnectorcover.
Slidethe connectorcoverto the left untilit locks into place.
13.Replacetheribboncartridgeandtopcover,andplugthepowercordback
in.
97
9
c
8
SPECIFICATIONS
Printingsystem ..............................Serial ImpactDot-matrix
Printingspeed ................................ 150cps (Draftpica)
37.5cps (NLQpica)
Print direction................................Bidirectional,logic-seeking
Unidirectional,logic-seeking
(selectable)
Numberofpnnt pins.........,...........,9
Printhead life.................................100 millioncharacters
Line spacing................................... 1/6, l/8, n/72, n/216inches
Character . . . . . . . . . . . . . . ..........ASCII
International
IBM special
IBMblockgraphic
Download
96
14 sets(*)
111
50
192
* USA,France,Germany,England,DenmarkI, Sweden,Italy, Spain I,
Japan, Norway, Denmark II, Spain II, Latin America, Denmark/
Norway
CPI
10
80
Numberof columns....................... 12
96
Pica
17.1
137
Elite
20
160
Variable
Condensedpica
Condensedelite
Proportional
9
Characterdot matrix ...................... 9 x 11 (Draft)
18X 23 (NLQ)
Bit imagedot-matrix...................... DPI
60
Normal
120
Double
120
High-speeddouble*
240
Quadruple
80
CRT I
90
CRT II
Plotter
72
144
Double-plotter
(8 or 9) x 480
(8 or 9) x 960
(8 or 9) x 960
(8 or 9) x 1920
(8 or 9) x 640
(8or 9) x 720
(8 or9) x 576
(8 or9) x 1152
* It is impossibleto printadjacentdotsin the modemarkedwith an asterisk
(
Paper feed ......................................Frictionand push tractor
Paper feed speed ............................2.8inches/secondmax
Paper width ....................................Cut sheet
Fanfold (continuous)
5.5’’-8.5”
4“-10”
Copies............................................Original+2 copies
Maximumbuffer size.....................WithoutDownload
With Download
4kB
1line
Emulations.....................................Epsonmode
IBM Proprintermode
Interface.........................................Centronicsparallel(standard)
RS-232Cserial (option)
Ribbontype....................................On-carnage,dedicated
Black
100
.
Ribhntife ......_~_fi~.~_fi~...
Imillion characters(draft pica)
Dimensions....................................396(w)x 301(d)x 120(h)mm
15.6(w)xll.8(d) x4.7(h) in
Weight............................................5.1kg (11.21b)
Power supply ................................. 120VAC,220VAC,240VAC,50/60Hz
(variesaccordingtothecountry ofpurchase)
Options.......=.
. . . . . . . . . . . . .Automaticsheet feeder (SF-10DR)
Serial-Parallelconverter(SPC-8K)
101
Thefollowingdescribesthepinoutof theparallel(Centronics-type)interface connector(signalswhich are low when activeare overlined):
Pin
I
I STROBE
2
I DATAO
~
I
Name
1
Function
Goes fIom high to low (for 20.51.M)when active
I Hi~hwhenactive
DATA1
DATA2
High when active
5
t DATA3
I Hi~hwhen active
6
DATA4
High when active
7
DATA5
High when active
8
DATA6
High when active
9
DATA7
High when active
10
ACK
5ys low pulse acknowledges receipt of data
11
BUSY
Low when printer ready to receive data
12
PAPER
High when paper out. Can be disabled with DIP switch
setting
13
I
High when urinter is on-line
SELECT
I N/C
I
High when active
4
I 14.15
I
I
I
WND
Chassis
ground
(Isolated
fromsignal
ground)
~~~~utfrom~intc
19-30
I
GND
Twisted pair ground return
31
RESET
When this input signal is low, printer is reset
32
ERROR
Outputs low when printer cannot continue, due to an error
33
I EXT GND
34,35
36
102
I External mound
N/C
SELECT IN
Always high
I
c
9
CHARACTER SETS
The followingtables showthe standardand IBM charactersets.
The decimalcharactercode of each characteris shown in an inset to the
lower right of the character.
Thehexadecimalcodecanbe foundby readingthe entriesat thetop andleft
edgesof the table. For example,the character“A” is in column4 and row
1, so its hexadecimalcharactercodeis 41. This is equivalent(4x 16+ 1 =
65) to decimal65, the numberin the inset.
Control codes recognizedby this printer are indicated by abbreviations
insidepointedbrackets.<>.
<Sample>
p
r
H
L
I
L
~
o
D
[’ontl-ol” code
H
o
103
104
105
I
STANDARD CHARACTER SET #2
Othercharactersare identicalto standard
characterset #1.
106
INTERNATIONAL CHARACTER SETS
Whenan internationalcharactersetis selectedDIPswitches2 to 2 or by
a commandfromsoftware,the followingchangesaremadein the character
set:
See Chapter3 for the DIP switch settings.
The commandfor selectingthe internationalcharactersets is:
<ESC>“R” n
Wheren meanscharactercode n, i.e. CHR$(n)in BASIC.The valuesof n
are:
10 Denmark11
5 Sweden
O U.S.A.
11 Spain II
1 France
6 Italy
12 Latin America
7 Spain I
2 Germany
13
Denmark/Norway
8 Japan
3 England
4 DenmarkI
9 Norway
IBM CHARACTER SET #2
o
0
(
I’m
1
h
2
2
1
-G
I
ix
In
3
v
4
‘
h
In
n
_
—
x
h
.
B%
~
(so)
14
~ (s1)
15
108
4
3
30
31
-
w
5
&l
7
109
IBM CH/ ,RAC’ ‘ER SET
1
(Ml)
J
(DC2)
J
-la
(GC4)
__lZ
(
-b
-b
-b
(
-_-b
(
-b
-_G
c
J
--b
-b
--E
Othercharactersare identicalto characterset #2.
The duplicationof controlcodesenablessystemswith a 7-bit interfaceto
obtain control functionswhen the most significantbit is set to 1 by the
<ESC>“>” commandin the standardmode.
110
IBM SPECIAL CHARACTER SET
Additionalcharacterscan be printedby specialcommands.
111
M
112
INDEX
m
A
A
A
A
A
D
B
B
B
B
B
B
B
B
B
a
C
C
C
C
C
C
C
C
4
C
C
C
C
C
C
C
m
D s
wi
r s2
oa9
1
e e
s
f
e6
ue
o p e i1 1 o i
m
r
f
3 u
s h1 3
f
8u
o
e1
c
o 4
h
u
p o
3
u
r
o 6a
c
5
a
kh
sr
c
3
o
h
l
3 1
a
v
2
u,S
2
3
70
23
6
e
e
p i
6
d
r
i r
e n
m i
E 8tp
1 i
p
5 i
r
- 9n i
E
3
p
p
3
r
i p
om
n r
3
1 m
u
m
5
oa E
r t
E 7 s 3
2
1
u
f
,
E
rn
1e v
E
s
3
e
s
p
4
x
c
6
o a E
m
nr
r
5
a
e
r
t
r
5
e
n
t
e
m
f a
a
o v
t s h 5
e F
t
r
n
1
o
ho a 4
c
p
r oa l
ir
d
1m
a
s c
h3
o
a p
r9
m
p1
s 9
h
9
a s
,e
r
1e
1 i rnmi
s a p hc
ao u
F 1s
4
p
F
2
u
s
4
h
p
ab
a
r
F ec
c
3 a
oo
9
l
2
w
9
o F if
l
d
p
1
o
ni
9
d
3
o
n
n
e
m
p
1
o
a
n
n
G 1
t
s
2
o
t8
u 0r y
G
G
c
5
r
o
h
6
6
l
s
t
5 b o
s
D c 6
D
D t
D
, met
D
D
D
c
eD
A D ,q
1
m
H
H
H
m
I
I
I
I
d
p
t
c
m
e2
c o
o5
s
3 1
5
x
o
a
a u
O
1
f3
or L b
O
1 i sm
bt
Or
s
2 i u
O
3
v
B
P
tP
s
1
i
P
s
p1
e
P
I
c n
3
1th
P
I
p
3
r
t P
P
P
m
P
J
5u
s
t
P
P
m
P
L m
5
a
P
L f
4
P
L s
4
p
7
L
t p
1
o
r P
P
P
m
P
M
9 a
i
P
M
f
6
a
P
M
a
P
b
5
o
P
l 5
P
r
5
P
M
p
m
4
a
M
2
i
c P
M
i
4 c
r
o
M s
b 6 i
g
Q
n
1
l
q
2
0
u
j
uc
m
e ,
R c
R
u
no
l
3 1
3
3
ea
1
f
mi
t
3 u z8
0r z l
e
a 0
e
r
6
0
51
M
l
3
e
w
9
g
f
2
i
f
pc 2
eF a b
r
12r
an
f i1
f
9
e
g
8 1
s
i p1
f e
d
3 a
e
1
a
1
e r
p e1
i
1
a i 9b c 1
i
k
3
s
9
s
3
n
t
9
r
e
n
h
9r
c
3
or
t
g a
1 r d
e
m
9
r e
i
8 r
o
r
o
s
p r 6r 1
oo
m
m
N
7
d
m
P
f
h
3
2
ml
8
e
r i
n9
a
i
i
l
u
w
e
I
o
o
e
i
r
g
j
g
i
t
h
4
c,
au
s
4 a
an
i ai
u aa
a
a
u a
i ca
p
ii
t
d
o
,
l
e
m
S
S
S
S
S
S
S
S
S
1
S
S
S
m
T
T
T
T
T
T
T
L
U
U
U
U
D1 e
printer,68
R
R
R
R
R
R
l f
4
m
2
c
4 1
m
5
c
s 6
i
a
s
2
2
u 4
s
a
l
m
l
1
s
p1
z
4
c
2
p9
f
1
1
c
s 3
m
V
V
i
a
h
t
t
e
e
3
aa
a
e4i
ae
t
r
o
a
a
l
m
c
h
n
i
f
e
p
9i
1r e
a a 9
a o
s
p
i
f
i
o
nr e
0
n
c
e
r
b
s
u
a
o
a
c
a
n
t
e
3 u
s
s
e
o
t
l
t
e
o
v
o
1 e
b
r
o
u
t
n
0
d
pn
i
6
nn 2
n
a
l9
y
e
d
r
d
e
y
r
i i
p
p
os
y
ih
u
e
p
t3
o
b
e
t
e
8
o
re
0
1
o
4
t n
b
5
a
p
2
c
3
o f
2
f
1
1
r 8
s
2
n
e
u
a
1
i
m
Z (
ce v
5v r
p
t
r
t
3
3
c
r
-
i
a
n
n
a
r
115
COMMAND SUMMARY
C
F
<B’EL>
<BS>
Bell
Backspace
Horizontaltab
<HT>
<LF>
<VT>
<FF>
V
Form
C
r
Expandedprintingfor oneline
Condensedprinting
Set printeron-line
Cancelcondensedprinting
Picapitch
Set printer off-line
<Sb
<oCl>
<DC2>
<DC2>
<DC3>
C
o
C
R
R
E
C
M
last line
printing
e
c
p
p
p
n
n
I
S
A
A
S
n
“
<Esc> “70”
<Esc> “70”“o”
c
s
m
h
c
d
S
S
c
c
d
c
<
D
.
std.
D
S
g
S
u
u
u
u
v
d
c
d
c
c
line spacing
s
s
E
n
W
IBM
std.
IBM”
c
S
C
u
a
a
1
c
p
C
F
<
S
S
D
E
<me> 6’:”
n
c
c
p
p
C
O
d
d
c
u
p
O
nl n2 <DC4> aO al d ml d
rrdl
D
d
al a2 ml m2
D
<Esc>
<
d
1
C
nm
c
M46
c
g
d
E
p
s
n
v
l
l
n
n
n
ni
h
“ 1“
“5”
n
E
C
D
C
S
S
S
S
S
S
S
S
S
S
S
S
S
S
S
P
p
e
d
c
c
c
c
d
c
d
d
i
q
c
c
c
c
c
c
c
d
c
d
c
d
n
c
n
d
n
g
g
b
m
C
b
S
S
m
s
p
n
s
m
p
‘Irr’
p
q
nl n2 ml m2
n
p
p
S
S
S
S
S
C
B
U
B
U
o
i
c
s
s
p
p
p
1
C
F
C
e
p
Expandedprinting
C
E
e
p
p
m
nl d
. ..
-d3SC> “Z” d d ml m2 . ..
<
“ “
d
q
P
S
R
E
R
E
c
c
: :
<
“ <
w
p
c
p
c
9
o
o
o
o
nl n2 ml d
“ “
<
h
s
h
1
s
s
g
g
<
s
%M
~
g
j
C
<
j
<
j
C
t!2.XL
j
nl d
-diSC> “e” <0> n
n
-3iSC> “e”
n
n
n
n
n
n
n
n
v
h
v
h
v
... <0>
c
nc
n
nc
A
h
A
h
n
<
<
<
<
S
d
r
“
C
“ <
“
“ “
S
S
S
S
R
P
R
“
<
<
<
<
118
<
<
<
<
<
<
<
<
<
<
‘ “
.
‘ <
<
“ “
“
r
m
<
“
q
P
S
S
S
S
S
C
“
c
n
n
“p”<b
<m,c>“p”
<
n
c
s
p
s
s
p
s
s
c
c
“
f
c
IBMcharacter
set
n
h
n
h
d
c
d
S
S
q
c
c
NLQ characters
Select
draft
quality
characters
Select
NLQ characters
S
S
S
n
n
C
C
<
“
“
‘
“
“
“
“
“
“
“
“
“
“
‘
“
“
“
“
“
“
“
“
“
“
“
“
“
“
“
“
“
“
“
“
“
“
F
“
“
“
“
“
“
“
“
“
S
D
M
c
“
“
“
“
“
S
S
S
S
S
C
S
O
O
n
n
S
c
c
c
c
c
q
c
c
p
119
I
Star MicronicsCo., Ltd. invites your suggestionsand commentson your
printerand this manual.Pleaseaddressyour correspondenceto:
WorldwideHeadquarters:
STARMICRONICSCO., LTD.
194Nakayoshida
Shizuoka,JAPAN422-91
Attn:ProductManager
AmericanMarket:
STARMICRONICSAMERICA,INC.
420 LexingtonAvenue,Suite2702-25
New York,NY 10170
Attn: ProductManager
EuropeanMarket:
STARMICRONICSDEUTSCHLANDGMBH
Westerbachstra13e
59
P.O. Box 940330
D-6000Frankfurt/Main90
F.R. of Germany
Attn: ProductManager
U.K.Market:
STARMICRONICSU.K., LTD.
Star House
PeregrineBusinessPark
GornmRoad,High Wycombe
Bucks.HP137DL, U.K.
Attn:ProductManager
FrenchMarket:
STARMICRONICSFRANCES,.A.R.L.
25, rue MichaelFaraday
78180 Montigny-le-Bretonneux
Attn:ProductManager
Asian Market:
STARMICRONICSASIA LTD.
Room 2408-10SincereBuilding;
173Des VoeuxRoad, Central,HONGKONG
Attn:ProductManager
PRINTED IN JAPAN