1
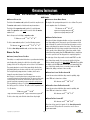
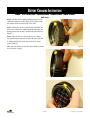
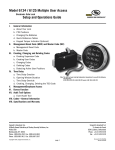
Operating Instructions S&G® Z 03 D-Drive™ Multi-User Electronic Safe Lock 2005 Series The S&G X03 D-Drive™ lock combines ease of operation with security and flexibility. Its advanced electronic circuit design makes it easy to open and easy to change codes. Follow these instructions carefully to get the best possible use from your lock. © Introduction • This S&G© X03 D-Drive™ lock is shipped from the factory in multi-user mode with a factory master code of 1 2 3 4 5 6 #. This code can be used to open the lock and set or change codes. You should set the lock to your own, unique master code. • Your lock can be programmed with a management reset code that can be used to regain control of the lock in the event the master code is lost. The management reset code must be programmed into the lock before the master code is changed for the first time. • At your discretion, the lock can be set to accept a supervisor code, up to seven different user codes, and a time delay override code. The master code holder and the supervisor code holder (if a supervisor code is set) are responsible for maintaining the number of active users programmed into each lock. The master code holder and the supervisor code holder can create and delete user codes. • The master code is designated as code #0. The supervisor code (if set) is designated as code #1. The user codes (if set) are designated by user position numbers 2, 3, 4, 5, 6, 7, and 8. The time delay override code (if set) is designated as code #9. • Each time a button is pressed, the lock acknowledges it by sounding a “beep,” and the LED on the keypad will light momentarily as the “beep” sounds. If it does not, check your battery (or batteries) to make sure it is fresh and connected properly, then try again. • All codes must contain six digits or six letters. Any digit or letter can be used as many times as you wish. For instance, the following codes (while not recommended) will operate the lock: 5 5 5 5 5 5 # OR J J J J J J # Sargent & Greenleaf, Inc. A Wholly Owned Subsidiary of Stanley Security Solutions, Inc. PO Box 930, Nicholasville, Kentucky 40356 USA Phone (859) 885-9411 Phone (800) 826-7652 FAX (859) 887-2057 FAX (800) 634-4843 © Copyright 2006, Sargent & Greenleaf • All codes end with #. This signals the lock that you have finished entering all digits of the code. • If you pause more than 10 seconds between button presses when entering a code, the lock will assume you do not want to continue, and it will reset itself to the original code. To open the lock, begin the code entry sequence once again from the first step. • If you realize you have pressed an incorrect button when entering a code, press ✽ or simply pause ten seconds or more, then begin entering your code again. • If five incorrect codes are entered in a row, the S&G© X03 DDrive™ lock will shut down for a period of ten minutes. This is a security feature. Entering a code during this period will result in two long error tones (braps). Pressing any buttons during the lockout period will not affect the penalty timer. After ten minutes, the lock should operate normally. The lock can also go into the lockout period during programming if it interprets an incorrect programming sequence as five or more consecutive incorrect code entries. If the lock emits two long error tones (braps) during repeated programming attempts, it is in lockout mode. Wait ten minutes, then try again. •For UL installations, the maximum number of working codes allowed is one. •Personal data which can be directly related to a code holder, such as a birthdate, should not be used in making up a lock code. Avoid codes which can be easily guessed. •After the lock is changed to a new code, the lock function must checked by locking and unlocking it several times with the container door open. Make sure it functions correctly before closing the door. Note: This lock has been Listed by Underwriters Laboratories for use with the following S&G keypad(s): 6130-2XX and 6130-3XX Sargent & Greenleaf S.A. 9, chemin du Croset 1024 Ecublens, Switzerland Phone +41-21 694 34 00 FAX +41-21 694 34 09 Document 630-735 Revised 7/25/06 Operating Instructions S&G® Z 03 D-Drive™ Multi-User Electronic Safe Lock 2005 Series To Open the Lock Make sure the keypad is turned counterclockwise to stop. Press the code digits or letters in order, followed by #. Then, within six seconds, turn the keypad clockwise about 70 degrees, until it comes to a positive stop. Do not put any pressure on the safe handle until after the keypad has been turned. To re-lock the S&G© D-Drive™, turn the keypad back counterclockwise to stop. 2. If the lock “chirps” when keys are pressed, but it will not open, the batteries may be drained to the point that they will not operate the lock’s solenoid. Follow the battery replacement procedure in this manual. 3. If the lock makes no sound when any of the keys are pressed, dead batteries are likely to be the cause. Follow the battery replacement procedure in this manual. 4.Your lock may be in penalty mode. If the lock interprets your button presses as four or more incorrect codes in a row, it will lock you out for ten minutes. During this period, the lock will ignore any keypad inputs. At the end of ten minutes, enter a valid code to open the lock. Note: The Master Code Holder is responsible for maintaining the number of active users programmed into each lock. If all of the preceding remedies have been exhausted and the lock still does not open, contact a qualified safe technician in your area for professional service. In Case of Trouble If your lock should fail to open when a valid code is entered, check for the following: 1. The boltwork of a safe can, under certain conditions, place pressure on the side of the lock’s bolt. This is often caused by something inside the safe pressing against the door or by something caught between the safe door and its frame. When this occurs, the lock will not operate properly. To relieve side pressure on the lock bolt, move the safe’s handle to the fully locked position, make sure the keypad is turned counterclockwise to stop, then re-enter a working code. The lock should open. Page 2 © Copyright 2006, Sargent & Greenleaf Operating Instructions S&G® Z 03 D-Drive™ Multi-User Electronic Safe Lock 2005 Series the time delay, for the opening code at the end of the time delay, Opening the Lock or for both codes. The silent alarm signal will be sent each time a ➥With No Time Delay duress code is entered. (Note: Lock codes 4 - 8 are not available if the duress feature is turned on. If time delay override is disabled or not used, lock A valid code is needed to open the lock. This is how to open the code 9 is available.) lock with the original factory master code of 1 2 3 4 5 6. Make sure the keypad is turned counterclockwise to stop. ➥Using a Time Delay Override Code Enter 1 2 3 4 5 6 # This lock is capable of using a time delay override code if it Then, within six seconds, turn the keypad clockwise about was originally ordered with this feature, and if the TDO (time delay 70 degrees, until it comes to a positive stop. Do not put any override) feature is enabled. As the name implies, the time delay pressure on the safe handle until after the keypad has been override code can be used to open the lock without waiting for turned. To re-lock the S&G© X03 D-Drive™, turn the keypad back the time delay period to expire. This is useful for armored car cash counterclockwise to stop. When the mechanism re-locks, it will emit a pickups. The TDO code only works when your lock uses a time delay. double beep consisting of a low tone followed by a slightly higher tone. If Your lock is capable of two different types of time delay override. you do not hear the double beep, the mechanism is not properly locked. Single control time delay override allows the TDO code holder to ➥With Time Delay Active Time delay enforces a waiting period between entry of the first code and opening of the safe. This feature is a proven deterrent to armed robbery. Any valid lock code can be used to start the time delay. When this code is entered, the lock beeps three times and begins counting down the delay period. The lock will beep once every ten seconds during the delay period. At the end of the delay period, the lock will beep ten times rapidly. Enter a valid code for the lock. After the code is entered, the lock will release for six seconds to allow you to turn the keypad and open the safe. ➥With Duress Active Duress , sometimes referred to as “silent alarm,” is a feature that causes an alarm signal to be sent when a code is entered. This capability must be enabled in the lock, and an optional duress module must be added to the lock and connected to an existing alarm system for this feature to work. A duress code (one which triggers the alarm signal) is simply any valid lock code with 1 added to the last digit. For instance, if you create a user code of 2 2 2 2 2 2, the duress version of this code is 2 2 2 2 2 3. This code is valid for operating the lock and simultaneously triggering the duress alarm signal. When the duress feature is turned on, lock codes 0, 1, 2, 3, and 9 are capable of triggering the silent alarm signal. If a time delay is programmed into the lock, a duress code can be used to start © Copyright 2006, Sargent & Greenleaf simply enter his code to open the lock. The time delay period is completely bypassed. For example, if the TDO code is 9 8 7 6 5 4, it would only be necessary to press the following keypad buttons to unlock the safe. Enter 9 8 7 6 5 4 # The other type of time delay override is dual control TDO. To use this type of time delay override, it is necessary to start the lock’s time delay by entering any valid code other than the TDO code. Then, within one minute, enter the TDO code. The lock will open immediately. This type of time delay override places a secondary control on the TDO code holder, adding a measure of extra security. The following example uses the factory set master code (1 2 3 4 5 6) to start the time delay, then a TDO code of 9 8 7 6 5 4 is used to open the lock without waiting for the time delay period to expire. Enter 1 2 3 4 5 6 # ♪♪♪ 987654# ➥Useful Operating Information The lock will emit a long error tone if an incorrect or incomplete code is entered. If five or more incorrect codes are entered in a row, the lock will go into a ten-minute lockout period. If you attempt to enter a code during this lockout period, two long error tones will be heard. Simply wait ten minutes, then attempt to operate the lock again. The lockout period cannot be bypassed. You must wait for it to time out. Page 3 Operating Instructions S&G® Z 03 D-Drive™ Multi-User Electronic Safe Lock 2005 Series ➥Changing Your Own Code Changing, Creating, Deleting Codes Any code holder can change his own code. The process is: ➥Creating a Management Reset Code 2 2 ✽ OLD CODE # A management reset code can only be created before the lock's master code is changed for the first time. It can later be used to reset the lock in the event the master code is lost. Resetting the lock this way deletes the time delay override code, supervisor code, and all user codes, and it allows you to set a new master code at the same time. This reset does not affect the time delay or opening window, duress, audit trail, or lock access method. 22✽222222# ♪♪♪♪♪ ♪♪♪ ♪♪♪ NEW MRC # NEW MRC # ♪♪♪♪♪ ♪♪♪ 246833# ♪♪♪ 246833# The holder of the master code (position 0) can create new codes and delete existing codes. The master code can also be used to set or delete a time delay override code. The holder of the supervisor code (position 1) can create and delete user codes and the time delay override code. The supervisor code cannot be used for any operations affecting the master code. There are several code storage positions in the lock, designated 0 through 9. They store the following types of codes: position 0 — master code position 1 — supervisor code positions2 through 8 — user codes position 9 — time delay override code Here is the process for creating a supervisor code. ♪♪♪♪♪ ♪♪♪ 7 4 ✽ master code # 1# ♪♪♪ ♪♪♪ new supervisor code # new supervisor code # To create a new user code, use the following sequence. In this example, a new user code is being created in position 5. ♪♪♪♪♪ ➥Using a Management Reset Code 7 4 ✽ master code or supervisor code # Use the MRC only when you have lost or forgotten the master code for the lock. You should make up a new six digit master code before implementing the reset. Following is the procedure. ♪♪♪♪♪ ♪♪♪ ➥Creating a New Code The management reset code is different from other lock codes. It is composed of seven digits, two of which are pressed at the same time. This two-digit pair must be either 0/1 or 0/3. For instance, a management reset code could be 3 6 2 [0/3] 1 9. The 0 and 3 must be pressed simultaneously. The 0/1 or 0/3 can be located anywhere in the management reset code, and the digits 0, 1, and 3 can also be used as individual digits anywhere in the code. For instance, 0 3 1 0 [0/1] 0 would be an acceptable MRC. Only the 0/1 in brackets would be pressed simultaneously. 67✽123456# ♪♪♪ NEW CODE # NEW CODE # For example, changing a user code of 2 2 2 2 2 2 to a new code of 2 4 6 8 3 3 would be accomplished as follows: It is important to note that the management reset code can only be set or changed before the lock’s master code is changed for the first time. It is recommended that the management reset code be stored off premises as an additional security measure. The lock’s MRC (management reset code) may have been preset at the factory. A factory MRC can be set or changed using the following procedure. ♪♪♪♪♪ ♪♪♪ 6 7 ✽ MRC # NEW 6-DIGIT MASTER CODE # ♪♪♪ NEW 6-DIGIT MASTER CODE # ♪♪♪ 5 (position number) # new user code ♪♪♪ # new user code ♪♪♪ # User codes can be set in any storage position from 2 through 8. To create a new time delay override code, see the time delay section. After the final three beeps, indicating completion of the reset, the lock will beep once for each time the MRC has been used, including the current usage. Page 4 © Copyright 2006, Sargent & Greenleaf Operating Instructions S&G® Z 03 D-Drive™ Multi-User Electronic Safe Lock 2005 Series ➥Deleting an Existing Code ➥Changing the Opening Window Duration The holder of the master code (position 0) can delete any other code. The master code cannot be deleted under any circumstances. The length of the opening window period is set as follows. The period can be anywhere from 1 to 10 minutes. ♪♪♪♪♪ ♪♪♪ ♪♪♪ length of desired opening window period # ♪♪♪ The holder of the supervisor code (position 1) can delete user codes. The supervisor code cannot be used to delete the master code or itself. 7 4 ✽ master code # length of desired opening window period Here is the process for deleting a supervisor code. ♪♪♪♪♪ 7 4 ✽ master code # # # This optional feature determines whether or not you can override the time delay waiting period. There may be special circumstances that make it desirable to open the lock before time delay expires, such as during cash pickups by an armored car service. Time delay override only works when the lock is being operated in time delay mode. Your lock is capable of two different types of time delay override. Single control time delay override allows the TDO code holder to simply enter his code to open the lock. The delay period is completely bypassed. To delete a user code in position 5, use the following sequence. ♪♪♪♪♪ 7 4 ✽ master code or supervisor code # ♪♪♪ ♪♪♪ ♪♪♪ 5# # # To delete a time delay override code, see the time delay section. Managing Time Delay ➥Creating, Changing, Deleting a Time Delay Time delay is a security feature that enforces a predetermined waiting period between the entering of a valid lock code and the actual opening of the lock. The delay period can be set from 1 to 99 minutes. The opening window is a period of time immediately after the time delay during which you can enter a valid lock code to open the lock. The factory default opening window is 2 minutes, but it can be changed to any value between 1 and 10 minutes. Note: Changes to an existing time delay or opening window can only be accomplished during the opening window period. This means you must enter a valid operating code for the lock, wait for the time delay to expire, then begin the appropriate programming sequence rather than opening the lock. The programming sequence for setting, changing, or deleting a time delay period is as follows. The period can be anywhere from 1 to 99 minutes. ♪♪♪♪♪ # ➥Managing Time Delay Override ♪♪♪ ♪♪♪ ♪♪♪ 1# 01# ♪♪♪ 7 4 ✽ master code # 00# ♪♪♪ ♪♪♪ length of desired time delay period # length of desired time delay period # To delete a time delay, enter 0 for the desired time delay length. The other type of time delay override is dual control TDO. To use this type of time delay override, it is necessary to start the lock’s time delay by entering any valid code other than the TDO code. Then, within one minute, enter the TDO code. The lock will open immediately. This type of time delay override places a secondary control on the TDO code holder, adding a measure of extra security. ➥Turning Single Control Time Delay Override ON If your lock was ordered with time delay override capability, single control TDO can be turned on as follows. ♪♪♪♪♪ 4 6 ✽ master code # ♪♪♪ 2# ♪♪♪ 2# ➥Turning Dual Control Time Delay Override ON If your lock was ordered with time delay override capability, dual control TDO can be turned on as follows. ♪♪♪♪♪ 4 6 ✽ master code # ♪♪♪ 1# ♪♪♪ 1# ➥Turning Time Delay Override OFF ♪♪♪♪♪ 4 6 ✽ master code # ♪♪♪ 0# ♪♪♪ 0# When time delay override is turned off, the time delay override code is erased. PIN position #9 can now be used to store a regular user code. © Copyright 2006, Sargent & Greenleaf Page 5 Operating Instructions S&G® Z 03 D-Drive™ Multi-User Electronic Safe Lock 2005 Series After this programming procedure is completed, the lock will be disabled. If a valid code is entered, the lock will emit a double beep, but will not open. ➥Creating the Time Delay Override Code The TDO code is located in position 9. It is programmed as follows. ♪♪♪♪♪ ♪♪♪ 7 4 ✽ master code or supervisor code # 9 (position number) # ♪♪♪ ♪♪♪ new TDO code # new TDO code # ➥Enabling the Lock in Management/Employee Access Mode Before valid codes can be entered to open the lock, it will be necessary to perform the following procedure. ➥Changing the Time Delay Override Code ♪♪♪♪ An existing TDO code can only be changed by the holder of that code, as follows. ♪♪♪♪♪ 2 2 ✽ OLD TDO CODE # ♪♪♪ 5 5 ✽ master code or supervisor code # Note that the lock emits four beeps to indicate that it can now be opened by any valid code. ♪♪♪ NEW TDO CODE # NEW TDO CODE # ➥Deleting the Time Delay Override Code ➥Disabling the Lock in Management/Employee Access Mode The TDO code is deleted as follows. ♪♪♪♪♪ 7 4 ✽ master code or supervisor code # ♪♪♪ ♪♪♪ ♪♪♪ 9 (position number) # # # To make the lock inoperable by any code, simply repeat the same programming procedure. ♪♪ 5 5 ✽ master code or supervisor code # Management/Employee Access Mode Note that the lock emits two beeps to indicate that it is now disabled, and cannot be opened by any code. ➥Types of Management/Employee Access Management/employee access is an alternate way to operate this lock, to meet special security needs. Your lock can be programmed so that during everyday operation, the master code holder or supervisor code holder can enable the lock. It can then be opened using any valid lock code (master, supervisor, or user code), until it is disabled. There are two varieties of the enable/disable function. This sequence simply toggles the lock on and off to determine whether or not it can be opened by the master code, supervisor code, or any user code. When the lock is disabled, it will emit a double beep when a code is entered, but will not open. In the first version, only the holder of the master code and supervisor code can enable and disable the lock. Only the holder of the master code or supervisor code can enable the lock, but there may be circumstances under which you want user code holders to also be able to disable the lock. To allow this, perform the following procedure. In the second version, user code holders can also disable the lock. The master code and supervisor code holders are the only persons who can both enable and disable the lock. ➥Programming the Lock for Management/Employee Access Mode Your lock can be programmed so that the master code holder or supervisor code holder can use his code to enable the lock for opening by any valid lock code. When either the master code or supervisor code is again to toggle the lock, it can no longer be opened. This process can be repeated whenever appropriate. ♪♪♪♪♪ 3 2 ✽ master code # 2 ♪♪♪ # 2 ♪♪♪ ➥Letting Users Disable the Lock in Management/Employee Access Mode ♪♪♪♪♪ 5 6 ✽ master code # 1 ♪♪♪ # 1 ♪♪♪ # Now, after the lock is enabled by the master code or supervisor code holder, any user code holder can disable it by entering the following sequence. ♪♪ 5 5 ✽ any user code # When the lock is disabled, it will emit a double beep when a code is entered, but will not open. # Page 6 © Copyright 2006, Sargent & Greenleaf Operating Instructions S&G® Z 03 D-Drive™ Multi-User Electronic Safe Lock 2005 Series ➥Cancelling User Disable in Management/Employee Access Mode If you decide user code holders should no longer have the ability to disable the lock, perform the following procedure. ♪♪♪♪♪ 5 6 ✽ master code # 0 ♪♪♪ # 0 ♪♪♪ # User code holders will no longer be able to disable the lock, although the master code holder and supervisor code holder will still have the ability to do so. ➥Taking the Lock Out of Management/Employee Access Mode If you no longer want the lock to function in the management/ employee access mode, enter the following sequence. ♪♪♪♪♪ 3 2 ✽ master code or supervisor code # ♪♪♪ # 1 1 Managing Audit Trail ➥Capturing an Audit Trail Your lock must have been ordered with this option. Using the audit trail feature also requires an optional keypad extension (S&G part number 6101-201), as well as an audit trail software kit (S&G part number 6103-100). The lock records the last 63 events, in the order they occurred. After the 63rd event, the lock overwrites the oldest event with the new one, so you always have access to the most recent 63 events. To download the audit trail through the optional keypad extension, hold the Dallas iButton key provided in the audit trail kit to the receptacle in the keypad extension, and enter the following. 2 8 ✽ master code # ♪♪♪ # The lock will now operate on any valid code at any time. Managing Duress ➥Turning Duress ON The lock will beep three times when the download is complete. You may then remove your iButton key from the keypad extension’s receptacle. The information now stored in the key is a copy of what is in the lock. The lock’s audit information is not erased in the download process. If your lock was ordered with time duress capability and an optional duress module is installed, the feature can be turned on as follows. ♪♪♪♪♪ 3 8 ✽ master code # ♪♪♪ 1# ♪♪♪ 1# ➥Turning Duress OFF The duress feature can be turned off as follows. ♪♪♪♪♪ 3 8 ✽ master code # ♪♪♪ 0# ♪♪♪ 0# ➥Verifying Duress If duress is enabled, you can tell if the lock has sent a silent alarm. Fifteen minutes or more after a duress signal has been sent, press and hold down the ✽ button for at least four seconds. The lock will emit a continuous alternating series of high and low pitch beeps to indicate that a duress signal has been sent. Reset the duress indication by entering the lock’s master code within one minute after the verification signal ends. © Copyright 2006, Sargent & Greenleaf Page 7 Operating Instructions S&G® Z 03 D-Drive™ Multi-User Electronic Safe Lock 2005 Series Low Battery Condition Information Tables ➥Determining Your Lock’s Mode of Operation Enter 4 3 ✽ The ensuing beep pattern will tell you if your lock is configured in single user, multiple user, or dual control mode. BEEP PATTERN 1ST SET OF BEEPS 4 4 4 2ND SET OF BEEPS INDICATES MODE 1 BEEP INDICATES SINGLE USER 2 BEEPS INDICATE MULTIPLE USER 3 BEEPS INDICATE DUAL CONTROL The S&G© X03 D-Drive™ lock uses a 9-volt alkaline battery. We recommend Duracell® brand. If the battery in your lock needs to be replaced, twenty consecutive beeps will be heard after the last number of the code and # have been pressed. The battery will have to be replaced before the lock can be opened. Note: If the battery is getting low, but the lock still has enough power to function, it will emit five sets of two short, high pitch beeps before opening. This is an early signal that battery failure is approaching. ➥Beep Pattern Reference Table Lock Activity Beep Pattern Emitted A code has been entered to start a time delay 3 short high pitch beeps An incorrect code has been entered 1 long continuous beep A code has been entered during a penalty lockout period 2 long continuous beeps Time delay countdown period in effect 1 short high pitch beep every 10 seconds Time delay countdown finished 10 short high pitch beeps Opening window period in effect 2 short high pitch beeps every 6 seconds Low battery warning 5 sets of 2 short high pitch beeps Battery too low for lock to function 20 short high pitch beeps (lock does not open) Bolt extension signal 1 low/high beep sequence Optional audit trail download completion 3 high pitch beeps Lock is enabled in Management/Employee mode 4 high pitch beeps Lock is disabled in Management/Employee mode 2 low pitch beeps ➥Quick Reference Table Command Function 22✽ Any code holder changes his own six-digit code 28✽ Master code holder downloads the event audit trail 38✽ Master code holder enables or disables the optional duress feature 43✽ Anyone identifies the lock type 46✽ Master code holder enables or disables the optional time delay override feature 74✽ Master code and supervisor code holder sets or deletes codes 77✽ Anyone interrogates the lock to identify used and unused code positions 32✽ Master code holder enables or disables management/employee mode 55✽ Enable and disable the lock in management/employee mode 56✽ Master code holder determines whether or not user code holders can disable the lock in management/employee mode 67✽ Set and use the management reset code (MRC) Page 8 © Copyright 2006, Sargent & Greenleaf Battery Changing Instructions S&G® Z 03 D-Drive™ Multi-User Electronic Safe Lock 2005 Series Low Battery Condition The S&G© X03 D-Drive™ lock uses one 9-volt alkaline battery, which is housed in the keypad. We recommend Duracell® brand. If the battery needs to be replaced, the lock will emit five double-beeps whenever it is opened. If this signal is ignored and the battery becomes so weak that it will no longer operate the lock, you’ll hear twenty quick beeps when you enter a code, but the lock will not open. You will have to replace the battery before your lock can be opened. Figure 1 Battery Replacement Procedure Always perform a battery change with the container door open. The lock will NOT forget your code(s) during battery change. The circuitry is designed to hold this information for extended periods of time even if there are no batteries installed. Codes are stored in non-volatile memory. Step 1—Pull the yellow, spring-loaded tab at the top of the keypad (Figure 1) toward you slightly. It is not meant to separate from the keypad. Once it’s pulled forward, carefully turn the keypad ring counterclockwise to stop. Then pull the ring away from its base far enough to expose the battery compartment. Figure 2 Step 2—Put your finger in the battery compartment, and carefully pull out the battery cables (Figure 2). There should be enough slack to allow you to pull the connector and old battery outside the compartment. Disconnect the old battery. Step 3—S&G strongly recommends Duracell® brand alkaline batteries. No matter what brand is used, the battery must be alkaline. Align the battery and connector terminals, and snap the battery to the connector (Figure 3). Figure 3 © Copyright 2006, Sargent & Greenleaf Page 9 Battery Changing Instructions S&G® Z 03 D-Drive™ Multi-User Electronic Safe Lock 2005 Series Step 4—Carefully slide the battery behind the keypad, into the cavity that is designed to hold it (Figure 4). Be sure the battery has dropped all the way to the bottom of the cavity. Step 5—Gently place any excess wire into the cavity. Make sure it is not in a position to be caught between the keypad ring and the keypad base when the ring is pushed back against the base (Figure 5). Step 6—Once the wires are safely positioned out of harm’s way, push the keypad ring back up against the base, then turn it clockwise until the yellow tab snaps back into its normal position (Figure 6). Check your lock operation at least three times with the container door open before closing it. Figure 4 Figure 5 Figure 6 Page 10 © Copyright 2006, Sargent & Greenleaf WARRANTY Seller warrants that for one year from the date of shipment from Seller’s point of manufacture, the goods shall be free from defects in material and workmanship, provided the goods are normally and properly used according to the Seller’s written instructions. THIS WARRANTY IS EXPRESSLY MADE IN LIEU OF ANY AND ALL OTHER WARRANTIES, EXPRESS OR IMPLIED. S&G DOES NOT WARRANT THAT THE GOODS ARE MERCHANTABLE OR FIT FOR ANY PARTICULAR PURPOSE EXCEPT AS EXPRESSLY PROVIDED HEREIN. Seller’s entire liability and Buyer’s exclusive remedy in the event that the goods do not conform to the foregoing warranty shall be Seller’s repair or replacement of the goods (including payment of freight costs to and from point of manufacture). UNAUTHORIZED USE OF DIAL, DIAL RINGS, AND/OR SPINDLES NOT MANUFACTURED BY THE SELLER IN CONJUNCTION WITH ITS COMBINATION LOCK PRODUCTS INVALIDATES THE WARRANTY. SELLER SHALL HAVE NO LIABILITY FOR ANY CONSEQUENTIAL, INCIDENTAL, INDIRECT OR SPECIAL DAMAGES. SELLER DOES NOT WARRANT ITS LOCK PRODUCTS TO BE IMPERVIOUS TO FORCIBLE OR SURREPTITIOUS ENTRY, AND SELLER SHALL HAVE NO LIABILITY FOR DAMAGE TO OR LOSS OF PROPERTY SOUGHT TO BE PROTECTED BY ANY SUCH LOCK. Sargent & Greenleaf, Inc. A Wholly Owned Subsidiary of Stanley Security Solutions, Inc. PO Box 930, Nicholasville, Kentucky 40356 USA Phone (859) 885-9411 Phone (800) 826-7652 FAX (859) 887-2057 FAX (800) 634-4843 Sargent & Greenleaf S.A. 9, chemin du Croset 1024 Ecublens, Switzerland Phone +41-21 694 34 00 FAX +41-21 694 34 09