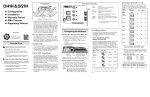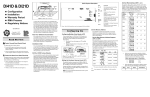
1
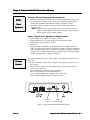
Sprint Digital Voice
Models DVP – 203 & DVP – 403
Quick Start Guide
®
Item Number 699345
Nothing contained in this guide shall be deemed to be, and this guide does not constitute, a
warranty of, or representation with respect to, any of the equipment covered. This guide is
subject to change without notice, and the Voice Mail manufacturer has no obligation to provide
any updates or corrections to this guide. Further, the Voice Mail Manufacturer also reserves the
right, without prior notice, to make changes in equipment design or components as it deems
appropriate. No representation is made that this guide is complete or accurate in all respects,
and the Voice Mail manufacturer shall not be liable for any errors or omissions. In no event shall
the Voice Mail manufacturer be held liable for any incidental or consequential damages in
connection with the use of this guide.
SPRINT AND THE DIAMOND LOGO ARE REGISTERED TRADEMARKS OF SPRINT COMMUNICATIONS
COMPANY L.P., USED UNDER LICENSE.
Protegé® is a registered trademark of Sprint Products Group, Inc.
Copyright © 2000, CTL, Inc. Used with permission. All rights reserved.
Table of Contents
Chapter 1: Introducing the Voice Mail System
Welcome to Sprint® Digital Voice..................................................................................1
Hardware Requirement ....................................................................................................2
Software Requirement ......................................................................................................3
Default Voice Mail Setup .................................................................................................3
Default Automated Attendant Answering ....................................................................4
Default Automated Attendant Dialing Menu...............................................................4
Contacting Technical Support.........................................................................................4
Chapter 2: Installation Checklist
Before Installing the Voice Mail and Phone Systems..................................................5
Chapter 3: Getting the Voice Mail System Up and Running
STEP 1:
STEP 2:
STEP 3:
STEP 4:
STEP 5:
STEP 6:
STEP 7:
STEP 8:
STEP 9:
STEP 10:
STEP 11:
STEP 12:
STEP 13:
STEP 14:
STEP 15:
Issue 1.6
Check Equipment .........................................................................................7
Observe Safety Precautions.........................................................................9
Install Your Phone System..........................................................................9
Install the Voice Mail System....................................................................10
Connect Sprint Digital Voice to Your Phone System ..........................11
Program Sprint Digital Voice for the Correct Phone System .............12
Program the Protégé ® Phone System for Voice Mail..........................13
Select the Numbering for Your Subscriber Mailboxes.........................14
Set Sprint Digital Voice Time and Date..................................................15
Call (Log Onto) a Subscriber Mailbox ....................................................15
Test the Automated Attendant.................................................................16
Re-record the Main Greeting....................................................................16
Set Up A System Administrator’s Mailbox.............................................17
Customize Three Basic Subscriber Mailbox Features ..........................17
Installation Checklist ..................................................................................17
Table of Contents – ◆– i
Table of Contents
ii – ◆ – Table of Contents
Issue 1.6
Chapter 2: Installation Checklist
Sprint® Digital Voice Automated Attendant:
Welcome to
Sprint Digital
Voice
Voice Mail &
Automated
Attendant
for Your Phone
System
•
Answers incoming calls with a recorded main greeting (also called an
Instruction Menu). It typically begins with the phrase Thank you for calling
XYZ company followed by a list of dialing options. If this default greeting is
too generic, the Instruction Greeting can be customized at any time.
•
Lets outside callers press digits on their touchtone phone to process their
own call. Dialing option can be customized to aid callers with such options
as For sales, press 1. For customer service, press 2. For Joe, press 3.,
3., etc. Or,
the default selection of dialing options can be used.
Sprint Digital Voice:
•
Lets an Automated Attendant caller leave a recorded message for an
extension if the extension is busy, does not answer, or is in Do Not Disturb
mode. Or, the caller can return to the Automated Attendant Instruction
Menu.
•
Provides a Subscriber Mailbox for each extension user. This Subscriber
Mailbox holds the recorded messages, lets the extension users record and
send messages to each other, plus more.
•
Retains any customized programming in the event of a power failure.
About This Guide
This guide explains how to get Sprint Digital Voice up and running with the
®
Protegé 3x8, CTX, MTX, LTX or XTX phone system. Once the setup procedure
is completed:
• each phone system extension will have a Subscriber Mailbox, and
• the Automated Attendant will answer calls using the default main greeting
and dialing options.
To customize Sprint Digital Voice, refer to the System Administrator’s Guide.
Guide
Other Guides With Sprint Digital Voice
Issue 1.6
•
User’s Guide
This guide explains Sprint Digital Voice’s subscriber mailbox features and
how to use them. It is for extension users. (Subscriber mailboxes are
referred to as Voice Mailboxes in the User’s Guide.)
•
System Administrator’s Guide
This document is a detailed explanation of Sprint Digital Voice’s
programmable features. These features customize the Subscriber Mailboxes,
the Automated Attendant and the system-wide features of Sprint Digital
Voice. In addition, the appendices at the end of this guide contain menu
trees for quick reference to programming and using the system. This guide
is intended for the installer and/or the person who maintains the voice mail
on a daily basis.
Installation Checklist – ◆ – 1
Chapter 2: Installation Checklist
•
Laptop Programming Guide
This document details how to connect a laptop computer to Sprint Digital
Voice. An installer uses the laptop to perform advanced programming
options that are not available through a System Administrator Mailbox.
These programming options should not be used unless Sprint Products
Group Technical Services request changes be made. Changing any default
settings may alter the operation of the voice mail system.
•
Integration Guide
This document details the programming you must perform on your phone
system when integrating with the Sprint Digital Voice System. Use this
guide if using a phone system other than Protégé.
•
Release Notes for Software Versions
This document details the latest change to the software.
Voice Processing Engine
Hardware
Requirement
Number of Ports
Analog network interface
Control Microprocessor
Digital Signal Processors
DVP – 203 allows for two ports
DVP – 403 allows for four ports
On-board loop start interface circuits
®
Intel 80C188
Motorola DSP56303 @ 80MHz
Host
486 33MHz
embedded processor
DRAM
Application Integrity
2 DB-9 Serial Ports
Base Address
Interrupt Level
PC core AMD Élan SC410
2Mbytes
Real Time Clock with battery back up
Operating at 115 kb/s RS232 (COM2 supports
keyboard display emulation via ROM-DOS)
Fixed at DE00 to DEFF
Fixed at IRQ 5
Telephone Interface
Trunk Type
Impedance
Ring Detection
Loop Current Range
Crosstalk Coupling
Frequency Response
Connector
Loop Start (Ground Start for answer only)
600 Ohms nominal
40 Vrms min., 15.3 to 68 Hz, 130 Vrms max.
20 to 120 mA, dc (polarity insensitive)
-70dB at 3KHz channel-to-channel
300 Hz to 3400 Hz ±3 dB (transmit and receive)
RJ-11 type
Power Requirements
External Wall Transformer
Plug-in Power Cord
Base Unit
Operating Temperature
Storage Temperature
Humidity
2 – ◆ –Installation Checklist
120VAC 60Hz
provides 24VAC
Consumers 12W max.
32°F to +104°F (0°C to + 40°C)
32°F to + 158°F (0°C to + 70°C)
20% to 50% non-condensing
Issue 1.6
Chapter 2: Installation Checklist
Physical Dimensions
Base Unit
Height
Width
Depth
Weight
Wall or desktop mount
2.2 inches
11.1 inches
2.0 inches
2.0 pounds
Power Requirements
External Power Supply
Height
Width
Depth
Weight
Wall transformer, 6 foot power cord
2.5 inches
2.25 inches
2.0 inches
.90 pounds
Regulatory Certifications
United States
Canada
Warranty
FCC part 68 ID#: EBZUSA-25267-VM-T
REN: 1.1B
UL: E96804
IC CS-03, 885 8871 A
REN=0.3
ULC: E96804
One (1) Year
Software Capacity
Software
Requirement
Default
Voice Mail
Setup
Issue 1.6
Storage Capacity
Subscriber Mailboxes
Trunk Mailboxes
Programming Interface
DVP – 203 allows for 3.5 hours
DVP – 403 allows for 3.5 hours
Maximum 50 mailboxes
Maximum depends on system
®
A Protegé digital extension or a single line
extension
•
Sprint Digital Voice DVP – 203 and DVP – 403 provide 50 Subscriber
Mailboxes.
•
When Sprint Digital Voice DVP – 203 initializes for the first time, it defaults
to the Protegé 3x8 numbering plan. The DVP – 403 defaults to the Protegé
CTX.
•
Sprint Digital Voice lets extension users know when they have a new
message in their Subscriber Mailboxes. The voice mail feature key on the
telephone flashes when the mailbox has a new message.
•
After leaving a message in a Subscriber Mailbox, an Automated Attendant
caller can dial zero (0) to reach the lowest numbered extension (which is
frequently an operator extension).
®
Installation Checklist – ◆ – 3
Chapter 2: Installation Checklist
Default
Automated
Attendant
Answering
Default
Automated
Automated
Attendant
Dialing Menu
•
By default, the Automated Attendant answers with this recorded main
greeting: Thank you for calling. If you are calling from a touchtone
touchtone phone,
please dial the extension number you wish to reach or dial zero for
assistance. If you are calling from a Rotary Dial phone, please stay on the
line for assistance. This greeting can be re-recorded at any time.
•
Sprint Digital Voice lets the Automated Attendant play different main
greetings according to schedules that are based on the day(s)/date and
time. For example, you can set up a schedule for typical business
workdays (Monday-Friday, starting at 9:00 a.m.). Then you can set up
another schedule for typical off-hours (Monday-Friday, starting at 5:00 p.m.
This schedule is used for weekends). This way you can have two main
greetings: one for workdays, and one for off-hours. These schedules are
already set up as defaults.
The dialpad keys 0-8 can be used to customize a dialing menu. Keys 9, *, and #
are each permanently assigned for a certain function (described in the list
below). Callers can dial either extension or mailbox numbers.
By def
default,
ault, the dialing menu is as follows:
• Press zero (0), or wait on the line for the operator (the lowest numbered
extension) during the workday schedule.
Press zero (0), or wait on the line to record a message for the operator (the
lowest numbered extension) during the off-hour schedule.
•
Dial a Subscriber extension number to transfer to that extension. If the
extension is busy, does not answer, or is in Do Not Disturb, the caller
hears, At the tone, leave a message for extension XXX.
•
Press 9 to hang up the call (this cannot be changed).
•
Press * and a Subscriber extension number to leave a recorded message in
that mailbox (this cannot be changed).
•
Press # and a Subscriber Mailbox Number to log onto that mailbox and
listen to the messages and/or use other Voice Mail features (this cannot be
changed).
Note: The Time Out function determines where the Automated Attendant
routes a call if the caller doesn’t press a key after the Main Greeting
finishes playing. The Time Out function works differently according
to the workday schedule or the off-hours schedule. By default, the
Automated Attendant sends the caller to the lowest numbered
extension during the workday schedule and lets the caller leave a
message for the lowest numbered extension during off-hours.
Contacting
Technical
Support
For questions regarding Sprint® Digital Voice DVP – 203 or DVP – 403 or a Protegé®
system, contact Sprint Products Group Technical Support at 1-800-791-1110.
4 – ◆ –Installation Checklist
Issue 1.6
Chapter 2: Installation Checklist
®
Before
Installing the
Voice Mail
and Phone
Systems
Sprint Digital Voice is easy to install and maintain if the details of the
installation are outlined before the phone or voice mail are installed. Before
beginning the installation, talk with the customer and make sure that you
have a complete understanding of how the customer wants the systems to
function. This will keep you from having to make changes after installation
that can cause Sprint Digital Voice to re-initialize. When the voice mail has
to be re-initialized, previous programming and recordings, such as main
greetings and subscribers’ greetings, are destroyed.
Some of
•
•
•
•
•
•
•
•
•
the questions that you will need answers to are outlined below.
®
Which Protegé system is being used?
How many mailboxes will be needed?
Will the default numbering plan change?
Will Dial by Name be used?
If Dial by Name is used, will it be first or last name?
How many greetings need to be recorded?
Who will record the greetings?
What information will the greetings contain?
Will the site use the Automated Attendant feature?
Important
If the default
default mailbox numbering is incorrect for the extension numbering
plan on your phone system, change it before doing any other
programming. To change the mailbox numbering you must rere-program
mailbox ranges. This information is covered in STEP 8 of this document.
document.
Issue 1.6
Installation Checklist – ◆ – 5
Chapter 2: Installation Checklist
6 – ◆ –Installation Checklist
Issue 1.6
Chapter 3: Getting the Voice Mail System Up and Running
Protegé® System Equipment Requirements:
STEP 1
•
Check
Equipment
•
Check the Installation and Maintenance Manual of the Protegé system you
are installing to see that you have all of the equipment required. Plus, it
contains the installation information needed to install the system.
An analog station port from the phone system will be needed for each
Voice Mail port.
Note: On the Protegé 3x8 and CTX systems, this will be an Analog
Adapter. On the MTX and LTX, the analog port may be from an
analog station card or Analog Adapter.
Sprint® Digital Voice Equipment Requirements:
•
•
•
•
•
Package
Contents
Sprint Digital Voice cabinet (see Figures 1 and 2)
Sprint Digital Voice AC power adapter, AC outlet (120V, 60Hz)
Modular line cord(s) (2-wire or 4-wire)
RJ11 Jack.
Laptop computer (optional). Sprint Digital Voice is configured to work
with any of the phone systems in the Protegé family. Upon the completion
of the installation, the unit is operational. To change or modify the default
settings, such as mailbox numbering or providing advanced programming
options and diagnostics, a laptop is required.
Each Sprint Digital Voice DVP – 203 or DVP – 403 should be unpacked and
inspected:
• Remove the DVP – 203 or DVP – 403 from its packaging and place it on a
level surface.
• Check that all components are included in the package. These include
One (1) voice mail unit
Two (2) mounting screws with flange standoffs
Two (2) wall anchors for drywall installation
One (1) 120VAC 60Hz Power Supply with six foot cord
One (1) Wall-Mounting Template and Instructions
COM 1
Future
COM 2
Connect Laptop
Figure 1: Sprint Digital Voice Cabinet (Back Panel)
Issue 1.6
Getting the Voice Mail System Up and Running – ◆ – 7
Chapter 3: Getting the Voice Mail System Up and Running
Note: The LEDs are lit when:
• the unit has power (Power LED).
®
• Sprint Digital Voice is up and running (Voice Mail LED).
• a particular Voice Mail port is busy (Port Status LEDs).
Figure 2: Sprint Digital Voice Cabinet (Front Panel)
8 – ◆ – Getting the Voice Mail System Up and Running
Issue 1.6
Chapter 3: Getting the Voice Mail System Up and Running
Phone System Safety Precautions:
®
STEP 2
Observe Safety
Precautions
Before beginning installation of a Protegé phone system, read through
Important Safety Instructions found in the Installation and Maintenance
Manual.
Sprint® Digital Voice Safety Precautions:
•
•
•
•
•
•
•
•
•
STEP 3
Install Your Phone
System
Do not expose this product to rain or any type of moisture.
Do not locate the unit near heating appliances.
Do not expose the operating unit to direct sunlight.
Locate the unit away from devices that generate electrical noise like
fluorescent lamps and motors.
Protect the unit from dust, high temperatures, and vibration.
Do not place any covering over the unit while it is in operation.
Do not obstruct the ventilation holes on the sides of the unit.
Allow at least two inches of clearance from any adjacent surface.
Keep the environment at a temperature of 50° to 104° F (10° to 40°
C) with a 10 - 90% relative humidity (non-condensing).
If this is a new installation, install the Protegé phone system in
accordance with the phone system Installation
Installation and Maintenance Manual.
IMPORTANT NOTE ABOUT THE OUTSIDE LINES
Request outside lines with open loop flash disconnect supervision from
the phone company. Outside lines with open loop disconnect
supervision prevent the recording of unwanted silence. This can happen
when an Automated Attendant caller records a message and then hangs
up but Sprint Digital Voice is unable to detect the hang up.
Also, request that the telephone company apply an open loop of at least
300 milliseconds. If this feature is not available in the area, request that
continuous dial tone be sent upon disconnect from the far end (that is,
when an Automated Attendant caller hangs up).
Once the Protegé phone system is installed and operational proceed
with Step 4.
Issue 1.6
Getting the Voice Mail System Up and Running – ◆ – 9
Chapter 3: Getting the Voice Mail System Up and Running
To install Sprint® Digital Voice:
STEP 4
1.
Install Sprint Digital
Voice
2.
Mount Sprint Digital Voice on a wall, using the screw slots located
on the bottom of the cabinet. Use the enclosed template as a
guide when wall mounting. Make sure that the ventilation slots are
not blocked. Position the cabinet so that the LEDs are not blocked
from view.
OR
Place Sprint Digital Voice on any sturdy flat surface.
Plug Sprint Digital Voice power supply cord into the connector
labeled “24 VAC.” Place the adapter box into a 120V, 60 Hz
grounded outlet. See Figure 3.
Tools Need for Wall-Mounting
Onto Plywood
Drill
1 / 8 in. Bit
Phillips screwdriver
Onto Drywall
Drill
1 / 4 in. bit
Hammer
Phillips screwdriver
Port 1
Port 2
Port 3
Port 4
1
IOIOI
2
24
0.7A
VAC
50-60Hz
NVM2exVB-C1
AC Power Cord
AC Adapter
Figure 3: Installing Sprint Digital Voice
10 – ◆ – Getting the Voice Mail System Up and Running
Issue 1.6
Chapter 3: Getting the Voice Mail System Up and Running
STEP 5
Connect Sprint
Digital Voice to Your
Phone System
To connect Sprint® Digital Voice to a Protegé®
system:
1.
2.
3.
4.
Plug one end of a modular line cord into Voice Mail Port 1 on
Sprint Digital Voice. See Figure 4.
Connect the other end into the RJ11 modular jack that is
connected to an analog port on the phone system (Note: on the
3x8 and CTX systems, this will be an Analog Adapter. On the MTX
and LTX, the analog port may be from an analog station card or
Analog Adapter.)
Repeat steps 1 and 2 for voice mail ports 2, 3 and 4 (if ports 3 and
4 are installed).
Verify that all cabling and connections are correct. Plug in the AC
adapter connector to the voice mail, and then plug the AC adapter
into an electrical outlet.
Note: If using a phone system other than Protégé, refer to the Release
Notes for Software Versions and the Integration Guide for further
options.
IMPORTANT NOTE
Extensions will receive notification of new messages (flashing
Intercom LEDs) only when voice mail port 2 is connected to the phone
system. This is the factory default and can be modified if required.
For further information refer to STEP 8 of this guide.
Figure 4:
Issue 1.6
Connecting Sprint Digital Voice to the Protegé Phone System
Getting the Voice Mail System Up and Running – ◆ – 11
Chapter 3: Getting the Voice Mail System Up and Running
®
STEP 6
Program Sprint
Digital Voice for the
Correct Phone
System
Protegé 3x8 is the default phone system for Sprint
Digital Voice DVP - 203. Protegé CTX is the default
phone system for Sprint Digital Voice DVP - 403
®
To change this setup, log onto the system administrator’s mailbox. At
default that is either 10 or 201, depending on the Protegé system and
Sprint Digital Voice. Once logged on follow the prompts to change the
default phone system to the correct Protegé system.
Note: This step must be performed before the Protegé phone system
is programmed for voice mail.
Change the default phone system to the one installed in
Step 3:
1. Log onto the System Administrator Mailbox, which before
initialization is extension 10 or 201 depending on Sprint Digital
Voice unit installed, as follows:
Dial into the Automated Attendant using the outside number
or
Dial the extension number
2. If you hear the Main Greeting, dial #.
Otherwise, go to step 3.
3. If requested, dial mailbox number 10 or 201. Before initialization
of the new system, Sprint Digital Voice’s system administrator
mailboxes are programmed for the lowest mailbox number.
4. At the Main Menu, press DM (36) for the Database Management
Menu.
5. Press SI (74) for System Initialization.
6. Press 3 to initialize Sprint Digital Voice database for a specific
phone system.
On the list below, find the code corresponding to the Protegé
system you installed:
1 - Protegé 3x8
2 - Protegé CTX, MTX or LTX
3 - Protegé XTX
Note: If using a phone system other than Protégé, refer to the Release
Notes for Software Versions and the Integration Guide for further
options.
7. Enter the code and #. Follow the voice prompts.
12 – ◆ – Getting the Voice Mail System Up and Running
Issue 1.6
Chapter 3: Getting the Voice Mail System Up and Running
STEP 7
Program the
®
Protegé Phone
System for Voice
Mail
Mail
Certain functions in the phone system require specific
®
programming entries when integrated with Sprint
Digital Voice.
Note: If using a phone system other than Protégé, refer to the Release Notes
for Software Versions and the Integration Guide for further options.
Protegé® 3x8
When installing Sprint Digital Voice on a Protegé 3x8 system, the
following settings must be changed on the phone system through the
System Administrator’s mailbox using a display keyset.
Extension – Ring Assignment:
Assignment Under Extension change Ring Assignment
for all voice mail ports to NO. At default on the 3x8 system all
extensions are assigned to ring for all lines in Day Mode operation. If
the voice mail ports’ ring assignments are YES, then all voice mail ports
will answer incoming calls simultaneously.
Trunkline – Voice Mail Group Answer:
Answer Program Voice Mail Group
Answer to allow ring in to the Automated Attendant based on the time
of day when the Auto Attendant should answer. If no Automated
Attendant is used, the field should be set to NEVER. The other valid
entries are ALWAYS, DAY or NIGHT.
Call Handling – Voice Mail Dialing Ratio:
Ratio Set both the Tone Time and
Int_Dgt Time to 90.
Control – Voice Mail:
Mail Program all of the fields in this category as follows:
VM Group Member – enter all the voice mail extensions that are used.
Prefix Codes – ICM/VM: 12
Transfer: 11
Busy FWD: 11
No Ans: 11
Direct FWD: 11
Suffix Code – NULL
Disconnect Digits - 999999
Protegé CTX/MTX/LTX
When installing Sprint Digital Voice on a Protegé CTX, MTX or LTX
system, the following settings must be changed through Remote
Maintenance Programming. Once the changes are complete, connect a
laptop to the Protegé system and send the updated information.
RMPRMP-ProgrammingProgramming-ExtensionExtension-Category 3:
3 Mark all ports that are
connected to Sprint Digital Voice as V.M. The last column on the right
specifies the port type. To change a type, press e until V.M. is displayed
in the field. Exit the screen and Save.
RMP-Programming-Call Handling-Voice Mail Function: Using the Down
Arrow, highlight the Disconnect Codes field and enter six of the number nine (9).
Exit the screen and Save.
RMPRMP-ProgrammingProgramming-Extension ApplicationApplication- Uniform Call DistributionDistributionUCD Settings:
Settings Enter the number of the UCD hunt group that will be used
as the voice mail hunt group and press e. From the Parameter
Issue 1.6
Getting the Voice Mail System Up and Running – ◆ – 13
Chapter 3: Getting the Voice Mail System Up and Running
Programming screen, use the Down Arrow to highlight the “Members”
field and press the e key to proceed to the Hunt Group Member screen.
Enter each extension’s directory number that will be a member of the
Hunt Group. Exit the screen and Save.
®
Protegé XTX
This is for future development.
STEP 8
Select the
numbering for
your Subscriber
Mailboxes
IMPORTANT
If the default mailbox numbering does not match the extension
numbering plan of your phone system,
system, you will need to set up all your
mailbox numbering before you perform any other voice mail
programming.
programming If you add or change the ®mailbox numbering at a later
date, you will have to rere-initialize Sprint Digital Voice. As a result of the
rere-initialization,
initialization, you must rere-program the entire system, users must rererecord their personal Mailbox Greetings, all messages and greetings will
be erased.
When you select a phone system for integration (see STEP 6), Sprint
Digital Voice automatically assigns numbers to the Subscriber Mailboxes.
Generally, these numbers start at the lowest numbered extension and
continue in sequence until the total number of mailboxes reaches 50.
However, Protegé 3x8 has fewer than 50 extensions. For these systems,
Sprint Digital Voice provides Subscriber Mailbox numbers that
correspond to the current phone system numbering plan. With the
current 3x8 system, there will be 34 unused mailboxes. These unused
mailboxes typically are numbered in sequence starting with mailbox 810.
For example, the default numbering for Subscriber Mailboxes in the
Protegé 3x8 is 10 to 25 and 810 to 843.
To create these mailbox ranges, you use the laptop computer that you
connected to Sprint Digital Voice and access a program in Sprint Digital
Voice called the System Configuration Management Program. You can
change a Protegé system’s numbering plan and create different ranges of
mailbox numbers. Such as ranges 10 to 15 and 22 to 25 for the 3x8. For
more information on this feature refer to the document Using a Laptop
with Sprint Digital Voice.
Voice
When you create mailbox ranges, you need to account for any additional
Mailboxes that you may need to use later on. After you create the
desired mailbox ranges, you must re-initialize Sprint Digital Voice. The
re-initialization returns the entire database to default values and erases
any recordings (such as the Main Greeting, personal Mailbox Greetings
and messages).
To determine if you want the default Mailbox numbering:
1. From the table below, locate the system you selected in STEP 7.
2. Review the default Mailbox numbering. Note, Trunk Mailbox
numbering is not used with this version
14 – ◆ – Getting the Voice Mail System Up and Running
Issue 1.6
Chapter 3: Getting the Voice Mail System Up and Running
3.
4.
If you want to use the default numbering, proceed to STEP 9.
If you want to create ranges of Subscriber Mailbox numbers, see the
document, Using a Laptop with Sprint Digital Voice.
Voice When you are
finished changing ranges of mailbox numbers, go to STEP 9 below.
Phone System
®
Protegé 3x8
Protegé C/M/LTX
Protegé XTX
STEP 9
®
Set Sprint Digital
Voice Time and
Date
Default
Subscriber Mailbox
Numbering
10-25, 810-843
201-250
2201-2250
Default
First Trunk
Mailbox Number
Not used
700
7701
To set Sprint® Digital Voice time and date from the
System Administrator Mailbox (the lowest numbered
extension):
1.
2.
3.
4.
Log onto the System Administrator Mailbox (see STEP 6).
Dial SA (72) for System Administrator Menu.
Dial TI (84) for System Time. Follow the voice prompts. When
finished setting the time, go step 4.
Press DT (38) for System Date. Follow the voice prompts. When
finished, follow the voice prompts for exiting.
The basic setup is complete. The default Sprint Digital Voice
is up and running.
•
•
By default, there are 50 Subscriber Mailboxes.
The Automated Attendant will answer incoming calls. When the Automated
Attendant answers, callers can dial a desired extension number to which to
transfer their call.
STEP 10 and STEP 11 show you how to verify the Subscriber Mailboxes
and the Automated Attendant operation.
STEP 10
To call a Subscriber Mailbox from its own
(corresponding) extension:
1.
Call (Log Onto) a
Subscriber
Mailbox
2.
3.
4.
Issue 1.6
From any extension: Get intercom dial tone. Access Voice Mail by
pressing the voice mail feature key on the telephone, or by dialing
the voice mail group extension number.
If you hear the Main Greeting, dial # and your mailbox number.
Wait for the voice prompt, You have no messages. To record and
send a Message, press RS (77).
(77) For a help message, press zero (0).
Ready.
Listen for the above voice prompt. If you do not hear it, return to
STEP 3 (Install Your Phone System).
Getting the Voice Mail System Up and Running – ◆ – 15
Chapter 3: Getting the Voice Mail System Up and Running
Call in on one of your outside lines, and wait for the
Automated Attendant to answer.
STEP 11
The Automated Attendant will say the following main greeting, which is
called an Instruction Menu: Thank you for calling. If you are calling
from a touchtone phone please dial the extension number you wish to
reach or dial 0 (zero) for assistance. If you are calling from a Rotary
Dial phone, please stay on the line for assistance.
Test the
Automated
Attendant
The Automated Attendant allows callers to select options from a dialing
menu. To change the dialing menu, see the System Administrator’s
Guide.
Guide For now, leave the dialing menu alone and go on to STEP 12.
You may want to change the Main Greeting before
doing any other Auto Attendant programming.
STEP 12
By default, you can have two main greetings (Instruction Menus) — one
for each of the time periods listed below:
• Monday to Friday, starting at 9:00 a.m. This is for typical workweek
days.
• Monday to Friday, starting at 5:00 p.m. This is for typical business
off-hours, including weekends.
ReRe-record the
Main Greeting
Suggestions for the Main Greeting:
•
•
®
If Sprint Digital Voice is located in your business, it is common to
say Thank you for calling XYZ Company. Please dial . . .
When it comes to recording the dialing options, use the default
menu (explained in the beginning of this guide) as an example. You
may want to add the instructions for leaving a Quick Message (press
the * key and dial the extension number).
To change the Main Greeting from the System
Administrator Mailbox (the lowest numbered
extension):
1.
Log onto a System Administrator Mailbox (see STEP 6). Wait for the
voice prompt, You have no messages. To record and send a message,
press RS (77).
(77) For a help message, press zero (0). Ready.
2. Dial SA (72) for System Administrator Menu.
3. Dial I (4) for Instruction Menu. Follow the voice prompts. When Sprint
Digital Voice asks you to enter the mailbox number for the Main
Greeting, do the following:
To change the workday Main Greeting, enter 802
®
(8002 in Protegé XTX).
To change the off-hours Main Greeting, enter 803
(8003 in Protegé XTX).
4. When done, follow the voice prompts for exiting the System
Administrator Menu.
To set up different time periods (schedules) for the main greetings, see the
Programming section in the Installation and Maintenance Menu.
16 – ◆ – Getting the Voice Mail System Up and Running
Issue 1.6
Chapter 3: Getting the Voice Mail System Up and Running
STEP 13
Set Up System
Administrator’s
Mailbox
You may want to set up a system administrator’s
mailbox for technicians. This allows remote access to
the system.
By default, the lowest numbered mailbox on the system is the System
Administrator’s mailbox. This is traditionally used by an on-site
administrator who is allowed to set up and delete mailboxes, reset
passwords, customize attendant features and perform administrative and
maintenance tasks on the voice mail system.
To ensure access to the system at all times, multiple system
administrator mailboxes can be assigned. This will allow access to a
secondary administrator when the primary administrator is unavailable.
There will be times when no administrators are available and a
technician will be called to perform some task. With a system
®
administrator mailbox set up on Sprint Digital Voice, a technician can
dial into the system and make any changes that are requested.
®
If available use mailbox number 25 on the Protegé 3x8 or mailbox
number 250 on the CTX/MTX/LTX. Follow the instructions in Chapter 4
“Customizing Subscriber Mailbox Features” in the System Administrator’s
Guide to set up a System Administrator’s mailbox.
STEP 14
The basic features are: Mailbox Greeting, Mailbox
Security Code, and Mailbox Name. Subscribers do this
from their own mailbox.
•
Customize Three
Basic Subscriber
Mailbox Features
Step 15
Installation
Checklist
Issue 1.6
The typical recorded Mailbox Greeting is Hello. This is John.
John. I can’t
answer the phone right now . . . Note that at default, Automated
Attendant callers can dial zero (0) during or after the greeting to
transfer the call to the lowest numbered extension as well as enter
an extension number. Subscribers can include this information in
their greetings.
• A Mailbox Security Code can be assigned to prevent unauthorized
access to a Subscriber Mailbox. The code can be up to 6 digits long.
No one can log onto the mailbox without entering the code. Note
that there are no security codes assigned at default.
• A recorded Mailbox Name will play a personalized voice prompt
instead of the corresponding extension or mailbox number. In other
words, Sprint Digital Voice will say John does not answer instead of
Extension XX(X) does not answer.
answer
See the User’s Guide for instructions.
Review this 10 important steps to insure that Sprint
Digital Voice is ready for use:
•
From Sprint Digital Voice’s system administrator’s mailbox (the
lowest extension number, which defaults to extension 10 or 201 at
installation, depending on the phone system and Sprint Digital Voice
installed), select correct phone system. If mailbox range is incorrect,
change it before proceeding with any other steps.
Getting the Voice Mail System Up and Running – ◆ – 17
Chapter 3: Getting the Voice Mail System Up and Running
•
•
•
•
•
•
•
•
•
Set date and time.
Set answer schedule table with holiday schedule.
Set each dial action table that is used.
Record main greetings
Disable mailboxes that are not in use. Be sure to set each unused
mailbox’s Message Limit to zero (0).
If message wait indication is desired, make sure that port 2 on
®
Sprint Digital Voice unit is connected. If you have installed a DVP
– 403, but initially are using only ports 1 and 2, disable message
notification on ports 3 and 4. This will allow the voice mail system
to operate properly.
Assign mailbox names for dial by name directory.
Record mailbox names for use until subscribers can enter their
mailboxes and record their names.
Assign system administrator’s mailbox for vendors.
18 – ◆ – Getting the Voice Mail System Up and Running
Issue 1.6