1
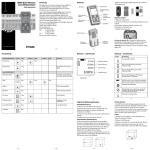
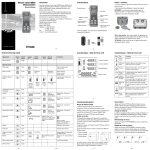
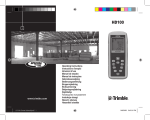
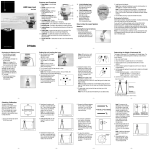
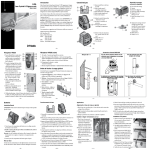
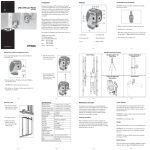
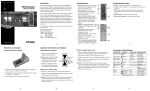
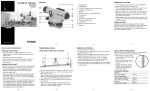
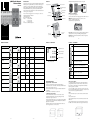
QM95 Quick Measure
Distance Meter
User Guide
•
Features
Introduction
Thank you for choosing the Spectra Precision QM95 from the Trimble
family of precision products. This easy-to-use distance measuring tool
will allow you to measure distances quickly, accurately and reliably.
Before using the Quick Measure, read this operator’s manual carefully.
Included is information about operation, safety and maintenance.
Ensure that the operating instructions are with the laser distance meter
when it is given to other persons.
Your comments and suggestions are welcome; please contact us at:
Trimble Spectra Precision Division
8261 State Route 235
Dayton, Ohio 45424 USA
Phone: +1 (937) 203-4419
+1 (800) 527-3771
Fax:
+1 (937) 482-0030
Internet: www.trimble.com/spectra
Included with the QM95: Pouch, unit, battery, user guide
Power ON / OFF
Measure reference
Liquid Crystal Display
(LCD)
Measure Buton
Add Button
Clear Button
Batteries - Installation
Subtract Button
Area Button
1. Open the battery compartment.
2. Remove the batteries from the packaging and insert them in the tool.
NOTE When installing batteries note the positive (+) and
negative (-) markings on the housings
3. Close the battery compartment cover.
Battery Access
Side Measure
Button
Flip-out tab
extension
Protective
overmolding
www.trimble.com/spectra
–2–
Quick Start Guide
Battery disposal - Some areas have regulations regarding the disposal
of batteries. Be sure to dispose of discharged batteries properly.
CAUTION: The batteries should be removed when storing the laser
more than 30 days.
–3–
–4–
Features - LCD Detail
Features - LCD Detail
Icon
Unit OFF
Press
Press Time
Single Measure
Short
Continuous Measure
Long
Press 2
Press Time
Press 3
Press Time
Comment
Short
Beeps if sound is on
Unit ON
Cycle front or back
Description
Indicates laser is activated
3.112m
3rd prior measure
12.324m
2nd prior measure
8.235m
Previous measure
6.507m
Current measure
Indicates measure reference is from back
Indicates measure reference is from front
Change measure
reference
Short
Area
Short
Addition
Short
Adds next measure
Subtraction
Short
Subtracts next measure
Hardware error. Switch unit on/off several time. If this
symbol remains, contact your dealer
Sound on / off
Long
Cycle on / off
Temperature too high or too low
Units of measure
change
Long
Cycle through units
Clear previous action
Short
Power off
Short
Automatic detection of tab extension and indicates
measure reference is from extension
Units of measure
Short
Short
More bars indicate more battery power remaining
Flashing indicates it is time to change batteries
Erase previous action
Unfavorable signal conditions
General Operation
Power on/off options
Single distance measurement
1) The Quick Measure is designed to allow quick measurements by
pressing the Measure Button to switch on the tool and activate the
laser. In this case, measurement is accomplished when the Measure
Button is pressed the second time.
2) It is also possible to use the power button to switch on the tool. In
this case, the Measure Button must be pressed once to activate the laser
and a second time to accomplish a measurement.
1) Switch on the laser beam by pressing the Measure Button.
2) Point the laser dot to the surface to be measured. (Default measure
reference is from bottom of the tool).
3) Press the Measure Button once again. The measured distance will
be displayed.
4) Press the Power On/Off Button to switch off.
Continuous measurement
1) Press and hold the Measure Button for 2 seconds to activate
continuous measuring mode. The tool beeps during continuous
measure mode if beeper is turned on.
2) Press the Measure Button again to stop continuous measure. When
continuous measure is stopped, the last valid distance measurement is
displayed on the result line.
Continuous measure can be useful to find the shortest distance to a
wall or longest distance to a corner as shown.
–9–
– 10 –
–8–
–7–
– 11 –
Area
1) Press the measure button to turn on the unit (or the Clear button
to clear)
2) Press the Area button
3) Press the Measure button to measure the first side as shown on the
LCD screen
4) Press the Measure button to measure the second side as shown on
the LCD screen. The Area will be shown, along with both measures.
– 12 –
General Operation
Settings menu (to change sound and unit of measure)
Addition and Subtraction
+ The next measure is added to the previous one
- The next measure is subtracted from the previous one
1) With the tool switched off, press and hold the Power On/Off Button
for approximately 2 seconds to enter menu mode.
MENU
Clear button
Press the C button to clear the last reading. During area measures, the
C button clears the most recent measure, but preserves previous
measures.
m
2) Press + to cycle sound on or off
3) Press the – button to cycle through unit measure options:
Specifications
Measuring Range*
0.1 to 200 m (1 to 650 ft)
Accuracy
± 1.0 mm typical (± 1/24 in)
Functions
Individual measure, Continuous measure
Area, Addition, Subtraction
Measure reference
Front, Rear, Rear with Extension tab
Automatic shut off
Laser - 1 minutes / Product - 10 minutes
Battery life (alkaline)
8000 measures
Operating temperature
-15⁰C to +50⁰C (3⁰F to 122⁰F)
Storage temperature
-25⁰C to +65⁰C (-13⁰F to 149⁰F)
Power supply
2 x AA x 1.5V
m
cm
mm
in
1/8 in
1/16 in
1/32 in
Power indication
LCD 4 segments - 100%, 75% 50%, 25%
ft
1/8 ft
1/16 ft
1/32 ft
Laser Safety
Class II as per EN 60825-1:2007;
IEC 60825-1:2007 CFR 21 § 1040 (FDA)
yd
4) To close the menu, press and hold the Power On/Off Button for
approximately 2 seconds. The tool is switched off and settings are saved.
Measurement range:
Distance performance and measure speed is dependent upon several
factors:
• Ambient lighting
• Target reflectivity
• Dust and particles in the air
• Temperature
Measurement
range on
standard
target
Albedo
Temp.
Light
Range
>5
-10⁰C to +50⁰C
<1000 lx
0.17 to 200 m
1
+10⁰C to +35⁰C
<1000 lx
0.17 to 120 m
0.2
+10⁰C to +35⁰C
<1000 lx
0.17 to 55 m
0.2
-10⁰C to +50⁰C
<1000 lx
0.17 to 50 m
1
+10⁰C to +35⁰C
100000 lx
0.17 to 50 m
+10⁰C to +35⁰C
100000 lx
0.17 to 50 m
Laser Type / Power
635 nm visible red / < 1.0 mW
0.2
Dimensions
62 x 28.5 x 120 mm (2.4" x 1.2" x 4.7")
1
-10⁰C to +50⁰C
100000 lx
0.17 to 45 m
217 g (7.7 oz) with batteries
0.2
-10⁰C to +50⁰C
100000 lx
0.17 to 45 m
Dust & Water resistance
IP54
Minimum measuring distance
170 mm
Drop Performance
1.5 m (5 ft)
Clearness
>300 m
Weight
* Dependent upon several factors. See table next page
– 13 –
– 14 –
Cleaning and drying
General safety rules
1. Blow dust off the lens.
2. Do not touch the lens with the fingers.
3. Use only a clean, soft cloth for cleaning. If necessary, moisten the
cloth slightly with pure alcohol or a little water.
NOTE Do not use any other liquids as these may damage the plastic
components.
Do not use prisms or mirrored surfaces
Distances can be measured from all stationary targets without a highly
reflective surface, i.e. concrete, stone, wood, plastic, paper, etc. The use
of prisms or other highly reflective targets is not permissible and, if
attempted, may falsify the results.
Calibration Check
It is recommended to occasionally check the calibration of the tool.
1) Select a known measure distance about 1 to 5 meters (3 to 15 ft) that
does not change over time.
2.) Measure the distance 10 times. Calculate the mean deviation from
the actual distance. The measured mean deviation should be less than
the typical accuracy tolerance of ± 1.5 mm (± 1/16 in)
– 16 –
Trouble Shooting
General Care, Safety And Storage
a) Check the condition of the tool before use.
b) The user must check the accuracy of the tool after it has been
dropped or subjected to other mechanical stresses.
c) Although the tool is designed for the tough conditions of jobsite use,
as with other measuring instruments it should be treated with care.
– 15 –
Storage
The temperature limits for storage of your equipment must be observed,
especially in winter / summer.
Remove the tool from its pouch if it has become wet. The tool, its
carrying case and accessories should be cleaned and dried (at maximum
40°C). Repack the equipment only once it is completely dry. Check the
accuracy of the equipment before it is used after a long period of storage
or transportation.
Fault
Possible cause
Remedy
The unit can’t be switched on.
The batteries are exhausted.
Replace the batteries.
Incorrect battery polarity.
Insert the batteries correctly and close the battery
compartment cover.
The button is faulty.
Contact Service
Measure Button was not pressed.
Press the Measure Button.
Unit was not switched on
Press the Measure Button.
No distances displayed by the unit.
Frequent error messages or the unit doesn’t
measure.
Transport
Faulty display.
Contact Service
The target surface is too brightly lit by the sun.
Measure from the other direction – sun from behind.
The target surface is too shiny.
Take measurements from less shiny surfaces.
The target surface is too dark.
Use a lighter colored surface
Bright sunlight towards the tool.
Shade the unit.
Temperature too high (>+50 °C / 122 °F)
Allow the unit to cool down.
Temperature too low (<-10 °C / 14 °F)
Allow the unit to warm up.
Use the original packaging or packaging of equivalent quality for
transporting or shipping your equipment.
Temperature indicator - symbol in the display
CAUTION
Unfavorable signal conditions - symbol in the
display
Insufficient reflected laser light.
Observe the minimum measuring distance (>200
mm / 8 inch from the front edge of the unit);
clean the lenses; take the measurement from a
different surface or use a target plate.
General hardware fault - symbol in the display
Hardware fault
Switch the unit off and on again.
Always remove the batteries before shipping the tool.
– 17 –
– 18 –
– 19 –
– 20 –
Laser Safety
Warranty
Service Request
Declarations
Use of this product by people other than those trained on this product
may result in exposure to hazardous laser light.
• Do not remove warning labels from the unit.
• The QM95 is a Class 2M (635 nm) laser product .
• Never look into the laser beam or direct it to the eyes of other people.
• Always operate the unit in a way that prevents the beam from getting
into people‘s eyes.
Trimble warrants the Quick Measure QM95 to be free of defects in
material and workmanship for a period of 3 years. For the first 2 years,
Trimble or its authorized Dealer or Service Center will repair or replace,
at its option, any defective part, or the entire product, for which notice
has been given during the warranty period. For the 3rd year, an
exchange fee may apply. This warranty period is in effect from the date
the system is delivered by Trimble or its authorized Dealer to the
purchaser, or is put into service by a Dealer as a demonstrator or rental
component.
Any evidence of negligent or abnormal use, or any attempt to repair
equipment by other than factory-authorized personnel or Trimble
certified or recommended parts, automatically voids the warranty.
The foregoing states the entire liability of Trimble regarding the
purchase and use of its equipment. Trimble will not be held responsible
for any consequential loss or damage of any kind.
This warranty is in lieu of all other warranties, except as set forth above,
including an implied warranty. Merchantability of fitness for a
particular purpose is hereby disclaimed.
Customers should send products to the nearest authorized Factory,
Dealer or Service Center for warranty repairs, freight prepaid. In
countries with Trimble Service Subsidiary Centers, the repaired products
will be returned to the customer, freight prepaid.
To locate your local dealer or authorized Trimble Service Center outside
the U.S.A. for service, accessories, or spare parts, contact one of our
offices listed below.
We declare, on our sole responsibility, that this product complies with
the following directives and standards:
EN 50081-1, EN 61000-6-2, 2004/108/EC.
Designation: Laser range meter
Type: QM95
– 21 –
– 22 –
North-Latin America
Trimble / Spectra Precision Division
8261 State Route 235
Dayton, Ohio 45424-6383
U.S.A.
(888) 527-3771
(Toll Free in U.S.A.)
+1-937-203-4419 Phone
+1-937-482-0030 Fax
www.trimble.com/spectra
Asia-Pacific
Trimble Navigation Singapore PTE Ltd.
80 Marine Parade Road, #22-06
Parkway Parade
Singapore, 449269
+65 6348 2212 Phone
+65 6348 2232 Fax
China
Trimble Beijing
Room 2805-07, Tengda Plaza,
No. 168 Xiwai Street
Haidian District
Beijing, China 100044
+86 10 8857 7575 Phone
+86 10 8857 7161 Fax
www.trimble.com.cn
Europe
Trimble Kaiserslautern GmbH
Am Sportplatz 5
67661 Kaiserslautern
GERMANY
Tel +49-(0)6301-71 14 14
Fax +49-06301-32213
Africa & Middle East
Trimble Export Middle-East
P.O. Box 17760
JAFZ View, Dubai
UAE
+971-4-881-3005 Phone
+971-4-881-3007 Fax
Notice to Our European Union Customers
For product recycling instructions and more information,
please go to: www.trimble.com/environment/summary.html
Recycling in Europe
To recycle Trimble WEEE, call: +31 497 53 2430, and ask for the “WEEE
associate,” or
mail a request for recycling instructions to:
Trimble Europe BV
c/o Menlo Worldwide Logistics
Meerheide 45
5521 DZ Eersel, NL
N324
– 23 –
© 2012, Trimble Navigation Limited. All rights reserved.
Reorder PN 1213-1220 Rev A (09/12)