1
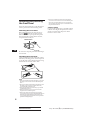
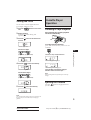
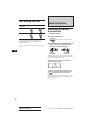
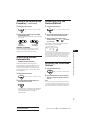
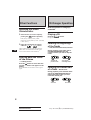
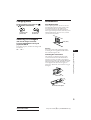
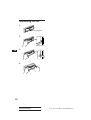
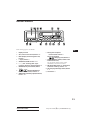
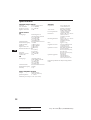
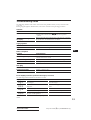
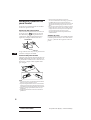
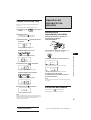
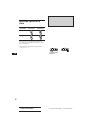
3-856-658-51 (1) FM/AM Cassette Car Stereo Operating Instructions EN Manual de instrucciones ES ##### C For installation and connections, see the supplied installation/connections manual. Con respecto a la instalación y las conexiónes, consulte el manual de Instalación/ conexiones suministrado. ##### XR-C100 1996 by Sony Corporation Actual total number: Sony XR-C100 (E,S,C) 3-856-658-51 (1) Features Precautions General • Before operating the unit for the first time or after replacing the car battery, press the reset button with a ball-point pen etc., and then start operating the unit. • Detachable-front panel enables you to take the front panel away with you when you leave your car (page 4). • Caution alarm is activated if you turn off the ignition key without removing the front panel from the unit. • Built-in power amplifier (max. output: 20 W × 4 ch) enables you to enjoy a 4-speaker system. • Digital 12-hour clock provided (page 5). Tuner section • Up to 18 stations can be preset: 12 stations on FM and 6 stations on AM. • Automatic Memory function stores a total of 18 stations in memory quickly and easily (page 7). EN Optional CD changers can be used. Up to two Sony CD changers (not supplied) can be connected and controlled with the unit by using the Sony source selector (not supplied). Reset button • If your car is parked in direct sunlight resulting in a considerable rise in temperature inside the car, allow the unit to cool off before operating it. • If no power is being supplied to the unit, check the connections first. If everything is in order, check the fuse. • If no sound comes from the speakers of a 2-speaker system, set the fader control to the center position. • If your car is equipped with a power antenna, note that it is automatically extended while the unit is operating. If you have any questions or problems concerning your unit that are not covered in this manual, please consult your nearest Sony dealer. 2 Actual total number Sony XR-C100 (E,S,C) 3-856-658-51 (1) Notes on Cassettes Table of Contents Cassette care Detaching and Attaching the Front Panel ............ 4 Setting the Clock ...................................................... 5 • Do not touch the tape surface of a cassette, as any dirt or dust contaminates the heads. • Keep cassettes away from equipment with built-in magnets such as speakers and amplifiers, as erasure or distortion of the recorded tape could occur. • Do not expose cassettes to direct sunlight, extremely cold temperatures, or moisture. • When the tape is played back for a long period, the cassette shell may become warm because of the built-in power amplifier. This is not a sign of a malfunction. Notes on Cassette Deck Tape Heads • Long use of cassette tapes contaminates the tape head causing poor sound quality or complete sound dropout. Therefore, we recommend cleaning the tape head once a month or so with the separately available Sony Cassette Cleaning Set. If the sound does not improve after using a cleaning cassette, please consult your nearest Sony dealer. • In case of old or inferior cassette tapes, the tape head gets contaminated much more quickly. Depending on the tape, one or two playbacks may cause poor sound. Cassettes longer than 90 minutes The use of cassettes longer than 90 minutes is not recommended except for long continuous play. The tapes used for these cassettes are very thin and tend to be stretched easily. Frequent playing and stopping of these tapes may cause them to be pulled into the cassette deck mechanism. Cassette Player Operation Listening to Tape Playback .................................... 5 Ejecting the Cassette ................................................ 5 Fast-winding the Tape ............................................ 6 Radio Reception Searching for Stations Automatically — Automatic Tuning ......................................... Tuning in by Adjusting the Frequency — Manual Tuning ............................................... Memorizing Stations Automatically — Automatic Memory Function ...................... Memorizing Only the Desired Stations ................ Receiving the Memorized Stations ....................... 6 7 7 7 7 EN Other Functions Adjusting the Sound Characteristics .................... 8 Enjoying Bass and Treble at Low Volume — Loudness Function ......................................... 8 CD Changer Operation With the optional CD changer(s) connected Playing a CD ............................................................. Locating the Beginnings of the Tracks — AMS (Automatic Music Sensor) Function .......................................................... Locating the Desired Part of a Track — Manual Search ................................................ Changing Discs ........................................................ Selecting CD Changers ........................................... 8 8 8 9 9 Maintenance ............................................................. 9 Dismounting the Unit ........................................... 10 Button Locations .................................................... 11 Specifications .......................................................... 12 Troubleshooting Guide ......................................... 13 3 Actual total number Sony XR-C100 (E,S,C) 3-856-658-51 (1) Detaching and Attaching the Front Panel The front panel of this unit can be detached in order to prevent the unit from being stolen. Detaching the Front Panel Before detaching the front panel, be sure to press the OFF button first. Then press the RELEASE button to open up the front panel. Then slide the front panel a little to the left, and pull it off towards you. • Do not expose the front panel to direct sunlight, heat sources such as hot air ducts or leave it in a humid place. Never leave it on the dashboard etc. of a car parked in direct sunlight where there may be a considerable rise in temperature inside the car. Caution alarm If you turn the ignition key to the OFF position without removing the front panel, the caution alarm is activated and a beep tone will be heard for a few seconds. RELEASE button EN Be sure not to drop the panel after detaching it from the unit. Attaching the Front Panel Apply the right hand side of the front panel to the unit by attaching part A of the front panel to part B of the unit as illustrated, then swing the left side into the unit until it clicks. A B Notes • Make sure that the front panel is the right way up when attaching it to the unit as it cannot be attached upside down. • Do not press the front panel hard against the unit when attaching it to the unit. It can easily be attached by pressing it lightly against the unit. • When you carry the front panel with you, put it in the supplied front panel case. • Do not press hard or give excessive pressure to the display windows of the front panel. • Before removing the front panel, be sure to turn the power off. However, if you press the RELEASE button to detach the panel while the unit is still turned on, the power is automatically turned off in order to protect the speakersfrombeingdamaged. 4 Actual total number Sony XR-C100 (E,S,C) 3-856-658-51 (1) Setting the Clock The clock has a 12-hour digital indication. Cassette Player Operation For example, setting it to 10:08 A.MEM 1 Press the unit. 2 Display the time. (Press the button during unit operation.) 3 Press the seconds. button to turn on the FM/AM DSPL Listening to Tape Playback After inserting the cassette, playback will start automatically. DSPL button for more than two 100 The hour digit blinks. To change the tape direction, press both the 0 and the ) buttons at the same time. Set the hour digits. EN 1000 4 Press the SEL Indication of Tape Transport Direction The side facing up is being played. button momentarily. 1000 The minute digit blinks. Cassette Player Operation (to go back) (to go forward) The side facing down is being played. Tape playback automatically changes direction at the end of the tape. Set the minute digits. Note Before turning off the unit, eject the tape to avoid tape damage. (to go back) (to go forward) 1008 5 DSPL Press the button momentarily. Ejecting the Cassette Press the button to stop playback and eject the cassette. 1008 The clock activates. Note The clock cannot be set unless the power is turned on. Set the clock after you turn on the radio, or during tape playback. Actual total number 5 Sony XR-C100 (E,S,C) 3-856-658-51 (1) Fast-winding the Tape Direction indicator* To advance Radio Reception To rewind ( Searching for Stations Automatically — Automatic Tuning 9 1 Select the desired band. A.MEM FM/AM To resume playback, press the other fastwinding button partially until the locked button is released. * The 9 or ( indicator flashes while fast-winding the tape. 2 FM I n FM II n AM n FM I Press either side of the SEEK/AMS/MANU button momentarily to search for the next station (automatic tuning). MANU MANU SEEK AMS SEEK AMS EN For lower frequencies For higher frequencies The scanning stops when a station is received. Press either side of the button repeatedly until the desired station is received. When an FM stereo program with a sufficient signal strength is tuned in, ST 879 the “ST” indication will appear. To avoid the automatic tuning from stopping on stations too frequently (local seek mode), press button momentarily to get the “LCL” the indication. Only the stations with relatively strong signals are tuned in. The local seek mode functions only when the automatic tuning is in operation. SENS LOUD 6 Actual total number Sony XR-C100 (E,S,C) 3-856-658-51 (1) Tuning in by Adjusting the Frequency — Manual Tuning Memorizing Only the Desired Stations 1 1 Select the desired band. 2 Press and hold either side of the SEEK/ AMS/MANU button. Release the button when the desired station is received. MANU MANU SEEK AMS SEEK AMS For higher frequencies PREVENT ACCIDENTS! When tuning in during driving, use the automatic tuning and the memory preset tuning instead of the manual tuning. — Automatic Memory Function Stations with the clearest reception are automatically searched and memorized on each band (FM I, FM II and AM). Up to 6 stations on each band can be stored on the preset number buttons 1 to 6 in the order of band frequency. FM I n FM II n AM n FM I 2 Tune in the station which you wish to store on the preset number button. 3 Press and hold the desired preset number button ( 1 to 6 ) for about two seconds. The number of the pressed preset number button appears on the display. ST FM 879 1 Up to 6 stations on each band (FM I, FM II and AM) can be stored on the preset number buttons in the order of your choice. Therefore, 12 stations can be memorized on FM. If you try to store another station on the same preset number button, the previously stored station is erased. Receiving the Memorized Stations 1 Select the desired band. A.MEM FM/AM FM I n FM II n AM n FM I Select the desired band. A.MEM FM/AM FM I n FM II n AM n FM I Press the FM/AM/A.MEM button for more than two seconds. A.MEM FM/AM 2 Press momentarily the preset number button on which the desired station is stored. EN Cassette Player Operation/Radio Reception Memorizing Stations Automatically 2 FM/AM FM I n FM II n AM n FM I For lower frequencies 1 Select the desired band. A.MEM A.MEM FM/AM Note If you press the preset number button for more than two seconds, the currently received station is memorized. To receive the previously memorized station, make sure that the preset number button is pressed only momentarily. The unit starts scanning the selected band and memorize the tuned stations on the preset number button 1 through 6 automatically. 7 Actual total number Sony XR-C100 (E,S,C) 3-856-658-51 (1) Other Functions Adjusting the Sound Characteristics 1 Select the item you want to adjust by pressing the SEL button repeatedly. BAS (bass) n TRE (treble) n BAL (balance) n FAD (fader) n VOL (volume) n BAS (bass) 2 EN Adjust the selected item by pressing either the or button. Adjust within three seconds after selecting. (After three seconds the button will again serves as the volume control button.) Enjoying Bass and Treble at Low Volume — Loudness Function CD Changer Operation With the optional CD changer(s) connected Playing a CD CD Press the button. CD playback starts. Locating the Beginnings of the Tracks — AMS (Automatic Music Sensor) Function During playback, press either side of the SEEK/AMS/MANU button the number of times you wish to skip the tracks. MANU MANU SEEK AMS SEEK AMS To locate the previous tracks To locate the succeeding tracks SENS Press the button for more than two seconds. n “LOUD” will appear on the display. Bass and treble are boosted. To cancel, press again. LOUD Locating the Desired Part of a Track —Manual Search During playback, press and hold either side of the SEEK/AMS/MANU button. Release the button when you have found the desired part. MANU MANU SEEK AMS SEEK AMS To reverse To forward 8 Actual total number Sony XR-C100 (E,S,C) 3-856-658-51 (1) Changing Discs Maintenance During playback, press either the or 2 button momentarily. DISC 1 1 DISC 2 1 To return to the previous disc 2 To advance to the next disc Fuse Replacement When replacing the fuse, be sure to use one matching the amperage rating stated on the fuse. If the fuse blows, check the power connection and replace the fuse. If the fuse blows again after replacement, there may be an internal malfunction. In such a case, consult your nearest Sony dealer. Selecting CD Changers (with two CD changers connected) Press the button during CD playback. Each time you press, another CD changer will be selected. Fuse (10 A) CD CD I ˜ CD II Cleaning the Connectors The unit may not function properly if the connectors between the unit and the front panel are not clean. In order to prevent this, open the front panel by pressing the RELEASE button, then detach it and clean with a cotton swab dipped in alcohol. Do not apply too much force. Otherwise, the connector may get damaged. EN Other Functions/CD Changer Operation Warning Never use a fuse with an amperage rating exceeding the one supplied with the unit as this could damage the unit. Main unit Back of the front panel 9 Actual total number Sony XR-C100 (E,S,C) 3-856-658-51 (1) Dismounting the Unit 1 Release key (supplied) 2 EN 3 4 10 Actual total number Sony XR-C100 (E,S,C) 3-856-658-51 (1) Button Locations DISC DSPL RELEASE 2 3 4 5 6 SEEK AMS OFF A.MEM SENS SEL DIR MANU 1 FM/AM CD LOUD Refer to the pages in r for details. 1 Display window 2 SEL (control mode select) button 58 3 DSPL (display mode change/time set) button 5 4 6 (eject) button 5 5 SEEK/AMS/MANU button 678 6 0 • ) (fast winding)/DIR (tape transport direction change) buttons 56 7 RELEASE (front panel release) button 4 9 8 (bass/treble/balance/ fader control/volume) buttons 58 9 SENS/LOUD (sensitivity adjust/loudness) button 68 EN ! º During radio reception: Preset number buttons 7 During CD playback: 1 2 (changing discs) buttons 9 ! ¡ Frequency Select switch (located on the bottom of the unit) See “Frequency Select Switch” in the Installation/Connections manual. !™ FM/AM/A.MEM (radio on • band select/ automatic memory) button 567 ! £ CD (disc play/CD changer select) button 8 9 ! ¢ OFF button 4 11 Actual total number Sony XR-C100 (E,S,C) 3-856-658-51 (1) Specifications Cassette player section General Tape track Wow and flutter Frequency response Signal-to- noise ratio Output lead 4-track 2-channel stereo 0.13 % (WRMS) 30 – 15,000 Hz 55 dB Tone controls Tuner section Power requirements FM Dimensions Tuning range EN FM tuning interval: 50 kHz/200 kHz switchable 87.5 – 108.0 MHz (at 50 kHz step) 87.5 – 107.9 MHz (at 200 kHz step) Antenna terminal External antenna connector Intermediate frequency 10.7 MHz Usable sensitivity 12 dBf (75 ohms) Selectivity 70 dB at 400 kHz Signal-to-noise ratio 63 dB (stereo), 68 dB (mono) Harmonic distortion at 1 kHz 0.5% (stereo), 0.4% (mono) Separation 28 dB at 1 kHz Frequency response 30 – 15,000 Hz Capture ratio 5 dB AM Tuning range Antenna terminal Intermediate frequency Sensitivity AM tuning interval: 9 kHz/10kHz switchable 531 – 1,602 kHz (at 9 kHz step) 530 – 1,710 kHz (at 10 kHz step) External antenna connector 450 kHz 35 µV Mounting dimension Mass Supplied accessories Optional accessories Optional equipment Power antenna relay control lead/Power amplifier control lead Bass ±8 dB at 100 Hz Treble ±8 dB at 10 kHz 12 V DC car battery (negative ground) Approx. 188 × 58 × 170 mm (w/h/d) not incl. projecting parts and controls Approx. 182 × 53 × 153 mm (w/h/d) not incl. projecting parts and controls Approx. 1.3 kg Parts for installation and connections (1 set) Front panel case (1) BUS cable (supplied with an RCA pin cord) RC-61 (1 m), RC-62 (2 m), RCA pin cord RC-63 (1 m), RC-64 (2 m), RC-65 (5 m) CD changer CDX-45, CDX-51, CDX-52, CDX-65 etc. Source selector XA-C30 Design and specifications are subject to change without notice. Power amplifier section Outputs Speaker outputs (sure seal connectors) Speaker impedance 4 – 8 ohms Maximum power output 20 W × 4 (at 4 ohms) 12 Actual total number Sony XR-C100 (E,S,C) 3-856-658-51 (1) Troubleshooting Guide The following checklist assists in the correction of most problems which you may encounter with your unit. Before going through the checklist below, refer to the connection and operating procedures. General Problem Cause/Solution No sound • Adjust the volume with the button. • Set the fader control to the center position for 2-speaker systems. Indications do not appear on the display. Remove the front panel and clean the connectors. See “Cleaning the Connectors” of “Maintenance” for details. Tape playback Problem Cause/Solution Playback sound is distorted. Contamination of the tape head. n Clean the head. EN Radio reception Problem Cause/Solution Preset tuning is not possible. • Memorize the correct frequency. • The broadcast is too weak. Automatic tuning is not possible. The broadcast is too weak. n Use the manual tuning. The “ST” indication flashes. Tune in precisely. Disc play Problem Cause/Solution Playback sound skips. A dusty or defective disc. Error displays (with the operational CD changer(s) connected) The following indication flashes for about five seconds. Display E01 E02 E04 E99 Cause Solution The disc magazine is not inserted in the Insert the disc magazine with discs into CD changer. the CD changer. No disc is inserted in the disc magazine. Take out the magazine and insert the discs. The disc is dirty. Clean the disc. The disc is inserted upside down. Insert the disc correctly. The CD changer cannot be operated because of some problem. Press the reset button of the unit. If the above-mentioned solutions do not help to improve the situation, consult your nearest Sony dealer. 13 Actual total number Sony XR-C100 (E,S,C) 3-856-658-51 (1) Particularidades Precauciones Generales • Antes de utilizar la unidad por primera vez, o después de reemplazar la batería del automóvil, presione la tecla de reposición con un bolígrafo, etc. y, a continuación, comience a utilizar la unidad. • Panel frontal desmontable para poder llevarlo consigo cuando abandone el automóvil (página 4). • Alarma de precaución, que se activará cuando ponga en OFF la llave de encendido sin haber extraído el panel frontal de la unidad. • Amplificador de potencia incorporado (salida máx.: 20 W × 4 canales) que le permitirá disfrutar de un sistema de 4 altavoces. • Reloj digital de 12 horas incluido (página 5). Posibilidad de utilización de cambiadores de discos compactos opcionales. • Si dejó el automóvil aparcado bajo luz solar directa y aumentó considerablemente la temperatura interior del mismo, antes de emplear la unidad deje que se enfríe. • Si la unidad no recibe alimentación, compruebe en primer lugar las conexiones. Si todo está en orden, compruebe el fusible. • Si no oye sonido a través de un sistema de 2 altavoces, ponga el control de equilibrio entre los altavoces delanteros y traseros en la posición central. • Si el automóvil está equipado con una antena motorizada, tenga en cuenta que la antena se extenderá automáticamente cuando la unidad comience a funcionar. Es posible conectar y controlar con la unidad hasta dos cambiadores de discos compactos Sony (no suministrados) mediante el uso del selector de fuente Sony (no suministrado). Si tiene alguna pregunta o problema en relación con la unidad que este manual no pueda resolver, consulte a su proveedor Sony. Sección del sintonizador • Posibilidad de memorización de hasta 18 emisoras: 12 para FM y 6 para AM respectivamente. • Función de memoria automática, que puede almacenar rápida y fácilmente un total de 18 emisoras en memoria (página 7). ES Tecla de reposición 2 Actual total number: Sony XR-C100 (E,S ,C) 3-856-658-51 (1) Notas sobre los cassettes Indice Cuidado de los cassettes Extracción e inserción del panel frontal ............... 4 Puesta en hora del reloj ........................................... 5 • Evite tocar la superficie de la cinta de los cassettes, ya que el polvo o la suciedad ensuciarán los cabezales. • Mantenga los cassettes alejados de equipos con imanes potentes, tales como altavoces y amplificadores, ya que las cintas grabadas podrían borrarse o distorsionarse. • No exponga los cassettes a la luz solar directa, a temperaturas extremadamente bajas, ni a la humedad. • Las cajas de los cassettes pueden calentarse cuando haya realizado la reproducción durante mucho tiempo debido al amplificador de potencia incorporado. Sin embargo, esto no significa mal funcionamiento. Notas sobre los cabezales de cinta de la platina de cassettes •El uso durante largo tiempo de cintas de cassette ensucia el cabezal de cinta, causando un sonido de baja calidad o la supresión total del sonido. Por ello, se recomienda limpiar el cabezal de cinta una vez al mes, aproximadamente, con el kit de limpieza de cassette Sony, disponible por separado. Si la calidad del sonido no mejora después de usar una cassette limpiadora, consulte a su distribuidor Sony más cercano. •Con cintas de cassette antiguas o de poca calidad, el cabezal de cinta se ensucia con mucha más rapidez. Dependiendo de la cinta, una o dos reproducciones de la misma podrían causar mala calidad de sonido. Nota sobre los cassettes de más de 90 minutos No se recomienda el empleo de cassettes de más de 90 minutos excepto para reproducción larga y continua. La cinta de estos cassettes es muy fina y tiende a estirarse fácilmente. Las operaciones frecuentes de reproducción y parada podrían hacer que la cinta se enredase en el mecanismo del reproductor. Operación del reproductor de cassettes Escucha de la reproducción de cintas ................... 5 Extracción del cassette ............................................ 5 Bobinado rápido de la cinta ................................... 6 Radiorecepción Búsqueda automática de emisoras — Sintonía automática ....................................... Sintonía mediante el ajuste de la frecuencia — Sintonía manual ............................................. Memorización automática de emisoras — Función de memoria automática ................. Memorización de las emisoras deseadas ............. Recepción de emisoras memorizadas ................... 6 7 7 7 7 Otras funciones Ajuste de las características del sonido ................ 8 Buena calidad de sonido incluso a bajo volumen — Función de sonoridad ................................... 8 Funcionamiento del cambiador de discos compactos Si conecta uno o varios cambiadores de discos compactos opcionales Reproducción de un disco compacto .................... Localización del comienzo de los temas — Función AMS (Sensor de música automático) ..................................................... Localización de una parte determinada de un tema — Búsqueda manual .......................................... Cambio de discos ..................................................... Selección de cambiadores de discos compactos ... 8 8 8 9 9 Mantenimiento ......................................................... 9 Desmontaje de la unidad ...................................... 10 Ubicación de las teclas .......................................... 11 Especificaciones ..................................................... 12 Guía para la solución de problemas ................... 13 Actual total number: ES Sony XR-C100 (E,S ,C) 3-856-658-51 (1) 3 Extracción e inserción del panel frontal Podrá extraer el panel frontal de esta unidad a fin de evitar que se la roben. Extracción del panel frontal Antes de extraer el panel frontal, cerciórese de presionar la tecla OFF . Después presione la tecla RELEASE para abrir el panel frontal. A continuación, deslícelo ligeramente hacia la izquierda y extráigalo tirando hacia fuera. Tecla RELEASE ES • Antes de extraer el panel frontal, cerciórese de desconectar la alimentación. Sin embargo, si presiona la tecla RELEASE para extraer el panel frontal con la alimentación de la unidad conectada, ésta se desconectará automáticamente a fin de proteger los altavoces contra daños. • No exponga el panel frontal a la luz solar directa, fuentes térmicas tales como conductos de aire caliente, ni lo deje en lugares húmedos. No lo deje nunca en el salpicadero, etc. de un automóvil aparcado al sol, porque la temperatura del interior del mismo podría aumentar considerablemente. Alarma de aviso Si pone en OFF la llave de encendido sin haber extraído el panel frontal, se activará la alarma de aviso, y durante unos segundos sonará un pitido. Tenga cuidado de no dejar caer el panel frontal cuando lo extraiga de la unidad. Inserción del panel frontal Aplique la parte derecha del panel frontal en la unidad enganchando la parte A del mismo en la parte B de la unidad, como se muestra en la ilustración, y empuje el lado izquierdo hasta que chasquee. B A Notas • Cerciórese de colocar correctamente el panel frontal en la unidad, ya que no podrá fijarse al revés. • No presione el panel frontal con fuerza contra la unidad cuando lo inserte en la misma. El panel podrá insertarse con facilidad presionándolo ligeramente contra la unidad. • Para llevar consigo el panel frontal, métalo en la caja suministrada. • No aplique demasiada fuerza sobre el visualizador del panelfrontal. 4 Actual total number: Sony XR-C100 (E,S ,C) 3-856-658-51 (1) Puesta en hora del reloj El reloj posee una indicación digital de 12 horas. Operación del reproductor de cassettes Por ejemplo, para ajustarlo a las 10:08 A.MEM 1 Presione la tecla unidad. 2 Muestre la hora. (Presione la tecla durante el funcionamiento de la unidad.) 3 FM/AM para activar la DSPL DSPL Presione la tecla segundos. durante más de dos Escucha de la reproducción de cintas Después de insertar el cassette, la reproducción se iniciará automáticamente. 100 Los dígitos de la hora parpadean. Ajuste los dígitos de la hora. Para cambiar el sentido de la cinta presione las teclas 0 y ) al mismo tiempo. ES Indicación del sentido de transporte de la cinta 1000 4 Presione la tecla SEL un instante. Está reproduciéndose la cara superior del cassette. 1000 Los dígitos de los minutos parpadean. Está reproduciéndose la cara inferior del cassette. Ajuste los dígitos de los minutos. (para retroceder) (para avanzar) 1008 5 Al reproducir la cinta, cambia automáticamente el sentido de la misma cuando llega al final. Operación del reproductor de cassettes (para retroceder) (para avanzar) Nota Antes de desactivar la unidad, extraiga la cinta para evitar que se dañe. DSPL Presione la tecla un instante. 1008 Extracción del cassette Presione la tecla para detener la reproducción y extraer el cassette. El reloj comienza a funcionar. Nota El reloj no podrá ponerse en hora a menos que conecte la alimentación de la unidad. Ponga en hora el reloj después de haber conectado la radio, o de haber iniciado la reproducción de una cinta. Actual total number: 5 Sony XR-C100 (E,S ,C) 3-856-658-51 (1) Bobinado rápido de la cinta Indicador de sentido* Para hacer que avance Para rebobinarla ( 9 Para reanudar la reproducción, presione la otra tecla de avance rápido hasta que se libere la tecla bloqueada. * Durante el bobinado rápido de la cinta parpadeará el indicador 9 o (. MANU MANU SEEK AMS SEEK AMS Para frecuencias inferiores ES 6 Actual total number: Sony XR-C100 (E,S ,C) 3-856-658-51 (1) Sintonía mediante el ajuste de la frecuencia — Sintonía manual 1 Memorización de las emisoras deseadas 1 Seleccione la banda deseada. Seleccione la banda deseada. A.MEM FM/AM A.MEM FM/AM 2 FM I n FM II n AM n FM I FM I n FM II n AM n FM I Mantenga pulsado cualquier lado de la tecla SEEK/AMS/MANU. Suelte la tecla cuando se reciba la emisora deseada. MANU MANU SEEK AMS SEEK AMS Para frecuencias inferiores Para frecuencias superiores ¡PARA EVITAR ACCIDENTES! Durante la conducción se recomienda emplear las funciones de sintonía automática y de sintonía de emisoras memorizadas en vez de la sintonía manual. Sintonice la emisora que desee almacenar en la tecla numérica de memorización. 3 Mantenga presionada la tecla numérica de memorización deseada ( 1 a 6 ) durante unos dos segundos. El número de la tecla numérica de memorización presionada aparecerá en el visualizador. ST FM 879 1 Podrá almacenar hasta 6 emisoras de cada banda (FM I, FM II y AM) en las teclas numéricas de memorización en el orden que desee. De esta forma, es posible memorizar 12 emisoras de FM. Si intenta almacenar otra emisora en la misma tecla numéricadememorización,laemisorapreviamente almacenadaseborrará. — Función de memoria automática Las emisoras de cada banda que se reciben con mayor claridad se localizan y se almacenan en la memoria de forma automática (FM I, FM II y AM). Es posible almacenar un máximo de 6 emisoras de cada banda en las teclas numéricas de memorización de 1 a 6 por orden de frecuencia. 1 Recepción de emisoras memorizadas 1 Seleccione la banda deseada. A.MEM FM/AM Seleccione la banda deseada. FM I n FM II n AM n FM I A.MEM FM/AM 2 FM I n FM II n AM n FM I Presione la tecla FM/AM/A.MEM durante más de dos segundos. A.MEM FM/AM La unidad iniciará la exploración de la banda seleccionada y memorizará las emisoras sintonizadas en las teclas numéricas de memorización de 1 a 6 automáticamente. 2 Presione ligeramente la tecla numérica de memorización en la que está almacenada la emisora deseada. Nota Si mantiene presionada una tecla numérica durante más de dos segundos, la emisora actualmente recibida se memorizará. Para recibir la emisora previamente memorizada, cerciórese de presionar ligeramente la tecla numéricadememorización. ES Operación del reproductor de cassettes/Radiorecepción Memorización automática de emisoras 2 7 Actual total number: Sony XR-C100 (E,S ,C) 3-856-658-51 (1) Funcionamiento del cambiador de discos compactos Otras funciones Ajuste de las características del sonido 1 Seleccione el elemento que desee ajustar presionando repetidamente la tecla SEL . BAS (graves) n TRE (agudos) n BAL (equilibrio) n FAD (equilibrio entre los altavoces delanteros y traseros) n VOL (volumen) n BAS (graves) 2 Ajuste el elemento seleccionado presionando la tecla o ES Si conecta uno o varios cambiadores de discos compactos opcionales Reproducción de un disco compacto CD Presione la tecla . Se inicia la reproducción del disco compacto. . Realice el ajuste antes de que transcurran tres segundos desde la selección (después de tres segundos, la tecla volverá a funcionar como tecla de control de volumen). Buena calidad de sonido incluso a bajo volumen — Función de sonoridad SENS Presione la tecla durante más de dos segundos n “LOUD” aparecerá en el visualizador. Se reforzarán los graves y los agudos. Para cancelar la función de esta tecla, vuelva a presionarla. Localización del comienzo de los temas — Función AMS (Sensor de música automático) Durante la reproducción, presione cualquier lado de la tecla SEEK/AMS/ MANU tantas veces como temas desee omitir. 0 9 MANU MANU SEEK AMS SEEK AMS LOUD Para localizar los temas anteriores Para localizar los temas posteriores Localización de una parte determinada de un tema — Búsqueda manual Durante la reproducción, mantenga presionado cualquier lado de la tecla SEEK/AMS/MANU. Suelte la tecla cuando localice la parte que desee. MANU MANU SEEK AMS SEEK AMS Para retroceder Para avanzar 8 Actual total number: Sony XR-C100 (E,S ,C) 3-856-658-51 (1) Cambio de discos Mantenimiento Durante la reproducción, presione durante un instante la tecla 1 o 2 . Sustitución del fusible Selección de cambiadores de discos compactos Al sustiuir el fusible, asegúrese de utilizar uno que coincida con el amperaje indicado en dicho fusible. Si el fusible salta, compruebe la conexión de alimentación y sustitúyalo. Si después de sustituirlo vuelve a saltar, es posible que exista un funcionamiento interno defectuoso. En tal caso, póngase en contacto con el proveedor Sony más próximo. Fusible (10 A) (cuando haya conectado dos cambiadores de discos compactos) CD Presione la tecla durante la reproducción de un disco compacto. Cada vez que la presione, se seleccionará otro cambiador de discos compactos. CD I ˜ CD II Advertencia No utilice nunca un fusible con un amperaje superior al del suministrado con la unidad, ya que ésta podría dañarse. Es posible que la unidad no funcione correctamente si los conectores entre la unidad y el panel frontal no están limpios. Para evitar que ocurra esto, abra el panel frontal presionando la tecla RELEASE y, a continuación, extráigalo y límpielo con un bastoncillo de algodón humedecido en alcohol. No aplique demasiada presión. De otro modo podría dañarse el conector. Otras funciones/Funcionamiento del cambiador de discos compactos Limpieza de los conectores ES 9 Actual total number: Sony XR-C100 (E,S ,C) 3-856-658-51 (1) Desmontaje de la unidad 1 ES 10 Actual total number: Sony XR-C100 (E,S ,C) 3-856-658-51 (1) Ubicación de las teclas DISC DSPL RELEASE 2 3 4 5 6 SEEK AMS OFF A.MEM SENS SEL DIR MANU 1 FM/AM CD LOUD Para más imformación, consulte las páginas de r. 1 Visualizador principal 2 Tecla de selección de modo de control (SEL) 58 3 Tecla de cambio de visualización/puesta en hora (DSPL) 5 4 6 Tecla de extracción del cassette 5 5 Tecla de búsqueda/AMS/MANU (SEEK/ AMS/MANU) 678 6 Teclas 0•) (avance rápido)/DIR (cambio de sentido de transporte de cinta) 56 7 Tecla de liberación del panel frontal (RELEASE) 49 8 Teclas de graves/agudos/ equilibrio/control de equilibrio entre los altavoces/volumen 58 9 ! º Durante la radiorecepción: Teclas numéricas de memorización de emisoras 7 ES Durante la reproducción de un disco compacto: Teclas de cambio de discos 1 9 2 ! ¡ Selector de frecuencia (situado en la base de la unidad) Consulte “Selector de frecuencia” del manual de instalación/conexiones. !™ Tecla FM/AM/A.MEM (activación de radio y selección de banda/memoria automática) 567 ! £ Tecla de reproducción de disco/selección de cambiador de disco (CD) 89 ! ¢ Tecla de desconexión (OFF) 4 Tecla de ajuste de sensibilidad sonoridad (SENS/LOUD) 68 11 Actual total number: Sony XR-C100 (E,S ,C) 3-856-658-51 (1) Especificaciones Sección del reproductor de cassettes Pistas de la cinta Fluctuación y trémolo Respuesta de frecuencia Relación señal-ruido 4 pistas, 2 canales, estéreo 0,13 % (ponderación eficaz) 30 – 15.000 Hz 55 dB Sección del sintonizador FM Gama de sintonía ES Intervalo de sintonía de FM: 50 kHz/200 kHz, conmutable 87,5 – 108,0 MHz (intervalo de 50 kHz) 87,5 – 107,9 MHz (intervalo de 200 kHz) Terminal de antena Conector para antena exterior Frecuencia intermedia 10,7 MHz Sensibilidad útil 12 dBf (75 ohmios) Selectividad 70 dB a 400 kHz Relación señal-ruido 63 dB (estéreo), 68 dB (monoaural) Distorsión armónica a 1 kHz 0,5% (estéreo), 0,4% (monoaural) Separación entre canales 28 dB a 1 kHz Respuesta de frecuencia 30 – 15.000 Hz Relación de captura 5 dB AM Gama de sintonía Terminal de antena Frecuencia intermedia Sensibilidad Intervalo de sintonía de AM: 9 kHz/10 kHz, conmutable 531 – 1.602 kHz (intervalo de 9 kHz) 530 – 1.710 kHz (intervalo de 10 kHz) Conector para antena exterior 450 kHz 35 µV Generales Conductor de salida Control de relé para antena motorizada/Conductor de control del amplificador de potencia Controles de tono Graves ±8 dB a 100 Hz Agudos ±8 dB a 10 kHz Alimentación Batería de automóvil de 12 V CC (negativo a masa) Dimensiones Aprox. 188 × 58 × 170 mm (an/al/prf), excluyendo partes y controles salientes Dimensiones de montaje Aprox. 182 × 53 × 153 mm (an/al/prf), excluyendo partes y controles salientes Masa Aprox. 1,3 kg Accesorios suministrados Componentes de montaje y conexiones (1 juego) Caja para el panel frontal (1) Accesorios opcionales Cable BUS (suministrado con un cable con clavijas RCA) RC-61 (1 m), RC-62 (2 m) Cable con clavija RCA RC-63 (1 m), RC-64 (2 m), RC-65 (5 m) Equipos opcionales Cambiador de discos CDX-45, CDX-51, CDX-52, CDX-65 etc Selector de fuente XA-C30 Diseño y especificaciones sujetos a cambio sin previo aviso. Sección del amplificador de potencia Salidas Salidas para altavoces (conectores herméticos de seguridad) Impedancia de los altavoces 4 – 8 ohmios Salida máxima de potencia 20 W × 4 (a 4 ohmios) 12 Actual total number: Sony XR-C100 (E,S ,C) 3-856-658-51 (1) Guía para la solución de problemas La lista de comprobaciones siguiente le ayudará a solucionar la mayoría de los problemas que pueda encontrar con su unidad. Antes de pasar a la lista de comprobaciones siguiente, repase los procedimientos de conexión y operación. Generales Problema Causa/Solución Ausencia de sonido • Ajuste el volumen con la tecla . • Con un sistema de dos altavoces, ponga el control de equilibrio entre los altavoces en la posición central. Ausencia de indicaciones en el visualizador principal. Extraiga el panel frontal y limpie los conectores. Para más información, consulte “Limpieza de los conectores” de “Mantenimiento”. Reproducción de cintas Problema Causa/Solución El sonido de reproducción se oye distorsionado. El cabezal de la cinta está sucio. n Límpielo. ES Radiorecepción Problema Causa/Solución No es posible sintonizar la emisora memorizada. • Memorice la frecuencia correcta. • La señal de radiodifusión es débil. No es posible realizar la sintonización automática. La señal de radiodifusión es débil. n Emplee la sintonía manual. El indicador “ST” parpadea. Sintonice con precisión. Reproducción de discos Problema Causa/Solución El sonido de reproducción salta. El disco está sucio o defectuoso. 13 Actual total number: Sony XR-C100 (E,S ,C) 3-856-658-51 (1) Indicaciones de error (cuando haya conectado un cambiador(es) de discos compactos) Las indicaciones siguientes parpadearán durante unos cinco segundos. Indicación E01 E02 E04 E99 Causa Solución El cargador de discos no está insertado en el cambiador. Insértelo con discos. No hay discos en el cargador. Extraiga el cargador e insértele discos. El disco está sucio. Límpielo. El disco está al revés. Insértelo correctamente. El cambiador de discos compactos no funciona debido a algún problema. Presione la tecla de reposición de la unidad. Si las soluciones mencionadas no ayudan a resolver la situación, consulte a su proveedor Sony. ES 14 Actual total number: Sony XR-C100 (E,S ,C) 3-856-658-51 (1) Sony Corporation printed in Singapore Actual total number: Sony XR-C100 (E,S,C) 3-856-658-51 (1)