1
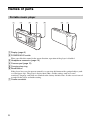
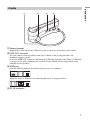
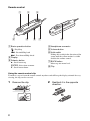
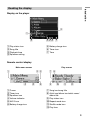
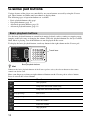
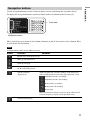
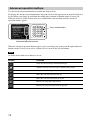
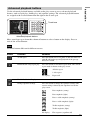
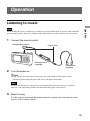
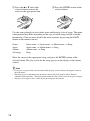
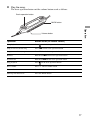
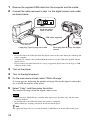
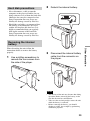
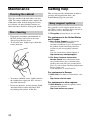
Portable Music Player
VGF-AP1 Series
Operating Instructions
Trademarks
• VAIO,
, SonicStage, VAIO music transfer, ATRAC, ATRAC3, ATRAC3plus
and the associated logos are trademarks of Sony Corporation.
• Microsoft and Windows are registered trademarks of Microsoft Corporation in the United States
and/or other countries.
• Other system names and product names appearing in this document are generally registered
trademarks or trademarks of their manufacturers.
• ™ and ® marks are not shown in this document.
Portions of this software are based in part on the work of the Independent JPEG group.
• In this manual, Microsoft® Windows® 98 Second Edition is referred to as Windows 98
Second Edition.
• In this manual, Microsoft® Windows® 2000 Professional is referred to as Windows 2000.
• In this manual, Microsoft® Windows® Millennium Edition is referred to as Windows Me.
• In this manual, Microsoft® Windows® XP Home Edition, Microsoft® Windows® XP
Professional, and Microsoft® Windows® XP Media Center Edition* are referred to as
Windows XP.
* Support for Microsoft® Windows® XP Media Center Edition is provided only in U.S.A. and Canada.
2
Table of Contents
Introduction
What you can do with the portable music
player ............................................... 4
System requirements ........................... 5
Names of parts ..................................... 6
Portable music player ................... 6
Cradle ............................................ 7
Reading the display ....................... 9
G-sense pad buttons ........................... 10
Basic playback buttons ............... 10
Navigation buttons ...................... 11
Advanced operation buttons ....... 12
Advanced playback buttons ........ 13
Operation
Listening to music ............................. 15
Finding songs .................................... 18
Searching by album genre, artist
name, album title, and
song title .................................. 18
Searching among previously played
songs ....................................... 19
Searching by group or
group jacket ............................ 19
Using playlists ................................... 20
Registering a playlist .................. 20
Playing songs from a playlist ...... 20
Removing songs from
a playlist .................................. 21
Viewing still images .......................... 21
Transferring still images from a
digital camera .......................... 21
Viewing the transferred still
images ..................................... 23
Using the portable music player as a
hard disk drive ............................... 24
Deleting music files ........................... 24
Other Information
Setup items and settings ....................
About the internal battery ..................
Precautions ........................................
Usage and storage .......................
Overheating .................................
Condensation ..............................
Disk handling ..............................
Hard disk precautions .................
Removing the internal battery ....
Maintenance ......................................
Cleaning the cabinet ...................
Disc cleaning ..............................
Getting help .......................................
Sony support options ..................
Specifications ....................................
Troubleshooting .................................
Power ..........................................
Operation ....................................
G-sense pad .................................
“SonicStage” software ................
“VAIO music transfer”
software ...................................
Other problems ...........................
25
27
28
28
28
28
28
29
29
30
30
30
30
30
31
32
32
32
34
34
35
36
Before using this manual, read the separate Quick Start Guide, which provides
information necessary prior to using the player, from unpacking to hardware
preparation and software installation.
3
Introduction
What you can do with the portable music player
The Portable Music Player VGF-AP1 / AP1L incorporates a 20 GB* or 40 GB* hard disk, and
allows you to carry an entire music library wherever you go.
* Some portion of hard disk capacity is reserved for application / data management function.
Portable music player
• Easy-to-carry player with built-in 20 GB / 40 GB hard disk. The player also serves as an
external hard disk for your computer.
• 2.2 inch high-resolution LCD panel and unique “G-sense” touchpad (subsequently referred
to as the “G-sense pad”) make it a breeze to operate the player and find the songs you
want.
• Simply placing the player on its cradle when not in use recharges the battery.
• By connecting the player to a digital still camera (subsequently referred to as “digital
camera”) by using the cradle, the player can be used as a storage device for digital photos
(JPEG images). You can also view a slide show of pictures while listening to music.
Supplied software for transferring music from a computer
• “SonicStage” software
This software lets you control the entire process from saving songs from music CDs to
transferring them to the player. The application also supports net-based electronic music
distribution (EMD) services, letting you purchase and download songs from the Internet
for use on your player.
• “VAIO music transfer” software
Drag and drop MP3 files, WMA files, or other music files already on your computer to
transfer them to the player.
4
Introduction
System requirements
To use the player, the following hardware and software requirements must be met.
Computer
IBM PC/AT compatible
CPU
Pentium II processor, 400 MHz or above (Pentium III, 450 MHz or above recommended)
Free hard disk space
200 MB or more (1.5 GB recommended)
Depending on the Windows version and the number of music files, more space may be required.
RAM
64 MB or more (128 MB or more recommended)
Operating system
Windows XP Professional, Windows XP Home Edition, Windows XP Media Center Edition 1),
Windows 2000 Professional (Service Pack 3 or higher), Windows Millennium Edition, or Windows
98 Second Edition
Display
16-bit color or higher, 800 × 600 resolution or higher (1024 × 768 or higher recommended)
Other requirements
• Internet connection (for obtaining song data from CDDB or using net-based music distribution
services “EMD”)
• Windows Media Player 7.0 or higher (for playback of WMA files)
• CD-ROM drive (supporting WDM digital playback)
• Sound support
• USB port 2)
1)
2)
Support for Microsoft Windows XP Media Center Edition is provided only in U.S.A. and Canada.
Hi-Speed support is not mandatory, but if the connected computer does not support USB 2.0, file
transfer will occur at a lower speed and take longer.
Notes
• Even if the above requirements are met, the player will not work with every computer.
• Operation of the player is not assured in the following environments:
– Operating system not listed above
– Operating system not factory-installed (upgraded later to a different version)
– Multi-boot environment
– Multi-monitor environment
5
Names of parts
Portable music player
1
2
3
4
5
6
7
1 Display (page 9)
2 POWER/HOLD switch
When you slide this control in the arrow direction, operation of the player is disabled.
3 Headphone connector (page 15)
4 G-sense pad (page 10)
5 Carrying strap ring
6 Reset button
If the player has ceased to operate normally, try pressing this button with a pointed object (such
as a bent paper clip). The player's display turns white, and the settings such as G-sense
sensitivity, language, and clock are returned to the factory default values. It takes several tens of
seconds for the player to finish resetting.
7 Cradle connector
6
1
2
3
Introduction
Cradle
4
1 Support bracket
Supports the cradle when in use. When the cradle is not in use, the bracket can be folded.
2 LINE OUT connector
Lets you connect external speakers to the player. When a cable is plugged in here, the
headphone output is cut off.
To use the LINE OUT connector, disconnect the USB cable from the cradle. While a USB cable
is plugged in, the player automatically is in Data Transfer Mode and no sound will be heard
from the external speakers.
3 USB ports
Left side: Mini-B connector (for connecting the player to a computer)
Right side: Type A connector (for connecting the player to a digital camera)
4 DC IN connector
7
Remote control
1
4
2
5
3
6
1 Basic operation button
: Play/Stop
. : Rewind/Skip back
> : Fast forward/Skip ahead
2 Display
3 Selector button
v : Scroll cursor up
ENTER: Select item on menu
V : Scroll cursor down
7
8
4 Headphone connector
5 Volume button
6 Hold switch
Sliding this switch in the direction of the
arrow until the yellow marker is visible
disables the remote control.
7 BACK button
Moves up one menu level.
8 Clip
Using the remote control clip
To make it easy to fasten the remote control anywhere and still keep the display oriented for easy
viewing, the clip can be reversed.
1
8
Remove the clip.
2
Reattach it in the opposite
direction.
Introduction
Reading the display
Display on the player
2
1
456 7
3
1 Play status icon
2 Song title
3 Playback time
4 Equalizer setting
5 Battery charge icon
6 Timer icon
7 Time
Remote control display
Main menu screen
Play screen
1
2 3
4
1 Cursor
2 Timer icon
3 Equalizer icon
4 Volume indicator
5 AVLS icon
6 Battery charge icon
5
6
7 8
9
0
qa
qs
7 Song icon/song title
8 Artist icon/album icon/artist name/
album title
9 Play status icon
0 Repeat mode icon
qa Shuffle mode icon
qs Play time
9
G-sense pad buttons
Various features of the player are controlled by on-screen buttons accessed by using the G-sense
pad. These buttons are hidden until you choose to display them.
The following types of operation buttons are available:
• Basic playback buttons (this page)
• Navigation buttons (page 11)
• Advanced operation buttons (page 12)
• Advanced playback buttons (page 13)
Basic playback buttons
Use the basic playback buttons to control basic music playback, such as starting or stopping songs,
jumping to the next song, or changing the volume. The basic playback buttons are always available
while music is playing, even if the buttons are not displayed on the screen.
To display the basic playback buttons, touch any button in the right column on the G-sense pad.
Touch here
Basic playback buttons
z Hint
Whenever the basic playback buttons of the G-sense pad are active, the selector button on the remote
control can also be used.
Move your finger up or down on right column of buttons on the G-sense pad to select a button.
Press to activate the selected button.
Button
Function
Start playback
Jump to the start of the current song
Jump to the start of the next song
(keep pressing)
Fast reverse
(keep pressing)
Fast forward
Raise the volume
Lower the volume
Stop playback
10
Introduction
Navigation buttons
Use the navigation buttons to move between display screens and change the sort order of lists.
To display the navigation buttons, touch any button in the left column on the G-sense pad.
Touch here
Navigation buttons
Move your finger up or down on left column of buttons on the G-sense pad to select a button. Press
to activate the selected button.
Note
Available buttons differ on for different screens.
Button
Function
Remarks
Return to the main menu screen
Move up one menu level
Scroll up one page
Show the play screen
for the song being played
Sort the currently
displayed list
With each push, the sort order changes. The current sort
order is indicated by an icon at the top right of the screen.
Alphabetical order (ascending)
Alphabetical order (descending)
Rating order (ascending)
Rating order (descending)
Track order
When sort based on rating is selected, songs will be listed
based on frequency of play and on playback status.
Scroll down one page
11
Advanced operation buttons
Use the advanced operation buttons to modify the displayed list.
To display the advanced operation buttons, move the cursor to the appropriate item in the displayed
list by sliding your finger up and down the middle three columns of buttons on the G-sense pad.
When the cursor is on the desired item, press and hold the current button until the advanced
operation buttons appear.
Press and hold here
Advanced operation buttons
When the advanced operation buttons appear, move your finger up or down on the right column of
buttons on the G-sense pad to select a button. Press to activate the selected button.
Note
Available buttons differ on for different screens.
Button
Function
Close the advanced operation button display
Add the currently selected song or album to the playlist
Play the selected song
Move the selected song up in the list
Move the selected song down the in list
Remove all songs from the playlist
Remove the selected songs from the playlist
12
Use the advanced playback buttons available on the play screen to access advanced playback
features, such as repeat play, shuffle play, and equalizer settings. The advanced playback buttons
are assigned to the second column from the right on the G-sense pad.
Touch here
Advanced playback buttons
Move your finger up or down this column of buttons to select a button on the display. Press to
activate the selected button.
Note
Available buttons differ on for different screens.
Button
Function
Remarks
AtB repeat
Press the button once to set point A. The next time sets
point B and begins repeated playback of the passage
between A and B.
Enable/disable song repeat play
Press the button to switch the repeat mode. The current
repeat mode is shown on the play screen.
All-title repeat
1-title repeat
No display
Repeat off
Enable/disable shuffle play
Change equalizer settings
Press the button to change the equalizer settings. The
current setting is shown by the equalizer icon on the
play screen.
Bass emphasis (strong)
Bass emphasis (light)
Bass + treble emphasis (strong)
Bass + treble emphasis (light)
Treble emphasis (strong)
Treble emphasis (light)
No display
Flat response (equalizer off)
13
Introduction
Advanced playback buttons
Button
Function
Remarks
Add the currently playing song
to playlist
Show the next image
Show the previous image
14
Start slide show
To stop a slide show, press any button on the G-sense
pad.
Switch display mode
There are two display modes: Speed Priority Mode
) and High Quality Mode (
). The Speed
(
Priority Mode enables quick displaying of large images
copied from a digital camera.
Assign as jacket image (album
cover) to the currently playing
song
An image assigned to a song is displayed next to the
album name.
Operation
Listening to music
1
Connect the remote control.
Headphone connector
Plug in firmly
Remote control
(supplied)
Headphones
(supplied)
2
Turn the power on.
zHints
• You can also turn on the player by pressing any of the buttons on the remote control.
• For details about turning the power off, refer to the Quick Start Guide.
Note
The first time the player is turned on, set up automatically begins for the G-sense sensitivity,
language, and clock settings. Follow the instructions that appear on the display.
3
Select a song.
Use the selector button on the remote control to control the items shown on the
display of the remote control.
15
Operation
Note
Avoid shaking the player or subjecting it to shocks or vibration while music is playing. Such conditions
may interrupt playback and cause a clicking sound. This behavior is normal and not cause for concern.
1 Press the v or V side of the
selector button to move the
cursor to the appropriate item.
2 Press the ENTER section of the
selector button.
Use the same principle to select other items and bring up a list of songs. The menu
configuration may differ depending on the type of stored songs and the available
information. (You can move back in the menu structure by pressing the BACK
button on the remote control.)
Genre:
Artist:
Album:
All songs:
Genre name t Artist name t Album name t Song
Artist name t Album name t Song
Album name t Song
Song
Move the cursor to the appropriate song, and press the ENTER section of the
selector button. The play screen for the song appears on the display of the remote
control.
z Hints
• If you press any part of the selector button while the play screen is shown, the display returns to
the main menu.
• When the player is controlled from the remote control, the player display shows “Remote
controller under operation”. Touch any button on the G-sense pad to reactivate the player display.
• The play screen appears after a while if you do not operate the controls.
16
4
Play the song.
The basic operation button and the volume button work as follows:
Basic operation button
BACK button
Operation
Volume button
Operation
Button action (on remote control)
Start playback
Press
on the basic operation button
Jump to start of current song
Press . on the basic operation button
Jump to start of next song
Press > on the basic operation button
Rewind
Hold down . on the basic operation button
Fast forward
Hold down > on the basic operation button
Stop playback
Press
Raise volume
Press “+” side of volume button
Lower volume
Press “–” side of volume button
Move up one menu level
Press the BACK button
on the basic operation button
17
Finding songs
You can search for songs in the following ways:
• Genre, Artist, Album, All songs
Music files are transferred to the player together with information about album genre, artist
name, album title and all songs. Search for a desired music file by specifying such information
(this page).
• My History
My History lists all songs played in the past, making it easy to return to a favorite song. If the
songs are still on the player, you can start playback from the My History list (page 19).
• Group and Jacket
“SonicStage” track groups transferred to the player retain their group information, enabling you
to select music by group name. If an image has been registered as the jacket for a group,
moreover, you can search for tracks by the group jacket (page 19).
• My Playlist
By adding songs stored on the player to playlists, you create sets of music that you can easily
switch between. The player can store up to five playlists at a time (page 20).
Searching by album genre, artist name, album title, and song
title
You can search for songs by selecting “Genre”, “Artist”, or “Album”, or “All songs” on the main
menu screen.
Note
Avoid shaking the player or subjecting it to shocks or vibration while music is playing. Such conditions
may interrupt playback and cause a clicking sound. This behavior is normal and not cause for concern.
z Hint
When the player is in any mode other than the play screen, “Device under operation” is displayed on the
remote control. Press any part of the selector button to activate the remote control display.
18
Searching among previously played songs
1
Select “My History”, and press the button.
2
Select the year, month, and day.
The song selection screen appears.
3
The play screen for the selected song appears, and the song begins playing.
Note
Songs on the player will no longer display in My History if you use the “SonicStage” software to
remove them or transfer them to a computer.
Searching by group or group jacket
You can search for a track by group name if it has been added to a group in the “SonicStage”
software. Display the main menu screen, and select “Group”.
If an image has been registered in the “SonicStage” software as the jacket for a group, you can
select tracks by the group jacket. Select “Jacket” from the main menu screen to display a thumbnail
list of the group jackets that have been transferred to the player. When you select a jacket
thumbnail, the tracks for the corresponding group appear, and then you can select the track that you
want to listen to.
19
Operation
Move your finger up and down on the G-sense pad to move the cursor
to the song, and press the button.
Using playlists
By adding songs stored on the player to playlists, you create sets of music that you can switch
between. The player can store up to five playlists at a time.
Registering a playlist
There are two methods for registering a song to a playlist:
Registering the currently playing song to a playlist
Display the advanced playback buttons during play, move the cursor to the
then press the button.
position, and
Registering songs to a playlist from a list of songs or albums
Display the advanced operation buttons while a list of songs or albums is displayed, move the
cursor to the
position, and then press the button. The currently selected song or album on the
list is added to the playlist.
z Hint
The number shown in the advanced operation button
symbol indicates the number of the currently
selected playlist. To add the song to a different playlist, you must first switch playlists.
Playing songs from a playlist
1
On the main menu screen, select “My Playlist”, and press the G-sense
pad button.
The selection screen appears.
2
Select the cursor to the song and press the button.
The play screen for the selected song appears.
20
Removing songs from a playlist
1
On the main menu screen, select “My Playlist”.
2
Move the cursor to the song you want to remove.
3
Display the advanced operation buttons, move the cursor to the
position, and then press the button.
4
Operation
A confirmation message asking whether to remove the song from the playlist
appears.
Select “Remove”, and then press the button.
The selected song is removed from the playlist.
Viewing still images
You can connect the player to the digital camera and copy images from the
digital camera to the player.
The transferred images can be viewed on the player display.
As of September 2004, the player is compatible with most USB mass storage class digital still
cameras, and supports Cyber-shot cameras, excluding models DSC-F1, DSC-F2, DSC-F3, DSCF55, DSC-F55K, DSC-D700, and DSC-D770.
Note
The player is not guaranteed to work with all USB mass storage class digital still cameras.
Transferring still images from a digital camera
Note
Always use the AC adapter when connecting the player to a digital camera.
21
1
Remove the supplied USB cable from the computer and the cradle.
2
Connect the cable removed in step 1 to the digital camera and cradle,
as shown below.
Move the sliding
cover to the left
USB cable (supplied)
Large plug (Type A) plugs into cradle
Small plug (Mini-B) plugs into digital
camera
Notes
• Do not disconnect the USB cable from the digital camera or the cradle before the still image file
copy is complete.
• To connect to a digital camera without Mini-B connector, use the USB cable supplied with the
digital camera.
• Do not connect any other kind of device except a supported digital camera to the Type-A USB
connector of the cradle.
3
Turn on the player.
4
Turn on the digital camera.
5
On the main menu screen, select “Photo Storage”.
A screen appears, indicating the number of image files on the digital camera that
are available for transfer to the player.
6
Select “Copy”, and then press the button.
The transfer of images from the digital camera starts.
Notes
• When you select “Photo Storage” from the main menu, music playback stops and the remote
control is disabled.
• Do not disconnect the USB cable before the transfer is completed.
• While still images are being transferred, do not turn off the player.
z Hint
The copied still image files are saved in the folder “VAIO Photo” on the hard disk of the player.
22
Viewing the transferred still images
This function is used to view still images copied from a digital camera.
Note
Avoid shaking the player or subjecting it to shocks or vibration while images are being displayed. Such
conditions may interrupt slide show playback, cause images to display incorrectly, and cause a clicking
sound. This behavior is normal and not cause for concern.
z Hint
1
On the main menu screen, select “Photo Viewer”.
2
Select the item and press the button.
3
Select the image file, and press the button.
The JPEG file is displayed on the entire screen. For details, see “Viewing still
images” (page 21).
z Hint
The Photo Viewer function on the player can display any JPEG files stored in a “USER_xxx” folder
(“xxx” is a number) in the “VAIO Photo” folder on the internal hard disk drive. This means that you can
connect the player to a computer as an external hard drive, create a “USER_xxx” folder in the “VAIO
Photo” folder, and manually copy JPEG files to the player.
By touching the second row of G-sense pad buttons from the right, you can bring up advanced playback
buttons for various image viewing functions.
When the advanced playback buttons are displayed, move your finger up and down to move the cursor.
For details about the advanced playback buttons, refer to page 13.
23
Operation
You can also use the player to view JPEG images transferred from a personal computer. To transfer
images from a computer, connect the player to the computer as an external hard disk drive, and copy the
image files from the computer's hard disk drive to the player. For details, see "Using the portable music
player as a hard disk drive" (page 24).
Using the portable music player as a hard
disk drive
The player can be used as an external USB hard disk for your personal computer, increasing the
available data storage capacity and serving as portable media.
When the player is connected to a computer using the USB cable, it is recognized by the computer
as a removable hard disk, allowing data read and write. (For details on how to connect the player to
a computer, see the Quick Start Guide.)
Notes
• If you use Windows Explorer or similar software to transfer music files directly from the computer to
the player, the player will not be able to play these files. (They will be handled as data.) In order for
music files to be playable on the player, you must use the “SonicStage” or “VAIO music transfer”
software.
• When the player is used an external hard disk for a computer, the space available for transferring music
files will be reduced by the amount of computer data transferred to the player. If you need more space
for music files, you must delete saved computer data or use the “SonicStage” software to delete
transferred music files.
• Before disconnecting the player, always right-click the “Safely Remove Hardware” (or “Remove”) icon
in the notification area of the task bar on the computer.
Deleting music files
Music files transferred to the player can be deleted using the “SonicStage” software.
For detailed instructions, refer to the “SonicStage” online help.
Note
Always use the “SonicStage” software to delete music files, even if they were transferred to the player
using the VAIO music transfer software.
1
Connect the player to the computer.
For details, refer to the Quick Start Guide.
2
Start the “SonicStage” software.
Click “Start” - “All Programs” (or “Programs”) - “SonicStage” - “SonicStage”.
3
Delete the music files.
Click the “Transfer” tab to display the screen for transferring music to the player,
and then use the list display in the right side of the screen to delete your desired
music files.
24
Other Information
Setup items and settings
To adjust settings for the display and operation functions of the player, select “Setting” on the Main
Menu screen.
Setup item
My Playlist
Setting and description
The player can store up to five playlists.
This setting specifies which is currently active.
Display Setting
The following display-related settings can be adjusted.
Sound Setting
The following sound-related settings can be adjusted.
Beep
Selects whether a sound is heard when the G-sense pad and the remote
control are pressed.
AVLS
When this is set to ON, loud sounds above a certain threshold level are
automatically reduced in volume. This lets you listen to music at an
agreeable volume while reducing the risk of sound leakage, possible
hearing damage, and danger from masking of external sounds.
Clock Setting
The following time-related settings can be adjusted.
Clock Setting
• Clock setting
Sets the date and time shown on the display. You can also select 24h
or 12h for the time display.
• Format
Changes the order in which the year, month, and day appear.
Timer Setting
You can select one of the following functions.
• Power off
Automatically puts the player into power off mode after a certain
amount of time.
• Playback start
Automatically starts audio playback at a pre-selected time or after a
set time interval.
• Beep
Automatically plays a beep tone at a pre-selected time or after a set
time interval.
• Off
All alarm-related functions are turned off.
25
Other information
Backlight setting
Sets the time delay for automatically turning off the display backlight
when no operation is carried out. You can also set the backlight to be
“Always ON” or “Always OFF”.
Setup item
Setting and description
Language
Selects the language for the menus and commands.
G-sense setting
Adjust G-sense pad parameters for optimum efficiency.
Sensing Area Setting
Select one of the following:
• Thumb operation
This setting works best when holding the unit with one hand and
operating it with your thumb.
• Flat
Response is evenly distributed over the button area.
Sensitivity Setting
Move the cursor to “Start” and press a G-sense pad button. Sensitivity
compensation is automatically set according to the G-sense pad
condition.
Remote device contrast
Adjusts the contrast of the remote control display.
System Information
Displays various information about the player, such as hard disk used/
free space, number of transferred songs, and firmware version.
Initialize Setting
Returns the unit to the factory default condition. When you select
“OK”, all settings are returned to the default condition, except for “My
History”, time, and rating data.
Initialize My History
Clears the saved My History data of songs that were played.
Initialize Rating
Clears the saved song rating data based on play frequency and play
status.
Restore Music Info
Restores the music information.
Firmware Update
Lets you update the firmware of the player. For details, visit the Web
site described on “Getting Help”(page 30).
HDD Format
Formats the internal hard disk drive of the player.
Notes
• When you format the internal hard disk, all data are removed.
You should back up the data if you use the player as an external
USB hard disk.
• If you format the internal hard disk with NTFS, the player will
become unable to play music.
26
About the internal battery
When the player is operated on the internal battery, the battery charge gradually decreases. The
battery icon on the display indicates the current state of the battery's charge.
Icon
Meaning
Battery charge of 75% or more
Battery charge of 50 - 75%
Battery charge of 25 - 50%
Battery charge of 5 - 25%
Battery charge of less than 5%
Other information
Player is powered by AC adapter (battery is charging)
Player is powered by AC adapter (battery is fully charged)
Notes
• The numbers given for remaining battery capacity are only approximate. The actual operation time with
the battery will depend on the usage environment, number of charged, and various other factors.
• When discarding the player, follow the instructions on page 29 to remove the battery properly.
27
Precautions
Usage and storage
• Use only the specified AC adapter.
• Never short-circuit any of the connectors.
• Do not leave the unit in locations that can
become hot (over 60°C), such as in a
closed car or exposed to direct sunlight.
• Protect the player from water and moisture.
Disk handling
To protect the data on the supplied CD-ROM,
observe the following precautions.
• Do not attach paper stickers or similar to
the disc, and do not scratch or otherwise
damage the disc.
Overheating
If the unit seems to be running hotter than
normal, turn off power to the player and
disconnect the AC adapter. Then contact the
Web site described on “Getting Help” (page
30).
Condensation
If the unit is brought from a cold to a warm
location, or if ambient temperature suddenly
rises, moisture condensation may occur on the
outer surface and in the interior of the unit. Do
not use the unit in such a condition, as this can
cause damage. If condensation has occurred,
leave the unit for about an hour without
turning the power on.
A disc label may come off while the disc is
inserted in the CD-ROM drive of the
computer, causing serious damage. To
prevent this, make sure that any label is
properly attached before using the disc.
Sony Corporation does not accept any
liability for damage caused by improper
labels or by media damage. Carefully
follow the instructions of any label-printing
software and label products. Use of such
products occurs entirely at the risk of the
user.
• Do not touch the data side of the disc
(opposite the label).
• Do not store the disc in locations subject to
high humidity, high temperatures, direct
sunlight, or high levels of dust.
• Take care not to spill any liquid on the disc.
• Return the disc to its case when not in use
in order to prevent data damage.
28
Hard disk precautions
2
Detach the internal battery.
3
Disconnect the internal battery
cable from the connector on
the player.
• Never disconnect a cable or turn the
computer or the player off while data are
being written to or read from the hard disk.
Otherwise data may be corrupted or lost.
Sony Corporation does not accept any
liability for damage caused by data loss.
• Hard disks can hold a vast amount of data,
but damage or malfunction can lead to
sudden and irreplaceable data loss. It is
highly recommended that you regularly
back up the contents of the hard disk.
Sony Corporation does not accept any
liability for damage caused by data loss.
Removing the internal
battery
1
Use a phillips screwdriver to
remove the four screws from
the side of the player.
Notes
• The interior of the unit may become hot during
operation. Before removing the battery, make
sure that the unit has cooled down.
• Take care that no foreign object enters the unit
while the battery is removed.
• Before removing the battery, you should
discharge it fully, for example by performing
continuous playback.
29
Other information
When discarding the unit, follow the
instructions below to remove the battery
properly.
Maintenance
Cleaning the cabinet
Wipe the outside of the unit with a soft, dry
cloth. To remove stubborn stains, moisten the
cloth with a mild, neutral detergent. Do not
use solvents, cleaning alcohol, benzene or
other substances that may damage the finish.
Disc cleaning
• Fingerprints and other contamination on
the disc surface can lead to read errors.
Always keep the disc clean.
• To clean the disc, lightly wipe it from the
center outwards.
Getting help
This section provides information on how to
get help and support from Sony, and
troubleshooting tips for your unit.
Sony support options
Sony provides several support options for your
unit. When you have questions about your unit or
the software, refer to the following:
❑ This guide explains how to use your unit.
For customers in the United States
and Canada
❑ Sony Online Support provides instant
access to infomation on commonly
encountered problems. Type a description of
the problem and the Knowledge Database
searches for the corresponding solutions
online.
You can visit the Sony Online Support at:
http://www.sony.com/pcsupport .
❑ The Sony Customer Information
Service Center offers information about
your portable music player and other Sony
products that work with your portable music
player. To contact Sony Customer Information
Service Center, call
1-888-4SONYPC (1-888-476-6972).
For customers in Europe
• To remove stubborn stains, lightly moisten
the cloth before wiping the disc, and use a
dry cloth afterwards.
• Do not use benzene, record cleaning liquid,
antistatic fluids or other substances that
may damage the surface of the disc.
30
❑ VAIO-Link. For addresses and numbers, refer
to
http://www.vaio-link.com/
For customers in other regions
❑ VAIO Website provides Frequently Asked
Questions and solutions.
http://vaio-online.sony.com/
Specifications
Main unit
Ambient conditions
Display
2.2 inch TFT color display (320 H × 256 V dots)
Operating temperature
41°F to 95 °F (5°C to 35°C) (temperature
gradient less than 18°F (10°C)/hour)
Hard disk capacity 1)
20 GB / 40 GB
Supported playback file formats
ATRAC3plus, ATRAC3, JPEG
External connectivity
Headphone connector: stereo mini phone jack
Cradle connector
Power source
Lithium-ion rechargeable battery or AC adapter
Playback time
Approx. 20 hours
20GB model:
Approx. 4.6 × 2.5 × 0.7 inches (115.2 × 63.3 ×
17.2 mm) (widest part 1.1 inches (27 mm))
(w/h/d), not including protruding parts
Mass
40GB model: Approx. 7.4 oz. (210 g)
20GB model: Approx. 6.9 oz. (195 g)
Cradle
External connectivity
PC interface: USB 2.0 2) (High-speed/Full-speed)
Digital camera interface: USB
DC IN
LINE OUT connector: stereo mini phone jack
Storage temperature
–4°F to 100 °F (–20°C to 60°C) (temperature
gradient less than 50°F (10°C)/hour)
Storage humidity
10% to 90% (no condensation), provided that
humidity is less than 20% at 140 °F (60°C)
(hygrometer reading of less than 95 °F (35°C))
AC adapter (VGP-AC5V1)
Power requirements
Other information
Dimensions
40GB model:
Approx. 4.6 × 2.5 × 0.8 inches (115.2 × 63.3 ×
20.4 mm) (widest part 1.1 inches (27 mm)) (w/h/
d), not including protruding parts
Operating humidity
20% to 80% (no condensation), provided that
humidity is less than 65% at 95 °F (35°C)
(hygrometer reading of less than 18 °F (10°C))
100 – 240 V AC, 50/60 Hz
Output voltage and current
5.2 V, max. 2.9 A
Software
SonicStage ver. 2.1
Supported file formats 3) ATRAC3plus,
ATRAC3, MP3, WMA, WAV
VAIO music transfer
Supported file formats 4) MP3, WMA, WAV
Supplied accessories
Cradle, USB cable, remote control,
headphones, AC adapter, power cord,
software CD-ROM, Quick Start Guide,
warranty card
Dimensions
40GB model:
Folded: Approx. 4.8 × 3.0 × 1.7 inches
(120 × 76 × 42 mm) (w/h/d)
In use: Approx. 4.8 × 2.1 × 3.2 inches
(120 × 52 × 80 mm) (w/h/d)
1)
20GB model:
Folded: Approx. 4.8 × 3.0 × 1.7 inches
(121 × 75 × 41 mm) (w/h/d)
In use: Approx. 4.8 × 2.0 × 3.1 inches
(121 × 51 × 78 mm) (w/h/d)
4)
2)
3)
Some portion of hard disk capacity is reserved
for application / data management function.
If the connected computer does not support
Hi-speed, data transfer will take longer.
MP3 and WAV files will be converted to
ATRAC3 or ATRAC3plus.
All supported file formats are converted to
ATRAC3 or ATRAC3plus.
Design and specifications are subject to change
without notice.
Mass
40GB model: Approx. 3.6 oz. (100 g)
20GB model: Approx. 3.5 oz. (98 g)
31
Troubleshooting
If a problem occurs during operation of the unit, please check the points listed in this
troubleshooting guide. For contact information, see “Getting Help” on page 30. You should also
consult the printed and electronic documentation of the computer.
Power
Symptom
Cause/remedy
Power does not come on.
c The internal battery may be fully discharged. Charge the battery as
described in the Quick Start Guide.
c Press the reset button (page 6).
After pressing the reset button, it takes about 10 seconds for the unit
to become operative.
Power goes off.
c If the backlight timer setting is enabled, the power is automatically
shut off when the player or the remote control has been operated for
a set time period. Press the POWER/HOLD switch to turn the player
back on.
Power comes on briefly,
but then shuts off again.
c If the player has not been used for a while, the battery may have
gradually lost its charge. Charge the battery before using the player
again.
c The player is shipped from the factory with a partial battery charge
that may have been lost by the time you receive it. Charge the
battery before first using the player.
c Over time, the operating time offered by a full battery charge will
decrease. The performance of the internal battery will gradually
deteriorate, based on the number of times the battery has been
charged, how much the player has been used, and how long the
player has been stored unused. This is normal for a lithium-ion
battery and may indicate that the battery needs replacement.
Operation
Symptom
Cause/remedy
Cannot play music.
c The player cannot play music while connected to a computer.
c If you directly copy music files to the player using Windows
Explorer or similar applications, the files cannot be played on the
player. Be sure to use the “SonicStage” or “VAIO music transfer”
software (page 4).
32
Symptom
Cause/remedy
Unit does not respond
to controls.
c While the player is connected to a computer, the unit is in data
transfer mode and no operation is possible at the player. Disconnect
the player from the computer.
c When the player is removed from the cradle or when the USB cable
is disconnected from the cradle, data about transferred files are
updated. The update process takes about 40 seconds for every 100
songs. The actual time will differ depending on the number of
genres, artists, albums, and total number of songs.
c If the POWER/HOLD switch on the player or the HOLD switch on
the remote control is set to HOLD, no operation is possible. Cancel
the HOLD mode.
The player does not
operate normally
c If the player has ceased to operate normally, for example due to
exposure to static electricity, disconnect the AC adapter, wait about
30 seconds, and then try the operation again.
c Press the reset button.
c When used for an extended period, the temperature of the unit will
rise. This is not a defect.
No sound.
c Confirm that the headphone connector is inserted correctly.
c When playback is paused, fast forwarded, or rewound, sound output
can become faint or stop.
c If a device is plugged into the LINE OUT connector on the cradle,
there will be no sound from the headphones.
c At the lowest volume setting, there is no sound. Raise the volume
setting.
c The player cannot play music while connected to a computer. In
such a case, there will be no sound from a device connected to the
LINE OUT connector on the cradle. To use the LINE OUT
connector, disconnect the USB cable.
Cannot change the volume.
c If AVLS is enabled, the volume will not go beyond a certain
threshold. Check the AVLS setting (page 24).
c If the POWER/HOLD switch on the main unit or the HOLD switch
on the remote control is set to HOLD, no operation is possible.
Cancel the HOLD mode.
33
Other information
The unit becomes warm.
G-sense pad
Symptom
Cause/remedy
G-sense pad does not
function properly.
c Change the area and sensitivity setting of the G-sense pad. For
details, see page 25.
c Press the reset button (page 6).
After a reset, the G-sense pad sensitivity must be set again (page 25).
c If there is moisture on the G-sense pad, it will not operate normally.
Wipe it with a dry cloth.
“SonicStage” software
Also refer to the “SonicStage” online help.
Symptom
Cause/remedy
Cannot transfer music.
c Confirm that the player is correctly set in the cradle.
c Confirm that the cradle is correctly connected to the computer.
c If there is not enough free space on the internal hard disk of the
player, transfer cannot be carried out. Connect the player to the
computer and use the “SonicStage” software to delete unnecessary
files.
c The number of transfers that are permissible for a single song may
be limited. For details, refer to the “SonicStage” online help.
An error message is shown.
c Never disconnect the USB cable during a transfer. Otherwise an
error message will be shown and transfer is not possible.
Tracks recorded from an audio
CD have noise on them.
c Using another program while the “SonicStage” software is recording
can add noise to the recorded track. Do not operate other programs
while the “SonicStage” software is recording.
c The CD drive needs to be checked. Click “Options” on the “Tool”
menu to display the “Options" dialog box, and click “CD drive
settings” on the left. Click “Test CD drive” on the right to test the
drive.
The remaining transfer count of
a track is not the same as the
actual count.
c If a track is deleted from a device/media, the remaining transfer
count of the track in My Library may not be restored (only applies to
restricted content). To restore the track's transfer count, connect the
device/media to your computer, and click on the “Controls” menu,
point to “Device/Media”, and then click “Recover Rights”.
c If the player was disconnected from the computer during the transfer
of a song, the permission count may be incremented and it may not
be possible to reset it.
34
Symptom
Cause/remedy
The player is not recognized
by the “SonicStage” software.
c Check whether the player is recognized properly on the Windows
“Device Manager” screen.
If an exclamation mark is shown next to the symbol for the player in
the “Device Manager” screen, the unit was not recognized properly.
Reinstall the driver for the player.
A warning message appears
when disconnecting
the player from
the computer.
c Wait a while and then perform the disconnection procedure again.
“VAIO music transfer” software
Symptom
Cause/remedy
Cannot transfer music.
c Confirm that the player is correctly set in the cradle.
c Confirm that the cradle is correctly connected to the computer.
c ATRAC format files (extension “oma” or “omg”) cannot be
transferred with the “VAIO music transfer” software. Use the
“SonicStage” software for these files.
An error message is shown.
c Never disconnect the USB cable during a transfer. Otherwise an
error message will be shown and transfer is not possible.
c When you attempt to transfer files that are not supported by music
move, an error message will appear.
A warning message appears
when disconnecting
the player from
the computer.
c Wait a while, and then perform the disconnection procedure again.
35
Other information
c If there is not enough free space on the internal hard disk of the
player, transfer cannot be carried out. Because files cannot be
deleted with the “VAIO music transfer” software, connect the
player to the computer and use the “SonicStage” software to delete
unneeded files.
Other problems
Symptom
Cause/remedy
The unit vibrates.
c This is due to the operation of the built-in hard disk and is not a
defect.
A clicking noise is heard
from the unit.
c This is due to the operation of the built-in hard disk and is not a
defect.
The remote control does not
function.
c When the remote control is set to the HOLD mode, no operation is
possible. Cancel the HOLD mode.
c Confirm that the remote control is plugged in correctly into the
connector.
c Confirm if the headphone connector is dirty. If necessary, wipe it
with a dry cloth or similar.
When the player is connected
to a computer, the computer
cannot be brought out of
standby mode.
36
c Computers running the Windows Me operating system may not
come out of standby mode while the player is still connected. When
the music transfer is finished, disconnect the USB cable.
http://www.sony.net/
© 2004 Sony Corporation
A-C3A-100-11 (1)


![[PRODUCT SHOWCASE] デジタルカメラ購入ガイド](http://vs1.manualzilla.com/store/data/006598744_2-741d5a97d6df83414e9f2111c70f79ec-150x150.png)